Repair in the whole apartment where to start. Repair of an apartment with your own hands where to start: the beginning of repairs in an apartment, a work plan
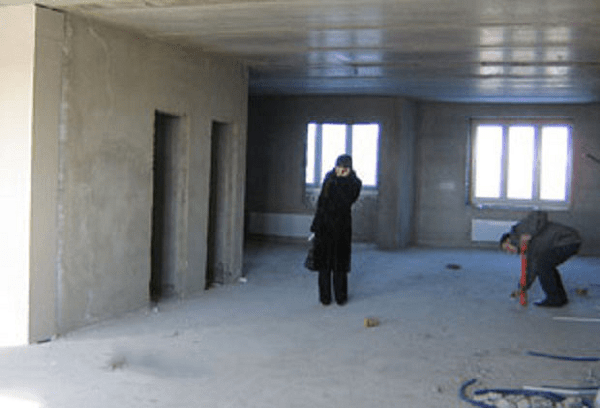
Almost always, new housing is purchased by a happy newcomer from a developer company without interior decoration and repair, but with communications brought into the apartment. Firstly, such housing in a new building will cost less, and secondly, almost always the repair and arrangement of the apartment by the developer is carried out extremely carelessly, using cheap materials. Thirdly, there is a desire to perform some stages of apartment renovation with your own hands or the hands of good craftsmen.
How to start repairing an apartment in a new building
First you need to make an audit and inspection of the apartment, install problem areas walls, ceilings and floors. We proceed in the following order. We determine what needs repair and finishing in the first place. If time and money complete renovation apartment is not enough, it is necessary to put in order first of all:
- Entrance door and windows, apartment ventilation;
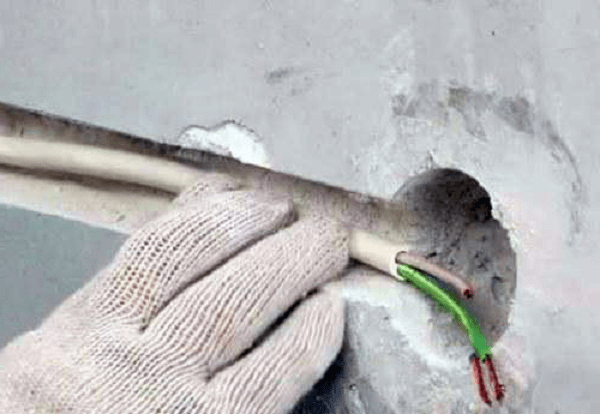
- Perform a full and highest quality electrical wiring and wiring sockets in the apartment. This stage needs to be thought out as detailed as possible, to draw up a connection diagram and a circuit for laying wires into the walls;
- Connect water and collect sewage in the bathroom and toilet, install a toilet, washbasin and shower;
- If the start time of apartment renovation in a new building coincided with heating season, be sure to check the degree of heating of the aluminum registers using a remote thermometer.
Advice! Before starting the repair, a list of claims for the presence of defects or defects must be presented to the representative of the seller. You may be able to get compensation for repairs in a new building. Do not settle for rework by the company.
In the process of carrying out the above preparatory work you can calculate the sequence of repairs in a new building.
What affects the sequence of repairs in an apartment in a new building
Much in the repair of housing in a new building depends on the availability of resources of time and money. Having bought a “bare” apartment and having issued the necessary documents for the right of ownership, you automatically start paying rent and house payments for using adjoining territory for the removal of household waste and construction debris. After connecting electricity and water, a new apartment in a new building began to bring you a loss in the form of costs for its maintenance and decoration. How longer time repairing an apartment in a new building, the more expensive it will cost you.
There are two main options for approaching the issue of finishing a new apartment in a new building:
- Planned renovation and finishing of the apartment. In this case, the hosts are detailed map and execution schedule finishing works, in which all the main types of decoration and installation of appliances are prescribed in stages. Such repairs, as a rule, are carried out from scratch to its completion by one team of craftsmen. The turnaround time for a repaired facility can take several weeks or months. The disadvantages of this approach include the ever-increasing price and cost of the work, sometimes exceeding the estimated costs by more than two times. As a result, if due to unforeseen circumstances there are not enough funds, the repair may be delayed for an indefinite period.
- Quick repair from scratch. In this case, all of the above stages of repair in a new building are carried out by hired craftsmen with direct quality control on your part. The apartment in a new building will be prepared for further finishing rooms. In addition to communications, they finish and equip the smallest room of the apartment with laying temporary linoleum and wallpapering. There are no amenities in such a room yet, but it can be used as housing - a temporary hut and a warehouse for building materials. All other work is carried out as free funds and time become available.
The first option is well suited if the family has small children or elderly people who need to provide some comfort and convenience. The second option is considered more economical and faster, especially if, after finishing the kitchen, bathroom, toilet and one room, housing is rented out, with the remaining rooms of the new building being consistently brought to condition.
We carry out apartment renovations with our own hands and head
Among the most popular horror stories for new buildings are considered to be stories about the shrinkage of the walls of the house and its foundation. In reality, a similar process for high-rise building must be completed by the time the building is put into operation. This period averages no more than 18 months. If after 1.5 years cracks form in the corners, ceiling or at the joints and in the masonry of the walls, the tiles in the bathroom fall off, the doors are deformed with skewed doors, this means that the new building has certain problems with the stability of the foundation. It is worth waiting with repairs until the main thing is clarified - what is happening with the new building.
How to start renovation in a new building
Before starting work, first of all inspect the lock on the front door. The model and standard equipment of the door can be subject to separate agreement. Specify in the addendum to the contract which model of door and lock you need to install. If there is a need to take additional security measures, first of all change the lock supplied when the new building was handed over.

At the next stage, it is necessary to resolve the issue of installing a distribution electrical panel, connecting an electric meter. This will make it possible to start using power tools when repairing an apartment. To get rid of the need to use a large number of carriers and extension cords, plan the layout of the electrical wiring in the apartment. In doing so, the following should be taken into account:
- For the kitchen and bathroom, the wiring must be laid in sealed hoses, sleeves;
- Lay a separate residential wire in the bathroom to connect the boiler or washing machine. The cross section of the cable must be designed for a current of at least 25 A;
- An additional wire must be laid to the installation site of the air conditioner;
- In the bathroom, in the kitchen, in the hall, it is necessary to conduct a wire, which will be connected and used in the future when organizing additional grounding.
Advice! When laying wiring, use only copper cable without twists and soldering.
In addition to electricity, in order to create more or less normal conditions, it is necessary to connect hot and cold water meters and collect sewage in the bathroom and toilet. It is necessary to start work with the installation of a toilet bowl and a washbasin.
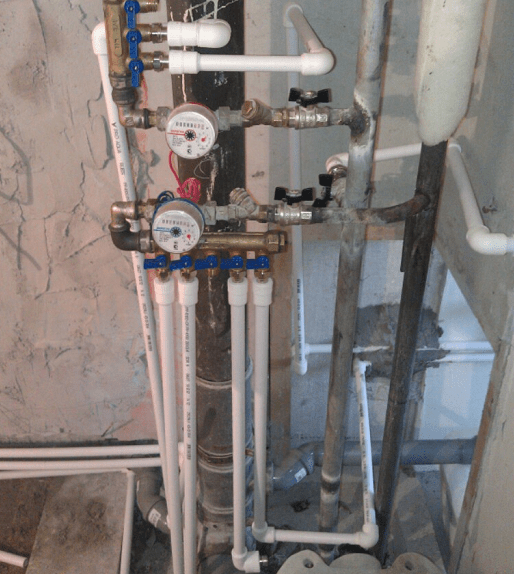
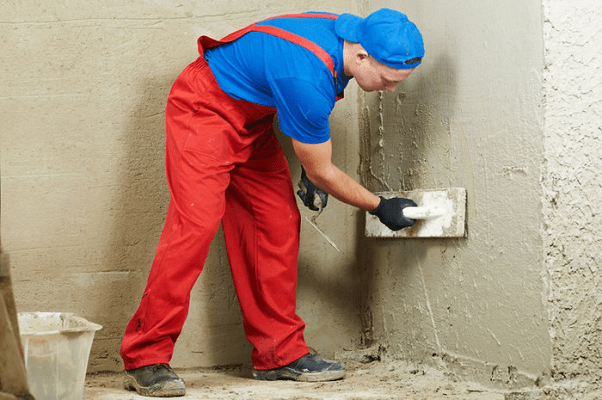
Considering that good plumbing is expensive, for the first time you can install inexpensive option toilet bowl, assemble and connect plastic sewer pipes, bellows and washbasin. During the renovation of the apartment plumbing can be replaced at any time. Installing expensive plumbing increases the risk of damage to it during repairs; it must be installed at the final stage of repairing a new building.
For gasket plastic plumbing using a perforator, we will drill channels in the walls of the bathroom, toilet, kitchen with a depth of 2.5-3 cm. Next, you need to solder water pipes and connect the leads to drain tank and washbasin. Lastly, we will install and connect water meters to the cold and hot water to domestic plumbing.


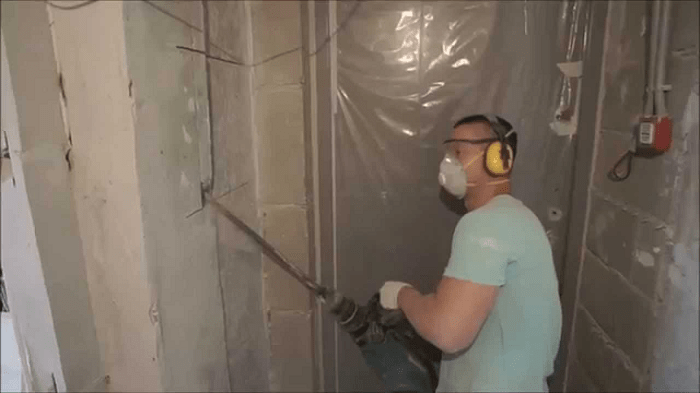
Rough operations
Before starting work, it will be necessary to perform a large amount of cleaning up the remains of concrete, mortar. The main part will be for rough cleaning of walls, floors, ceilings, their chasing, leveling and cutting seams. Such work gives a large amount of dirt and dust, so it will be necessary to organize good ventilation and wet cleaning inside the new building.
A separate point is to highlight the preparation of floors in each of the rooms for fine finishing. During the repair in the apartment, it will be necessary to close up all the cracks, holes in the seams between the plates, in the floor, in the interior walls of the new building. The most difficult will be leveling the floor with a cement mortar screed and a reinforcing mesh. This procedure will need to be performed upon completion of the preparation of the walls and ceiling for fine finishing.
We will perform similar work in the kitchen, bathroom and toilet.
Carrying out finishing work
After rough cleaning, it will be necessary to prepare the walls in the kitchen and toilet for laying tiles on the walls and floor. Facing tiles you can do it yourself, but this is a troublesome business and requires a lot of time. Therefore, it is better to entrust the laying of tiles to craftsmen who specialize in this kind of finish. While the tiling work is underway, you can do the repairs yourself in one of the rooms of the apartment. The best option would be to lay decorative plaster or liquid wallpaper on the walls. If at the time of the start of the repair in the apartment of the new building, the double-glazed windows in the windows were in a satisfactory condition, then you can start applying plaster on the walls of the room immediately.
Upon completion of laying tiles on the floor and walls in the kitchen, bathroom and toilet, you need to lay inexpensive linoleum in the corridor connecting these three rooms and the room in which the repair was made using decorative plaster. This will reduce the amount of dust raised and make it easier to clean the apartment.
The most important stages of the renovation of a new building
Before finishing the walls in the apartment, it is necessary to align, and in case of a defect, repair the interior doors. If your future plans include wallpapering, normally closing doors are simply necessary for quality performance wallpapering work. After the wall decoration is completed, we proceed to laying linoleum, laminate or carpet on the floor of the apartment. The most practical is considered to be a laminate for living rooms, for the corridor, an office version of linoleum with increased abrasion resistance. This type of work does not require special qualifications and is easily done by hand during the renovation of a new building apartment.

Conclusion
The final stage of the repair is the connection of lamps and the installation of furniture in the apartment. Approximately 70% of the amount of work during repairs in a new building is quite affordable for do-it-yourself work. And only when doing special types finishing - laying parquet, installing stretch ceilings, installing double-glazed windows or entrance doors in a new building, you will need the services of specialists.
Where should you start repairs in an apartment or a separate room in order to do everything in optimal timing, not overpay and get exactly the result you expect? the site put everything on the shelves so that your repair turns from a state into a process.
We've put together a list of questions you should ask yourself and construction team before starting the repair. The answers will help you finish the work faster and spend less money and nerves.
Capital
When more global changes are required, major repairs begin. It includes redevelopment of space, demolition and construction of new partitions, replacement of pipes, electrical wiring and heat supply elements. Such repairs are an order of magnitude more expensive than cosmetic ones and last longer - but after it you get a completely updated home.
Repair with a contractor or do it yourself?
Any type of repair can be done independently or with the help of specialists. The first option is less expensive, but does not guarantee a 100% result. If it is closer to you, check out our helpful instructions and master classes - they will help you do the work no worse than an experienced master.
Repair with a contractor seems more reliable choice but it also has its pitfalls. How to choose a good specialist? How to draw up a building contract? Exhaustive answers to these questions are collected below.
How to calculate the cost
and make a budget?
The most burning side of the future repair is financial. First of all, you need to decide how much the selected work will cost and what is enough money for; on what and how you can save, and what is better not to skimp.
Another important aspect is the preparation of a repair estimate, on the basis of which its approximate cost is estimated. There are other questions regarding the budget: for example, is it worth spending money on repair insurance?
Our advice will help you deal with all the financial subtleties. And with the help of simple and understandable calculators, in just a couple of clicks you will calculate the approximate cost of repairing an apartment or private room and building material costs.
In addition to the previous article in this column, we will allow ourselves, dear readers, to tell you one short story that happened last summer with one gentleman, and show you a certain table, which the performer called an estimate.
Why it is so significant, you will soon understand.
Starting repairs, the diligent owner first of all picks up a calculator. However, he will receive close to real amounts of expenses only if he takes into account various factors and nuances, including non-obvious ones.
Apartment renovation calculator
Specify the main parameters of the apartment, select the type and cost of work and materials, and find out how much it will cost to repair your apartment.
Outcome 0 ₽
Design projects you might like
How to compose
repair plan?
In order for the repair not to stretch indefinitely, it is necessary to plan it correctly. To do this, it is necessary to take into account the order and timing repair work, get acquainted with the legal framework, find out what documents will be needed for the transformations and how to draw them up. And that's not all. It is important to understand whether it is worth contacting a designer for help and how to think over the redevelopment so as not to drown in a series of approvals.
Knowing all these details, you will save time, money and nerves, but, most importantly, you will be able to find yourself in your new apartment
Do you want to be surrounded modern interior but can't figure out what it should look like? Do you like something in the apartments of your friends, something attracted you in magazines, it’s hard to decide on something ... Is it much easier to say what you don’t want categorically? Understand preferences and accept optimal solution only a professional can help.
On the forums of potential new settlers, battles over finishing from the developer have not subsided for many years. Is it worth spending additional funds to ready typical repair Or is it still cheaper to buy an apartment and do the decoration yourself?
What can and can not be done when redevelopment? What types of work are not included? In what cases can a balcony or loggia be attached to a room? We answer the main questions about the global change of the apartment.
The word "renovation" immediately causes negative emotions for many. This feeling is due to the fact that this is a very laborious, lengthy and costly process. Especially if the work is done independently. This article describes in detail how to start repairs in an apartment, depending on its type, what materials to choose and in what sequence to carry out the work so that the repair goes without problems, and the result exceeds all expectations.
The stages of apartment renovation and the cost of work depends on the condition of the premises, the type of repair and the size of the area covered, i.e. it can be the entire apartment or its individual premises. There is a major, cosmetic and renovation. Each of them has its own clear sequence of actions, the correct implementation of which determines the final result and the duration of the period of operation.

Overhaul is considered the most ambitious and time-consuming, which will require not only a lot of effort, but also significant financial costs. It involves a complete reconstruction of the apartment with a possible redevelopment, replacement of windows, doors, engineering communications, ceiling, wall and floor covering. It usually starts from scratch.
How to legalize an already done redevelopment of an apartment. How to get permission to redevelop your own home.
Choice of interior design
Where to start repairing a room or apartment as a whole? With the choice of style of decoration of the room. Properly selected interior design will help create a comfortable and stylish home. His choice depends on the taste, character and outlook on life of the owner of the apartment. Today there is a variety of interior styles with distinctive features, which should be studied before making repairs in order to be able to successfully bring the chosen direction to life.

Designers divide all existing style directions into certain groups:
- classic, which includes Provence, Empire, Baroque, English and antique style;
- ethnic style covers Japanese, Egyptian, African, Scandinavian and Chinese directions;
- modern style combines country, modern, classicism and minimalism.
remains the most popular classic design interior. Splendor, grandeur, functionality, defiant aristocracy and noble grace are considered characteristic features of the direction. All elements of the interior indicate the high status of the owners of the apartment.
The rooms are decorated in restrained pastel colors. calling card becomes massive expensive furniture with carved patterns self made. An unusual painting rises on the ceiling. V classical style often large-sized apartments are made out, in which you can not save on free space.

Modern youth prefers to decorate the room in modern style. This is especially justified for apartments with a small area. Here everything should be simple, restrained and concise. The premises contain a minimum amount of furniture, which should be compact, mobile, functional and modern. Dilute a calm palette decorative finishes premises can be done using bright elements decor.
The ethnic direction reflects the owner's predisposition to a certain culture, the main features of which are embodied in interior design. With help modern technologies and finishing materials, you can make your dreams come true and create an imitation of your beloved country in your apartment. This direction is chosen by non-standard-minded people with a great love for adventure and travel. You can more clearly see each style in the photo of renovated apartments.
How to start apartment renovation: the main strategy
After the design project of the apartment has been developed and the question has been resolved in what sequence to make repairs, you can begin to perform work, which consists of the following stages:
- preparatory stage;
- draft work;
- finishing of the room.

How to start repairing an apartment with your own hands? WITH preparatory phase, which consists in performing the complex de installation work. This applies to both new construction and old apartment. Regardless of what kind of repair is planned, cosmetic or major, all surfaces must be cleaned of the old finish. At this time, window blocks are being dismantled, followed by the installation of more quality products. The front door also needs to be replaced. Here you may need to expand or reduce the doorway. Based on the project, partitions are dismantled and erected, embedding or doorways for installing interior doors or creating arches.
Useful advice! Do-it-yourself room repair should begin with the dismantling of interior doors.
Surface preparation is one of the most milestones DIY repair. Where to start the process depends on the state of the foundation. This stage includes cleaning the walls, ceiling and floor from the old coating and eliminating all flaws on the surface of the structures using building materials. It is on the quality of the work at this stage that it will depend on how firmly and accurately the new finishing coating will hold.

First of all, the ceiling is cleaned of the old coating. Whitewash is washed off with a brush dipped in water. Old putty is removed using a grinder with an iron brush.
Take off ordinary wallpaper from the walls with a spatula, after wetting them with water. Vinyl wallpapers are quite resistant to moisture, so you can remove them with a steam generator or ironing. If there is no such device, you can use an ordinary iron with a steaming function, which is brought to the wall at a distance of 10-15 cm. Under the influence of steam, the wallpaper easily moves away from the wall. You can remove the paint using a grinder with a special nozzle or building hair dryer. The next step is to remove the old flooring.
Useful advice! If the project provides for the installation of a suspended or stretch ceiling, the old coating can not be removed. It is enough to treat all problem areas with a strengthening primer and an antiseptic.

Where to start repairing an apartment with a rough finish in a new building
Where to start finishing the apartment depends on its condition structural elements. Usually, the developer performs the necessary minimum of work, strictly not adhering to the technology of their implementation and without using high-quality building materials. Therefore, all elements of the premises need a rough rough finish of the apartment with their own hands or with the help of specialists, which consists in performing the following activities:
- dismantling of old and construction of new non-bearing structures based on a new layout;
- window replacement;
- preparation of holes in the walls for laying new engineering communications according to the developed scheme;
- electrical wiring;
- installation of technological communications: water supply, sewerage, heating, ventilation, air conditioner inter-unit line;
- leveling of all concrete surfaces;
- installation of insulation and sound insulation;
- floor screed.

After completing the rough repair work in the apartment, the finishing of the premises is carried out. The solution to the question of how to plan repairs at the final stage will depend on the type of finishing material and the way it is laid. For example, if the walls and ceiling are painted or wallpapered, then the finishing work starts from the ceiling, then the walls are lined and the flooring is laid. In case of false ceiling installation work is carried out after finishing the walls.
If parquet is being installed, then the work is carried out before finishing the walls and ceiling, so as not to damage the surface. Doors can be mounted both before and after finishing the walls. If there is no platband, then installation door leaf carried out before finishing, in order to be able to seal the joint between the wall and door frame. In the case of a platband, the gap is filled with foam, and the platband is attached to the wall after finishing the walls.
After completing all the finishing work, they proceed to the installation of skirting boards, sockets, switches, platbands, lighting and plumbing fixtures. Then a general cleaning is carried out, after which you can proceed to the arrangement of furniture and decor elements. It is in this sequence that repairs are carried out on their own.

How to start repairs in a rough apartment: installation work
The list of installation work when performing repairs from scratch includes:
- erection of non-bearing partitions;
- replacement of windows and doors;
- work related to the laying of electrical wiring and other communications.
Construction of non-bearing interior partitions carried out on the basis of a previously developed plan. For the installation of structures can be used gas, foam concrete blocks, brick or metal frame with plasterboard finish.
Concrete blocks create a solid structure that can withstand a significant cantilever load. Therefore, this is the most suitable option if a TV will hang on the wall or wall cabinet. The surface needs base plaster for further decoration.

Much less often, partitions are erected from building bricks. This is due to the fact that the design occupies a significant part of the free space. Indeed, in order for it to be stable, the thickness of the partition must be at least 170 mm. In addition, this design creates a significant load on the base.
The most popular option is to create a partition from a metal frame, which is sheathed with drywall. The design has good sound insulation and does not create a significant load on support element building.
Useful advice! V drywall partitions it is necessary to provide for the installation of embedded parts that will withstand the load from possible hinged structures .
The installation of windows and entrance doors should be entrusted to specialized organizations, the quality of which will determine the nature of the protection of the apartment from the cold and the likelihood of burglars entering.

Features of installation of communications
How to start do-it-yourself repairs after redevelopment of an apartment? With the implementation of electrical wiring and laying of other engineering communications. First you need to do all the plumbing work. New radiators are being installed, and pipelines are being connected to the common house heating system. Pipework is being carried out for connecting mixers, toilets, washing machine, sinks, baths, showers, water heaters and dishwashers. Before installation, you should clearly know the location and connection features of all devices.
Hot and cold water pipes can be hidden in wall niches or mounted in plasterboard or plastic boxes. As a material for pipes, it is recommended to use polypropylene, which has high strength and performance characteristics.
Useful advice! The size of the holes for laying plumbing communications should be twice as large as the diameter of the pipelines, which is associated with a high value of the coefficient of thermal expansion of the material.

Wiring is usually hidden. All cables and wires are laid in wall strobes, above a suspended or stretch ceiling, or in the floor under a screed.
Important! When making repairs panel apartments wall chasing for future electrical wiring is carried out only vertically. Horizontal sections are mounted at the junction of the wall and floor or under the ceiling.
Work must begin with the markup, which is carried out on the basis of the developed plan of the apartment. According to this marking, wall chasing is performed. The size of the holes is determined by the number and thickness of the cables to be laid. In new buildings, all electrical wiring is installed from scratch, starting from the electrical panel. In old apartments when doing overhaul can also be completely changed electrical cables, or mount its individual sections necessary for connecting electrical appliances based on a new design project.
At this stage, it is necessary to provide for the laying of cables for the intercom, TV, telephone and Internet, which can also be hidden.

How does ceiling repair begin in an apartment?
How to start repairing a rough apartment? All repairs in the apartment are usually carried out from top to bottom. So, you need to start from the ceiling. In new buildings, it is presented in the form of a monolithic concrete slab, the surface of which must be cleaned, plastered, primed and lined with decorative trim. If the repair is carried out in an old apartment, then at the first stage the surface should be cleaned of the old finishing material.
The further plan of action depends on the chosen design option for the ceiling. If the surface is perfectly flat, then the easiest and cheapest option is to whitewash or paint it. If the base requires preliminary elimination of defects using plastering works, then this option will be very laborious and costly.
Another budget, but not so laborious option is installation ceiling tiles which even a novice can do. The surface of the base does not need to be pre-levelled. The main thing is to choose the right quality finishing material and glue.

A more acceptable but costly solution is to create hinged structure from drywall, which can be of any shape and have several levels, which determines the cost and time of work. Thanks to this solution, it is possible to obtain free space between the ceiling and the structure for laying and installing spotlights.
A modern solution today is the creation of a stretch ceiling made of PVC fabric. The result is a perfectly even base of any texture and shade. Installation is carried out in a matter of hours by a specialized team. Before performing work, you must first prepare wall structures. Because the installation process of a stretch ceiling involves the execution of edging from baguettes. In addition, all dirty work must be completed in the room so that dust and possible pollution do not settle on a clean ceiling.
Finishing of wall structures
Alignment of the walls is an important event, the quality of which depends on the durability and aesthetic appearance of the future decorative finish. Usually, when repairing apartments with a rough finish, they encounter fairly even concrete walls that need only slight adjustment with plaster mixes. However, if the walls are made of expanded clay blocks, gas silicate or brick, rather laborious and costly work is required to level them.

Before proceeding with the alignment of the walls, it is necessary to thoroughly clean the surface of the old coating. This is a mandatory step for the overhaul of old apartments. All detected cracks or other defects need to be sealed. To do this, problem areas must be embroidered, primed and repaired. cement mortar, putty or sealant. Wide gaps and cracks in the corners can be filled with polyurethane foam.
Wall alignment can be done in two ways:
- plastering walls with building mixtures;
- wall decoration GKL and GVL sheets.
The first option involves the use of plaster mixtures based on gypsum or cement. If the wall has slight irregularities, visual alignment with help building level. If the surface has a significant difference, then it is advisable to carry out the alignment according to the beacons. This is especially important when the walls will be painted. When installing furniture along a flat wall, the likelihood of cracks is eliminated.

Together with the alignment of wall surfaces, it is necessary to finish the door and window openings. To do this, you can use plaster, drywall or plastic panels.
The second option is preferable when the walls are made of brick or have significant irregularities. The use of plaster is unreasonably costly and time-consuming. GKL or GVK sheets are mounted on a previously installed metal frame. As a result of such a finish, a gap is formed between the wall and the cladding, in which various communications can be hidden. This process characterized by the absence of dirty work and low labor intensity. The walls do not need further plastering before finishing with decorative material.
The main disadvantage of this design is its fragility. Therefore, if hanging furniture or appliances will subsequently be located on the surface, care should be taken about the embedded parts that are mounted before performing the leveling layer.

Where does floor repair begin?
The apartment begins with the implementation of the screed, which is used to eliminate significant damage and irregularities in the base relative to the horizon. This happens due to backfilling or pouring the floor. special composition, which forms a perfectly flat surface, necessary for further laying of the floor covering. In addition, the screed serves to strengthen the surface of the concrete slab and increase its strength characteristics. Before its implementation, it is necessary to create a sound and heat insulating layer. For this, expanded clay is often used, which is laid with a thickness of at least 5 cm. Due to the leveling layer, you can raise the floor level or make a technological slope.
Useful advice! In the bathroom, it is advisable to set a certain slope of the floor for water flow in the event of a flood, which will prevent the entire apartment from being flooded.
Floor screed can be:
- concrete;
- cement-sand;
- self-levelling;
- dry;
- semi-dry.

The traditional way to adjust the floor surface is to use concrete or cement-sand mortars, which are advisable to use to eliminate significant irregularities and surface damage. They are used in the installation of heat and sound insulation.
most practical and modern solution is the use of self-leveling compounds, consisting of two variants of the mixture: leveling and leveling. The first is used to eliminate significant irregularities in the base, the second is a finishing layer that creates a flat and smooth surface without defects.
However, despite the less laborious process when using these compositions, their cost significantly exceeds traditional mixtures. Therefore, it is advisable to use self-leveling compounds when the height difference relative to the horizon does not exceed 4 cm.
The semi-dry or dry version is used to level the base when the height difference reaches more than 3-5 cm. This is a good alternative to traditional compositions, however, the new layer will create much less pressure on concrete slab. Therefore, this method is recommended when repairing apartments in old houses and for laying carpet and laminate.

Floor screed procedure
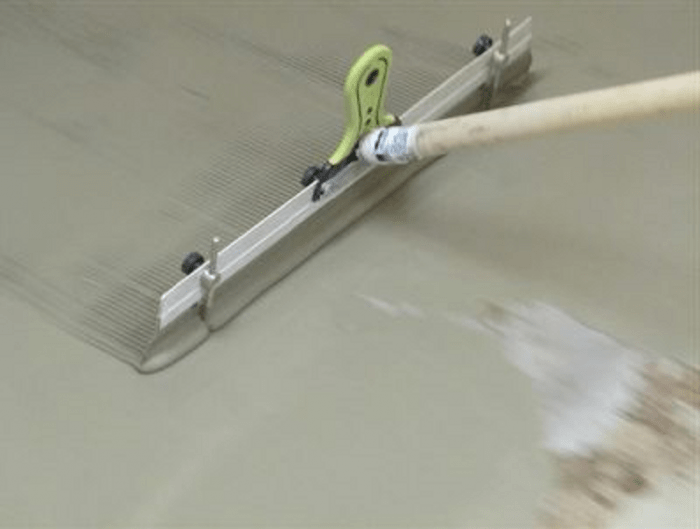
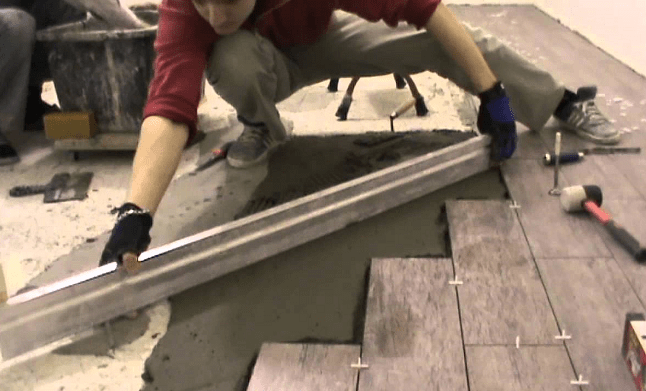
First you need to prepare the base of the floor. To do this, open old design floors with the dismantling of skirting boards, flooring and old screed. Next, the surface is cleaned of construction debris and dust. In case of detection of cracks, potholes and chips, it is necessary to carry out repair work using sealing mixtures. To eliminate deep damage, the jointing method is used, which consists in making cuts perpendicular to the crack with a depth of 20 mm and a thickness of 5 mm. Further, all damage must be repaired with concrete mortar.
Leveling the floor begins with its marking, namely the determination of the lowest and highest points relative to the horizon. A level is indicated on the walls, which indicates the thickness of the future fill layer. Based on the markup, beacons and guides are installed. Pouring the mixture starts from the far corner of the room. The solution is distributed and leveled using a metal rule.
The concrete screed should dry for three weeks. After 24-30 hours after completion of work, the surface must be moistened once a day.

Useful advice! To obtain a solid and high-quality foundation, it is not recommended to disturb the natural process of moisture evaporation with the help of heating appliances and ventilation of the room.
Similarly, the floor surface is leveled with a semi-dry mortar, which is evenly distributed and compacted with a conventional shovel. After complete drying, the surface must be treated with a wooden grout. The process is carried out until the floor surface is perfectly flat.
Dry screed involves laying a layer of expanded clay with a fraction of 1-5 mm, on top of which gypsum fiber boards are mounted. They are interconnected using self-tapping screws with smearing the end edges with special glue. This is the easiest way to level the floor, which allows you to get a coating of increased strength. After the floor screed is completed, you can proceed with the installation of the selected floor covering.

Turnkey apartment renovation. Price per square meter
Regardless of what kind of renovation is planned in the apartment, you can do it yourself or use the services of professionals. You can also involve specialists to perform specific types or stages of work in the entire apartment or in a specific room.
The cost of cosmetic repairs includes the following list of works:
- dismantling of the old finish from the elements of the room;
- painting or whitewashing the ceiling;
- partial alignment of the walls;
- sticking non-woven or paper wallpaper;
- laying flooring;
- partial replacement of electrical and plumbing;
- laying tiles.
The cost of such a list of works starts from 2500 rubles / m², which depends on the complexity of the process. Repair will cost 85 thousand rubles, two-room - 110 thousand rubles, three-room - 120 thousand rubles. This is all without taking into account the cost of materials.

If it is necessary to perform draft work, which includes the installation and dismantling of wall structures, the alignment of all elements of the room and electric installation work, the price of services is on average 3500-4000 rubles / m².
When it is necessary to perform all turnkey electrical work in a new building, the price of the work will be for one-room apartment 25 thousand rubles, two-room - 35 thousand rubles, three-room - 45 thousand rubles.
The cost of a turnkey overhaul is an average of 5500 rubles / m². It all depends on the condition of the apartment and the total area of \u200b\u200bthe room. Many experts offer premium repairs, which include the development of an individual design project. The price of such a repair is about 7500 rubles / m².

Turnkey apartment renovation price with materials
The cost of repair work, taking into account materials, depends on many factors: the area of \u200b\u200bthe apartment, its current state (new or second-hand housing), the volume and complexity of the stages of work and the quality of the building materials used. You can roughly calculate the cost of repairs using an online calculator, which is located on specialized sites. Here it takes into account average cost renovation of an apartment per square meter. More accurate information can be obtained only after drawing up an estimate in each individual case.
So, the cost of budgetary repair of an apartment in a new building with materials will cost an average of 6-6.5 thousand rubles / m². If more expensive building materials are used to repair an apartment, the price of the work will be about 11-12 thousand rubles / m². Those who want to decorate their homes with exclusive finishing products must prepare at least 20 thousand rubles / m². The repair price of secondary housing will be 10-15% lower, which is determined by the condition of the apartment.
Also, the cost of repairs with materials is affected functional purpose premises. So repairing a living room will cost 6,000 rubles / m², a corridor - 6,500 rubles / m², a kitchen - 8,500 rubles / m², a bathroom - 8,000 rubles / m², a loggia or balcony - 5,000 rubles / m².

When deciding where to start repairs in a house or apartment, it is necessary to study each process in detail. Especially when we are talking about doing your own work. If you are not confident in your own abilities, it is better to entrust the execution of all work or a specific stage to professionals who will offer a clear apartment renovation plan. As a result, the work will be performed qualitatively and in a short time.
Do-it-yourself apartment renovation. Video plot
So, you have finally become a happy owner of your own home or just decided to radically change your interior. Among the many logical questions that have arisen in this regard, the main one is in the lead: how to organize everything correctly in order to translate all ideas into reality and forget about subsequent repairs for many years?
Of course, the issue of repair work can be dealt with without any problems by resorting to the services of a professional working team of craftsmen, but everyone knows that this pleasure, especially in the era of the financial crisis, is far from affordable for every family.
In addition, it is much more pleasant to transform your favorite home. with my own hands, investing a piece of his soul in the repair.
Capital or cosmetic?
Repair of an apartment can be divided into two groups: major and cosmetic. The difference between them lies in the original state of the living space and your own desires.
Overhaul involves redevelopment of rooms, installation or dismantling of electrical wiring, replacement of windows, doors, plumbing, leveling of ceilings, floors and walls, equipment for communications. Such a sequence of repairing an apartment in a new building or in a dwelling, the layout of which you want to radically change, is appropriate.
Redecoration provides for a change in the appearance of housing without global destruction: puttying walls, wallpapering, repainting ceilings (or installing suspended / stretched ceilings), painting or restoring windows and doors, replacing flooring, skirting boards and architraves.
Apartment renovation sequence: step by step instructions
Step 1. Decide on a design
Well planned is half done, so first of all, you need to understand what exactly you want.
In order to decide on the layout, design and style, get visual information: look through the catalogs of interior design and decor ideas, take a look at what your friends and acquaintances did in their apartments, because it is much more profitable to learn from other people's mistakes than from your own.
When choosing a style Special attention pay attention to the color scheme of the rooms, because the color you choose will determine the comfort, mood and even the health of you and your loved ones.
Psychologists have long proven the system of the influence of color on the mental state of a person:
- salad and green colors in the interior tone up, improve brain activity (this solution is perfect for an office, schoolchild or student room);
- yellow, coffee, cream shades create a feeling of warmth and comfort, and therefore are ideal for the bedroom, living room, kitchen and hallway;
- blue and pale blue colors in the interior set up tenderness, perfectly relax and soothe, and therefore are often used for bedrooms and children's rooms;
- but with red, orange and bright purple colors in the design should be used with extreme caution, as they can act excitingly and create the effect of " wall pressure». Such color solutions suitable only for especially creative and expressive natures.
Along with the choice colors, decide what and where you will have. This is where the arch will appear instead regular door, in this room - stretch ceiling with starry sky, and here - certainly a parquet floor ...
Then you will need to figure out what materials all this will be made of, and then decide on the manufacturers of these materials and calculate the price, but more on that later.
Step 2. Plan the apartment
Inspired by the idea, you should not rush headlong to the hardware store for materials. First draw up a clear plan of the dwelling, measure the rooms, the width of the door and window openings, location of risers, batteries, wiring to the stove, etc.
Even if you use the apartment plan data from the BTI (by the way, if you are planning a major overhaul, you will need permission from this organization), you still need to double-check the width of all the ledges in the apartment. Often the walls are slightly curved, and such nuances are not recorded in the documents.
Step 3. Calculate the budget
To control the amount of financial costs, it is very important to draw up an estimate, rationally calculating the number necessary materials and their cost.
What should be included in the list:
- building materials (putty, primer, tile and wallpaper adhesives, dry mixes, plaster, nails, plumbing and electrical wiring, etc.);
- finishing material (wallpaper, stretch ceiling, decorative panels, floor coverings, windows, entrance and interior spaces, plumbing fixtures and elements, paints, sockets, cables, etc.);
- price necessary equipment and tools (however, they can be rented or borrowed from relatives, friends or neighbors);
- the cost of the work of professional craftsmen (and you can’t do without them if, for example, you are going to replace windows or install stretch ceilings);
- article " unexpected costs”: as practice shows, it is impossible to 100% predict all needs, you will certainly have to buy something, so you will have to have a certain amount of “reserve” money.
Important advice: purchase building materials approximately 10-12% more than the original plan. Believe me, even qualified workers are not immune from careless use, errors and incorrect calculations.
Step 4. Prepare room for activity
Before you start" active actions", free the apartment from personal belongings and furniture by moving them to another place - for example, to the dacha, to the neighbors, to the attic. If this is not possible, carefully pack all available items (leaving only the most necessary things that will be needed during the repair) in cardboard boxes and tie them with tape.
The very first thing to do before you start renovating any room is to understand what we want to achieve as a result.
Ask yourself a few questions:
- What should the room look like after renovation?
- What would you like to keep unchanged?
- What does not suit you in the first place and needs to be changed?
- What wishes do the people who will be using the room (e.g. other family members) have about the look of the room?
- Do you need a major overhaul or will a cosmetic one suffice?
Think through the details appearance premises can be independently. If this is difficult, you will have to contact a professional designer. This stage should not be postponed until later, they say, we will start the repair, and then we'll see what happens. Much depends on how we want to see the room - from the choice of materials to the execution of the different kind works. It's better to think things through beforehand than to redo them later.
Preparation stage
So, future view the rooms are well thought out. Before you start any manipulations in the room, you need to take the following steps.
- Describe the sequence of repair work in as much detail as possible.
- Learn about the materials you plan to use and any work you intend to do yourself.
- Choose a start and end date for the repair, allocate a period for preparation. This is necessary so that the goal is clearly defined, and the repair does not drag on for many months.
- Calculate the amount of necessary building and finishing materials.
- Select and buy all the building materials and tools you will need throughout the renovation.
- Decide who will do the repairs. Think about whether you will do everything on your own, find assistants for yourself, or entrust certain types of work.
- Order windows and doors in advance so you don't delay work by waiting for them to be made.
- Think about how and where the garbage will be taken out. In any case, there will be a lot.
- Outline the new location of switches and sockets.
Tip: building materials should always be bought with a small margin.
Consider the option of a major overhaul in the living room, which involves not only changing wallpaper, baseboards, updating paint on the ceiling and walls, but also replacing windows, doors, electrical wiring and other large-scale events.
- Electrical is changing. The old wiring has already been removed, the channels for the new one are being cut. After that, the cable is laid, and the channels.
- The ceiling and walls are leveled, rough preparation of the floor is carried out (insulation).
- The ceiling is completely finished, up to and gluing the baguette.
- Fine finishing of walls and slopes of doors begins.
- and switches.
- If selected as a floor covering, it is laid after wallpapering. Strip parquet is laid earlier, cycled and covered with the first layer of varnish. After that, you need to glue the wallpaper, and only then the parquet is covered with subsequent layers of varnish.
- New doors are being installed. You can change windows and window sills not only at the very beginning, but also at this stage.

