Finishing the ceilings in the apartment decorative plaster. How to finish a ceiling decorative plaster
Decorative plaster on the ceiling is one of the beautiful, but labor-intensive types of finishes. Non-easy technology is complicated by a horizontal surface. However, the durability and attractiveness of the coating are fully justified.
Benefits of material
Thanks to the special composition, such plaster is practical. So, depending on the purpose of the room, you can choose a material with antiseptic and water-repellent characteristics, thermal insulation and other features.
All varieties of decorative plaster are inherent as follows:
- environmental friendliness;
- the possibility of masking small irregularities;
- lack of scrupulous surface preparation for finishing;
- ease of application;
- increased strength, which provides a long time;
- the possibility of decor of any surface.
Another important dignity is the diversity of textures. However, it is the wide range that requires a thorough choice, since, depending on the texture, the main steps of finishing are different. For example, the material with the smallest particles does not have reinforcing functions, because the thin layer will repeat all surface irregularities. Therefore, working with it implies a preliminary alignment of the ceiling.

It is very important to solve in advance what type of surface will apply a mixture. Some species will only spoil the main material. For example, the water is not used on the surface that losing appearance and shape during wetting, it can be plasterboard or wood.
The advantages include the property of the original and rapid transformation of the room. The ceiling decoration with decorative plaster allows you to create any drawing either pattern, paint it into the desired color.
Combining with decorative elements you can create a nontrivial style.
Product specifications
The mixtures are classified depending on the binder into four groups, each of which has its own merits and disadvantages, which predetermines their application.
Mineral decorative plaster on the ceiling happens with the following basis:
- lime;
- gypsum;
- cement.
It is applied to the preloaded surface.
Benefits of mineral mixtures:
- resistant to high humidity;
- durable;
- vapor-permeable;
- lungs in application;
- fireproof;
- allow to get a silk surface.
For the price, the mixture is available and involves the use of flocks, chips and other elements. Regarding the flaws, the formation of cracks during the shrinkage of the building is noted.

Acrylic plaster for the ceiling is sold in a ready-made form. It is distinguished by an increased level of adhesion with different mineral surfaces, a small coefficient of absorption of moisture and high elasticity. However, it is combustible and not suitable for facing.

Silicate decorative plaster ceiling is based on the "liquid" potash glass, the emulsion, which is stirred before use. The mixture is characterized by the ability to skip steam and elasticity. Open stucco should be used quickly. Over the surface of the silicate mixture is easy to care. This species is characterized by a long period of exploitation, water resistance and vapor permeability. It is suitable for different coatings. If necessary, it is easy to create any color by adding a koller.
Filler for mixture
The species of plaster differ in the type of stone crumb. Manufacturers use several natural stones that are crushed. Its size varies from 0.5 to 5 mm.
Each species has unique properties:
- marble - has excellent adhesion characteristics with the basis, but not resistant to mechanical damage and abrasion;
- quartz - has an average adhesion with a binding basis;
- granite - it has excellent resistance to mechanical damage.

Classification
The composition of the plaster affects the method of applying the mixture. There are several techniques:
- simulated;
- furrowed;
- uniformly grungy.
To any type of coverage, choose the material suitable for it most. Compatibility data Manufacturer plays on labels. Before starting work, read the information.
Before making a purchase, you need to check the shelf life. Overdue material turns into flour.
Manufacturers produce decorative plaster in different forms:
- dry;
- ready.
The most popular views are the textured "sea breeze", roller and Venetian mixtures.
Method of application
Before starting work, remember that silicate plaster is not used in the coating finish, which are treated with dispersion or water-free primer. It is applied to the sandy ceiling. For silicate material it is better to use plaster with a mineral base.

The decorative mixture is applied only after thorough mixing. To this end, use a special tool - auger. It works on small revolutions. At high mixing speed, the granules are collapsed.
Separate the ceiling can only be completed. It must be purified and dry.
The advantage of such plaster consists also in the fact that it is applied in comparison with paint to the ceiling with flaws. It is important to remember that this is possible when the size of irregularities is no more grain of the filler. To enhance the clutch, the surface is grounded with a special composition with quartz sand.
The method of applying plaster is similar to the method of putty. The material is applied from the bottom up and recall. Then comes one of the most important points - the formation of the desired pattern. The plaster is processed with a spatula, a special structural roller or a grater of plastic. To create embossed drawings, use such application techniques:
- The formation of patterns of brushes, graters and spatulas. For example, with the help of circular motions, the spatula simulates the effect of marine shells. A plastic grater creates furillary drawings.
- Formation of a structure using a roller. If you do rotational movements, then a homogeneous surface will be obtained, and with light rolling, a kind of drawing is obtained.
Usually, after drying the plaster, additional processing is not required. In some cases, it is covered with paint to increase operational and decorative qualities. It dries in a couple of hours, but it is completely possible in only a few weeks.
The owner of the house, apartment or office, depending on the wishes, as well as operating conditions and features of the coating can choose a certain type of decorative mixture, desired texture and shade. This material is suitable for design bedrooms, living rooms and hallways.
In order to start finishing the ceiling operation, it is necessary to have a fairly smooth surface. But thoughts about plastering works in several stages of little to the soul. In this case, texture plaster for the ceiling can help. This material is well applied even on the ceiling, having minor defects. The shortcomings will not be noticeable on the textured, uneven surface. One of the main advantages of such coatings is their durability. A variety of species and types will help in creating the original interior with their own hands without help.
The advantage of textured plaster in the durability of the coating.
Selection of decorative plaster
Deciding the traditional ceiling coating to replace texture plaster, the usual consumer faces the question of choice. In building stores and supermarkets, labels are confused with their names: textured, decorative, structural plaster, stoy, plaster. In fact, under different names, the same thing is often hidden. Just various manufacturers call the product produced in their own way. To determine what exactly is in the bucket, you just need to carefully inspect the label. The consumer should be interested in information on the appearance of plaster, methods for its application, materials acting in the role of binders, fraction of the filler, the minimum thickness of the textural layer.
Back to the category
Types of textured plaster for the ceiling
Textured plaster can be several types:

The formation of a structural surface can occur due to the large-scale filler as part of plaster.
- the relief on the surface is obtained by treating the layer with all sorts of instruments. The thickness of the layer can be 2-7 mm and depends on the desired texture and tool;
- the formation of the structural surface occurs due to the overseas filler as part of plaster. The thickness of the layer varies in the range of 1-6 mm and depends on the fraction of the filler;
- creating an invoice is achieved by multilayer application of the required material, visually and to the touch such surface is smooth. Such coatings have a thickness of no more than 1.5 mm.
A separate item can be noted by the variation plaster. In this case, the acquisition of the base and filler occurs separately. As filler uses marble and quartz crumb, chips and flops.
Back to the category
Classification by the type of binder
The cheapest option is the plaster, which is based on a mineral binder. The role of the binder performs plaster, cement or lime. Representatives of this type of plaster have good vapor permeability and adhesion. Cement plasters easily endure moisture. As a result, they are used for the exterior decoration and for finishing ceilings of wet rooms. However, cement plaster differ in rough texture and are not appropriate for each interior.

Polyurethane and epoxy plasters are the most persistent and durable.
The greatest resistance is polyurethane and epoxy plasters. They are not afraid of fire, no chemicals. Plasters on a polyurethane basis are used for internal and external finishing works. They can be used under any conditions, but chemical origin - their main minus. Such plasterers have a specific smell, and with strong heating, toxic substances are separated. Their cost is quite high.
The most acceptable option, experts consider water-based plaster. In their composition, acrylic, styrene-acrylic or polyvinyl acetate act as a binder. Their advantages include good plasticity, vapor permeability, resistance to ultraviolet and moisture.
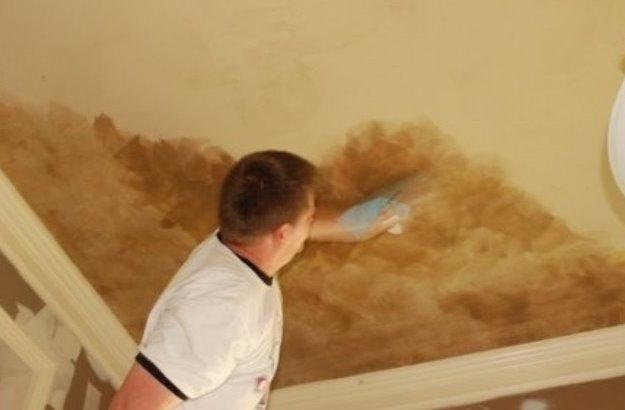
Previously from the ceiling, all old coatings are written: wallpaper, ceiling tiles, whitewashes, putty, etc. Then the surface is ground.
Instrumentary plaster with their own hands requires the following tools:
- a mixer or drill equipped with a nozzle for mixing;
- spacious packaging (for example, 18 l) in order to breed the plaster;
- set of spatulas;
- rule;
- master OK;
- tEROKS or HERRIER;
- brush for applying primer;
- roller
Back to the category
"Coroed" as a way of applying plaster
The work on the application of textured plaster type "Coroed" with their own hands does not differ from the process of work with any other plaster having a large filler.
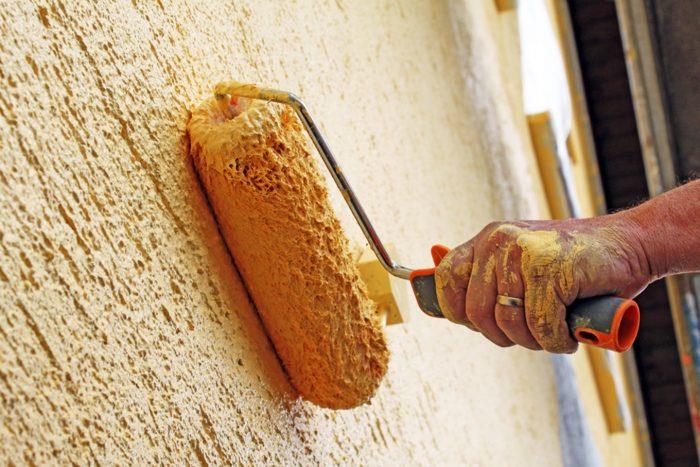
- Initially, the surface of the ceiling is purified from wallpaper, plain, ceiling tiles, putty, etc., and then ground. To achieve a uniform distribution of filler on the composition of plaster, it should be mixed. In order to avoid damage to the filler, mixing is better manually.
- On the ceiling, the finished plaster is applied using a trowel or a spatula of metal. The optimal thickness of the layer should not be more than 5 - 6 mm. The surface covered at a time is chosen by each at its own discretion. However, you should not forget that the rubbing of plasters to give the surface of the ended type should be started until it starts to be captured. It is advisable to have a partner for the production of such work with your own hands. The first puts the layer of plaster, and the other half-sash creates on the ceiling "labyrinths".
Tip: In the course of work on applying and resuring putty, the tools are inevitably contaminated by the remains of plaster. All pollution must be deleted in a timely manner with a pressed damp cloth.

The finished textured surface does not require paint coverage. If, of course, the color corresponds to the intended. Best after buying plaster Immediately give it the necessary color. Such a service is provided by all major manufacturers and realizers of plaster.
Back to the category
Texture plaster as an artist canvas

Special roller for working with textured plaster allows you to create a relief ceiling.
Decorative plaster that does not have large aggregates is a material that is able to open endless spaces for the flight of the fantasy of decorators, architects and artists. With the help of such plaster create real works of art, wall panels, modern frescoes, etc.
To create a relief (invoice), you can use all sorts of materials at hand, for example:
- merchal;
- rag;
- plastic bag;
- hairbrush.
Special tools for creating textured plaster can also be purchased in the store. For example, various spatulas having curly edges that allow drawings in the form of waves and grooves, or special rollers to work with textured plaster. Such rollers have a carved pattern, remaining on the ceiling when rolling, not yet solidized coating. They can be imitated wood texture or grass.
The effect of the paper on the surface of the ceiling can be achieved by placing an ordinary roller into a fabric cover.
Back to the category
Patterns on the plaster do it yourself

With the help of the selected tool, form a relief texture and, pressing a relief spatula, spend on a layer of putty along a predetermined trajectory.
To the first stage of creating a volumetric pattern on the ceiling can be attributed to the surface preparation (close up of cracks, primer work, purification from dust).
The next step is to apply plaster. It is applied to the wall, and then the layer of plaster is equal to 3-5 mm. All work needs to be carried out with the fact that drying will occur pretty quickly.
And then the most interesting and fascinating starts - the creation of a texture pattern with your own hands. With the help of the selected tool begin to form a relief texture. Pressing a relief spatula, a roller or another tool, spend them according to a layer of putty along a predetermined trajectory (horizontal, vertical, wave-like, arcuate, etc.). Pressure strength on the tool affects the depth of the relief. If doubts about how the pattern will look in a particular place, it is necessary to work in advance on a small area of \u200b\u200bthe surface and finally decide on the appropriate texture. Then already dried the textured surface must be smoked. Large protrusions are sent to a metal ironing. It is first dipping into the water, and then, slightly touching the ceiling, slightly align the surface.

After a complete drying of the plaster layer, the ceiling is erased by fine-grained sandpaper, and poorly holding particles are removed using a spatula.
At the last stage, the surface is extracted. Painting the ceiling with textured plaster with your own hands is a very exciting occupation. You can make a ceiling one-photo, and you can connect fantasy and use several colors. For this, the ceiling is first covered with darker paint, and then with the protruding sections, the paint is erased with a cloth or sponge and apply a brighter color. Such painting will strengthen the effect of the ceiling relief.
The ceiling plays an important role in the interior of the apartment. To get beautiful design, it is not necessary to use expensive materials. To create an atmosphere, designers often use various finishing mixes in their work. Their number includes decorative plaster on the ceiling.
Options for finishing ceiling decorative plaster
Decorative plaster is an finishing texture. It consists mainly of sand and cement, but it adds various components that are fully capable of changing the appearance and structure, allowing the coating to become volumetric. As additional components apply marble, quartz, granite crumb. Depending on these additives, plaster is divided into several types. It happens:
- the textured - in this embodiment, all ingredients have already been added to its composition, and its texture is due to its composition;
- structural - Here the finish is a white mixture, which can be supplemented in any color in the process of work, and thanks to the tools, the specialist is able to give it any appearance;
- venetian;
- flock.

This finish has several advantages:
- masking defects on the main surface;
- you can apply it on any building material, be it tree, concrete, plasterboard, brick;
- large color gamut;
- long service life;
- resistance to mechanical effects;
- the material is safe for ecology.
Among the options for finishing the ceiling decorative plaster allocate Venetian plaster and camp.
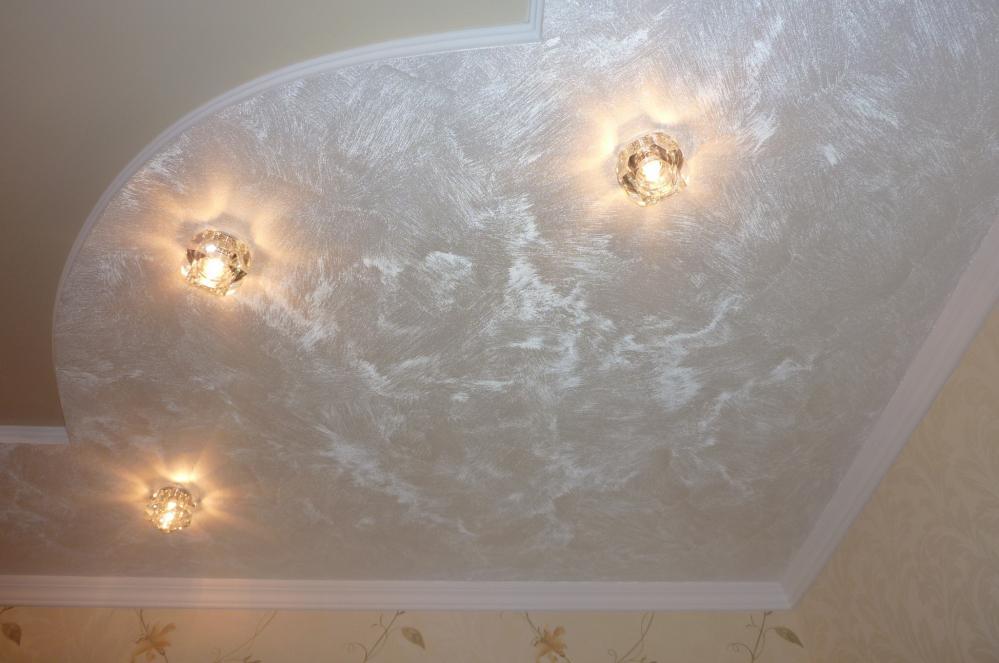
Venetian plaster on the ceiling
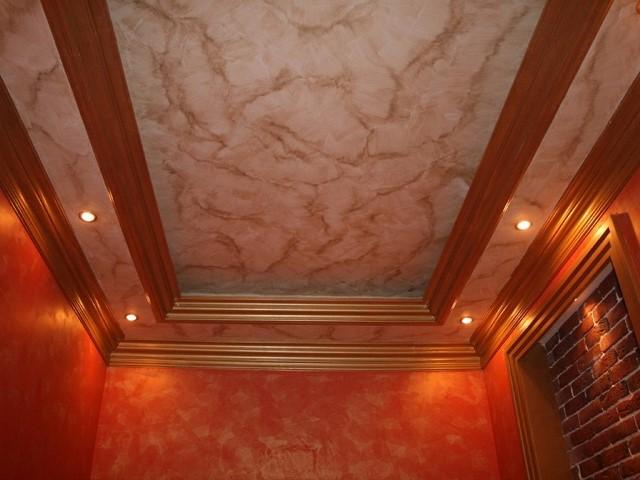
The main difference of this mixture is its exclusive appearance. A unique drawing master creates directly in place. As the basis of the material for Venetian plaster, acrylic is used, and various pigments are added to obtain the desired color shade. In the decoration you can also use marble dust. Due to this, the imitation of natural marble is obtained. Wax wax at the very end of the plastering layer. It protects against unwanted effects on the surface and gives shine. You can estimate the beauty of such a coating by looking at the photo of the Venetian ceiling.

Important! The technology of applying venetian plaster on the ceiling requires the presence of certain qualifications in workers, since the process is very complex. Without having experience in this matter, you can spoil the coating.
Before applying the finishing material, the ceiling surface should be carefully polished, align it, and then apply a primer solution. Next, the layer on the layer apply the decorative mixture itself. Basically, you need to apply from 3 to 10 layers of various shades. Each row of plaster must be made as smooth as possible. Due to translucentness, in the final work, the visual effect of the depth of the ceiling space is obtained.
The brush strokes are applied to different sizes, thereby create a chaotic pattern. Specialists in their work can use the technique of imposing dry smears on the wet surface and apply a different pressure to the tool. These techniques help create the desired effect.
At the end of the finishing work, wax is applied to the surface, and then carefully grind the ceiling with a soft cloth, creating a mirror glitter. And even the photo will not be able to transfer all the beauty of Venetian plaster on the ceiling.
Ceiling textured plaster
The advantages of this type of finishing material are a lot:
- low cost;
- easy to use;
- there is no need to very carefully align the source ceiling before work;
- durability of the coating.

Before applying decorative plasters, it is thoroughly cleaned by the working surface from the old material and the priming is carried out so that the material is better sticking to the ceiling. Next apply plaster, creating a desired relief. To obtain the original ceiling design, you should keep some nuances. For example, to obtain a plane that will be evenly covered with small tubercles, you need to apply the mixture, and then use the usual rolling roller. To change the drawing, you can wind the cord on the roller. In places where it will urge the layer, it will be a noticeable and non-standard version of the drawing.

Important! For a creative goal, you can even use the usual cellophane package, wound it on the roller and adding to the layer of the decorative mixture. Also, special tools are used to create a certain texture, as well as conventional sweater materials, such as a foam sponge, tissue flaps.

After creating the necessary texture, the finishing material must dry well. After that, you can leave the initial version of the design or add paints, shine or glaze to it. All this will give the ceiling a unique view.
Textured plasters There are several types, but it is advisable to apply a mixture with knitting materials to the ceiling - such as polyvinyl acetate or acrylic. They are the most plastic, thanks to this, they are easy to apply to the source surface. Possess moisture resistance and are not affected by ultraviolet rays.
Structural plaster on the ceiling
To create a designer ceiling, you can use structural decorative plaster. Some consumers are often confused with a textured mixture. They have a similar composition, but the method of applying the relief is different. In the case of using textured decorative plaster, the drawing is created on a low layer of the mixture, and when using a structural mixture, the texture is obtained immediately during its application. The composition of this plaster includes the base and the filler from which the effects depend.
Before applying, the source ceiling is aligned and ground. Then the mixture is applied using tools, rubbing it on the surface. The structure of the future drawing appears already in the process of the work itself. After the source material is dry, the surface can be colored paint.

Flock plaster for ceiling
Flocs are small particles that are used in the quality of addition to the mixture. They can be of different shapes and colors, can be covered with sparkles or just remain matte. Mixing various types of flocks, you can get a unique hue and the texture of the ceiling. Flock decorative plaster perfectly fit into any interior style.
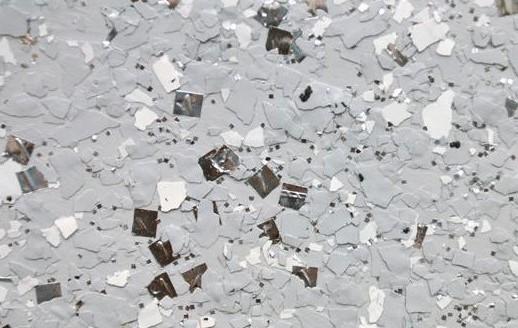
This type of decorative decoration has durability, waterproof and increased moisture resistance. The material is completely non-toxic, it can be used to finish children's rooms and public premises. Plaster retains its appearance unchanged for many years. Wet cleaning of such a surface is very simple. For this you only need to use a wet sponge with detergent. Flock decorative plaster meets all fire safety standards, as it does not support the combustion process.
At the beginning of the finish, they apply a layer of adhesive coating, and then the sprayer is sprayed to the basement. After complete drying, the surface is driving a rigid brush to remove particles that do not stick. At the end, the ceiling is covered with acrylic varnish.
Decorative plaster on the ceiling: photo in the interior
It is believed that the decoration of decorative plaster is already not limited. Looking at the photo of the ceilings with such a finish, the opinion of most people is changing. Many dream of a beautiful stylish ceiling. And it is not so expensive and difficult to make it, as it appears at the very beginning.

If you use such a material for decorating, you can see imitation for marble or any other stone. This texture gives a kind of highlight apartment. And if the gothic or antique style is dominated in the room, then it is possible to use stucco to use a stucco, made of polyurethane base. Seeing the beauty of decorative plaster in the photo, no one can resist the desire to create such beauty in the room.

Decorative plaster on the ceiling with your own hands
To create a decorative ceiling, it is not necessary to hire specialists. If there is a lot of experience in such works, then you can independently make the ceiling surface indoor finish.
Preparatory work
To decorate the house with decorative plaster, it is necessary to make a very responsible approach to the choice of the mixture. The dry composition of the finish requires preparation, and for this you need a certain experience in order to correctly create the desired consistency. The mixtures are made only in one white color to get another shade need to be additionally painted during work.
Important! When finishing with a material of this species, it should be noted that for complete drying it will be necessary to wait a week.
In addition to such mixtures, there is a finishing material that is immediately ready for use. And such a finish is driving one day.
After the material was selected, you need to choose a special tool. It is chosen depending on the type of material and the method of applying plaster. The main tool when working with decorative trim - Kelma. And for structural plaster, also plastic grater is used. The use of a roller of ordinary or figured is also very common.
Before proceeding with the decoration of the ceiling by plaster, it must be aligned using the finish putty. And then process the surface of the primer. It is necessary for better clutch decoration with ceiling.

Application of decorative plaster on the ceiling
If a dry mix is \u200b\u200bused, then it must be prepared using a building mixer.
After laying plasters are taken for creating texture. For this purpose, the grater is used. Moving it on the ceiling surface, the master creates an artistic pattern.

You need to paint the ceiling after the finish layer is dry. The paint is applied at least two layers, with a break after each color. When working with textured plaster to create patterns, various devices use to create an intended texture.
Venetian plaster is applied with a spatula, and applying a straight culma, align and form a layer. The thickness of the layer must be up to 5 mm. The number of layers depends on the designer idea. Each subsequent layer is applied to the previous one after 12 hours. After complete laying of the cell surface, the surface is thoroughly rubbed and covered with wax.

Conclusion
Decorative stucco on the ceiling is one of the inexpensive materials that allow you to create an original design and style of the apartment. Photo of ceilings, decorated with decorative stucco, are amazed by their beauty. This design is an ideal solution for finishing the ceiling in a bedroom, living room, children's room.
Stone texture is always in fashion
One of the advantages of such a finishing of surfaces is the durability of the coating. And if you decide to do without the help of specialists, and make a job with your own hands, the question of choosing a material.
What to pay attention to the selection
Reading different names on labels, the unfair person will not always understand that this is often the same: decorative, structural, textured, plaster, cha. Just every manufacturer has its name.
 Different types of decorative plaster
- The difference between these compositions lies not in this. The instruction on the package must contain information about a binding basis, the minimum thickness of the texture layer, fillers fractions and the final form of the plastered surface.
- The structure of the plaster layer is formed due to the large-disorded special filler in its composition. From its fraction hesitates the thickness of the layer - from one to six millimeters.
- Creating a certain texture is achieved by multilayer material application. In this case, the surface of the plaster to the touch is smooth, and may have a thickness of no more than one and a half years.
- But the relief on the surface is created due to the mechanical processing of the applied special tools. It is clearly visible on the photo presented in the gallery. In this case, the thickness of the applied layer may vary, reaching six to seven millimeters.


There is also a type of decorative plaster - variational. Basic mixture and fillers for it are sold separately. Flops, chips, quartz or marble crumbs can be used as filler. Thanks to them, there are so different, and incredibly beautiful textures.
Types of compositions and their use
The lowest price for mineral plaster options. The binder here is lime, cement or gypsum. These mixtures are well grapped, and each has its own applications.
- For example, cement plaster will better tolerate moisture, but has a coarse texture. Not in every interior it will look good, therefore it is more used for walls and ceilings of rooms with high humidity.
Stuccoings on a cement basis are used to create the effect of "under concrete"
- Gypsum textured plaster on the ceiling is more appropriate thanks to the natural whiteness of this material. As for the limestone mixture for decorative plastering, it is mainly used to finish the walls.
- There are combined options. For example: a lime-cement mixture, which is called terrarasitic plaster. It has a white portland cement, a lime-puff, sand, mica, various pigments. This composition is usually used to finish facades of buildings.
- The most persistent and durable are epoxy and polyurethane compositions. They are not afraid of any exposure to chemicals and high temperatures. Their main minus is a specific smell.
- With a strong heating, the surface plastered with such a composition, extracts toxic substances. It is clear that for residential premises, these mixtures are not used. But for outdoor decoration, these are excellent options, despite their high cost.
Stylization of the texture of travertine on the kitchen ceiling using acrylic attacks and paints
The best option is the plaster textured for ceiling, the astringent base of which is acrylic or polyvinyl acetate. Such plasterers have the best plasticity. They are racks for moisture and exposure to ultraviolet and do not constitute any danger to human health.
How to work with decorative plaster
Zoning coating in golden colors
Before starting the finish, no special surface preparation is required. Everything as usual is a thorough sweep to the slab plate, and the coating concrete contact. Only if there are drops on the base ceiling, seams are seams between the plates - they need to sharpen or align them. How to do it, look at the video.
- To knead the solution, you will need a twental tank; Construction mixer, or drill with a nozzle. To work with a finished solution, various tools are used - depending on which invoice should be obtained:
A set of tools for the formation of relief
- First of all, it is a set of spatulas: it will also be narrow, and wide stainless metal, and necessarily rubber. Application of textured plaster on the ceiling, and its alignment is performed by the spatula.
- Kelma is also used for this purpose, and also to create relief when forming patterns. In fact, for each type of plaster, you need your tool.
- There is a popular texture "Coroed". Create it with a grater that needs to be moved along the layer of plaster in a certain direction. There are many versions of the Terc, using which you can get different pattern.


- The same can be said about the rollers. The usual fur roller ground surfaces. There is a technology of applying such a roller of textural plaster. The patterned roller can be drawing even on a simple plaster, and not just on decorative.
- If a solid drawing is applied with a patterned roller, then a stamp is used to create a separate image. It turns out neat and pretty quickly.
- An interesting pattern on the surface can be obtained by winding on the roller mint polyethylene film or rope. Original reliefs and drawings can be created using a stencil.
- For the formation of the relief by the spray method, a special pistol is needed. The solution is supplied to the compressor with a capacity of up to four atmospheres. Specialists work this method. It is unlikely that for independent plastering, someone will acquire such equipment.
- Textured plaster ceiling with quartz filler requires a tool called rowing. It is used to create linear patterns on thick layers of the applied composition.
Types of textured tension structures
Speaking of textured ceilings, we mean some features of the surface of the film or tissue canvas, which make up their texture:
- relief drawing (furrows, stripes, waves, protrusions);
- the degree of smooth roughness;
- the level of reflection of light.
 The textured tension canvas looks great in combination with matte suspended structures.
For example, the minimum reflective characteristics are characteristic of matte film. The drawing most often imitates one of the natural surfaces - wood, stone, bamboo or natural fabric. A little more reflects the light rays of satin, especially light, and the maximum reflective properties in a gloss, the mirror of which serves as an excellent use of an increase in space.
To emphasize the features of the interior style, choose one of the popular types of tension textured ceiling:
- silk - distinguished by light glitter, pastel shades and softness;
- marble - Ideally copies a cold and smooth surface with a natural pattern;
- metallic - has a wide palette of shades with a slight flicker, changes color with varying degrees of lighting;
- pearl - transmits a luxurious pearl shine, looks great in any interior;
- suede is an unusual solution for the ceiling, great for eclectic decoration.
 Noble glossy marble visually increases the height of the room
The combinations of various textures look original. For example, the alternation of gloss and matte dark tones serve to create imitation of a multi-level design.
Features of textural paints
If you first decide to conduct an experiment and create a flat ceiling with your own hands, use special paints. The volume and relief occur due to the addition of fillers to the usual composition. The base consists of acrylic resins, water is used as a diluent. Due to the thick consistency, the paint is applied not with a brush or roller, but a spatula like plaster. The traditional tools are more often used to create a pattern or ornament.
 With the help of decorative plaster, you can create an unusual stylized surface.
Pay attention to the benefits of paint:
- efficiency (especially in comparison with tension structures);
- the ability to hide small irregularities plates;
- preservation of the height of the room;
- operational and inexpensive repair.
Fair to fully note the disadvantages: the textured paint for the ceiling is well kept on wooden surfaces, has a high consumption and does not close the large defects - protrusions and cracks.
 The use of decorative paints is the easiest way to make the surface texture
How to choose decorative plaster
Reaches a little in the appliance technique, you can use textured plaster for the ceiling, which in construction supermarkets is sometimes found and under other names - decorative plaster, plaster, pukko.
Finished compounds
Thanks to the new technological developments in the field of modern decorative plasters, there are several types of creating a relief structure of material, as well as several techniques of application:
- the volume is created by adding a large filler, the thickness of the layer depends on the size of which - 2-5 mm;
- the visual effect of irregularities occurs in the process of applying several layers, although in fact the treated surface remains smooth;
- the structure is built under the influence of special tools.
 Decorative plaster is most often applied by the usual spatula
Variation plaster We obtain mixing two components: the base and one of the fillers, the role of which are chips, quartz crumb, flops.
Composition and structure of decorative plaster
Depending on the use, the compositions of decorative plaster may differ in fillers and additives that give the finishing material for or other additional properties. Decorative plaster for the ceiling is not only a stylish element of the interior decor, but also a durable coating that protects the ceiling from excessive moisture, dampness and other adverse effects.
In building stores, you can purchase both structural and textured plaster for ceilings.
Structural plaster

Finishing the ceiling by structural plaster of different textures
The structural plaster mixture is a white mass, which during the finish process can be painted in any color. These mixtures allow using specialized plastering tools to give the surface of the ceiling by any texture stipulated by the interior design of the room.
The decorative ceiling plaster with the help of a structural plaster mixture requires certain skills in the construction and finishing work.
Textured plaster

Instrument plaster with marble crumb
This type of decorative plaster is very convenient to use, as it is completely ready for use.
All necessary components have already been added to the textured plasters, and the surface texture with applied is already due to the composition of the construction and finishing mixture.
The size of the grains of filler decorative plaster are divided into the following types:
- Large textured decorative plaster has the size of the granules from three to five millimeters;
- Average textured - the size of the granules from one and a half to two and a half millimeters;
- Finely textured plaster - the size of the granules from 0.5 to 1 millimeter;
- Sufficiently textured decorative plaster has the size of the granules less than 0.5 millimeters.
Council. Determinating with the choice of material for finishing the ceiling, it should be noted that for applying finishing plaster with shallow or thin texture, the ceiling must be perfectly even, since this material does not hide the surface defects.
Composition of decorative plaster
Decorative stucco on the ceiling has several compositions of the working mixture:
- Stuccoings, which include acrylic or polymer, dissolved in water, are environmentally safe, but their wear resistance leaves much to be desired;
- If epoxy resins or polyurethane are used as a binder in the composition of decorative plaster, then such a material is more durable, but can select evaporation, unsafe for human health when heated.
Council. These coatings are not used to finish the ceilings in bedrooms and children's rooms.
- When used as a filler for a plaster mixture of granite or quartz crumbs, the surface of a smooth or rough invoice is resistant to abrasion;
- If marble crumb is chosen as a filler, the treated surface will have an unstable to abrasion, rough texture;
- To give a plaster mixture of waterproofing and antiseptic properties, special thickeners, preservatives and antiseptics are introduced into the composition, which should be indicated on the finished packaging.
Preparation options for ceilings with decorative plaster
Depending on the design of the design of the room and its features, the version of decorative plaster for the ceilings is also selected.
For example, the ceiling decoration with decorative plaster in the bathroom or hall will differ in composition and texture from the bedroom or dining room.
Decoration of bedrooms and children's rooms

Applying mineral plaster on the ceiling, a large selection of options and textures
As a finishing material for bedrooms and children's rooms, it is better to choose plaster mixes on a mineral lime-based basis - this is the safest environmentally friendly material that allows the surface of the ceiling "to breathe".
Thanks to the enormous choice of colors and textures of mineral decorative plasters, the ceiling can be decorated in a variety of styles and color combinations.
Council. Stuccoings on a water basis cannot be applied to the surface, swelling under the influence of moisture - DVP, drywall and wood.
Decoration of rooms with high humidity

Options for finishing the ceiling in the bathroom "under marble"
For decoration of rooms with high humidity - bathrooms, bathrooms and kitchens, decorative plaster for the ceiling on an acrylic basis, which have water-repellent properties.
There are a number of plaster mixtures for ceilings with a water-repellent effect, which is also defined on the package with a mixture. The application of decorative plaster on the ceiling does not require pre-alignment of the ceiling overlap, as the mixture is applied with a layer of at least five millimeters.
But still preliminary preparation of the ceiling and eliminate large surface defects, before applying a plaster mixture, it is necessary.
Advantages and disadvantages of plaster mixtures for ceilings
The merits of decorative plaster include the following factors:
- Ease and simplicity to use;
- Decorative plaster can be applied almost on any surface;
- The stucco decorative for the ceiling does not require careful surface preparation, but large surface defects are preferably eliminated;
- Decorative plaster remarkably masks small irregularities of the ceiling surface;
- Decorative plaster - persistent, environmentally friendly and durable coating.
The lack of this construction and finishing material include the following:
- Finishing work must be carried out by a specialist;
- Finely textured plaster requires a perfectly smooth surface of the ceiling;
- Stuccoings on a water basis can not be applied on the surface, unstable to the effects of moisture - plasterboard, chipboard and wood.
Properly selected decorative plaster on the ceiling will help to give the interior of the room the unique style and elegance. The main thing is that the material of the plastering mix is \u200b\u200bselected with all the technological requirements.
Features and sequence of installation
First you need to say that it is quite difficult to produce such a character. It is necessary not only to stand on a certain hill, but also constantly keep hands raised up to produce certain actions. Given this, most people prefer to hire workers for this operation, so as not to fulfill it.

It is quite difficult to produce work on the ceiling, because you have to continuously work with the arms raised
Features
- First of all, it is necessary to understand that when working with the ceiling, any little thing is important. In such work, it is impossible to make mistakes, since this not only may worsen the quality of the design, but also significantly reduce the service life.
- Special attention is paid to the coverage. Usually, installation instructions recommends using additional lamps that should be installed in a special way to identify irregularities.

The wrong selection of the mixture can lead not only to the difficulties in the installation, but also reduce the service life
- To the selection of mixtures for work, it is also necessary to approach responsibly. The fact is that large-grained materials should be used for alignment, and the finish finish is made with compositions with small particles and even on the other basis.
- It is worth mentioning that some compounds for working with the ceiling are often called putty, although in fact they are plaster mixtures. Accordingly, the decorative plaster on the ceiling is the same mixture, the truth performed by special compositions. This can use special technologies that differ from each other.

Properly installed lighting can greatly facilitate work and identify installation defects
Preparation and lighthouses
- First of all, it is necessary to completely remove the old coating from the ceiling. For this, the sharp spatula is well suited. It is also recommended to use a brush with a bristle made of metal.
- After that, the surface is treated with primer. Professional masters recommend to apply several layers with an interval of 4 hours. The fact is that this will not only increase the level of adhesion, but also significantly reduce absorption.

Each individual operation needs to be applied to certain materials that perform strictly specified functions.
- If it is planned to create a ceiling of decorative plaster, it is best to use the type of primer that is recommended along with the main material. (See also the primer article under putty do it yourself.)
- At the next stage, you need to level the surface. For this, first of all, put markup. It is best to perform it with a laser level and threads that stretch through the area.

Installation scheme of lighthouses and marking
- On the basis of marking and cords you need to make lighthouses. At the same time, professional masters recommend to reduce the planned layer level of plastering to a minimum. That is why they are trying to take a place on the surface, which is closest to the floor.
- For the manufacture of beacons, the landing gypsum is best used. The fact is that this substance is very quickly freeing and it will be much easier to work with it. It should be noted that the beacons are made at a distance of 20 cm from the walls and between them leave the gap equal to the length of the rule minus 20 cm.

Installing gypsum beacons for subsequent pulling on them
- After the design freezes, the entire surface is once again processed by primer.
Tip!
If you do too large lighthouses, the thickness of the plaster layer will also be significant.
However, it must be remembered that it takes space and takes off the ceiling.

Some wizards use a water level tool to facilitate the measurement process.
Sketch and pulling
- At this stage you need to use a mixture intended for surface leveling. Nobody uses ordinary cement solutions long ago, although the price of plaster compositions is significantly higher. This is due to the fact that it is much easier to work with them and faster, and the final surface will have very good quality indicators.
- It must be said that the mixture must be prepared very carefully using a special nozzle on a drill. The consistency of the resulting mixture should be quite thick so that it can stick on the vertical plane.

Leveling ceilings using the rule
- Apply a mixture to the surface with a spatula, trying to rub it with pressure. After that, the leveling process starts, pulling the composition of its rule or other long and smooth tool. If the solution turns out to be too dry, it can be additionally mixed.
- At the next stage, the mixture is allowed to completely frozen and then it is processed by primer to strengthen the connection with the surface.

Some experts also advise apply a notch to increase the clutch level with the surface.
- Next, decorative ceiling plaster with your own hands, taking into account the features of the selected material. Typically, a metal spatula or halfter is used for this. However, there are such compositions that suggest the use of special tools.
- Given the features of the finishing finishing coating, professional masters strongly recommend in detail to study technological processes for working with specific types of material. At the same time, they are advised to listen to the mixtures manufacturers who advise the use of additional components of the same series and even the party.

Mandatory priming before each application of material on the surface will increase the strength of the connection of the layers of the mixture and will create a practically monolithic structure.
- Final alignment, if there is no pattern or relief on the surface, made using a polyurethane grater. In this case, the surface can be moistened to create a polishing effect.
Tip!
When working with the ceiling on the floor, the residues of the solution often fall.
That is why before the start of installation it needs to be seeded in order not to spoil.

Apply the simplest finish layer to the surface, which can later be painted or used as a basis for decorative design
The ceiling decoration with decorative plaster creates a strong, stable coating on the surface, which has also waterproof, thermal insulating and antiseptic properties. Also, the use of such a material allows you to obtain a plane imitating natural marble or the texture of any other stone.
Application technology during design decorative and textured plaster requires special accuracy and accuracy.
After all, despite the elimination of small defects, significant flaws of the surface will clearly stand out on a general background.
So, how do the decorative plaster ceilings do it yourself?
If you take a definition, then decorative plaster is a mixture viscous consistency designed to finish the housing surfaces. But, the highlight of the material gives its fillers that form special in the appearance of the coating.
There are the following types of plaster used for the decor:

Each species forms its surface due to mineral and organic fillers.
Structural plaster
The most striking example is "Coroed", which is most often used in decorating the facades of buildings. The peculiarity of such a mixture in the presence of binders of mineral additives - quartz crumb size from 0.5 to 3 mm.
After applying structural plaster, it is necessary to form its relief manually. Due to the pebbles, you can get volumetric patterns. 
Textual mixes
This is a plaster containing binders with mineral and organic additives: mica, wood fibers, small stones. The combination of fillers, ultimately gives the effect of a three-dimensional image. If you use different stamps or molding rollers, you can form texture images on the surface. 
Venetian plaster
It has a fine marble crumb. Also in the mixture there is a binder. When applied on the surface, a smooth, homogeneous coating, repeating the appearance of natural marble is formed. 
Flock mixes
Plasters, for the interior of the ceiling, allowing you to get an image in the style of mosaic. The effect of applying three layers is achieved: biased adhesive composition, multi-colored and solid-caliber stones, lacquer coating.
The mixtures differ in their composition, one way or another affecting the laying methods and the final result. 
Classification in composition
In addition to fillers in the form of mineral crumbs or organic additives, an important component affecting the properties is the binder.
According to this criterion, the following versions of decorative plasters are distinguished:
Polymer
Typically, acrylic resins are used as the astringent component, which give the coatings resistance to humidity, and temperature rudders.
Silicone
The base of silicone components gives the plasticity of the coated plaster, besides, steam-resistant properties are improved, and waterproofability. 
Silicate
In their composition, such components as liquid glass and alkali. Such components allow coatings with good antiseptic properties, plasticity, water resistance and vapor permeability.
Mineral
The main binding substance used in such types of plasters is lime, can also be part of clay and mineral additives.
To improve properties, additives can be used: acrylic, polyurethane, and epoxy resins, strengthening coating, giving it resistance, durability.
Mineral crumb (quartz, granite), besides the invoice allows you to get a layer, resistant to abrasion, and having smooth / rough surfaces.
Waterproofing and antiseptic properties are improved due to a mixture of preservatives, thickeners and others.  An example of complex multicomponent mixtures is the Venetian plaster, which, in addition to a durable, durable coating, has an original appearance in the form of a marble surface.
The compositions of decorative mixtures in the end give a lot of positive qualities.
Positive and negative properties of plasters
The use of this type of design surfaces of the ceiling allows you to get a variety of positive properties.
The practical component. Coatings formed by decorative plaster are very easy to maintain clean, you can wash them and wipe.
Antiseptic properties. The plastered planes will be securely protected from formation on the surface of mold and fungus.  Water resistance. Increased level of humidity does not harm finishing from decorative plaster.
Universality. Material can be applied to various types of bases: brick, concrete, drywall and others.
Ecology. The mixtures do not have harmful and toxic compounds.
Extensive range. A variety of blends with various fillers allows you to create different types of texture images.  However, there are no ideal building and finishing materials, there are also its drawbacks at finishing mixtures.
- High price;
- High requirements for surface preparation;
- The need for work experience.
- The impossibility of laying on the hydrophobic bases of some types of plaster (wood, plaster and other).
But, the prevailing positive qualities of decorative mixtures make them one of the most sought-after materials in the design of the premises.
How to choose a suitable mixture
The mixture for the ceiling decor is sold in the form of ready-to-use, and dry compositions requiring independent preparation. The mixtures in the finished form can be immediately applied to the pre-prepared ceilings, in addition, the basis of such plasters are acrylic resins. This feature makes them universal, that is, they can be laid even on fearless water surfaces: wood or drywall.
Dry formulations need to be prepared to use the addition of some water and thorough mixing. It requires skills, because you can not always immediately get the consistency needed to work. And the base in the form of water limits the use of dry decorative plasters on hydrophobic bases.
Dry mixes are cheaper than ready, but it is worth considering that the first option has one color - white. To get the surface needed on the range, the ceiling will have to additionally paint, or to compose the plaster itself during cooking.  Another point is the speed of drying, ready-made mixtures on an acrylic basis can be painted the day after applying, but in the case of dry, it will be required at least a week.
Choosing various formulations better pay attention to samples from well-known manufacturers, their certified materials are really high quality.
Decorative Plastering Technologies on the ceiling
The tool is selected for decorative plaster depending on the types and methods of application. Dry mixes are prepared by mixing the nozzle mixer on a drill. The main device for laying decorative plaster is straight Kelma, or as it is also called Venetian. 
For structural types of material, a plastic grater is still needed, which is formed by the surface texture. When choosing the necessary tool, you must initially explore the manufacturer's recommendations for using a specific material.
Methods for applying decorative plaster depend on its type.
Applying structural plasters
Initially, you need to prepare the mixture, after which it is embarked on it.
On the surface of the cell, the mixture is imposed by auxiliary spatula. After that, there is an instrument at an angle to the surface of the ceiling of 30 degrees, and the composition is pulled on the plane. The layer of structural plaster is laid with a thickness of the corresponding size of mineral crumbs (0.5-3 mm).
When using structural finishing materials, it is necessary to start forming texture after their laying. This is done using a plastic grater, moving it on an excavated surface, create a specific pattern.
You can paint the structural coatings after drying the material. The paint is applied at least 2 layers with interruptions between approaches.
It is important to know that working with structural mixtures is best to use the subband. While one puts the plaster layer, the second rubs the applied mix, forming a drawing!
Work with textured plaster
In addition to direct cells, to form a picture on the surface of the coating, it is desirable to use a curly roller with a corrugated rink. Application technology is as follows.
At the first stage, the finished mixture is applied, as well as its structural analogue, direct cells.
Patterned images can be applied with a roller, but Kelma, brushes, rags and other devices forming textures are also used.
Separate plaster for the ceiling after drying.
How to apply Venetian
Technology work as follows:
The laying is made in several layers, catching the plaster with a spatula, and using the straight axle, roll up and form layers.  The overall coating thickness is withstanding within 5 mm, how many layers can be accommodated individually. Each individual layer is placed at a periodicity of 12 hours.
After laying make the "magnification" procedure, rubbing the surface of the cell. And after the final drying, it is grinding with fine-grained emery paper, and covered with wax.

