Hinged kitchen cabinet with your own hands. How to make your own kitchen cabinet and folding table
If desired, and relatively small financial resources, you can make a kitchen cabinet with your own hands. Based on the recommendations given in this review, a self-made kitchen set will differ in its original appearance and durability. 
Similar articles:
Choosing the location and purpose of the kitchen cabinet
Before you make kitchen cabinets with your own hands, you need to understand their location in relation to interior items and household utensils, as well as their purpose. In addition, you need to know before starting work how to correctly draw up a project and drawing of a product, depending on the area of \u200b\u200bthe room, the number of shelves and drawers needed, and their functionality.
It is necessary to attach the bottom and top of the cabinet to the sidewall. Assembly is carried out using self-tapping screws or confirmations with a hexagon head.
Then the structure is turned over, laid on a flat surface and the back wall of the cabinets made of laminated fiberboard is fixed. The sheet is fastened with staples from a stapler or small carnations: 1 nail per 10 cm.
Collecting boxes
The frame of the boxes is assembled according to the principle. Chopsticks are inserted into the holes, pressed and tightened with screws. Guides are installed on 2 sides, which are fastened with an M6x13 euro screw.
The sides are connected to the back, then to the front. The bottom is mounted with staples or nails last. Before installing it, check the diagonal parameters. They must match.
We fix the table top and doors
Doors are fixed with special ties. After the cabinet is assembled and fastened, corners are installed on the walls, thereby fixing the countertop. At the final stage, fittings are attached, shelves and drawers are installed.
What do you do with old furniture?
Making a kitchen cabinet with your own hands is not an easy task, but the result justifies the effort. The need for self-production of furniture usually arises if the kitchen has a non-standard size or layout. It is not always possible to find a corner cabinet for dishes in stores, which allows you to save space in a small kitchen. Sometimes one additional cabinet is needed, but the space for it is limited, so the sizes of the items sold are not suitable. It is cheaper to make a cabinet yourself than to pay for custom-made furniture that has non-standard sizes.
First you need to think over the design and develop drawings, indicating the dimensions, and then, in accordance with the calculations, purchase the necessary materials. On sale you can find a wide range of chipboard and MDF - the most popular materials for making furniture. Specialists who sell them can immediately cut them, accurately observing the dimensions. They also perform high-quality edge processing, drill holes for connecting parts with dowels. The finished cabinet can be decorated using decoupage technique, add stylish fittings, creating exclusive furniture at low cost.
Measurements, drawing up a plan
With your own hands, you can make a small cabinet, and a whole set of furniture, where there is a place for dishes, kitchen appliances and various utensils, products.
To create such a kit, you need to draw up a kitchen plan, noting the position of the sink, stove, hood, sockets, pipes. It should outline where what furniture can be placed, and what should be the dimensions of each item. The hanging cabinet will successfully disguise the gas meter, pipes, wiring, and inside you can make shelves for storing dishes or tools in the free space.
If the kitchen is already equipped with furniture, but you need to make additional cabinets, accurate measurements are of particular importance. There are computer programs to help plan the placement of furniture. When drawing up a plan, you need to make sure that new furniture will fit between already installed furniture, that there will be enough space for opening or folding doors, pulling out drawers. When drawing up a plan and drawings, it should be borne in mind that the corners in apartments are often not perfectly straight.
It happens that a new corner cabinet, according to the plan, should come close between other pieces of furniture. In practice, due to the curvature of the walls and corners, it turns out that the walls of adjacent cabinets in one place are a centimeter or more apart from each other, and in another this gap disappears, and a couple of millimeters are not enough for the cabinet to fit into place. Therefore, it is better to make it a little smaller, especially if sawing will be done at home and there is a high risk of error. If there is not enough space for some dishes, you can always rearrange them. But if the corner cabinet does not fit into the space allotted for it, and the rest of the furniture cannot be moved, you will have to disassemble the structure, file the details.

What can you make a cabinet for the kitchen
It is desirable to maintain the entire environment in the same style. If the kitchen is understaffed, and the material similar to the old one is not for sale, you can change the facades of existing furniture. If this is too expensive, you can perform the same decoupage on the facade of a new cabinet and some kitchen interior items. Or decorate all the furniture using decoupage technique, but choose different patterns for facades made of different materials.
Having outlined where the corner or wall cabinet will be located, determining its dimensions, you can purchase material and order sawing. And what can it be made from? Kitchen furniture must be resistant to high humidity, hot steam, it is necessary that the surface is easily washed from dirt. The most popular and affordable material for it is moisture-resistant laminated chipboard with a thickness of 16-18 mm, covered with artificial veneer (melamine). Also in the manufacture of cabinets for dishes and kitchen utensils, the following materials are used:
- Chipboard, finished with a thin layer of natural veneer;
- MDF is a compressed wood dust board that is more flexible, resistant to adverse effects and more expensive than chipboard. It can have a matte or glossy, painted or laminated surface, suitable for decoupage decoration;
- multiplex - moisture-resistant multi-layer material based on thick veneer, can be coated with polyurethane varnish that is resistant to mechanical damage. By ordering curved sheets, you can make a corner cabinet with a radius facade from it;
- solid wood is the most expensive and rather capricious material that needs to be impregnated and treated with a protective varnish. The natural pattern of natural wood, stained or bleached, is so beautiful that decoupage and other finishes are not needed. Due to the high cost of wood, luxury furniture is made or combined with other materials, for example, it is used for facade frames.
Auxiliary materials
For the case, cheaper materials are usually used, and for the facade, more expensive and attractive in appearance, for the countertop, a thicker material with an improved protective coating is needed. Shelves can be made of chipboard or plywood of sufficient thickness and density to support the weight of dishes, kitchen appliances. The shelves are also made of thick impact-resistant glass. For glazing the doors, they take transparent or frosted glass with a stained glass pattern, sandblasted. For the back wall, fiberboard, pressboard is suitable.

If you are not satisfied with the decor of commercially available materials, there are many options for decorating facades with your own hands - decoupage, lining with PVC film with a pattern, enameling, glisal (translucent paint for creating special effects). In addition to MDF, chipboard, solid wood and other materials to create the body, facade and shelves, you will need:
- hinges for attaching doors (if the door is reclining, you need a special lifting mechanism with a latch);
- corners for mounting on the wall (for hanging cabinets);
- if a cabinet is made with drawers - guides for them;
- pins, dowels, confirmations (euro screws) with plugs for fastening parts together;
- shelf holders;
- handles and other accessories.
If you plan to do the sawing and edging yourself, you will need a jigsaw, an edge banding iron, and edging material. To assemble the prepared parts, you need a drill, a screwdriver, a milling cutter, a stapler with staples.
Kitchen cabinet designs
The cabinet consists of the following parts:
- upper part (roof, in a floor cabinet it can serve as a countertop);
- lower part (bottom);
- sidewalls (at the floor cabinet they usually serve as legs, a plinth 10-12 cm high can be made between them);
- back (if the cabinet is angular, it consists of 2 parts). Sometimes, instead of a solid back, a screed bar is installed between the sidewalls; the back is not made if the corner floor cabinet is used as a sink cabinet;
- shelves.

All these details form the body, and the cabinet also has a facade. Its designs are varied:
- 2 swinging doors (for small narrow cabinets - 1);
- 1 door adjacent to the blind false panel;
- 1 or 2 doors that fold down or up, they need gas lifts and reliable latches;
- the cabinet can be completely open, or doors are made from below, and an open niche from above;
- the drawer(s) may be located above the door or hidden behind it;
- an accordion door is often made in an L-shaped corner cabinet;
- if the cabinet is angular trapezoidal, the facade and sidewalls form obtuse corners;
- in an L-shaped cabinet, the facade consists of 2 parts converging at a right angle, its elements can be doors, false panels, drawer fronts.
There is also a model that occupies an intermediate position between the L-shaped and trapezoidal corner cabinet, with a 3-part front. Usually this is not a one-piece cabinet, but a modular corner set.

The left and right sidewalls are symmetrical to each other, the roof usually completely coincides in size with the bottom, and the table top should be somewhat larger and thicker. The height of the floor cabinet is usually correlated with the height of the table, sink or stove, the depth - with the depth of adjacent cabinets. The tabletop, which is the lid of the cabinet, usually protrudes beyond the facade, and the internal shelves should be slightly less deep than the bottom and the lid, so as not to prevent the doors from closing. If the wall cabinet is located above the sink, stove, table, there should be enough vertical space between them to accommodate tall dishes and perform various operations. This must be taken into account when drawings are drawn up and dimensions are affixed.
In a corner trapezoid cabinet, for ease of access to contents, rotating round shelves, the so-called carousel shelves, are sometimes made. But their useful area is less than that of shelves that follow the shape of the bottom and top.
Therefore, the corner cabinet loses its main advantage, which is that it takes up little space, but has solid internal dimensions. Other options for internal filling are possible, but at home it is best to stay on ordinary shelves.

Cabinet assembly and finishing
It is better to order sawing material in a carpentry shop or in a hardware store where you purchase it, you only need to provide sketches and drawings to specialists and ask them to number the parts. Assembly is carried out in the following sequence:
- holes are drilled in the sidewalls for shelf supports. If the doors will cling to hinged hinges, you need to use a milling cutter with a nozzle for sweating to select the internal holes for them.
- sidewalls, roof and bottom are connected;
- guides for drawers (if provided by the design), shelf holders are attached to the body;
- the back is mounted or the back bar is attached;
- fastened to the sidewall, bottom and roof of the false panel (if any);
- doors are hung, hinged hinges are adjusted (first they are attached to the doors, then to the sidewalls);
- if the cabinet is floor-standing, the plinth and legs (if any) are mounted;
- if hinged, corners are screwed for mounting on the wall;
- if the model is with a countertop, the corners are attached under it, and it is installed in place.

It is recommended that you first pre-assemble on wooden dowels, if the product is assembled correctly, without distortions, and the dimensions allow you to put (hang) it in the allotted place, the dowels are smeared with glue. You can additionally fasten the parts with euro screws. The back is fastened with staples using a stapler. Piano loops are fixed with self-tapping screws. At the final stage of the assembly, the fittings are mounted, the shelves are put into place when the cabinet is hung or put in place.
Decoupage decoration
The finished cabinet can be turned into an exclusive piece of furniture by decoupage on the facade. In essence, decoupage is an application for which three-layer napkins with a pattern, magazine clippings are usually used. The surface for decoupage is carefully sanded and covered with acrylic paint in 2 steps, and if the surface does not absorb paint (glass, plastic), a special primer is needed. On the prepared surface, using PVA glue or specially designed for decoupage, the selected pattern, cut along the contour, is glued. After complete drying, it is covered with the first layer of varnish, then additional processing, painting is carried out. The finished work is covered with a final layer of varnish.
What do people usually do if they need a new kitchen cabinet? As a rule, they go to the store, choose the right model and buy. However, there is another, more interesting and less costly solution to this issue. With a little preparation, you can make a kitchen cabinet with your own hands of excellent quality. It is only important to be careful, patient and follow the instructions clearly. The finished product, whether it is a standard wall cabinet or an original corner cabinet, will delight you for many years. In addition, creating a cabinet for the kitchen with your own hands will help save a lot of money that can be spent on something else. The entire upcoming process of making a cabinet for the kitchen with your own hands can be divided into the following main stages: preparation, manufacturing of the necessary elements and assembly of the structure, installation of the finished cabinet on the wall.
The kitchen cabinet is placed at eye level, so this is the first thing that catches your eye in the kitchen.
Preparatory work
One of the most important and primary points of this work is the creation of the project. At this stage, you need to think carefully about everything in order to avoid errors and inaccuracies that can lead to additional time costs. In addition, a do-it-yourself kitchen cabinet is created with the expectation that it will serve for a long time. So the design must be approached with all responsibility.
First of all, you need to prepare a drawing. You can take ready-made drawings as a basis. The figures below show a general view of the wall cabinet and a diagram of the device side wall of the product.
After the drawing is ready, you need to choose a place where the wall cabinet for the kitchen will be installed in the future. There are no specific recommendations here. Position it so that it is convenient to use and does not interfere while working in the kitchen.
Calculate the dimensions of individual structural elements and the overall dimensions of the product.
Here it is important to take into account not only such basic parameters as the length and width of the cabinet, but also the number of shelves and, of course, the distance between them.
Three types of kitchen cabinets: corner, regular and open.
It will be much more convenient for you to work if you prepare a drawing with all dimensions indicated. It will help to more clearly imagine what kind of product the end result should be. In fact, despite the huge range of factory-made kitchen furniture, all cabinets come in 3 types, which you can see in the picture. Only their shape changes, while the order and features of the assembly remain unchanged. So you can make a kitchen cabinet of any desired configuration.
To assemble the product, you will need a lot of materials and tools. Since the dimensions of the cabinet can vary, the dimensions of the materials for work can also be different. This manual covers how to make a cabinet 75.2 cm high, 28.6 cm wide and 27.9 cm deep - one of the most common and convenient models. For assembly, you can use both chipboard and plywood. Prepare the following materials:
- 1 roof board with dimensions 19x286x438 mm;
- 2 boards for the side walls of the cabinet - 19x286x762 mm;
- 2 boards for shelves - 19x260x413 mm;
- 1 board for the bottom - 19x279x438 mm;
- 1 board for the manufacture of the back wall of the cabinet - 6x286x752 mm;
- 2 drains with dimensions 19x38x279 mm;
- 2 fastening strips with dimensions 19x38x419 mm;
- 2 linings for the edges of the cabinet shelves - 19x19x413 mm;
- 2 crossbeams with dimensions 19x57x381 mm;
- 1 door with dimensions 19x387x413 mm.
In the finished design, the door will overlap the opening by 10 mm on each side.
Think about what color you want. There are a lot of different options available. Traditional are maple, alder and oak. If desired, you can order a board of any other color.
Before you make a kitchen cabinet, prepare all the tools for work and the necessary accessories:
- doorknobs;
- overhead loops;
- finishing and finishing nails;
- pins for shelves;
- edge for finishing;
- sandpaper;
- drill;
- jigsaw;
- stationery knife;
- level;
- iron;
- measuring tape;
- drill;
- self-tapping screws;
- suspensions;
- euroscrews.
Back to index
Construction assembly
After the drawing is ready, and all the tools and materials are laid out at the workplace, you can start making a cabinet with your own hands. The product is assembled from individual elements, the dimensions of which were given above. Individual elements are cut from a single sheet. It is very difficult to do this with your own hands, so it is better to contact the nearest furniture workshop. If you do not know where to find it, ask the seller of one of the furniture stores in your city, he will surely help you solve this problem.
It is difficult to do this with your own hands, primarily for the reason that if you saw the board with a regular jigsaw, chips will appear at the cut points. If self-cutting is the only possible option, work according to the following scheme:
Make a markup. To do this, draw 2 lines. One of them should run exactly in size, and the other should be about 1.5 mm wider. Carefully make a cut between these lines with a jigsaw (better, of course, use an electric one). After that, carefully clean the chips with sandpaper. It is usually enough to run along the edges several times.
After all the blanks are prepared, you can start assembling. Drill holes for euro screws in the walls of the future cabinet. You need to drill through, using drills with a diameter of 7 mm. The holes should be located at a distance of 4 cm from the edges of the vertical blanks. In the shelves, holes are drilled at the ends. For this, a drill with a diameter of 4.5 mm is used. Holes must be drilled to a depth of 4 cm. Using the same drill, you need to prepare holes in the sidewalls - where the shelf will be fastened.
After that, you will need to glue the visible ends of the cabinet parts with a special edge. For this you need an iron. Turn the iron on to 75% of its power or set the wool setting, apply the edge to the surface, run the iron over the film several times, and then press firmly with a dry cloth. Excess film should be cut off with a utility knife.
Then take the euro screws and use them to screw the bottom and top strips to the side parts of the kitchen cabinet. After that, using the same euro screws, fix the shelf inside the cabinet. In the end, you just have to attach the back wall to the cabinet.


Floor kitchen cabinets are, one might say, those whales on which the updated kitchen rests. On the other hand, the first impression is made by good hanging cabinets for the kitchen. Hanging cabinets are located at eye level. It is they who are the first in the kitchen, what people pay attention to. The presented DIY Wall Mounted Kitchen Cabinet project is designed to harmonize with the floor cabinet (DIY Floor Kitchen Cabinet). Both cabinets are provided with overlay doors with raised panels, however, you can choose a different design style. The width of the hanging kitchen cabinet is 45.7 cm, which is the standard and matches the width of the floor cabinet. The list of materials for the manufacture of a wall-mounted kitchen cabinet provides for exactly this size. The dimensions of the cabinet can be changed at your discretion. For example, you can downsize two cabinets to fit above a cooker hood.
There are no fixed shelves in the wall cabinet, so its height is especially easy to change. To do this, you just need to reduce its walls, front frame and door by the same amount. If you need to close a wider space, you can make the cabinet wider and hang a double door on it. In this case, you will have to add a center stand to the front frame. Make it twice as wide as the side posts.
For the manufacture of those side walls of the hinged kitchen cabinet that will be in sight, take plywood from hardwood, and for the walls that will adjoin other cabinets or to the wall, use spruce veneers. Also, for the manufacture of such a kitchen cabinet, you can use chipboard. Face frames, doors and edge trims should be made from solid hardwood to harmonize with the hardwood plywood you are using. The level of complexity of making a hanging kitchen cabinet with your own hands is relatively high.
List of materials for making a hanging kitchen cabinet with your own hands:
Cabinet body and front frame:
Roof (plywood, chipboard) - 1.9 x 28.6 x 43.8 cm - 1 pc.
Side walls (plywood, chipboard) - 1.9 x 28.6 x 76.2 cm - 2 pcs.
Bottom (plywood, chipboard) - 1.9 x 27.9 x 43.8 cm - 1 pc.
Shelves (plywood, chipboard) - 1.9 × 26.0x41.3 cm - 2 pcs.
Rear wall (plywood, chipboard) - 0.6 x 28.6 x 75.2 cm - 1 pc.
Mounting strips - 1.9 x 3.8 x 41.9 cm - 2 pcs.
Racks - 1.9 x 3.8 x 27.9 cm - 2 pcs.
Crossbeams - 1.9 x 5.7 x 38.1 cm - 2 pcs.
Pads on the edges of the shelves (solid wood) - 1.9 x 1.9 x 41.3 cm - 2 pcs.
door- 1.9 × 38.7 × 41.3 cm (superimposed on the opening by 1 cm on each side) - 1 pc.
Fittings and fittings for the kitchen cabinet
Pins for adjustable shelves - 12 pcs.
50 mm finishing nails.
22 mm finishing nails.
Overhead loops - 1 pair.
Door handle - 1 pc.
76 mm drywall screws.
Manufacturing of the cabinet body
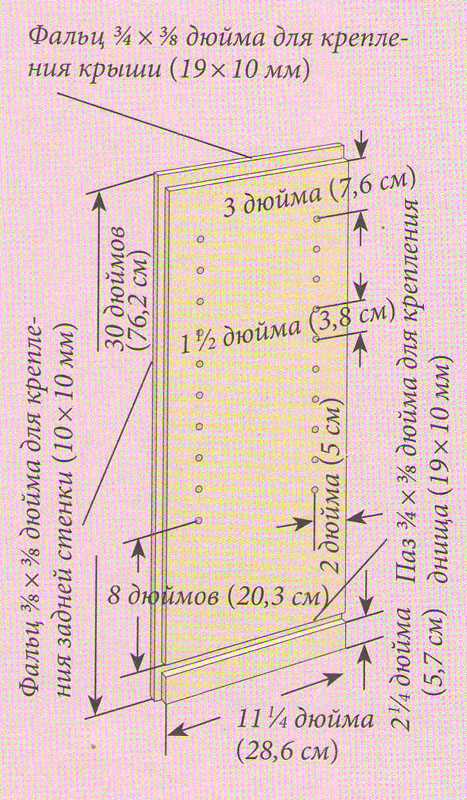
1. Parts manufacturing. Cut out the roof, walls, bottom, shelves and fasteners of the cabinet in accordance with the dimensions indicated in the list of materials for making a cabinet with your own hands. In the inner sides of the side walls, drill sockets for the pins, as shown in the drawing “Detailed view of the side wall of the hinged kitchen cabinet” .
2. Selection of grooves and folds in the side walls and roof. Select the grooves and folds in the side walls of the cabinet, as shown in the figure "Detailed view of the side wall of the hinged kitchen cabinet" . To ensure freedom of adjustment, and if the walls in your kitchen are not quite ideal, remember, Infobud writes that the fold intended for attaching the back wall is 3 mm wider than the wall thickness. Please note that the illustration shows one side wall. Do not forget that the second wall of the hinged kitchen cabinet should be its mirror image.
|
|
3. Assembly of the cabinet body. Connect the bottom to the side walls with glue and 50 mm finishing nails. Use glue and nails to connect the mounting plate to the side walls, as shown in the picture “General view of the wall-mounted kitchen cabinet”; .
4. Rear wall installation. Use a carpenter's square to make sure the case is square. Apply glue to the folds of the side walls and the roof and fix the back wall with 22 mm trim nails.
5. Production and fastening of racks and crossbeams of the cabinet. The dimensions of the crossbeams given in the list of materials for making a cabinet with your own hands are chosen in such a way that the crossbeams are flush with the side walls of the cabinet. This provides the best appearance for a freestanding cabinet. However, if you are making a row of cabinets, you should increase the length of the crossbars by 6 mm. As a result, the crossbars will protrude by 3 mm on each side of the cabinet, which is very convenient if the walls of the bedside tables are slightly warped or the walls in the kitchen are not too smooth. Cut out the uprights and attach them with 50mm glue and finishing nails. Then cut out the crossbars to match the distance between the uprights, and attach them in the same way.
Shelves, doors and cabinet installation
1. Production of shelves. Cut out the faceplates according to the dimensions shown in the material list for the cabinet. Glue them to the front edges of the shelves and press them with clips.
2. Making and hanging the door. The dimensions indicated in the list of materials correspond to such a door, which is superimposed on the uprights and crossbars by 10 mm on each side. To hang the door, attach a pair of overhead hinges to the rack, placing them at a distance of 50 mm from the ends of the racks. Reinforce the hinges on the uprights and hang the door, taking care that it is not skewed.
3. Finishing and hanging a cabinet (or several cabinets). Apply a final finish to the cabinets (polyurethane varnish is very good for kitchen furniture). Install the door handles using the screws provided with them. Using 76mm drywall screws in the top and bottom fixing strips, secure the cabinets to the wall. Hanging cabinets can be a problem as they need to be supported until they are secured to the wall.
This adorable herb hanging cabinet has an original look with a delicately rounded top and bottom, sophisticated coloring and a carved wrap handle. This French cabinet is made from good quality pine boards joined with tongue and groove.
The exterior is painted with diluted acrylic paint and treated with teak oil. To achieve a greenish tint, green and blue colors are mixed here, but you can choose a color of your choice, such as bright red or even white.
§ To make such a locker, you need the following materials and tools (⇓)
Tools - workbench with vise and clamps, compasses, pencil, ruler, square, jointer, screwdriver, jigsaw, sanding block, frame bow saw, countersink drill with a diameter of 7 mm and cutter for plugs, electric drill, twist drills with a diameter of 10 and 3 millimeters, an awl and two brushes. Other useful tools may also come in handy: a cordless screwdriver, a grinder, a marking knife.
Materials - pine (see specification); 50 steel screws with countersunk heads 35 millimeters; sandpaper with grit 80 and 150; 2 overhead brass hinges of a suitable size with screws; teak oil; acrylic paint [see paints SPS "Wall Paint" and "Architex"].
Specification - 4 tongue and groove boards 700 × 89 × 15 mm (2 doors and 2 strips); 4 sheet pile boards 650 × 89 × 15 mm (rear wall); 4 sheet pile boards 650 × 89 × 15 mm (sidewalls); 3 boards 312 × 170 × 18 mm (shelves); 8 boards 160 × 30 × 18 mm (2 crossbars for doors and 6 supports for shelves) - all blanks from pine. If you want to cut a more complex wrap, use basswood, which is easy to work with.
§ Do-it-yourself hanging French cabinet: step by step guide (⇓)
1 . Carefully study the design and pay attention to the narrowing at the ends of the boards adjacent to each other. With a jointer, bring the workpieces to the desired dimensions ( fig. 1).

2 . Fasten two door boards with two 160 mm long crossbars. Fasten each door board with two screws (fig. 2).
3 . Connect all 4 boards 700 mm long (2 door boards in the center and 2 strips along the edges), bend the ruler and apply curved contours along the ends (Fig. 3). If necessary, you can call someone for help if you cannot cope on your own.

4 . Cut the ends of the door along curved contours with a mechanical jigsaw ( fig. 4). Do the same with the planks. Sand the cuts with sandpaper and slightly round the edges.
5 . With a frame bow saw, carefully bevel one end of each 160 mm support workpiece at an angle of 45 degrees (fig. 5).

6 . Attach 160mm supports to the ends of three 312mm long shelf blanks with screws. The side faces of the supports should be flush with the ends of the shelves (fig. 6). Sand all edges and ends with a sanding block.

7 . Attach three shelves with screws to the sidewalls connected in pairs (fig. 7). The middle shelf is positioned so that the supports are on the underside of the shelf and their 45° bevelled ends face the front of the cabinet.
8 . Fasten the back boards in place (fig. 8) by driving the screws through them into the edges of the shelves and sides. The screw heads must be flush with the surface. Attach the front planks of the cabinet with screws, having previously countersunk the holes so that the screw heads are recessed.

9 . With a knife, cut out the three components of the door wrap - a part that is fastened with a screw to the side wall of the cabinet, a latch and a central swivel. There is no need to exactly copy the given sample, give free rein to your imagination. Drill a hole with a diameter of 10 mm in the heck and install the swivel in place. Drill a hole with a diameter of 3 mm in the side wall of the cabinet and attach with a dowel 100 long and 3 mm in diameter, cut from the trim. Continue shaping the wrap until it takes on nice shapes ( fig. 9). Wrap the stick with sandpaper and sand the planed parts.
10 . Replace the door, make holes for the screws with an awl and screw on the hinges ( fig. 10). Depending on the size of the hinges, position one about 140mm from the top and the other about 100mm from the bottom. Go over the surface of the brass hinges with a thin sandpaper to dull their shine.

11 . Attach a wrap to the side of the cabinet and use it to locate the latch. Mark the axis of rotation with a pencil and drill a hole with a diameter of 10 mm. Insert the central peg into it (fig. 11). Drill a 3mm diameter hole through the peg on the inside of the door. Use a knife to cut a pin and insert it into the hole to secure the wrap.
Sand all surfaces with sandpaper. Thin the paint with water and paint the cabinet. When the paint is dry, sand all surfaces with sandpaper, scratching the paint until the texture of the wood is revealed, and rub with teak oil. Use a chisel to cut end caps from scrap wood and glue them into countersunk holes to hide the screw heads.
Rice. 12. Homemade wall cabinet: other design options (⇓)

Useful advice !
Experiment before painting. Dilute some acrylic paint with water and paint over a piece of scrap wood, then sand and oil as above. If you want to darken the shade lighter or darker, add more water or paint to the mixture accordingly. Remember that the end wood fibers absorb more paint and therefore become darker.
3.3333333333333 Rating 3.33 (3 Votes)

