concrete tables. The frozen elegance of brutal material: coffee and coffee tables made of concrete Necessary materials and tools
To purchase a finished countertop for the kitchen that will fully meet your needs in terms of aesthetics, reliability and functionality, you need to prepare a considerable amount of money. It is much cheaper to make it yourself, especially since it is quite possible to do it at home. This idea can be implemented using wood, chipboard, liquid stone or concrete. Among these options, perhaps the most interesting is the concrete countertop, due to the availability of the material and the relative ease of working with it. Knowing the basics of concreting, you can not only make a new work surface in the kitchen, but also restore the old one, which will make it possible to save even more.
Concrete in its structure is a solid and durable material that can withstand high temperatures. In this regard, it is practically not inferior to granite, although it costs an order of magnitude cheaper. However, the concrete surface has one feature that must be taken into account in the manufacture kitchen worktop. The fact is that concrete consists of pores that can be clogged with various organic matter, which complicates the care of the kitchen. In addition, this material must be protected from acidic agents, since they can destroy calcium, which is the main binding element in concrete.
Note! Negative impact on concrete surface can render even a drop lemon juice leaving behind a stain.
This disadvantage is easily eliminated with the help of a protective polymer layer, which is applied to the concrete after it hardens. A concrete countertop with such protection is easy to clean and retains its appearance over a long period. However, it is not recommended to use such a surface as a cutting board or put a hot frying pan on it, because, unlike concrete, the polymer coating is less resistant to such loads.

Concrete worktop without polymer coating can be used in the living room, bedroom or office, where there are no strict operational requirements
Production of a monolithic concrete countertop
The basis for the manufacture of concrete furniture is a standard technology that is used in construction. To make a concrete countertop with your own hands, you need to complete several steps, each of which is important in its own way.
Preparation of materials
Since the kitchen countertop in our case is made of concrete, you need to prepare the main components for its production:
- cement;
- sand (preferably river sand);
- crushed stone or marble chips;
- water.
Advice! To make the countertop look like marble, granite, or have any other shade other than gray, a special pigment (color) is added to the mixture, which can be purchased at any hardware store.
For the manufacture of formwork you will need wooden beam 50x30 mm and moisture resistant plywood 12 mm thick. As a base, instead of plywood, you can use a sheet of laminated chipboard of the appropriate thickness. The main thing is that the base is perfectly flat and does not succumb to deformation under the load of the plate.
Considering that the manufacture of the countertop will be done by hand, we need the following set of tools:
- shovel;
- bucket or other container;
- construction mixer or a concrete mixer;
- Master OK;
- jigsaw;
- screwdriver;
- grinder;
- tape measure, level, pencil.
Product drawing
The value of a quality sketch is difficult to overestimate. Correct drawing work is greatly simplified, and the wrong one adds headaches during the installation of the countertop. It is very important to accurately measure the parameters of the kitchen, the location of cabinets and plumbing fixtures. If it is necessary to place a sink or hob, then the place for their installation must be calculated down to the millimeter.
An example of a drawing of a concrete countertop
Advice! If a general design has significant dimensions, then it is better to divide it into several parts in order to simplify the process of installing the plate.
Formwork creation
We lay a sheet of plywood or chipboard on a flat surface, after which we transfer the previously prepared drawing with a ruler and a pencil. On each line we install a wooden beam 50x30 mm, so that in the end the thickness of our countertop is 50 mm. Exactly given parameter considered optimal for a concrete product: reducing the thickness will make the structure fragile, increasing it will make it too heavy.
The fastening of the formwork walls must be strong enough to withstand the load created by the concrete during its curing. It is better to connect the joints of two walls using corners or long screws (from 60 mm).
The place under the sink is located depending on the type and dimensions of the plumbing fixture. There are two types of sinks: built-in and overhead. The second option has a horizontal side about 30 mm wide, which must be taken into account when drawing up the drawing.
Advice! If you decide to make a concrete countertop for the kitchen, then it is better to use an overhead sink. Firstly, embedded models have a landing chamfer, which is not so easy to make. Secondly, the presence of a side allows you to make a small error when creating a hole for the sink.
It is also necessary to provide a hole for the mixer. For this you can use plastic pipe diameter 35 mm ( standard size mixer mounting pipe).
Formwork for pouring concrete countertops
Installation of the reinforcing frame
The frame is steel mesh with a cell size of 25x25 mm. This structure must be placed inside the formwork so that it is at a distance of 25 mm from plywood and walls.
Before mounting the reinforcing frame, a polyethylene film. Its edges must be brought to the side boards. At the same time, it is very important that the film lies without wrinkles, if you do not want to observe their imprint on the concrete slab.
Increase bearing capacity with steel frame
Pouring concrete
Do-it-yourself concrete for making countertops is made according to the classic recipe:
- 1 share of cement;
- 2 shares of sand;
- 4 shares of filler;
- 0.5 parts of water.
At the first stage, cement is mixed with water until a homogeneous mass is obtained, after which the remaining ingredients are added to the mixture. The process of concrete preparation itself must be carried out at low speeds, thoroughly mixing the solution.
Important! Do not increase the amount of water in order to fast food mixtures. Excessive moisture content in the solution will cause many pores to appear after it dries.
After filling and uniform distribution concrete over the entire area of the formwork, it is covered with a film and left in this state for a day. After 24 hours, the film is removed and a wet cloth is placed in its place to prevent cracking. Formwork can be dismantled after 48 hours.
Surface treatment
The countertop for the kitchen should be perfectly smooth, so the front side is sanded. For such purposes, it is better to use a grinder, because manual processing sandpaper surfaces will take a lot of time and effort.
First, the slab is ground with a coarse-grained wheel. After obtaining a smooth surface, processing is carried out with fine-grained emery. Even though a polished concrete countertop already looks great, it still needs to be opened with a water-repellent polymer impregnation.
The last stage is grinding with a felt wheel using a special paste, after which the plate acquires “marble” characteristics.
Grinding concrete slab for kitchen
Restoring an old countertop with concrete
Concrete can be used for more than just making monolithic slab. With its help, it is quite possible to restore the old surface. In this case, the costs in this case will be much less. Below we will consider how the restoration of the old countertop for the kitchen with our own hands is carried out.
Necessary materials
Since a too thick layer is not required in this case, we will use a concrete mixture for floor screed instead of the usual solution. For work we need the following materials:
- concrete mix for screed (finish);
- acrylic sealant;
- varnish for concrete;
- a container for preparing the mixture;
- 2 spatulas (20 mm and 10 mm);
- sandpaper;
- industrial mixer;
- Sander.
Note! The amount of concrete mix must be determined based on the coverage area. Usually, the material consumption is indicated on the packaging and averages 1.2-1.5 kg per 1 m² with a layer thickness of 1 mm.
Cement-based floor leveling mixes
Surface preparation
Countertops for the kitchen are often made of MDF, on which scratches, chips, temperature defects and grease stains appear during operation. Before applying concrete, the surface must be cleaned of all contaminants. Special attention give the remnants of fat - they can be removed with the help of kitchen detergents. If there is on the surface silicone sealant, then it should also be removed, since concrete has poor adhesion to such materials.
Once the surface is completely clean, it should be abraded with 25-H or 20-H coarse sanding paper. Purpose this process is to improve the adhesion of concrete to old surface by creating many scratches. After processing with sandpaper, the countertop must be washed and allowed to dry well.
Application of concrete mix
The technology for the manufacture of concrete mix can be read on the packaging. Usually it is diluted with water in a ratio of 2 to 1. The main thing is that the consistency is not too liquid or thick, since in this case the process of applying the solution to the plate will become more complicated.
Advice! To begin with, prepare a small portion of the mixture to determine the amount of water to obtain the optimal viscosity. In the future, strictly observe this proportion. Even slight discrepancies can affect the shade of the dried concrete.
The application of concrete on the plane of the countertop is carried out using a wide spatula, while the ends are processed with a narrow spatula. Spread the mixture over the surface using slow and smooth movements to reduce the likelihood of bubbles. The thickness of the applied layer should not be large - 1-2 mm is enough.
Spreading the concrete mix on the countertop
concrete grinding
After the layer has completely dried (about 24 hours), the concrete countertop is sanded, for which coarse-grained emery is used. Pay special attention to the smoothness of the surface - no unevenness should be felt when holding the hand.
Note! Grinding concrete is quite a dirty job. You must be prepared for the fact that the dust in the kitchen will be everywhere. Therefore, it is better not to do such work without a mask.
To make a reliable kitchen worktop with your own hands, you need to apply 3-4 layers of concrete, each of which is sanded after drying. If coarse-grained sandpaper is used to process the first layers, then last layer, in addition to roughing, is subjected to fine grinding with fine-grained emery.
Sanded concrete countertop
Waterproofing and varnishing
To protect concrete from moisture, a special acrylic-based sealant liquid is used. It is applied with an ordinary paint brush and, after drying, creates a reliable waterproofing layer. This material is very quickly absorbed and dries completely within a day, after which the second and last layer of sealant can be applied.
In order for the tabletop to have a glossy finish, after waterproofing, a layer of concrete varnish is applied, which, depending on the temperature in the room, takes from 4 to 8 hours to dry. After the varnish has dried, the plate is polished, for which fine-grained M14 sandpaper is used.
Do-it-yourself concrete countertop for the kitchen
In conclusion, we add that although the manufacturing technology of such a countertop is not particularly difficult, for its implementation it is necessary to have the skills to work with concrete. Therefore, in the absence of such construction experience, it is better to use professional help.
Video tutorial on making concrete countertops:
Detailed master class from the pros:
Concrete in kitchen interior- Inspired by design


Concrete tables are functional decorative items, which you can buy on our website at an affordable cost. Their shapes and sizes are quite diverse, which will allow you to create a unique landscape design any area.
Basically, a concrete table is used to decorate the exterior of a building. Due to the fact that it is made from natural raw materials, the product is able to withstand loads of varying intensity.
Production technology of concrete tables
The concrete table is distinguished by a rather complex manufacturing process, which uses high-tech equipment and special devices- forms. With their help, the product is given a certain look and parameters.
Initially, the concrete mass is mixed, which includes the following ingredients:
- Portland cement;
- cleaned sand;
- water with certain technical properties;
- plasticizers and other fillers.
In order for the concrete table to be endowed with a high indicator of strength and reliability, and also to have a dense structure, the cement mass is thoroughly mixed in special equipment. After that, it is poured into molds, lubricated with technical oil, and placed on a vibrating table. Then the forms filled concrete mix, are placed in the drying chambers, in which they are until the product is completely dry.
We offer you to purchase concrete tables, which are sold on our website at an affordable cost. The products meet the established quality standards, which makes it possible to operate it for a long time.
Product Features
The concrete table has the following advantages:
- moisture resistance - due to the fact that concrete has a dense structure, it is not able to absorb moisture and deform under its influence;
- strength - the product is able to withstand significant physical and mechanical loads;
- fire resistance - concrete does not burn and does not melt under the influence of high temperature conditions;
- wear resistance - tables are used for a long time and at the same time do not lose their characteristics and appearance.
For the design of the countertop, you can use any modern Decoration Materials: wood, plastic, ceramic tiles, porcelain stoneware and much more.
There is a huge variety of types of countertops, they differ both in appearance and in shape. Masters have learned to combine almost incompatible things into one whole. In many interesting works use and combine materials such as (wood, glass, metal and concrete) . In this work, the author will use three main elements, it will be wood, concrete, and metal, as the element will serve as the internal structure of the future countertop.
In order to make a similar countertop with our own hands, we need:
Tool:
- saw;
- clamp;
- level;
-putty knife;
- sponge;
- grinder with grinding discs;
- gas-burner;
- sandpaper.
Materials:
- log;
- steel fittings;
- stainless steel bolts;
- pigments for painting concrete;
- concrete polishing wax;
- polyethylene film;
- epoxy resin;
- lumber;
- the base of the table.
The first step is to choose wood. You can choose any breed that you like, or one that is available. The main thing is that the tree is strong and dried in advance.
We take a log and cut out the board. In this article wood material such a variety of wood as Cedar was chosen. We leave all the uneven side edges of the board, they are needed in order to convey the natural beauty of wood.
The thickness of the board can be used five to seven centimeters. If you do not have the right equipment and skills for sawing wood, it would be best to order this blank from the nearest sawmill.

When the board is ready, you need to sand the surface as carefully as possible. If there are any irregularities and surface recesses, they must be filled epoxy resin. In this case, you need to be as careful as possible so that there are no air bubbles in the process.


If bubbles still appear, use gas burner. We bring and warm the surface, while trying not to hold it in one place for a long time, as you can ruin the wood. We leave the board and wait until the resin dries.
When the surface is dry, take 220 grit sandpaper and go over the surface. Then polish with wax.

The next step is to make the frame of the countertop.
To do this, you need to take lumber and build an invented shape. The design should not be overall, as in the future ready product it can get heavy, but we don't need it. The inner side of the frame needs to be processed special composition, this is so that the hardened concrete subsequently easily lags behind it.
We take the board and put it in the center of the frame. We screw stainless steel bolts on the sides of the board, this is to ensure that there is maximum fixation of concrete with wood.

We put reinforcement of a certain length along the board at the bottom of the frame, this will also serve as an additional reinforcement of the product.

Next, we breed high-strength concrete mortar, while adding a special coloring pigment to it, it should evenly dissolve. When the solution is ready, pour it into finished form. This must be done very carefully. It is necessary to exclude air ingress as much as possible. There should be no gaps between the board and concrete. In order for the concrete mortar to sit best - with outer side let's go through grinder, it creates vibration, so the solution fills all the voids.

After the concrete surface has been poured, we go through the rules and level it. We leave to dry. In this case, this process should not be accelerated, just cover with polyethylene. In hot weather outside, it is advisable to wipe the surface with water using a sponge.

When the concrete has completely hardened, we remove the box and grind it with a grinder with different nozzles. From the largest we gradually move to the smallest.


After grinding, small depressions may form on the concrete, which means that during the pouring process air entered and bubbles remained. We simply fill all these recesses with a solution of concrete and let it dry, and then we grind it again.


Now we carry out wet grinding, that is, we wet the surface with water and grind it. Since the surface is slippery, you need to be as careful as possible, do not forget about safety precautions.
The final stage.
We cover the countertop with wax and carefully polish it.

Something new is constantly appearing in the creation of interior design, and the latest novelty is the elements of concrete present in various furniture, especially true in the kitchen or in the country. However, do not limit yourself to kitchen set, very original and interesting to look coffee table in the living room with concrete countertop.
And to make such a tabletop is quite simple with your own hands, and you don’t need much experience to create it, almost anyone can make it, the main thing would be desire.
- These tables are simply irreplaceable. for country furniture : do not get wet, do not deteriorate!
- , it is enough to cover a worn-out table with it - and you will get a super modern thing.
- For the kitchen - they do not deteriorate and are very durable!

Tools
In order to make a coffee table with a rectangular concrete top, we need:
- Wooden boards.
- Wire mesh for strengthening concrete.
- A piece of 1/2-inch chipboard or plywood to make the desired shape.
- Drywall.
- screws.
- Pneumatic nailer to attach the sides to the bottom panel.
- Large plastic container for mixing cement.

Instructions for making countertops
Step 1: Making the Box
No matter what size and shape the countertop will be, wire mesh should be two inches smaller in width and height than chipboard or plywood panels.
We make a box of the shape and size we need from panels and drywall. After the workpiece is completely ready, you can start mixing concrete.
Step 2: Pouring Concrete
- AT plastic container knead the cement, for this you can use an ordinary shovel, which you need to mix the mixture thoroughly.
- After that, carefully pour the concrete into the mold to half, distributing it in the corners.
- We cover wire mesh mix, and then fill the form to the top so that the mixture protrudes slightly from above. This is done so that it is easier to level the surface and make it smooth, for this purpose it is best to use a spatula.
TIP: After this, you need to leave the mold for a few days for the cement to dry completely.

Step 3: Sanding
After that, you need to remove mold and sand from the surface. To smooth the countertop, 120 grit sandpaper works well.
Then you need to wipe the surface well with a sponge, roller brush or soft cloth.
If you want to cover the surface of the coffee table with nothing, then it is best to seal the countertop with concrete sealant, then it will look very beautiful and be more practical.

Step 4: attach the tabletop to the legs
- After the top of the coffee table is completely ready, you can use absolutely any base.
- Very beautiful and practical option will be like this table on wooden legs on wheels so that it can be easily moved.
- Attaching the table top to the legs liquid nails or silicone adhesive.

So original concrete table hic will become a real decoration home decor and make the interior irresistible.
Ideas and photos of concrete countertops and tables
With a flower bed in the middle
For giving a great option - when pouring concrete, leave a gutter where you can plant flowers. Looks very amazing. 
 How to lighten the design
- Ideal option and great idea leave a hole in the middle make a glass tab. To do this, you need to cut a gutter for a glass tab.
- Also put a concrete countertop on legs with wheels- this is especially true for coffee tables which often have to be moved.


Concrete furniture has many advantages: it is durable, cheap to manufacture, environmentally friendly, suitable for both home and garden. But its main virtue is higher than everyday life - innovative designers are able to see in concrete a material for the production of furniture.
Concrete in the kitchen
German designer Rainer Spehl knows how to surprise with a non-standard approach to materials - among his projects are not only concrete furniture, but also a wooden laptop case. The designer's portfolio includes two different combinations concrete kitchen furniture. In one, a monolithic tabletop is combined with noble oak panels, in the other, with open shelves for storing supplies and utensils.

 The owner of a concrete kitchen will no longer have to spend money on a sink - most often it is cast along with the countertop.
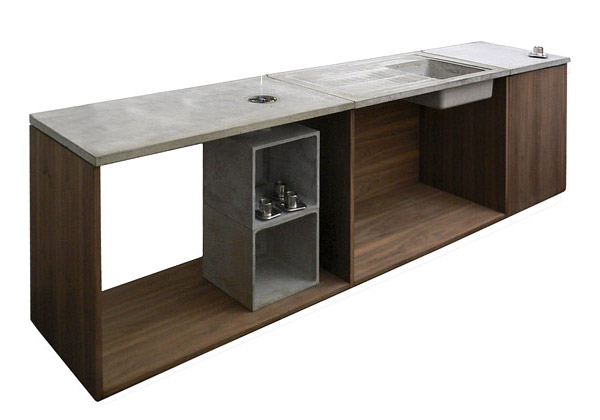
As you have already noticed, the concrete kitchen furniture is not always monolithic. But there are exceptions, for example, the Dutch designer Thomas Linssen (Thomas Linssen) came up with and created a kitchen island Concrete kitchen. The disadvantages of Concrete kitchen include immobility - a concrete table is simply impossible to budge, it is even cast where it will stand.
 Monolithic island table Сoncrete kitchen prepared for embedding hob and water supply. Side surfaces have a fabric texture (a hard synthetic fabric was used to make the mold, into which the solution was poured), and the tabletop is polished.
Cooking with pleasure is much easier when you are not doing it alone. This postulate was guided by the German designer Milena Monssen, who came up with the perfect kitchen for lovers. In such a kitchen, it is pleasant to cook and sit back: “At the end of the work surface, I provided a bench for those who prefer communication over cooking,” says Milena. “The chef himself can rest on it, and if there is a party at home, the counter can be turned into a bar with snacks.”

 remote working surface 2 meters long gives additional opportunities for storing kitchen utensils and pleasant communication.
Concrete in the interior of the living room and dining room
Design studio Metrofarm (Germany), which is not indifferent to concrete, produces laconic tables and benches, as well as concrete tiles. Furniture legs are made from reinforced concrete, and the central part of the bench can be wooden or upholstered - since all the furniture is made by hand, it can be adapted to the customer's requirements as much as possible. The thickness of the concrete is only 6 cm, Metrofarm furniture can be moved quite easily.
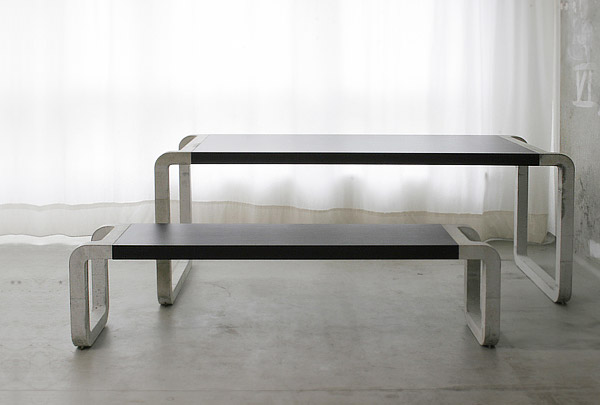
 Metrofarm furniture has been shown at many international exhibitions - ICFF New-York, Tokyodesignersblock and Salone DEL MOBILE Milano.
Practice shows that once having fallen in love with concrete, the designer returns to it again and again. The Frenchman Philippe Tissot tried to work with this material, and then founded the Tapor o studio, which produces several dozen types of concrete furniture.

 In the portfolio Taporo hand painted dinner table Beton & Peinture, SQKub Croco coffee table with crocodile texture on the top, wall consoles, designer fireplaces and finishing materials.
 The Migration table is a limited edition. The Taporo limited edition features projects made in collaboration with young artists and designers.
American Michael Littlefield founded Melange studio in 2006. He fell in love with concrete much earlier, when, as a five-year-old boy, he was busy at the construction site of his parents' house and saw how the screed was being poured in the garage.
 “I really like to create the illusion of a significant mass in our magazines and coffee tables says Michael Littlefield. “To be honest, they are really heavy, but they can be moved.”


Melange studio, like many American companies, strives to be "green", the portfolio of the company is dominated by projects where concrete is combined with natural stone, shells and tree. One of the few objects that stand out from the ecological canvas is a chair made of concrete and plexiglass, which the creators themselves attribute to sculpture, and not to furniture.

Concrete in the interior of the office
Another carrier of the ideas of "green" design is the Arizona