How to build a fence. How to make a fence in the country
One of the most inexpensive fences for a summer residence or a private house - from corrugated board. Its design is simple - dug-in poles to which transverse logs are attached. A profiled sheet is attached to this lattice with self-tapping screws or rivets. Everything is really easy, especially if you know how to use welding machine. Although there is a technology without welding - on bolts or on wooden crossbars. In any case, you can build a fence from corrugated board with your own hands. You can do all the work, if necessary, alone, but when installing sheets it is more convenient with an assistant.
Construction with metal poles
The simplest production is a fence with metal poles dug into the ground. You can use round or square pipes, but it is more convenient to work with square - profiled ones.
The length of the posts is taken depending on the desired height of the fence, plus from 1 to 1.5 meters is added for penetration into the ground. It is necessary to dig into the ground below the freezing depth of the soil. For each region, the soil freezes to a different depth, but in middle lane In Russia, this is about 1.2 m. When determining the depth to which you bury pipes, it is better to play it safe and make the holes deeper. Otherwise, the forces of winter heaving of the rack will simply be pushed out, and your fence will fall down (see photo).

For pillars, they usually take a profiled pipe with a section of 60 * 60 mm with a wall thickness of 3 mm. The distance between the posts is from 2 to 3 meters. The greater the thickness of the profiled sheet, the less often you can put poles. If the soil is hard to dig, it makes sense to make the distances larger, otherwise you can save on the purchase of metal - the thinner, the cheaper and the price difference is significant.
Logs for a fence from a professional sheet are made from a profile pipe 40 * 20 or 30 * 20 mm. The second option is wooden blocks 70*40 or so. When using wood, a significant amount is saved, but the tree disappears faster, and besides, it warps from moisture. Most likely in a few years you will have to change the lags, and they will already be metal. But as an economy option for several years will go.

When making a do-it-yourself fence from corrugated board with wooden logs, do not forget to carefully treat the wood with an antibacterial compound (for example, Senezh Ultra). It is better to do this in the bathroom - immerse the bars for 20 minutes in the solution completely. So they will last longer.
The number of lags depends on the height of the fence. Up to 2 meters - two are enough, from 2.2 to 3.0 meters you need 3 guides, even higher - 4.
Ways of fastening the lag to the poles
Metal logs are welded either between the pillars or in front. The first method is more laborious, and more waste is obtained: you have to cut the pipes into pieces. But with this arrangement of the lag, the structure turns out to be more rigid: each pillar serves as a support for the sheet and it “walks” less, if desired, a couple of additional fasteners can be placed along it.
If you weld pipes in front of the pole (from the side of the street), there is less work, but you still have to cut and there will be waste: it is necessary that the weld of the two sections falls on the pole. Unless you guess the distance so that they lie flat. Then you buy materials in advance, and then calculate the installation step of the pillars.

For fastening wooden bars, holders are welded in front or on the sides - metal corners or U-shaped guides. Holes are then drilled into them and fastened with bolts or self-tapping screws.
There is an option to assemble a fence from corrugated board without welding. There is a special fastener for this, which is called the X-bracket. This is a cross-shaped plate with curved edges, which is mounted on self-tapping screws.


Decking for fences
For fences, a profiled sheet marked C is used - for fences and walls. There are also H and HC, but they are not suitable for fences - these are more roofing materials. It is rare to find markings A and R, profiles A can be used for fences.
In the marking after the letter there is a number - from 8 to 35. It indicates the height of the rib in millimeters. So C8 means that the profiled sheet is intended for a fence, and the wave height is 8 mm. The higher the wave height, the more rigid the surface will be. In strong winds, take at least C10, and even C20.
Sheet thickness - from 0.4 to 0.8 mm. Most best option- thickness 0.45 mm or 0.5 mm. They are suitable for fences up to 2.5 m in height. If you need a higher one, take at least 0.6 mm.
The height of the sheet is usually around 2 meters, you can find 2.5 m. The width is very different - from 40 cm to 12 meters. Different factories produce corrugated board of various formats.

Decking can be galvanized or painted (painted is 15-25% more expensive than galvanized). Paint is applied in two types: powder and polymer coating. Powder coating is more durable, but also more expensive.
There are sheets painted on one side - on the second there is galvanization coated with gray primer, there are - on two. Double-sided coating is naturally more expensive than single-sided painting, but the view is better, and the service life is longer.

Support pipes and logs for the fence are usually primed, then painted. And it somehow happened that they were painted with dark paint. Having then attached a profiled sheet painted on one side to them, they get a clearly visible “skeleton” on a light gray background. On the small area this is critical. Pay attention, and when building a fence from corrugated board with your own hands, paint load-bearing frame in light grey. The result will please you: it looks much better from the yard.
How to fasten the profiled sheet to the frame
Fasten the sheet with screws or rivets. Self-tapping screws for profiled sheet are galvanized, there are painted. Pick them up to match the color of the fence. Tighten with a screwdriver using a nozzle.
The installation step depends on the wavelength and the height of the fence. The higher the fence, the more often you need to install fasteners. It holds normally if fastened through a wave to increase strength, with two lags it can be fastened in a checkerboard pattern, and not one above the other.
During installation, it is important to set the first sheet vertically. Then all the rest will be installed without problems. When laying sheets, the next one enters the one already installed on the 1st wave. Attached to the bottom of the wave. It is necessary to install the self-tapping screw strictly perpendicularly. Then the hole is covered with a washer and precipitation will not cause peeling of the paint.
For information on how one can attach a profiled sheet to a fence, see the video.
Do-it-yourself fence from corrugated board: photo report
A fence was built from the neighbors and frontal. The total length is 50 meters, the height is 2.5 m. A brown profiled sheet is used on the front, and galvanized on the boundary, thickness 0.5 mm, grade C8.
In addition, the following materials went:
- profiled pipe 60 * 60 mm, wall thickness 2 mm, pipes 3 m long for poles;
- 80 * 80 mm with a wall of 3 mm were placed on the gate posts and gates;
- logs 30 * 30 mm;
- gate frame and gates 40*40 mm;

A ready-made fence from corrugated board was built by one person with his own hands
The fence is mounted on metal poles, between which the plinth is then poured. The owners need it, since it is planned to set up a flower garden in front of the fence (you can see the fence made under it). It is also needed so that water does not flood the yard during heavy rains. Metal sheets are not fastened immediately from the ground, but slightly retreated. This gap is closed with a die-cut - a tape that remains in some industries. This is done on purpose so as not to block the access of air, so that the earth dries out faster.

Metal preparation
The first stage is the preparation of pipes. From the warehouse, the pipe comes rusty, so that it serves for a long time, you have to clean off the rust, then treat it with Antirust and then paint it. It is more convenient to first prepare all the pipes, prime and paint, then just start the installation. Rust was cleaned with a metal brush mounted on a grinder.

The pipes in the warehouse were only 6 meters long. Since the height of the fence is 2.5 meters, you need to bury another 1.3 meters, the total length of the post should be 3.8 meters. To save money, they cut it in half into 3-meter pieces, and the missing pieces were added with various scrap metal available on the farm: trimming corners, fittings, pieces different pipes. Then everything was cleaned, primed and painted.
Pole installation
The first two corner posts were placed. Pits were drilled with a drill bought in a store. The soil is normal, one hole 1.3 meters deep took about 20 minutes.

The first pillar was set horizontally and so that it rose above the ground to a height of 2.5 meters. To set the second one, it was necessary to beat off the height. Used a water level. It must be filled in so that there are no bubbles - from a bucket, and not from the tap, otherwise it will lie.
They put up the second pillar at the broken mark (applied to the bar, which was placed next to the hole) and concreted. When the cement had set, a twine was pulled between the posts, along which all the rest were aligned.
The filling technology was standard: a double-folded roofing felt was installed in the hole. A pipe was placed inside, poured with concrete (M250) and set up vertically. The level was controlled by a plumb line. It is very important to set the posts correctly, otherwise the entire fence will warp.
In the process of work, it turned out several times that concrete was poured not inside the rolled roofing material, but between it and the walls of the pit. Raking it out of there is a small pleasure, because the protruding part was cut into petals, nailed to the ground with large nails. Problem solved.

After the concrete had set, they made a portable formwork from boards covered with a dense film. With their help, the basement was filled. To make it stronger, reinforcing bars are welded to the posts on both sides from the bottom. Formwork was placed around them.

Jumper setting
Cleaned, primed and painted pipes for the crossbars were cut and welded. Cooked between the pillars. They are also tedious to put in a level to make it easier to mount.

After the welding is completed, all welding points are cleaned with a wire brush, treated with "Anti-rust" and then painted.
Profiled sheet installation
Since the top jumper runs along the very top of the fence, and it is welded exactly to the level, there were no problems with leveling and installing the sheets. Fastened first along the edges, then installed intermediate screws. To make it easier to put them evenly, a thread was pulled between the extreme ones.

Smooth installed fasteners- nice too
After the gates were welded and attached. How final touch- mounted on top additional elements- U-shaped profile covering the top of the fence and plugs on the pipes.

As you understand, there is nothing particularly complicated. It is important to set the posts evenly and weld the frame. This is the main task. A lot of time - about 60% is spent on preparing pipes - cleaning, priming, painting.
Fence made of profiled sheet with brick pillars

Of course, a fence with brick pillars looks more decorative. You can do it if you want, but it will take more time. There are two options:
- Make a full-fledged strip foundation. But it is long and expensive. On well-drained soils, you can make a shallow foundation, on heaving soils you will have to dig in below the freezing depth of the soil. And although the tape will not be wide, there is a lot of work - dig a trench for the entire length of the fence, put up formwork, knit reinforcement, fill it and then finish it. Put brick pillars on top. Strong, reliable, but expensive.
- Make according to the scheme described above: bearing pillars with a base. Bricks are laid around the pillars. This method is less costly. About,

The whole technology is the same, only the reinforcement will be required more rigid - two belts of two bars with a diameter of 10-12 mm. It will be necessary to install embedded elements in the pillars, to which the guides will be attached. They (mortgages) can be welded to the pipe after it has been exposed and the mortar has set.
Photo of the design of the fences from the profiled sheet
Often a profiled sheet is combined with forging, sometimes a frame is welded from a profile pipe, a profiled sheet is mounted in it and all this is decorated with metal patterns - forged or welded. Another option to make the fence non-standard is to install the wave not vertically, but horizontally. A small, seemingly change, but the view is different. Some ideas in the photo gallery below.
The fence of the site plays not only a protective, but also a decorative role. Due to the variety of materials on the modern market, it is possible to build a fence not only from wood or chain-link mesh, but also from brick or corrugated board.
You can find instructions, ideas and drawings for building a fence with your own hands in this article. It contains useful information for those who want to make strong and beautiful fence for the site.
DIY fence
Permanent fences are subject to both general and statutory requirements. Among the common ones are:
- Reliability of supports, their resistance to wind loads, as well as to rain and melt water;
- Lack of shading of residential buildings and green spaces;
- Careful appearance;
- The erection of deaf fences is allowed only from the side of the street.
Guided by these requirements, you will be able to independently create a project and build a fence on the site, choosing the most suitable material for this.
How to make a wooden fence
AT recent times wooden fences are becoming less and less common, because wood is being replaced more modern building materials having high quality. However, a picket fence structure is often erected on summer cottages, because it combines ease of construction with an attractive appearance and low cost.
Installation materials
To build a wooden picket fence, you will need the following materials:
- Wooden poles for supports;
- Trimmed or planed boards, the length of which depends on the estimated height of the future structure;
- A beam, 2 - 2.5 m long and 40x40 in section;
- Cord and stakes for marking;
- Construction nails (screws);
- Crushed stone (concrete) for mounting pillars;
- Ruberoid (roofing felt) for waterproofing supports.
In addition, you will need an antiseptic or bituminous mastic to process the pillars. Without this, the supports can quickly fail, and the integrity of the structure will be compromised.
Construction of a wooden fence
With the budget cost of a wooden fence, it can serve its owner from 10 to 15 years. In addition, its construction does not require special building skills, so it is quite possible to do all the work yourself without spending money on the services of professional builders.

Stages of building a wooden fence
Consider the sequence of work during construction wooden fence from the picket fence:
- Performing markings with determining the locations of the pillars (2-3 meters apart);
- Preparation of wooden poles for installation in the soil: treatment with an antiseptic and bituminous mastic. Alternatively, wrapping the ends of the supports with roofing paper or roofing material can be used;
- Digging recesses for supports in accordance with the markings. In this case, the depth of the submerged support must be at least a quarter of the total height of the structure;
- Arrangement of a sand and gravel cushion at the bottom of the recesses. Its thickness should be from 10 to 25 cm. It is mandatory to spill the layer with water and thoroughly compact it;
- Installation of supports and their concreting;
- Fastening a wooden beam to the installed supports after the concrete has hardened;
- Fastening shtaketin to transverse bars. In this case, the minimum distance from each picket fence to the ground surface should be at least 5 cm.
At the final stage, the wooden structure is treated with colorless mastic, impregnation or oil paint.
How to make a chain-link fence with your own hands
In the conditions of small summer cottages, due to the risk of shading, it is impossible to build fences from corrugated board, slate or brick. In this case, the chain-link mesh becomes indispensable, the fence from which does not prevent the sun from entering the site and passes air well.
In addition, the netting is inexpensive, but it lasts a long time. Let us consider in more detail the features of the construction of a structure made of this material.
Construction of a chain-link fence
by the most in a simple way the construction of a chain-link fence is to fix it between posts made of various materials (metal, wood, concrete). In this case, the optimal distance between the supports is 2.5 meters, and their height is calculated in a special way.
To the width of the grid add the height of the clearance from the fence to the ground (5 - 10 cm) and an additional meter and a half. The resulting number will indicate the average height of the column. At the same time, the length of the corner posts exceeds the rest by 20 cm, since these supports carry a large load, and therefore they need to be buried deeper.
If you are using wooden posts, be sure to treat them with an antiseptic before installing. It is also recommended to concrete the bases of all installed supports for greater stability.
Further, hooks for mounting the mesh are attached to the supports with the help of screws, nails, wire, welding. The grid begins to be installed from the corner post, straightening it from post to post and hanging on hooks with a rod. Then, reinforcement is threaded into the grid from above and below, located horizontally, at a distance of 5 cm from the edges, and the rods are welded (attached) to the poles. Construction work is completed by bending the hooks and painting the supports.
Stages of work in the sectional construction of the fence
Another option for building a chain-link fence is to attach it to sections. As in the case of the tension model, work begins with the marking and installation of pillars. Then proceed to the manufacture of the frame. For him, you need a corner measuring 40/5 mm.

Chain link fence construction plan
Next, you need to calculate the right dimensions frame. To determine the length of the section, it is necessary to subtract 10-15 cm from the distance between the posts, and to calculate the width, the same number is subtracted from the height of the support above the soil level. In accordance with the calculations, the corners are welded into a rectangular structure and the mesh is fixed, forming sections. Then, between the pillars, it is necessary to fix metal strips, 15-25 cm long, 5 cm wide and 5 mm in cross section. Finished sections are welded to these strips. The work is completed by painting metal elements.
How to build a fence from corrugated board
Fences from a professional flooring enjoy wide popularity thanks to a number of advantages. Profiled sheets are reliable and durable, and their color range and various sizes can satisfy even the most demanding consumer. Such a fence protects well from dust, wind and noise, it is easy to install, and the service life is quite a long time.
This material is great for building a stepped fence on a site that gives a slope. With some building skills, it is quite possible to build such a structure from corrugated board on your site. Let's see how it's done.
Fence Installation
The construction of a fence from a profiled sheet begins with precise marking and installation of pillars. You should know that in this case, the supports are installed at a distance of no more than 3 meters from each other. For these purposes, pipes with a square or round section can be used. In the first case, their size should be 50/50 mm, in the second - at least 76 mm. The upper holes of such supports must be welded to prevent moisture from entering them.

Stages of erecting a fence from corrugated board
To install the pillars, you will need pits with a depth of 1 to 1.5 meters and a width of 15 cm, which depends on the height of the fence and the diameter of the supports themselves. The bottom of the pits must be covered with gravel of the middle fraction, then the pillars must be strictly vertically installed and concreted. In the case of soil, where ground water come too close, to install the pillars, you will have to build a strip foundation. It consists of a box, 20 cm high, the boards of which are fastened with bars or wire. The walls of the box are covered with a layer waterproofing material and filled with concrete. After the solution has completely solidified, they proceed to the installation of the lag - transverse strips, to which the profiled sheets will be attached. As a log, you can use a profiled pipe with a cross section of 40/25 mm. At the same time, the number of logs depends on the height of the future fence: with a height of up to 1.7 m, you will need to install two logs, with a higher height - three.
The upper and lower lags are attached at a distance of 4 cm from the top of the sheet and the edge of the earth. mounted in this way metal constructions must be treated with a special primer to protect against rust. Sheets of corrugated board are attached to the logs with the help of metal screws. In this case, the joining of the sheets is overlapped.
What is needed for construction
For self-assembly, you will need the following materials and tools:
- Sheets of corrugated board;
- Pipes for support pillars;
- Pipes for log;
- Cement, crushed stone, sand for the preparation of concrete mortar;
- Rope, level;
- Primer;
- Welding machine;
- Solution container;
- Drill and drill;
- Riveter with rivets or self-tapping screws
- Antiseptic and bituminous primer for wooden poles.
How to make a brick fence: video
Brick fences retain their popularity due to their strength, durability and decorative effect. However, this type of fencing is expensive and requires special construction skills. Therefore, most often the canvas is made combined using various materials.
Construction stages include:
- The choice of material and the calculation of its quantity
- Drafting
- Marking on the ground
- Foundation laying
- Bricklaying
- Plastering
Since the construction of a brick fence requires certain skills, we recommend that you familiarize yourself with the video, which shows the main stages of this process.
A foundation is needed to build a fence. At the same time, its appearance depends on several factors: the type of soil, the type of supporting structures, and the material of the canvas. It should be borne in mind that the foundation must withstand the loads applied to it from the side. environment, soil and the fence itself. Therefore, it is so important to choose the right type of foundation. For example, a tape type is required for brick and concrete fences. Under the fence of corrugated board, it will be enough to lay a point foundation at the installation sites of the supports. Let's take a closer look at the construction technology different types foundation.
The laying of the strip foundation is preceded by marking along the perimeter of the site with the help of pegs and twine. This is followed by digging a trench according to the markings. At the same time, its depth reaches half a meter, and the width should not be less than the thickness of the future fence. The bottom of the moat is covered with a mixture of sand and gravel, after which it is rammed.
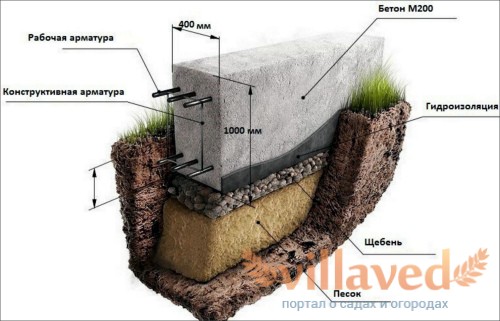
The main components of the foundation
This is followed by the execution of formwork from boards, the height of which above the ground is about 15 cm. At the same time, you should know that its inner surface must remain smooth, therefore all fastenings of the boards are made from the outside. Fittings are laid inside the box: cuttings of pipes, metal, reinforcing mesh. In the places where the supports are installed, the reinforcement should form a three-dimensional structure.
The next step is pouring the formwork. concrete mortar, its alignment and removal of air bubbles. At the end of the concrete hardening (after 1-2 weeks), the formwork is removed, however construction works do not continue, since the foundation will still gain strength for about a month and cannot be disturbed. Only after the final installation, you can proceed with the installation of the fence itself.
For light types of fences use pile foundation, raising it in the following sequence:
- Site marking;
- Drilling wells for supports, with a depth of 0.8 m for the fence and a diameter of about 20 cm;
- Laying a sand and gravel cushion in wells, from 10 to 15 cm high;
- Installation of supports with their preliminary processing (if necessary), their fixing with props;
- Concreting of pillars from the outside;
- Concreting of wells from the inside to the ground level;
- Further construction of the fence after the concrete mortar has completely solidified.
fence posts
Support posts play an important role in the process of arranging any fence, because they not only increase the strength of any structure, but also complement it in style. Therefore, it is so important to choose the most optimal type of supports during the construction of the fence.
Types of pillars
Most often, wooden, brick and metal poles are used as supports. The choice of material depends not only on financial capabilities, but is also determined by the expected load that is created by the sections, as well as mechanical and wind loads.
So, metal poles are universal, since they can be mounted on both sections of the chain-link mesh, and wooden picket fence and corrugated board. In addition, metal poles have a long service life (up to 50 years). Wooden supports, on the contrary, can last no more than 20 years even with proper processing due to the tendency to rot. Therefore, wood poles are recommended for use in the construction of temporary fences, front gardens, or low hedges. Brick (concrete) pillars are erected during the construction of heavy fences, however, in some cases they are used for decorative purposes.
Installation methods
The installation of pillars can be carried out in several ways, the choice of which depends on the design features of the fence and the nature of the soil. So, metal, reinforced concrete and wooden structures on soils with low level occurrence groundwater, mounted in a universal way. This means that a hole of the appropriate size is drilled (dug out) under each support, a pole is installed, and the remaining space is filled with concrete mortar.
The easiest and cheapest way is to drive poles with the help of the so-called "headstock". In this case, the supports are installed on a tape or columnar foundation. Another option is to use piles that are easy to install. manually, and serve reliable support for heavy structures of the fence.
Materials for building a fence
As mentioned above, you can build a fence from almost any material. For small areas, a chain-link mesh is most often used, but if the design needs to be more reliable, preference should be given to wood products.
Brick fences are considered the most reliable, but their installation requires special construction skills or the involvement of specialists. One of the simplest and most modern is considered to be a fence made of corrugated board, which is easy to install, but has a long service life.
Calculation
Performing the calculation of the foundation for the fence is a rather complicated process and requires special knowledge. In addition, you should know the features of the soil on which the fence will be located, the prevailing direction and strength of the wind. Therefore, if you are building a fence yourself, it would be best to resort to a combined tape-point foundation, which is considered the most reliable. With this design, any type of load will be distributed over the entire length of the fence.
Let's give a simple calculation of the fence from corrugated board. With a span length of 2.5 meters and a height of 160 cm, the area of \u200b\u200bthe sheet of corrugated board will be 4 sq.m. Considering the magnitude aerodynamic coefficient for flat vertical surfaces (1.4) and the magnitude of the dynamic wind pressure (about 40 kg), the wind load will be 224 kg per support. Having distributed the load evenly over the entire surface of the fence, and taking into account the coefficient of resistance (225), we obtain the depth of the foundation, equal to 80 cm.
However, it should be noted that this calculation was made without taking into account the characteristics of the soil. Therefore, in practice, the foundation is buried to the depth of soil freezing for each specific area. Most often it is 120 cm and guarantees a solid installation of the pillars.
What boards to choose for sheathing
As the lining of the fence most often choose inexpensive not edged boards. They can be placed vertically or horizontally. The first option is considered the simplest. In this case, horizontal crossbars are attached between the supports, and pickets from boards are attached to them.
It is worth considering that a wooden fence can be through or deaf. In the first case, a certain distance is left between the boards, and in the second, they are nailed tightly on both sides of a horizontally located beam.
Before installation, the boards must be carefully inspected and cleaned. A width of 20 cm is considered optimal, since in this case the material will not dry out or crack.
Fence sheathing calculation
The main structural elements of any fence are the foundation, supports and materials that will be used to sew up the spans. But if to calculate wooden planks the calculation is simple (the width of the span and the board is measured, and the distance between the pickets is determined), then for products from corrugated board, calculate required amount sheets need to be more carefully.

An example of calculating materials for building a fence
First of all, you should decide how the sheets will be attached, and what brand of corrugated board you will use. The last point is especially important, since the sheets of different brands have different widths.
Consider a few common calculation options:
- Horizontal placement without gaps for supports: in this case, the brand of the sheet does not matter. The only thing to consider is the overlap on the poles (subtracted from the length of the sheet). This indicator should be half the width of the support plus 10-15 mm.
- Horizontal fastening with gaps for supports: with this arrangement, the calculation is carried out similarly to the first example, with the only difference being that no margin for overlap is left. In other words, you need to measure the width of the span, and buy sheets 10-20 mm less than the figure obtained. This will allow you to build an even and symmetrical fence, even if there are bumps on the support posts.
- Vertical fastening without gaps for poles requires careful calculations. First of all, it is necessary to determine the working width of the sheet, since the width of one span will depend on this indicator. Further, depending on this indicator, sheets of suitable width are selected and multiplied by the number of spans. For example, if 3 sheets are required for one span, then 15 sheets are required for a fence of 5 spans.
However, with a vertical mounting method, there is a risk of uneven material consumption and the formation of a large amount of waste, therefore, when buying a profiled sheet, a small margin should be made.
construction tool
To build a fence, you will need a standard set of tools. First of all - a tape measure for taking the necessary measurements, as well as a drill for digging holes for supports.
In addition, you need to prepare a drill, a screwdriver and fasteners (self-tapping screws) to fix the structural elements together. It is better not to use a grinder for cutting profiled sheets, as it leads to heating of the metal and a violation of the integrity protective coating. For this purpose, it is better to use electric shears for metal.
How to make a budget fence
There are situations when the site must be protected, but there are no extra financial resources for the construction of a brick or corrugated fence. In this case, it is better to give preference wooden products or chain-link fences.
It should be borne in mind that a wooden fence needs to be painted regularly, and a mesh fence has a decorative rather than a protective function, and can only serve as a temporary structure or delimiter for several areas.
Protection personal plot from prying eyes, winds and precipitation with a fence - a paramount task. It can be built from materials of various quality: brick, mesh, wood, artificial decorative rock etc. But, if cost issues are relevant, you should choose a profiled sheet. The material has many advantages. But, most importantly, even a novice builder can make a fence from corrugated board with his own hands. Sheet plates have a small mass, so you do not need to hire assistants and special equipment. Their installation is carried out with standard fasteners according to a simple scheme. Let's find out how else you can save on a fence from a profiled sheet, and how to build it yourself.
What can you save on?
The lion's share of the budget will go to the purchase of profiled sheets. Seriously saving on its quality is not worth it, especially if a country fence is installed in order to block access to the site to intruders.
You can cut costs by:
- Proper calculation of the required volume of building materials. Especially profiled. If you reduce the volume of waste to a minimum, then the final savings will be at least 12%;
- Do-it-yourself fence installation without the involvement of craftsmen. Relatives can help at the stage of driving support pillars;
- Drawing up a competent design of the enclosing structure. You will need to take measurements, draw a diagram and mark the territory. Strict adherence to the plan will eliminate installation errors, which means additional expenses;
- Stages of work that can be done independently;
- Ordering a profiled sheet in the amount necessary for the construction of the fence. This will require accurate measurements and calculations. No need to buy material with a large margin. The remains will then have to be thrown away or stored for the entire service life.
And if you purchase materials for the construction of a fence in winter period- from December to February, - you will have to make smaller compromises in quality. In the "non-construction" period, the cost of all building materials without exception decreases by approximately 12-45%. Many manufacturers of profiled sheets in the off-season offer free shipping. Therefore, before ordering building materials, it is worth studying the maximum of offers.
The foundation for the fence from the profiled sheet
By itself, the enclosing structure made of profiled sheet does not need a foundation. The main material is quite light - from 5.9 to 11.2 kg / m.p. Such a load can easily withstand the supporting pillars, which will definitely have to be installed. The foundation is poured in the event that high aesthetic requirements are imposed on the fence from the profiled sheet in the country and, if sheet material will be hung in close proximity to the edge of the ground. In the first case, the whole structure will look more neat and elegant, and in the second, it will last longer.
If there is no foundation, and the lower edge of the profiled sheet rests on the ground, then in winter the material will probably be deformed. At low temperatures, the water in the soil freezes and provokes the process of soil heaving. Simply put, the ice pushes the fragments out, which in 9 out of 10 cases deforms the profiled sheet.
If the country fence should only protect the site, then you can save on the foundation by applying one trick. Under the lower edge of the corrugated board, they dig a trench up to 10-15 cm thick and about 30-50 cm deep. Ordinary sand is tamped into it. The better it is compacted, the better the profiled sheet on the fence is protected from deformation. No foundation costs - minus another 45% of expenses.
You can buy corrugated board in Perm from the manufacturer at a low price at the Novy Dom company.
Save on poles and lags
Support posts and logs - stability and reliability of the fence. Therefore, it is better not to save much on their purchase. The standard version of the supports is profile pipes 60 × 60 × 2.5 mm. But if the fence is no frills, then 40 × 40 × 1.5 mm supports will be enough to hold the profiled sheets. Strictly adhering to the recommendations for installation, it is easy to get a strong and reliable enclosing structure.
To invest in the budget, you can make a fence from a profiled sheet with your own hands from used pipes. They will cost half as much as new products, but you need to know which ones to choose. Most suitable option- tubing pipes. They are dismantled at the end of their service life in excellent condition. The thickness of the pipe is sufficient to withstand a light metal fence. When buying, you need to check the products for the presence of foci of corrosion and rust. After installation, paint with protective coatings.
But wooden poles it is better not to use it as a base. A cheap fence made of profiled sheet with such elements will not last more than 5 years. Of course, you can choose thick oak or hardwood timber (wood that perfectly resists weather and climatic stresses). With such a support, the service life of the fence will be much longer, but it will not work to reduce the cost of construction. wooden beam it is necessary to additionally process with special compounds, otherwise it will quickly rot and warp. Annual care will also cost a pretty penny. And the cost of a bar is much higher than a profile pipe.
Worth stopping and using wooden lag with metal poles. In this case, you will have to order additional metal brackets for attaching the slats. This is an extra expense and a longer installation of the fence.
You can save on the number of support pillars. The recommended distance between supports is 2-2.5 meters. If a profiled sheet with a profile height of 21 mm or more is chosen for the construction of the fence, then this parameter can easily be increased to 3 m. But, if the profile is low, then compensate long distance between the pillars will have additional lags.
How to save money on the corrugated board itself?

It is not worth saving on the quality of a profiled sheet for a fence, but you can competently approach its choice. Competently - means, taking into account the purpose of the structure and the main requirements for it. For example, you can make a purchase of an ordinary galvanized sheet without a colored polymer coating. Costs will be reduced by approximately 14-29%. The external design data will not be so expressive, but over time, this drawback can be eliminated on your own by painting the corrugated fence with a protective one. paintwork material. It is better not to buy non-galvanized sheets, since it will not work to galvanize them at home.
A fence made of profiled sheets of grade C10, C12 or C14 (wall with a corrugation height of 10, 12 and 14 millimeters) will be cheaper. Savings will be somewhere around 19-31%. During the construction of structures enclosing the territory, it is recommended to buy corrugated wall grades with a corrugation height of 20 mm - C20, HC35, C21 or C44. Metal thickness 0.5-0.8 mm. The brand is selected according to the height of the fence. The higher it is (from 2.1 m), the more corrugation on the sheet, otherwise the fence will not be able to withstand even medium wind loads (large sheet windage).
You can reduce the cost of construction by ordering a professional sheet with a thickness of 0.45 mm. Saving about 13-17 rubles. on every running meter. Optimal Thickness material 0.6 mm. But even 0.45 mm is perfect if you calculate the dimensions correctly. It is believed that the building envelope should have a height of 2 m. Usually 2.1-2.3 m. But if you make a fence of corrugated board 1.8-2 m high, then there will be no significant loss in its reliability and practicality. With such dimensions of the structure, it will be possible to reduce costs by 7-10%.
We minimize the cost of installing a profiled sheet
It will be much cheaper to build a fence from corrugated board with your own hands. Savings of approximately 15-20%. But this is taking into account that the builder has at least minimal skills, otherwise correcting errors will cost 3 times more than paying for the services of professionals. Therefore, it will be cheaper to build a fence for those summer residents who know how to work with their hands and have the necessary tools:
- Drills and concrete mixer;
- Welding machine in case you have to weld brackets for logs;
- Reinforcement and everything for its knitting - when pouring the foundation;
- Self-tapping screws, etc.
Decide on the missing equipment should be in advance, otherwise the process will end before it starts. When installing a fence from a profiled sheet, its future external data must also be taken into account. Therefore, the work is carried out, adhering to the instructions, and carefully.
Installation of a fence from a professional flooring

The installation of the building envelope begins with the purchase of the necessary building materials. Would need:
- support pillars;
- Crossbars, or logs. profile pipe 40 × 20 × 2 mm (best option). The length of the lag should be equal to the distance between the supporting pillars;
- profiled sheets;
- Plugs for supporting pillars;
- holders. Elements that will save on welding;
- Roofing screws and bolts.
To give the fence a complete look, you can install the end U-shaped strip along the upper edge of the profiled sheet. But this is not necessary with a modest budget. The plank has no essential functional feature. It is also worth taking care of the purchase of sand, gravel and cement in advance. These building materials will also come in handy if the foundation is not organized.
foundation for a fence
If it is difficult to decide on the need to fill the base under the fence, carefully read the photo in the article. Enclosing structures with and without a foundation look different.

It is easier, faster and cheaper to pour a strip foundation. It is versatile and suitable for all types of soil. At the initial stage, the territory is marked out - the border of the site is marked, the location of the supporting pillars and functional elements of the fence, for example, gates or gates, is marked. It will not work to make a high-quality fence from corrugated board with your own hands without excavation. Therefore, after marking the territory, they begin to dig a trench along the installation line of the fence. The depth of the ditch is 45-50 cm. In places where the support pillars are to be installed, they are buried to a depth of 90 cm. The following instructions follow:
- Installing formwork inside the trench. It can be made from improvised materials. The formwork is installed so that the foundation protrudes 40 cm above the ground level;
- Rebar laying;
- Setting up pillars;
- Pouring concrete.

After completing the pour, the foundation is left for 17-21 days. The formwork is not removed until the concrete reaches 55% strength. But it is better to withstand the entire 24-day period.
Installation of poles and lags
Pillar pouring will allow you to complete the work faster. Would need:
- Dig holes up to 1.5 m deep at a distance of 1.5-3 m from each other. The diameter of the ditch is 3 times the diameter of the pipe;
- At the bottom of the pits, make pillows of rubble and sand;
- Clog pipes;
- Fill holes with pipes placed in them cement mortar with gravel;
- Wait until the concrete hardens.
When marking the territory, do not forget about the sand cushion. If additional excavation you don’t want to spend or don’t have time, you need to raise the profiled sheets of the fence above ground level by 10-15 cm. In case of uneven terrain, this parameter must be increased so that the installation line of the flooring is even.
The lags are attached after the concrete has completely hardened. Their number depends on the height of the fence. For fencing up to 1.5 m, one crossbar is sufficient. With a height of up to 1.7 m, two crossbars are needed. And the reliability of the fence with a height of 1.8-2.1 m will be provided by three logs. They are installed along the upper and lower edges of the profiled sheet, departing from the edges of 4-7 cm, as well as in the center.
We fix the fence from the profiled sheet
To properly make a fence from a profiled sheet with your own hands, you need to seriously approach the choice of fasteners. The easiest way to fix the flooring is with self-tapping screws. You will need 35 mm metal fasteners with flat caps. wall material will hold securely if you place the screws at a distance of 50 cm from each other on each crossbar. Installation of sheets at the joints is carried out with an overlap.
The final stage of work is the fastening of the U-shaped bar. When installing profiled sheets, there is a high probability of damage to the galvanized surface. If this happens, the defect must be immediately eliminated by painting the fence. Self installation building envelope will take about 1.5-4 weeks. Terms depend on the dimensions of the fence and the skill of the builder.
In this article we will talk about the advantages and disadvantages of certain types of fences, and about building a fence with your own hands.
So, you are the happy owner of a new land plot! Work - no end, but it is a very pleasant job. Where will you start? From the construction of the fence, of course! If you have enough funds, it is better to hire specialists (although it is not a fact that they will do it qualitatively and “for centuries”). But if the budget is limited, and you are full of energy and enthusiasm, then it is quite possible to build a fence yourself. The process is quite laborious, but quite feasible - you are not building the Great Wall of China, after all)) In this article I will talk about the advantages and disadvantages of certain types of fences, and about building a fence with my own hands.
What kind of fence to build?
So, after consulting with your wife (and most importantly, with your mother-in-law)), you are finally “ripe” for construction. Now you need to decide - what kind of fence do you need? If you want to completely “hide” from the outside world in your country oasis, then build a fence made of bricks, corrugated board, concrete slabs or high boards. If you just need to fence your property, consider building a palisade, a metal lattice, a chain-link fence, a low board fence, or even make a beautiful green hedge fence.
And do not forget, in addition to its main purpose - to protect the territory and protect it from foreign penetration, the fence must also perform an aesthetic function. Therefore, pay attention to its appearance. Before I talk about building a country fence with my own hands, let's make a brief comparison of the most common types of fences.
Wooden fence
Advantages:
- the availability of the material;
- low cost.
You can inexpensively purchase edged boards and process them yourself (plan, sand, treat with an anti-rotting agent and paint). And you can buy a ready-made wooden fence in the store (edged board, by the way, will cost 3 times cheaper finished product). You choose.
Flaws:
- short-lived;
- requires regular maintenance: repair, tinting, and so on.
brick fence
Advantages:
- very durable (it will serve you faithfully for more than 50 years), the most durable of all types of fence;
- does not require special care;
- looks solid and respectable.
Flaws:
- very high material cost;
- you will need a solid foundation, the construction of which is very expensive.
Corrugated fence
Advantages:
- availability and variety of material: different sizes wave, different color, coating and other parameters;
- ease of installation (does not require a special foundation);
- low price;
- practical;
- durable: will last you about 30 years.
Flaws:
- very unattractive appearance (especially from the inside).
Therefore, quite often, when building fences with their own hands, they combine corrugated board with bricks.
It turns out durable and aesthetically pleasing.
Concrete slab fence
Advantages:
- excellent material strength: concrete fence 5-6 times stronger than a fence made of brick and can last more than 100 years;
- undemanding care;
- an impressive variety of decorative concrete slabs for fences - you can choose any model you like.
Flaws:
- it will not be possible to build it with your own hands from beginning to end, because for the installation of such a fence you will have to involve special equipment and workers.
Metal mesh fence
Advantages:
- reliability: modern metal fence meshes consist of galvanized iron rods with PVC coating;
- sufficient durability (service life up to 30 years);
- does not create a shadow on the garden plot.
Flaws:
- does not close your site from the immodest glances of passers-by))
We build a fence in the country with our own hands
And now I present to you two ways to build a fence with your own hands, the most popular among summer residents and do not require serious financial investments.
Wooden fence:
A detailed master class on building a wooden fence with your own hands is presented here, so now I will only very briefly recall the main points.
- We define the boundaries of the site.
- We drill holes for supporting pillars with a depth of 0.7-1.0 m at a distance of 2 or 2.5 m from each other.
- We insert poles into the pits, using a level (or plumb line) we check that they stand strictly vertically.
- We strengthen (can be concreted or cemented).
- We nail or fasten a bar with a section of 50 x 50 mm or more onto the pillars from above and below or fasten it with self-tapping screws.
- Install cross bars.
- To finished construction we fix edged boards (you can take boards with a section of 85 x 145 mm) at a distance of 1.5-2 cm from each other.
- Let's start painting.
Very important! Before proceeding with the construction of such a fence, all wooden parts should be oiled 2-3 times or coated with another anti-rotten agent.
Corrugated fence:
So, you bought the metal sheets you liked in the store and are ready to build a fence from corrugated board with your own hands. Start with a trivial markup of the site, and then follow the instructions:
- Along the perimeter of the site, drill holes in the ground with a depth of 1-1.2 m.
- Fill each hole with a layer of crushed stone or gravel 20-25 cm thick.
- Install metal poles with a cross section of at least 50 x 50 mm in the pits and adjust them strictly vertically.
- Strengthen the posts with concrete or cement mortar.
- Weld transverse logs (2–3 pieces) from a profiled metal pipe to the posts at an equal distance from each other.
- On the resulting base, fix the sheets of corrugated board (usually they are mounted on self-tapping screws).
It is worth noting here that it is undesirable to fasten corrugated sheets to self-tapping screws, because cunning attackers can easily twist such fasteners in your absence and steal corrugated sheets. Alas, such cases are not uncommon. Therefore, it is better to use special rivets for metal, which no thief can unscrew.
A few important nuances:
The quality factor and durability of any fence depends on the supports - the pillars on which it rests. Therefore, experts advise using durable metal supports even for wooden fences- so the fences will last much longer.
Think over where and how you will fix the gate, what they will be: sectional, swing, folding or others. And then you can use the classic solution for any type of fence: a rectangle for the gate, welded from a profile metal pipe, should be slightly smaller than the niche in the fence for arranging the gate. The size of the gate is up to you. You can sheathe the profile with the material from which you make the fence: boards, corrugated board, and so on. And you can experiment))
You need to take care of the double-sided handles on the gate and the valve (if you need it). The gates are attached to the supporting frame with the help of durable metal canopies. If you put an overhead lock, then you need to fix metal hinges for it on the gate. And if you decide to do mortise lock, then on one of the support pillars (from the side of the lock) and on the gate door, make holes for the lock itself and for its tongue. published
P.S. And remember, just by changing your consumption, we are changing the world together! © econet
The construction of fences from corrugated board is a common method of fencing a site. This fence goes well with any landscape. Manufacturers produce canvases in various colors.
We will tell: how to make a fence from a profiled sheet with your own hands, let's talk about the features different designs, we describe step by step instructions. In the article you will find answers to the questions: how to make a fence from a profiled sheet with metal, stone and brick supports.
Construction materials
To install a fence yourself, you need to prepare certain building materials:
- Polymeric corrugated board. It can be painted on one or both sides. The material is covered with a polyester composition, which ensures a long service life of the product. Do not purchase galvanized profiled sheets. They have one advantage - the price, while galvanizing is quickly covered rusty spots. On a sunny day, such a fence will further raise the temperature. If you plan to install a two-meter fence from corrugated board with your own hands, while the foundation will be installed as the base, subtract the height of the base from the planned height (2 meters). The difference is the height of the profiled sheets that you need to purchase. The distance between the posts is the width of the span of corrugated sheets. If you do not know how to install the poles, we advise you to place them at a distance of 2.5 - 3 m from each other.
- supports. Metal pipes are used, round, rectangular or square. Optionally, stone or brick columns are installed as supports. Brick supports look much more attractive than metal ones. For the installation of non-metallic poles use decorative brick, stone, cement and sand. What poles are needed for maximum strength designs? Metal supports should have dimensions of 40 x 60 mm or 60 x 60 mm. Then the design will withstand loads of various forces.
- metal lags- they are necessary for the transverse fastening of corrugated board. Logs of 20 x 20 mm will be optimal. The technology for building a fence with a height of 2 meters or more involves two rows of lags. Otherwise, the structure may be deformed under physical impact.
- Mounts(or dowel for mounting). With their help, you can fix the profiled sheet on the fence.
Stone, sand, crushed stone (screenings), cement - will be needed to create the foundation. To properly build a fence from a profiled sheet, you need to install it on the foundation. Without a quality base, the fence will not last long. Vegetation, soil erosion, animals can deform the structure over time, and the foundation will prevent this possibility.
We already wrote in more detail about what types of foundation exist in the article:, types and methods of pouring.
Tools for the job
When we build a fence from a professional sheet with our own hands, we need the following tools:
- Sledgehammer.
- Shovel.
- Roulette.
- Cord.
- Level.
- Apparatus for welding.
If the tools and materials for construction are prepared, we proceed to the construction of a fence from a profiled sheet.
How to build a fence?
Stages of work:
- Territory marking and calculation of materials.
- Installation of the foundation and columns (installation of supporting pillars in a fence without a foundation).
- Installation of corrugated board on logs.
Before building a fence from corrugated board, we mark the territory and collect site data. How to do it right, we wrote.
At the corners of the future fence we hammer in pegs, between which we stretch the thread. Along it you need to put marks where the poles or metal supports will stand.
The construction of fences from a profiled sheet in a territory with a slope involves a stepped structure. We check the height and evenness of the steps with the help of a level.
Calculate the number of columns to be set. To do this, divide the length from the corner to the next by 2 - 3 meters. These will be spans. It is necessary to make markings for gates, gates and take into account these additional supports during the acquisition of material.
According to the type of construction, the fencing from the profiled sheet is of the following types:
- Fence without foundation. The sheet of corrugated board is placed along the height of the fence.
- Constructions.
Building a fence from a profiled sheet without a base is less expensive. In addition, the installation is faster, but the second option looks more respectable, although it requires more costs for materials, tools, and labor resources.
Building a fence with metal poles
To properly place a fence made of corrugated board, where segments will be used as pillars metal pipes, we do the following:
- We put corner posts in the marking places. To properly make a fence from a profiled sheet, we advise you to immerse the post in the ground by a third of the length, in which case maximum wind resistance is created. The recesses are filled with concrete.
- We organize formwork. In this way, a board is created that connects adjacent columns. The width of the formwork depends on the wishes of the owner, but the side looks aesthetically pleasing, about 20 centimeters wide. If we build a fence from a profiled sheet with formwork, it will last longer.
- Along the length of the structure, at a distance of 2 - 3 meters, we set markings. We stretch the thread between the corner columns.
- We dig in the columns according to the markup. Building a fence from a profiled sheet with your own hands involves the installation of pillars at the same distance.
- Pour into the formwork container concrete mix. Additionally, we compare the accuracy of the transverse, longitudinal and vertical columns. Leave the structure to dry completely.
- We weld the transverse strips to the finished structure. To put a fence from a profiled sheet correctly, you need to check the evenness of the structure with a building level.
- We attach the corrugated board to the transverse lags. For reliable fixation, we use self-tapping screws for metal. We advise you to select fasteners that match the color of the sheets.
Important: Special attention pay attention to attaching the first sheet. The appearance of the entire structure depends on how evenly it is attached. After all, each subsequent profiled sheet is attached to the previous one. It is necessary to overlap, the size of one wave.
Installation of brick and stone pillars
Construction metal fences from corrugated board with brick columns involves the creation of formwork for the future foundation.
The brick layer is built using reinforcement. Metal parts are arranged in a vertical position and lined with bricks.

Do-it-yourself fence construction from corrugated board with brick columns cannot be made without reinforcement. Brick is a fairly heavy material. Metal lintels will only reinforce the load on the foundation, which can eventually collapse under the influence of gravity. If we make a fence from a professional sheet with our own hands, it is necessary to reinforce the foundation layer.
- We lay out the pillars and intermediate lintels with bricks. If the height of the fence is standard, we install the brackets in the poles at a height of 20-30 and 1.50-1.60 m from the ground, where the horizontal strips will be welded. Periodically check the verticality with a level.
- We weld horizontal strips to embedded parts. It is advisable to cover metal parts with paint. This will help prevent corrosion in the future.
- Fasten with self-tapping screws profile structures. You can use rivets and attach them with a special riveter.
The peculiarity of building a fence from a profiled sheet with brick columns involves the creation of a roof for each column. The design will not be affected by precipitation and weather phenomena (snow, rain, wind).
More detailed instructions with video tutorials and images on installing fences with brick pillars presented in this article:
Video
You can see how to build a fence from a profiled sheet with your own hands in this video:
Designers advise to install a do-it-yourself fence made of corrugated board with posts for finishing the facade. It looks stylish and emphasizes the status of the owners. FROM back side it would be appropriate to build a fence with metal columns.
We determine which option will suit us more, and put up a fence. As you can see, building a fence from a profiled sheet with your own hands is quite realistic, and videos, photos and detailed instructions will help you achieve your goal.

