Make garden paths in the country with your own hands. How to make garden paths with your own hands
The overall impression of the suburban area will be incomplete if it is not decorated with beautiful and comfortable garden paths. Not only the appearance of the territory, but also the organization of economic activity depends on how well they are located and well made. Walkways in the country can be made of different materials and in different ways.
The choice of material for the track in the country
Many summer residents ask themselves the question: what is the best way to make paths in the country? The answer to this question depends on its size and human material capabilities.
Some walkways made from scrap materials look more attractive than traditional concrete or concrete slabs. Paving in the country should be economical, practical and durable. The material for summer cottages can be very different. Most often, common improvised and building materials are used for their manufacture. V last years people are increasingly producing. All materials used for this purpose can be different in color, texture and decorativeness. Most often, they independently make tracks with a tamped surface layer or with a hard surface.

The photo of the tracks in the country house simply amazes the imagination with its diversity. The simplest - rammed paths are made of sand, pebbles, gravel, brick breakage. Some summer residents use wooden cuts to complete this element of the suburban area, which give it a special decorative effect.
For this purpose, only hard types of wood are used, treated with special impregnations.
Video: making a summer cottage path from hemp
Hard cover can be made of bricks, natural stone, concrete slabs, paving slabs or monolithic concrete. Various patterns can be made from such material, which will give the site an additional decorative effect. Such a track is much stronger and more durable than rammed ones. It is distinguished by its practicality, but it costs much more expensive than that that is made from scrap materials.

An important role in creating a path in the country with their own hands is played by a border. It not only fixes clear boundaries, but also protects its edges from destruction. The border also plays a decorative role. While curbstone is a desirable element, it is not considered mandatory. Most often, without a border, paths are made of concrete slabs with large gaps between them and natural stone with a curvilinear configuration of boundaries.
When covering from sand, pebbles, slag, gravel, a border is necessary. The most practical and durable concrete curb, laid on concrete base... For curved paths, it is better to choose curbs made of bricks, flat stones or tiles, laid on the edge.
Thanks to the choice the right stuff you can create a harmonious system of tracks, made in the same style and ideally combined with general view plot.
- So for registration of a site in rustic style a tree is most suitable.
- Natural stone is ideal for making curved paths.
- Brick goes well with buildings made from it. To complete the paths, special types of paving bricks are chosen that are not afraid of moisture and cold.
- Paving stones of different shades allow you to create unique patterns.
- Gravel and pebble paths are best suited for gardens and artificial ponds.
In recent years, people have the opportunity not only to create paths from monolithic concrete, but also to give it original form... To do this, it will be enough to buy plastic templates of various configurations in a specialized store, which will allow you to cast concrete elements yourself.
Some of the materials used to make the tracks go well with each other. Combine so well:
- concrete and brick;
- river pebbles and wood;
- multi-colored gravel and natural stone.
Summer cottage planning
Before making paths in the country, it is necessary to correctly draw up a diagram or plan of the site, on which to depict the planned directions, taking into account all the buildings and landings on the site.
When developing them, one should take into account the amount of precipitation that falls in this area. Sometimes it is necessary to create a drainage system so that there is no stagnation of water in the area. It should also be remembered that when it freezes, excess water quickly spoils not only wood, but also materials such as concrete and brick.
Should not grow near paths large trees as they can destroy them with their powerful roots. When drawing up a more detailed plan-scheme, the picture of the country landscape will appear more clearly and it will be easier to make a choice in favor of one or another building material.
For almost all types of summer cottage paths, one technology of their laying is observed. All work is divided into several important stages:
- Site marking. At this stage, with the help of a cord and pegs, the contours of the track are marked. The edges are carefully executed along the outlined lines.
- Using a shovel, remove the sod along the length and width of the intended path. The soil is taken out to the thickness of the sand cushion, which serves as the basis for the paving. The thickness of the base layer must be at least 10 cm.
- Sand (sometimes crushed stone) is poured into the dug trench and carefully tamped and leveled.
- Paving is laid on the sand, carefully monitoring the observance of the level of the path.

Do-it-yourself budget tracks in the country
The most popular in the country are the following track options:
- Gravel or small pebble path. They are made very quickly, but they do not differ in durability. The soil in the trench is treated with herbicides and covered with polyethylene or agrofibre so that weeds do not germinate. A layer of pebbles or gravel is poured onto it and the surface of the path is leveled. In order for this material not to scatter over the site, it is necessary to create a border, for example, from tiles or bricks.
- A path from wood cuts. For its creation, trunks and thick branches of sawn hardwood trees are suitable. They are cut into circles. The thickness of the material should be more than 10 cm. Well-dried cuts are treated with hot drying oil, which is applied with a brush over the entire surface. After the impregnation has dried, the treatment is repeated. On a pre-prepared sand pillow lay plastic wrap... Cuts are laid on it with any fantasy pattern and level them up. All voids between them are covered with gravel, sand or soil.
- A country path made of stone can be made not only from purchased material, but also from what can be found in almost any area. When choosing elements, preference should be given to the stone that has at least one flat side. Under such paving, the trench should have a depth of at least 20 cm.Crushed stone (10 cm) is poured onto its bottom. It is tamped, and sand is poured on top (10 cm) and tamped again. Stones are laid on the prepared sand-crushed stone pillow. To fill the voids between them, sand is poured on top and all the voids are filled with it. At the final stage, the path is thoroughly watered with water. It may be necessary to re-sand the voids between the stones.
- Paving stone path. This option is one of the most optimal. The depth of the trench for such material should be 20-25 cm. The sand-crushed stone pillow is created in the same way as under the path for the stone. Paving stones more than 60 mm thick will protrude above the soil. This path is best done with curbs. Paving stones are laid on a sandy base tightly to each other. Moreover, the pattern can be very diverse. When laying, you cannot use paving stones with signs of marriage, since they will quickly become unusable.
- Brick path. It is created according to the same principle as a paving track. The same brick placed on the edge is used as a curb. Paving made of bricks of various shades looks especially attractive.

Concrete walkway (video):
Concrete path
Monolithic concrete paths in the country are still popular. For their manufacture, a large amount of cement, sand and crushed stone is required. But they are durable and practical. When performing them, one rule should be remembered: the more cement in the solution, the stronger the concrete will be. For tracks, the following proportions of materials are most often used:
- cement - 1 part;
- crushed stone - 3 parts;
- sand - 2 parts.
In order for such a path to rise above the ground, it is necessary to make a formwork from boards under it. At the bottom of the trench, stones, broken bricks or other solid construction debris are laid out. A solution is poured into the formwork and its surface is leveled. Concrete can be decorated with tiles, mosaics or beautiful stones pressed into an uncured mortar.

Tile paths
Tracks made of concrete slabs of various sizes are very popular. They are easy to fit and are distinguished by their durability. A sandy base is also arranged under them. A country path made of 50x50 or 40x40 cm tiles looks quite impressive, does not take up much space and is very practical. By using smaller tiles, you can create different options paving patterns. They can be laid close to one another or at some intervals, which are covered with small stones or soil. They can be sown with grass.
Country path (video)
In this article, we will suggest several original ideas for arranging original, beautiful and at the same time inexpensive and comfortable garden paths with your own hands, which will become one of the decorations of your local area or summer cottage.
1. Gravel, just gravel
Let's start with one of the simplest and least expensive ideas - creating gravel paths for your garden. The advantages of this option include a wide selection of fractions and shades, as well as the ability to get by with a minimum of cost and effort.
In the case of arranging such a path, you will have to take care of the presence of a curb or other limiter so that the gravel remains within the boundaries of the path.
 In this case, enough gravel was covered big square between neat flower beds, where not flowers grow, but vegetables
2. Large stones or slabs on gravel
A somewhat more costly, but also more comfortable and original option is to lay out a path of flat stones or concrete slabs, and fill the space between them with the same gravel.
 Large slabs of stone or concrete will form the basis of the path, and so that grass does not break through between them and the path looks more attractive, the space is covered with inexpensive gravel
 Stone slabs on gravel can be scattered in any, most chaotic order - so the path will look even more unusual
3. Stones and lawn
If you don't mind green grass, let the lawn grow freely between stone slabs tracks. This combination of greenery and stone will look very natural and harmonious in the garden.
 Stone slabs literally "grow" into green lawn becoming an integral part of the garden
 Why destroy a lawn when you can create such a beautiful track, which will be no less comfortable to walk on than on ordinary paths, completely tiled
 One can confidently say about such a path made of massive stone slabs - “made for centuries”. And the moss growing between the slabs gives it a natural look, as if the path appeared on its own.
4. One tablet, two tablets
As a result, it may not turn out a ladder at all, but a comfortable garden path. Just remember to process the wood, which will have to withstand moisture and temperature extremes.
 It is not necessary to use fairly expensive ready-made boards, you can purchase ordinary pallets that are very inexpensive. It remains only to disassemble them, process the resulting boards with a special composition and lay out the track
 Another plus of such a garden path - if necessary, replacing one of the boards will not be difficult.
5. Boards and gravel
From wooden planks it is not at all necessary to lay out continuous flooring. You can use gravel and create a harmonious combination of stone and natural wood.
 You can put different gravel between the boards - large, medium, small, it all depends on your desire
 By the way, with the help of boards and gravel, you can also create stepped paths in areas with uneven terrain.
6. Pebbles
An ideal option for those who want to transfer a piece of the sea beach to their garden - pebbles. You can lay out unusual compositions from it or just fill up the track, be sure to take care of the limiters.
 Highly beautiful option pebble paths. Children will especially love jumping from one laid out piece to another - a real playground
 It will be pleasant to walk along such a path barefoot, imagining yourself on a pebble beach somewhere on the Black Sea coast.
7. Wooden cuts
If the boards seem too common to you or you just recently got rid of big tree that cluttered the site, you can use wooden cuts to create a garden path. The beauty of natural wood does not need additional decorations, but to protect it from external influences have to.

 Wooden cuts can be of different sizes - this combination will look just as good
 Of course, finding large wood cuts will not be easy. However, smaller round pieces can also be laid out in this way - on top of each other, in steps
8. Planks and grass
As with stone slabs, green grass can be allowed to grow between the planks. Experts note that planks lying on gravel last longer, but your garden will look like a corner of almost untouched nature with a lot of greenery.
 Old planks on a green lawn are both a retro option and a very natural part of a garden that has retained its natural charm
9. Stone mosaic
This option for arranging a garden path will require a considerable investment of time and effort, but the result will be so beautiful, durable and original that it will pay off all the efforts.
 Pebbles, large and small stones can be used to create amazing garden paths, real mosaic panels
 Such a mosaic is laid out on concrete or sand. If you decide to lay stones on the sand, you can additionally secure them with wood glue so that the paths last long enough
 The process of laying out such a stone mosaic is very painstaking, it requires attention to each pebble.
10. Mosaic from broken ceramic tiles
Everyone who has ever made repairs using ceramic tiles, unclaimed pieces are sure to remain. Do not rush to throw them away - with the help of a bat or tiles cut into pieces, you can create a beautiful and reliable garden path.
 From pieces of the most different broken tiles, you can create garden paths that will definitely be one of a kind
 Small pieces of tiles can be used to create small individual panels
11. Plastic covers
Highly interesting option arrangement of garden paths. The more you have plastic lids different colors, the more beautiful and brighter your garden path will turn out.
 Plastic is not afraid of moisture and temperature changes, so such covers can be called unusual, but quite suitable option to create garden paths
 The only thing that can delay the implementation of such a project is the need to collect a sufficiently large number of plastic covers. Although, if you turn to friends, acquaintances and neighbors for help, it will not be difficult to cope with this task.
12. "Vegetable" concrete slabs
Concrete - truly universal material, from which you can make amazingly beautiful things. To create a garden path from unusual concrete slabs, you only need cement mortar and an ordinary large burdock, which you will definitely find without any problems under the nearest fence.
 It turns out that even a child can make such a garden path! So you can handle it for sure
 These are the concrete mugs you should end up with.
13. Mold for casting
Special forms for creating garden paths from concrete can be purchased today in many hardware stores. With their help, you will be able to arrange comfortable paths with your own hands throughout the garden or the local area.
 The appearance of your garden path will depend on the chosen shape.
 You can add color to the solution and your track will sparkle with all the colors of the rainbow
14. Terrace board
Of course, this option can no longer be called cheap, because a ready-made decking is very expensive. However, such a track will not only look beautiful, but also respectable, and will last for many years without losing its original parameters.
 Path from terraced or deck board- one of the most expensive options
 Larch deck board will be cheaper depending on the type of material
15. Brick
Remember the girl Ellie, who walked with her friends to Goodwin along the path from yellow brick? Why not transfer such a fabulous path to your garden, creating a solid and beautiful brick path with your own hands.
 The brick for the walkway can be chosen in different shades, and the process of laying it is similar to paving slabs.
 The most economical option is to create a garden path from old brick left after dismantling the outbuilding.
16. Paving slabs
It seems that there is nothing original in this idea. Indeed, at present, paving slabs have become one of the most popular options for arranging garden paths. But tiles are different! The variety existing today allows you to create original patterns from paving slabs and turn garden paths into a masterpiece landscape design.
 And in this case, the paving slab path is surrounded by areas covered with gravel.
As you can see, there are many options for arranging garden paths, and you can choose very inexpensive, if not free, options that involve the use of such "improvised" materials as wooden cuts, old brick and plastic covers. Choose an idea that you like, implement your options and let your paths on the site be the most beautiful!
Garden paths are part of the landscape design. They make country cottage area well-groomed and attractive, make it easier to move around the territory.
In our article, we have collected detailed instructions, photos and videos, how to make tracks with your own hands.
Do-it-yourself economy options for tracks in the country
For the arrangement of garden paths are used different materials but there is General requirements to which they correspond:
- Aesthetics
- Security
- Moisture resistant
- Maintainability
- All-season
- Strength
- Easy care
Gardeners and summer residents make paths from concrete, wood, natural stone, paving slabs and other materials. See how they look.
Concrete walkway using ready-made shapes

Natural stone path

Garden path made of wood

Concrete and paving slabs walkway

Concrete walkway imitating natural stone

Gravel path

Combined garden path made of stone and rubble

Another option for combining rubble, stone and paving slabs

Paving slab walkway

Clinker brick path

Stone path

Ideally, garden paths are combined with the exterior of the house and complement the landscape. The material for the tracks is selected taking into account the expected load.
Decorative paths are rarely used for their intended purpose. Bulk materials are suitable for them: gravel, sand, crushed stone.
It is better to move along paths made of solid concrete, brick or paving slabs. It is recommended to cover the car park with concrete, paving stones or stones.
DIY concrete paths in the country
Concrete garden paths are practical, durable, withstand heavy loads. Rough surface concrete pavements does not slip.
Such paths are equipped in two ways: using formwork or special forms.
Casting with formwork
Prepare the base first: remove the top layer of earth and tamp it down. Then proceed according to the scheme.

Gray concrete looks boring, but there are ways to refine it.
On small areas lay winding paths with smooth turns and bends. This will visually expand the space.

Add pigment to concrete mix to color the track in desired color... Introduce coloring pigments at the stage of preparing the mixture for pouring.

Get creative and the gray concrete will turn into an imitation of a wild stone, as in the photo below. This requires a sharp knife and a steady hand to make stone-shaped grooves on the surface when the concrete has already set, but has not completely hardened.

Pouring into special shapes
Plastic molds for pouring concrete are sold in hardware and garden stores.
Prepare the base for the walkway. To do this, go 10 cm deep into the ground. Then tamp the ground and lay a cushion of sand and gravel. If you add crushed stone to the concrete mix, make a sandy base.

Moisten the prepared base with water, and treat the casting molds with special grease from the inside.
Then place the molds on a sand cushion, press them in so that the top protrudes 0.5 - 1 cm above the ground.

Prepare a concrete mixture, add a plasticizer to it to give the track strength, add a colored pigment (optional) and pour it into the molds so that the concrete is evenly distributed over the entire area. Smooth out the top layer with a trowel or trowel.

After 30 - 40 minutes, when the concrete has set, carefully remove the forms, cover the path with foil for 1-2 days. You can walk along the path after 5 days.
Video thematic master class will help you
Do-it-yourself tile paths in the country
Paving slabs are used for garden paths different designs, color and size. It is laid on a prepared base with a sandy substrate, as in the diagram below.

Tiles 40 × 40 cm are often used for laying. Big size reduces the time for arranging garden paths. The tile is laid so that the distance between its centers is no more than a step.

The gaps at the joints are filled with sand, and the edges of the path on both sides are limited by curbs.

The advantage of paving slabs is that it is combined with country houses and summer cottages of any style, fits into simple and complex landscapes.

DIY wooden paths in the country
Wooden paths in the country look natural, stylish and durable. Garden paths in the country are made of ordinary boards with a thickness of at least 5 cm. You will have to tinker with them less than with the piece-by-piece laying of individual cuts.
The advantage of such wooden trails is quick installation and neat appearance. Manufacturing begins with the selection of materials and tools. Inexpensive and widespread lumber - softwood boards. It is better to choose larch, but the cost price in this case will be higher.

The tree is treated according to the standard scheme: with an antiseptic, and then varnished or painted for further protection. The clear lacquer enhances the grain of the wood, while colored paint sets accents. The boards are cut into equal lengths. For tracks complex shape the length of each board is selected individually.

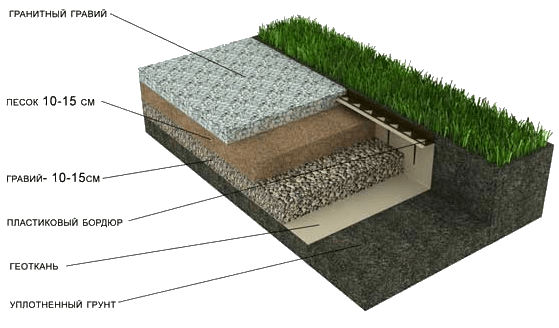
Base of paths from natural wood, as well as for a wooden path from saw cuts, is made from a sand-crushed stone pillow. Preparatory work is performed in the following sequence: marking, foundation pit, geotextile, rubble layer, sand layer, tamping.

Then the boards are laid on the base or placed on a dais - a specially arranged frame. Planks laid in the ground look natural and relaxed, but such a wooden path deteriorates faster. The structure on the frame will be stronger and more durable, in a word - capital. This idea takes more effort.
Watch a video on how to make garden paths from wood with minimal costs
The device of a garden path made of wooden saw cuts resembles paving stones. Instead of stones, flat wooden blocks of the same height are laid. To create a dense path, large cuts are alternated with stumps of small diameter, the free space is filled with large branches.
From ordinary stumps or tree cuts, pretty winding paths are obtained. Choose the right material, understand the laying methods, and you will be able to make a garden path from tree cuts with your own hands in the garden or in the country.

Pay attention to preparing the tree. Untreated wood will quickly deteriorate, and the tree ring track will have to be redone. First, select the type of wood. Suitable:
- Pine
- larch
- Birch
The difference between hardwood (larch, beech, oak) and other types is the durability. Larch will last 25 years, pine will be in use for 5 - 7 years.

Use dry wood without traces of pests. Dissolve the logs into pieces of the same height. Optimal size- 15 cm. For convenience, use the template. If you are making the workpiece yourself, make sure that the cut is made strictly perpendicular to the log. Sort the sliced "pancakes" by size, remove the cracked ones. Remove the bark from the rings.
Next, process the tree cuts for the paths to protect them from decay and decay. Elementary method- drying oil treatment. Bring the drying oil to a boil, then dip each die in hot oil. The boiling substance seals the pores of the tree and prevents moisture from entering - the first enemy wooden products... Disadvantages of this method: long and dangerous. You can burn yourself with hot linseed oil.
Another variant - special formulations... Equip yourself with a brush or spray bottle and treat the wood with an antifungal agent. After preventive treatment, let the wood dry.
After preparing the material, proceed with the construction of the path. Take your time to lay a path from wood cuts. First, do the preparatory and excavation work:
- Mark a path in the garden
- Remove the top layer of soil
- Dig a trench
- Arrange waterproofing
- Prepare the base.
Now you can take up the shovels. Don't make the trench deep. Add 10 cm to the height of the dies - this will be the optimal depth.
Lay a waterproofing layer in the trench. Some people use a film, roofing material, but it is better in such cases to take geotextiles. This material prevents stagnation of water and germination of weeds.
Pour a 10 cm layer of gravel on the waterproofing - this is a drain to drain water. Tamp and cover 5 - 10 cm with sand.
Wet the sand to compact and level the base under the hemp garden path. When wet, the sand is rammed by hand.

The wood is laid in accordance with the pattern or in any order. The logs are placed on a sand cushion, then they are tamped and set on a level. Sand or crushed stone is poured into the gaps. For seams on top, mulch is suitable, sawdust, pebbles, moss.

Having a personal plot, I immediately want to equip it, improve it. And then plant, and this ... Fantasy is in full swing, and there are so many ways to realize your plans! You just need to understand what exactly we want and HOW to do it? And you don't need to rush in search of a newfangled designer right now, calm down, you can arrange everything YOURSELF! And our site will help you make the right choice.
What can give each garden a special individuality and exclusivity? Of course, garden paths!
There are many different types garden paths that can be done at low cost. Moreover, there is nothing difficult in their manufacture, but the savings are obvious. Having done everything with your own hands, you will save on the services of a designer, and by correctly "seeing" and selecting materials from those already available on the site, you will also reduce these costs to zero.
Most Popular country paths from scrap materials that you can easily make with your own hands, we will now consider in more detail:

- Here's everything you need to get started:
- Gravel (pebbles, expanded clay), at the rate of 1 ton per 15 m ^ 2;
- Dense film or geotextile;
- Sand;
- Bumpers made of wood or concrete on either side of the walkway.
- Mark your future track on personal plot, draw all its turns and bends (if any);
- On both sides of the future path, dig in the sides made of wooden blocks, or concrete strips;
- Remove the top layer of sod along the entire path by 15-20 cm;
- Take geotextile or dense film and lay it along the entire path, while trying to put the edges under the sides of the path;
- Sprinkle the cleaned area with sand 5 cm;
- Thoroughly level and sand the surface;
- Everything preparatory work finished, now you can finally start filling the prepared space of the walkway with gravel;

- That's all for gravel roading!
Related video: the secret to a quality gravel path
Natural stone paths are considered the most durable and durable. However, to make them, you will need to purchase a natural stone, if there is none in your area.
- Prepare the following materials:
- Booth or chipped cobblestone;
- Sand;
- Sand ramming tool.
Stages of laying a stone path:
Work should begin with marking the future track, after which the sod should be removed from the place along which the track will be laid. Moreover, the depth will be indicated by the largest of the stones you have prepared (dig 5-10 cm more than the largest stone);

Then you should fill the entire path with sand and evenly level it, the height of the sand embankment should be about 10 cm;
Place stones on the sand, pressing them well into the sand. For large stones, the distance between the stones can be up to 8 cm, subsequently it is covered with earth and can, for beauty, sow with grass. For a small stone, a distance of 2-3 cm will be sufficient. Such seams are subsequently sealed with a cement solution;
The stone path is ready! Do you have difficulty in styling?
DIY concrete garden paths
For concreting garden paths, modern manufacturers have come up with a special plastic frame... With this device, your concrete garden path do it yourself will appear in the garden very quickly and will not require any extra time, or the delivery of a stone. What materials for garden paths are needed - sand, fine gravel or fine gravel, cement, water.
Related video: Concrete garden path, mold for making
- We prepare the path in almost the same way as the gravel path, only the trench for the path should be dug 20 cm wider than your finished path will be.

- We take out excess soil and tamp everything down well;
- Fix the formwork with pegs along the entire track on both sides;

- Attach transverse strips to the formwork every 2.5-3 m. This will help protect the concrete from cracking during operation;
Place the form on the prepared sections of the track and start filling out the form cement mortar... In this case, it is very important to ensure that the entire form is filled with cement evenly and there are no voids left anywhere. If, nevertheless, somewhere you did not notice the formed emptiness - do not worry, apply the form again and fill it with cement - everything will be corrected;

Compact the concrete thoroughly with a heavy flat object, possibly a board;
Move from one section of the track to another. At the same time, cover the finished one with polyethylene - so as not to inspire debris on freshly prepared concrete that has not yet completely hardened;

Fill up the space between cement tiles ground and sow them with herbaceous plants - it should turn out very beautiful!
The remaining spaces around the path (remember, we dug a larger trench than necessary) can be covered with bricks, covered with earth or small pebbles.
Related video: We concreting the garden path with our own hands
An excellent and very popular material for your garden path can be ordinary tree... Thanks to the variety of colors and wood structures, you can create a unique and very beautiful path!

DIY paths can be made from many materials. They can be classified into 2 main types.
- Not removable.
- They are made from traditional materials:
- clinker brick;
- wood;
- pebbles or natural stone;
- jellied concrete;
- made using forms.
- Removable. As a rule, they are installed for the summer period. You can make them yourself, or you can buy ready-made ones.
The use of any building material has its own advantages and disadvantages, their detailed analysis is given in the table.
Tracks are divided into 2 types. Removable and non-removable.

Each construction material has its own characteristics

The path of their stone can last a very long time.
Table 1
Comparative characteristics different types garden paths
|
Types of garden paths |
Advantages |
disadvantages |
|
Natural stone |
Durability, resistance to mechanical stress (passage of garden equipment), high aesthetics, a large selection of shapes and textures |
High cost, becomes slippery when moistened, and winter time covered with ice |
|
From paving slabs |
Versatile, affordable material |
Unprofessional masonry can lead to distortions and drops, which will dramatically reduce decorativeness |
|
Clinker brick |
Durability, strength, inexpensive price. |
Brick laying should be carried out on concrete mortar, since sand does not provide reliable fixation of the material |
|
From wood |
Availability, originality |
Fragility, instability to mechanical stress |
|
Concrete path in the garden |
Durability, strength, frost resistance |
Labor intensity, the need for formwork |
|
Plastic modules |
Low cost, ease of installation, decorative |
Air temperature restrictions from -35 to +50 С |

A natural stone walkway will last a very long time

Choose materials based on your own preferences
DIY garden paths. Professional advice, drawings and design options
Marking is a mandatory stage of construction
The initial stage in the construction of the track with your own hands is the marking. The first step is to determine its width and orientation at the summer cottage.
For marking, fixed pegs are used, on which the cord is pulled, and the side borders are sprinkled with lime. This method of marking allows you to visually indicate the planned area of a paved road, taking into account the location of plants and other objects.
It is worth noting that the excavated space must be made slightly wider than the planned path for installing curbs. High-quality markings directly affect the strength and durability of the finished garden road.

First of all, you need to decide on the size of the track

Make the styling area a little wider just in case.

Marking plays an important role in the process of laying garden tiles.
Garden paths made of natural stone
The river Altai stone is perfect as a natural stone. It is from it that beautiful mosaic images are obtained, thanks to a variety of sizes and colors: from light to dark gray. To create such a paved road, you need tools:
- it is necessary to pick up smooth stones of various sizes;
- sand;
- rubber hammer;
- cement;
- sponge;
- level;
- water.
Harvesting the right amount of quality stone is the first step in creating a paved road.
In the beginning everything river stones carefully sorted. If the rejection of the surface of the pebble is insignificant, then it can be used to build a path, turning the flat side up.
The next an important milestone is the choice of a pattern that corresponds to the width of the prepared path.
The basis for the picture can be squares. A drawing of curls will perfectly fit into them.
The image from the sketch is transferred to the prepared base. In order to avoid the destruction of the entire structure, the drawing should be placed in the designated square, so that it is bounded by the sides on all 4 sides to create the strength of the mosaic. Usually, curbs are used for this, or formwork from boards, which are then removed after hardening of each mosaic element.

Natural stone paths look very beautiful

Natural stone will serve you for a very long time
Due to the fact that the base substrate is made of crushed stone, it is recommended that the marking be done with lime.
Then the sand-cement composition is mixed, in proportions of approximately 3 to 1 or 4 to 1. The resulting solution is faced with a small strip, on which part of the mosaic pattern is laid out. To level the surface, each pebble is slightly pressed into the hydraulic solution. The stripes are laid out in small areas, for convenient alignment of pebbles in them.
Oval pebbles with rounded edges gradually form the finished mosaic pattern of the path. If the mixture has hardened, then to level the surface, over the stones, you can knock with a rubber hammer.
After laying out 1 strip, it is necessary to check its evenness using a building level. So, guided by the drawing, row by row, revet the laid out stone covering... In her mosaic, it is possible to use both small rounded even stones, laying them on the edge, and solid ones, if they match the image being formed.
It is also possible to use different colors of pebbles, for example, laying out 1 strip light, the second dark, or making color dilution.
After one of the mosaic elements has been laid out, it is poured with water through a spray bottle. This will fix the hardening compound and remove excess material.
So, dividing the image into separate components, they cover all parts of the garden road. As a result, the garden path is closely filled with natural stones.

Such material is not cheap

To make the track last longer, it is worth making a pillow of sand

Natural stone is durable and not subject to mechanical damage
Construction of a walkway without cement
The difference between this option is that cement is not used when laying out a paved road.
The base is also crushed stone, raw sand is poured on it, compacted and smoothed by the “rule”. The level of the sand layer is always 30 mm less than the level of the curb or formwork. It is with such values that the stones will begin to stay flat. It is necessary to align the filled mosaic along the border.
It is easier to veneer stones not one by one, but at the same time to lay them in rows, tapping them on top with a hammer. The sand will need to be additionally moistened.
The rise of pebbles must be regularly checked with a special building level.
Having laid out a specific segment of the mosaic, before the sandy base dries, it is necessary to tap the plane one more time with a hammer, and then add more sand on top. The excess of such filling is then immediately swept away with a brush.
After the filled surface has completely dried, it is possible to walk one more time on the plane with a brush.
When in a couple of hours sand level will decrease, it is necessary to duplicate the filling and watering again.
After another drying of the mosaic, all stones are wiped with a damp sponge.
The completed structure is moistened with a small amount of water every day, for a week, so the path “accumulates hardness”.
If the installation process is carried out in open space, in this case, so that the canvas is not washed out by the downpour, it is preferable to cover it with non-thick foam rubber. It has a porous structure that allows some moisture to pass through, but does not allow the flow of water to wash off the sand.
If the paved road was erected using plank formwork, then at the end of the masonry, it is necessary to strengthen the canvas with stone or brick curbs.

You can lay out the track without cement

Sealing sand is used for laying tiles without cement.
Paving slabs for covering paths
Paving slabs are durable durable material... The service life of this material is approximately 15 years, if the laying technologies are followed.
If it is planned to move and park cars along such a paved road, then the height of the tiles should be equal to 60 mm or more. It is available in various types and sizes.
The sequence of works on the construction of the roadbed.
- Creation of a project plan and markup. Further, the design and pattern of the tile layout is developed and selected.
- Determination of material costs.
- Road bed laying.
Laying process:
- small depressions are dug in the ground under the curb;
- installation of a border around the perimeter of the path to secure the canvas;
- fits base layer gravel;
- tiling is being laid;
- filling of tile joints.

A garden path can be made from many materials

A garden path made of natural stone will serve you for a very long time

A garden path can be made with help. special forms
Clinker brick garden paths
A rather solid and aesthetic road emerges from it. For its durability, it is recommended to select high quality clinker bricks.
The base for it, with the rolled-up upper sand layer, must be smoothed out using the “rule”. It can be constructed from a plank with flawlessly smooth and smooth end edges. The plank must be 200 mm larger than the scale of the roadway. The corners of the lower component of the plank are equal to the thickness of the brick.
After leveling the sand mass, the installation of the side blocks begins, they are installed on an edge half the width into the ground with a rubber hammer. The sides are fixed: with curbs; solution; or fittings. Then the additional layer of crushed stone is thoroughly compressed.
Having fixed the side parts along the edges, they determine the type of pattern for decorating the middle part. They are laid out in two main versions, it is placed on the end or on its wide side.
For the strength of the masonry, the 1st row must be put in length, and the next one across the path, tamping the bricks into the sandy base. However, for reliability, they are fastened with glue on a cement base.
The solution is placed in such a way that its excess does not protrude over the masonry.

For durability, brick paths impregnated with a primer

To make the track last a long time, you should choose high-quality materials
After the end of the laying of all blocks, the seams are filled with sand. It is evenly spread with a long-bristled brush.
After the solution has hardened, the formwork is removed. On the edge, crushed stone of the middle fraction is poured and carefully compacted, and on top of it another layer of crushed stone is added.
For durability and brightness of the tone, the brick is treated with a penetrating primer, the dried material is painted over with a specialized stone varnish.
Variants of paths using wood
Garden paths made of wood do not require additional processing, therefore, are a durable option. Thanks to specialized processing, their service life can be extended and protected from moisture. Optimal material are larch and oak, as well as conifers. Bars and cuts of wood are considered the most inexpensive, and decking are considered the most expensive.
The ideal thickness of the blocks should be 15 cm. They are laid on a sandy foundation covered with a layer of gravel. This method contributes to the longevity of the garden path.
To create a more aesthetic version, wood cuts are used. They must be peeled from the bark and treated with linseed oil. It is recommended to lay out the side parts from cuts of a larger diameter to increase strength.
Installation of decking is carried out on top of the concrete surface. The advantage of this option is its high temperature resistance, and the availability protective coating... These properties provide high level strength, and durability terrace board... Fastening to the base is carried out using clips or self-tapping screws. However, this is the most expensive wood coating option.

Garden paths made of wood do not require additional processing

A path made of stone will last you a very long time
Concrete path in the garden
For a concrete road, the markings are performed in the same way as presented above, and then soil is removed.
Then curbs or formwork are formed on the sides of the walkway.
A certain layer of sand is poured into the workpiece, then it is moistened and compacted. The final thickness of the bed being compacted is 60 - 70 millimeters. Crushed stone is poured over the rolled sand, which must also be compacted. A reinforcing mesh is installed on the gravel, which makes the canvas much stronger.
Method of pouring concrete path
To obtain a smooth plane, the thinnest concreted composition is formed, and the formwork of the path is poured.
Strength is created by "iron". Dry cement is poured onto the still dry surface in a thin layer, and is immediately rubbed in. The use of store-bought topping mixtures is also allowed.
Garden paths with form: advantages and technology
Benefits of using track molds
Of course, many people choose the most classical method laying paths with tiles or paving stones. However, such a formation looks a bit formulaic, and it turns out to be quite costly. For this reason, almost all owners country houses decide to build garden paths on their own plot using forms. This gives you the opportunity to express your imagination in landscape design.
Paths in the garden, laid out in this way, work out, as a rule, very elegant. And, in comparison with conventional technologies, they have important advantages, for example:
- the minimum level of costs for the construction of work;
- the ability to produce tracks of various sizes and configurations;
- simplicity of the work execution process.
Create a track using shapes, they can be filled various materials, for example: marble chips, pebbles and other materials that will create originality in the look of the path. However, before you start tinkering with paths, you should perform certain preliminary work on the marking.
Using special form, you can build a very beautiful software outward appearance track. Such coverage is quite popular among summer residents and owners of suburban real estate due to the simplicity of production and the low cost of raw materials.
It is important to know that when constructing a walkway, you need to take care of drainage. To do this, it is possible to place it on elevated areas or tinker at a certain angle for water drainage. Otherwise, cracking of the coating may occur during the frost period.
Flooded garden paths and their benefits
The fill coating is characterized by the highest strength and is perfect for loads. The paving of the fill paths is performed on a concrete base. To form the system can be used paving stones or natural stone. A multi-colored material is used to form a natural look.

The easiest way is to bury concrete blocks into the ground. This option looks unusual and beautiful.

Garden paths are very helpful

Paths in the garden, laid out in this way, work out, as a rule, very elegant
Modern idea - plastic modules
Movable garden paths made of plastic modules are laid quite quickly and do not require a gravel base.
They allow you to build a road of any width, it is worth noting how they have fasteners that allow you to combine them both in length and across.
The connecting parts of plastic panels, which have rather huge dimensions, give the structure strength, so 2 plates are fastened at 2 points using special fasteners on the modules.
The advantage of such slab-panels is considered not only the speed of installation, but also the fact that their plane is completely non-slip, they can withstand quite impressive overloads, and are very reliable.
For the production of boards, frost-resistant plastic is used. This material can withstand temperature fluctuations from minus -35C to plus + 45-50 C. winter period such a track can be quickly and simply dismantled, stored in one of the utility structures. Plastic boards are practical and compact, the width and length are 570 x 570 mm, and the thickness is 22 millimeters. Due to the longitudinal holes, moisture from precipitation does not accumulate on the surface.
These garden paths are simple and easy to install, suitable for both lawn and soil. When germinating near plants, the path can be moved.
Video: DIY garden path
50 photos of ideas for creating garden paths with your own hands:


