Craft a rooster from ceiling tiles. Ceiling tile crafts: toys, cards and decorations
Ordinary foam ceiling tiles can be used to make unique decorations and crafts for the New Year. The article contains examples of such and a description of how to do them.
Often there is a desire to decorate your home with festive crafts. This ritual is especially important on the eve of the New Year. After all, it is for this celebration that people are waiting for some kind of miracle. Children expect magic in the first place, so they try hardest.
How to make ceiling tile decorations?
It's time for family, time for friends, time for good food and time for shopping. This is not your fault, this is the way it is in our culture. So yes, you might have to buy gifts for your family, friends, and colleagues, but do you really need to buy new Christmas decorations every year? Of course, you can buy them once and then reuse the same ones over and over again. but if you're bored with the routine or just feeling creative, why not create some of your own jewelry?
Crafts can be made from various materials, and there is a lot of information about this on the online spaces. Very original Christmas tree toys are made from ordinary foam tiles that are glued to the ceiling. Next, let's look at examples of Styrofoam Christmas decorations in detail.
How to make a white fairy house from ceiling tiles: diagrams, descriptions, photos
To get started, first of all, stock up on free time. This process will require patience, skill, desire. And kids will be delighted with such work.
Junk Ball Decorations
And by using recycled materials, you will not only save money, but also break the crazy consumer cycle! If you need ideas to get started, here are some simple decorations and crafts anyone can make at home. Have you bought too many Christmas cards and have nothing to do with them? All of this paper can be used to create impressive Christmas lights and decorations.
To make this particular piece of jewelry, all you have to do is cut the spare paper cards into circles, fold them, glue and string them all together. It really is as easy as it sounds. Read the full tutorial for detailed instructions.
Prepare materials, tools in advance:
- scissors, marker, glue
- tile, sharp knife
- felt-tip pens, gouache, colored paper, foil
The house can be made in one plane, or rather, simply cut out the pattern of the roof, the front panel with a window and a pipe on the roof from the foam. Or you can build a whole 3-D model of a real fabulous gingerbread house or Baba Yaga's hut.
If the first project seems too difficult for young children, this one will be perfect. There is no extra folding or gluing - just cut out pieces of paper and glue them onto a string. You can use any kind of paper for this, from unused Christmas cards to junk mail and magazines.
All it takes to craft keyboard decorations is some keyboard keys and a little creativity. Even if you just bind them in the strings that make up words, you've already done something special. Making a sturdy deer as perfect as a painting takes a little work and some tools, but it can be an interesting project for you or your older kids, and the results are bound to have an answer. All you need to do is corks and twigs, although additional decorations can definitely help.
For the second option, do the following:
- Cut four sides of the house out of foam
- Two identical roof pieces
- Two isosceles triangles for the front and back of the attic part of the building
- Then carefully make openings where there will be windows, doors
- In the future, they can be decorated with colored paper, curtains can be made inside
- Glue all finished parts of the product
- Cut the pipe and glue it to the roof
- To make the house more fun, you can still make a whole courtyard
- There, make a Christmas tree in the yard (again, from foam)
- With felt-tip pens, paint it and draw toys on the branches.
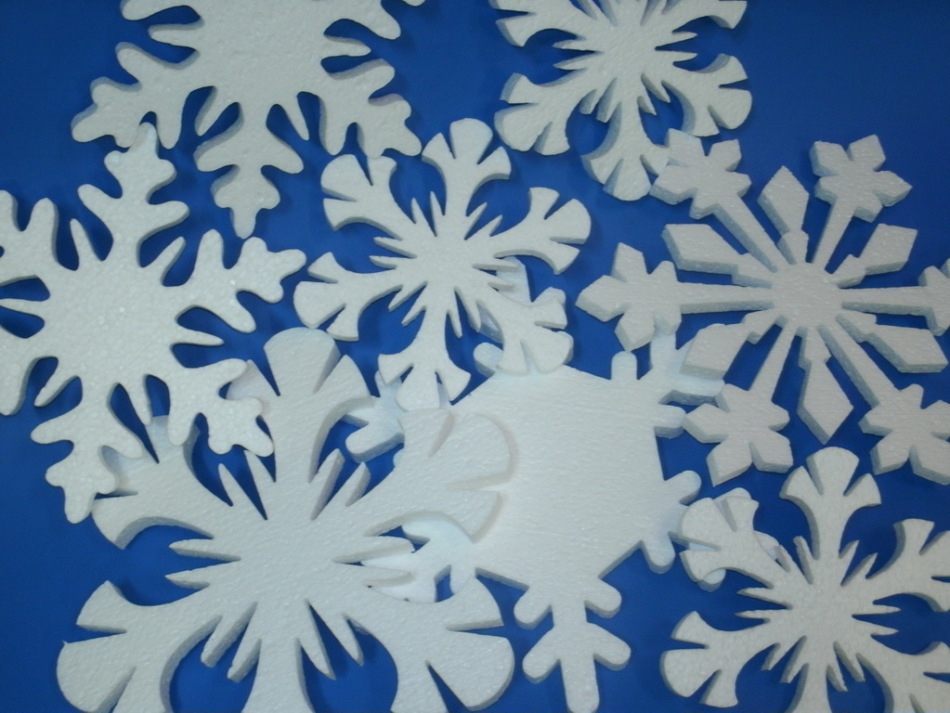
How to make snowflakes from ceiling tiles: templates for cutting, photos
What a New Year's holiday without beautiful white snowflakes of different shapes. They are cut not only from paper, but from ceiling tiles. But it should be borne in mind that the foam cannot be folded like paper, so that the snowflake turns out to be strictly symmetrical.
Lanterns snowflakes from empty cans
Are there any empty cans? You are ready to make snowflakes. Then move on to the next tutorial to learn how to make lanterns. In short, you need to glue the snowflakes onto several jars and, if you like, light the candles inside. You can use snowflakes in many different ways, like sticking them to a wall, or any other way you can come up with. It doesn't take long: take a few pages from the book, cut them open, and attach a piece of string. This ornament is very easy to make and will give your tree an authentic, bookish look.
To create neat products, you will need templates (templates that you can make out of cardboard). Subsequently, such templates are not difficult to transfer to the material using an ordinary felt-tip pen, it is enough just to outline the contours.
You will see a number of such examples of patterns in the image below.
They can be printed on a printer, and then carefully cut, glued to more durable paper. Again, cut them out, after which you can safely transfer them to the foam tiles.
DIY volumetric snowflake
Follow this tutorial for more details. This is a great craft for those with young children and want to engage them in fun. Just collect some empty yogurt bottles and some extra bottle caps, and using a few simple craft supplies, create these adorable snowmen.
You can fill them with all sorts of goodies. In this tutorial, for example, the snowmen are filled with jelly. Do not throw away burnt out light bulbs! Cover them with glitter or paint, and hang them on your tree instead of those expensive store-bought decorations. It's very simple and requires nothing more than simple creativity and whatever supplies you have. To understand how to make the ornament in the picture above, check out this tutorial.
Now cut the intricate patterns of snowflakes with a sharp knife on the foam. Hang the finished products on the Christmas tree or decorate them with garlands, chandeliers in the house.
IMPORTANT: When you cut snowflake figures from ceiling tiles, keep in mind that the material is brittle and the process should be done carefully, with maximum accuracy.
Corks are a great thing to save money if you love recycling and crafts. Besides the deer, you can also make other decorations out of them and of course this wreath. All you need is a styrofoam wreath, a glue gun and of course, corks!
How to make a white fairy house from ceiling tiles: diagrams, descriptions, photos
Collect some coffee filters you don't need and make a tiny Christmas tree. As long as you have filters, a foam cone or something for the wood itself, and something flat for the base, the rest is really up to you. Draw filters or leave them white, glue whatever you find as decorations and find the perfect tree top to suit your little tree.
How to make a Christmas tree from ceiling tiles?
If the tree is already in the house, then the children know that gifts will appear under it for the New Year. But there are unexpected situations when adults did not have time to buy the most important symbol of the New Year. In this case, do not be upset, a pretty tree will turn out from different sizes of ceiling tiles.
Follow this tutorial for some inspiration and instructions. Christmas isn't the only time of the year when you can use things that you would normally throw away. For example, do you know that you can How do you dispose of your old computer equipment?
How to make winter crafts and snowman-related activities using recycled and readily available materials. Print out the snowman template and costumes you would like to use. You might want to make three different snowmen with different equipment.
True, for the product you need a thicker tile. In addition, the number of squares must be collected more, then the artificial beauty will come out in a large size.
Fold the squares in the form of a pyramid, as in the picture below. Glue a small top at the top.
 Christmas tree - do it yourself
IMPORTANT: Any decoration for the Christmas tree will do. Silver rain, garlands, beads will come in handy.
Color the swatches and then cut them out. Glue the clothes to the snowman. If you want to make a paper doll snowman so you can dress and undress the snowman, cut out the snowman and add paws to the clothes.
Crepe paper or scarf material.
Orange colored nose pencil for carrots. So that the snowman's head wrinkles on scrap paper and hangs the bag about halfway. Tie the end and draw a white bag. To make the snowman's body fill another paper bag almost to the top, then fold the top edges over each other and glue them.
How to make Christmas tree decorations from ceiling tiles?
As Christmas tree decorations, you can use a variety of figurines for a suitable New Year theme.
 Santa Claus with gifts
 Deer - do it yourself

How to make ceiling tile decorations?
From one ceiling tile, you can cut dozens of small decorations that are hung on the front door or in other places on the eve of the New Year's celebrations.
Roll it up again and then again. Don't worry too much about wrinkles. Draw black or any color. Glue the body to the head and then glue the hat to the head. Draw the eyes and carrot nose on white paper, and then paint in the nose with orange crayon. Cut out the eyes and nose and glue them to the head. Draw the mouth with black marker.
Cut the legs and hand shapes out of black construction paper and glue them to the snowman. So that the charcoal buttons would wind up black construction paper and glue it to the body of the snowmen. Cut a strip of paper about two centimeters wide to glue around the snowman hat.
Those who can draw well will effortlessly decorate the products beautifully with felt-tip pens, gouache and other auxiliary materials. To keep them on garlands, a Christmas tree, tie threads to stars, bells, snowflakes.
 Beautiful decorations for the New Year
IMPORTANT: Observe the safety rules. After all, the foam melts, easily ignites when exposed to high temperatures, fire. Therefore, it will not hurt you to explain to your child that you cannot indulge in fire, so that a fire does not happen.
Spin and Squash Snowman Water Bottle for Kids
Use crepe paper to make a snowman scarf. Cut out small slots at the end of the crepe paper to make it look like a scarf.
These little snowmen are so funny! You never know what they will look like until you are done.Styrofoam snowflakes
Plastic bottles with caps. White and black acrylic paint or spray paint for plastic. Things you want to use to decorate your snowmen, such as ribbon, buttons, felt, twigs, etc. How to Make a Twisted Water Bottle Snowmen.

How to make flowers from ceiling tiles?
Flowers, like snowflakes, must be cut out after you transfer the drawing from the template to the foam. To make them different colors, paint them with gouache. A varied ornament will turn out on the surface of the flowers, since there are interesting patterns on the ceiling tiles.

How to make a snowman from ceiling tiles?
Using the applique technique, make a snowman from a ceiling tile. Then place it under the tree on a small stand made of another tile so that it does not fall. A cheerful snowman will delight you and your children, charge you with positive emotions throughout the winter holidays.
Remove the label from the water bottle. Use a funnel to fill the bottom of the bottle with sand or dry rice about an inch. This keeps the snowman from falling. Hold the bottom of the bottle with one hand and grasp the bottle about two inches from top to bottom with your other hand. Rotate the bottle like you would blow up a balloon. If the bottom of the bottle is indented, blow up the bottle until the indentation disappears.
How to make a volumetric paper snowflake using the quilling technique
Insert a handle or something long and skinny inside the bottle to pop out any areas at the top of the bottle that were dented after curling. When you have a shape that you like, screw the cap back onto the bottle. You can also make a molten snowman by clicking on the top of the bottle to make it flatter. Replace the lid when you have the desired effect.
 Snowman for New Year's holidays from ceiling tiles
How to make Santa Claus from ceiling tiles?
A cute Santa Claus for a Christmas tree in the form of a toy will turn out if you cut it out of a pattern from a ceiling tile. In addition, for a beautiful design, it can be dressed in a hat, a fur coat made of red fabric. And paint your face with paints. Make a beard, mustache, edging of white plush.
Paint the bottle with white paint and let it dry. If you are using acrylic paint, you will probably need two coats. To have the top hat draw a two-inch circle on the black foam and cut it out. Remove the cap from the bottle and place it in the middle of the Styrofoam mug. Trace around and then cut out a circle. Replace the cap and place the cut out part of the circle over the cap. Paint the cap black to match the edge of the craft hat. Place decorative tape around the hat.
Have the cap cut the top of the sock so that it is about three inches long. Tie the end of the cutout to a string. Make a matching scarf with the rest of the sock. Cut off the orange foam from the nose of the carrot. You can use real buttons or cut out the button shapes from craft foam to stick to the body of the snowmen.
 Santa Claus - do it yourself
How to make a tank from ceiling tiles?
It is better to make a tank from combined materials. To do this, prepare:
- multiple ceiling tiles
- cardboard, knife, glue
- paint, markers, scissors
First, make a tank pattern, as in scheme below, on plain paper.
Use real sticks or hand pipe cleaners. 

How to make a paper snowman doll. The color of clothes and hats. Cut out templates. Divide the clothes and add sequins, ribbon, or other decorative items. Glue the clothes onto the snowman. Can you help me keep warm? I pasted the clothes on the inside. 
Kayla used this snowman ship to make a palette game for young children. She printed twelve snowmen with hats. She wrote the numbers 1-12 on the hats and then added a different amount of bottom to each snowman.

Progress:
- Cut Styrofoam Parts
- Start by collecting the bottom of the tank
- Glue all other parts of the craft
- Gently paint it with felt-tip pens, paint.

Styrofoam is a great material for this type of craft. If you have imagination, you will come up with various toys for the New Year yourself. Thus, please yourself and your little family members by making them together.
Ko15shulka 06.12.2016
To decorate your home for the holidays, snowflakes can be made from a variety of materials: paper, cardboard, foam, silicone ... And it's not difficult at all.
A snowflake is an integral symbol of winter. On New Year's holidays, I want to decorate my home in a special way. So why not hang (attach) beautiful snowflakes on your ceiling, chandelier or window? It is not difficult to make them, and any material can be used. Thick cardboard, foam or silicone glue will work. Learn the secrets of making snowflakes from these materials from this article.
Made of cardboard
For work you will need:
- pieces of foam;
- thick white cardboard;
- scissors;
- pencil;
- PVA glue;
- silver tinsel.
First, take a large sheet of white cardboard and draw a snowflake on it. An example is shown in the photo.

Cut out two identical parts and glue them together. This is necessary in order for the craft to be denser and keep its shape well.

We smear the surface with PVA glue and glue silver tinsel and foam balls on it.
The gorgeous snowflake is ready!

Openwork snowflake made of paper
For such a craft, you need to take:
- white sheets of paper (you can from a sketchbook);
- scissors;
- stapler.
First, the paper should be cut into squares. Each square folds into a triangle two times. Before reaching the middle fold, we will make several cuts along the edge with scissors. Then we will completely open the square, after which you can begin to connect the ends in pairs, alternating the sides. It turns out one segment. You need to form 4 more of these and connect them with a stapler into one large snowflake.

Styrofoam
If you take a thin sheet of polystyrene and arm yourself with a clerical knife, then in just a few minutes you can make voluminous white snowflakes.
Foam ceiling tiles are a material from which it is easy to make crafts with children. The work requires the use of simple tools, which allows even novice craftsmen to make a craft. And the material itself is easy to purchase at any store of building supplies, or to use the tiles that were not useful during the repair.
Material features
Ceiling tiles made of polystyrene are pliable, lightweight material that is pleasant to create with. You can freely cut it with scissors or a clerical knife, glue the parts necessary for work, paint, decorate with additional materials. However, you need to remember some of the nuances of working with tiles.
- Gouache, felt-tip pens are suitable for painting tiles.
- It will not be possible to paint the foam with colored pencils - it is too soft.
- For gluing parts, use PVA or double-sided tape.
- It is impossible to use adhesives based on acetone, because they will damage the tiles.
- For work, non-laminated tiles are suitable.
- The prepared parts from the ceiling tile can be slightly bent, giving them the necessary shape, but it is impossible to bend too much so that the tile does not break.
Craft options
You can make both flat and volumetric crafts from tiles:
- postcards;
- letters and numbers;
- decorations for the tree;
- models of houses and various equipment (airplanes, tanks, cars, etc.);
- figures of animals and birds;
- also make multilayer products;
- etc.
Execution technique
The execution process usually involves applying the elements of the product to the tiles, cutting, gluing (if necessary) and decorating the craft.
In the detailed photos in our master classes, you will see how you can make crafts from ceiling tiles, and then embody these ideas, doing it yourself or with your children.
After renovation, a lot of residues from coating materials usually remain in the house. Many people think about where they can be used with benefit. The remnants of wallpaper, for example, are used to paste over furniture, interior items or to make a cover for homemade notebooks. What can be made of foam ceiling tiles? Some use them as a basis for DIY crafts.
Ceiling tile craft options
The simplest options for products that can be made from foam ceiling tiles are Christmas tree decorations or pendants. Children will love to spend time with you decorating such decorations. They are done very simply:
- the desired shapes are drawn on the foam residues: hearts, stars, snowflakes, little men, etc.;
- cut them out with clerical scissors;
- individual figures are decorated or pasted on them using PVA glue, drawings are sewn on, decorative elements are sewn on.
The composition of the paint used to decorate foam products should not include acetone and other active substances that can melt the foam. Better to paint ceiling tile crafts with gouache, felt-tip pens or oil paints.

You can make a voluminous Christmas tree for the New Year, paintings on various topics, houses, cars, etc.
Ceiling tile paintings come in a variety of sizes and functions, such as postcards. They can be decorated in the form of a valentine. To do this, neat hearts are cut out of the tiles and decorated with sparkles, beads, decorate, and appropriate inscriptions are made with felt-tip pens. You can make postcards in the form of a book: cut out two identical parts from polystyrene and connect them with a glued strip of decorative paper.
If you know how to draw well, create a masterpiece, paint a landscape, still life, or something else to your liking on the cut out piece of tile. The paintings can then be hung on the wall and shown to relatives and friends.
Another option is to hang photos of your loved ones on a foam base and decorate it with rain, sparkles, small toys or decorations. It all depends on your imagination, in this case there is an opportunity to show it to the fullest.

How to cut a glider from a ceiling tile
The most popular foam product that kids love is the ceiling tile glider. It is quite easy to do, you will need the following materials:
- ceiling tiles without a pattern;
- PVA glue;
- wooden lath, preferably pine with a section of 4x4 mm and a length of 1922 cm;
- buttons;
- pins;
- clothespins;
- templates;
- markers, felt-tip pens, pens;
- office knife;
- skin for sanding;
- plasticine.

First you need to cut the template. Drawings of different gliders can be found on the Internet and you can choose the model of your choice. The printed and cut elements must be glued to the cardboard, then attached to the tile, fixed with buttons or pins and circled. After that, they are cut out with a clerical knife with an allowance of 12 mm.
Now the workpieces are sanded to give smoothness and smoothness to the surfaces of the wing and the stabilizers of the forward and backward motion. The parts should be sanded smoothly and carefully so as not to spoil them.
The next step is gluing all the elements. The lath is coated with PVA glue on one side and the other and left for impregnation. Mark the middle on the wing and stabilizer and coat the bottom with glue along the middle line. Then all the details are fixed with clothespins, the keel is attached with pins to the wing along the midline.

After 68 hours, the mounts can be removed and the glider adjusted. To set it up, you should start the model from your hands and see how it flies. If the glider is rapidly gaining altitude, then you need to make the nose heavier by sticking a piece of plasticine to it. If the model dives sharply, then the tail should be heavier and the plasticine should be glued to it or the stabilizer should be bent down.
So, if you decide to decorate your ceiling with foam tiles, remember from the remnants of the material you can create useful products or make toys for your children.
Crafts for the New Year made of foam and ceiling tiles are an easy way to decorate your home for the holiday. We have made for you a selection of popular ideas and the best master classes on working with these materials. The article is useful for those who love original decor, as well as parents whose children are already preparing their crafts for contests in kindergarten or elementary school.
For crafts from ceiling tiles, Christmas templates will come in handy. We advise you to look into the "stencils" section on our website: there you will find snowflakes, New Year's heroes, deer and other collections. Any of these templates can be printed and then simply cut and traced on the styrofoam - here's your decoration.
House of tiles
White ceiling tiles will be an excellent basis for a New Year's hut. If you are engaged in creativity with children, entrust the child with the decoration of the craft.

We need:
- tiles (1 piece);
- plastic baguette;
- foil, "rain";
- glue, markers, felt-tip pens;
- cotton wool.
We cut out 4 walls from the foam. The sides can be made narrower. The main thing is that the height is the same.
It is best to glue the house with glue, but if you wish, you can add tape to connect the inner edges. Decorate the roof with a baguette. And if you don't have one, put cotton wool on it - you get a beautiful snowball.

We decorate the house with snowflakes, Christmas trees and other New Year's attributes. Make several of these houses from the ceiling tiles with your own hands - you get a whole festive village.
Snowflakes
Ceiling tiles can be used to make a simple and cute decoration for the New Year in the form of large snowflakes.

We need:
- 2-3 sheets of tiles;
- thin cutter;
- "Rain" or fishing line.
First you need to print snowflake stencils (you can take them from our selection). You can make them small and plant several snowflakes on one thread. Or paint a snowflake all over the ceiling tile.
You need to cut out small parts with a cutter. If they are very small, you will have to gouge the holes with a needle or awl.

Additionally, you can decorate the snowflake with bright colors or sparkles. Hang the snowflakes from the ceiling.
Complement the decoration with balls of cotton wool or foam. This will create an artificial snowfall that will look very cool on the window or just in the apartment.
Christmas tree decorations
Ceiling tiles will make great garlands or New Year's decor for decorating a Christmas tree. The main thing is to prepare bright colors and sparkles, and then it's up to little. This Styrofoam Christmas craft is perfect for a kindergarten competition.

We need:
- ceiling tiles or foam;
- laces;
- stencils;
- markers, pens, paints, glitters.
Print the stencils, transfer them to Styrofoam (any New Year's images will do, even New Year's heroes). It is best to cut them with a cutter, not with scissors, so as not to spoil them.
Draw the outline with a thin felt-tip pen. The base can be painted with bright colors, and the decor can be added with sparkles or special paints to create ornaments.
Pierce the figurines at the top with a thick needle, insert string or rain.
Styrofoam snowman
If you want to create a stable figure, you are better off using Styrofoam. If you need a snowman to stick it on a wall or to decorate windows for the New Year, take a ceiling tile.

We need:
- tile and foam;
- paints;
- stencil;
- sharp knife or cutter;
- sandpaper.
Views: 9 182
Irina Kononova
Such christmas tree can be done with a child at home in a few evenings and without high costs
You will need the following materials:
Smooth white ceiling tiles;
Acrylic paint;
Light green tinting paste. dark green, blue colors;
Universal polymer glue;
Stationery knife;
Thin elastic wire;
A set of beads or old beads.

We make patterns for parts Christmas trees made of paper.
Cut out four symmetrical details:
1 - top Christmas trees(bottom part,
2 - top Christmas trees(top detail);
3 - bottom Christmas trees(bottom detail);
4 - bottom Christmas trees(top detail)
and one detail - "snowdrift".

Laying out the details on the sheet ceiling tiles on the back and outline it with a ballpoint pen.

Using a clerical knife, we cut out the details herringbone ceiling tiles


Let's start coloring.
Dilute some green paint (no more than a teaspoon will be needed)... We will paint over the front side of the details with it.
First, paint over the sides (thickness tiles)

Then we paint over the front side of the details.

Now we breed light green and blue paints (even less will be needed)
We paint the upper parts with light green paint Christmas trees
We paint with blue paint "snowdrift"... Let the paint dry.

We collect herringbone.
With glue (a small drop is enough) we connect the lower parts Christmas trees(top and bottom)... Let the glue dry a little.

To the bottom Christmas trees glue on the top part. We use a small amount of glue (one drop in the center of the part).

We glue the upper part on the upper part Christmas trees.
Glue herringbone on"snowdrift"... Let the glue dry well.

Decorate herringbone
We make small staples from the cut wire.

We pass the wire into the beads.

We pierce herringbone through with a staple with a bead.

Bend the ends of the wire from the seamy side

For Christmas tree garlands we put the beads next to each other. You can string several beads on one wire.

We place balloons and other decorations all over herringbone in no particular order.

Now I'm ready Christmas tree.

Such herringbone can be wall-mounted or any flat surface. For this, it is enough to "snowdrift" on the seamy side, glue two strips of thin double-sided tape and glue Christmas tree in the place you need.
You can glue a small magnet and hang on the refrigerator
HAPPY NEW YEAR!
Related publications:
Teamwork "The clouds woke up with a sunny smile" from the ceiling tiles. Master class Cloud woke up With a sunny smile ,.
Good day, dear colleagues and friends! I bring to your attention a master class "Chicken for a walk" Before starting work.
Purpose: Transfer of experience by direct and commented demonstration of the sequence of actions, techniques, forms of pedagogical activity at.
Autumn! Sweet smell of apples, Unprecedented harvest, Many of them under the canopy of apple trees, Bend over, pick. I really enjoy this wonderful time.
New Year is just around the corner to keep your child busy on cold winter evenings and get ready for the upcoming holiday. I propose a master class.

