Filling the floor in the apartment is all about the materials and technology for creating a perfectly flat floor. How to fill the floors yourself How to make a flooded floor
How to fill the floor, most often interested in the happy owners of the new private building. And if you have virgin soil in front of you, then consider how to make a strong and durable foundation on it - from sand cushion to the final layer.
Self-leveling concrete floors have been popular with builders for a long time. The fact is that the material is not only durable in itself, but also quite cheap, not demanding on environmental conditions. However, this process is quite laborious and not too clean, and therefore most people do not dare to pour the concrete floor with their own hands, entrusting the task to teams of experienced workers. If you decide, then let's figure out how to prepare for this event.
So, if you have your own house and do not need to run through various authorities to obtain permission to fill, then start by calculating the area and cubic capacity. Next question, which must be clarified without fail, is how dry the soil is, as well as the level available under the house ground water. Such pickiness is needed in order not to increase the load during the winter freezing of the soil and to prevent the destruction of the foundation.
If the self-leveling floor is used as a draft floor, it must be taken into account that groundwater must be at a depth of at least 5 m.
Draft self-leveling floor
The sand and gravel pillow is the basis of everything, so we start from this crucial stage. From the bottom level doorways we take measurements at what level the outer surface of the floor will be located, draw a line of this limit. Starting from this line we draw excavation, removing the soil about 35-40 cm from the markup. We fill the perimeter of the excavated space with rubble, which should then be tightly tamped so that its level is approximately 10 cm.
To fasten the base, it is necessary to fill the crushed stone with sand, the layer of which will be at least 10 cm, fill it with water, and compact it tightly. After drying, we apply another sandy layer, with which exactly the same manipulation is performed. Again we pour a layer of crushed stone 5 cm high, which we supplement with sand and tamp. The main requirement is that the sand covers the rubble completely, preventing the sharp edges of the stones from protruding.
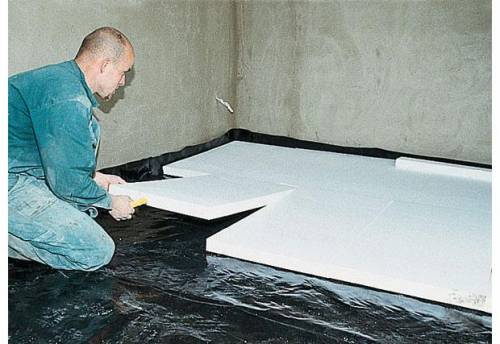
Since it is impossible to properly fill the floor without proper insulation from water and cold, then after creating a kind of crushed stone-sand cushion, we will do just that. Protection is made easily: sheets of roofing material are overlapped on top of compacted gravel with sand, the edges are fastened together with bitumen or metal staples. Heat-insulating ingredients are placed on top of the roofing material: expanded clay, basalt wool slabs or others modern materials intended for these purposes. But this stage is not as strictly necessary as a pillow; you can arrange an appropriate layer after the concrete has been poured.
In what order should work be carried out?
Now you can proceed to the most important thing and literally walk through the steps of how to pour a concrete floor.
How to fill the floor from scratch with your own hands - step by step diagram
Step 1: Before pouring
When all the necessary measures have been taken to prepare for pouring, we proceed to the installation reinforced mesh. For floors, a welded structure is usually used, the side of one cell of which can be from 5 to 10 cm. Reinforcement is necessary in order to increase the strength of the floor during pouring.
The fittings should not be placed immediately on the heat-insulating gasket. It is best to install the mesh on supports about 3 cm high. At the same stage, “beacons” are installed - pieces of wooden blocks fixed with concrete. They will level the surface. The main thing is that they are perfectly straight. They are set according to the level and fixed rigidly, but in such a way that they can be removed if a mistake is suddenly made.
Step 2: Mortar
While the "beacons" are fixed with cement, we begin to dilute the solution. Here it should be noted that he must prepare immediately in the right amount and poured in one go, and not in parts. Otherwise, you can forget about a flat surface. For a dwelling, a filling solution prepared in a bucket is clearly not enough. So, you need to take care of the concrete mixer in advance. And if you already have a concrete mixer, it’s a good idea to think about additional thermal insulation by adding an ingredient such as perlite (sand with special properties) to the solution.
The material for pouring the floor is prepared in the following order. First, we pour two buckets of sand (perlite) into the concrete mixer, fill them with 10 liters of water. When everything is well mixed, you should again add a bucket of sand and 2 liters of water. The mixture must be stirred until it becomes completely free-flowing. When the base of the solution reaches the desired consistency, you need to stop the device and let it stand for 15 minutes. As soon as the composition has settled, the kneading should continue until the substance becomes thick and viscous.
Instead of sand, you can use domestic cement marked M400 and M500. Its use in this case should be consistent with the recommendations attached to the material.
Step 3: Fill
Do-it-yourself concrete flooring should be poured in such a way as to end near the exit from the room. Otherwise, you will have to sit by the window and wait for the screed to harden. The surface is poured in sections and leveled with a special device - the rule. It is advisable to use a vibrator when tamping so that the layer is denser. As the solution is applied, it is desirable to immediately roll out from above polyethylene film so that it can dry for 3-4 weeks.
Also, do not forget to moisten the solution once every two or three days so that the layer does not crack and dry out. It can be used for coating with a polyethylene film stretched over a prefabricated rack frame. It is better to spray the hardening solution from a thin hose with a sprayer, gently lifting the polyethylene protective coating.
Step 4: Get the Beacons
After waiting for the necessary time, sufficient for the final solidification, the installed "beacons" should be removed. It's a personal matter, of course. Some people just leave them on the floor. If you want everything to be "according to science", start slowly freeing the lighthouse from the solution, lifting it from one end and at the same time tapping on the surface with a hammer, beating off part of the concrete.
When the beacon is removed, the resulting groove is filled with concrete. The disadvantage is that you will have to wait again for the solution in this cell to seize, and then also grout so as not to disturb the evenness of the surface.
Step 5: Perfecting
Self-leveling floors in residential premises rarely perform the function of a full-fledged coating; they are used as a base for other types: tiles, linoleum, carpet, or for construction under a rough wooden or laminated floor. In any case, we must strive to ensure that the horizontal surface is close to ideal. This also determines the period of its further operation.
If it is planned to lay a laminate or linoleum on the floor in the future, it will not be superfluous to apply an additional leveling screed to the existing concrete base. For these types of surface requirements are increased, and therefore special "self-leveling" mixtures can be used.
There are many myths about solutions that themselves spread over the floor and solidify, allowing you to create an ideal mirror surface, among people who are not passionate about repair and construction. We will try to clarify, because applying such a layer also requires skills and abilities.

Self-levelling floor compound
- easy to prepare - just mix the powdered substance with a certain amount of water;
- freezes liquid composition much faster than cement;
- are made from environmentally friendly components;
- the layer is quite thin, which is especially important for owners of premises where the ceilings are quite low;
- a large selection on the market, giving the possibility of selection for any purpose.
Cons of self-leveling compounds:
- thorough cleaning of the surface is necessary before application;
- special care when applying to a wooden base, since as it is absorbed into the fibers, cracks may appear on the surface;
- if laying tiles is planned, you will have to wait at least a day for the liquid layer to dry for sure;
- an ordinary screed is much cheaper than a self-leveling mortar.
Self-leveling mixtures cannot replace the "rough" composition, which was mentioned at the beginning of the article. Their role is to prepare the top layer for final finishing or service as original flooring.
A floor screed is necessary for several reasons: before arranging the finish coating, when creating a “warm floor” system, when laying insulating materials. How to independently fill the floors in the apartment, find out from our article.
How to fill the floors in the apartment with your own hands - the preparatory stage
Any building and repair work begin with the preparation of work surfaces. In the case of the floor, the preparatory work will include the following actions:
- The old coating is dismantled from the floor, if any.
- Then the surface is swept, all debris is collected, dust is wiped off and dirt is washed off.
- Grease stains are removed with solvent compounds.
- Then the floor is covered with a primer layer, which will improve the adhesion of the materials used. If working base too dry or porous, then it is primed 2 times. The primer must dry before continuing.
How to fill the floors in the apartment with your own hands - floor waterproofing
After preparatory work the floor should be waterproofed. For this, polymer, bituminous, mineral or mixed compositions are used. Types of materials for waterproofing are different:
- Roll or film - these are multilayer membranes that perform both hydro- and thermally insulating functions.
- Mastic - this is a kind adhesive mixtures based on resins, rubber or polymers. They are good because they do not leave gaps anywhere and fill all cavities.
- Liquid - after hardening, cover the base with a durable waterproof film.
- Powdered - they are a mixture of plasticizers and astringent ingredients that must be diluted with water in accordance with the instructions.
Floor waterproofing is especially necessary if work is carried out in a bathroom or toilet, if there are significant gaps and gaps at the joints of walls with the floor or near communications.
When waterproofing, you can immediately equip the thermal insulation of the floor by laying a layer of the appropriate material: mineral wool, expanded polystyrene, expanded clay.


How to fill the floors in an apartment with your own hands - measuring the horizontalness of the floor and setting up beacons
The screed is poured strictly horizontally, for which the horizontality is preliminarily determined by a laser or water level. Here's how it's done:
- From the lower level of the door, measure 1 m upwards and make a mark there.
- A line corresponding to this mark is drawn along all the walls of the room. So that the line is parallel everywhere, it is checked with a level.
- Down from the first line at a distance of 1 m, a second one is drawn.
- In the corners of the room at the level of the lower mark, nails are driven in and a cord is pulled between them.
Marks drawn on the walls will help to place beacons. As beacons, you can use segments of metal profiles or wooden slats. They are placed on edge, observing a distance less than the length of the rule for leveling the cement mortar.

How to fill the floors in the apartment with your own hands - preparation and pouring the solution
The mixture for preparing the solution can be purchased ready-made or made by hand. If the area of \u200b\u200bthe room is small, then some prefer not to save money and buy the composition in ready-made. Well, those who want to save money or perform a large amount of work, choose independent option cooking. The cement-sand mortar is made as follows:
- Water and perlite are mixed in a ratio of 2:4.
- Then 1 part of cement and 1 part of water are introduced into this composition.
- The mass is again thoroughly stirred and pour 2 parts of sand. Then add another 5 parts of water and mix again until a plastic consistency.
Pour the solution in the following way:
- It is laid out in parts between the beacons and leveled building rule, in appearance resembling a mop. If there is no such rule at hand, a plaster trowel or a very wide spatula is taken instead.
- When leveling the solution, vibrating movements are carried out so that the composition fills all the cavities with itself, and air bubbles come out of it.
- If expanded clay is placed under the screed as a heater, then it is poured with cement milk before pouring the solution - a very liquid mixture of cement and water.
- In some cases, expanded clay is added directly to cement mortar.
Sometimes the floors are not filled with cement mortar, but with special plastic mixtures that are sold ready-made. Such self-leveling floors are stronger and more durable. The composition acquired in powder form is diluted with water, a sufficiently liquid mixture is obtained, which is poured using the same technology. As a rule, the self-leveling floor is more even due to the fact that the liquid composition spreads better over the surface.
If you have started overhaul in the apartment, then you should start with a long and laborious process - pouring the floor. This is especially true of old-style apartments. Modern floor finishes require a level surface. Not only the quality of the coating, but also the entire interior depends on this. Who wants to substitute improvised materials under the furniture that it stood exactly. Laminate is easily and simply placed on a flat floor, and in operation it shows itself to be durable and durable material. While irregularities in the floor lead to the formation of cracks and deformation of the floor covering.
Filling the floor in the entire apartment can be done independently, saving on the services of a master. Even if you are doing this for the first time, it is enough to practice on small room and already in the rest of the rooms the work will go like clockwork.
Filling a new floor is required:
- with further laying of the finishing floor covering: parquet, linoleum, laminate;
- when insulating the floor or when laying the construction of an electric or water heated floor.
To work easily and efficiently, you will need:
- metal brush;
- rail for lighthouses;
- primer roller;
- cuvette for the mixture;
- sidewalk scraper;
- a small brush for priming on a small or hard-to-reach area;
- needle roller;
- spatula wide;
- drill with a nozzle for mixing;
- primer.
Stages of work
A qualitative result largely depends not only on skill, but also on the sequence of work.
Filling in the apartment is carried out in several stages.
- The surface is being prepared.
- Priming is being done.
- Waterproofing.
- If necessary, a heat insulator is laid.
- The horizontal level is determined.
- A solution is being prepared - concrete, cement-sand or based on a dry mix.
- A screed is being made.
- The surface is expected to dry.
Preparing the floor for work
Before proceeding directly to the work, you should prepare the surface. For this:
- we dismantle the old coating;
- be sure to remove the plinth and dismantle the doors;
- We clean the floor with a grinding machine or with a brush. We remove from the surface all the remnants of the mixture, glue, crumbling concrete;
- We remove all construction and other debris, dirt and dust. It is recommended to moisten old surface to improve the adhesion between the layers of the screed. You can use a regular vacuum cleaner for cleaning. Degrease the surface after dismantling the old floor with a conventional soap solution;
- all sorts of cracks and cracks are puttied with a thin and barely noticeable layer. To do this, choose a tool that contains a resin or adhesive solution.
The primer strengthens the surface to be treated and improves adhesion to subsequent repair operations by creating a rough surface. For a conventional concrete-sand mortar, any of the universal primers is used. In small rooms, the primer can be applied with a brush, in larger rooms it is more convenient to use a roller. Allow the primer to dry before continuing. This will take up to two hours.
Porous and dry surfaces require re-priming. Before proceeding with the application of the next layer, it is necessary to allow the previous one to dry completely. The primer will be needed in the future before each layer, if the alignment is done in several layers.
| Manufacturer | Description | Consumption | Volume and price |
|---|---|---|---|
| PrimeGround | Deep penetration primer with antiseptic | 0.08 -0.2 kg per 1 m2 depending on the absorbency and the treated surface | 10 l, 600 rubles |
| CT 17, Ceresit | Deep penetration primer | 0.1-0.2 l/m2 with a single application depending on from absorbent foundation abilities | 10 l, 500 rubles |
| OSNOVIT UNKONT T-51 | Soil universal | 100-200 mg. per 1m2 | 10 l, 450 rubles |
| OSNOVIT DIPKONT T-53 | deep penetration primer | 50-100 mg per m2 | 10 l, 500 rubles |
| Knauf-Tiefengrund | Universal primer | 0.07 - 0.1 kg/m2 | 10 l, 650 rub. |
In cases of laying on the ground, reinforcement is used to reinforce the screed. Often masters use in its role a special steel mesh. The reinforcement effect is created by the fibrous material fibrin. It is metal or plastic and is simply added to the mortar to fill the floor surface. At the same stage, if necessary, installation is also carried out. additional equipment- or wiring distribution.
Waterproofing
It is necessary if the floor has big gaps. Especially in places where walls adjoin the ceiling or where communications pass.
The main water-repellent component determines the following types of waterproofing:
- polymeric;
- bituminous;
- bitumen-polymer;
- based on mineral components.
Among the varieties of materials for waterproofing, the following materials are distinguished:
- roll or film. They are considered the most popular and are multilayer polymer membranes that combine not only waterproofing, but also thermal insulation properties.
- mastic. It is a plastic adhesive compositions. They are based on resins, polymers, liquid rubber. They create an excellent waterproof layer.
- liquid materials. They penetrate into the pores and differ in degrees of viscosity. Creates a thin and water-repellent film.
- powders. Created on the basis of binders and plasticizers. It looks like dry mixes, which are enough to be diluted with the amount of water indicated in the instructions.
We determine the level of the floor and set the slats-beacons
Armed with the rule with the level, we determine how flat the floor is. We mark the level of the future floor on all walls. We remove the plaster on the plastered walls 0.25 cm above this level.
It is best to do this when the room has already been cleaned and the floor surface is clean. The level of the floor is determined in order to establish the highest point of the surface and fill the floor correctly.
This is done by following the instructions.
- One meter is measured up the wall from the door threshold and a mark is made.
- A line is drawn around the perimeter of the room. Its parallelism is checked by level.
- Another parallel is drawn at a distance of one meter down from the control.
- To make it easier to navigate, nails are driven into the corners of the room on the bottom line and a construction cord is pulled.
Marks on the wall help you navigate when placing beacons. They are wooden slats or metal profiles that fit on the edge. The distance between them should not be more length the rules by which the mixture will be leveled.
It is not worth rushing to put rails. The quality of the filling largely depends on this. At the end of the work, they are removed if desired, and the space that remains after them is filled with the same filling solution.
The use of technology with beacons simplifies the process and guarantees a smooth surface after the screed. Even if work is underway on a small area, it is desirable to strengthen the minimum number of beacons.
Beacons - tripods for self-leveling floor are a professional tool
Preparation of the working mixture
For a self-leveling floor, the mixture is prepared easier and faster. It is enough to pour it into the amount of water specified according to the instructions and mix thoroughly with a drill and a special nozzle until a homogeneous consistency.
It will help to save, especially on large volumes, a concrete or cement-sand mortar. The latter is prepared as follows.
- Four parts perlite requires two parts water.
- Part of the cement and part of the water are added to the mixed solution.
- After repeated mixing, two parts of sand and five times more water are added to a homogeneous substance.
- The solution is kneaded until a plastic consistency is obtained.
A concrete screed is more appropriate for pouring the floor in apartments on the ground floors or in a private house.
Filling the floor
It is advisable to fill the surface in one room during the day, without delaying or stretching the process. Then the surface will be homogeneous in composition.
Start pouring from the far corner of the room. The layer of mortar for pouring is leveled with a spatula or a rule, evenly distributed within the established beacons.
A needle roller will be needed to remove air to avoid voids inside. Only after that the screed is finally leveled. Repeat the process until the entire floor is covered.
A mortar based on sand and cement sets within an hour. After that, it is very difficult, if not impossible, to compare it.
Therefore, when working with dry mixes for self-leveling floors, and using other solutions, it is recommended to work with a partner. While one person is preparing the solution, the other is pouring and leveling it.
Ready mixes for self-leveling floors have a more liquid consistency. The solution spreads, leveling on a horizontal level, and the floor surface is perfectly flat.
But even when the floor is already filled, the process is not over. Now it is important to protect it from temperature extremes, direct sunlight and drafts.
The laid solution is periodically moistened or covered with a film. This will help avoid cracks.
Concrete needs 28 days to gain strength. For a cement-sand mortar, this period is much less - no more than two days. To check that the screed is well seized, there should be no signs of punching when stepped on. In order not to leave a footprint on the newly made floor with caution, it is recommended to use a kind of supporting island from improvised building materials.
Do not forget to remove the slats that served as beacons and fill the remaining traces in the form of grooves with the solution.
Sanding required concrete floor when it is completely dry. This finishing touch concrete screed. After that, the surface is ready for any flooring. Floors that were filled with self-leveling screeds are ready for use in 6-12 hours.
But don't rush to lay top coat and even more so to arrange furniture. For maximum loads, it will be ready only in 2-3 days. In the meantime, you can choose the finish coat. Laying linoleum, tiles, parquet, laminate or carpets can only be done after a week.
We hope that our instructions will help you get started on your own. In the course of work and with the acquisition of experience, it is possible that you will have your own methods and technologies. Before you get down to business, you should decide for yourself a few important issues. They will help you save on materials and organize your work properly.
It is important to decide on the materials for pouring the floor. Will it be ordinary concrete, cement-sand mortar or ready mix. The latter option is more expensive, but easier to prepare and use. And the results certainly won't disappoint. To mix the other two solutions, observe correct proportions. In order for the work to proceed without hitches and forced breaks, it is important to prepare all the necessary tools, materials and make sure that they are always at your fingertips. And finally, do not take on work in splendid isolation. Even when we are talking about pouring the floor in the bathroom, and even more so if you are doing the pouring for the first time.
If you want to learn new things, diligence and patience, the results will exceed all expectations. The screed will turn out to be of high quality, and the floor will last for many years.
Video - How to fill the floor in the apartment
Not only in old houses, but also in new buildings, the subfloor is rarely even. Most modern coatings require a perfect surface. Therefore, major repairs should begin with leveling the floors. So, we tell you how to fill the floor in the apartment with your own hands.
Foundation preparation
In order for the concrete coating to last as long as possible, the floors should be carefully prepared before pouring:Dismantle the old coating and skirting boards;
should be removed and door jambs- they will interfere with the filling;
Door jambs must be dismantled before pouring
Remove large debris and poorly holding pieces of concrete;
Large cracks, so that the solution penetrates as deep as possible into them, expand, remove dust from them, thoroughly moisten, strengthen with a sickle tape and close up cement-sand mortar; small gaps can be smeared with adhesive;

Large cracks are pre-covered with mortar
Thoroughly clean the floors from dust with a vacuum cleaner;
If necessary, wash them with soapy water to degrease them;
To improve adhesion after drying, the floors should be treated with a primer; porous surfaces are smeared with it twice, the second layer - only after the first has completely dried.
Is waterproofing necessary?
Protection of concrete from moisture is required mainly in rooms with a high level of moisture - bathrooms and toilets. Without reliable waterproofing over time in concrete base cracks will quickly appear, and it will become unusable. source high humidity can serve and modern kitchens with installed washing machines and dishwashers. High-quality waterproofing will protect the lower floors in the event of a leak.The simplest type of waterproofing is polyethylene film sufficient thickness and strength. In this case, it is better to pre-coat the floors bituminous mastic . Since the flooring should only be continuous, after rolling the roll with an overlap of 25-30 cm, all layers must be glued together. The film needs to be slightly brought to the walls and attached to them with adhesive tape.

Waterproofing the screed with polyethylene
More reliable protection from moisture is bituminous roll waterproofing or fiberglass flooring. The cost of bitumen-rubber mixtures is slightly higher, but they are considered more durable, plus their use does not require heating and melting.
Important! Waterproofing can be both under the screed and on top of it. When applied over concrete, it will remain dry even in the event of leaks. But still liquid types waterproofing, which can be easily damaged, it is wiser to apply under the screed.
Cement-sand mortar. Proportions
For getting durable coating it's better to get a good one cement brand 300-400. Do not get confused - after all, the resulting solution also has a brand. For example (see photo), when mixing M400 cement with sand 1: 3, we get grade 150 concrete, and when mixing sand and M300 cement in the same proportion, less durable concrete grade 100. For screeds, it is recommended to use concrete (not cement, but concrete) grades 150-200.
The brand of concrete directly depends on the brand of cement and the proportions of the solution
So, we prepare the solution:
It is better if the sand for the solution will have both large and small fractions; best to use dry river;
Before kneading, it must be sifted;
To obtain a homogeneous mass, sand and cement are mixed only dry; water is added gradually, until the consistency of liquid sour cream, such a solution should not be too liquid and drain from the trowel;
It is simply impossible to ideally mix a large amount of mortar without a concrete mixer; therefore, it is better to rent it or borrow it from friends, otherwise you will have to knead the solution in small portions; for pouring small areas, you can mix the concrete with a drill with a nozzle.
Floor level markings
Marking - determining the level of the future floor by drawing horizontal lines on the walls. To begin with, we arbitrarily determine the highest point of the room (in case of an error, the line can be easily redrawn).Now with the help building level we draw horizontal lines along all the walls. It is along these lines that the beacons will be placed.

Lighthouses are displayed on the markings on the walls
What are lighthouses?
lighthouses in the construction business, mortar or alabaster slaps are called, on which metal or wooden slats are laid, which serve to level the floors. Self-tapping screws screwed to a certain height are sometimes used as beacons. For convenience, they are pre-fixed on small pieces of wood. The distance between the lighthouse rails is selected according to the width regulations – construction tool used to stretch (level) the solution (see photo below).
An easy way to install beacons
Since the cement mortar sets for at least 2 days, it is sometimes used to place beacons alabaster, hardening in 15-20 minutes. But experienced craftsmen it is recommended to refrain from using it - the resulting screed will be unreliable due to the heterogeneity of the composition.

Alignment of the solution by the rule
Important! Please note that too thick a layer of concrete will dry out unevenly, and its quality will not be up to par - it will immediately crack. If a screed with a thickness of 5 cm or more is required, it is applied in two layers or the screed is reinforced with a reinforcing mesh.
Main stages
The pouring of the screed begins after the beacons are completely dry (that is, after 2 days):Work should start from the farthest corner, moving gradually towards the front door;
With the help of a trowel, the space between the beacons is completely filled without gaps and voids;

Laying out the solution
After laying a couple of meters, the solution begins to be leveled by the rule, first in different sides"right-left", and then along the rules;
It is not necessary to ideally level the surface - after a couple of hours, when the concrete grabs a little, small bumps level with a grater;

Grating the screed
The resulting screed for uniform drying is covered with polyethylene;
Lighthouse slats are removed in a day; the voids formed in their place are filled with mortar and carefully leveled.
Important! Despite the fact that the screed room temperature able to dry out in 2-3 days, and it will be possible to walk on it, the main work should begin only after a month, when the concrete has fully gained strength.
Video: How to fill the floor with your own hands
Due to its strength, durability, unpretentiousness and versatility, concrete floors are popular not only in rooms where heavy loads on the floor surface are expected, but also in private housing construction. So, for example, a concrete floor in the kitchen, bathroom and bathroom is a must. And in bedrooms, hallways, living rooms and other rooms, concrete pouring began to be used with the advent of the "warm floor" system, which solved the important problem that such a floor is very cold. Even in private houses, where only wooden floors on logs were previously equipped, concrete began to be poured everywhere. And here questions began to arise, how to pour a concrete floor onto the ground and what are the features of pouring onto floors. In this article, we will reveal the general technology of pouring and outline some of the nuances and differences.
Technology of laying concrete floors
Concrete floors can be installed on various surfaces: directly on the ground, on the floor slab, on the old concrete pavement, even on the old wooden floor. Concrete is a simple, undemanding material available to everyone, and, importantly, relatively cheap.
In order for the floor to end up strong and durable, all technological conditions and stages of work should be met. When pouring concrete on different surfaces exists distinctive features, but there is also general rules for all occasions.
Concrete floors - pouring technology and stages of work:
- Foundation waterproofing.
- Thermal insulation.
- Reinforcement.
- Installation of guides ("beacons").
- Pouring a rough concrete floor.
- Grinding the surface of the concrete floor.
- Filling leveling screed.
Depending on the design features premises, some stages of work can be added. For example, when arranging a concrete floor on the ground, backfilling should be done on the base.
To protect the concrete screed from cracking, it is cut into expansion joints, of which there are three types:
- Insulating expansion joints are performed in places where the concrete floor comes into contact with other structural elements buildings: walls, columns, ledges, etc. This is necessary so that vibrations are not transmitted from the floor to other structures. Otherwise, there may be a warp or partial destruction of the foundation.
- Construction seams are performed in places where concrete hardens unevenly, i.e. in the event that the filling did not take place at one time, but with breaks that were more than 4 hours.
- Shrink seams perform to relieve stress due to uneven shrinkage and drying.

Expansion joints must be cut before random cracks appear, but the concrete must already have gained the necessary strength. The depth of the joints should be 1/3 of the thickness of the concrete layer. In the future, the seams are filled with special sealants.

Given the laboriousness and dustiness of concrete flooring, many hire construction teams for their implementation. The price for concrete floors depends, first of all, on the complexity of the ordered work and the thickness of the layer. The cheapest option would be cement-sand screed. A coating with reinforcement will cost a little more. The cost of a concrete floor is affected by the type of reinforcing mesh: if it is a regular road mesh, it will turn out cheaper, and if a frame welded from reinforcement, then it will be more expensive. The most “biting” option for the price is a concrete floor with a hardened top layer, it will cost 30 - 40% more than a regular floor of the same thickness.
With minimal skills in construction, knowing how to handle a tool and inviting one or two partners, you can easily pour a concrete floor with your own hands. It is enough to make calculations, stock up essential tool, material and study technology, so that everyone performs their functions and the case is argued. Then the price for pouring a concrete floor will depend only on the material that will be used and its quantity.
How to make a concrete floor on the ground
The arrangement of the floor directly on the ground is always associated with a number of questions: what to make the backfill from, and with what layer, and how to waterproof, and at what stage to insulate, and so on. The concrete floor on the ground is a "layered cake", which we will discuss below.
Pouring a concrete floor: the scheme of the "pie"

Conditions under which it is possible to lay a concrete floor on the ground
Before going directly to technological process arrangement of a concrete floor, I would like to note that not all soils can be poured with a concrete floor. Firstly, the groundwater level should be no higher than 4 - 5 m to prevent floor flooding and moisture suction through the capillaries. Secondly, the soil should not be mobile, otherwise the concrete floor can quickly collapse, damaging the foundation. Thirdly, the house in which such a floor is planned must be residential and heated in winter time, since the soil freezes in winter, and with it the floor, which will put additional pressure on the foundation, deforming it. Well, the last restriction - the soil must be dry.
Marking the level of the finished concrete floor: "zero" mark
We begin all work on arranging the floor only after all the walls are fully erected and the building is covered with a roof. So we will be protected from the surprises of nature.
First of all, it is necessary to outline finished floor level, i.e. the mark to which we will fill the floor. Since we do not plan to carry out the threshold, we will focus on the bottom of the doorway so that the floor turns out to be even and the same in all rooms.

We apply the “zero” level as follows: from the lowest point of the doorway we set aside exactly 1 m upwards. We put a mark on the wall, then transfer the mark to all the walls in the room, draw a line, the horizontal of which is constantly controlled using the level.
After the line is drawn, we lay 1 m down along the entire perimeter of the room from this line. We draw a line. This will be the level of the finishing floor. For convenience, in the corners of the room we hammer nails on the line and pull the cord. This will make it easier to navigate.
Foundation preparation works
We remove everything from the room construction garbage. Then we shoot upper layer soil and take it out for garden or landscaping purposes. How deep to excavate? The concrete floor on the ground is a multilayer cake, about 30 - 35 cm thick. Focusing on the "zero" mark, we are just trying to remove the soil to a depth of 35 cm.
Be sure to tamp the surface of the soil. It is better to do this with the help of a special vibrating plate or vibrating machine, but if there is no such equipment in the arsenal, you can get by with improvised means. We will need a log to which we will attach handles, and from below we will nail a flat board. Using this log together, we compact the soil to such an extent that no footprints remain on its surface.
Important! In case of high strip foundations there are situations when the distance from the “zero” mark to the ground is more than 35 cm. In this case, we remove the upper fertile layer, and instead of it we pour sand and carefully ram.
Measures for additional waterproofing of the floor may include the arrangement of clay bedding. Then clay is poured on top of the soil and carefully compacted. In the future, it will prevent the penetration of moisture into the floor.
Formation of bedding from gravel, sand and crushed stone

Before you make a concrete floor on the ground, it is necessary to perform backfilling.
First layer - gravel(5 - 10 cm). Pour in water and seal. To make it easier to control the thickness of the layer, we drive pegs of the required length into the ground, set them according to the level, and after backfilling and tamping, we take them out.
Second layer - sand(10 cm). We control the thickness and level with the same pegs. We spill the layer with water and compact it with a vibrating plate or a log with a board. For this bedding, you can use ravine sand with impurities.
Third layer - rubble(10 cm). Carefully level and compact. Our task is to make sure that there are no sharp edges of rubble on the surface. If they are, you need to smooth them out by unfolding the pebbles or removing them. Crushed stone with a fraction of 40 - 50 mm should be used. After tamping, crushed stone can be lightly sprinkled with sand or crushed stone and compacted again.
Important! Do not forget to control the horizontal with a level.
It should be noted that backfilling can be performed only from two layers: sand and crushed stone. Also, to simplify control over the thickness of the layers, their level can be applied to the walls of the foundation.
Laying waterproofing and thermal insulation

If the crushed stone layer is compacted tightly and there is no sharp corners, then waterproofing material can be laid directly on top of it. To do this, you can use modern roll materials and membranes, roofing felt in several layers or just polyethylene film with a density of at least 200 microns. We spread the material over the entire area of \u200b\u200bthe room, bring the edges to the “zero” mark on the walls and fix it there, for example, with adhesive tape. If the canvas is not enough to cover the entire area, then the joints must be made with an overlap of 20 cm and glued with adhesive tape.
On top of the waterproofing, thermal insulation can be performed using the following materials: expanded clay, perlite, extruded polystyrene foam, polystyrene foam(Styrofoam), stone basalt wool(corresponding density), polyurethane foam.
Consider the option of laying extruded polystyrene foam boards. They are laid out in a checkerboard pattern, tightly to each other, the joints are glued with a special adhesive tape.
Important! There are cases when it is not possible to perform hydro- and thermal insulation directly on the backfill. Then a layer of so-called "lean" concrete (liquid consistency) up to 40 mm thick is poured on top of the bedding. When it hardens, the above procedures can be performed from above. "Skinny" concrete firmly binds the crushed stone layer together and is more solid foundation, which will not be able to break through or damage waterproofing materials.
The concrete floor pouring technology necessarily includes reinforcement in order to strengthen the floor as much as possible. The reinforced floor is able to withstand heavy loads, which are evenly distributed over the surface.
Can be used as a reinforcing material metal and plastic mesh with different cells, and rebar frame. Most often, welded reinforcing meshes with dimensions of 5x100x100 mm are used. Less commonly, for floors that will be subjected to heavy loads, use a frame welded in place from a reinforcing bar with a thickness of 8 - 18 mm. In this case, more thorough vibration compaction will be required. concrete mix.

The reinforcing mesh or frame cannot be laid directly on the base, as it will not fulfill its functions and will even be superfluous. It must be raised by 1/3 of the thickness of the future concrete pouring. Therefore, we install the grid or frame on coasters 2–3 cm high, which are called “high chairs”.
Installation of "beacons" and the formation of "maps"
The installation of guides, or as they are also called "beacons", allows you to fill the concrete mixture as evenly as possible, at the same level.
As guides, you can use round pipes or a metal square profile, as well as wooden blocks, if their surface is smooth enough, special aluminum "beacons" can be laid.
We divide the room into segments of 1.5 - 2 m wide.
We install the guides on the "buns" made of concrete mortar. By pressing them in or adding mixtures, we control the location of the "beacons" so that their upper edge is strictly along the "zero" line. We lubricate the guides with special oil, in extreme cases it can be worked out to make it easier to remove them in the future.

Important! We control the strictly horizontal arrangement of the guides with the help of a level and a level. It will be possible to fill the floor with concrete after the “buns” harden enough so that when you click on the “beacon”, they do not push through.
The breakdown of the premises into "maps" is carried out if its area is large enough and it is not possible to fill with concrete in one go. Then the room is divided into square or rectangular "maps", the size of which is dictated by the performance of the construction team.
We mark the area into sections. We knock down the formwork-frame from freshly sawn wood or from laminated plywood. Naturally, the height of the formwork must be strictly set to zero.
Preparation of mortar for pouring concrete floor
To ensure that the concrete floor has the best possible thermal insulation properties, expanded sand or perlite should be added to the solution. And in order to have time to pour and knead the mortar with high quality, you need to purchase or rent a concrete mixer.
The secret to preparing the solution is as follows:
- Pour 2 buckets of perlite into the concrete mixer.
- Add 10 liters of water and mix. After adding water, the volume of perlite should decrease noticeably.
- When the sand mixes well with water, add 5 liters of cement and continue to knead.
- Add 5 liters of water and continue to knead.
- When the mixture becomes homogeneous, add 10 liters of sand and 2 liters of water. Knead until the mixture becomes loose.
- We pause in the batch for 10 minutes, in no case do not add water.
- After 10 minutes, continue kneading until the solution becomes plastic.
For pouring the floor, it is best to use cement M400 and M500.
Pouring concrete floor, leveling mortar
We begin to fill the floor from the corner opposite from the door, trying to fill several “cards” in one or two steps.
Since the concrete should not fit snugly against the walls and protruding structures of the building, we isolate them by laying a damper tape along them.

The resulting solution is poured into the "map" with a layer of 10 cm and leveled with a shovel. We perform piercing movements to remove excess air and compact the solution. If possible, you can use a deep vibrator, which is immersed in concrete, and when concrete "milk" appears on the surface, it is transferred to another place.
We level the solution with the rule. We install it on the guides and pull it towards ourselves with light movements to the left and right. So excess concrete is removed and distributed into the voids of other "maps".

After completing the leveling of the solution along the guides, we take them out and fill the vacant space with fresh mortar.
In the following days, we constantly wet the surface with water, you can additionally cover the concrete with a film. We give concrete to gain the maximum of its strength characteristics within 4 - 5 weeks.
Leveling screed concrete floor
When pouring a concrete floor, it is rarely possible to make the surface perfectly flat, most often there are small flaws, sagging. If you plan to install ceramic tiles, then perfect evenness is not needed, so you can immediately start work. But if you want to make a floor from a laminate or linoleum, then the surface must be perfectly flat.
Self-levelling compounds allow you to make the floor surface mirror-smooth.

According to the instructions on the package, we prepare a solution of a self-leveling mixture, pour it onto the floor and level it with a special brush. Then roll with a spiked roller to remove air bubbles from the solution. Let dry for at least 1 week. After that, the concrete floor is ready for use.
How to pour concrete floor over floors

A feature of pouring the concrete floor over the ceilings is that there is no need to backfill.
Checking concrete slab overlap, whether there are any cracks, crevices and chips on it. If we find, then we close it with a repair solution. wooden floor must also be strong, without large gaps.
Without fail, the overlap is waterproofed by laying a polyethylene film with a density of 200 - 300 microns.
We lay the insulation on top. This can be expanded polystyrene, extruded polystyrene foam slabs, basalt wool slabs or polyurethane foam spraying.
We install beacons and fill the solution with a thickness of 100 mm. All other operations are carried out in the same way as in the arrangement of the floor on the ground. If something is not clear to you in the pouring instructions, perhaps watching a video demonstrating the concrete floor will help you.
It is quite possible to pour a concrete floor on your own, the main thing is not to save on materials and follow the technological process. Then the floor can last for decades without requiring major repairs.
Pouring concrete floor: video - example

