Roofing with ondulin. How to cover a hipped roof with ondulin
Ondulin, also commonly known as Euroslate, is a lightweight, easy-to-use, relatively inexpensive and highly reliable roofing material that has been in wide demand around the world for over 50 years. With a strong desire, the installation of the material can be done by hand. You just need to figure out in detail how to properly cover the roof with ondulin and prepare everything you need for work.
In order to cover the roof with ondulin, you don't have to look for and buy some expensive and hard-to-find tools. Special skills and extensive experience are also not required for such work. You just need to grasp the essence of the technology and complete each stage of the work step by step.

When roofing a roof with ondulin, you can be guided by almost the same rules and requirements as when using ordinary slate, which is well known to almost every developer. The biggest difference between the installation technologies of conventional slate and euro-slate is that the latter is characterized by some flexibility, which makes it possible to use it to work not only on flat roofs, but also on more complex structures.
If ondulin is planned to be laid on top of the old roofing, regardless of the type and condition of the existing material, before starting work, it is necessary to inspect the roof rafter system and assess its condition.
You can do this on your own, but in the absence of the necessary skills, it is better to use the help of third-party professional roofers. If the assessment shows that the rafters can withstand the weight of the new roofing ondulin, it will be enough to simply fill a standard wooden crate over the existing coating and mount the euro slate on it. In this situation, not only will a new coating be obtained, but also additional moisture insulation and insulation will be provided.

Due to the fact that ondulin is characterized by a rather low rigidity, the crate for its installation must be fastened with a relatively large step. Determine the step individually. The main thing is that the sheets of roofing material do not sag, otherwise they may simply become unusable under the influence of various kinds of external loads, for example, atmospheric precipitation. Also, when choosing a step, the slope angle of the roof slope must be taken into account.

If necessary, the sheets can be safely cut. For this, it is recommended to use a jigsaw.
In the absence of it, you can get by with an ordinary hacksaw for wood. It is recommended to preliminarily lubricate it with oil so that the sawing is as easy as possible, and the blade does not get stuck during operation.

If it becomes necessary to move along the already laid material when performing work, you need to step strictly on the ridge, because the material between the individual ridges is simply not capable of supporting human weight.
For fastening a separate sheet of euro slate, at least 20 nails should be used.
Fasteners are included with the roofing material. You do not need to save them, because because of this, the material at one point can simply come off in strong winds. If the installation is carried out by third-party roofers, make sure that they fasten the sheets in accordance with the given rule.

The properties of ondulin are such that it can stretch somewhat, and many not quite conscientious roofers willingly use this. In an attempt to save time and material, they fasten the stretched Euro slate to the crate to the maximum. This is totally wrong. Quite quickly, the sheets will be covered with waves, which can only be eliminated by completely replacing the roofing. To prevent such problems, you need to fix the sheets in a normal state, without stretching or other deformations.
Before you start laying sheets, take the time to make the most complete and accurate measurements. Pay special attention to overhangs. If their length is too large, the sheets of ondulin will simply bend and spoil the look of the roof as a whole. If the overhang length is too small, a variety of debris and atmospheric precipitation will fall under it.
Be careful when installing the battens. When choosing a step, it is necessary, as already noted, to focus on individual conditions, but no one canceled the technology requirements. They will be discussed later. Even the slightest deviations from the recommended values can ultimately lead to a significant reduction in the service life and performance of the roofing as a whole.
Preparation of materials for work
First of all, pay your attention to the nails that will be used to fasten the euro slate. Outwardly, they resemble simple screws. The design features allow them to be securely fixed in the wood and ensure the highest quality installation of ondulin. There is a rubber gasket on the top of the fastener. The nails in the kit will have it the same color as the sheets of material. Thanks to this gasket, additional moisture protection will be provided in the places where the mounts are located.

Where the material meets walls and other vertical elements, valleys specially created for such places are used. In these areas, waterproofing should be of the highest quality.
If there is a chimney in your house, it must be covered with ondulin using special rubber aprons.
To achieve the most reliable and high-quality result, all joints should be carefully processed. Waterproofing must be of the highest standard. Otherwise, moisture will penetrate the roofing, which will lead to a fairly rapid decay of the roofing system frame.
When performing roofing work, it becomes necessary to use all sorts of accessories such as skates, covering aprons, valleys, self-adhesive tapes and others. It is recommended to buy exclusively original components from one manufacturer. This will guarantee the receipt of the roof covering as harmonious in appearance and the most effective in terms of performance.
In accordance with the recommendations of professional roofers, a solid lathing is best suited for the installation of ondulin. It will prevent the material from sagging when heated in hot weather and under the influence of snow in winter.

The first thing a roofer should learn to do is to create markings on the used sheets of Euro-slate. The process is complicated by the fact that the sheets are wavy. Marking lines can be applied with ordinary pencils or markers. A straight line can be drawn using a second sheet of material.
To cut sheets, use a hacksaw for working with wood, a jigsaw, or a grinder. The hacksaw, as already noted, must be periodically treated with oil so that the work is done without unnecessary complications.
Standard sheets of ondulin weigh no more than 5-6 kg. This makes working with them as convenient as possible and allows you to lift the material onto the roof without any problems. The finished roofing will also have a relatively low weight, which is an additional advantage.
Installation of sheets begins from the edge of the sheathing. In order to ensure the most reliable fixation, the sheets should be nailed in each wave. For each sheet of euro-slate, as already noted, about 20 nails should go, maybe even a little more.

For the manufacture of the lathing, wooden blocks of 6x4 cm are used. To determine the optimal pitch of the lathing, you need to know the angle of inclination of the roof. If the slope does not exceed 10 degrees, a solid crate is the best option. Plywood is most often used for its manufacture. A material called OSB is also suitable. If the slope of the roof is in the range of 10-15 degrees, the lathing bars must be fastened in increments of up to 45 cm. If the slope exceeds 15 degrees, the largest pitch of the lathing bars will be 61 cm.
First you need to mount the crate. Remember to consider the slope of the roof. It is recommended to start the installation of the bars from the corner that is least blown by the wind. Nail the bars along their axes. Maintain the same distance between the individual battens. If the slope of the roof is such that the bars have to be fastened with a large step, additional slats must be mounted between the bars at a distance of 30-50 cm from each other. They will help to increase the strength. But a solid crate, as already noted, is the most preferable and effective option in all respects.
Detailed instructions for installing ondulin
The fastening of the roofing material in question must be started from the bottom corner of the roof to be trimmed. In this case, the installation technology is such that the starting sheet of the 2nd row should be cut longitudinally in half. Euroslate sheets are mounted horizontally. For fastening, it is strongly recommended to use exactly those nails that come with the factory set with the roofing material. Fix each sheet with an average of 20 screws.
In the starting row of the euro slate, nail the fasteners to the top of each wave.
In the rest of the sheets, the fastening must be installed in every 2nd ridge. The second row of material must be laid with an overlap, grabbing a sheet from the first row of ondulin, etc. The hats of the fastening nails, as noted, are fitted with rubber gaskets in the same color as the ondulin, so that the finished roof will have a uniform and harmonious appearance.
However, in some situations, the caps become quite noticeable. Nail them in one line to achieve an attractive appearance. To ensure that the fasteners are held evenly, you can stretch the rope and hammer nails along it.

Euro-slate must be nailed to the sheathing beams vertically with a mandatory transverse overlap equal to about 15 cm. Make the longitudinal overlap so that its length is not less than the length of the first wave.
At the end, you need to fix the ridge elements. The technology for their installation is extremely simple. These accessories are overlapped and fixed along the euro-slate wave. If ondulin is used for a roof with a gable structure, the ridge is finished using special corner pieces. Endova is made with the obligatory arrangement of one more additional crate.

An instruction should be included with the roofing material in question. Full-fledged instructions from trusted manufacturers usually provide not only textual recommendations for fixing ondulin, but also a variety of drawings, thanks to which the installation becomes understandable to any person, regardless of his skills and experience.
The size of a single sheet of the Eurosphere is 2000x950 mm. One such sheet weighs about 5800 g. Each wave usually has a height equal to 3.6 cm. There are 10 such waves in total.
Competent installation, carried out taking into account all the basic requirements and rules, will make it possible to equip such an ondulin roofing that will reliably serve 50 years or more. Manufacturers usually give a 15-20 year warranty. Do not forget to ask the seller for a warranty card, a fire certificate and a hygiene certificate.

How to fix ondulin - instructions
Thus, there is nothing super complicated in the roof of the roof with ondulin. You just need to carefully understand the instructions for laying euro slate. The article contains all the necessary information that you may need while working. Follow the basic recommendations and basic rules for arranging an onduline roof and everything will work out.
You can not only save money on the services of third-party roofers, but also independently control the entire process from its beginning to fixing the last element. To make everything even clearer, be sure to watch the video, which demonstrates the main stages of fixing the ondulin on the roof.
Video - How to properly cover the roof with ondulin
Warning /var/www/krysha-expert..php on line 2580
Warning /var/www/krysha-expert..php on line 1802
Warning: Use of undefined constant WPLANG - assumed "WPLANG" (this will throw an Error in a future version of PHP) in /var/www/krysha-expert..php on line 2580
Warning: count (): Parameter must be an array or an object that implements Countable in /var/www/krysha-expert..php on line 1802
Recently, ondulin is losing popularity among developers, the first hobby for widely advertised roofing material has passed. Consumers were able to personally verify the veracity of manufacturers' promises and draw their independent objective conclusions.
In order to attract buyers, ondulin in advertising brochures was called Euroslate, our compatriots trust foreign standards, and quite reasonably. But they did not know that in Europe ondulin was never used as a roofing covering of residential buildings, only the cheapest and most temporary structures were covered with this material: sheds, storage areas, etc. And then only in those cases when it was not planned to use for a long time with such structures, they stood for a maximum of 5–8 years, and then they were demolished.
In our country, inexperienced developers covered houses designed for many decades of operation with ondulin. Ondulin, on the other hand, loses its original properties after a maximum of ten years, then it must be dismantled. It is long and expensive, it is much more profitable to immediately cover the roof with reliable, high-quality and durable materials.

The base of the ondulin is made from waste paper or recycled paper, then the sheets are impregnated with waterproof bituminous materials and paints, and a profile is given to the flat sheets.

It is the physical properties of the base that have a decisive influence on the technical parameters.

The indisputable advantage is the low price. But the roof is not the architectural element of the house on which it is advisable to save. For its construction, it is necessary to use the highest quality and durable materials.

Ondulin is one of the most budget-friendly roofing
Prices for various types of ondulin
How to distinguish an original ondulin from a fake
The original material does not differ in high quality indicators, fake roofing coverings are much worse, it is not worth buying and installing them even on temporary structures.
This branded ondulin has several features that you should pay attention to before buying:
- the reverse side with a rippled black mesh, all veins are clearly visible;
- there are only ten waves on the sheet, the edges for the joints are slightly thinner to reduce the drops on the roof;
- the front surface is slightly rough, which indicates a cellulose base;
- the last wave with the manufacturer's marking, date of manufacture, factory code.


Accessories are marked - ondulin

On request, sellers must provide quality certificates. If there are excuses that all the documents for the goods are in the central office - they are trying to sell you a one hundred percent fake, do not buy anything from unscrupulous sellers. Today, buying ondulin is not a problem, all construction goods stores are crammed with this product.
In practice, there are no two completely identical buildings, each has its own differences, which requires minor correction of the generally accepted ondulin installation technology. But experienced roofers have come up with some universal tips to follow regardless of the building's features.
Preparation for work
There is no need to rush, you need to carefully prepare for the start of work. Count and buy a certain amount of materials. At the same time, there is no need to make a large stock, ondulin has a minimum amount of waste. Along with the sheets, you need to purchase additional materials for skates, wind and cornice boards.

Additional elements: ridge bar, valley, wind bar, nails
Additional elements for ventilation and abutments
Cellulose-bitumen roofs are distinguished by an affordable price, high service life and ease of installation. That is why more and more often a roof is being built with their own hands from Ondulin, and not from materials that are more difficult to process. Observing the installation technology, you can be sure that the roof will serve for more than one generation!
The advantages of building a roof with your own hands from Ondulin
The reliability of the material is evidenced by the unprecedentedly high guarantee for water resistance from the manufacturer - as much as 15 years! At the same time, bituminous sheets do not deform in the sun and withstand high-degree frosts. And the rough surface of Ondulin allows the snow to melt right on the roof, preventing the convergence of large layers.

If you block your house on your own, then only Ondulin. And there are several reasons for this:
- the material is practically non-flammable;
- the roof can easily withstand medium-sized hail;
- for installation, you only need a hammer, a hacksaw for wood and a construction knife.

Types of roofing from the manufacturer Ondulin
Before buying corrugated bitumen sheets, you should familiarize yourself with their types and purchase the ideal option:
- Ondulin Smart - sheets measuring 1.95x0.96 m and weighing 6.3 kg;
- Ondulin DIY - sheets are 2 waves narrower, which reduced their weight to 5 kg;
- Ondulin tile - sheets of a standard size 1.95x0.96 m, imitating real tiles, weighing 5.9 kg.
The thickness of Ondulin sheets has remained unchanged for more than 70 years and is 3 mm. So in the case of reconstruction of only part of the roof, you can be sure of the interchangeability of the sheets.

General rules for the construction of roofs from Ondulin
When purchasing a roof covering, you should pay attention not only to the integrity of the sheets and the quality of their painting, but also to the accompanying documents. So, all Ondulin materials are accompanied by instructions for their installation and requirements for the lathing device. Strict adherence to the instructions guarantees the durability of the roof and the strength of the fixings.
Requirements for the crate
The first thing to decide is whether the roof will be insulated and whether a waterproofing film is needed? If not, the lathing can be stuffed directly onto the rafters.

If additional waterproofing of the roof is planned, a ventilation gap should be made between the roofing and the film. To do this, the waterproofing is rolled out along the rafters, fixed on top with a counter-lattice, and only then the crate is stuffed.

The frequency of the lathing under Ondulin depends on the angle of inclination and slope of the roof:
- for roofs with a slope from 1/11 to 1/6 and an angle from 5 to 15 degrees, a continuous crate is needed;
- for roofs with a slope from 1/6 to 1/4 and an angle of 10-15 degrees, you can make a sparse crate with a maximum step of 45 cm;
- for other roofs with a large slope, the maximum pitch of the lathing is 61 cm.
Ondulin is not suitable for flat roofs. As a continuous sheathing, you can use OSB boards, plywood, fiberboard or boards nailed without a gap. For a sparse lathing, you can use a board with a thickness of 2.5 cm or bars with a thickness of 5 cm.

To increase the reliability of the roof, it is better not to use the maximum pitch of the lathing and make it more frequent. This is especially true for areas with natural hazards.
How to mount Ondulin on roofs, depending on the angle of the slope
Thanks to the markings applied to the Ondulin sheets, you no longer need to make your life difficult by measuring the distances for the correct fixing of the roofing material. The applied markings are suitable for all roofs with an angle of more than 15 degrees, the installation process itself is extremely simple:

The top of the wave of the outermost leaf should fall on the wind board. In order not to stretch or squeeze the sheets, an additional external beam is attached to the protruding crate at the required distance.
For roofs with a slope of less than 15 degrees, the installation process is slightly different:
- side overlap of sheets for roofs with an inclination of up to 10 degrees - 2 waves;
- end overlap (top row over bottom) for roofs up to 10 degrees - 30 cm, for roofs 10-15 degrees - 20 cm;
- in this case, you should not be guided by the markings on the sheets, the distance between the rows of nails fixing the center of the sheet, for roofs with an inclination of up to 10 degrees is 55 cm, for roofs 10-15 degrees - 45 cm.
In other words, nails nail the roofing sheets to the battens, so it is especially important for a thin batten to accurately calculate the distances so that the nails do not end up being hammered into the air. The principle of sheet fixing is shown more clearly in the diagram.

Don't skimp on the number of nails! The bottom of the sheet is always fixed for each wave, otherwise the reliability of the fastening of the roofing material cannot be guaranteed. Despite the fact that you can walk on Ondulin, it is better to use stairs and building bridges during the installation process.

Otherwise, the flexible sheet may stretch under human weight during fixation and subsequently collapse.
Decoration of individual roof elements
When installing a roof, the main problem is to correctly adjoin the material to the chimney or to the wall of the house, as well as close the edges and ridge. But thanks to ready-made additional elements and accessories, it is very easy to give the roof a complete look, even for people whose hands are not yet full of construction.
So, a gable or a wind bar is perfect for decorating the upper edge of a shed roof. After the bituminous sheets have been laid, a cornice board is nailed to the end so that it is aligned with the upper edge of the sheets. The selected corner element is placed on it, and the gaps between the gable and the roof are closed with a special filler. After that, the tong is fixed with nails for each wave. The sides of the roof with the wind board are also closed in the same way.

The skate can also be used ready-made. It is laid after the roof is completely covered with sheets on both sides. Its installation begins from the same side from which the laying of the roofing material began - from the opposite direction of the wind. The overlap of the ridge element is 12-15 cm, but care must be taken that its end completely overlaps the top of the sheet wave. After filling the gaps between the ridge and the roof, you can start fixing the ridge with nails in each wave.
If you need to seal the joint between the chimney and the roof, you can use a special sealing tape and a covering apron. For this, after the sheets of Ondulin have already been laid, an apron is laid on the front edge of the pipe from below and cut off so that it extends beyond the pipe by one wave on each side. The apron is nailed into every wave.
On top of the apron, a sealing tape is glued to the top of the chimney. On the sides and back, the tape is glued so as to close the joint between the roof and the chimney.

There is no need to lay the apron, just the tape is fixed with nails every 30 cm or at the top of each wave. The upper edge of the tape is pressed against the chimney with a metal bar.

Behind the chimney, an additional Ondulin sheet is laid and fixed, cut in width so as to go beyond the edges of the pipe by one wave.
The side joints of the roof to the wall are also sealed with joint tape. The self-adhesive tape is started to be laid from top to bottom so that its bottom edge completely covers the wave of the sheet. The upper edge of the tape is pressed with a metal bar, and the lower one is nailed to the wave with a step of 30 cm.
But for the horizontal joint of the roof to the wall, you will again need a covering apron. It is laid over the roofing sheets close to the wall and fixed on each wave.

Above, with the approach to the wall and the apron itself, a sealing tape is glued, and its upper edge is pressed with an aluminum strip. Interestingly, the apron is optional, it is a decorative element. Sealing of seams is provided by butyl rubber tape on an aluminum base.

Restoration of an old roof in a couple of days
If roof repairs are constantly postponed due to the fact that the family has nowhere to move out during the removal and installation of a new roof, you can use the "hood" technology invented by Ondulin. Due to the low weight of the bitumen sheets, they can be laid on top of the old roofing without fear of the strength of the rafters.
A crate is stuffed on top of the old roof, and Ondulin sheets are laid on it according to the standard scheme. At the same time, you can live in peace in the house, because the roof does not go anywhere! The process of restoration of a roof with an old slate is shown in detail in the video:
In Russia, one of common roofing material is ondulin... It was first released by the French company ONDULINE almost 50 years ago.
Today, ondulin is produced in sheets with dimensions of 2 m in length and 95 cm in width. Sheet thickness does not exceed 3 mm, and weight - no more than 6 kg.
Material ondulin has a number of positive qualities, which include:
- Life time ondulina is about 50 years old;
- The manufacturer gives a guarantee for water resistance not less than 15 years;
- Working temperature is from -40 to 80 degrees Celsius;
- 1 square meter of material is able to withstand the load in 300 kg;
- The material can withstand the wind up to 200 km / h;
- Has a high level of noise insulation and is also not susceptible to fungi and other chemicals.
In front of the rooftop with ondulin preparatory work should be done... At the initial stage, the roof is insulated. For this, the insulation material is laid in even parts, leaving the sheathing overlap visible in the lumen.
After laying out the insulation, they are taken for the ondulin fasteners. His begin to fasten from the bottom of the roof... In this case, you should leave the eaves overhang at least half a meter. When laying, overlaps are also taken into account, they must be in one wave.
Attach ondulin with special nails... According to the instructions for fastening the material to the roof - there are 20 nails per sheet of ondulin. Failure to comply with this rule is fraught with tearing of the sheet during bad weather conditions.
It is not recommended to use force when driving a nail, the nail must be driven in calmly so that the sheet does not bend, otherwise water will accumulate in it. For convenience, you can use special caps that fit into the holes immediately.
The second layer is laid from half of the sheet, which was previously cut lengthwise. The overlap can be up to 30 cm.
Then start attaching the gable material... It gives the roof a finished and aesthetic appearance, and also serves as a boundary for the edges. When fastening, special nails are also used, they are driven in at a distance of 20 cm from each other.
Calculation of ondulin on the roof

Before starting roofing work all calculations must be made accurately... All clearances and overlaps must be considered.
The useful area of the sheet is 1.9 m2 (2 * 0.95). Taking into account the gaps and overlaps, the usable area is reduced to 1.6 sq. M. It turns out that for a simple gable roof with a total area of 100 square meters, 63 sheets (100 / 1.6) are required.
If the roof is uneven, it is necessary to make calculations using a drawing... To do this, draw the roof along the projection, and then break it down into geometric shapes.
Depending on the level of inclination, we reduce the height of the figure (from 10 to 30 cm for the level of inclination from 15 to 30 degrees, respectively). Calculate the area of each figure... Then add all the obtained values.
How to cover a broken roof with ondulin?

Often you can meet houses with curly roofs, their correct names are broken lines. Such roofs usually have an attic underneath. It is necessary to cover a sloping roof with ondulin using the same technology as a simple gable.
The calculation of the material is also carried out according to the general principle. But there is a small peculiarity during fastening actually, this is the only difference.
The sloping roof is being covered starting from the top. This is for convenience. Immediately install a galvanized iron ridge. Having covered the top of the roof, go to the bottom.
See also:
Useful information on how to cover the roof with ondulin - the subtleties of installation
For information on what ondulin is, see here
They begin to cover it from the bottom row. It must be closed from below with a special cornice filler. The top row is cut with a hacksaw.
And also watch a video on how to mount a new roof ondulin:
Today, such roofing material as ondulin is very popular. The production of such material is carried out in various countries. The quality of ondulin largely depends on the country of origin. Ondulin is often also called Euro-slate. It is quite simple to carry out roofing work using ondulin. But, in order to perform the work efficiently, you need to know how to put ondulin on a sloping roof - step by step instructions.
Materials and tools
In order to cover the roof with ondulin, you need to have some tools and materials on hand. These include:
- roofing material;
- special fastening nails.
Before buying a material, you need to carefully calculate its quantity. For this, a roof project is drawn up, which allows you to calculate the roof area. The resulting area is divided by the size of the roofing material. The length of the sheet is 2 m, and the width is 0.95 m. When calculating, it is worth taking into account the peculiarities of the roof, especially when it comes to broken structures. In such cases, experts recommend dividing the roof into separate sections. This will allow you to calculate the exact amount of roofing material. 
As for the fasteners, they often come with the roofing material. They have a color identical to the shade of the roofing material. This will create an aesthetic appearance of the roof and hide the attachment points.
Installation of ondulin
An ondulin sheet weighs only 5.5 kg. This greatly simplifies the installation of the roof. Ondulin is laid using a technology similar to a slate roof. Sheets are bent, which allows them to be used on uneven surfaces. To prevent the roof from sagging under the influence of heavy loads, experts recommend installing the sheathing.
The sheets of roofing material are overlapped. Fasteners are installed at the joints of the sheets. This allows the connection to be sealed. In order for the roof to have an aesthetic appearance, all fasteners must be located in the same row. To achieve this result, markings are preliminarily applied on the sheets, at the locations of the nails.
At the final stage, the installation of the ridge elements is carried out. If there is a chimney or windows on the roof, then waterproofing tape is used at the joints of the structures with the roofing material. This allows the joint to be sealed.
Roofing is the last stage in the construction of your own home before the start of interior decoration and connection of communications. To reduce the time for roofing work, you can do the installation of ondulin with your own hands. Ondulin is a modern bitumen-based coating, the laying technology of which allows you to mount the material both on a new roof and on an old one without disassembling the structure. It is suitable for roofs of any complexity, area and slope, therefore it is considered a universal option used in private and industrial low-rise construction. In this article, we will show you how to properly cover your roof with ondulin to get a durable, airtight coating that will withstand winter frosts and summer rains.
Material characteristic
Ondulin is an inexpensive, technologically advanced roofing material that was invented in the post-war period in France for the quick repair or reconstruction of shell-damaged, dilapidated roofs made of traditional ceramic tiles, slate, and metal. The production technology of this coating consists in obtaining refined cellulose fibers, making sheets with a wavy surface from them, dyeing and impregnating them with petroleum bitumen. Covering the roof with ondulin makes the structure waterproof, resistant to temperature changes, shockproof, but at the same time lightweight. Due to the low weight of each sheet, the installation of ondulin can be carried out on the old roofing material without dismantling the structure. This material has the following advantages:
- A light weight. Each sheet of ondulin of a standard size weighs only 6 kg, so a blood device made of this material does not require the establishment of a massive frame or reinforcement of the foundation.
- Ease of installation. Do-it-yourself ondulin roofing is done in 1-2 days without the involvement of hired workers, since such a coating can be mounted without special tools and experience.
- Flexibility. Sheets of this material based on bitumen have a certain flexibility, which makes it easy to lay ondulin on a roof of complex shape, which is valleys, sloping slopes, ribs and dormers.
- Affordable price. The ondulin roofing device does not require large costs from the homeowner by saving the lumber used for the construction of the frame and performing the installation on its own.
Important! Since ondulin was nevertheless conceived as a repair material, it has a service life of 15-20 years and a relatively small color gamut. It comes in just 4 colors: red, black, brown and green. Before covering the roof with ondulin, it must be borne in mind that this material fades in the sun due to the destruction of the pigment by ultraviolet rays.

Sheet dimensions

Color sheets
Roofing device
Before covering the roof with ondulin, it is necessary to understand the composition of the roofing cake, which is made for this type of roofing material. Roofing with molded cellulose impregnated with bitumen is simpler due to its light weight. It consists of the following elements:
- Rafter frame. The fastening of the roofing material is carried out on rafters made of natural wood with a section of 50x150 mm, the pitch between which is 50-80 cm. Since the material is lightweight, usually the frame is not weighed down with additional elements.
- Insulation. Before laying ondulin, a thermal insulation material is placed between the rafters. Most often, mineral-type heaters are used (basalt wool, glass wool, slag wool).
- Vapor barrier. Insulation laying technology involves the use of a vapor barrier membrane, which protects the thermal insulating material from below from steam penetration and wetting.
- Waterproofing. To protect the wooden frame elements and insulation from possible leaks or condensation, a waterproofing film is laid. The waterproofing is fastened to the rafter legs using a construction stapler.
- Counter grill. Before laying ondulin, counter-lattice slats are nailed over the waterproofing along the rafters, which organize the ventilation gap necessary for air circulation inside the structure.
- Lathing. The type of lathing is stipulated by step-by-step installation instructions. Ondulin must be nailed to a solid crate made of moisture-resistant plywood or a lattice made of unedged board, laid in 10-15 cm increments so that the roofing material does not deform during operation.
- Ondulin. The roofing material must be nailed directly to the crate with special nails, overlapping the sheets on top of each other by 10-15 cm.

Roofing cake composition
Please note that before covering the roof with ondulin, most professional craftsmen process the wooden frame elements with antiseptic impregnations and fire-blocking compounds to protect them from fire and decay.
Required materials and tools
Many inexperienced craftsmen are wondering how to properly cover the roof with ondulin, and what is needed for this. The fastening of this roofing material is carried out without the use of special tools or expensive equipment, so the installation is often done by hand. To erect a roof from ondulin use:
- Ondulin sheets with dimensions 0.95x2.05 m required to cover the entire roof area with a margin of 10-15% for trimming and overlaps.
- The ridge profile for the entire length of the ridge, taking into account the overlaps between the elements 10-25 cm.
- Fasteners. Special nails for ondulin with a rubber head are made of carbon steel and painted to match the material.
- A bar with a section of 40x40 mm or 60x40 mm for the construction of the lathing, treated with an antiseptic.
- Waterproofing membrane or film.
- Sharp hacksaw for cutting sheets.
- Lightweight hammer for hammering in nails.
- Screwdriver for fixing the battens.
- Ruler, tape measure and building pencil for measuring and marking.
Note! Before you cover the roof with ondulin with your own hands, you need to establish scaffolding around the house or a high staircase that allows you to get to every corner of the slope.

Step-by-step instructions for the driver

Requirements for the crate
Installation technology
Even without knowing how to fasten ondulin, an inexperienced craftsman can easily cope with this task alone, since the sheets of material are easily processed. However, do not forget that the reliability and service life of the roof depends on the quality of installation. For ondulin flooring, the following step-by-step instructions are used:
- First of all, a waterproofing film must be put on the finished rafters and fixed. To do this, it is rolled out, cut into strips of the required length, which are mounted along the ramp perpendicular to the rafter legs with an overlap of 10-15 cm. The film is fixed to the rafters with a construction stapler, and the joints are glued with tape.
- Over the waterproofing material along the rafter legs, counter-lattice slats are nailed. To do this, use long nails or screws.
- On top of the lathing, a lathing is nailed from 4x4 cm, 5x5 cm bars in 10 cm increments, or solid - from sheets of moisture-resistant plywood.
- Next, they begin laying ondulin. Sheets of material must be laid with an overlap of 10-15 cm, starting from the lower edge of the ramp. The rows are mounted with an offset of half the sheet, observing a vertical overlap of 15-20 cm.
- Sheets are nailed to the crate with special nails with wide rubber heads. It takes about 20 fasteners to fix each sheet.

Laying scheme

Fasteners arrangement diagram

Installation of a ridge profile
Not knowing how to lay ondulin correctly, inexperienced craftsmen make mistakes when installing the roof. The main thing is to lay this material in dry, but not hot weather, since the elevated temperature leads to deformation of the sheets. It is forbidden to stand on the ondulin during installation, as it may break or change its shape.
Video instruction
Ondulin (euro slate, onduline) has been used as a roofing material for more than half a century. During this time, it has proven itself well, which was facilitated by such advantages as the ease of installation of ondulin, low weight and affordable cost.
Roofing ondulin is preferred by people who care about the environmental friendliness of their home. After all, euro slate does not contain asbestos, which is prohibited in many countries, it is based on cellulose mixed with bitumen. And minerals and binding additives provide it with strength and reliability. In addition, the private house covered with ondulin is beautiful and elegant.
The warranty period for the ondulin operation is 15 years, provided that the ondulin installation technology is followed. This is where we will stop. Let's consider step by step what requirements need to be met in order for the quality of work to meet standards.
Do-it-yourself ondulin installation - instructions
Ondulin roof construction technology in stages.
1. Calculation of ondulin on the roof
The easiest way is to use the calculator on the seller's website or contact a consultant. But, in order to have an initial idea, you need to divide the total area of all roof slopes and divide by the useful area of one sheet. Add 5 to 15% to waste. The amount of waste depends on the complexity of the rafter system.
2. Installation of battens for ondulin
Due to the fact that ondulin is a flexible roofing material, the technology of its installation provides for the fastening of sheets to a wooden crate. For the roof lathing for ondulin, a 60x40 timber is used.
Step of the crate for ondulin
- the slope angle of the slope up to 10 ° (1: 6) assumes the device of a solid crate, otherwise the sheet will bend;
- an angle of 10 - 15 ° (1: 4) - the pitch of the lathing is 450 mm;
- angle over 15 ° - step 610 mm.
Nuance. Professionals advise not to skimp on the crate and in all cases make it solid. In this case, the sheets will not bend either from heat or under snow or wind loads.
 Installation of additional battens
You can ensure the parallelism of their arrangement if you use a pattern. Laying a piece of timber between the previous and the next batten of the sheathing will be a good help.
In the place of the future fastening of the ridge strip, additional crate battens need to be installed.
Note. Installation of a waterproofing film is not a mandatory step when installing an ondulin roof. Therefore, the need for its installation is determined by the owner.
3. Installing the valley plank
Please note that it is installed before starting the installation of sheets. Its installation is carried out on special cleats. Under it you need to make an additional solid crate. The process of its arrangement is shown in more detail in the diagram.
 Valley plank installation diagram
  Installation of the valley plank
4. Installation of sheets of ondulin
 Ondulin markup Installation begins with the correct markup. With a pencil, you need to draw a thin line along which the screws will be screwed in. The lines on the sheet are spaced at a distance equal to the distance between the sheathing beams.
Advice. To keep the line even, despite the waves of ondulin, you can do the following: mark the distance along the height of the wave, lay the sheet on the sheet and draw a line along the second sheet. Then on the first there will be an even and clear strip.
 Cutting the ondulin To work at a height does not create inconveniences, you must first cut the ondulin into certain blanks (if the cottage has broken slopes). You can cut ondulin using a jigsaw, grinder or hacksaw.
In order not to get confused where to attach which sheet, you need to number them and put numbers on the drawings.
Advice. To prevent the saw from getting stuck in the ondulin, it must be lubricated with oil.
How to fix ondulin correctly?
To do this, you need to adhere to technology. First, we proceed with the installation of the first sheet. It is recommended to start work from the leeward side. Then the cover wave will not be exposed to wind load.
 The sequence of laying ondulin sheets taking into account the wind load
In addition, due to some of the properties of ondulin, a certain temperature regime must be maintained during its installation.
Ondulin is mounted at temperatures from 0 to 30 °. Working in this temperature zone eliminates two disadvantages of ondulin:
- fragility to break. This is because in colder weather the risk of material damage and cracking increases.
Nuance. If you need to replace the sheet, it is better to pre-drill the holes for the self-tapping screw in the sheet.
- stretching the material. Therefore, in hot weather, do not lay the material tightly.
Advice. Many workers try to reduce the installation time by nailing the stretched sheets. When the temperature changes, such a sheet is deformed. Subsequently, in order to eliminate such defects, it is necessary to completely cover the roof.
Correct installation of the first sheet of ondulin will make installation easier. Therefore, you need to carefully align the sheet along the end and the cornice. At the same time, ondulin should not protrude beyond the cornice by more than 50 mm. Otherwise, water will overflow through the gutter of the gutter system, and the sheet itself may bend, which will not look aesthetically pleasing.
Nuance. The first and each subsequent sheet is fastened thoroughly, only after checking for horizontal. To do this, you need to use the level.

The procedure for attaching subsequent sheets of ondulin is shown in the photo.

Ondulin is staggered with obligatory longitudinal and transverse overlap. To achieve this, the installation of the second row starts from half of the sheet.
It is important to know that the angle of inclination of the ramp affects the amount of overlap. Namely:
- the slope angle of the slope is up to 10 ° - the longitudinal overlap is two waves, the transverse one is not less than 200 mm.
- an angle of 10-15 ° - the longitudinal overlap is one wave, the transverse one is not less than 160 mm.
- angle over 15 ° - the longitudinal overlap is one wave, the transverse overlap is not less than 140 mm.
5. Laying ondulin on the roof
The reliability of fastening the euro slate depends on the type of hardware used and the method of their fastening.
 Self-tapping screws with a drill for metal Since all fasteners remain in sight, other methods have not yet been invented, it is better to use hardware with a hat according to the color of the material. In addition, they consist of a nail, a wide head and a gasket - this ensures the tightness of the installation.
For metal lathing, self-tapping screws with a drill for metal are used.
Material prepared for the site www.moydomik.net
 Nails with a special head For wooden lathing, nails with a special head are suitable, which covers the metal from external factors.
Such nails require attention during installation.
A heavily hammered or not hammered nail cannot be covered with a head. As a result, the reliability of the fixation is reduced.
 Nails with a monolithic head Pros advise using new nails for ondulin. Their cap is solid and can withstand hammer blows.
The hardware is fixed strictly in the wave, at its highest point. In this case, the lower and upper parts of the sheet must be fixed in each wave, and in the middle - in a zigzag.
The fastening scheme for hardware is shown in the photo.
 The scheme of fastening ondulin with hardware with a lathing step of 45 cm
  Ondulin fastening scheme with a lathing step of 61 cm
How to properly attach ondulin is shown in the figure.
 How to properly fix ondulin with hardware
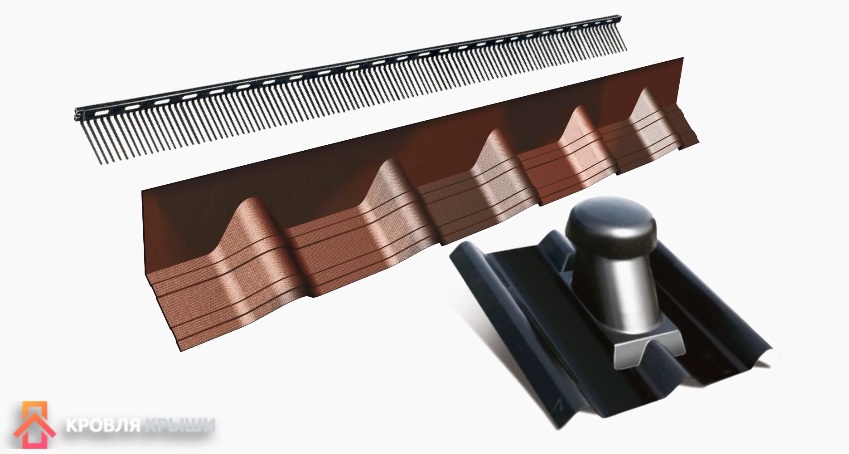
6. Additional elements (components for ondulin)
The ondulin installation does not end there. In order for your country house to have a presentable look, and the roof to be reliably protected from leaks, you need to install decorative elements. These include the ridge, cornice, wind bar and valley.
The ridge is mounted at the junction of two slopes. The overlap must be at least 120 mm. The skate can be purchased, or you can do it yourself. To do this, the upper sheets are wound up through the junction and nailed to the top of the opposite slope. True, this can be done only when it is hot outside and the ondulin is soft enough. The ridge attachment point can be refined with a wooden plug.
Nuance. The ridge is installed on pre-installed battens.
 Lining the tape under the ridge Place a special insulating self-adhesive tape under the ridge. If you save money on it, then the snow will blow under the ridge and drain onto the roof. After all, waterproofing for ondulin is not provided. And the structure shown in the photo will reliably protect the attic or manasrda from rain and melt water.
 Sealing tape under the overhang of the ondulin sheet The same tape will be built to install in the place of the overhang of the ondulin sheet. This will prevent snow from blowing out from under the eaves and will also allow natural ventilation in the attic. In addition, the attic will become inaccessible to small birds or insects.
Non-ventilated roof construction involves the use of sealant instead of tape.
- The cornice or wind bar is installed along the sheet wave. The overlap must be at least 10 cm.
- Adjoining a wall or bypassing protruding elements. For this, a special covering apron is used. Its use guarantees a hermetically sealed roof assembly.
 Covering apron
7. Natural lighting
In order to ensure the penetration of daylight, you can install a hatch window under the ondulin. Ordinary roof windows are not suitable for these purposes.
 Window-hatch for ondulin
  Hatch-window for ondulin
However, today such material as translucent ondulin is presented on the market. During installation, a regular sheet is replaced with a translucent one, this can significantly reduce the time, complexity and cost of installing windows.
 Translucent ondulin
You can give an ondulin roof an exclusive look by combining different colors in the process of performing work.
Video instruction for the installation of ondulin
Conclusion
As you can see, working with such material as roofing ondulin, you can cover the roof of not only a private house, but also a garage, a gazebo or a bathhouse. If you adhere to the tips and recommendations, as well as follow the instructions, then you can perform the ondulin roofing device with your own hands.
Tags: Roof Roof Ondulin Euroslate
Completion of the main construction work can be called the arrangement of the roof. This is the last stage, after which the interior decoration is carried out and the communications are connected. Do-it-yourself coating with ondulin can speed up the roofing work.
This modern roofing material is made on a bitumen basis and can be installed on a newly erected structure and on an old roof without prior dismantling. Ondulin is considered a versatile material, since it is used for roofs of any shape, area and angle of inclination. Subject to the rules of installation, the coating turns out to be airtight and durable, capable of withstanding any natural phenomena.
Characteristic features of the material
Ondulin is considered an inexpensive but high-tech material. It was invented by the French after the war in order to quickly rebuild old, dilapidated houses, covered with slate, tiles or metal, after bombing.
The technological process of roofing the roof with ondulin implies the following: products with a wavy surface were molded from refined cellulose fibers, dyed and impregnated with bitumen. The result is a material with good water-repellent properties, resistant to sudden temperature changes, lightweight, but able to withstand mechanical stress. Low weight allows you to use the material for roof repairs without disassembling the old coating.

Before laying ondulin on the roof, you should familiarize yourself with its advantages:
- Simple assembly... Laying of roofing material can be done in 1-2 days, without involving auxiliary workers, without experience and a special set of tools.
- Low weight... The mass of one standard sheet does not exceed 6 kg, therefore, under the ondulin it is possible not to make a massive base or a complex foundation.
- Flexibility... Bitumen-based materials lend themselves to bending, which makes roofing easier to install on complex structures.
- Acceptable cost... Technical characteristics allow you to lay the material on any frame, both old and new, doing all the work yourself. This enables the homeowner to save money on roofing.

Among the disadvantages of ondulin are the following:
- the service life does not exceed 20 years.
- The color range consists of 4 main types: black, brown, red and green.
- Under the influence of sunlight, the pigment is destroyed and the material fades.
How to cover the roof with ondulin correctly - roof features
The roof covered with ondulin is a roofing cake of the following composition:
- Rafter system... For the manufacture of the frame, natural wood is used. The rafter legs are 5 * 15 cm in size and are located at a distance of 0.5-0.8 m from each other. The roofing material is lightweight, so the frame does not require additional reinforcement.
- Heat insulating material... Do-it-yourself roofing with ondulin involves thermal insulation of the rafter system. For this, the space between the rafters is filled with glass wool, slag or basalt wool.
- Vapor barrier layer... To protect the insulation from vapors coming from below and subsequent wetting, it is necessary to use a vapor barrier membrane. This material is used to cover the thermal insulation from below.
- Waterproofing works... Before laying ondulin, it is necessary to waterproof the roof. The waterproofing material protects the wood frame and thermal insulation from above from condensation or accidental leaks. The waterproofing is fixed to the rafter legs using a construction stapler.
- Counter grill... To ensure ventilation inside the structure, slats are stuffed onto the rafters on top of the waterproofing material. These actions are performed before the ondulin is directly laid.
- Lathing... For the installation of an ondulin roof, a continuous lathing using moisture-resistant plywood or made of boards with an unedged edge is required. In the case of boards, the pitch of the sheathing for ondulin is 10-15 cm. This design will prevent deformation of the roofing material during operation.
- Ondulin... The last thing to do is to cover the roof with ondulin. The sheets are attached to the crate with special nails, stacking up to 15 cm on top of each other. Immediately before laying, the wooden frame and other elements are protected from fire and decay using antiseptic solutions and fire retardants.
Required materials and set of tools
For the installation of ondulin, no special tools are used, which allows you to do almost all the work yourself.
To solve the question of how to properly cover the roof with ondulin, you will need the following:
- Roofing material, in particular ondulin sheets, in the required quantity, taking into account the stock for trimming and overlaps.
- Ridge profile covering the entire length of the roof. When determining the length of the product, one should not forget that at the junction the parts overlap from 10 to 25 cm.
- Special fasteners. The most commonly used carbon steel nails are painted in the same color as the material and have a rubber head.
- Materials for the manufacture of lathing, pre-treated with an antiseptic solution. It can be a board or bars with a cross section of 4 * 4 cm.
- Waterproofing material, which can be used as a film or membrane.
- Hacksaw and hammer.
- Pencil and measuring tools.
Roof covering with ondulin - step by step instructions
Despite the easy processing of the material and simple installation technology, which even an inexperienced master can handle, the work must be performed at a high quality level, since the operational period and reliability of the structure depend on this.

When laying ondulin, you should follow the step-by-step instructions on how to cover the roof with ondulin:
- The installed rafter system is covered with a waterproofing material. To do this, you need to cut strips along the length of the slope and lay them perpendicular to the rafters, making an overlap of up to 15 cm. You can fix the material using a construction stapler, and the joints must be glued with tape.
- On top of the waterproofing along the rafter legs, a counter-lattice is nailed. The slats can be fastened with nails or self-tapping screws.
- Further, the installation of the battens is carried out using moisture-resistant plywood for a solid version or bars located at a distance of 10 cm from each other. Before laying ondulin, the wooden frame is treated with an antiseptic and fire retardant.
- Ondulin is laid on the crate. The work begins at the bottom of the slope, laying the sheets with an overlap of up to 15 cm.Each next row is installed with a half-sheet offset and a vertical overlap of up to 20 cm.
- The ondulin is fastened to the crate with special nails with a rubber cap with a consumption of up to 20 pieces per sheet.
How to lay - rules
In order to prevent common mistakes during the installation process, we cover the roof with ondulin in compliance with the following rules:
- The laying of the material should be carried out in dry weather at a low air temperature, since deformation of the sheets can be observed in the heat.
- When installing ondulin, do not expose it to strong mechanical stress, this may cause deformation or damage to the material.

