Do I need to plaster the slopes of the windows. Plastering window slopes as a way of decoration and reliable protection
Do-it-yourself plastering of window slopes is an excellent and economical solution that is popular, despite the prevalence of plastic on the market. Below we will describe this procedure in detail.
The plaster of window slopes retains its popularity due to some of its advantages:
- Availability. Plaster mix it costs very little, and this attracts attention.
- Showiness. The place of decoration will look very beautiful, subject to all the rules.
- Lack of emptiness inside.
The finishing of slopes with plaster gradually fades into the background, giving way to PVC panels... This is largely due to the disadvantages of technology:
- Risks. During work, there is a high probability of damage to the frames.
- No additional insulation. The use of this technology complicates the process of creating a heat-insulating layer.
- Weak resistance to temperature extremes. If you live in a sharply continental climate (for example, Eastern Siberia), then cracks will begin to appear in a few seasons.
Tip: to extend the operating period along the perimeter of the slope at the points of contact with the frame, make small grooves with a knife. We squeeze out acrylic sealant into them. This technique is relevant only if the window slopes are plastered with gypsum plaster.
- Labor intensity of installation. Despite its simplicity, such work will require a lot of effort.
Conclusion: there are more disadvantages and they are more significant than the named advantages.
We do the job correctly
Some are wondering, first is the window sill or the plaster of the slopes? We highly recommend the second option. In this case, the window sills will remain intact. Otherwise, during work with cement mixture they can be damaged. Next, we will consider in stages everything that needs to be done.
What tool do you need to cook
We need the following list of tools:
- Level (if funds allow, then laser).
- Roulette, pencil (or marker).
- Rule (preferably aluminum).
- A set of spatulas.
- Malka (made of plywood or a sheet of metal) - it should ideally fit the depth of the opening. It can be made independently from scrap materials.
- Containers for water and mixing.
- Master OK.
- Square.
When choosing a mixture, pay attention to its characteristics. It is advisable to use moisture resistant analogs. The use of cheap unstable mixtures will force you to carry out surface restoration almost every year.

Preparing the original surface
In our case, preparation is the most laborious and time consuming process. You will need to do the following:

Now let's take a closer look at how to make slopes on plaster windows. Most people are familiar with trowel work. However, each case will have its own nuances. Let's analyze the work in stages - for a better perception of information.
Important! You can work at a temperature of at least +7 degrees (at different manufacturers may have their own requirements). It is also undesirable to work at high humidity, because in this case the solution will dry out for a very long time.
- First, the markup is done. Using a square, draw the line of the future opening.
- We create limiters for finishing the side parts of the slope (so as not to go beyond the applied markings). We cut out three strips of plywood and screw them onto self-tapping screws around the entire perimeter of the window. It is necessary that the edges extend beyond the edge by the appropriate distance (according to the markings applied earlier).
- It is necessary to achieve perfect evenness - we set the horizontal edge using a level, and vertical posts plumb line.
- Following the instructions, we prepare the solution - it is better in small portions so that it does not have time to set, especially if you do not have the appropriate experience. To speed up the mixing process, use a screwdriver with a mixer attachment. We achieve the consistency of "liquid sour cream".
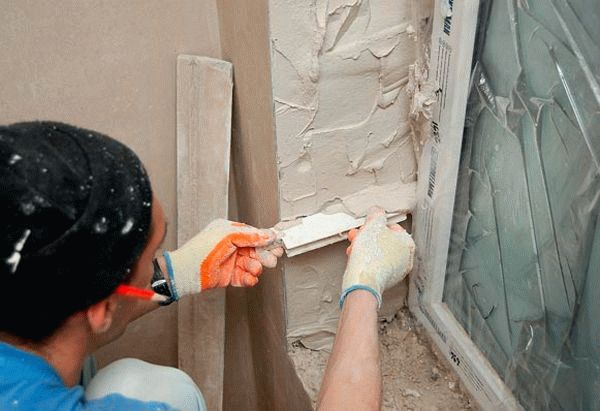
- We throw the mixture onto a plane using a small spatula. We completely fill the space between the beacons.
- Armed with a wide spatula, smooth the surface. We do this from bottom to top in smooth circular motions. We achieve maximum evenness.
- Let the mixture dry (not completely).
- Then we make undercuts in the places where the beacons are installed and take them out. Do this carefully so as not to damage the plaster layer.
- We cover the gaps that have appeared and let the surface dry.
- We proceed to the following procedures only after the mixture has completely dried.
- We evaluate the evenness of the surface - if necessary, apply another leveling layer.
- After drying, slightly moisten the surface with water from a spray bottle.
- Armed with a float, we do the grout. We drive along the surface with smooth circular movements (as with manual polishing). We do this until the surface is perfectly flat.

Conclusion
As we said, putty is not the most durable option. However, there are ways to prolong her life. You can paint it with enamel, which will give increased strength. If the aesthetic characteristics of this paint material you do not like it, you can immediately after drying, cover the surface with a PVA solution (1 to 1 with water). As a result, a transparent waterproof film will be created on the surface.
Replacing a glass unit is always accompanied by deformation. window opening... And in the end, after the installers leave, you are left with a new one beautiful window and ugly dilapidated slopes. This violates not only the aesthetics of the room, but also its thermal insulation. Therefore, it requires the immediate application of appropriate measures.
In this article, we will look at how to plaster the slopes on the windows so that they fully meet all the necessary requirements.
General Provisions
Why do you need to know how to plaster window slopes and what are they actually needed for?
Knowledge will help you to cope with the task on your own. And, based on the fact that the cost of hiring the appropriate specialists is quite high, then you can significantly save your family budget.
They perform the following functions:
- Aesthetics... The twisted entourage of cement chips might look good in some dungeon, but in the living room it's still somehow ridiculous. But an even, smooth frame will only emphasize the beauty and freshness of the new window.

- Increase in thermal insulation... Some of the resulting installation works cracks and crevices can even go through the wall to the outside. And, even if the hole is not through, it still significantly increases the level of thermal conductivity of the window opening, which negatively affects the coziness and comfort of the room.

- Dew point outward transfer... Disturbance of heat transfer due to deformations leads to abundant condensation from the inside of the window. Finishing work will help to normalize the process and eliminate moisture settling in the room.

Description of technology
Before plastering the slopes on the windows, you should carefully prepare by collecting everything you need.
Tools and materials
We will need:
- Cement-sand mixture. It is prepared by mixing cement and sand one to three, or it is bought ready-made.

- "Smoothing device" for smoothing the applied layer.

- A rule and a specially made template for leveling the cement pavement.

- Sponge for wetting.

Work progress
Now let's take a closer look at how to properly plaster the slopes on the windows. At first glance, the process seems rather complicated, but by adhering to some recommendations and peculiar tricks, it will not be difficult for you to do all the work yourself.
The instruction looks like this:
- We prime the surface to increase adhesion.

Tip: when using DSP, you can limit yourself to abundant wetting without using a commercially available primer. This will save budget funds.
- We create a suitable solution. Purchased ready mix just add to water and stir thoroughly with construction mixer with a special attachment. If we cook ourselves, then we knead the sand with cement in a ratio of 3: 1 and add water to a mushy state.

- We install corner plaster profiles. This is very important point, since they not only form and protect the corners, but also serve as a kind of beacons for the future leveling of the cement layer.
It is these guides that answer the question: how to plaster the slopes of the windows exactly?

- We apply several cakes of the solution along the corner in increments of 15-20 cm.
- We apply a profile and press it down to each cake.
- We attach to it building level and, by pressing or, conversely, adding a solution, we set its vertical.

- How to plaster the slopes on plastic windows so as not to stain and damage the glass and the plastic itself? It is necessary to cover them with a special protective film.

- Cut out a template from a piece of plastic. The goal is such that the resulting figure can completely enter one side into a narrow gap between window frame and the surface of the slope, and the other lie on the guide profile.

- We put the template down the slope as shown in the previous image and put the plaster on the slope with a spatula.
- Taking the workpiece up, remove the excess amount of solution. In places where it is not enough, we report and repeat the procedure. If the layer turns out to be thick, then before applying the next one you should wait for it to harden.
- We also close up the metal guides so that they are not visible.
- After the slopes have dried, we look for irregularities with a spirit level:
- Carefully fill the cavities with a small amount of the mixture and smooth them out with a trowel.
When an old window is replaced with a new one, many have difficulty finding a person, which can make high-quality slopes on windows using plaster.
Many people do their job poorly and require a lot of money. Due to improper installation of the slopes on the windows, there will be a loss of heat, and extraneous noise will enter the house. In addition, the appearance of fungus, mold is possible. Therefore, it is important to know how do-it-yourself plastering of window slopes is done.
How to plaster the slopes on the windows: step by step instructions
To make the window opening of the apartment beautiful and complement the interior, you can use the work guide, which will be presented in the article. Before starting work, you need to remember the basic rules that allow you to make high-quality slopes on the windows, they will not crack and will last a long time:
- The temperature in the room where the slope is made should be at least 5 degrees Celsius if cement mortar is used, as well as from 10 degrees when using rhodband. All mixtures are prepared according to the instructions on the bags.
- All mixtures are subject to restrictions on the period of use. As a rule, the time to use the ready-made solution is indicated on the package. Cement plaster it is used for half an hour, which means that you do not need to cook it a lot.
- Before plastering windows, you should calculate the amount of mixtures based on the thickness window openings and the size of the slope.
Knowing the basic rules of success, you need to know how to plaster the slopes on the windows outside, inside.
What tools and materials will you need?

Masters recommend using not only a solution for window decoration, but also other types finishing materials... For example, PVC panels or drywall. It is easier to work with such materials than with solutions, but the putty itself turns out to be cheaper, and you can also use it on an internal slope or an external one.
The main thing during plastering is to be accurate and accurate, to put a little time and effort in order to achieve a positive result. The start of work will be from the choice of mortar, after which you need to find out how to plaster the slopes on the windows. The table shows the mixtures with which it is better to work inside and outside:
Advice! When choosing a mixture for a window slope, one should take into account the time it takes for this or that material to dry. The cement base will take longer to dry, even in summer period... At the end of the work, a finishing, finishing material is used. In this case, paint is often used.
The plaster itself for slopes wooden windows, and plastic systems will not cost much in cost, if not plastered with the most expensive mixtures. In addition to the material, you will need to prepare tools:
- Brush for priming walls.
- Roller for painting.
- Net.
- Spatulas of various shapes.
- Half-eater.
- Wooden element, rail.
- Level.
- Perforated corners.
- Lighthouses.
When choosing tools to finish the window opening, you need to take into account that the plane is small, so it is inconvenient to work with a large tool. It is recommended to additionally buy gloves; for convenience, a table or a goat is used.
How to plaster the slopes on the windows (video)
The use of gypsum and cement-sand mortars
Although to putty windows is old way, but all the same materials are used as before:
- Cement-sand mortar.
- Plaster solution.
In stores, you can easily buy both material. The choice is up to the owner of the house. Using gypsum solution and compare it with a cement mixture, the advantage of cement in its cost, which will be lower than gypsum. When it turned out to close up the window, in any case, putty is used, and after its application - painting, wallpapering. It is necessary to putty the window only after the plaster has completely dried, after about 6-10 days.

When using a gypsum solution, the drying period is reduced to 3 days. In general, the drying time depends on the indoor temperature. After each stage of work, it is necessary to remove the surface from dirt and dust, and during window finishing, all windows must be closed.
The disadvantage of plastering is the duration of the work, because at each stage it takes time to dry. Otherwise, the slope will crack, and the paint will peel off on it. Another minus internal and exterior decoration slopes with mortars - cracks that appear after a short period of time. How to properly plaster the slopes on the windows will be presented in stages below.
Preparatory work
If there is a window sill, it is better to install it before plastering the slope, otherwise it will be necessary to beat off part of the slope from below and re-seal the flaws. The installation of the window sill is simple, but before plastering the slope on the window, you need to seal it with tape and film or paper so that it does not get dirty or damaged. The preparation of the window slope is as follows:
- A layer of the old mortar is removed from the window, after which the walls are swept with brooms so that the plaster adheres well to the surface. Otherwise, cracks will appear, even worse if the new layer simply falls off the wall.
- It is better to close the window frame itself with tape or tape.
- Inside, it is better to paste over the fittings on the window, as well as the radiator under the window.

- The entire surface to be treated is primed with a deep penetration agent. This allows for maximum material adhesion.
- Further, the window is left to dry out the soil, if necessary, you can make insulation. Insulate the window sill itself before installation and you can use the material for the slope. Insulation for the slope is not suitable for any, it is allowed to use polystyrene and expanded polystyrene.
Plastering window slopes with your own hands
How to plaster the slopes on the windows? Initially, you will need to spray the walls with a primer to ensure good adhesion of the materials. A liquid solution is thrown onto the wall to ensure a better adhesion of the further mixture. This procedure is performed over the entire surface, which will give a positive result. The method is excellent if the layer of putty is thick. Next, you need to plaster the window opening like this:
- It is necessary to install slats made of wood or metal, beacons that are sold in any store. They are mounted on mortar, but this does not guarantee strength, so you can use self-tapping screws or dowels if the house is brick. Correctly installed rails serve as a guiding element for installation.

- The lighthouses are mounted on a plumb line, so that they do not shift, due to this, the slope will be good, even.
- The main beacons have been installed, now we need to make special beacons that will level the surface of the window slope and shape the edges.
- The device is made easily. From a smooth tree, 10-15 centimeters longer than a slope with back side a nail is nailed, and it is better to bite off the cap with pliers, so that the outer or inner slope is not scratched. The nail is driven in at a distance of 4-7mm from the rail.

- Further, they put on the slopes ready solution, and you can level the layer with a small one, moving the bar from the bottom up, bring the surface into an even state. The rest of the solution is removed, the slope is left to dry. So you can plaster the window slope in one layer, but the work does not end there.
- Until the plaster is completely dry, it is rubbed off. The work is carried out from the top to the bottom, with the help of translational movements.
- After drying the solution, the slats are taken out, you need to close up the holes that came from the slats with a small amount of material. After that, the window slope is trowelled again.

- Next, you need to bring the surface to a perfectly even state, for this you need to properly plaster the walls using a special spatula. The solution is applied in several layers, each of which is rubbed over. During the application of the first layer, it will be correct to install a plastic perforated corner around the perimeter of the window so that the slope has the correct shape.
- Further, the window slope is painted in several layers.
During work, while the mortar has not yet dried completely, it is necessary to make a furrow between the window and the slopes with a spatula, the width and thickness should not be more than 5mm. Next, a sealant or liquid plastic is used to fill the void. This move is necessary for plastic window since from high temperatures they expand and increase in volume, therefore, in places of slopes, cracks and breaks often appear, even if it was possible to plaster perfectly. The sealant will not allow the slope to deform.
At the end, along the perimeter of the window, you can stick decorative corner, which will add beauty, and for the summer you can close the window with foil so that the heat does not enter the house or apartment. It is necessary to insulate so that the window does not freeze even in winter, the heat does not leave the house. You can choose the window design from the photo on the Internet, and you can get acquainted in detail with the work, solution and do-it-yourself technique from the video:
How to make slopes on plaster windows? This is the question facing the owners of their homes when replacing windows. The repair is not considered complete until the slopes are put in order.
The article offers to get acquainted with how to plaster the slopes on the windows for reliable protection the whole structure from moisture and cold getting into it. Similar work can be performed by a beginner, with a strong desire to do the repair himself, who has certain information, and does all the operations carefully and carefully.
Why do we need slopes on the windows, their types and features
Slopes are the part of a wall between its corner and a window.
They are:
- Internal that make up the inside of the wall.
- Outdoor located on the outside of the building.
The functions of these elements include:
- Giving a finished look to the window opening, which will allow it to become its decoration, to emphasize general style premises.
- Hiding mounting elements.
- Improving the thermal insulation of the room, shifting the "dew point" beyond the boundaries of the room.
The very first plaster slopes appeared, which are performed by applying one or more plaster layers, followed by coating the top layer with paint. When installing such slopes, a lot of debris and dust appears, and in terms of the timing of the work, they take a lot of time.
With the advent of new materials and technologies, plaster slopes began to be replaced by:
- Plastic (see Finishing window slopes with plastic - installation steps). Materials for their manufacture are taken:
- plastic panel without insulation;
- a sandwich panel is a two-layer material, it already contains a heater. This is the most warm look slopes for windows, which has the longest service life, commensurate with the service life of the metal-plastic structure itself.
- Plasterboard. These are the slopes for which the material is used moisture resistant drywall, with its subsequent painting in any color that the customer wishes. As a rule, it is chosen white. The space inside the slope, if necessary, is laid with insulation, which can be expanded polystyrene or mineral wool.
The advantages of such materials:
- Low price.
- The speed of work.
- Presence of small amounts of debris and dust.
Materials and tools for work
Before plastering the slopes on the windows, you should prepare:
- The building level, up to one meter long, but not very short, will be inconvenient to work with.
- Aluminum rule.
- Roulette.
- Containers for diluting plaster, water and primer.
- Small spatula.
- Master OK.
- Small and large ironers.
- Wide spatula - 45 centimeters.
- A spongy float for applying plaster compounds.
- A grater and a grater for working with cement mortar.
- Special gun for sealant.
- Sharp construction knife.
- Spray or brush to apply the primer.
- Corner profiles, window strip.
- A simple pencil.
Tip: For work, you need to make a small goat, on which it will be more convenient to perform all operations. Do not putty from a stepladder or stool, which can be quite dangerous.
The choice of how to plaster the slopes on the windows depends on the presence and level of humidity in the room and the location of the slope - inside or outside the dwelling:
- In rooms where there is high humidity and for structures located outside, it is better to take cement compositions.
- Work inside the room can be performed with lime-gypsum, gypsum mixtures.
In addition, you will need:
- Polyurethane foam, for blowing in cracks in the window block.
- A primer (see What a primer is for: technological nuances of finishing work) deep penetration.
- Headdress.
- Nitrile gloves to protect hands from the solution.
- Overalls.
- Comfortable shoes.

In order to properly design a window, it is necessary to mount all its elements with high quality:
- Windowsill.
- Window block.
- Correct ebb.
- The slopes themselves.
How to prepare a window for plastering slopes
Before plastering the slopes on the windows, you need to:
- Decide on the type of solution.
- Carry out priming work. The use of a primer improves the adhesion of the plaster mortar to any slope substrate. Depending on the material of execution of the side surfaces of the window, which can be very different, an appropriate mixture for the primer is selected.
- After processing, the surface must be completely dry.
- Vapor barrier is in progress. Room-side end pieces are closed vapor barrier film or is applied to them silicone sealant... In the absence of this stage, over time from the condensate the foam will get wet, which will break it thermal insulation properties, it can begin to crumble and collapse, this will lead to fogging of the window, a draft will stretch from it.
After the installation of door and window structures, it becomes necessary to carry out additional finishing work, which are associated with plaster of the slopes. This work is easy to carry out on your own, without the involvement of specialists and the use of a complex tool. Naturally, there are numerous rules that help create a truly beautiful surface.
Strange, but the decoration of the slopes is given very little importance. It is believed that this structural element does not carry a special interior design. Therefore, very often you can see how a rather curved and primitive surface is made next to a new and beautiful window (door), which completely negates any efforts. Although now they have appeared various materials to hide any flaws, but they require installation skills.
But there is a very simple way, namely, plastering the slopes. For all its simplicity, it has many advantages:
- Low material cost.
- Simplicity. All work is done independently.
- The ability to create a harmonious part of the interior.
And, despite the fact that this option has been used for many decades, it still enjoys due popularity.
 Plastering slopes - simple and cheap way strengthen the wall
Why do you need to plaster the slopes
When it comes to plaster slopes? This happens when a new window or door appears in the room (most often the entrance). Due to the work being carried out, part of the wall that is adjacent to the object to be installed is destroyed. Therefore, this area must be brought into aesthetic compliance. But, in addition to purely decorative functions, the slopes also have a number of important purposes:
- Hiding montage elements.
- Improving the thermal insulation of the room.
- Protection against moisture ingress.
- Protection against extraneous noise.
It is worth noting that plastering window slopes and doorways are operations that are similar in technology, but have some differences. This is very important to consider, otherwise some difficulties may arise.
 Plaster doorways and window slopes - processes similar in technology
 Tools and materials for work
Before wondering how to plaster the slopes, you need to prepare necessary tool and purchase materials. They will be identical for all types of work.
You will need the following:
- Level. It should be borne in mind right away that its size should be at least 1m.
- Rule. It must be checked that it does not have curvature or damage to the ribs. Otherwise, it will take a very long time to level the applied solution.
- Roulette. This device should always be at hand.
- Mixing bucket. In general, any convenient container will do.
- Spatulas - wide, medium and small (trowel). It is convenient for them to scoop up the mixture and throw on desired site... And also quickly smooth out small flaws.
- Large and small trowel. Will distribute the composition and create a smooth surface.
- Grater. It is better to select based on the plaster used.
- Construction knife. For cutting foam.
- Tuba gun. Needed for applying sealant.
- Pencil. Better not to take a felt-tip pen or marker, they can leave their mark visible.
- Brushes and roller. For priming and painting.
Advice! The work lies ahead. Doing them while standing or on a stepladder is not very convenient. If possible, it is better to make a structure like a goat. This will allow you to immediately capture a large area and not constantly rearrange the support.
 For the convenience of plastering, you can use a construction "goat"
 You need to be very careful about the purchase of materials. It is important to consider that different types of premises will require a different mixture. How to choose the right plaster?
- For objects with high humidity, as well as for outdoor work - use compounds that are made on the basis of cement.
- Do-it-yourself plastering of slopes inside the rooms is made with gypsum mixtures.
On a note! There is a more modern one, acrylic material, but it is quite expensive and cannot compete with the above products in terms of this indicator... But this does not mean that it cannot be used for slopes. On the contrary, it is universal.
Additionally prepared:
- Polyurethane foam. In fact, it is usually not spared by the installers of windows and doors themselves, but the opposite also happens.
- Sealant in tubes. It will be needed to better seal crevices and cut foam areas.
- Primer. Binder and pore-closing solution.
- Corner or wood planks. Serve as beacons.
Problems that may arise
Everything is prepared and waiting in the wings, but there are many nuances that make it difficult to finish Finishing work... What are the main reasons?
- The installation of the structure itself (windows, doors) is of poor quality. Therefore, all the works that do outside specialists, must be carefully taken, and independent - initially done conscientiously. Otherwise, it will turn out that the plastered areas will have to be broken in order to correct the initial defects.
- Was not taken into account electrical cable... Few pay attention, but in old houses electrical wire winds up under the frame front door... Right in the corner of the slopes. It is easily damaged.
- Temperature indicators do not correspond to the necessary:
- for cement mortars- above five degrees;
- for gypsum mixtures - from ten degrees.
Therefore, you should eliminate all secondary causes, and then get to work.
Plastering of window slopes
Do-it-yourself plastering of window slopes - will require a number of interrelated stages. Each must be done fully and in a timely manner. The final quality depends on this.
Preparation
Before making slopes on plaster windows, you need to perform a number of the following manipulations:
- The required mixture is selected. The required quantity is purchased.
- All unnecessary is removed. Cut off polyurethane foam... This is done flush with the window frame.
- The old line-up is being knocked down. Better to remove it completely. So, there is less risk of voids and cracks.
- All dust and dirt is erased. You can spend wet cleaning, but then everything should dry well. It is very convenient to use a vacuum cleaner.
- Two coats of primer are applied. The solution is selected based on the wall material. Often this concrete slab or brick.
- A vapor barrier is created. This is done in two ways:
- The film is being laid. It is fixed with self-tapping screws or glued. It is important to achieve full contact with the surface.
- Coat with sealant. It is much more convenient. Remember that the cut foam is completely covered with silicone.
On a note! You need to work with the sealant quickly. Surplus is immediately removed. The composition must be initially frost-resistant.
There is another problem with balcony window blocks... It consists in the fact that the upper part is initially made with a bend. Therefore, you will have to knock down a large area or apply a thick leveling layer (reinforcing it).
 Plastering a balcony block often requires top reinforcement
 The beginning of the main work
The sequence of general actions looks like this:
- Preparatory work is being carried out.
- The window and its elements completely cover plastic wrap... This is to protect against dirt and accidental damage.
- Install pre-prepared corners. They will serve as additional reinforcement, as well as beacons. They are measured out using a level. This must be done carefully.
- A bar is attached, which will determine the plane of application of the composition.
 Installing a rail and a beacon on the window allows you to do the job according to all the rules
 Advice! For more convenience, you can make a template. He will take into account the width of the slopes, which will make it possible to carry out work faster.
Plastering
You can plaster the slopes on the windows according to the following instructions:
A rule should be added regarding plastic windows:
- The initial work is carried out according to the instructions, but then they do the following: hold the trowel angle between the slope and the frame. A shallow groove appears.
- It is filled with sealant. This is done to avoid cracking.
Following such a simple technology, it is possible to answer an exciting question: how to plaster the slopes on the windows. For a more complete picture of this process, we recommend watching the video:
Features of plaster door slopes
How to plaster door slopes? This activity is different from working with windows. And it has the following features:
- For quality execution- use two rules.
- The mixture is applied according to the scheme that is used for window structures.
- It is required to install the door correctly - keeping the parallelism to the floor. This will make it possible to get a smoother slope.
- Be sure to install perforated corners.
 Plastering rules door slopes do it yourself
 Due to the fact that often work is carried out at the entrance to the apartment, one problem arises - most of the wall surface will interact with the box (metal or wooden), which will be exposed to different temperatures. This is prevented as follows (the method is similar to that used in window blocks):
- Plastering door slopes begins with the complete removal of the old layer (next to the frame).
- A construction knife is taken. It is placed at an angle of five degrees in the upper corner. And pressing, they lower it to the very bottom.
- The entire treated area is primed.
- The surface is slightly cleaned and filled with sealant. It is immediately overwritten.
Surface work
Due to the fact that you have to work with large surfaces, which are often quite damaged, the plaster of door slopes is divided into two stages.
1. A starting cover is made:
- a preparatory stage is being carried out;
- a layer of plaster is applied, which is rubbed off.
 Large damage to the slopes requires the application of a starting layer of plaster
 2. The finishing layer is formed. A putty is excellent for this. Do the following:
- take time to completely dry the first layer;
- apply a layer of primer;
- knead the putty;
- apply a layer up to 2-3 mm thick;
- rub it with a wet spatula;
- internal and outer corners- grind, chamfer;
- paint.
 Finishing door slopes
 From the above, it follows that the plaster of doorways is complemented by small nuances. Indeed, it may seem that they are completely insignificant, but it is their observance that allows you to create exactly what will meet the expectation.
Outcome
Now it is completely clear: how to plaster and how to plaster the slopes. It is the adherence to the presented rules that will make the work quick and easy, and most importantly - high-quality.

