Lattices in the gazebo do-it-yourself drawings. Decorative wooden lattice for a gazebo with your own hands: options, photos, videos
Just building a gazebo in the yard is not difficult. But it should stand not only for show, but also bring aesthetic pleasure, because its main purpose is the opportunity to spend time with loved ones or be alone, pondering the depths.
In this case, an indispensable element for the gazebo is the crate. It can be done in various ways. One of them will be discussed in the article.

Why a crate is needed
Making a crate for a gazebo can hardly be called a non-trivial task. The process requires accuracy and care. The design of the crate allows you to give the building a complete look by removing large openings.

At the same time, the crate provides a higher level of privacy, closing visitors from the prying eyes of neighbors or passers-by. The fabric will not be able to replace the crate, because the latter does not prevent the flow of fresh air.

On a sunny day, the crate will bring more comfort inside the gazebo, partially shading the area. It is easier to mount an anti-mosquito grill on the grate, which will become protection against annoying mosquitoes. In addition, such an addition to the gazebo is perfect for climbing plants that can freely braid the structure.

What to make

Someone prefers that the crate is made of metal, but this design turns out to be rather cumbersome and takes away all the lightness from the gazebo. That is why it is easier to make it from wood, in addition, it is this option that is easy to do with your own hands. Oak can be used as a base.

The wood of this plant has high strength and durability. It can be covered with stain to give a special shade. But for an inexperienced carpenter, oak can be a problem, because its processing requires special skill.

In terms of strength, oak is not inferior to larch. But the wood of this plant is more malleable to processing, so it is an excellent option for crates. Another advantage of just such wood is its resistance to moisture.

Due to the high density of wood, moisture is not able to penetrate into the thickness and cause decay processes. Another option for the construction of such a structure is ash. To a certain extent, it has absorbed all the advantages of the other two options and its appearance will please the owner.

In some areas it is easy to get beech wood. The highlight of the wood is a pinkish tint that cannot but attract the eye. The wood of this plant is well processed, but will not last long without finishing. With constant exposure to moist air, coniferous wood will be an excellent basis for the crate.

The thickness contains a significant amount of resins that have a water-repellent effect. In addition, such wood will fill the room with a pleasant aroma.
Preparatory stage

The task of the preparatory stage is to collect the necessary tools and materials. To successfully complete the task, you will need:
- roulette;
- pencil;
- chisel;
- screws or nails;
- glue for wood;
- square;
- antiseptic composition;
- paintwork;
- hacksaw.

The first step is to measure the space that will be covered by the crate. The obtained values are transferred to a piece of paper. It is advisable to make a schematic drawing of the gazebo, so that it is clear how this or that pattern will look on a particular building. Next, you need to choose a method for placing the slats on the crate. There are several options, the main ones are:
- diagonal rails;
- straight slats;
- chevron;
- mill.
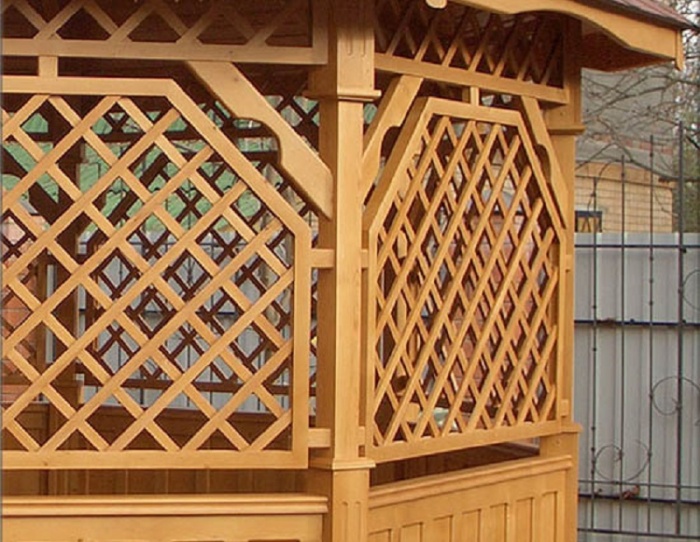
Visually, these wood structures can be appreciated from the illustration above. The most common is the first version of the crate. Due to the diagonal placement of the planks, diamond-shaped holes are formed at their intersections, which give the structure a pleasant appearance. The disadvantage of this option is a certain difficulty in maintaining the angle, as well as the impossibility of glazing. In addition, climbing plants cling worse to such a crate.

The rectangular version of the crate for the gazebo will be one of the simplest that an inexperienced craftsman can make. The slats are arranged at right angles, and the size of the cells can be easily varied by the number of elements. In some cases, glazing of the structure is provided. This option is perfect if you want to grow wild grapes. The third and fourth options will look great on gazebos, which are made according to a model borrowed from the eastern peoples.

Note! The preparatory stage also includes planing surfaces, as well as impregnation of wood with antiseptic compounds.
Frame preparation
Any construction begins with a foundation or foundation. Such a basis for the crate is a frame made of wood. Previously, according to the dimensions in the drawings, it is necessary to prepare the bars for the crate by simply cutting them to the required dimensions. The connection is made by the spike method. To make it, you will need a chisel, a hacksaw and a pencil with a tape measure. A groove is made in two bars of wood. Its depth should be equal to the width of the bar. In the other two, a protrusion or spike is made from two ends, which should fit snugly into the prepared groove. Additionally, a hole is drilled in the wood into which a dowel is inserted. Its task is to strengthen the entire structure.
Before assembly, all interacting wood parts are coated with wood glue. Next, you need a square, which will help maintain right angles at the wooden frame for the crate. Instead of a dowel, you can use wood screws or nails. In the first case, it is better to pre-drill holes with a smaller diameter than the self-tapping screw, and only then screw them in. This will prevent cracks in the wood of the frame.

Advice! Instead of a spiked connection of the frame for the crate, you can go the simpler way. In this case, each end of the frame elements is cut at an angle of 45 degrees. A miter box will help with this. After that, you can connect the elements with nails and glue. If the implementation of a crate with a diagonal arrangement of slats is planned, then a double number of frames will be needed, since the slats of the crate themselves are placed between them. In this case, the size of the paired frames must be identical.
Assembly process

For ease of assembly of the diagonal pattern of the crate, two templates can be made, as shown in the photo above. They are small pieces of planks of the same size. The first frame is located on a flat surface and is fixed to it with clamps. The ends of the slats for the frame do not have to be immediately cut at an angle of 45 degrees. It will be easier if they protrude slightly beyond the frame of the crate during assembly.

The first element is set using a tool that can be set aside 45 degrees. All subsequent ones are placed through prepared templates. The slats are nailed to the frame with small nails. Additionally, they can be glued so that the crate has greater strength. The protruding parts are cut off along the perimeter of the frame, which will automatically make the ends at 45 degrees. The finished structure is covered with several layers of varnish. After that, you can fix the second frame on the crate.

Each element of the crate is made according to the above algorithm. When assembling, it is necessary to choose the correct length of the nails. They should not protrude beyond the frame of the crate after clogging. If this happens, then the point must be eliminated with wire cutters, and the place of breakdown should be covered with drying oil so that it does not become a focus for the development of decay processes. When ready, all modules of the crate are installed in their place and fixed with screws or nails. You can watch the installation process in the video below.
Summary
As you can see, the crate is a great addition to the gazebo. There is a variant of the crate, which is made with a gash. In this case, at the intersection of the planks of the crate, cuts are made in half the thickness of the plank. This allows you to connect them in such a way that the design is monolithic. Most often, the elements sit on the glue, because the nails will look messy. During the manufacture and assembly of modules, it is necessary to use personal protective equipment in the form of gloves and goggles.
The desire to give a wooden gazebo an attractive look is justified. The installation of a grate, which you can make yourself, will help to achieve the task. Decorative lattice for the gazebo serves as an excellent basis for climbing plants. We will tell you in detail how to make a practical element of construction with your own hands in various ways.
spike connection
Before you directly begin the process of creating a wooden lattice, you should take care of the availability of all the necessary tools and materials at hand, so that in the future you will not be distracted by trifles in search of one or another object.
Preparatory stage
To work on the design of a wooden gazebo with a pretty lattice, you will need:
- bars for frame assembly;
- slats for crates;
- sanding machine;
- wood saw;
- fasteners (nails, screws, wood glue);
- materials for finishing the wooden grating (lacquer or paint intended for external work).
Comment! The beginning of work is preceded by drawing up a drawing, which reflects the shape of the decorative element of the gazebo, dimensions and design. It is convenient to check in the process of working with sketches, having a sketch of small sizes at hand.
Frame making
The basis of the wooden lattice is the frame, it is assembled in the first place. A frame is made from a bar 20x45 mm. The material is sawn taking into account the dimensions of the gazebo indicated in the drawing. The diagram below offers several options for connecting wooden parts. The ends of the bars are cut off with a hacksaw, after which the frame elements under the grate are fastened together with nails. The second frame is assembled in a similar way.
crate
The wooden lattice for the gazebo is assembled quite simply:
- For the crate on the frame, you will need to prepare a fold (rectangular recess).
- Planks with a section of 10x20 mm are fixed at the edges with nails. Fastening points are marked on the long sides of the wooden frame.
- After joining, the edges of the planks are sawn off at an angle of 45 o.
- It remains to assemble the lattice for the gazebo. Lathing battens on the frames should be located relative to each other at a right angle. The frames are interconnected with self-tapping screws.
Naturally, both frames must be absolutely identical. This is the easiest way to decorate a gazebo with a do-it-yourself lattice. To extend the life of wooden elements will help protect them with varnish or paint. The compositions are applied in several layers; pre-treatment of the wooden surface with drying oil is able to reduce the consumption of materials.
Advice! If it is planned to completely sew up the gazebo with decorative elements, a mosquito net can be placed between the two frames. This will create a reliable barrier against annoying insects. In the evening, the entrance is additionally treated with insecticides.
Examples of attractive wooden buildings and carved gazebos in the photo below:


The second way to decorate a wooden gazebo with a lattice
Not everyone is able to arrange a spike connection and a fold. The easiest way to make a lattice suitable for beginners:

The further algorithm of actions is similar to the process of spike connection.

The "hidden" option
Another option for creating a lattice is more laborious and requires certain skills in working with wood. This method involves drowning the rails one into the other, and not overlaying elements on top of each other, as in the previous case.
Action algorithm:
- The slats are marked according to the planned lattice design. Will a rhombus or a square be obtained after crossing individual elements.
- On each wooden plank, according to the marking, grooves are cut manually or using a milling machine, the depth of which corresponds to half the thickness of the lath. The kerf width matches the size of the part to be inserted.
- Gradually, one bar is inserted into another. This allows you to create the effect of a solid canvas with cut out geometric shapes. The lattice for the gazebo is very refined.
Comment! If the design of the gazebo needs to install durable and reliable gratings, timber and slats are selected with a large section.

Such a connection of planks can be framed by two frames or one. In the second case, grooves are prepared on the frame for planks of the appropriate size (they are guided by the thickness of the wooden slats). The elements are fixed in the holes with wood glue or self-tapping screws. The advantages of the method are the elegance of the lattice and the absence of the need to form a second frame. Minus - additional work on the preparation of recesses on a single frame.
Installation on the gazebo
When all the lattices are ready, it is required to carry out the installation of wooden elements on the gazebo. The installation process begins with the alignment of the decorative product relative to the bearing pillars of the gazebo. A hammer will come in handy for this.
The sides are knocked out until the edges of the wooden decor are even with the outer side of the vertical supports. When the grid is completely aligned, proceed to fixing. The side bars need to be fixed on the bearing supports with self-tapping screws. The aesthetics of fastening is ensured when the fasteners are sunk into the wood. Completely disguise the fastening elements helps to process the areas with putty.

Decoration of the lattice and gazebos
There are many options for decorating a gazebo. Traditionally, climbing plants are planted around a wooden structure with a lattice. Girlish grapes, climbing rose or actinidia are popular. The lattice can be covered with bright paint.
Gazebos look spectacular, where, in addition to classic rectangular lattices, decorative elements of complex configuration are installed. The arched entrance is the most popular design approach.
Everyone strives to make the gazebo attractive in appearance. An excellent decoration in this case is lattice for a gazebo. Do-it-yourself wooden lattice for a gazebo is quite simple. This will be discussed in this article.
The decorative lattice for the gazebo serves not only as a beautiful decoration, but can also be the basis for climbing plants. 
materials
It is possible to make decorative wooden lattices for an arbor in quite an economical way. You most likely have all the materials. Even if something is missing, you can easily get it at a garden store for a cheap price. After determining the necessary materials, it remains only to figure out how to make a lattice for a gazebo.
To make you will need:
- Bars;
- Hacksaw
- self-tapping screws
- Nails
- planks
- Sander
- Wood glue
- Wood paint or varnish
A little advice. Before you start making a grate, decide on the size of the frame, the design and shape of the grate. It is best to make a small drawing that you will refer to as you work.
Method number 1: spike connection
We make frames
In order to make a wooden lattice, you need to make its frame. A bar with a section of twenty by forty-five mm is perfect. We cut the bars according to the parameters of the gazebo section, which we will close with a grate. Then we connect them with one of the options for connecting the planks of the main frame (pictured below) 
Looking at the picture, cut off the ends of the bars with a hacksaw. After that, we knock them together with nails. In the likeness we make the second frame.
crate
The crate for the gazebo is easy to do. We have almost finished frames, it remains to make a fold (a selection on the edge of the board in the shape of a rectangle). We need 4 wooden frames 10x20mm per frame (8 in total). We fasten these strips with nails along the edges of the sides of the frame.

Let's make markings on the long sides of the frame in the place where the lattice strips will be. We cut the ends of the planks at an angle of forty-five degrees.
Now it remains only to assemble the lattice. Let's fold the resulting halves in such a way that the frame strips cross and fasten them with self-tapping screws.
Frames must be exactly the same, the only way you get a quality result.
We considered the first way to create a wooden lattice. This method is the simplest and most popular. Also, decorative grilles are made in other ways. Let's consider them further.
Method number 2. If there are no tools for spike connection
Algorithm for creating a crate
At the ends of the wooden bars we make small samples. Then we dock them and firmly connect them with wood glue. You should also strengthen the corners with self-tapping screws (drive one self-tapping screw into each corner).
We make two identical wooden frames. Then we attach the slats to the side of each beam. Now you have a fold. 
filling
Now, in order to get a high-quality wooden lattice for a gazebo with your own hands, you need to start filling it. To do this, you need to make the same slats that are used in the fold. Reiki are placed diagonally at an equal distance from each other.
Assembly
Let's start assembling the grid. We fold the two frames so that the slats intersect, and fasten them with self-tapping screws. At the same time, the frames can be cut a little for better docking.
It is also worth placing a mosquito net between the frames. This will help you avoid a huge accumulation of insects in the gazebo and reliably protect against bites.
Lattice processing
To give the tree a better look, as well as for a longer life of the tree, it should be treated with paint or varnish. Usually varnish is applied in several layers. It is better to process before grating assembly.
Here is one example of how to make a ready-made lattice for a gazebo. 
And here is a variant of the finished lattice on the gazebo. 
Method number 3: "In the secret"
When applying this method, it is necessary not to overlap the slats on each other, but to sink one into the other. To do this, it is necessary to mill or cut grooves on each element half the thickness of the rail in depth and with a width equal to the width of the rail. Next, insert one plank into another. This will create the effect of a whole canvas with diamonds or squares cut out. Such a product will look more unique and openwork.
If you need to make more durable and massive wooden lattices for a gazebo with your own hands, then you should take a rail and a bar of greater thickness. You can make a lattice as above or use a different method. It consists in the manufacture of one frame, not two. In this frame, notches are sawn under the strips of the required size, equal to the thickness of the parts. Next, you need to fix the strips in the holes with screws or glue.
The advantage of this method is that you do not have to make a second frame. Yes, and such a lattice will look much more unique.
Grille installation
In all cases, you will need to install the grate yourself at the very end in the place prepared for it. When installing, it is imperative to align the product with respect to the bearing walls, using a hammer. You need to knock out until the edges are even with the front side of the vertical pillars. After you align the grate, you can begin to mount the product. It is necessary to attach the side bars to the supporting beams using self-tapping screws. Fasteners should be recessed into the wood, and then covered with putty.
lattice decoration
To give the wooden lattice a more presentable look, you can use various decorations. A bindweed plant will fit perfectly into the interior of a summer cottage, but do not forget that such a plant also needs care. It is necessary to periodically trim the plant with secateurs, and also water it with the required amount of water about once a week. Such plants include climbing rose, parthenocissus, actinidia and others.
You can also paint the trellis in a color that matches the color of the plant. This will give a special contrast and style to your gazebo.
Let's add originality
Now let's look at a more complex version of how do-it-yourself wooden lattices for a gazebo are made. The main difference between more complex structures lies in their design. For example, a rhombus can be double or triple. Lattices are also combined with various figured and carved elements. 
You can create almost any shape of the lattice, harmoniously decorating it to your taste. The photo shows various options for the design of gratings.
You can go even further and make a lattice from cut tree branches. Such a lattice certainly will not leave anyone indifferent, it will attract everyone's attention. Manufacturing should begin with a frame of thick branches. These branches need to be connected with screws. Then the space inside the frame must be filled with thinner branches, arranging them to your heart's content. You can attach branches to the frame either with a tight wire or with self-tapping screws.
The shape of the lattice for the gazebo
The most common lattice shape is a square or rectangle. And this is quite logical and convenient. But if you want to give the gazebo a unique look, you can make the top of the lattice broken or curved. The slatted cornice looks great in the shape of an arch. You can choose any other shape, it all depends solely on your imagination.

A wooden lattice for a gazebo with your own hands will significantly save your money and fit perfectly into the interior of a summer cottage. In addition, as we found out, it is not at all difficult to make it. With the help of wooden lattices, you will make your site unusual and stylish. This will greatly improve the appearance of the garden and show you a true gardener.
Do you want to build a garden gazebo or a summer terrace with openwork lattice walls? In this article I will tell you how to make wooden lattices for a summer residence yourself using inexpensive and affordable materials.
Features of self-production of wooden gratings
Ready-made grills can be found on sale in many large garden supermarkets, while most of them have two significant drawbacks:
- Price they may be unreasonably high;
- Range usually limited to a small variety of sizes.
So that each owner of a summer cottage can independently make wooden lattices of the required size and shape, this article contains instructions that describe in detail the main features of doing such work with your own hands.

Functional purpose and scope
The decorative and protective lattice for giving from wooden laths represents easy, but at the same time strong and rather rigid design. It can be used as a fence in the manufacture of garden small architectural forms, local division of the territory, or other similar works on the site.
- These grilles are well suited for use as side walls. for a gazebo or terrace. Thanks to their breathable design, they provide shade in the country house and at the same time do not interfere with the free circulation of fresh air. or terrace you can read on our website.
 Wooden gratings do not block the view from the inside
 - Low resistance the movement of air flows allows them to withstand wind loads well, so they can be used outdoors without dismantling at any time of the year.
- Wooden lattice frame good to use as a base for climbing plants, as well as vines or other horticultural fruit and ornamental crops.
- decorative hedge from wooden lattice modules can also be used to delimit your site into separate zones, for example, to separate a recreation area from a car parking or utility area.

Note!
In summer garden arbors, the so-called pergolas, light wooden lattice structures can also be used as a ceiling, designed to protect from sunlight. If you do not know how to make a shadow in the country, then this option is just for you.
Material selection and preparation
For self-production of decorative lattice structures, wooden bars with a section of 40x20 mm and slats with a cross section of 20x10 mm are best suited, but if they are not available, you can use any lumber and trimmings of wooden slats of a suitable size.
Considering that any do-it-yourself wooden grating is intended for outdoor use, special attention should be paid to the correct choice of wood for their manufacture.
- oak wood has high performance and aesthetic qualities, but it is quite expensive and difficult to machine.
- Beech has no less durable and beautiful wood structure, however, this material is not always and everywhere available for sale.
 The photo shows a fragment of an oak lattice
 - Ash wood larch wood, which is practically not subject to destruction, is distinguished by high strength, and best of all resists the effects of atmospheric factors, even when used in conditions of high humidity.
- Pine considered the best option for the manufacture of such products. Pine wood is the most inexpensive and affordable, easy to machine, and it is impregnated with natural resin throughout its entire thickness.

Note!
In order to prevent the finished product from deforming and cracking over time, it is recommended to make decorative gratings on your own from dry wood, the moisture content of which is no more than 10-15%.
Assembly and installation of structural elements
Depending on its purpose and the personal preferences of homeowners, a decorative and protective carved lattice made of wood or MDF can be made according to various sketches, however, there is a classic scheme according to which any home craftsman can assemble such a product in a short time using a set of household carpentry tools.
- Preparation of materials. First of all, from a 40x20 bar, you need to assemble two identical rectangular or square frames, the outer dimensions of which must correspond to the overall dimensions of the future lattice.
- Frame assembly. The connection of two adjacent frame bars should be done at a right angle using wood glue, wooden spikes, dowels or overhead metal corners.

- Rail set. On one side of each frame, using small nails or small self-tapping screws diagonally, fasten a crate of slats with a section of 20x10 mm, strictly maintaining the angle and distance between them using a pre-made conductor.
- Frame joining. The result should be two identical frames with a diagonal crate. They must be folded with each other with thin slats inward so that they intersect each other crosswise, and then fasten with wood glue or self-tapping screws.
- Installation. The resulting structure must be installed in a pre-prepared opening, and in the case of a separate installation, it is recommended to beat its end around the entire perimeter with thin boards or plywood.
Wooden gratings are indispensable when we need to build a building on the site with light and elegant structural elements. It can be a wall of a half-open gazebo, or an element of a porch. And making them yourself is not too difficult. And besides, it's not expensive at all.
Any lattice is a frame that gives the structure strength and a certain rigidity, and a filling of intersecting elements. The first technological operation will be the manufacture of the frame. It is advisable to use bars with a section of 20X45 mm for it. You can connect the bars to the frame either with a spike connection, or by connecting the corners “on a mustache” and using an insert rail.
Suppose you cannot connect with a tenon joint, because you only have a hacksaw from carpentry tools. We make selections at the ends of the bars. Then we join the parts and fix with glue. You can even connect with nails. First, just bite off their hats. So that they do not spoil the appearance of the structure. For reliability, screw a self-tapping screw into each corner of the frame. For one lattice, two frames are needed. They must be the same. Prepare parts for them at the same time, using the bars of one frame as templates for parts of another.

On the sides of the bars that make up the frames, slats are stuffed with a section of 10x20 mm. Thus, we get a fold. If the slats are installed so that the joints of the bars are blocked by the ends of the slats, this design will serve as an additional fastening for the bars. In this case, there will be no need for self-tapping screws for the corners of the frames.
Now you can start filling. For it, you will need slats of the same section as for the fold. Reiki are arranged diagonally, through arbitrary, but equal distances. To make the work neat, the location of the rails on both frames must be identical.
In case if wooden trellises for gazebos will be installed in an opening closed on all four sides, as an element of a wall panel, for example, or as a structure replacing or supplementing a window, a rebate on the edge of the frames is not required. This filling option will be much easier. They can be stuffed onto the frame with some allowances. And then just cut off the excess along the contour of the bars.

Now you can assemble the grid. It is necessary to fold the halves of the frame so that the slats filling the opening intersect. If necessary, the frames need to be trimmed to better fit them together. It remains to fasten the structure with four self-tapping screws. But it's better to do it later.
The next technological operation is surface treatment with decorative and protective compositions. It is advisable to perform it before assembly - each half separately. First, it's much more convenient. And secondly, so you definitely won’t have untreated places at the intersections of the rails, you can apply two to three layers of varnish on all surfaces. You can also choose any suitable stain option. Its choice depends on the purpose of the lattice.
If the grate is installed in the wall panels of the gazebo, then you can lay a mosquito net between its halves. This will protect your gazebo from mosquitoes.
Such a lattice can also be installed at the bottom of the gazebo, as an element of the basement fence. In addition to the fact that such a structure will look very elegant, the lattice will also serve as a protective screen that prevents rodents and insects from entering the underground space, but does not impede air circulation. In this case, a mesh is laid between the frames, which can be changed as needed. This version of wooden gratings can be disassembled and reassembled in a matter of minutes.

A more massive trellis lattice can be made from wider planks without using the double frame option. This design can be used as the walls of an open gazebo. Then it will be attached directly to the frame. Or serve as an integral part of . For the grate, strips with a section of 20x40 mm are suitable. They will be used both as a frame and as an infill. First, all elements of the lattice are prepared: they must be well polished.
By imposing horizontal bars on vertical ones, a rectangular frame is assembled. Places of imposition are fixed at a right angle with the help of clamps. Then they are glued with waterproof glue. The planks of the future grille are sawn at an angle of 45 degrees. We collect the wrong side of the diamond-shaped lattice.
To maintain the exact distance between the planks, it is convenient to use a wooden template. Planks are attached to horizontal bars end-to-end flush. Now you need to turn the structure over to the front side and assemble the second side of the lattice, also fixing the planks end-to-end flush with the vertical bars. All intersections of the planks are additionally reinforced with self-tapping screws. It remains only to put a decorative and protective coating on the wooden trellis.

