How to insulate the walls of the loggia. Balcony insulation with cold glazing
In spite of small size, the comprehensive modernization of these parts of residential facilities is challenging task. To figure out how to do it yourself step by step photo need to be supplemented detailed descriptions work operations. Useful information about modern materials, . It is necessary to find out how the new premises will be equipped. Find the right answers to these and more practical matters it will be easier after reading this article.
Read in the article
Do-it-yourself balcony insulation: step-by-step instructions for preparatory work
Open balconies in domestic climatic conditions can be fully exploited for no more than a few months a year. They are blown by cold winds, filled with rain and covered with snow. After the implementation of the project, the necessary protection will be created. Even when choosing the most economical option, the insulating characteristics of the property will improve, and the cost of heating will decrease. After a deep modernization, you can actually increase living space at relatively low cost.

Mistake prevention
Some important details should be noted at the beginning to exclude incorrect solutions:
- Excessive "frugality" can subsequently be transformed into additional expenses. If you install cheap frames without, use insufficient quality and Decoration Materials, the desired result will not be obtained. Subsequent alterations are additional costs.
- The wrong choice of technology is also accompanied by troubles. It is necessary to carefully study the nuances of the techniques in order to make sure that they are realistic to reproduce on their own. To perform the most complex work processes, you can invite specialized specialists.
- Standard ones cannot be installed on the balcony. Some municipal authorities prohibit changing the color of exterior surfaces, installing frames, and other changes that are visible from the outside.
| Image | Name | Advantages | Flaws |
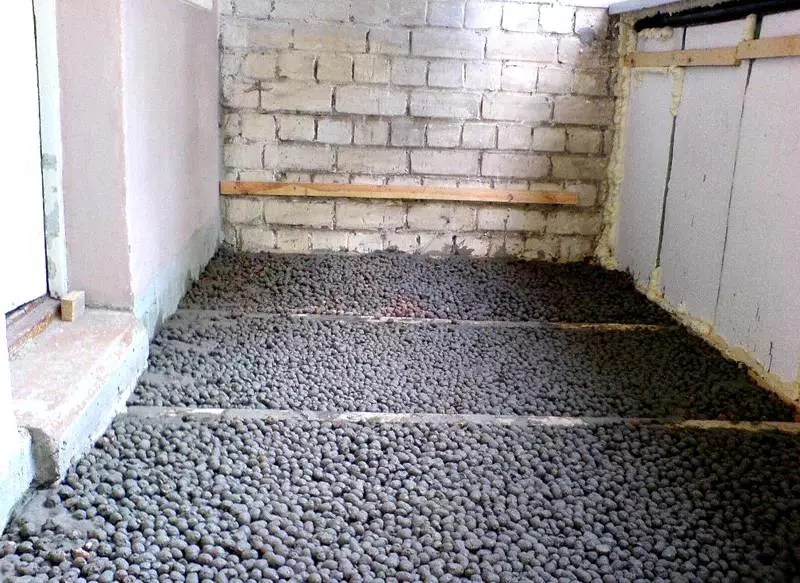
  | Expanded clay | Low cost; good filling with granules of complex volumes; maintaining integrity over a long service life; incombustibility. | High moisture permeability, which is accompanied by loss of insulating properties. |
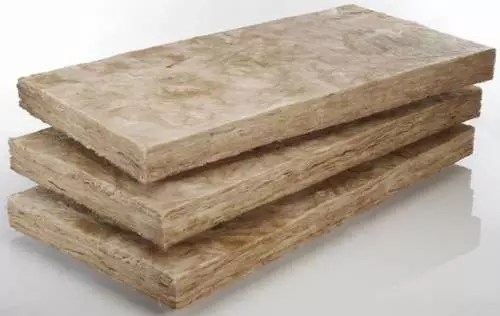
 | Mineral wool | Product durability modern level; resistance to high temperature; high quality butt joints. | Low strength; deterioration of the structure and an increase in thermal conductivity when water enters. These materials must be further protected from mechanical damage and elevated. |
 | Styrofoam | Reasonable prices; ease of processing; smooth outer surface; light weight. | Low strength, flammability. To improve resistance to an open flame, special additives are used, but the corresponding materials are more expensive. |
 | Expanded polystyrene boards | High strength products with a sufficiently high density; ease of installation; resistance to moisture; durability. | Relatively expensive materials factory production from well-known manufacturers. The difficulty of filling the internal volumes without the formation of empty spaces. |
 | Polystyrene formed at a construction site from several liquid components | It has all the advantages of plates, but in addition - it fills all the cavities of any shape. | The total cost is higher, since you have to use special equipment. |
 | Foamed polyethylene with a layer of metal foil (penofol) | Small thickness; long-term preservation of good consumer characteristics; moisture resistance. | High price. |
For your information! The insulation system will be effective if you install insulation materials on outer wall, floor ceiling.


How to insulate a balcony with your own hands: step by step photo, window installation
| Drawing | Description of actions |
Having completed the insulation of the balcony, you can achieve 2 goals at once: expand the living space and improve the degree of thermal insulation of the apartment. It is most correct to produce external insulation, but here you can not do without the services of industrial climbers and the corresponding costs. Warming the balcony from the inside will be much cheaper, especially if you do it yourself.
How to insulate the balcony inside
A positive result of the work performed is the equally comfortable temperature inside the room and the balcony adjacent to it. It makes no sense to invest effort and money in insulation that does not protect against the penetration of cold onto the balcony and forces you to tightly close the doors leading to the loggia in winter.
As a rule, for internal insulation of balconies is used:
- foamed polystyrene with a density of 25-35 kg / m 3, otherwise - foam;
- based on basalt fiber 80-110 kg / m 3 density;
- extruded polystyrene foam (one of its varieties -).
Note! For additional thermal insulation, thin foil insulation made of polyethylene foam - Izolon or Penofol - is often laid on the main layer.
In addition to the above insulators, there is another insulating material - ecowool, made from cellulose waste. In other words, waste paper. The rules for handling it and the installation technology are used the same as with basalt wool. Ecowool is not very popular due to its high cost.
Brief description of heaters
Styrofoam is the cheapest material for insulation, produced in the form of plates of various thicknesses.
Like all foamed polymers, it repels moisture well and has sufficient strength (at the specified density). It is characterized by high resistance to heat transfer and flammability, which requires protection from accidental sparks.
The thickness of the foam for insulation of the balcony in northern regions should be at least 100 mm, in the south 50 mm may be enough.
Unlike polystyrene, mineral wool does not burn at all, but it is able to absorb moisture, after which its thermal conductivity rises sharply. The problem is solved with protective layers from special films, which will be discussed next.
The heat transfer resistance of mineral wool is not too high, so it makes no sense to use a material with a thickness of less than 80 mm. Insulation is offered in rolls and plates, and at a price it will cost more than polystyrene.
Advice! The balcony should not be insulated with fiberglass-based wool (glass wool) intended for outdoor or roofing works. The use of such materials inside residential premises is unacceptable.
The best option for internal insulation of a balcony is extruded polystyrene foam, sold in slabs.

Expanded polystyrene is durable, lightweight and has the best thermal insulation properties.
Where it is necessary to lay mineral wool 100 mm thick, 50 mm of foam plastic will suffice.
In addition, the polymer is absolutely impervious to moisture and is so strong that the plate can be screwed on with self-tapping screws if necessary. There is only one drawback - the high price of the material, which is offset by the long service life of the material - up to 50 years.
Balcony insulation technology from the inside
To carry out thermal insulation on the balcony, you must carefully prepare. This includes not only the purchase of materials and the preparation of tools, but also the implementation of a number of preliminary works:
- The device of a reliable parapet. 2 types of structures are practiced: a welded metal frame with fastening to the wall or masonry from foam blocks. How to strengthen the parapet -.
- . Sometimes the balcony is made panoramic by installing metal-plastic blocks to the full height, without a parapet. Then it remains to insulate only the floors and ceiling.
- Elimination of all cracks and leaks leading to the street, removal of excess mounting foam.
- pad electrical wiring for lighting, as well as drainage and lines with freon k (if any).
Before insulating the balcony inside, you need to level all surfaces, removing obvious influxes or filling up cavities and cracks with mortar.
Interior wall decoration
The technology of do-it-yourself balcony wall insulation depends on the design of the parapet and the applied thermal insulation material. Metal carcass, finished with plastic on the outside or, it is better to sheathe it with 2 layers of thermal insulation so that the second row of insulation covers everything metal racks, which are cold bridges. And with outer side, between the cladding and the insulation, a windproof film should be laid.
When insulating a balcony with mineral wool, it is necessary to use not an ordinary film, but a diffusion membrane as a windscreen. It will let the moisture that occurs in the thickness of the cotton wool out, but will not let it get wet from precipitation or fog on the street. For polystyrene foam and expanded polystyrene, the use of a membrane is not necessary; a regular film is also suitable.
To fix the mineral wool, you will need to assemble with your own hands an additional wooden frame made of bars, whose width is equal to the thickness of the insulation. The step between the bars is selected according to the width of the material, the latter is inserted between them by surprise. At the last stage thermal insulation layer overlaps vapor barrier film, after which the frame is sewn up with clapboard or drywall.
ceiling lining
And the balcony ceiling can be insulated in 3 ways:
- If you plan to do wallpapering at the end, then the method of gluing slab insulation is suitable building mix. Warming, accompanied by "wet" processes, is carried out only in the warm season at positive temperatures.
- For or similar finishing must be attached to the walls and ceiling wooden bars, and lay the rolled or slab material between them.
- When insulated with polystyrene foam, the plates can be fixed directly to the walls and ceiling with dowels. After that, the surfaces are leveled with putty and painted, or a crate is placed by fixing the bars to the foam blocks or concrete through the insulation. Lining, plastic, drywall and other finishes of your choice are calmly attached to the crate.
Note! For fastening the crate to concrete ceiling through polystyrene foam it is necessary to use special screws for concrete - frame dowels.
When insulating a balcony with mineral wool without wooden frame not enough. Cotton wool can also be glued, but it is quite difficult. The best way- insert it between the beams attached to the wall and ceiling, protect it with a vapor barrier and line it with a suitable material.
The gluing method is convenient when working with foam plastic, but after 2 days it must be additionally fixed with dowel umbrellas and a plaster layer is applied over the fiberglass mesh.
Video:
Floor insulation
The technology of thermal insulation of balcony floors differs from walls and ceilings, since the “pie” of insulation must bear certain dynamic loads and have a flat surface. Alignment is carried out by laying wooden logs, between which a heater is laid, and a finishing coating is laid on top. The sequence of actions is as follows:
- Cut a wooden beam into crossbars along the width of the balcony and fix them to the floor with anchors or self-tapping screws and dowels using steel corners.
- Fasten 3 longitudinal logs to the crossbars on self-tapping screws. In the process, they must be aligned horizontally, starting from the highest point. Using building level, the beams at the intersections with the crossbars should be raised and plastic or wooden wedges should be placed.
- Between the crossbars and the log, lay the insulation tightly. In the case of mineral wool, a vapor barrier must be laid on top of it.
- Lay a floor covering with fastening to the logs.
It is characteristic that the length of the crossbars and the log does not need to be adjusted to the dimensions of the balcony. It would be more correct to make them shorter by 10-20 mm so that the ends do not rest against the walls. Wood has the ability to "breathe" and deform a little; with a tight fit, the floor surface may later arch.
Moreover, walking on such floors will be accompanied by an annoying creak. The resulting gaps near the walls will hide under flooring and become invisible.
When using slab insulation, it is worth choosing the step of the crossbars correctly so that you do not have to cut the slabs once again. Standard Width- 600 mm, and you need to focus on it. After laying the foam or expanded polystyrene, all joints and cracks must be filled mounting foam.
Useful instructional video:
Mineral wool is protected with a vapor barrier as tightly as possible so that moisture from inside the room cannot seep into it. Here, too, you can use foamed polyethylenes such as Penofol, but pay attention Special attention gluing joints.
If you seriously and scrupulously approach the procedure for internal insulation of a balcony, then it is not at all necessary to hire craftsmen and pay them money, which is never superfluous. You will spend twice as much time to complete the work, but you will do everything with high quality and in accordance with personal wishes. In addition, save money for the family budget.
The notorious housing problem has been troubling us since the time when Adam and Eve were expelled from paradise. “What does paradise and balconies have to do with it?” the reader will ask. And besides, the balcony is a constructive component of our home. And the solution to the question: the better to insulate a balcony or loggia , may, in the end, bring either heavenly pleasure, or headache due to wasted money, time and effort. After all, a properly selected insulation will turn your balcony (loggia) into additional cozy square meters, expand the space of the apartment and reduce the energy consumption of this area to preserve heat in the winter.
First, consider what types of heaters exist for balconies and loggias. Then we compare them, highlight the advantages and disadvantages, after which you can determine which insulation better fit in your case.
Common types of insulation for balconies and loggias
Mineral wool
 Mineral wool is widely used in the insulation of balconies and loggias due to the ease of installation and relative cheapness.
 Mineral wool (basalt wool, wool made from natural fibers (linen) with a polyester content (up to 15%)) - solid, modern look noise and heat insulation, used in the insulation of roofs, walls, ceilings, balconies and facades. For roofing, roll-type cotton wool with a density of 25-35 kg / m3 is more often used. But for the facade, it is better to choose a denser insulation up to 70-90 kg per meter, which will ensure minimal shrinkage of vertical surfaces.
The mineral wool or basalt insulator used in the insulation of loggias or balconies has shown excellent results. It can also be used as protection against moisture by laying a hydrobarrier. The thickness is chosen according to the temperature indicators of a particular region, but usually not more than 100 mm. Fasten mineral wool under the finishing layer (plastic, drywall) using slats or counter-battens.
One of the disadvantages this insulation is wetting of the material. Only cotton wool natural linen provides vapor permeability and stable operation when partially wet.
Brief characteristics of mineral wool ISOVER Classic Plus 50 mm:
Depending on the manufacturers, cutting and specifications may differ.
Expanded polystyrene, extruded
 Polyfoam - universal insulation for balconies and loggias
 Expanded polystyrene extruded (polystyrene) is a heat-insulating material with a homogeneous structure and closed cells that is widely used. Almost does not absorb moisture (up to 0.1% per 1 meter per day) and does not react strongly to ultraviolet radiation. Styrofoam has differences in density and is mainly used in the insulation of technical rooms.
The material for the insulation of the balcony should be chosen as a heat insulator with an optimal flammability class, and better - with non-combustible additives in general. Moreover, the market offers all kinds of types and classes of insulators.
Scope and some characteristics of expanded polystyrene brand Extraplex 50 mm:
How to insulate a loggia or balcony? Choosing the right brand is simple, the main thing is to consider the criteria by which the material is selected. If you have a small balcony, suitable materials that can be applied decorative layer. For example, plaster type "bark beetle". Expanded polystyrene is perfect for this, but you should remember about the "dew point" and use only high-quality adhesive for plates.
The disadvantage of expanded polystyrene is the release harmful substance styrene, when heated above 40 degrees Celsius. Therefore, it is best to insulate the balcony from the outside with such material.
Expanded polystyrene can also be mounted on a mounting construction foam. V Lately often used this way of fastening. The foam, expanding, does not leave gaps, well filling all the cracks. And when installing a warm floor, you can lay polystyrene foam under a heating element by gluing it directly to the floor of the balcony.
Advice: on the balcony, it is better to make a coating or other waterproofing of the walls, ceiling and all junctions (windows, doors), since usually balconies are most susceptible to leaks. You can also use a hydrobarrier as a moisture insulator.
Penofol
 Penofol - modern insulation used for insulation, including balconies and loggias
 Penofol is a thin modern insulation, which is also suitable for warming balconies or loggias. More than three modifications are produced.
Space saving is the number two priority in all installation and finishing works. Here, penofol comes to the fore.
Type "A" - are used both in combined insulation of external walls from the inside (polystyrene foam plus penofol), and in independent version by applying material 10mm thick. The product, consisting of polyethylene foam, with a reflective layer on one side, will serve you well for many years.
Type "B"- foil material with two reflective surfaces is more used for additional floor insulation, both under a screed in rooms, and as a substrate on balconies and loggias under a warm floor. The high operational and reflective qualities of such an insulator have proven themselves well.
Type "C"- self-adhesive product, with one-sided reflective layer, easy to mount on walls and ceilings. The requirements for surfaces for such insulation are minimal: cleanliness (dust removal) and surface evenness (can be glued to concrete). Do not forget to carefully prime the places of insulation.
Type "ALP" It has both a reflective layer and a protective polyethylene membrane.
If, for example, you want to bring out additional pipes for floor heating in the loggia, the ALP type of penofol is laid as a reflective layer under the pipes and screed. The protective film of such material does not react with the wet solution during the work on pouring the screed. Then, having made reinforcement with a mesh (usually brand BP-1) and placing beacons or guides, pour the solution. Do not forget about aluminum tape for gluing seams and junctions. It is better to wrap the edges of the penofol on the walls, by about 80 mm.
Important: pipes that are laid as a heating element must be under pressure of 5-7 atmospheres when pouring. Such a measure will prevent the base from breaking in the future and relieve stress in the thickness of the material when heated (there is room for expansion). Installing a pressure gauge in the system will make it possible to monitor the indicators and tell you if there are any leaks in the system.
And it is best to glue the screens for additional batteries on the balcony with type “C” penofol, with a reflective layer inward to the battery.
Briefly about the properties of penofol:
What is the best way to insulate a balcony?
Before deciding how to insulate a balcony or loggia, you need to understand which side to use the insulation and where. At the same time, glazing the balcony is a mandatory step, otherwise, what's the point of insulating if everything is ventilated.
The balcony can be insulated:
- bottom (floor);
- top (ceiling);
- inside (walls);
- outside (also walls).
Insulation of the floor of a balcony or loggia
 The better the material for warming the balcony, the better the microclimate will be preserved. closed space. In light of the latest trends, insulating the floor on the balcony is highly recommended. This will give energy-saving heat savings from 20 to 40%, depending on the type of insulation. The cost will pay off, especially if you plan to convert the balcony into an extra room.
Warming methods:
- using insulating materials;
- underfloor heating system.
Insulation materials:
Mineral wool
The advantage is low cost, ease of installation. The disadvantage is that over time it becomes caked and loses its insulating qualities. With an illiterate calculation of the heat-insulating layer (this is a completely separate topic of conversation), you can not achieve the desired effect.
Styrofoam
Good, comfortable, cheap material. The disadvantage is that mice eat it. It will be necessary to take care of excellent tightness.
Expanded clay
Lightweight, cheap, eternal heat insulator, but cooler.
Penofol
Moderately costly. Combines the qualities of mineral wool and polystyrene. It can be laid on an imperfectly flat surface. According to experts - one of the best heat-insulating materials for warming balconies and loggias.
Penoplex
Also moderately costly, a good heat insulator, but requires a very flat surface.
Underfloor heating system
There are three options:
water floor
Connected to the central heating system. If you do not have individual heating, then this option is not suitable due to the lack of permissive legislative acts.
Electric
- Cable.
- Cable with reinforcing mesh.
Electric floors are effective together with self-leveling floors and tiles.
Film (infrared)
Fits without capital repair work. A technically simple solution.
Attention: the film floor cannot be used under tiles and screed. It is possible under linoleum or laminate.
Insulation of the ceiling of a balcony or loggia
 It makes sense to insulate the ceiling on the balcony if your balcony is located on the top floor.
To insulate the ceiling on the balcony, the following materials are used:
- drywall;
- Styrofoam;
- penofol;
- penoplex (foamed polystyrene foam).
Do not forget that when insulating the ceiling, a decrease in the ceiling space is inevitable.
If you do not want to do capital insulation of the ceiling, then you can get by with decorated foam tiles. In this case, there will be two advantages: an elegant ceiling with a small layer of insulation.
Insulation of the walls of a balcony or loggia
 Before insulating the walls of the balcony, it is necessary to close up all holes and cracks. Neglecting such a trifle as a gap in cold windy weather will result in loss of heat and lack of comfort.
Balcony insulation materials are the same as for floor insulation. This:
- expanded polystyrene;
- penoplex;
- penofol;
- mineral wool.
You can add stuff like isover.This is a more modern mineral wool based on fiberglass. Available in rolls or sheets.
Another option is styrodur is a green extruded polystyrene foam.
Wall insulation can be carried out from the inside and outside. In case you need to keep usable space balcony, it is recommended to make insulation from the outside, and inside - only finishing work.
As in any other case, the choice of insulation from the outside has its advantages and disadvantages:
It is not easy to choose which insulation suits you, how to specifically isolate a particular room. the best way insulation will be combined.
Example: it is better to insulate the ceiling of the loggia and all walls with basalt wool mats, the floor with polystyrene foam, and use penofol as an additional sound-absorbing and heat-reflecting layer.
When choosing a material, remember that the flammability class and environmental friendliness are perhaps the most important criteria.

So, taking into account the plans hatched for the further use of a balcony or loggia, time and financial possibilities, taking into account the recommendations received, you can now make a reasonable balanced decision on choosing a heater for your balcony or loggia.
By insulating the balcony, we create a buffer zone on the way of cold air to the living quarters, we add a little square meters to create a pantry, or even a small room - but this is if you connect a heater. In our step by step instructions we will tell you how to properly insulate the balcony with your own hands and what materials are used for this.
Balcony insulation begins with a check load-bearing structures. For this, it is advisable to look at balcony slab from the balcony of the neighbors below: if the beginning of destruction is visible to the naked eye, then it is possible to strengthen the concrete and reinforcing layer as shown in the figure. If you doubt the strength of the plate and the ability to carry an increased load of glazing, insulation, floors, it is better to seek expertise. Although, as practice shows, balconies can easily withstand an increased load and collapse - this, fortunately, is an extremely rare exception to the rule.
 a - concrete is knocked down in damaged places. b - the surface is cleaned and repair compounds are applied: 1 - contact layer; 2 - anti-corrosion protection; 3 - repair solution; 4 - leveling putty
Remove before starting work old finish and frames (if any), clean all surfaces from collapsing elements, if necessary, make a small concrete screed or seal concrete mortar cracks in the plate.
Insulation work can be divided into:
- outer skin;
- glazing;
- internal insulation;
- finishing.
Outside parapet siding
The easiest way to make the outer skin of the balcony is vinyl siding.
Outside the parapet, a vertical crate is assembled in such a way that it forms a single flat area (check with a stretched thread). The bars or the metal profile of the crate are fixed at a distance of about 40 cm from each other. Further, siding guides (closing profile) are mounted along the lower and upper perimeters, and the corners are made out with a special vinyl profile - the “outer corner”.

The starting siding bar is attached with the long side to the lower rail using self-tapping screws. It is better to start from the side wall - and the panel is shorter and less visible from the street - you can practice. Between the siding and the balcony grille, you can immediately lay soft mineral wool slabs. At the top of the parapet, you need to mount a drainage system.

A very short video about the main stages of sheathing:
Glazing is a mandatory step in the insulation of the balcony. At the same time, you can independently make frames made of wood, aluminum or steel profiles (corner, profile pipe) and glaze, or you can purchase ready-made double-glazed windows. The first option will cost less, but it is more time consuming and, most importantly, will only slightly be able to raise the temperature on the balcony in winter. Sealed windows without the use of double-glazed window technologies, you are unlikely to succeed, they will have to be insulated or not insulated for the winter and leave the balcony, in principle, cold, which will only reduce the wind load. So it is better to order ready-made double-glazed windows for glazing.
If the balcony was not glazed, and you are not insulating the loggia, then the parapet for installing frames is most likely missing or insufficient. You can create a retaining wall in the form of a reinforcing cage with concrete or brick. To facilitate the construction, expanded clay can be poured into concrete, reducing the total load. The top of the parapet must also be reinforced with a metal profile.

If the protective grille of the balcony is strong enough, and the double-glazed windows are single-chamber, aluminum are very light, then wooden planks under the window sill, which are attached to the top of the grate.
If the balcony has a small area, then you can weld a frame on brackets that protrudes beyond concrete slab. At the same time, the window sill will not "eat" the valuable volume of the balcony. Such a balcony device is called takeaway.

After that, window sills and the frame of future glazing are installed - without frames and sashes, which will be mounted later. To do this, the metal structure is welded to the metal profile of the parapet and the supports fixed to the balcony slab of the neighbor from above. If you live on the top floor, the design will be more complicated, since you will have to make a canopy-roof, for example, from corrugated board, polycarbonate, etc. At the same time, the racks must be more durable.

After the frame is fixed, the upper drains (visor) are mounted and double-glazed windows are installed according to the instructions.

About the features of glazing small balconies without increasing the area, look at the video:
Balcony insulation from the inside
From the inside, the balcony is insulated from the sides of the walls, floor and ceiling. To do this, you can use various thermal insulation materials.
Balcony insulation materials
The thermal conductivity of building thermal insulation materials varies widely, so it is impossible to unambiguously name the recommended thickness. For information, see how they differ optimal thicknesses to achieve the same thermal resistance when using popular materials.

The main requirements for materials also include:
- long-term strength;
- non-hygroscopicity;
- fire safety.
Most often used:
- mineral or stone wool- fibrous insulation;
- lightweight foam and "Penoplex" ( different types polystyrene) - board materials;
- polyurethane foam or "Penoflex" - polyurethane foam.

Sometimes a composition of these materials is used.
Fibrous insulation is easy to install when it is made in the form of soft plates or a blanket with a foil surface.

Polyurethane foam is applied using special, preferably professional equipment.

For comparison consumer properties materials, we have summarized their main characteristics in a table.
Stages of warming the balcony from the inside
Now that the basic properties of thermal insulation building materials we know, consider the order of work.
Advice! If lighting or connection is supposed to be on the balcony heating appliances, make wiring to the lamp, switch and socket in advance by placing the cables in plastic boxes. So the wiring will be hidden, which is much more attractive than open wiring.
Before work, make sure that dust, small particles of insulation or a solution do not pollute the apartment - close the openings with a film.
Floor insulation
Warming should start from the floor. First, a layer of waterproofing should be laid on the balcony slab. It can be ordinary polyethylene or foil isol. At this stage waterproofing material can also be attached to walls.


To protect against condensation, a layer of vapor barrier is laid on top. If you purchase embossed film, then you need to lay it with the embossed side up.
The subfloor is completed with 10 mm thick plywood in two layers. It is attached to the lags with self-tapping screws. Instead of plywood, you can use sheets of fiberboard or chipboard.
Ceiling insulation
Apply a layer of antiseptic to the cleaned ceiling. For thermal insulation, you can take foil-clad mineral wool or polystyrene. A good solution would be to use penofol - a foam material covered with aluminum foil, which is glued to the PVA, and nailed on top with a crate for attaching the finishing layer of the finish - a stacked ceiling, drywall or siding.

Styrofoam can be fixed to the ceiling with mounting foam.

Mineral wool is laid on a false plasterboard ceiling, which is fixed on an aluminum profile frame or a wooden bar 40x40 mm.

If required, we fix the lamps.
Wall insulation
Waterproofing has already been completed at the first stage, so a vertical or horizontal crate from a bar. The distance between the bars is equal to the width of the heat-insulating material. For walls, it is better to use polystyrene foam or mineral wool boards.

PPS can be glued to special glue or mounting foam, be sure to blow out all the joints and cracks with it.
A vapor barrier film is fixed on top of the insulation.
Finishing work
There are many materials that can be used to decorate a balcony. This is drywall, which can be plastered or covered with wallpaper, and tiles, and vinyl siding, and lining.

On most balconies, stationary or mobile clothes dryers are mounted, which can rise to the ceiling.

If the area allows, you can install on the balcony compact furniture or transforming furniture: reclining tables and seats, and some happy owners of wide balconies even equip sleeping place. The window sill can be made wider and turned into a countertop - for morning coffee or business.
If desired, a fan heater can be installed on the balcony, which will allow using additional space in spring and autumn, or an electric convector can be installed, which will make the balcony all-weather for equipping an office or a winter garden there.

In conclusion, we invite you to look at photos of the design finishes of the balcony space - for inspiration and a source of ideas.


In winter, do you have to forget about the balcony? It's time for a change - make a warm cozy corner out of a warehouse of unnecessary things or even! insulate cold balcony both in a new building and in a private house it is not as difficult as it seems: it is enough to know what materials can be used and in what sequence to carry out insulation work.
To begin with, it is worth saying that there are two ways to insulate a balcony - from the inside and outside. External insulation, of course, is more convenient - precious centimeters of area are not “eaten up”, and the cladding of the balcony facade becomes more pleasant. But this is a laborious process that requires the involvement construction team and industrial climbers. Therefore, in the article we will focus on how to properly insulate a balcony in an apartment from the inside - this can be done independently.
For insulation inside the balcony, first of all, it is necessary to carry out preparatory work. They include several important steps:
- How to start warming a loggia or balcony? Free up space from all unnecessary. It is best if the balcony is completely empty: it is much easier to work this way. Also, get rid of the old finish in advance.
- Seal all the cracks - a lot of heat escapes through them. For small gaps, a weather-resistant sealant is suitable, fill larger gaps with mounting foam - it will not only fill the voids, but also serve as an additional heat insulator.
- To make it easier for you to carry out work on insulation, it is important to even out cracks and irregularities on the walls and ceiling with cement mortar.
- If you plan to place light bulbs on the balcony or lighting, it is worth taking care of the wiring in advance. To hide unpresentable cables, place them in plastic boxes.
- Before starting work, cover the opening between the balcony and the adjoining room with a film so that building dust and other pollutants did not get into the apartment.
Is it possible to insulate a balcony in winter? Yes, you can. Only when working in winter, it is necessary to choose frost-resistant materials, in particular mounting foam.
How to insulate a balcony: what materials are better to choose

To understand how to insulate a loggia or balcony, let's first figure out what properties the materials should have:
- high strength;
- fire safety;
- water resistance;
- environmental friendliness;
- relatively low cost;
- ease of installation (if we want to do all the work with our own hands).
Most often, mineral wool, polystyrene foam, polystyrene, etc. are used for insulation. Sometimes several of these materials are combined. We have reflected the pros and cons of each heat insulator in the table:
| insulation | Advantages | Flaws |
| Expanded clay> | Low cost; Durability; fire safety; Not afraid of mold and mildew; Light weight; Easily takes any shape |
High moisture permeability; Suitable only for floor insulation; May be difficult to install |
| Mineral wool | Good sound and heat insulation; Environmental friendliness; fire safety; Easily takes any shape |
Deterioration of properties when exposed to water; The thickness of the insulation "steals" the usable area |
| Styrofoam | Low cost; Ease of installation; Light weight; Not afraid of mold and mildew |
fragility; combustibility |
| Extruded polystyrene boards | High strength; Ease of installation; moisture resistance; Durability |
Relatively high cost |
| polyurethane foam(liquid insulation) | High strength; moisture resistance; Durability; Fills cavities of any shape |
Relatively high cost; Mandatory availability of special equipment |
| Penofol(foamed polyethylene with a layer of metal foil) | moisture resistance; Durability; Small thickness; Good thermal and waterproofing |
Rarely used as an independent heat insulator, usually only in combination with other materials |
What is the best insulation for a balcony? The answer to this question depends on your preferences and financial capabilities. You can read more about the characteristics of insulation, as well as about it in general, in our blog.

First, a waterproofing layer of polyethylene or penofol must be laid on the floor so that dampness does not bother us. Masters advise laying penofol with the reflective side up. Along the way, we can fix the waterproofing on the walls. The joints between the sheets of the waterproofing agent are best glued with foil tape.
Another good waterproofing agent is bitumen-based mastic. It dries for about a day, the surfaces treated with it cannot be touched.
Then we set the lags - wooden bars or metal beams, serving as the basis for floors, platforms and other surfaces. Suitable for floor insulation wooden logs. You should choose lags made from quality materials: The moisture content of the wood must not exceed 12%. Also, in order to prevent fungus and decay, the bars are treated with an antiseptic or primer.
The distance between the lags should be equal to the width of the insulation, and the builders recommend making the height of the bars 10-15 centimeters - this is necessary for reliable protection floors from frost. To seal the holes between the lags and the wall, as well as fix the bars in the desired position, use mounting foam. Do not worry about accuracy: excess foam can be cut off with a knife after it dries.
Next, a heat-insulating layer, slab or fibrous, is laid. Make sure that there are no gaps between the heat insulator and the lags: "cold bridges" will negate all your efforts to warm. If you are laying the heat insulator in several layers, be sure to shift each new layer so that the seams between the sheets of insulation are not in the same place.
To protect the floor from condensation, you will need a layer of vapor barrier.
Using self-tapping screws, attach a "rough" floor made of boards, plywood sheets, fiberboard or chipboard to the logs. This is the last step before finishing the floor, such as laminate, linoleum or carpet.

There are two technologies for insulating the ceiling - with or without a frame. Before starting work, it is recommended to apply an antiseptic layer to the ceiling: this way you will protect the surface from mold.
If you decide to make a crate, you will need wooden bars and dowels. We lay a heater in the crate - mineral wool or polystyrene is suitable as a heat-insulating layer. The mineral wool is fixed with mounting foam, and the foam plastic holds without additional fastening. Then comes the ceiling decoration: plastic panels, drywall, lining - any materials will do, it all depends on your idea.
Without a frame, ceiling insulation work is carried out as follows: the ceiling surface must be cleaned of dust and dirt, and also treated with reinforcing soil - this will help fix the insulation more securely. Then the glue is applied to the foam sheets (it is enough to apply glue around the perimeter and a little in the middle). We glue the sheets to the ceiling, for reliability they are fastened with dowel-mushrooms. We close the joints with mounting foam.
The adhesive you will be using must never contain toluene.

Our waterproofing is already ready, so we can immediately install a crate of wooden bars. The distance between them should be equal to the width of the heat insulator, and the height of the bars should be equal to the width of the insulation. Suitable for walls polystyrene boards, polystyrene or high-quality mineral wool. The joints between the insulation, as always, are filled with foam. On top of the insulation you need to fix the vapor barrier film.
As a rule, the wall between the balcony and the room is insulated in one layer, and the remaining walls are insulated in two layers, or the thickest heat insulator is used.
And what to do with windows?

Think about it: is it worth it to insulate a balcony with cold glazing? If you want a truly warm corner, you should not save on windows. You can insulate the ceiling, floor and walls to the highest standard, but cold air will still seep through old or low-quality double-glazed windows.
If your balcony is not glazed, first of all, pay attention to the parapet - a low wall that protects the balcony from the street. It must be strong enough to withstand the window structure.
Which windows to choose? If you are planning to make a balcony a living room, two-chamber plastic windows With hinged doors. They are tighter than sliding window systems, also such windows have the best heat and sound insulating properties. The only negative is that since the area of the balcony is mostly small, the arrangement of furniture can interfere with opening the windows.
In general, you can install plastic windows with your own hands. But it is better not to take risks if you have no experience: after all, even some window installation companies make annoying mistakes in their work. In order not to run into unfortunate installers, frosting of windows and, be sure to study the reviews of people who have collaborated with a particular company.
If it is still not possible to install new windows, it is quite possible to find another way out. on the balcony easily with the help of improvised materials.
Even on a perfectly insulated balcony it can be a little chilly in winter. To make it comfortable for you to be on the balcony on the most frosty days, ideal option There will be an electric heater. Usually it is placed against the wall separating the balcony and the apartment. You should not put a heater near the windows, otherwise the glass will start to fog up.
Conduct central heating the balcony is not allowed: it is prohibited by building codes.
Also good decision for heating there will be an electric floor heating or a water floor. Modern technology warm floors will delight you as long as the balcony itself will exist. Many systems are equipped with a thermostat, so you can set a comfortable temperature.
After you have done everything necessary work for insulation, you should take care of. If you sealed all the cracks on the balcony, fresh air there is simply nowhere to come from. Therefore, regularly

