Fasteners for block house special galvanized staples. How to fix the house block correctly: clamps and other fasteners
House block is a modern high-quality building material designed to perform decorative finishing interior and exterior walls of residential low-rise buildings. Having appeared not so long ago, he has already managed to gain immense popularity. And all this thanks to its appearance, which resembles a natural wood blockhouse, excellent quality characteristics and ease of use. Even a beginner can do the installation of a house block with his own hands.
Specifications
House block is made using a special technology from solid wood by means of intensive drying. Finished material the texture of any type of wood is given. Distinctive feature house block is its special shape. Its front side is cylindrical, while the back resembles in appearance regular board, along which one or more longitudinal grooves are cut. Such grooves on back side the house block is necessary, first of all, to reduce the pressure on the surface and provide ventilation.
Block house material
The sides of the house block have a kind of lock - thorn-groove. It greatly facilitates the installation process and gives finished structure strength and stability.
In fact, the house block is a version of the lining, in which the front part has been modified. Meanwhile, it was thanks to her that this material became in demand, as it allowed to create an imitation on the walls log house... Moreover, the front side may have not 1 cylinder, but two or more.
Builders distinguish between several classes of block house, depending on the type of wood, namely: "Extra", "A", "B" and "C". The most popular are class "A", which has an excellent appearance and characteristics, and class "B", on whose panels rotting or falling out knots are allowed, which make it more affordable.
House blocks can be made from both deciduous and coniferous species. Moreover, the latter are considered to be of higher quality, since they contain natural resins that provide natural waterproofing.
In addition to the wooden block of the house, there is also metal siding or metal siding. It is made of galvanized steel, but also mimics natural wood... In view of the excellent technical characteristics it is used to create sections of all types and use them even in the most adverse conditions.
Advantages and disadvantages
Advantages of a wooden block house:
- luxurious appearance, which gives additional comfort and coziness to the finished walls;
- ecological cleanliness;
- wear resistance;
- durability;
- resistance to fungi and decay;
- excellent hydro and sound insulation, as well as a good ability to retain heat (subject to production from coniferous wood);
- ease and simplicity of installation;
- the ability to use when decorating walls from any materials.
Antiseptic treatment block house
The disadvantages of a wooden block of a house include the need for its regular antiseptic processing, which should be done at least once every couple of years, as well as a high cost compared to drywall and siding.
Advantages of the metal block house:
- resistance to deformation even under the condition of operation in the mode of low and high temperatures(from -50C to +80C);
- durability (its service life is almost 50 years);
- resistance to ultraviolet light, any atmospheric phenomena and aggressive substances;
- ecological cleanliness;
- incombustibility;
- ease and simplicity of installation;
- aesthetics and attractive appearance;
- no need for regular care;
- the ability to use for wall decoration from any materials;
- democratic cost and an additional opportunity to save on heating, which appears due to the arrangement of a heat-insulating layer between the facade and the metal siding itself.
Building in metal siding
The only drawback of the metal house block is its heavy weight. Therefore, giving preference to this material, it is extremely important to correctly calculate the maximum possible load on the walls and foundation of the structure. Otherwise, metal siding cladding may negatively affect its performance.
An alternative to metal siding in this case can be aluminum siding. It is much lighter than galvanized steel, but also less resistant to mechanical damage.
Preparation for work
- Before installing the house block, you need to check the condition of the internal and external walls for chips and cracks. The discovered shortcomings should be eliminated in order to exclude the process of their further destruction. It is important to clean and grind areas affected by mold and fungus, and then treat with an antiseptic primer. Walls made of brick and reinforced concrete must be impregnated with a water-repellent compound, as well as walls made of wood, in order to avoid the appearance of mold and mildew.
- Slots and gaps need to be caulked using tow or jute. In this case, this procedure can be carried out in a stretch or in a set.
Before starting the installation of the house block, builders advise letting it lie down indoors or under a shed (subject to installation outside) for several days to undergo acclimatization.
- At the preparation stage, you can also lay electrical wiring and other communications.
It is advisable to install the house block in warm time years with stable humidity and temperature. It can also be installed in a well-heated room in winter.
House with wooden crate
When installing a block house outside the building, the following are additionally performed:
- laying vapor barrier;
- insulation of the building facade with foam or mineral wool.
To carry out these two stages, a vertical wooden lathing of beams is mounted using dowels (for bricks) or self-tapping screws (for wood), the step of which should be equal to the width of the insulation. Their thickness is also selected based on the thickness of the insulation itself. Laying of heat and vapor barrier materials is carried out in the spaces between the timber.
Builders advise to carry out the installation of thermal insulation from the bottom up, fixing it with disc dowels.
Installation instructions
Any building can be sheathed with a block house from the outside or from the inside. At the same time, in both cases, separate stages of work are provided, ensuring not only an aesthetic appearance, but also the durability of the finished structure.
House block assembly outside the building
House cladding process
- A second wooden or metal lathing is mounted, which will be used directly for fixing the house block panels. It is preceded by the marking of the walls with a level to ensure the evenness of the laying. At this stage, for the same purposes, you can use the fishing line by pulling it at the top and lower parts walls. The battens will be attached to each other using self-tapping screws. To ensure the strength of the second lathing, its step should be 50 cm. For buildings with a height of more than 10 m. It is better to use reinforced brackets when installing the metal block of the house.
- Installation of the panels themselves. For facade decoration, as a rule, a wooden house block with a thickness of 40-45 mm is used. or metal. You can fix it with self-tapping screws, galvanized staples, clamps, nails or liquid nails... Moreover, the fasteners themselves should be carried out near the spike and groove. A gap of 1-3 mm must be left between the panels, which will avoid deformations during temperature extremes. In addition, do not tighten the fasteners tightly on metal panels, leaving a little play for their deformation.
Due to such gaps during the installation of the metal block of the house, the effectiveness of the building's insulation decreases. But in the case of a tree, this does not happen.
Professional builders advise assembling the house block from the bottom up, while laying it with the thorn up. This will prevent water from entering the connection grooves.
Decoration of corners during installation
- Decorating corners with special corners.
To avoid this stage, a 50x50 mm timber can be fixed in the corner, to which the panels will be nailed. Or simply fit the panels to each other at the docking points by making cuts at 45 degrees.
- Installation of platbands on window and door openings.
- Decorating fasteners with decorative plugs.
Installation inside the building
The installation process for a block house inside a building is almost identical to the installation process outside. And includes:
- Disinfection of walls and elimination of irregularities through minor plastering work.
- Installation of a frame from a bar with a thickness of 25-30 cm.
- Laying thermal and vapor barrier layers inside the frame, if necessary.
- Installation of panels is a block house, which is carried out from the bottom up. For wall cladding inside the building, a material with a thickness of 20-25 mm is suitable, which is attached to each other with self-tapping screws. The latter are recessed by 2-3 mm. The panels are installed with a thorn up.
- Decorating corners if necessary.
- Decorating fasteners with plugs or plugs
Video: Making neat interior corners during installation
The advantages of a block house lie not only in its excellent ability to give incredible coziness to any type of buildings and premises, but also in its ease of use. Read the instructions, watch the video and get down to business.
For exterior decoration facade or indoor spaces houses are often used block house. The material is a modified lining, in which the front surface has a cylindrical shape. Despite the excellent characteristics of the material, the quality of the cladding and its durability will largely depend on how the block house is fastened.
It should be noted right away that the procedure for fastening the panels itself is not something super complicated, especially since the same dimensions and the presence of grooves and spikes on the edges of the board greatly simplify this task. Nevertheless, there are several rules, the implementation of which can be considered the answer to the question - how is the house block attached.
Preparing the block house for installation
As always, any action must be prepared in advance. So fastening the block house begins with preparatory operations. Before starting work, boards intended for installation must be kept for several days in a room, where they will be installed in the future, in order to gain the appropriate humidity. It will be useful to treat the bars with an antiseptic before installation.
The blockhouse is fastened to the lathing created on the walls. She represents wooden blocks, with a certain pitch installed on the surface to be clad. The most important requirement that must be met during installation is that the house block must be fastened with a spike up. This is done in order to avoid the accumulation of moisture in the grooves during operation. The lathing is leveled and plumb, otherwise you can get curved walls.
When installing the board to the wall from below and from the top of the sheathing, a technological gap of about fifty millimeters is left for natural ventilation... In addition, it is necessary to leave a gap of one to three millimeters between the boards to prevent deformation due to seasonal fluctuations in temperature and humidity.
What fasteners to use
You can fix the boards with nails and screws. Which is the best to use fasteners for a blockhouse, is determined depending on the board used. If its thickness does not exceed 21 mm, then you can use nails, if more, then it is better with self-tapping screws.
The main thing to consider when choosing a fastener is its coverage and length. It is necessary to use fasteners with anti-corrosion coating (galvanized, anodized, etc.). This is necessary in order to avoid traces of corrosion on the block house during operation. The length of the fastener should be at least one and a half times the thickness of the material.
How the house block will be located when fastening - vertically or horizontally, is determined by the interior, the purpose of the decoration and personal preferences. Usually, a house block is placed horizontally when cladding facades, creating an imitation log house... For interior decoration, vertical boards are often used. In a similar way, boards are often mounted when decorating baths and saunas, in this case water does not accumulate in the grooves of the board.
As a fastening element, they are often used special staples- kleimers for block house. How they look can be clearly seen in the photo:

This installation method is most often used for interior decoration, when narrow and thin boards are used.
Mounting methods
The installation of panels on the crate can be started both from above and from below. There can be several ways how to do this, and therefore, how to properly fix the house block, everyone chooses for himself, who is more comfortable.
One of the most common ways is in the tenon (groove) of the board. How this is done can be seen in the figures and photos:

With this method, the fastener itself is covered by the next board and becomes invisible. In the drawings, this is done with a nail, but instead of it a self-tapping screw can be used, how this is done can be seen in the photo:

You can use another option - how the block house is attached in this case is shown in the figure:
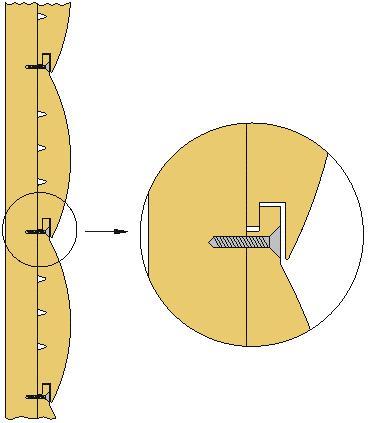
This method of fastening can be slightly changed, then the self-tapping screw is not located at the base of the spike, but directly on the cylindrical surface, and in this case, two self-tapping screws are used - one is located at the spike, the other at the groove. This method is used for especially thick boards, more than forty millimeters thick. Only for self-tapping screws, it is necessary to pre-drill holes with a diameter larger than the cap of the self-tapping screw, and then additionally close the holes with a plug.
If a kleimer is used for installation, then the fastening must be started from the top. How it looks is clear from the given figure and photo:
Before fixing the house block on the crate, it is necessary to connect the boards to each other through the spike groove system. To do this, one board is inserted with a thorn into the groove of the other. If necessary, with light blows on the edge through the intermediate bar with a hammer, the boards are tightly connected. For example, all the operations, how to fix a house block, the video below will show with the necessary details:
As mentioned earlier, this is not the only installation method. Additional information on how to mount a block house - video:
Docking surfaces and decorating corners
When installing and fixing the house block, you will certainly have to face a situation when you have to perform installation on different walls or connect the boards along the length. This is a completely solvable situation, and there are several options for joining a house block. When docked in the corner ( outside corner) to do this, you need to make a gash at 45 ° or use the outer corner. As the latter, you can use slats. How it looks can be seen in the photo:

Docking in the corner (inner corner) is more difficult, for this it is necessary to dock the end of the board very accurately, observing the surface relief, with the board on the opposite wall, as shown in the photo:

For a more complete understanding of the entire technology in the video:
it is shown how the docking of the house block is performed in the corners.
Each master, of course, has his own techniques, but you can recommend a less time-consuming and easier way to decorate the corner. In this case, a bar is nailed into the corner, and already to it at a right angle with different sides block house is suitable. The entire fastening operation is much easier and faster.
In approximately the same way, the joining of the boards is carried out when there is not enough length. In this case, short boards are used, a bar is located between them, as shown in the photo. Of course, such a connection is more noticeable than in the case when adjacent boards are sawn at 45 ° for joining, but it is performed quickly and does not negatively affect the overall impression of the cladding.

If the block house is installed in rooms with a predominance high humidity, it is necessary to ensure a constant flow of air from the opposite side of the casing for natural ventilation.
The described methods of fixing the panels are carried out for finishing both the facade and the interior. At exterior cladding use thicker house block panels, and fix them with self-tapping screws, with the inside - use thinner boards and it is possible to use both nails and clamps.
A wooden block house is an excellent option for exterior decoration of low-rise buildings. This applies to this finish and from other materials. It has an attractive appearance and is able to retain the natural warmth inside the building.
For reference
If you are familiar with the technology, you will be able to install the trim yourself, saving money. The block house imitates the decoration of natural wood species. This material is made of wood, galvanized metal or vinyl. Fastening is carried out using galvanized dowels or hanging brackets, it all depends on what the panels are made of.
Why choose a block house for the facade

Block house is popular today among professionals and home craftsmen. How to fix this material will be described in more detail below. If you still doubt whether it is worth choosing such a cladding for your home, then you need to pay attention to positive characteristics, among them:
- the ability to insulate the facade and waterproof the walls of the house;
- short term of work;
- non-exposure of the material to ultraviolet radiation;
- the possibility of finishing not only the walls, but also the pediments, as well as the basements of buildings;
- the ability to install a block house on walls made of any material, be it stone, concrete or brick.
Among a wide variety of modern finishing materials in stores, there is also such a block house. How to fix this material? Before starting work, it is imperative to familiarize yourself with the technology. You can do the installation yourself, as a result, you will be able to get a cladding that will not lose its original color over time.
For the reason that the material is attached using technology, moisture does not accumulate under the finish, which could cause mold. Among other things, such a finish does not exert a significant load on the foundation and walls of the house, which cannot be said about the material made of natural wood or metal.
Wall surface preparation

Before attaching the block house to the outside, you must prepare the facade, which must be flat and dry. The surface can be plastered, and wooden houses can be cleaned and sanded, which is especially true for places affected by fungus and mold. Such areas should be treated with an antiseptic primer. special purpose... The walls must be additionally waterproofed, for this it is applied to the walls made of brick or reinforced concrete. Exceptions are walls made of wood, a water-repellent composition must be applied to their surface, which will eliminate the formation of fungus and mold.
Installation of the carrier crate

If you are thinking about how to fix a block house, then you should know that this material is installed on a batten, which is made of metal profiles or wood. The first option is used to fasten the cladding made of galvanized metal, therefore, below we will consider an example of installing a block house on wooden crate.
At the first stage, a vapor barrier layer is attached, which can be a film. The canvases should be installed with an overlap of 3 cm to prevent steam infiltration. The wooden lathing should be set strictly vertically, the timber for supporting structure must be dry and treated with an antiseptic primer, it is important to choose a deep penetration composition.
So, you have decided to use a block house for the exterior decoration of your home. How to fix this material? You should familiarize yourself with this before starting work. The technology provides for the observance of a certain pitch of the lathing, which should be 50 cm. This will guarantee the reliability and strength of the structure. Fixation of the block house to the wall surface is carried out after the installation of thermal insulation and waterproofing, which are located between the battens.
At the next stage, the counter-lattice is fastened, which is installed over the insulation layer, and steam and waterproofing. Two bearing battens are fixed to each other with galvanized wood screws, it is important to choose the right length of fasteners correctly.
Features of installing panels

Increasingly, modern builders choose a block house for finishing low-rise buildings. How to fix this material, you should also find out if you are going to purchase a cladding for work. The boards are fastened from below or from the top of the wall. An important rule is the location of the tongue upward, in this case, water will not be able to penetrate into the joints of the boards.
Regardless of the installation method, leave a 5 cm gap at the top and bottom of the wall to provide ventilation space. Due to the fact that wood has the ability to expand when exposed to temperature and humidity, it is important to leave a gap between the boards, the width of which should be equal to 3 mm. If this rule is neglected, then the panels can be deformed under the influence of external unfavorable factors. The corners of the cladding joint should be decorated with external or internal corners. With a significant thickness of material, you need to hide the junction of the boards with two vertical slats.
Features of installing vinyl siding on the facade

If you want to know how to properly fix the block house outside, then initially you must decide on the finishing material. If it is vinyl, then a temperature gap must also be left between the panels, its width should be a maximum of 3 mm.
It is necessary to fasten each product only in the place where the manufacturer has provided perforation. If there are no holes for installing fasteners, then they must be punched before starting installation. The step between the attachment points should not be more than 40 cm. When working, use anti-corrosion fasteners, galvanized self-tapping screws, which are sometimes replaced with nails of sufficient length.
If you decide to use self-tapping screws, then after tightening them completely, you need to unscrew the fasteners one turn. This requirement is also dictated by the thermal expansion of the material. Nails provide for the need to provide a space between the head and the surface of the finish of one millimeter.
Features of interior wall decoration with a block house

Many novice craftsmen today are thinking about the question of how to fix a block house inside the house. The work methodology is almost no different from the one described above, but there are some nuances.
Regardless of what material the walls are made of, the lathing should be installed, for this you need to use 30-mm bars. The distance between them can be equal to an interval ranging from 50 to 60 cm, it is important to align the elements in height when installing them. This is one main advantage - when making interior walls at home with a block house, there is no need to level the walls before starting work.
It is not necessary to carry out insulation during interior decoration, this is especially true for wooden and brick structures. However, the decision on the need for thermal insulation must be made in advance, even before the installation of the crate. If this layer is present, then the above-mentioned thickness of the bars must be increased.
Before fixing the block house to the wall, it is necessary to calculate how much the room will be reduced, this is especially true in the case when a soundproofing effect is required, which is achieved by providing an air space between the cladding and the wall.
As a rule, an indoor block house is installed horizontally along a vertically oriented crate. But in some cases, vertical panel mounting is also used. This is true in cases where conditions of high humidity persist in the room, which is true for baths and saunas. These technologies during the operation of the premises allow eliminating the accumulation of liquid in the grooves of the boards, preventing premature destruction of the wood.
If you are thinking about how to properly fix a block house using the above-mentioned installation method, then the spike of the first and all subsequent boards should be directed towards the light source, this will make the joint of the boards not so noticeable. But such an attachment is usually considered an exception, while it is common practice to mount the block house horizontally, in which the tenon will be on top and the groove on the bottom.
Conclusion
Before fixing the metal block house, you need, as in all the cases described above, to install the crate. If you want to achieve a more durable result, then you should choose The layer of insulation under the finish is fixed with disc dowels, and if you need to install a double layer of thermal insulation, you need to apply a bandage so that no gaps form.
Block house is a modern wood product that is used for interior and exterior wall decoration of the house. This element is installed quickly and easily due to the presence of a groove and a tenon in the end longitudinal part. In principle, the technology for installing a wooden panel inside and outside the house is not very different. Of course, there are similar products on sale made of other materials (steel, polymers), which are fastened in a slightly different way, but many home owners prefer wood panels, so in our article we will tell you how to sheathe a house with a block house.
Material requirements
First of all, you need to choose a quality and durable material which is suitable for exterior decoration... As a rule, the manufacturer packs the panels in a heat-shrinkable film, so that you can have a good look at the product and evaluate its quality, you will have to open the package.
To sheathe the outside of the house, you only need high-quality panels, so you should not purchase products that have the following defects:
- there should be no dark knots on the front surface;
- deep cracks are not allowed;
- there should be no mold or rot;
- blue wood is also a reason to refuse to buy.
Important: for a high-quality product for outdoor decoration, the size of the pitch should be no more than 0.8 cm in width and no more than 0.2-0.3 cm in depth.
Also when choosing quality material it is worth paying attention to the location of the annual rings. Since dense wood is more suitable for outdoor decoration, it is worth choosing products on which the annual rings are located as close to each other as possible. Such material is characterized by high quality, excellent density and good moisture resistance.
Materials and tools

Having bought a block house, the installation of which is carried out without the use of specialized tools and accessories, you can handle it yourself. Self-tapping screws are usually used to fix the boards, so an electric drill is needed to work.
In addition, it is more convenient to mount house block panels using clamps. For the production of these fasteners, galvanized steel is used, therefore the elements are corrosion-resistant, which is very important for maintaining a beautiful appearance wood. The Kleimer is a flat plate with a protruding tongue. The product has cuts for installing screws. The panel is secured and held in place by this tab.
Important: you can install a house block using clamps with a height of at least 6-7 mm. If there is a choice between self-tapping screws and kleimers, then the latter should be preferred.
Advantages of using clearers:
- With the use of clips, the panels can be fixed without the risk of deformation and cracking.
- Thanks to the use of such fasteners, the joints of the panels will be almost invisible. As a result, the outer finishing layer will be more beautiful.
- The installation of the house block will be much faster, because it will take more time to screw in the screws.
Buying a fastener for a block house in the form of cleats is based on the calculation that for every 10 squares of cladding, 200 cleamers will go. However, such a high expense does not mean that you have to spend a lot on the purchase. The price of fasteners is quite affordable.

When cladding a house with a block house, you will have to cut some panels into more short elements, so you need an electric saw to work. However, if the amount of work is insignificant, then you can easily get by with an ordinary hacksaw with fine teeth.
Tip: if desired, you can use a house block for cutting circular saw... However, the cutting blade must be free of carbide-tipped material, which can give an uneven cut.
Sheathing your house with a blockhouse, you should not forget about its insulation. Mineral wool can be used as insulation. This material has good heat and sound insulation characteristics. You can also choose other types of mineral wool-based insulation.
Attention: it is worth abandoning the use of polystyrene as a heater, due to low vapor permeability and poor combination with wood. In addition, the foam supports combustion.
You will also need a bar for making the frame of the sheathing to which the trim will be attached. The dimensions of the timber should be chosen taking into account the thickness thermal insulation material... In addition, the house cladding with a block house is performed using a vapor and waterproofing membrane. A vapor barrier material is needed to protect the insulation from the accumulation of condensate in it, and the waterproofing will protect it from atmospheric moisture. As a vapor barrier, you can take ordinary glassine, a special modern membrane material or a traditional perforated film. For waterproofing, ordinary plastic sheeting is ideal.
Preparatory activities

Before fixing the house block, all wooden elements must be treated with an antiseptic composition. In addition, a flame retardant treatment is recommended to protect against fire.
Before cladding brick, aerated concrete or wooden house house block outside it is worth doing the following:
- First, a vapor barrier material is attached to the walls. The strips of material are fixed horizontally with an overlap of 10-15 cm. For fixing, you can use a stapler or staples.
- Next, we mount a lathing from a bar on the walls. For attaching the frame to wooden house you can use screws or nails, and frame dowels are suitable for a brick or aerated concrete surface. The installation step of the timber should be selected taking into account the width of the plates of the insulating material.
- We put heat-insulating material in the space between the crate.
- Next, a waterproofing film is attached over the insulation. It is fixed to the lathing with staples or a stapler.
- After that, we attach another crate to the main frame. She is needed to form ventilation gap behind the panels is a block of house. This will protect the material from decay and deterioration. It is to this crate that the facing elements will be attached.
Installation of panels

Do-it-yourself house block installation is carried out in the following sequence:
- Installation of panels begins from the bottom corner of the house. In this case, the house block is fastened horizontally with a groove down.
- To fix the panels with clamps, the fastening element is attached to the crate so that the panel spike fits into the claws of the clasp. If you use self-tapping screws, then you must first drill holes in the board. The installation step of the fasteners is 400 mm. The self-tapping screw is screwed into the spike of the board at an angle of 45 degrees.
- Next, the groove of the next facing element is put on the spike of the previous board. Installed panel again fixed to the crate with clamps. Thus, the installation of the finish is continued until the entire facade is sewn up.
For finishing external and inner corners you will need special ready-made elements. These are factory polymer products, similar to those used for wall siding. However, when using them, there is a significant drawback - the panel fits snugly to the profile only at the top point, as a result, uncovered cracks will remain in the finishing at the corners. In principle, this can be considered a significant disadvantage.
That is why it is better to use a planed bar with a section of 0.5x0.5 dm for the design of corners. It is attached to both walls in the corner area before plating. Further, the panels in this place are cut from the end at 45 °. Thus, the boards on the walls adjacent to the corner are butt-joined to each other without the slightest gap. This method can be used for interior and exterior corners.
Additional points

Sometimes the panels are fixed to the lathing directly through the front surface. In this case, visible recesses with a fastener head remain, which can be hidden in the following ways:
- From the scraps of elements, plugs can be cut to fit the dimensions of the hole. Next, the plugs are glued into the grooves using adhesive composition PVA. After it dries, the surface is sanded.
- You can purchase ready-made plugs that are sold in hardware stores. At the same time, you can find plugs on sale different color, so you can easily match the product to the color of your finish. PVA glue is also used to fix these plugs.
- You can also close the grooves from the installation of fasteners using a special wooden paste. Such a paste can be prepared independently from sawdust and an adhesive composition, for example, PVA. The prepared composition should be thick enough. This mixture is used to fill the holes in the panels. After it dries, the surface of the board is sanded. This method is the simplest and least expensive, but it is very difficult to prepare a paste that exactly matches the color facing material therefore, even after grouting, the installation locations of the fasteners may be slightly visible.
Video instruction for self-installation house block:
Do-it-yourself instructions for finishing a block house resemble the technology of installing a planken or other finishing material... Before you decide to sheathe the walls of your house with a blockhouse, you need to familiarize yourself with the existing types of material and the rules for fixing it.
Types of wood material and its choice
The semicircular shape of the blockhouse imitates a natural wooden frame. For indoor and outdoor work, there is a type of material, which primarily differs in thickness.
The exterior cladding of the house is made with a board 40-45 mm thick. Firstly, in addition to the aesthetic functions, the blockhouse provides the building with additional heat and sound insulation. Secondly, street cladding is more susceptible to harmful effects. natural phenomena... The tree will be in the rain, sunbeams, severe frosts... To endure everything unfavourable conditions, a thicker board is needed.
For internal works a thinner blockhouse of 20-24 mm is used. It is mainly intended for interior decoration. Inside the house, the extra thickness of finishing will only reduce the space in the rooms.
The blockhouse is made from different breeds tree and is divided into several classes:
Decorating the walls inside the house is done as a class "A" or "Extra" blockhouse. The most common is class "A", as the cladded walls take on a more natural look wooden frame... Monolithic cladding from "Extra" class weakly resembles natural wood.
Make outdoor installation it is necessary from the board "B" or "C" class. Here the choice depends on the finances of the owner and his preferences.
Fastening difference
Depending on the place of installation, the blockhouse has different fastening methods:

Manufacturing of lathing
When installing the house block inside the house, it is not required to mount the frame. An exception can only be for a building with uneven walls... But for decorating the walls from the outside, one cannot do without lathing. One of the main functions of the structure is to create a flat surface for fixing panels and additional laying of insulation.
useful in work
When sheathing the walls of a house with a wooden block with a house, as a rule, they make a vertical crate; if you want to arrange the panels of the house block vertically, you will need horizontal-vertical crate, which will lead to a rise in price.
In natural wooden log cabins, the logs are located only horizontally. The panels will be fixed to the frame in the same way.
The frame can be made from different materials. The initial stage of work consists of marking the walls. Starting from the longest wall of the house, the line is pulled along its level in the upper part. Using a plumb line, align and fix the fishing line along the wall at the bottom. Having aligned the fishing line so that the wall is not overwhelmed, they begin to mount the frame elements.
Wooden frame
This type of lathing is mainly mounted for attaching a wooden blockhouse to a building made of a wooden frame. In the manufacture of a wooden frame, bars of 40x40 mm or strips of 20x50 mm are used. Just like the whole frame, they are treated with an antiseptic. Installation of the first element is done along a vertically stretched fishing line, the rest are placed on a horizontal level at a distance of 400-600 mm from each other. If it is necessary to align the bars, wooden linings are placed under them. The structure is fixed to the wall of a wooden blockhouse with self-tapping screws or nails.
If it is necessary to create a reinforced structure, additional beams are attached perpendicular to the main lags. The resulting counter-lattice method strengthens the frame, but also increases the material consumption, which affects additional costs. 
Metal carcass
A metal crate is made from a galvanized profile. V to a greater extent it is installed to decorate the building from the outside. As a finishing material on metal carcass install a metal block house and siding. According to the markings, distancers are attached to the wall (a metal strip that allows the profile to be fixed from the wall at a distance of up to 120 mm, they are also called a crab, suspension or bracket) and bend them in the form of a letter P along the profile section. The installation procedure for all elements is the same as in wooden frame... The only difference is the process of aligning elements by level and plane. No lining is placed under the profile. It is aligned and fixed to the spacers. Self-tapping screws are used to fasten the profile.
For your information
Usage profile frame for siding or metal blockhouse allows you to make a ventilated facade.
The distance between the vertical elements is maintained at 350-500 mm, this is due not only to the strength characteristics of the material, but the dimensions of the insulation plates. Depending on the thickness of the profile, it can be very flexible, in which case the structure must be reinforced with additional horizontal profiles. 
Plastic frame
Appeared on the modern market the new kind material - plastic profile... His load bearing capacity higher than the galvanized counterpart. Differs in ease of installation: it is attached to the walls of a wooden frame with self-tapping screws. The main requirement is to install the profile only on a flat surface. If the walls of the house are uneven, then the plastic profile for making the frame will not work.
Fastening the house block to the frame
Having made and fixed the crate on the walls, the main process of facing the house begins. When starting the installation of a house block with your own hands, you must remember that regardless of the material, it is laid only horizontally, from bottom to top.
Wooden panels
Mounting wood panels the most difficult and costly. Basically, they use the following methods of fixing the board: 
- Fixing the board with a cleaimer ensures a firm connection of the board according to the "thorn-groove" system. The kleimer is a metal bar, one side of which is inserted into the panel groove, and the other side is screwed to the lathing lag with a self-tapping screw. The gap between the boards formed from the kleimers is sealed with a special paste that imitates the color of the wood;
- The second method of fixing is performed with nails or self-tapping screws. They are carefully driven into the "spike" of the board and nailed to the log;
- A similar method of fastening the board in the "thorn" with a nail or self-tapping screw is done at an angle of 45 °. This option is characterized by increased strength of fixing the material but requires additional skills. Inexperience, you can break off the "thorn" and ruin the panel;
- The through fastening of the blockhouse is made with nails or self-tapping screws. A hole is drilled through the panel and fixed to the log so that the head of the fastener sinks into the wood. It is convenient to make “potay” for a hat with a countersink. You can make your own countersink from a drill sharpened at an angle of 90 ° or 120 °. From above, the hole is hidden with a wooden plug, which is then sanded;
- The outdated appearance of panels without the "thorn-groove" system is fixed through through holes or with a special adhesive for indoor use.
To hide the joints in the corners of the log house, grooves are cut out for the panel board. A simpler option provides for the upper fastening of the decorative strips with glue. A nice connection is obtained by sawing the edge of the board at a 90 ° angle. Door and window openings make a variety of platbands.
Metal panels
A good option for wall decoration is metal siding in the form of panels made for a blockhouse. It is generally accepted to mount panels from the outside to decorate the building. They are fixed on a frame made of a metal profile with stainless self-tapping screws through longitudinal holes. Insulation is placed between the elements of the crate. mineral wool or foam. A film for vapor barrier is pulled from above and only then the panels are installed. Finishing of corners, hiding all joints are performed with additional additional elements.
Advice from the "facade"
If you like the vertical direction of the cladding, then the house metal block will be a way out of the situation. It can be mounted not only horizontally but also vertically.
Plastic siding
Variety plastic material under the blockhouse are made in the form of siding. A wide range of acrylic and vinyl panels makes it possible to arrange them when cladding a house. Fix plastic siding as well as metal panels- stainless self-tapping screws into special grooves that are located on the purchased panels.
Choose those panels in the manufacturing process of which special materials that do not support combustion were used.
With external wall cladding, a temperature gap of about 2 mm is made between the siding elements. It protects the material from splitting during thermal expansion. This is due to the difference in weather conditions. The siding is screwed to the crate loosely, maintaining a gap of 1 mm. The presence of numerous gaps on the cladding negatively affects the insulation of the building. The use of plastic sheathing under siding will help to avoid this.
The plastic profile will deform from the temperature drop along with the siding. Therefore, they can be rigidly fixed without observing the clearances. To hide the gaps between siding elements, use additional elements... Observing the instructions, you can easily make a crate yourself, make wall insulation and do the installation of a house block with your own hands.

