The technology of installation of pvc window blocks. Correct installation of plastic windows - video instruction
Installation of PVC windows is a simple matter if you have held it in your hands at least once Building tools and you know a little about the materials. Installation of such windows will take a little time: half an hour or an hour for dismantling old windows and 2 hours for installing new ones.
Installation of PVC windows. Installation according to GOST
GOST for PVC installations windows, unfortunately, in most cases is only a recommendation, but some rules should be followed during the installation of windows. First of all, this applies to preliminary measurements. Determine the type of window opening - with or without a quarter. Below is the illustrative example a schematic view of the opening with a quarter (A), without a quarter (B).
Scheme 1 - Window opening with a quarter and without a quarter
Measurement of windows without a quarter
The installation of windows without a quarter is carried out by installing windows in a cleaned window opening. To order a window:
- subtract 5 cm from the size of the window opening vertically - the indicator of the height of the window;
- subtract 3 cm from the size of the window opening horizontally - an indicator of the width of the window.
These gaps will subsequently be filled with polyurethane foam: i.e. 1.5 cm on each vertical side of the window, as well as 1.5 cm for the upper horizontal and 3.5 cm for the bottom (for mounting the window sill).
We measure the length and width of the window sill, the external ebb and add at least 5 cm to the obtained numbers - the window sill should cut into the wall from both sides of the window.
Measurement of windows with a quarter
We measure the window opening horizontally at the narrowest point. Add 3 cm to the resulting number (1.5 cm each on the sides of the window) - this is the required window width. We measure vertically the length from the bottom of the window opening to the upper quarter - this is the required vertical size of the window.
The window sill and low tide are measured in the same way as the quarter-less option.
As a result, you should have:
- window height indicator;
- the width of the window;
- the length of the sill;
- the width of the window sill;
- low tide length;
- the width of the low tide.
Scheme 2 - Window measurements
Installation technology
The technology for installing new windows in old houses is similar. The only amendment is that the measurements of the new window are made according to the outer dimensions of the window frame to be dismantled.
When ordering a window, please also check whether the delivery set includes:
- windowsill;
- stubs;
- mounting profile (mounting profile);
- anchor plates for fastening the window;
- instruction on installation of PVC windows (some manufacturers include it in the kit).
When ordering a window, you should also know the answers to such questions:
- What type window profile do you want to order - 3, 4 or 5-chamber?
- What type of double-glazed window did you choose - 1, 2, 3-chamber?
- The way to open your window is a blind window, an opening window, a tilt-and-turn window with ventilation, or a combined window (a tilt-and-turn window with ventilation and micro-ventilation).
By the way, if you want to get a high-quality product for a reasonable price, it is worth choosing from, mainly, German and, not surprisingly, domestic producers window systems: REHAU, Veka, KBE, Schuko, Aluplast, Kemmerling, Brugmann or Trocal.
The installation technology provides for two methods: installation of PVC windows with unpacking and installation of windows without unpacking.
Scheme 3 - Construction of a metal-plastic window
The first method involves preliminary disassembly of the window: removal of glazing beads, removal of double-glazed windows from the frame, fixing the frame to the wall with dowels, and the subsequent installation of double-glazed windows and glazing beads.
The second technology for removing double-glazed windows does not require: the frame is fixed with fasteners fixed on the outer surface of the wall, and not with dowels through and through.
The installation method with unpacking can sometimes lead to fogging of the windows, and with a lack of experience, glazing beads and double-glazed windows can be damaged, and the installation process itself will take much longer. Of course, correct installation will not lead to any negative consequences. However, be extremely careful!
The unpacking method is rightfully considered more reliable, especially if the frame has been fixed with large long anchors. If it comes about fixing a window on the floor above the 15th, about installation large windows(2x2 m), right choice- fasten the frame through and through by disassembling the window.
Required tool
To install windows you will need:
- screwdriver;
- level;
- gun (for a cylinder of polyurethane foam and sealant);
- polyurethane foam (1-3 cylinders for 1 standard window);
- PSUL for external waterproofing;
- Primer;
- puncher;
- set of hexagons;
- jigsaw;
- stationery knife;
- pencil;
- paint brush;
- roulette.
Installing windows. Work progress
During installation works you should be guided by the previously outlined plan: the window installation scheme (you drew it yourself or it was submitted as an example in the instructions from the manufacturer of window systems) will help to avoid mistakes and strictly follow the plan. If you doubt whether your calculations or ideas about the process of installing windows are correct, it can help routing for window installation - a universal set of rules and regulations for installation, guided by which you will be sure of the correctness of your actions.
We dismantle the old window and prepare the surface for the installation of the new window system.
Preparing the tool for work.
To improve the adhesion of waterproofing tapes to the surface of the opening, we treat it with a primer. Apply the primer with a paint brush.
Having removed the cellophane packaging of the windows, we glue the inner vapor barrier tape to the frame along the semi-perimeter.
Figure 1 - Semi-perimeter gluing of the window frame with vapor barrier tape
We glue the frame with an external vapor barrier - we fix the PSUL on the outer surface of the frame. When pasting, do not allow gaps between the tape joints. PSUL - a vapor-permeable tape will prevent the release of polyurethane foam when processing gaps to the outside, protecting not only appearance construction, but also foam from impact environment- precipitation, ultraviolet radiation and wind that destroy the foam.
We install the frame in the opening, align and fix, focusing on the installation rules:
- on the frame prepared for installation, we apply the markings of the places for subsequent fastening;
- we fix it from 4 sides of the frame with a step of 70 cm, while the distance from the corner of the window frame to the first fastener should be no more than 15 cm;
- fasteners are fixed to the window frame (the self-tapping screw must be fixed in the metal inside the frame, therefore correct technology installation involves the use of self-tapping screws for metal with a diameter of 4-5 mm, with large window sizes, the diameter of the self-tapping screw should be 12 mm);
- use anchor plates as fasteners;
- in places for the installation of fasteners, we make recesses in window opening(the fasteners are recessed by 2-4 cm for the convenience of working with the slopes after the completion of the window installation);
- the window should be leveled (for a slight leveling of the horizontal level of the window, you can use wooden wedges, placing them under the frame at the right points);
- to fix the frame in the opening, we install wedges - first the lower two, thanks to which you can set the lower and upper edges of the frame to the horizon (so that the window does not dangle, it is appropriate to fix the upper anchor), then the wedges are fixed along the vertical of the window;
- we attach the window to the window opening.
On the outside of the window opening, we attach a diffuse tape under the low tide.
After adjusting the fittings (it is not recommended to buy fittings from a manufacturer other than the manufacturer of the window system, however, if necessary, pay attention to the offers from Winkhaus, Siegenia, GU, Aubi, Schuko (Germany), Maco (Austria)), you can foam the window (apply foam around the entire perimeter of the window frame, taking into account that this mounting material increases its volume up to 3 times) and 15-20 minutes after processing all the gaps, it is necessary to bend protective film previously applied along the perimeter of the window frame so that it completely covers the mounting gaps (see figure).
Figure 2 - Processing of assembly seams
We fix the ebb. It is advisable to install it under the window - this way you can avoid water seepage on joint seam low tide and window frame.
Do-it-yourself PVC window installation in winter
Many are worried about the question: "Is it possible to winter installation of PVC windows?"
Certainly possible! And the installation technology is unchanged. The only thing worth paying attention to is the indicators temperature regime for materials used during installation. In particular - the indicators of the use of polyurethane foam.
Special winter options, thanks to which you can work even at -10 ° С!
When choosing a polyurethane foam for winter works, focus on products trade marks Macroflex Profi (Finland), Illbruck (USA) and Moment (Russia).
Installation of a PVC window sill
Installation of PVC window sill completes the installation of new window blocks.
The length and width of most windowsills are standard. In any case, you need to take a window sill with a margin of length and width. The excess can be easily cut off with a grinder.
Work progress:
Bring the window sill under the window and level it using wooden wedges or any other durable material at hand.
The window sill should go into the wall by at least 1.5 cm.
Front final assembly make sure the sill does not sag by applying pressure in several places.
The slope of the window sill relative to the window should not exceed 3 °.
Blow out the cavity under the windowsill with construction foam.
The surface of the window sill must be evenly immersed for at least 12 hours so that the expanding foam does not affect the installation angle of the window sill.
A day later, the remaining foam is removed with a clerical knife, and the joint between the window and the window sill is treated with a sealant.
Scheme 4 - Installation of the window sill
All that remains is the installation of slopes on PVC windows - and you're done!
According to GOST! Installation of PVC windows: VIDEO
Installation of PVC windows: VIDEO
$ Installation of PVC windows: the price of the issue
The cost of work will depend on how much your window costs: firms that provide a full package of services often deduce window installation rates from the cost of a window - from 10% starting. Thus, when doing work with your own hands, the savings on installing windows can range from $ 40 to $ 60 (for one window).
Installation of PVC windows. Price:
- Kiev - from 100-130 UAH. per m²;
- Moscow - from 1,000 - 1,200 rubles. per m².
Price plastic windows with installation:
The cost of plastic windows with installation is on average $ 80-90 (blind window 1m by 1.5m) and up to $ 2,200 (glazing of a 3.4m by 1.5m sliding two-chamber window system). As you can see, the range of prices is amazing. Installation of windows - the price is not always included in the total amount. Therefore, when signing an order for the manufacture of a window and the corresponding contract, make sure what is included in the final price, and what you still have to spend on.
An estimate is an extremely important document: upon receiving it in your hands, ask to provide you with a full price list of works and materials - checking is never superfluous.
The cost of installation, paid separately, is different: prices vary between $ 30-70.
If the client is not able to pay the entire amount at once, some firms provide goods and services to the brigade of their masters in installments.
By the way, the window business is a profitable business: for example, winning a tender for the glazing of high-rise buildings or a residential area under construction is like hitting a jackpot in a casino. A company's profits can be in the hundreds of thousands of dollars.
Plastic windows have advantages over wooden ones and have earned popularity among the population. The article provides the procedure for installing plastic windows and video material (at the end of the text). The main provisions of GOST, including instructions for carrying out such work, are given. Also, some recommendations and explanations for the construction of windows are given. The description is given on the example of replacing an old wooden window; dismantling is simply not necessary in new houses.
Sizes and selection of windows (GOST)
Dimensions of windows for different types houses are very different, but in the same house they can differ by several centimeters. That's why important to define correct sizes products that determine its value.
Comment! The gap between the edge of the window frame and the wall should be 2-6 cm, if it is larger, the window opening should be reduced by laying bricks ( stronger construction) or foam.
Windows are produced standard sizes, which depend on the type of house - panel, brick, "Khrushchev", etc. These are windows of the series P-46, P-44, -44T, P-3, -3M.
If standard windows do not fit, you can always make a custom-made window of any size. Moreover, there will be no loss in cost.
By the type of glazing (double-glazed windows), windows are of various types:
- two-chamber - preferable and cheaper;
- three-chambered, maybe more;
- triplex (multilayer) - do not give fragments;
- with tempered glass - give small "blunt" fragments;
- energy saving, noise protection, sun protection.
PVC windows are available in three classes:
- economy class - KBE, Montblank, Novotex;
- standard - Rehau, Shueco, Vera;
- VIP class - Shueco Corona, Salamander, etc.
Preparation of a window opening

First you need to prepare the window. Take out the glass unit and remove the sash. Drill several mounting holes in the bag. For a double-leaf window, 2 at the edges and one at the top and bottom are enough, for a three-leaf window there may be more. Next, you need to remove the old frame (if any), clean the surface from dirt and align. The frame is attached to the opening in three ways:
- special brackets;
- self-tapping screws for concrete;
- anchor bolts (the most common and convenient).
The depth of holes for bolts is 4-6 cm, depending on the wall, for slotted bricks - the maximum.
Attention! If available in the area strong winds wind load specialists should be consulted, especially on upper floors.
Materials:

- Polyurethane foam - double-leaf window - 3 cylinders.
- Liquid plastic - 1 tube is not multiple windows.
- Water-based paint - 2-3 l / window.
- Dowels - 660 mm - 15-20 pcs.
- Self-tapping screws.
- Anchor plates or anchors - 4 per window.
The exact amount depends on the type of window.
Installation procedure for plastic windows

Practice shows that window mounting defects may appear during operation. It is characteristic that immediately after the end of the work, these errors are not noticeable, therefore, when installing plastic windows with your own hands, you need to be very careful.
Mounting different options windows differ slightly from each other, but the most common stages are typical for all windows. These procedures are described below.

Ventilation of the room with PVC windows

When choosing a plastic window Special attention should be given to the ventilation of the room.
The fact is that the windows are almost completely sealed and ventilation is possible only by opening the window sashes, which leads to drafts. Wooden windows do not have such a defect. The way out is to install windows equipped with ventilation valves, for example, "Aereko".
The features of the valve include the absence of extraneous noise from the street. One valve provides ventilation for a room of approximately 50 m2. Ventilation is carried out continuously, with an adjustable flow rate.

Thus, the installation of plastic windows is possible on their own.
- Date: 08-04-2015
- Views: 179
- Comments:
- Rank: 47
Modern plastic windows have a fairly large number of advantages. Their installation is able to provide reliable sealing and thermal protection. In order to save some amount Money on the installation of windows, you can do their own installation. The construction is quite complex, but its installation does not require the use of any specific tools. To get a high-quality result, you will need to study the rules for installing plastic windows, which are contained in GOST 23166-99 and GOST 30971-02.
Figure 1. Measurements of a plastic window.
Installation procedure for plastic windows:
- First of all, you need to measure the openings.
- After that, the old windows are dismantled.
- Openings are being prepared.
- New windows are being installed.

Items that will be needed:
- Building level.
- Plumb line.
- Chisel.
- Anchor.
- Foam.
- Screws.
- Perforator.
- Primer.
- Marker.
- Documents that contain standards for the installation of plastic windows.
Required measurements: sequence of actions
Visually, the measurement process can be seen in Fig. 1.

Installation standards state that the first step is to measure a rectangular window. The width of the opening is measured. To do this, you need to determine the distance between the extreme points of the opening. Next, the height of the window opening is measured. To do this, you need to determine the distance between the upper slope and the window sill. To the result, you will need to add the thickness of the window sill.
Measurements must be made in at least three places for each size, in extreme points and in the middle. Smooth openings are rare. As a basis, you need to choose the smaller of the values that will be obtained.

Installation of PVC windows: double-glazed windows, slopes, ebb, fittings.
Using a plumb line with a medium sharpness of the end, you need to check the vertical curvature of the opening. Using the level, you need to check the horizontal distortions. If there are deviations, then they will need to be indicated on the sketch. The drawing of the frame is a rectangle that is inscribed in the sketch of the opening according to the measurements made. Based on the sketch, you will need to make adjustments to the dimensions of the frame.
Installation standards imply measurements of all openings in the room. The widths of these structures can vary considerably, but the heights must be the same.
Next, the placement of the window block is determined. It is necessary to mount the structure 2/3 of the wall width from the inside. If you plan to perform wall cladding thermal insulation material on the outside of the house, windows can be installed a little further.

After that, the external ebb is measured. Most often, you just need to measure the length of the mounted ebb or add 50 mm to the bend to the width of the opening. The width of the ebb is defined as the distance from the mounting plane to the outer part of the wall, the margin for the protrusion (35-40 mm) and for the bend. If thermal insulation is being performed, it is important to consider the thickness of the cladding layer.
Next, the window sill is measured. The width of the structure is equal to the distance from the inside of the wall to the mounting plane and the size of the overhang. In this case, you need to exclude the width of the window frame from the result. Departure must be calculated based on the fact that the window sill should overlap the heating battery by a third of its size.
Slopes are measured after the installation of plastic windows, since the width of the structure is difficult to determine.
Back to the table of contents
How to choose the construction of plastic windows by the fastening method?

After the measurements of the structure have been made, windows can be purchased. In the selection process, you need to take into account the type of fastening system of the structure. Installation standards include the following mounting methods:
- Installation through the frame in the plane of the window installation.
- Fixation with reinforcement, which is pre-fixed to the frame during manufacture.
We will most use the first method. Using this method you will need to completely remove the window structures from the blind sashes.
The second method is recommended if self-assembly plastic windows. In this case, it will be possible to eliminate the likelihood of damage to the glass units and the tightness of the structure during the disassembly-assembly process. However, when installing the entire window block, the structure will weigh much more, so it will be quite difficult to insert the window yourself.
Back to the table of contents
How to do the preparatory work?
When the windows are ordered, the terms of production and delivery should be clarified. It is not recommended to carry out any work until the arrival of the structure.
First of all, you need to clear the space in front of the windows, and then set aside all the furniture. Paul and heating radiators it is recommended to cover with a special film.
Back to the table of contents
How to prepare a window profile?

If old windows are installed, they need to be dismantled. To do this, you need to pry off the glazing bead with a chisel, with the help of which the glass unit is fixed, after which it must be pulled out of the groove with weak blows. The first step is to remove the glazing beads, which are located vertically. After that, you need to dismantle the lower and upper. It is recommended to mark the beads. At modern manufacturing the sizes of such devices may vary, so if they are confused, small gaps may appear.
The frame must be tilted so that the glass unit falls out of the grooves. After that, it must be set aside against the wall at a slight slope.
From awnings swing doors you will need to remove the decorative plugs and unscrew the hold down bolts. If there is a fanlight system, it is necessary to free the upper part of the sash and remove the hook from the lower canopy.
As a result, only the frame with imposts should remain. In the inner part of the frame, you will need to make holes for the fastening anchors. You need to make at least three attachment points on the sides and two on the ends. To make holes, you must use drills for metal, since inside plastic construction there is a metal insert for strength. You will need to fasten the windows with anchors with a diameter of 9-10 mm. The drill must be selected in the appropriate size.
If the windows are attached by the ears, then there is no need to disassemble the structure. You just need to install the mounts in the frame and secure them using screws.
Back to the table of contents
How to fill a profile with foam and prepare an opening: installation standards

To eliminate the possibility of cold bridges, at the point where the profile is attached to the frame, it will be necessary to fill the entire space inside the profile with polyurethane foam. It is recommended to do this a day before installing the windows so that the foam can fill the entire base and harden.
If you do not need to keep the old frame, it is best to dismantle it. The sashes must be removed from the awnings or pulled out together with the fixing screws. The frame and window frame need to be sawed off in several places. With the help of a crowbar, it is necessary to pry each part and remove it from the opening. In some cases, it is necessary to first dismantle the nails that hold the window frame.
The gasket and insulation, which are located under the box, will also need to be dismantled. Using a punch, it will be necessary to remove part of the slopes.

All garbage must be collected in bags and taken out.
The ends of the openings must be leveled and cleaned of dust. The surface will need to be primed.
If windows are installed in old building made of wood, it is recommended to lay waterproofing material along the entire opening to prevent moisture from entering the foam layer. If there is a need to strengthen the structure, you can insert a wooden box.
Before starting installation work, it is necessary to completely free the window opening and the space next to it:
- remove everything from the windowsill,
- remove the curtains,
- free the approach to the window by moving the furniture at least 1.5 meters away from the window.
Protect the room from dust and dirt by covering the floor and furniture with a cloth or thick oilcloth.
For ease of installation, connect the 220V power supply through the extension cord, prepare garbage bags.
Dismantling the old frame
After the room is ready for the appearance of dust and debris, they begin to dismantle the old window frame.
The sash is removed from the window. Dismantle window frames... If necessary, dismantle (knock off) the slopes.

The old window frame is dismantled, and, as a rule, it is seriously damaged. If you want to use old windows, for example, in the country, you should stipulate the option of keeping old windows when ordering.
The old ebb, the old window sill is being dismantled.
PVC window installation

The sashes are removed from the plastic window, the double-glazed window is removed. A window frame is inserted into the prepared opening and fixed on anchor bolts or mounting plates. In this case, it should be strictly observed that the frame is level, and not along the opening (in houses there are often cases when the horizon line of a window opening is far from ideal, the frame should also be level vertically). Otherwise, the window will not function properly.

The gaps between the wall and the frame are foamed with polyurethane foam. The foam serves both as an insulating function and as a fastening element. The overall result largely depends on the quality of this stage of installation. The foam should be applied evenly and fill all recesses and cavities in the opening, taking into account the expansion rate of the foam.

The installation of a plastic window in most cases means that a new window sill and a new ebb will be installed along with the new window. An exception is the case when the apartment (house, room) is renovation work and the sill can be installed on its own.

If the window to be mounted opens onto a balcony (as in this case), then it is quite expedient and functional instead of an ebb tide (with outside windows) install a window sill.
If you have a good old ebb tide, then you can save it for a new window, but in this case it will need to be restored (restored) - payable service, the cost of which is slightly different from the cost of the new ebb.
The window sill is cut out under the opening and attached to the window (to the support profile). If the opening under the windowsill is small, then it foams. Otherwise, it is necessary to masonry or seal the opening with mortar. When installing a window sill (window sill), control that it has a slope from the window within 5 degrees, and the overhang beyond the inner surface of the wall is no more than 60 mm.
When installing the window sill, it should be taken into account that its edges go beyond the finishing of the inner slope to a depth of at least 15-20 mm.

Advice: when choosing the width (depth) of the window sill, it should be borne in mind that the window sill is "recessed" by 2 cm under window frame so the width installed window sill will be 2 cm less)

All gaps between the window and the opening are filled with foam, and after it dries, they are isolated. The outer layer of insulation is designed to protect the insulation layer (which is the foam layer) from moisture penetration into it, as well as from destructive sun exposure.

So, the main part of the work is finished. However, for finishing the opening lacks slopes (which are both a decorative addition, under which you can hide the mounting foam, and a functional element that increases the thermal insulation and sound insulation of the window opening). Plastic slopes will give the window a finished look, moreover, it best combination with plastic windows.
Installation of plastic slopes

Plastic slopes are installed on the same day as the window for panel and block houses and on the second day for Stalinist houses.

Either a Belgian sandwich panel (in the picture) or German VEKA plastic slopes with removable platbands are used as slopes.
Differences between various plastic slopes are not essential, but you should know them.
The Belgian sandwich panel can be installed at dawn (not at right angles to the window), which visually enlarges the window opening. The choice of VEKA plastic slopes is justified for more accurate gluing of wallpaper with already installed slopes. Thanks to the removable casing, the edges of the wallpaper will be neatly hidden underneath.
Advice: if your apartment is renovated, then it is better to install the trims on the slopes from the Belgian sandwich panel after gluing the wallpaper yourself - it will turn out neater and prettier).
Installing accessories on windows

At the final stage, a double-glazed window is installed in the window frame and the sashes are hung. Installation of additional accessories is carried out, fastening additional elements fittings and components, such as: step ventilator, retainer, mosquito net, blinds, etc.

The window is ready. Upon completion of all work, an acceptance certificate is signed. In it, if necessary, the customer indicates his comments on the work performed, if any.
Almost immediately after completing all the work, the PVC window can be used. The exception is windows with large opening sashes, which are not recommended to be opened within 24 hours after the installation of the PVC window.
The plastic window is much better in functionality than the old ones wooden windows... If follow simple instructions for its care and operation, it will serve you forever.
Don't forget to remove the protective film from the outside of the PVC window!
According to GOST 30674 "Window blocks made of PVC profiles":
Removal of the protective film from the front surfaces of the profiles should be carried out after the installation of products and the finishing of the mounting opening, taking into account that the duration of exposure to sunlight on the protective film should not exceed ten days.

If repair work is still underway in the room where the windows were installed, the protective film may remain on the product until they are completed. However, from the outside, the film should not be exposed to sunlight for more than 10 days.
The adhesive base of the protective film loses its properties under heat and UV exposure and can spoil the aesthetic appearance of the plastic profile.
General requirements for installation in accordance with GOST
GOST 30971-2002 “Seams of assembly units for joining window blocks to wall openings. General technical conditions»Put into effect by the order of the State Construction Committee of the Russian Federation from 01.03.2003.
Due to the need for adjustments project documentation for design and construction organizations, the transition period for the development of GOST is established until 01.07.2003. The republics of Azerbaijan, Kazakhstan, Kyrgyzstan, Moldova and Uzbekistan have joined the Russian norms.
What's new? New standards bring significant formalization of window installation and require numerous documents. Among them, it should be noted the need for each installation company to have "Instructions for the installation of windows", approved by local authorities, the need to develop assembly assemblies of windows for each facility under construction and coordination of assemblies with the customer, it is recommended to analyze the thermal fields, as well as provide for the registration of certificates of delivery - acceptance window openings before installation, acts of hidden works and certificates of acceptance of the completed installation of windows.
Of particular interest in the standards are the Appendices:
- Appendix A (recommended) presents drawings with examples of window installation;
- Appendix B (recommended) sets forth requirements for fastening windows in openings;
- Appendix B (mandatory) represents the actual requirements for the installation of windows in general and, in fact, is the main working document;
- Appendix D (recommended) describes the requirements for the method for calculating thermal fields (isotherm analysis).
In general, Russian installation standards bring us closer to the standards adopted in Europe, and, in particular, in Germany.
GOST requires window firms a large number formalities and has more requirements for testing joint structures and materials used for them.
Formalization is justified by the fight against Russian negligence.
The testing of materials and seams in general is justified by the fact that until now in Russia there have been no detailed standards for installation at all, there is no accumulated scientific experience in determining the properties assembly materials and the quality of the seams. Of course, for the consumer there is no need to know all the provisions of this GOST, this is the duty of professionals.
Without delving into the intricacies, we can talk about three basic principles of installing windows, which should be paid the closest attention.
Three layers of joint
The content of the main part of the norms is devoted to the rules for filling the mounting gap between window blocks and openings on the basis of the principle "from the inside is tighter than from the outside." Each mounting assembly must have three layers of sealing: outside - protection from climatic influences, in the middle - insulation, inside - vapor barrier. Can be used different materials for outer layers and different polyurethane foams, but, in one version or another, these three termination planes must be present.
Outer layer is designed to protect the insulation layer from moisture penetration into it, and must be vapor permeable in order for the insulation to be ventilated through it. That is, outer layer must be waterproof and vapor permeable.

These requirements are due to the fact that when moisture penetrates into the insulation, its thermal insulation qualities fall. The best way PSUL (pre-compressed sealing strips) correspond to modern requirements for the outer layer. These are special mounting tapes that are glued to the window frame before installing it in the opening, and then, expanding, they fill all the leaks of the quarter in the opening.
With serious advantages: optimal construction physics and technological simplicity, they also have disadvantages. It is convenient to use these tapes in new construction when the opening has good geometry. But when replacing windows in old houses, when the slopes are uneven, and even more so, plastering, their use is difficult. Another drawback is that plaster does not apply to the PSUL.
Limited use of silicone outside is possible. In this case, certain rules should be observed: the thickness of the silicone layer should be half the width of the joint to be filled, and the silicone should be glued only on two sides and work in tension, the rest of its sides should remain free.
Insulation sealant assembly seam can be applied. Although, it is not clearly spelled out in the GOST, but there is no prohibition on its use, no matter how much the supporters of mounting tapes want. An example of the use of silicone outside and inside the room is shown on node A.14 in GOST 30971-2002. It is unacceptable, of course, as you can sometimes observe on objects, just anoint with silicone over the foam - this is an imitation of the protection of the seam, but not the protection itself.
Central layer- heat insulating. Currently, polyurethane foams are used for its execution. It is best to use foams made specifically for window installations. These foams fill the joint evenly and do not need to be trimmed once they have hardened. Other foams, after the end of installation, hang in shreds from the side of the room, and they are cut off, breaking the protective outer crust.
The inner layer- vapor barrier. Its function is to protect the insulation (foam) from moisture vapor penetration into it from the side of the room. For these purposes, when plastering slopes, vapor barrier tapes are used, mainly based on butyl, as well as paint vapor barriers for moisture resistant drywall... It is possible to use silicone according to the rules mentioned above.
Lack of cold bridges
An assembly seam is a node where the joining of wall and window structures with completely different properties, including in terms of heat engineering, takes place. And it is important to execute the knots in such a way that cold bridges do not appear on the window slopes.
Basically, the problem of cold bridges is the problem of single-layer wall structures that were used in houses of the past (solid brick, expanded clay concrete, etc.). In this case, the weak zone is the wall itself around the window frame due to its low resistance heat transfer. An area with a surface temperature below the dew point appears on the slope. In this area, firstly, there are high heat losses, and secondly, condensate falls out on it. If moisture condensation on the slope occurs frequently, then later on these places may form a fungus (mold). The same applies to quarter-cut openings. In their absence, the danger of cold bridges seriously increases, and here you should especially carefully consider the heating technology of the junction nodes.
Important recommendation- in the absence of quarters, use window frames with a width of at least 130 mm. With a narrow window frame, high-quality sealing of the seam is difficult and there is a high probability of cold bridges. The options given in GOST with false quarters from the corners or from the platband are possible only if exterior plaster, and still remain problematic from the point of view of heating technology.
In the presence of the wall effective insulation (mineral wool or non-combustible polystyrene foam), the window should stand either in the plane of the insulation, or behind a quarter of the insulation. In walls where aerated concrete is combined with external cladding and brick quarters, as a rule, cold bridges also do not arise due to the good thermal properties of aerated concrete.
Fastening the window unit in the opening
The specificity of plastic windows is that they have significant thermal linear expansion. That is, when windows are heated by the sun's rays, the bars of the box and sashes increase in size. As calculated thermal expansion values for windows white should be applied 1.5 mm per 1 running meter, for colored windows - 2.5 mm per 1 running meter (the difference in thermal expansion is due to the fact that white window profiles heat up much less than colored ones).
In accordance with this factor, the window is fastened to the wall. The corners of plastic windows must remain free, the extreme fasteners are placed at a distance of 150 mm from inner corners frames. The rest of the fasteners are placed along the entire perimeter with a step for white profiles no more than 70 cm, for colored ones no more than 60 cm. Near the imposts, fasteners are also placed at a distance of 150 mm from the corner. The gap between the box and the wall must be at least 15 mm. This is due to both thermal expansion of the windows and the fact that it is very difficult to fill a thinner seam with foam insulation evenly.
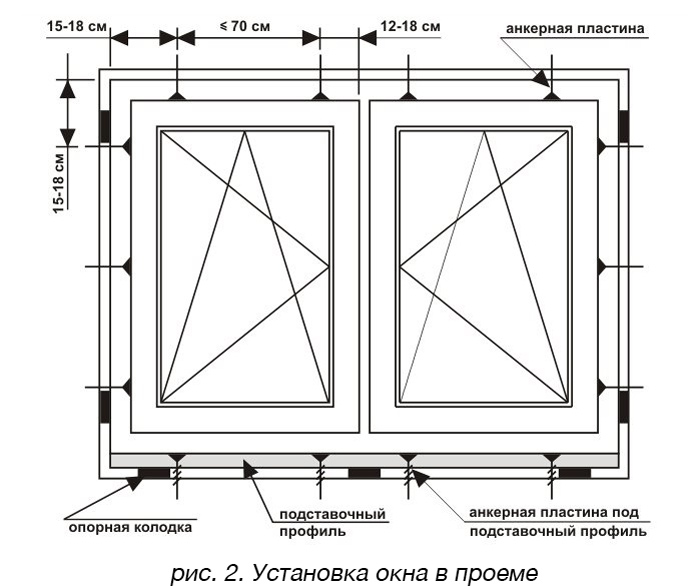
Bearing blocks are placed under the lower corners of the box and under the imposts. The pads are also placed from the sides as follows: if you look at the window from the inside, then with one pivot sash, the pads are placed on the side opposite to the hinges at the top and on the same side as the hinges below. With two flaps, respectively, four pads are placed.
Schematic diagrams of the nodes of the junction of window boxes to the walls

1 - window board;
2 - foam insulation;
3 – vapor barrier tape;
4 - flexible anchor plate;
5 - support block for the window sill;
6 - plaster mortar;
7 - a dowel with a locking screw;
8 - an insert made of antiseptic lumber or a leveling layer of plaster mortar (recommended only for the lower unit);
9 - waterproof vapor-permeable tape;
10 - noise-absorbing gasket;
11 - drain;
12 - insulating self-expanding vapor-permeable tape (PSUL);
13 - sealant in a thin layer

1 - foam insulation;
2 - insulating self-expanding vapor-permeable tape (PSUL) or vapor-permeable mastic;
3 - frame dowel;
4 - sealant;
5 - vapor barrier tape;
6 - panel for finishing the inner slope;
7 - plaster leveling layer of the inner slope.
Thermal gaps must be taken into account especially carefully when designing large-sized glazing elements: when making bay windows, showcases, glazing to the entire height of the floor. These are three basic principles when installing modern windows, although, of course, there are many nuances and subtleties that depend on various designs walls and from the materials used for sealing the seam. And - as we said at the beginning of the article - the human factor is very important - responsible and quality work installers.
When can you install windows
With the entry into force of Moscow Law No. 42 "On Silence", disturbing the peace of the neighbors is an administrative violation. Please carefully read our instructions for conducting noisy work in order to comply with the requirements in force in Moscow and the Moscow region in various buildings.
How much is the installation of windows in accordance with GOST
The cost consists of two components: the cost of work (hours) and materials.
The assembly seam will comply with GOST for the installation of windows, using both expensive and economical materials. The use of one or another will affect the stages (duration) of work and the final cost of installing windows.
Video instruction for the installation of plastic windows
The service life of plastic windows is 40 years or more, but only competent installation provides them with high performance properties. Installation of PVC windows in accordance with GOST is one of the Moscow Windows Standards.
The company offers two installation options using unique technologies: basic SetEco ™ and installation in accordance with GOST SetFull ™.
Installation of windows using the SetFull ™ system
Installation of plastic windows using SetFull technology is carried out in accordance with GOST, while taking into account the features and disadvantages of buildings.
Special composition protects the assembly seam both from the street side and from the room side.
The SetFull ™ system is guaranteed for 5 years.
System components:
- Polyurethane foam.
- Pre-compressed sealing tape.
- Waterproofing tape (membrane type)
- Vapor barrier layer.
- Sound-absorbing and heat-insulating material. *

Installation of windows according to the SetEco ™ system
This is the basic installation type. The materials used are easy to use, while providing a basic seal for the assembly seam. For additional protection, "Outside seam insulation" is carried out. The service includes the installation of two special insulating tapes. Recommended by the "Moskovskiye Okna" company, for orders with plastic slopes, providing reliable vapor barrier from the side of the room.
Installation warranty for SetEco ™ system is 2 years
System components:
- Polyurethane foam.
- Pre-compressed sealing tape. *
Installation according to GOST
Modern plastic windows require competent installation. When installing plastic windows, all future loads on the window must be taken into account: mechanical, temperature and chemical. The functional durability of the window primarily depends on the correct installation of the window.

Stage 1. Protection of living quarters from construction debris
Before installation, it is imperative to prepare the room. Cover the floor, furniture, expensive items, dishes, etc. plastic wrap for protection from construction dust.

Stage 2. Checking for compliance with the size of the windows and the complete set of the order
Before starting dismantling work, be sure to check the dimensions of the openings and frames delivered to the object, taking into account the standards for the dimensions of the assembly seam. We check the contents of the order.

Stage 3. Preparing new windows for installation
We spread the blind parts of the window and remove the sashes. We prepare the holes for the fasteners. Be sure to remove the protective film from the outside of the frame ...

