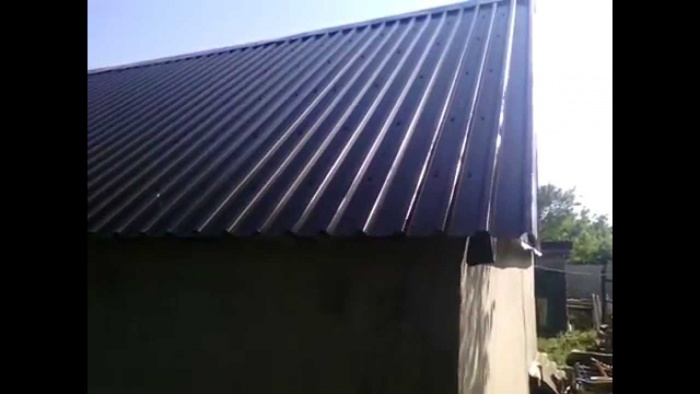
How to cover the inner corner of the roof with corrugated board. How to cover the roof with corrugated board with your own hands
If your home needs a roof that has an attractive and sophisticated look at a relatively low cost, a corrugated roof — cold rolled galvanized steel sheet with color coating polymer materials- This is what you need.
Advantages of profiled steel sheet:
- excellent performance: weather resistance, solar radiation, mechanical strength, corrosion resistance,
- short specific gravity(from 5.5 to 9.5 kg / m 2), therefore, low load on the truss systems and the crate,
- roofing material can be selected according to the texture and color for the design of the building,
- relatively low price with high aesthetic qualities.
What kind of corrugated board is suitable for the roof
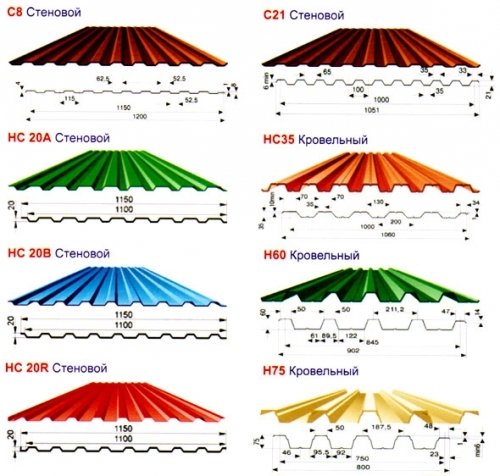
Any of the brands of corrugated board (universal, load-bearing or wall) is suitable for roofing, but for laying thin wall material it will take almost continuous crate. For a regular crate with a step of 65-100 cm, it is preferable to use a more durable and rigid profiled sheet. The most commonly used material with such indicators:
- brand H or HC (carrying and universal),
- profiled sheet thickness from 0.5 to 0.7 mm (strong and light at the same time),
- corrugation height 20-75 mm (provides the possibility of elastic deformation of the roof),
- the presence of a capillary drainage groove,
- coating color that matches the existing or planned exterior of the house.
The price of corrugated board depends on several indicators of the material.
What you need to cover the roof with corrugated board with your own hands

Single pitched or double pitched roof country house, summer kitchen or a garage to cover on your own will not be difficult with one or two assistants and some skills in working with a screwdriver and a jigsaw. A broken gable roof of a house with an attic will also be able to independent work. Help with this video.
If the roof frame is of a more complex configuration, experienced specialists should be invited to cover the roof with corrugated board. The price of work will depend on the complexity of the roof and the area of \u200b\u200bthe slopes.
How much material is needed
Calculate the amount of material for a lean-to or gable roof, knowing the size of the slopes, it will not be difficult. If the length of the slope is 12 m or less, you need to divide the width of the slope by the width of the material, the resulting number of sheets should be increased by 15%.
For more complex roofs, you can calculate the corrugated roofing online using special programs. Programs allow not only to determine the amount of material as accurately as possible, but also calculate the roof slope, overlap dimensions, determine the best option location and fastening of the profiled sheet.
Tools and fasteners for work

For work, you will need measuring and cutting tools, fastening materials:
Features of laying a roof from a profiled sheet
It is best to do the work with four people, it will turn out much faster. Two people can also cope, but alone work with long sheets corrugated board is very difficult.
- The minimum angle of the roof slope is 10 o. With a smaller slope angle, water can get under the material.
- The standard length of the profiled sheet is 12 m. If the length of the slope is less or more, the sheets will have to be cut.
- To protect the corrugated board from corrosion, waterproofing and vapor barrier should be made along the crate.
Installation of the crate under the profiled sheets

An important stage in the installation of corrugated roofing is the organization of hydro and vapor barrier to protect the metal from corrosion when water vapor enters.
They do this in two ways:
- laying a vapor barrier on the rafters under the crate and waterproofing (roofing material) on top of the crate under the corrugated board;
- organization of a ventilated roof, creating a ventilated space between the waterproofing layer and the roofing material. To do this, false rafters from bars are installed along the rafter legs along the waterproofing, a crate is made along them, a puff cake will turn out: rafters, waterproofing, false rafters, crate, profiled sheet.
Important! All elements of the crate must be impregnated on all sides with an antiseptic composition for wood. This will extend the life of the roof.
Lathing boards are laid in increments of 0.5-1.0 m, attaching them with nails or self-tapping screws to the rafters. The thicker and more durable corrugated board is used, the greater the distance between the boards of the crate. So, for example, for a profiled sheet of brand CH35, the crate step is 0.5-0.6 m, for CH44 - 0.65-0.75 m. The distance between the boards should not be more than 1 m.
Having made the crate, you need to check the diagonals of the slope and align the slope along the verticals, horizontals, diagonals. This will greatly facilitate the work of laying corrugated board on the crate.
The procedure for laying corrugated board with your own hands

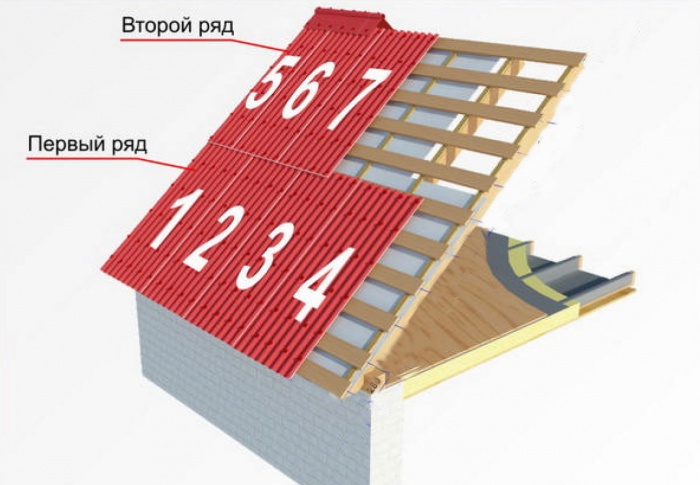
- Profiled sheets are laid from the bottom up, starting along the slope from the end of the building, from left to right or right to left - it all depends on which side of the sheet the manufacturer made the capillary groove. When laying the material, the groove must be closed by the wave of the next sheet.
- The size of the overlap of profiled sheets horizontally and vertically depends on the angle of the roof slope. At small values of the angle of inclination of the slope, the sheets are laid with an overlap in two waves vertically, at high values - in one or half a wave.
- The horizontal overlap of the slope is at least 10 cm. The first row is laid with an overhang of 30-50 cm above the overhang (the distance depends on the design of the drainage system). The joints between the profiled sheets are sealed with a special tape. The sheet of the second row is laid with an offset along the end by half the width.

If 2 or more people are working, lifting the sheets is easy. They are laid on a frame of 5-6 bars in packs of 5-10 pieces and are pulled up with a rope along inclined boards attached to the crate.
On the crate so that the sheets do not roll down, one or two bars are nailed from below and a pack of coating sheets is placed. It is much more convenient to work this way than to serve one at a time, although this method is also used.
How to fix corrugated board on the roof correctly

Sheets are attached to the crate with self-tapping screws with washers and sealing gaskets. Their number is no more than 6-10 pieces per 1 sq.m. flooring. On the slope, the screws are screwed into the lower, and on the ridge - into the upper waves of the sheet.
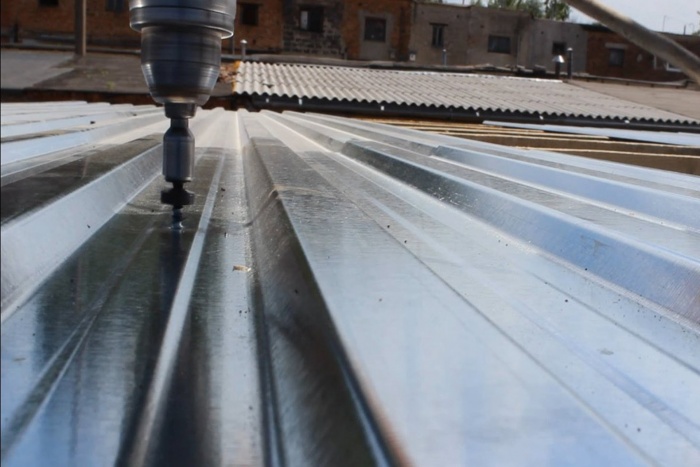
If the material is thin, the screws are simply screwed in with a screwdriver, they easily pass through without damaging the coating. On thick steel sheets in places where they are attached to the crate, it is advisable to pre-mark and drill holes for self-tapping screws with a drill.
Important! It is necessary to precisely align and correctly install the very first sheet, the quality of all work will depend on it.

The first sheet is first fixed in the middle with one screw and the overhang from the cornice and the vertical position of the crate are carefully aligned. After that, it is fixed with a second screw.
The material is attached to the upper and lower boards of the crate by screwing self-tapping screws into each deflection of the wave, into the central boards through the deflection.
The second highest row is placed with the sheets shifted to the right or left by half the width. They cut the profiled sheet with an electric saw, a hacksaw for metal or an electric jigsaw with a metal file. They do it on the ground.
Attention! It is impossible to cut a profiled sheet with a grinder. This will destroy the polymer coating. For cutting, use scissors for metal, and paint over the cuts with paint.
Horizontal joints are also sealed with tape. Self-tapping screws on the overlap are screwed into each recess of the wave. The rubber sealing washer should protrude 1-2 mm around the perimeter of the screw head, this indicates that it is not pinched or loose.
Installation of the skate on the corrugated board

Ridge additional elements for corrugated roofing are produced
- simple in the form of a sheet bent at an angle with a shelf width of up to 30 cm,
- with a semi-circular edge
- with a U-shaped rib and shelves of the same dimensions.
To install a ridge on a corrugated roof, the last row of sheets should be aligned in the upper part along the end and laid in the same horizontal plane. The installation order is as follows:
- on the edge of the last row of sheets, a tape or a strip of ridge seal is laid,
- bars are fixed parallel to the axis of the ridge,
- ridge elements are screwed to the bars with screws into the upper corrugation after 20-30 cm, starting from the side where the wind most often blows,
- the ends of the semicircular ridge are closed with special plugs,
- The U-shaped ridge is mounted on a bar, which is specially installed under it on the roof ridge.
A roof made of corrugated board will delight you with its beauty and make you feel proud of the excellent work done by your own hands. The money saved on this can be spent on making an original weather vane that will decorate the house.
The great popularity of corrugated board is not unreasonable. This roofing material has a long list of advantages, where one of the main advantages is the simplicity of its installation on the roof structure. Doing it yourself is not a problem. Therefore, it is worth considering this building process and point out some nuances and subtle points.
Stage number 1 - preparatory
To prepare for the installation of corrugated roofing, you need to purchase the roofing material itself. Here it is important to correctly calculate its quantity. Therefore, the area of \u200b\u200bthe roof slope is measured, and 10-15% is added to it, which can always go to waste in the process of cutting the material. But if everything is done wisely, then you can do without big waste.
To do this, the area of \u200b\u200bthe overhang of the corrugated board and the protrusions beyond the fronts of the structure are added to the area of \u200b\u200bthe slope. And if the length of the roof slopes is small, within 6 m, then each slope can be safely closed with one sheet. If the length is longer, then you can order the length of the corrugated board under required size or carry out installation in two or three rows with material of small length.
In addition to the corrugated board itself, additional products will be needed:
- Skate;
- Cornice strips;
- Front trims;
- Planks for the valley (if present in the roof structure);
- Planks adjoining to various structures located on the roofs ( chimneys etc).
- Of the materials, a sealant, a waterproofing membrane (not always) will be needed.
- From tools: metal scissors, screwdriver, tape measure, hammer or stapler with staples.

To preparatory stage can be attributed to the rise of the corrugated board on the roof. With your own hands, this can be done quickly and easily. Why is it necessary to lay two boards on an edge so that with one edge they touch the roof parapet, with the second they rest against the ground. At the same time, the distance between them was such that the profiled sheet fell on them with upper waves in the second row.
Stage number 2 - the correct layout of profiled sheets
How to do it yourself so that the sheets of corrugated board are laid correctly? If, again, we say that one sheet will completely cover the roof slope with its length, then in this case there are no problems. You simply, starting from the edge of the roof, lay the profiled sheets on the crate.
Attention! Important point- correctly set each sheet strictly along the line of the cornice with a ledge on the overhang.
It is sometimes problematic to do this with your own hands, therefore it is recommended to install a thread parallel to the eaves along the supposed overhang, stretched between the slats that are attached to the extreme rafters.
In the event that one sheet roofing material the slope cannot be covered, then you will have to use an orderly installation. It's over complex scheme, but you can handle it with your own hands. To do this, you will first have to lay three or four sheets in the first bottom row, and two or three sheets in the second top. All elements of the roofing must be set along the eaves and among themselves.
Stage number 3 - fixing the corrugated board
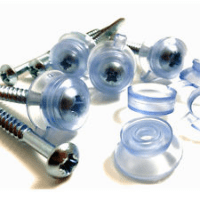
At this stage, the sheets of corrugated board are fastened to the elements of the crate. Firstly, it is necessary to indicate that the corrugated board is not fastened with nails. For this, special galvanized self-tapping screws with a press washer under a hex head are used. A rubber gasket must be installed with the composition of the self-tapping screw. They are made of neoprene rubber, which, under the influence of temperature and humidity changes, does not change its physical, technical and performance characteristics. And on the roof, natural loads change quickly, and besides, they are maximum at the top.

It is necessary to pay attention to the fact that the installation of self-tapping screws is carried out according to special rules and requirements. What?
- At the edges of the sheets at the eaves and at the ridge, self-tapping screws are installed and screwed into each lower wave of the corrugated board. On the rest of the plane in a checkerboard pattern, while it is not necessary to attach to each row of waves, it is possible through one or even two.
- The self-tapping screw must not be tightened too much, the neoprene gasket may break. You can’t screw it loose either, a loose fit of the cuff to the plane of the corrugated board is a high probability of leakage through the mounting hole.
- When screwing in, the self-tapping screw must be located exactly perpendicular to the plane of the lower wave.
- The corrugated sheets themselves are also connected to each other with self-tapping screws, because they are overlapped relative to their edges, but only the attachment point is the upper wave.
- The number of fasteners per 1 m² is 5-8 pieces.
Stage number 4 - installation of additional elements
As you can see, it is not very difficult to cover the roof with corrugated board, and besides, with your own hands. But that's not all assembly process. In order for the roof structure to be considered completely ready for operation, it is necessary to install additional elements.
Cornice strips are installed directly along the cornice and are attached to the first lower element of the crate with self-tapping screws. The length of the plank is not enough to cover the entire junction line, so they are overlapped, where the displacement distance is 10-15 cm. roll material. The reason is to avoid the passage of moisture on truss system if in some place water leaks through the corrugated board itself.
Mounting a skate also has its own nuances.
- Firstly, it is mounted on top of profiled sheets and attached to their upper profiles.
- Secondly, a solid crate must be laid under the ridge, it can be two or three boards.
- Thirdly, at the place where the ridge is installed, additional waterproofing is applied to the crate in the form of a self-adhesive tape.
- The elements of the ridge are overlapped relative to each other, the offset is 10-15 cm.
Installation of pediment strips is designed to close the gaps between the corrugated board and the rafter legs. The gap itself is formed by installing the elements of the crate, so its size is the height of the board (32-50 mm). Roof structure on the gables there can be two types, this is in terms of whether the sheets of corrugated board go beyond the edge of the roof. That is, whether they come out or not.
In the first case, the gable bar is a metal strip that is attached to the crate with self-tapping screws. It rests on the corrugated board with its upper edge. Usually, several planks are laid, which, like the rest of the additional products, are overlapped with the same offset. In the second case, the gable bar is a corner. It is installed in such a way that its horizontal strip covers the corrugated board.
Planks for valleys and junctions are a structure consisting of two parts: upper and lower. They are usually mounted with their own hands at the installation stage of the profiled sheets themselves. The lower one is attached to the crate, the upper one to the roofing material. At the same time, experts recommend laying under the corrugated board and the top bar waterproofing material. Some craftsmen also treat these places with bituminous mastic.

As for the elements for closing the junctions, the most commonly used here are prefabricated structures from metal. For example, boxes or special caps are used for pipes, for walls, planks in the form of a corner. Installing all this with your own hands is easy.
- When calculating the amount of corrugated roofing, it is necessary to take into account the working width of the sheet, and not the total, because the material is overlapped by one wave.
- If roofing sheets are mounted in two or three rows along the length of the slope, then it is necessary to take into account the angle of the roof. It concerns the amount of overlap. For example, for flat roofs best option- 30 cm, for steep ones 15 cm is also suitable.
- It is possible to align the sheets not along the eaves, but along the ridge. Most often, craftsmen do this on steep roof slopes. It's just more convenient that way.
- It is recommended to lubricate the overlapping areas with mastics or sealants on flat corrugated roofs.
- If the protective coating of the corrugated board was scratched for some reason, then you should not leave the defect unattended. It is best to paint the place of the flaw with paint to match the entire plane of the roof.
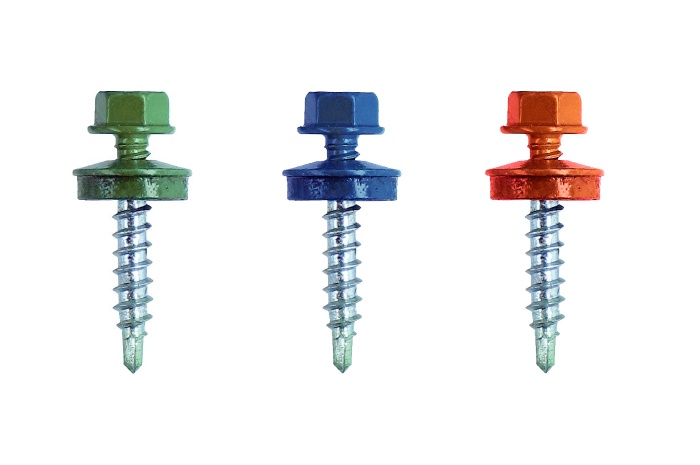
- Choose the color of the self-tapping screws in the color of the corrugated board, since there is such an opportunity today.
High-quality and durable roofing from corrugated board is quite easy to build on your own. It is only important to know what materials to take, how to properly attach the sheets to the crate and how to protect the inner under-roof space from dampness.
And Special attention we will devote to additional elements that need to be bypassed with full observance of technology. So, do-it-yourself corrugated roofing - step by step!
Material preparation: avoiding the first mistakes
Once you have made accurate calculations your roof, you can order profiled sheets. But, if you purchased corrugated board, but for some reason its installation will have to be postponed (for example, prolonged rains), then store the sheets without removing the factory packaging, on a flat surface and in indoors. Additionally, bars should be placed under the sheets in increments of 50 cm.
Shift and move such roofing material carefully, holding the edges along the length and especially avoiding creases and deflections of the sheets. You also need to move the sheets carefully, because. modern polymer coating is particularly sensitive to mechanical damage.
How to cut this material with abrasive cutting tools: Fragments from the wheel will scratch, and significant heat will occur at the cut site. But, if you had to work that way, then immediately cover all the damage with repair paint.
Fortunately, the technology of roofing from modern corrugated board will allow all work to be carried out in warm time year, from April to September, and you will not have to store the sheets for a long time.
Installation of corrugated board: step-by-step master classes
Let's first of all immediately deal with building terms so that you do not have to search the Internet for the meaning of each new word:
You will be surprised, but the same (at first glance) material needs to be laid in different ways. It's all about the manufacturers - everyone gives their own recommendations for laying, and they are really important. Because corrugated board from different companies is demanding on its conditions, even if the differences are small. Therefore, carefully study the instructions attached to the roofing material and do not trust fully hired workers who “ate the dog on such roofs” and try to do everything their own way.
Here is a simple example of how the installation of corrugated board with a thickness of less than 0.7 cm and more durable differs:

And when working with such material, a wooden scaffold is no longer needed:

Imagine that a hired team starts stomping on thin corrugated board, because before that they “put the exact same roof on your neighbor” and “nothing bent”? And now it will bend, and how, to which the unfortunate workers will declare that "the way it was."
But speaking in general, main indicator high-quality installation of a roof is tightness. After all, the roof just serves to protect all internal structures from moisture and cold. And even an inconspicuous gap can become a serious problem: dampness, smudges, quickly deteriorating materials and fungus. That is why we will now analyze in detail all the subtle points.
A little about safety
The technology of roofing with a metal profile is not as complicated as it is important not to damage the roofing during its installation. After all, although this material looks strong and tough, caution is still required when working with it:
- On the finished metal profile flooring, move in soft shoes.
- Try to step only on the concave waves of the sheets and better directly on the screws.
- So, you can only step on the roof on your toes.
- Keep your foot always parallel to the slope.
- Only one leg should be in one recess.
Construction of a sheathing for corrugated board
The crate for mounting the roof is made either solid, if the slope is small, or sparse, in increments of up to 5 meters. But with what step the roof lathing is needed depends on how thick the sheets of corrugated board will be:

Waterproofing and wind protection
Next, we think about how to do it right roofing cake roofs. The modern market produces a lot of waterproofing materials, the most different types and properties. We even have a whole separate article about it. But in general, focus on the following program of action:
- Step 1. So, fix the selected waterproofing material on the rafters. To do this, take the most common construction stapler, but before laying, be sure to check whether you are laying the film or membrane on the wrong side. And glue the panels together with a special tape.
- Step 2. After that, we break through the slats along the rafters (take a thickness of at least 2 cm) and form, thus, necessary for ventilation ventilation gap.
- Step 3. Now we put the roofing material on this upper crate.
Here's what it all looks like in real life:

We select high-quality self-tapping screws
The consumption of self-tapping screws when fastening corrugated board is usually about 6 pieces per 1 square meter. Self-tapping screws 4.8 by 28-35 mm are suitable, as for wood, and for additional elements - 4.8 by 50 or 60 mm. As a tool, purchase a screwdriver with a special nozzle or a cordless electric drill from the same manufacturers of roofing materials.
Special self-tapping screws for fastening profiled sheets are indispensable, because. This is the only way to ensure:
- Complete waterproofing of the roof.
- High connection strength.
- The minimum risk of injury to the coating during fastening, and, therefore, the absence of corrosion in the future.
The highest quality and most reliable self-tapping screws for corrugated board are sold by the same suppliers that deal with sheets. Use zinc coated carbon steel or stainless steel screws whenever possible. perfect option. But when buying, still carefully inspect all sealing washers.
How to properly fix the corrugated board?
You can understand that you have fastened the screw correctly by the metal washer - it will protrude about 1 mm of the rubber gasket.
It is necessary to screw the screws into the roofing material strictly perpendicularly, directly into the deflection of the vertical wave at the corrugated board. Although there are a lot of disputes about this in the construction fraternity, and each method has its own advantages. So, a self-tapping screw in the lower wave creates more secure fastening, and at the top rainwater has much less chance of getting into the roof space.

On the eaves and ridge, you need to screw the screws into the deflection through the wave, and in the middle of the sheet - into each board of the crate. In total, you will need about 5-8 pieces per square meter.
What tools are needed for installation?
Note that the device of the roof itself from corrugated board is really within the power of even a person with little knowledge in construction. Of course, there are roofing materials that only experienced professionals can properly install. But in the case of modern corrugated board, we can reassure you: you can handle it yourself!
Fortunately, there is nothing complicated here. Due to the large length of the sheets, the roof slopes overlap without additional transverse joints, and the material itself is easy to cut and shape. You will need a minimum of tools for this business:

So, you can lay corrugated board on slopes of almost any angle of inclination, it is only important to correctly calculate the amount of transverse overlap:
- 150-200 mm for roofs with 15-30°.
- 200 mm for slopes from 14°.
- 100-150° at large angles.
For fastening, you will need self-tapping screws with special sealing washers:

In what order should the sheets be laid?
Many roofers install profiled sheets as follows: starting from the bottom row, they first lay 4-5 sheets, and each of them is fixed with only one self-tapping screw in the center. After that, the sheets are interconnected with self-tapping screws 4.8x19 mm, which are installed in increments of 500 mm. Now they check how the sheets turned out to be aligned with the roof overhang, and finally fix the roofing material. Here is the scheme:

But, if you are working on the roof for the first time, in order to avoid skew, fasten the profiled sheets in the same way, but in this order:
- Step 1. We install the first sheet on the crate, and fasten it with one screw at the very ridge.
- Step 2. We lay the second sheet so that the bottom edges of both sheets below form one perfectly even line.
- Step 3. We fix the overlap along the top of the wave under the very first transverse fold.
- Step 4. We evaluate by eye how correctly the sheets are docked. Uneven? Then lift one sheet from the other, tilt it slightly from the bottom up, and again join the fold by fold. Secure everything with self-tapping screws at the top of the waves.
- Step 5. Work with 3-4 sheets in this way, carefully align them with the cornice and then install the remaining sheets.
To the base of the roof, the corrugated board must be mounted so that the edge extension is 40 mm from the eaves. This is necessary in order to leave a gap on the ridge optimal size and the ventilation of the roof was not disturbed. By the way, if the profiled sheets have a gutter, then each next one should overlap the groove of the previous one.
Remember: when laying, you cannot step on the comb of the sheets - they will bend. In general, fitters wear soft shoes for such work. That's all the details!
Working with additional elements
And now let's move on to our numerous additional elements. All of them are usually made standard length: for roofing with polymer coated- 2 meters, for a galvanized roof - 2.5 meters. They complete themselves roofing. The sealant, which is traditionally placed between the roofing material and additional elements, allows them to fit more tightly to the sheets, further preventing moisture from entering under the roof and allowing it to “breathe”.
But for the design of skates, cornices and others complex structures you need to purchase special elements that are offered by the same manufacturer whose roofing material you purchased:

It is necessary to fasten the additional elements with the same 4.8 roofing screws as the main material. The only difference is that the metal roofing is fastened with self-tapping screws 28-35 mm long, and the elements - with self-tapping screws 50-60 mm long.
Valley and valley overlay
And now let's deal with such a mysterious name as "valley". The valley and the valley lining are additional elements duplicating each other, which are mounted at the points of internal convergence of two differently directed slopes. You need to fasten the valley under the corrugated board.
Therefore, if the roof has complex shape, with internal surface joints, then take the valley and the valley overlay as an additional element. So you will give your roof a neater and aesthetic appearance, additionally protecting complex transitions from moisture ingress.
Aprons for pipes
The most critical stage of the roof is the removal of pipes. Such pipes consist of two conditional parts - the lower one, which goes along the roof profile, and the upper one, the actual pipe. And, if the through passage of the pipe falls on lower part roofs, it makes sense to install a snowplow over the passage.
For sewer ventilation system an uninsulated pipe about 10 cm in diameter is passed through the roof, without a head. And for radon, they take the same pipe, but with a cap. Remember that these pipes cannot be connected to ordinary ventilation pipes, because. for those, insulated elements of 125 mm in diameter are already used.
The pipe itself can be installed both before the installation of the roof, and at the end. If you chose the second option, then finished roof you will need to cut a hole for the pipe and temporarily cover it with some material. In the course of finishing work, pipe cuttings will need to be made of galvanized steel aprons or more modern materials like Wacaflex.
Here good master class, how to do it:
dormer window
Now we are working with dormer window. So, we cut the sheet of corrugated board into two parts at the lower end of the groove, put bottom sheet, then the bottom plank of the groove, and only then the top roofing sheet.
snow holder
The snow guard is mounted in those places where there is a risk of snow rolling. For corrugated board, this is usually the second line at a distance of 30-40 cm from the eaves. For installation, use self-tapping screws 4.8x50 through 1-2 profile waves.
Outer and inner corner
If the ramp changes its direction, then additional finishing elements such as internal and outer corner and transition. Their main task is to create maximum tightness and give the joint of sheets an aesthetic appearance.
adjoining
Adjacency is additional element, which serves as a bypass for the chimney or to protect the junction of the roof to the wall:

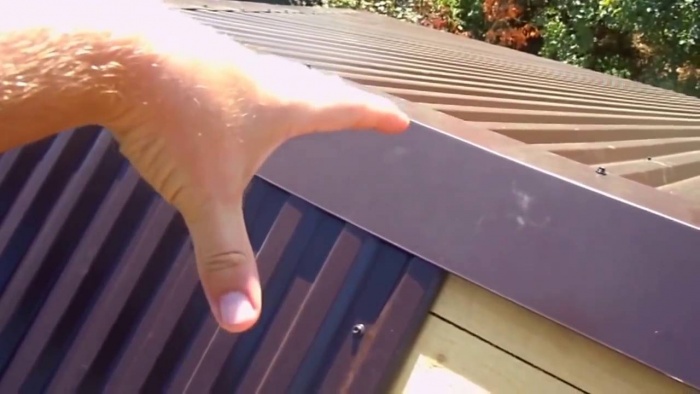
Cornice, end plank and joint plank
And here is the instruction:
- Start the installation of the end strips from the side of the roof overhang, directing towards the ridge.
- He already has an extra part of the end plate, just cut it off.
- Fasten the plank to the end board and profiled sheets in the ox comb with screws in increments of up to 1 meter. If you did everything right, the end strip will cover at least one wave of the roof profile.
- Fasten the end plate with wood screws 4.8x60 or 4.8x50, directly to wooden base. Leave a step from 30 to 50 cm and make sure that the end plate completely covers the end of the extreme wave of the corrugated board.
Now we move on to the installation of the connecting strip of the joint. Its length is 2 m, and the overlap of the planks cannot be less than 1 meter. The joint plank is taken 2 meters long, and two planks are attached to each other with an overlap of at least 1 meter. Attach the additional element to the wall in a strobe, or hide everything under the wall sheathing.
The main purpose of the cornice strip is to protect the under-roof space from precipitation, especially in rain with strong wind. And the lower the angle of inclination of the roof, the more necessary this additional element. But you need to fix the eaves bar earlier than the sheets of corrugated board. Overlap - 100 mm.
Installation of the skate
After all the roofing material has been laid, we fasten the ridge. In advance, we line the joints of the ridge and the roof with a sealant. Ridge elements for trapezoidal roofing sheets are usually taken smooth. Between them and profiled sheets, it is advisable to put ventilated seals, and for small corrugations - special ridge seals.
We fix the skate with screws on both sides at a distance of 2-3 waves. It is important that the ridge itself covers all the first screws that hold the sheets of roofing material. Skate bars should overlap each other with a grip of at least 1 meter, and fasten the elements to the roofing sheets with self-drilling screws in increments of up to 3 meters.
An important point: the smaller the angle of inclination of the roof, the wider the ridge itself should be. Yes, the most standard sizes- 140x140 mm or 200x200 mm.
But today it is more fashionable and rational to order a figure skate, which comes in two dimensions: 110x30x110 mm and 145x50x145 mm. There are also special types a ridge for a complex roof, when multidirectional slopes come together.
Roof care from corrugated board
Snow on the roof of profiled sheets lingers quite a bit, and therefore it is not necessary to clean it. But, if you need to carry out certain repair work, then arm yourself with small plastic shovels that will not leave scratches.
Caring for corrugated roofing is quite simple: the rain itself will wash away all the dirt and dust, and you just have to clean the grooves and drainage systems from clogged fallen leaves once a year.
If, for some reason, a more serious cleaning is ahead, then use plain water and hose with pressure up to 50 bar. Detergents you can use only those that are intended for painted surfaces, and "White spirit" will help to cope with stubborn stains.
As you can see, nothing complicated!
Roofing from corrugated board looks quite attractive and reliably protects the house from bad weather. In this case, the corrugated board belongs to the group budget materials and fairly easy to install. That is, if you take up roofing work with your own hands, arranging the roof of a house will be inexpensive. Consider how to cover the roof with corrugated board, if professional roofers are not planned to be involved in the work.
What determines the reliability of the roofing? Of course, from the properties and qualities of the roofing material. But not less an important factor is how correctly the installation work was carried out. Errors during installation can lead to leaks even if the highest quality and most reliable material is used.
Choosing corrugated board as a roofing material, homeowners prefer reliable and durable material. But in order for the assembled roofing to protect the house with high quality, it is necessary to assemble it correctly. Consider how to properly cover the roof with corrugated board.
Material selection
Even before the start installation work it is necessary to choose the right type of corrugated board that will be laid on the roof. On sale there is material with different thickness basics and different height corrugations, while each type of corrugated board has a corresponding marking.
Advice! Manufacturers offer a profiled sheet with a wave height of 8 to 158 mm. The choice of the most suitable brand of material is carried out depending on the area and construction of the roof. As a rule, for low-rise residential buildings, a profiled sheet with a corrugation height of 21 to 57 mm is used.
Choose, preferably, a material with a polymer coating. Firstly, such a profiled sheet looks more attractive and diverse. Secondly, the polymer layer additionally protects the steel base from corrosion and increases the service life.
Making a roof plan
The first stage of work is the preparation of a detailed roof plan indicating all dimensions and details (pipes, skylights, add-ons, etc.). Also, it is necessary to indicate the slopes of the slopes, since the design of the crate will depend on this value. Having detailed plan roof, it will be easier to calculate the number necessary elements- professional sheets and extensions.
Advice! If you plan to equip a simple gable roof with rectangular slopes, then you can calculate the amount of materials yourself. In the event that the roof is of a complex configuration, it is better to entrust the calculations to specialists.
It is more profitable to order corrugated board, necessary extensions and roofing screws from one supplier. The fact is that when buying material from one manufacturer, you can count on the fact that all the details of the roof will have the same shade. But when buying the main cover and add-ons in different places this cannot be guaranteed.
How to handle corrugated board?
When planning to cover the roof with corrugated board, it is worth, first of all, to get acquainted with the features of working with this material. It is very important to handle the corrugated board carefully in the process of work so as not to damage the protective coating. Otherwise, pockets of corrosion will appear on the roof covering, and the roof will fail much earlier.
Features of transporting corrugated board
- For transportation of material, packs of corrugated board must be laid on a solid and durable surface. Moreover, the dimensions of the body must be equal to or exceed the dimensions of the packs. It is prohibited to transport material by weight.
- When transporting sheets, it is not recommended to move at a speed of more than 80 km/h, and sudden braking should be avoided.
- Loading and unloading of packs, as a rule, is carried out using lifting equipment with soft slings. If manual unloading is necessary, a sufficient number of loaders must be involved. To carry sheets longer than 1.5 meters, at least two people must be involved.
- When carrying sheets, take them by the edges along the long side. The material must be transferred carefully, avoiding kinks and deformations.
- It is forbidden to throw sheets of corrugated board or drag them.
- To lift the sheets to the roof, logs should be built from two boards. Lift sheets only one at a time.
- Roofing work is prohibited in windy weather, as sheets can be carried away from the roof.
How to cut and fasten corrugated board?
During installation, it becomes necessary to cut sheets of corrugated board. When performing this work, use only those tools that do not heat up and destroy protective coatings. To do this, use the following tools:
- Hacksaw or circular saw with electric drive;
- Metal shears - manual or electric;
- Electric jigsaw.
But the grinder with an abrasive disc can not be used. To attach the corrugated board to the crate, you should purchase special roofing screws. These are screws with a drill at the end, equipped with a gasket made of an elastic material.
You need to screw in the self-tapping screw so that the gasket is slightly compressed, but not deformed. At correct installation self-tapping gasket securely seals the mounting hole.
Advice! In the process of cutting material or screwing in screws, metal chips are formed. It must be immediately carefully swept away with a soft brush, otherwise the chips will quickly rust and ugly spots form on the coating.
Roofing installation
Consider how roofing work should be carried out. First you need to prepare the base for laying corrugated board, and then mount the coating.
Assembling a roofing pie
If an uninsulated roof is being installed, then a waterproofing film must be spread along the rafter legs. The material is laid freely so that it sags a little between the rafter legs.
The film sheets are laid so that they form an overlap 15 cm wide. The sheets are fastened together with double-sided tape, and on rafter legs it is convenient to fix them with staples of a construction stapler.
Then the construction of a counter-lattice is carried out, this is necessary in order to form a ventilation gap between roofing and a layer of waterproofing. The counter-lattice is assembled by nailing bars with a section of 50 mm onto the rafter legs.
Next, you will need to build a crate. The design of the flooring for the profiled sheet is determined by two parameters - the slope of the slope and the height of the corrugation. The greater the height of the corrugation of the sheet, the more rigid it is, therefore, the crate can be built with a large distance between the elements.
The slope of the slope affects the amount of snow that accumulates on the roof. It is clear that the flatter the slopes, the large quantity snow can accumulate on them. Therefore, on slopes with a slight slope, a crate is built with a minimum distance between the elements.
Assembly of a profiled sheet
- Sheets are laid on the roof with an overlap, the width of the overlap is determined, depending on the slope of the slope.
- When forming a side overlap, laying is carried out so that the top sheet is located on the leeward side. When forming an overlap in a horizontal row, the upper sheet (from the ridge) overlapped the edge of the lower one.
- On rectangular slopes, sheets are laid from the bottom up.
- When laying the bottom row, they form eaves overhang 5-20 cm wide, depending on the height of the corrugation of the corrugated board.
Installation of extensions
- Special elements are installed on the ridge with an overlap of 10 cm wide. The elements are fastened with long self-tapping screws, screwing them into the crest of the wave.
- Internal corners (valleys) are equipped with lower and upper extensions. The lower ones are installed before laying the profiled sheets, the upper ones - after the completion of the laying of the coating.
- In places near pipes and other vertical superstructures, special junction strips are installed, under which waterproofing coating and a special element - a covering apron.
- At the ends of the roof you need to install special strips. On the cornices, the strips are installed before laying the coating, on the gables - after the installation is completed. Gable strips are used to protect the roof from wind loads.
So, you can install corrugated roofing on your own, without the involvement of professionals. To do this, you will need to study the rules for working with corrugated board and installation technology. Significant assistance to beginners will be provided by video materials describing the most difficult moments of work.
The profiled sheet is actually universal building material. It is widely used to implement the most various ideas. At present, attractive and elegant roofs are very common, which are covered with a bright profiled sheet.
General information
In most cases, one-color overlaps can be seen. However, there are also geometric patterns in the form of rectangles and stripes. Thanks to this, the roofs of houses have their own special style. Some homeowners are wondering: how to cover the roof with a professional sheet with your own hands? In addition, many do not know how to care for him. In this case, it is recommended to familiarize yourself with all the nuances inherent in this material. After that, you will be able to work with it yourself.
Clear Benefits
Laying a profiled sheet on the roof has its own characteristics. Before installing it, you should familiarize yourself with the advantages of this material. Many would like to do all the work themselves. This is not surprising, since hiring a professional team of workers is currently quite expensive. In this case, you can do without it. walled - quite a doable task. This is the main advantage of this material.

Additional Information
end element
The strap is about two meters long. The recommended material overlap is 50-100 mm. The installation itself should begin from the side of the plumb line. Next, you need to move towards the ridge of the roof. Near it, you need to cut off the excess. The entire end plank must be covered (at least one wave of corrugated board). Next, it will be necessary to attach it to the appropriate board, as well as to the comb. The recommended step is 1 meter.

ridge bar
In this case, specialized smooth elements are used. According to the recommendations of experts, seals should be laid under the profiled sheet. They should be with fine corrugation or repeat the profile of the roof itself. The recommended overlap length is from 100 mm. From the side of the sheet, you need to fix the bar with self-tapping screws. The recommended pitch is 400 mm. Each mount, made independently, should be under the skin or in the strobe. In this case, the ridge seal is used for protection. Lateral junction is arranged a little differently. For these purposes, a longitudinal seal is required. It can not be used on steep slopes.
Pass-Through Elements
Each outlet pipe consists of two parts: upper and lower. The latter is selected in accordance with the roof profile. The snow guard is recommended to be installed immediately. The recommended pipe diameter is 100 mm. Ventilation elements need insulation. Here's how to cover the roof with a profiled sheet.

Some rules of care
Basically, this process also not particularly difficult. In order for such a roof to be cleared, ordinary rain will be quite enough. However, water is unable to carry branches, leaves, and other debris with it. For this reason, regular surface cleaning is recommended. This must be done every year. Drainage systems also need regular cleaning. This also applies to grooves. Often there are heavily polluted places. They can be washed with a soft brush. It can also be done with water from a hose. The recommended pressure is up to 50 bar. It happens that the dirt strongly eats into the roof. In this case, you need to apply special means for cleaning painted surfaces. There is a simple algorithm of actions. First you need to apply the product to the surface. It will take a few minutes for the best effect. The product is then washed off with pure water. Difficult stains should be cleaned with a rag. It is pre-soaked in a solvent. Then the roof must be rinsed with water. It is highly not recommended to clean the roof with those means that are not intended for this. The fact is that with such an impact, the sheet or the surface of the polymer can be damaged. Ice and snow are removed independently. To do this, you can use wooden or plastic spatulas. In this case, you need to be careful. Otherwise, scratches cannot be avoided.