Homemade garden paths from garbage. Where to lay paths in the country and in the garden - photo
Garden paths are part of landscape design. They make the summer cottage well-groomed and attractive, facilitate movement around the territory.
In our article, we have collected detailed instructions, photos and videos, how to make tracks with your own hands.
Economy options for tracks in the country with their own hands
For the arrangement of garden paths, different materials are used, but there are General requirements to which they correspond:
- Aesthetics
- Safety
- Moisture resistance
- maintainability
- All season
- Strength
- Easy Care
Gardeners and summer residents make paths from concrete, wood, natural stone, paving slabs and other materials. See what they look like.
Concrete walkway using ready-made forms

Walkway paved with natural stone

wooden garden path

Path of concrete and paving slabs

Walkway made of concrete imitating natural stone

gravel path

Combined stone and gravel garden path

Another option for combining crushed stone, stone and paving slabs

Walkway from paving slabs

Clinker path

Walkway made of stone

Perfectly garden paths combined with exterior finish houses and complement the landscape. The material for the tracks is selected taking into account the expected load.
Decorative paths are rarely used for their intended purpose. Bulk materials are suitable for them: gravel, sand, crushed stone.
It is better to move along the paths from durable concrete, bricks or paving slabs. Parking for cars is recommended to be paved with concrete, paving stones or stone.
Do-it-yourself concrete paths in the country
Concrete garden paths are practical, durable, and can withstand heavy loads. Rough surface concrete pavement does not slip.
Such paths are equipped in two ways: using formwork or special forms.
Filling with formwork
First, prepare the base: remove the top layer of earth and tamp it down. Then proceed according to the scheme.

Gray concrete looks boring, but there are ways to ennoble it.
In small areas, lay winding paths with smooth turns and bends. This will visually expand the space.

Add pigment to concrete mix to color the track in desired color. Introduce coloring pigments at the stage of preparing the mixture for pouring.

Show your imagination, and gray concrete will turn into an imitation of wild stone, as in the photo below. This requires a sharp knife and a steady hand to cut stone-shaped grooves into the surface when the concrete has already set but not completely hardened.

Pouring into special molds
Plastic molds for pouring concrete are sold in hardware and garden stores.
Prepare the base for the path. To do this, go deep into the ground by 10 cm. Next, compact the soil and lay a pillow of sand and gravel. If you add crushed stone to the concrete mix, make a sandy base.

Moisten the prepared base with water, and treat the molds for pouring with a special lubricant from the inside.
Then place the forms in sand cushion, push them in so that the upper part protrudes 0.5 - 1 cm above the ground.

Prepare the concrete mixture, add a plasticizer to it to give the track strength, add a color pigment (optional) and pour it into the molds so that the concrete is evenly distributed over the entire area. Level the top layer with a spatula or trowel.

After 30 - 40 minutes, when the concrete sets, carefully remove the forms, cover the path with a film for 1-2 days. You can walk on the path after 5 days.
The video of the thematic master class will help you
Do-it-yourself tile paths in the country house
Paving slabs are used for garden paths different design, color and size. It is laid on a prepared base with a sandy substrate, as in the diagram below.

Tiles of 40x40 cm are often used for laying. Big size reduces the time for arranging garden paths. The tile is laid so that the distance between its centers is no more than a step.

The gaps at the docking points are filled with sand, and the edges of the track on both sides are limited by curbs.

The advantage of paving slabs is that it is combined with country houses and dachas of any style, fits into simple and complex landscapes.

Do-it-yourself wooden paths in the country house
Wooden paths in the country look natural, stylish and durable. Garden paths in the country are made from ordinary boards with a thickness of at least 5 cm.
The advantage of such wooden trails is quick installation and neat appearance. Manufacturing begins with the selection of materials and tools. Inexpensive and common lumber is softwood boards. It is better to choose larch, but the cost in this case will be higher.

The tree is treated according to the standard scheme: with an antiseptic, and then coated with varnish or paint - for further protection. A clear lacquer enhances the grain of the wood, while colored paint sets the accents. Boards are cut into segments of the same length. For tracks complex shape the length of each board is selected individually.

The base of the paths made of natural wood, as well as for a wooden path from saw cuts, is made from a sand and gravel cushion. Preparatory work perform in the following sequence: marking, pit, geotextile, crushed stone layer, sand layer, tamping.

Then the boards are laid on the base or placed on an elevation - a specially arranged frame. Boards laid in the ground look natural and at ease, but such a wooden path deteriorates faster. The structure on the frame will be stronger and more durable, in a word - capital. Such an idea requires more effort.
Watch the video on how to make wooden garden paths with minimal cost
The arrangement of a garden path made of wooden saw cuts resembles paving stones. Instead of stones, flat wooden dies of the same height are laid. To create a dense path, large saw cuts alternate with stumps of small diameter, the free space is filled with large branches.
From ordinary stumps or cuts of a tree, pretty winding paths are obtained. Choose the right material, understand the laying techniques, and you will be able to make a garden path from tree cuts with your own hands in the garden or in the country.

Pay attention to the preparation of the tree. Untreated wood will quickly become unusable, and the tree ring path will have to be redone. First, select the type of wood. Suitable:
- Pine
- larch
- Birch
The difference between hardwood (larch, beech, oak) and other types is the service life. Larch will last 25 years, pine will be in operation for 5-7 years.

Use dry wood without traces of pests. Dissolve the logs into dice of the same height. Optimal size- 15 cm. For convenience, use a template. If you are doing the harvesting yourself, make sure that the cut is made strictly perpendicular to the log. Sort the sliced \u200b\u200bpancakes by size, remove cracked specimens. Clear the rings from the bark.
Next, process the wood cuts for the paths to protect them from rotting and decay. An elementary method is processing with drying oil. Bring the drying oil to a boil, then dip each stick into the hot oil. The boiling substance seals the pores of the wood and prevents moisture from getting inside - the first enemy of wooden products. Disadvantages of this method: long and dangerous. Hot oil can burn you.
Another option is special formulations. Arm yourself with a brush or spray gun and treat the tree with an antifungal agent. After preventive treatment, let the tree dry.
After preparing the material, proceed to the device of the path. Do not rush to lay the path from the saw cuts of the tree. First, carry out preparatory and excavation work:
- Mark the path in the garden
- Remove the top layer of soil
- Dig a trench
- Arrange waterproofing
- Prepare the base.
Now you can take on the shovels. Don't make the trench deep. Add 10 cm to the height of the dies - this depth will be optimal.
Lay a waterproofing layer in the trench. Some use a film, roofing material, but it is better to take geotextiles in such cases. This material does not allow stagnant water and the germination of weeds.
Pour a 10 cm layer of gravel on the waterproofing - this is a drainage for water drainage. Tamp and cover with 5-10 cm of sand.
Wet the sand to better compact and level the base for the stump garden path. When wet, the sand is rammed by hand.

Wood is laid in a pattern or in random order. The logs are placed on a sand cushion, then they are rammed and leveled. Sand or gravel is poured into the gaps. Mulch, sawdust, pebbles, moss are suitable for seams on top.

Paths should be in every garden. Their presence makes it easy to navigate and move freely around the territory. Making garden paths with your own hands, at minimal cost, is not difficult. Instructions, photos and videos of this article will help to realize your ideas. See how many ideas and a variety of inexpensive, improvised materials exist on this topic.
Do-it-yourself concrete paths in the country
Concrete is most often used for arranging paths and paving around the house. This traditional material available and cheap. With your own hands, classic cast tracks from it, anyone can make.
1. Start by marking the boundaries. Mark the outline with wire or fishing line tied to stakes driven in at the corners.
2. Within the indicated boundaries, make a trench 25-30 cm deep, with a slope of 3-4% in the transverse direction from the axis of the track or in both directions.
3. Level the bottom of the trench and lay it with a bearing layer of gravel. Pour a 5 cm layer of sand over it. Compact each layer with a rammer.

4. Prepare the formwork, for which, around the perimeter, install a frame made of metal or lumber. Good for this purpose edged board section 25*150*6 mm.
5. Reinforce the body of the future track, use a chain-link mesh or others for this metal elements(pieces of wire, old water pipes).
6. Insert dividing partitions into the formwork, or special cellular forms treated with a protective solution. This will save the concrete from cracking when it dries and give the path a decorative relief.
7. Prepare the solution:
- cement (not lower than M 500) - 4 kg;
- sand - 6 kg;
- gravel - 13 kg;
- water - 1.9 l.
You should get a plastic semi-liquid consistency. It is desirable to add a plasticizer and a concrete hardening accelerator. To give the mixture the desired color (brick, stone), experiment with the color scheme.
8. Pour concrete into the formwork trough flush with the edge. Spread evenly with a spatula, making vibrating movements. Pierce (pierce) the mixture with a metal rod (reinforcement) to make it uniform.
Advice! To improve adhesion to the base, lay the solution on wet sand, crushed stone, gravel.
9. Finally level the surface of the filled track with a rule. The procedure for filling and forming the body of the track, perform sequentially. Go from one dividing rail to another, from one loading form to another, gradually.

10. Cover the lane with polyethylene to prevent the mortar from drying out quickly. Concrete gains strength for 3-4 days, during which moisten it with water. This will prevent cracking and give concrete additional strength.
To achieve an even greater decorative effect, various components are “embedded” into the surface that has not fully set: pebbles, colored glass, shell rock. The relief of the track is given by various strokes, furrows, prints. And to imitate antiquity, as if the path was overgrown with moss, kefir or milk is introduced into the solution.
Garden paths made of bricks and paving stones - scheme, layers, implementation
Durable and inexpensive material for the manufacture of garden coverings - facing brick or paving stones. This material is resistant to frost and abrasion. Brick is less durable due to greater porosity. However, he has decorative look and is available in several shapes and colors. In addition to the natural dark red color, there is brown, red, brown, anthracite, White color. brick path can be easily laid in the form of an arc, or herringbone, which significantly improves the spatial perception of the site.

Advice! When laying paving stones, keep in mind that for paving walking paths or terraces better fit paving stones ~ 4 cm thick. And on paths with intense loads, use cubes ~ 6 cm thick.
Pavement paving stone
Start by removing the topsoil to a depth that allows you to lay all the layers of the track so that last layer paving stones turned out to be level with the ground. More often, this depth is 20-40 cm.
Important! Foundation for paving stones - basis proper styling. This is the layer responsible for the uniform transfer of load from the surface of the pavers to the ground. It also acts as a drainage layer that protects against the effects of precipitation and negative temperatures.
Making a base for paving stones - 3 important rules
In order for the base under the paving stones to perform its function properly, for a long time, its design and manufacture takes place according to the rules.
1. The thickness of the base layer. It's about about the correct ratio of the thickness of the base layer for the planned load of the surface of the pavers. On the paths, a base 10-20 cm thick is more often used. In the case of pavements on which heavy traffic is planned, the base is increased to 25-40 cm.

2. Foundation material. The base under the pavers must be permeable to water, quickly pass it through itself to drain into the ground. For the manufacture of a drainage layer of the base, use: gravel, crushed stone, slag, or a mixture of sand and gravel.
3. Laying layers of the base. To ensure uniform laying and compaction of the base under the paving stones, lay the material in layers of 10 cm thick. Be sure to compact each layer, this will prevent possible subsidence in the future.
Attention! If the soil below the base has low water permeability, an additional drainage layer of geotextile may be required.
Making a sand "cushion"
Create a frame for the future track, according to the type of formwork. In the resulting trough, make a sand dump. Its task is to introduce and fix individual structural elements. Layer thickness ~ 3-5 cm. For greater strength, sand is mixed with dry concrete in a ratio of 3: 1. However, this kind of material makes later repair work difficult. Level the scree wooden lath. Soak a layer of sand until a liquid "slurry" is formed.
Laying brick pavement
The procedure is to place one element after another, in the direction "away from you". At the same time, light tapping on the upper part of the brick / stone with a rubber mallet or mallet allows you to plant the elements in a sandy base.

Surface fixing
The final stage of work consists in sprinkling working surface quartz sand, which fills the gaps between the cubes, bursts and gives solidity to the structure. The action is repeated several times. In between, the sand is abundantly wetted with water, swells. The excess is squeezed out, dried and removed with a whisk. A dense, cemented packing remains between the bricks.
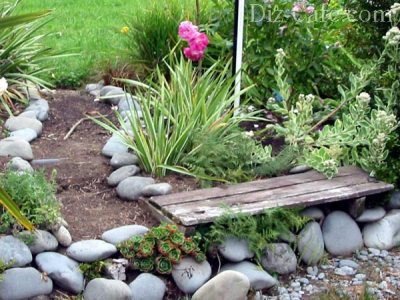
Stone garden paths
Paths made of wild stone are durable and elegant. Their natural texture and various shades of color are perfect for any environment, look good in combination with other materials.
The most commonly used granite flagstone. It is a hard and very durable material. He is not harmed by water and frost. Popular colors are gray, red, pink-red granite is beautiful. Similar properties have basalt (black), porphyry (gray-red-brown stone), syenite (gray, almost black), as well as: travertine, gabbro, diabase. Sandstone or slate looks attractive in different variations.
In the garden among the greenery, informal paths made of mosaic-laid stone slabs look great. In the intervals between them, grass or undersized, creeping plants are sown, for example: alissum, iberis, stonecrop.

The method of laying stone material is similar to that described above and depends on the location, purpose of the path and the permeability of the soil under it. On drained lands, with a low operational load, stone garden paths are laid on a 5-10 cm mortar layer of sand or gravel / crushed stone, cement, in a ratio of 1:12.
However, there are a number of problems associated with the use of a field stone:
1. Irregular natural forms. Stones are difficult to pick up, link together. Creating a perfectly flat plane is also problematic. This makes it difficult to move on them, for example, garden equipment.
2. The stone draws moisture from the ground. Therefore, it is often overgrown with moss and lichen. Easily exposed to dirt that is difficult to remove. To prevent this, wild stone, at least once every 3 years, is treated with a composition based on silicone or resins (Dynasil, Lithofin). These products form a protective layer without creating a slippery surface. At the same time, they clog pores and give the effect of a “wet stone” without changing its natural color.
Garden paths from paving slabs
The functional coating of this material is unparalleled. The price of the material is not fabulous, and laying tiles with your own hands is easy to perform.
There are antique-styled tiles imitating stone pavement and cut granite or raw sandstone. There are high-strength clinker tiles obtained by single firing. Colored and textured concrete are used to make elements that resemble boards, wooden sidewalks, or old railway sleepers.
The collections of trading companies contain elements different thickness and shapes: square and rectangular. Thin 3-5 cm, used for paving decorative paths, thicker tiles - for facing the entrance.

Do-it-yourself paving slabs have become popular. Suitable molds for making castings can be bought everywhere today. They are made of high-quality, durable plastic, laminate, and wooden ones are also found. Designed for repeated use. The sizes, a design, forms, the price are various. The surface of the casting can be smooth or patterned.
The preparation of the filler solution is carried out according to the technology described above.
Paving slabs are quite heavy, so they need a solid foundation. It is recommended to do two layers:
- leveling layer (sand, crushed stone, 10-15 cm);
- retaining layer (a mixture of sand and cement, 3-4 cm).
The thicker the frame layer, the more stable the coating - the plates will not move!
Care should be taken when cleaning tiles in winter - it is better not to beat off the ice with sharp tools, the outer layer is damaged.
Wooden garden paths - ideas, implementation
Wooden paths in the garden are not as resistant to weather conditions as stone or concrete, but they always attract attention with their naturalness, environmental friendliness and high decorative aesthetics.
Do-it-yourself garden paths from saw cuts of a tree
The path lined with wooden round logs looks original. best tree for this work - oak or larch. Their solid and weather-resistant structure, "survives" for more than a dozen years. It remains unchanged without impregnation, due to the large amount of tannins. Pine and spruce, unfortunately, are less durable.
1. Cutting wood. From the trunks and branches of an old tree, cut fragments with a diameter of 10-40 cm and a height of 15-25 cm. The optimal ratio of large blanks (25-40 cm) to small ones (10-15 cm) should be 3:1. Since the saw cuts are round and form large spaces between them, different cutting diameters complement each other during subsequent laying.
2. Remove the bark and dry the blanks for several days in the sun.
3. To protect the wood, be sure to impregnate the saw cuts with an antiseptic primer to a depth of 3-4 cm.

4. After the impregnation has dried (24 hours), it is advisable to apply a coat of varnish for outdoor use.
5. Installation. Remove the soil to a depth of 5 cm. Fill with sand. You can make a 4 cm cement screed. When tying the track, alternate the combination of three large and one small die. Between them, a perfect pattern is obtained, practically without a gap. The free space between the cuts is covered with fine sand. After a while, it will only be necessary to replenish its natural decline.
Advice.
Do not place slices close to each other. Over time, the wood swells, the track elements are squeezed out.
It is better to have wooden walkways in sunny, ventilated places. In the shade, wood absorbs and retains moisture, as a result of which it undergoes biological corrosion. Remember, wet wood is slippery!
To increase the durability of a wooden walkway, place a 20-30 cm thick layer of crushed stone drainage under the surface.
With proper operation, the service life of such a track will be 10 years.
Tree bark garden paths
It is a cheap and environmentally friendly material. Bark paths arranged among flowers and ornamental shrubs, provide them with nutrients and protect the soil from freezing. The best, such paths are in places where there are plants that prefer acidic soil (heather, rhododendron, hydrangea, erica). Path preparation is not difficult. It is enough to make a pit, and fill the bottom with a layer of sand (10-15 cm), then put 8-10 cm of bark on it.
Advice! The bark naturally decomposes. Once a season, the path from it requires additional backfilling.
Railroad sleeper track
Railway sleepers are a durable material, but difficult to access. You can make paths out of them, laying them flat, tightly with each other or positioning them freely, and fill the voids, for example, with gravel.
Important! Remember, paths should not run too close to trees, especially those with shallow root systems. Growing over time, it can break the surface of the track.
Do-it-yourself garden paths from car tires
We are all car enthusiasts. Using old car tires in this case is an ideal budget option in the manufacture of garden paths. It is the tire that is designed to experience the maximum load.
Constructions from it are obtained:
- reinforced;
- resistant to temperature extremes;
- not slippery;
- not absorbing moisture;
- not soaking;
- easy care;
- easy to manufacture.

The process is as follows:
1. Using a knife, separate the tire track from the side part. To make it easier for the knife to penetrate thick rubber, treat the blade with machine oil or soap from time to time.
2. Cut the resulting rings into ribbons. Three to four such tapes may be required to make a garden path.
3. Trim the strips to length and nail them to a wooden board or beam, next to each other.
4. Press the structure into the ground along the perimeter.
A beautiful well-groomed garden as from a magazine picture is the dream of any land owner. Unfortunately, the cost of such a postcard view is usually very high. What should we, ordinary lovers of beauty, do? Let's look at how you can equip garden paths yourself and not go broke.
A bit about track design
To begin with, I want to remind you that the garden path - required element all gardens, no matter what size they are and wherever they are. This is an important link that will say a lot about your garden, about the feeling of beauty, about comfort, about hospitality and about yourself. Therefore, I ask you to approach the design with all care, because redoing an unsuccessful option is long, expensive and labor-intensive.
It is usually convenient to lay paths along already trodden paths: as a rule, this is the most optimal route for movement on the site. Do not forget that the tracks have a transit function. If the path meets guests, then its width varies from 0.8 to 1.2 m, as space and budget allow. And when the path leads through the quiet corners of the garden, then you should not make it more than 0.6 - 0.8 m.
From the point of view of construction, the paths are of two types - capital and non-capital. A capital path is desirable in a parking lot, on a site with active traffic - from the gate to the house, to frequently used areas of the garden, someone has a bathhouse, someone has a garden, look according to your needs. The capital walkway provides active transit, transfer / transportation of goods, cleanliness in the autumn thaw and has a decorative function in the front area. All other paths will be more comfortable in a non-capital design - in the form of narrow paths or stepper paths for rarely used areas of the garden. In addition, walking paths are more economical.
In the ideal world of magazine landscapes, the material of the walkway should match the material of the facade, porch or terrace. If the foundation is decorated with stone, then the paths must be made of the same stone; if decking is on the terrace, then the paths should be made of decking or wood, matching in tone and size with decking. As a rule, all this is quite expensive. V real world there are other options that will make your garden look just as good and save a lot of money.
stone paths
The stone is probably best material for tracks, from time immemorial. It is excellent for capital tracks and sites, it serves for a long time, it is wear-resistant, it easily tolerates humidity, temperature changes, it is not afraid of ultraviolet radiation, it is beautiful, perfectly removes thawed and rain water, but demanding on the preparation of the base and on the soil.

In terms of the execution of the path made of natural stone, there are exactly two options. The first is a concrete base walkway that you can make yourself and will last you almost forever. Great for parking and front areas. The second option is a walking path, when the stone is sunk into the sand and gravel mixture, and the seams are sown lawn grass or moss. Such paths are suitable for the rest of the garden. They effectively drain water, do not press on the mass of paving, are strong and durable.

The choice of concrete tiles is striking in variety. It can be paving small elements of all colors and sizes, for every taste and budget. Modern concrete pavers are highly decorative - they lay out ornaments with it, you can pick up harmonious color, mark the center of the track with a pattern and show your design talents. Paths made of concrete paving stones will make your garden special and unique, especially those made with your own hands.
Another type of concrete elements for paths is medium and large format tiles. Its size starts from 30x30 cm and then it can be anything: square, rectangular, polygonal or completely round. And, as in the case of paving stones, the color is variable: the concrete is colored in bulk even at the factory during the manufacture of tiles. In modern designer gardens, these tiles are often used on the main paths and are approximately 30x90 cm in size.
It is traditionally considered that a path made of concrete tiles is demanding on soils and base preparation, on the presence of drainage and storm sewer. From point of view building codes and it really is the rule. But what about the owners of marshy plots? How to arrange lay out paths in the country at low cost?
In one well-known forum about country life participants talk about their experience when medium format tiles were laid on a layer of geotextile with sand and felt great on heaving soil for many years. Of course, I cannot recommend this method of paving garden paths with full responsibility, but since there are practically no capital options for wet soils, why not try it? In any case, it is cheaper than a drainage device, a large selection of soil and backfilling of several layers of sand and gravel with a rammer. Immediately make a reservation that this method will not work on soil other than wet. The whole trick is that the tile is held by wet sand and, as it were, sucked into it.

Also, do not forget about the possibility of pouring large-format slabs of the desired configuration in place, without using a mold. It is both inexpensive and effective. Designers sometimes use this technique if it is necessary to make a track from large elements. In the same way, it is possible to imitate ancient stone slabs.
pros self-manufacturing concrete tiles in low cost, in the ability to choose to your taste and shape, and color, and decorative surface material, and minus - in relative fragility. In the factory, concrete in the form is subjected to active vibration, which compacts its structure. At home, this is quite difficult to achieve. But this should not become an obstacle to arranging garden paths with your own hands at low cost.

Walkways made of loose materials
Infill paths are perfect in every way - inexpensive, easy to manufacture, undemanding to maintain, excellent moisture wicking and just beautiful. But there are also disadvantages - they often require updating, and in wet weather they will not always ensure cleanliness. And bulk materials are absolutely unsuitable for tracks with a height difference.
Raw materials for backfilling can be different:
- gravel and crushed stone of different fractions;
- broken brick;
- marble and granite chips;
- sand;
- pine bark;
- sawdust;
- or even nut shells.
How to make such garden paths with your own hands? The manufacturing technology is different, from very simple - pour and level (but the service life of such a path in the garden will be short) to more labor-intensive options.

It's still a good idea to prepare the base and install the curb. This increases the cost of construction, but increases the service life and minimizes maintenance - the material is not massively trampled into the ground, does not crumble on the lawn and beds, the garden with such paths looks more aesthetic, cleaner and tidier.

Whether you look at modern or vintage English gardens, you will see many pink gravel paths there. Gravel and crushed stone are good for the main paths in the country, for capital sites, and sand, bark and sawdust can be used on paths, on garden paths. When laying garden paths with your own hands, choose the size of the material fraction according to your own criteria - large elements are resistant to erosion, last longer, and small ones are more pleasant for the feet, but can get stuck in shoes. Sawdust and sand are uncomfortable in the rain - they stain shoes and slip, but are much cheaper than other loose ones.

Walkways made of wood
Recently, environmentally friendly natural materials are gaining great popularity. One of the most environmentally friendly when paving can be called a tree. The choice of materials is incredibly wide: from expensive decking with various special fasteners to simple saw cuts. Yes, and the quality of wood can be any. Such a garden path can become a real highlight of your suburban area, because it carries naturalness, which fits perfectly into the landscape and combines with plants.
With proper processing, the tree will be very durable, it is important to take protective measures and prevent contact of the material with the ground. Such paths are easy to maintain and easy to repair. Unlike stone ones, they are tactilely pleasant for walking barefoot. But wooden paths also have disadvantages - in wet weather, the tree becomes slippery.
What types of wooden paths exist?

However, there is one important exception when a pallet path becomes a permanent element of the garden: we are talking about forest areas. Traditional paving of garden paths has a very traumatic effect on the existing undergrowth: excavation, forced pruning of roots - all this can destroy biodiversity that has developed over the centuries. In this case wooden pallets- just a lifesaver. They are easy to install, dismantle and repair, do not require special maintenance, and most importantly, they protect the forest. And, if you are lucky, such a track will be almost free for you.
You can also disassemble the pallets into boards and equip the path from them.


Composite materials
The modern world is developing rapidly, and our landscape industry does not stand still. Lately several new materials from artificial raw materials have appeared for laying garden paths with their own hands.
- Let's continue about decking, now in the context composite materials. This is the same decking board, only made from sawdust and composite resins, which makes decking an excellent material for paving. It is not afraid of moisture, tolerates temperature changes well, retains color and does not require processing. And composite decking is cheaper than a natural decking board, it is easy to make a garden path out of it with your own hands and simply operate it.
- Another modern material— plastic tiles for tracks. They are different, they can imitate natural materials, but the most interesting view- in the form of a lattice. Despite their openwork, such elements are used in parking lots, campsites, and other places of active congestion of people and vehicles. They can be laid on the ground, sand, old paths, their only requirement for the base is a flat surface. Such gratings are not afraid of humidity, frost, heavy loads. Installation is carried out manually, without tools: the tiles snap into place, and the laying of the garden path is completed. The whole structure looks impressive when green grass breaks through the holes.
- And the third modern material is rubber coatings. Types can be different - and tiles, and paving stones, and in the form of a roll. There is another way to fill the required area with a rubber compound, but it is not for self-production. Rubber flooring is perfect in children's and sports areas, as well as in wet parts of the garden - by the fountain, pool, pond. It is wear-resistant, various in shape and color, tolerates our climate well and even protects against ice in winter. This is an environmentally friendly coating.

Separately, I want to warn you against using tires for arranging tracks. Modern car tires should be as wear-resistant as possible. extreme conditions operation, a lot of toxic components are added to it, the disposal of tires is not in vain carried out in special places. Therefore, it is worth using car tires on the site with great care. Tires in contact with the ground poison it with carcinogens, plants die, and soil replacement will cost a pretty penny.
The cheapest tracks
And in conclusion, ideas for garden paths made of unusual materials, which have quite a few disadvantages, but have their own areas of application.

Conclusion
I hope this review will give you an idea of the variety of paving materials and help you make the best choice. And if you can't decide, then try different paths - the paving slabs in the front area will not interfere with the wooden paths in the garden, and the rubber flooring in the playground does not contradict the gravel path in the secret corner of your garden. Combine boldly!
The cottage is used for gardening and recreation. For the convenience of moving around the site, transitions are necessary that connect the outbuildings, serve to separate personal plot on functional areas, make it easier to care for the garden, transport garden tools and crops on a wheelbarrow, allow you to walk around the dacha in any weather.
Beautifully arranged paths are perceived as an aesthetic accent. v landscape design. This part of the exterior is not difficult to do by yourself, knowing the styling features and using improvised materials. Consider the basic rules for arranging paths and try to be inspired by various design ideas in order to embody those that you especially like in your local area.


What to consider when laying?
Tracks differ in purpose and material requirements. The location of footpaths is taken into account at the site planning stage. On the plan, we draw functional areas: a garden, a vegetable garden, a yard, an economic block, an entrance area, the main house, buildings for pets and birds. We connect them with the most convenient transitions. We choose either the shortest distance to the land use object, or the most aesthetic one, if it is a walking path. Often they use this technique: one season they walk on bare ground and where the paths are trodden, and there is the most convenient location.
Paths are already being built along the paths.


The landscape of the site must be taken into account. You may have to add soil somewhere, and cut off an unnecessary hill in other places. Paths for walking should be laid using uneven terrain. It is pleasant, having risen on a hill, to see a sprawling garden or park. Designers prefer the effect of a turn: a straight section is replaced by a sharp turn, behind which there is either a beautiful gazebo, or a specially decorated corner of the garden, or a waterfall surrounded by a pond.

Straight paths are recommended to be equipped in utility areas for the efficiency of work in the garden or the convenience of bird care. In the garden or park area, winding natural lines are better perceived. elongated narrow section can be visually expanded by placing the path along a sinusoid or zigzag across the territory. Straight paths that go into the distance will visually lengthen the space of the dacha.

The path should not rest against the fence. It is better if it ends with the entrance to the building or gate. It is possible to equip a false gate with an arch entwined with flowers, it is good to place a bench in this arch, then the path will be logically justified and completed.


To the list compulsory works according to technical requirements when arranging the paths, it includes digging a trench, tamping the foundation with a bed of sand or gravel. Such a litter protects the track from subsidence of individual sections of the material and prevents overgrowing with grass.


The track device assumes the presence of drainage so that puddles do not form on the canvas. It is usually enough to make the edges a little lower than the middle part. In cross section, it looks like an arc. So the water will drain from the center and the path will always be dry.


It is important that the track width is sufficient. Minimum Width cottage path must be at least 80 centimeters in order for a loaded wheelbarrow to necessary work move freely around the site.


The height of the path without a curb should be flush with the ground, so it is more convenient to mow the grass and the path will always look neat.
The path protruding from the ground will not allow this, and the grass will have to be cut with special hand tool separately, it is not always convenient.

Popular materials
The material chosen for the tracks is not slippery and resistant to temperature changes in winter and summer. In the front area and in places of frequent visits, it is better to choose a more wear-resistant stone or tile; in the park area, you can give preference to sand, saw cuts of wood, chopped bark.

Concrete
The most inexpensive and durable tracks are made on a concrete base. To do this, a trench is dug 15-20 centimeters deep, a layer of crushed stone about 5 centimeters high is poured to the bottom, a reinforcing mesh is laid, a layer of sand 5-7 cm is poured, a formwork is made from the lath and installed along the edges of the trench. Instead of formwork, if you wish, you can immediately install borders if they are planned initially, but such a path is strong enough even without borders.

Preparing the cement slurry the following proportions: 1.5 parts of sand and 3 parts of gravel are needed for 1 part of cement, slightly less than 1 part of water is added until a semi-liquid mass is formed. This mass is poured into the formwork, observing the slope from the center of the track to the edges for drainage. Level to ground level. The path can also be used in this form, but for 3-4 days it is better to cover it with a film to evenly set the cement.

These tracks are highly durable., they are good to use in the economic zone and in the zone of access roads. This material is practically resistant to corrosion, withstands heavy loads, but from an aesthetic point of view it looks somewhat monotonous.
For decoration, it is worth purchasing a form for casting cement parts and laying out the canvas of the track with these elements.

Pebble
If desired, decorate the surface of the track with various natural finishing materials that are available in your area, for example, pebbles or shell rock. They can be pre-painted various colors outdoor paint.


You can leave the stones in their natural form. You can buy pebbles, or you can collect them in the area, although this will take time, but this way you will spend time in nature with benefit. Spread the decor either randomly, or in the form of a pattern.

It is worth making a beautiful and utilitarian path in the country from fragments of unnecessary ceramic or faience tiles. Well, if this tile is different color. After repair, many have the remains of tiles that are a pity to throw away, perhaps acquaintances have a couple of tiles or cracked specimens. Everything is assembled and formed like a mosaic. It's good if the pieces are different sizes. The base is prepared, as in the first case, but fragments of tiles are pressed into the cement that has not yet hardened.

Such garden paths made from improvised material are durable, well insulated from moisture, are not destroyed by frost, are bright accent in cottage design.
Plastic bottles
On a concrete base decorative trim made from the most different materials. If your family loves carbonated drinks, then do not throw away the bottles or collect the caps from them, you can also ask for plastic containers for drinks at the nearest catering point. For decoration use various parts of plastic bottles.


The brightest and most beautiful tracks can be made from multi-colored covers. It will take a long time to collect on a long country path, but everyone can do some sections with their own hands. In the prepared concrete surface press the lids in, arranging them harmoniously by color.


Another way to decorate is as follows: cut off the bottom of the bottle to a height of 5 - 8 centimeters and bury these glasses in a concrete screed. Even if the plastic breaks off over time, it will remain on the surface beautiful flower from hardened cement.


A whole plastic container is sometimes used to arrange the track. The bottle is filled with sand, placed in a dug trench with a sand cushion, the gaps between the bottles are filled with very fine gravel or sand. Glass bottles are also suitable for such purposes. Glass or plastic create multi-colored highlights in the sun and have a very picturesque look.
The coating turns out to be unusual and elegant, children really like it. The plastic surface is always warm, but the payload can withstand a small one and the material easily deteriorates from mechanical damage. The decor of the caps fits well with the borders of bottles installed upside down.


Brick
Remains of bricks may be found in the country house, they can also be used to build approaches to the house, barn, bathhouse.

The manufacturing technology of such a trail is somewhat simpler than that of concrete. A trench is dug for a bed 15 centimeters deep, a pillow of sand 5 centimeters thick is poured, rammed, bricks are laid on the sand, not forgetting to make a slope to the edges. From above they are covered with sand, spilled with water from a hose, after the sand has settled, they fill it up again, spill it again. This procedure is done until the sand fills all the cracks to the top of the bricks. The coating turns out to be very durable, frost-resistant, warms up well in summer, it is pleasant to walk on it barefoot. An important role here is played by sufficient tamping of the bricks so that a flat surface is maintained and the edges of the bricks do not stick out of the canvas.
If there is a whole brick, it is laid out according to the type of type-setting parquet.


A budget option is to use broken bricks. This may remain after repair work or be a waste of construction. Pieces of brick are carefully picked up along the chips and laid like a mosaic.


An option using bricks of different colors will look even more interesting: white and red. The cover is aesthetically pleasing. Brick is one of the most durable materials, but for driveways, of course, this is a fragile coating. But for pedestrian and bike paths, it will serve for many years.

Tree
Wooden paths are one of the most popular in summer cottages. It is an affordable and beautiful natural material. The natural wooden surface attracts with its natural color and interweaving of wood fibers, it can be tinted in different shades. In the summer heat, such a coating cools the feet, and in the cold it has a pleasant surface temperature. It is useful for children to play on wooden paths, they will not get dirty and will not catch a cold. Aesthetics wood flooring corresponds to the aesthetics of the site, decorated in a natural style.


Such tracks are made of boards. A frame is built on supports made of wooden or metal posts, boards are sewn onto it. The space between the ground and the coating is ventilated and prevents the tree from rotting. All wooden parts must be treated with an antiseptic.

In another version, wooden sleepers are laid on a cushion of crushed stone. A shallow trench is dug, covered with a layer of sand, the space between the boards is filled with stone. Here you can not make a clear boundary between gravel and forbs. It is not bad to walk along such a path to a pond overgrown with sedge, to touch the branches of apple trees, bent under the weight of bulk apples.

The tree is usually the main element of the landscape composition.

However, the processed board is a rather expensive material, therefore, tree cuts are used much more often for arranging tracks. They can be different size and height from 8 to 15 centimeters. The installation technology is quite simple: a trench 20 centimeters deep is dug, a sand cushion is compacted, stumps are installed and the gaps between them are covered with rubble, pebbles, sand. Wood cuts give an intricate pattern of tree rings, are environmentally friendly, inexpensive, and are easily replaced when destroyed.
Wood of any tree can be used, but it requires treatment with moisture protection agents.


Car tires
Virtually unaffected environment rubber coating from car tires. The simplest and most practical tracks are made from tires cut off at the edges, the straight part is straightened and laid directly on the ground. Such paths, if necessary, can be moved to another place, they are indispensable in the garden for passage between beds or in areas intended for keeping pets.


Other means
In some areas there is an overabundance of any natural material that can become the basis for garden paths. If there is a coniferous forest near you, you can probably pick up bark there. This material, poured in a thick layer, is quite durable, has a beautiful texture, passes moisture well, remaining dry; if the coating area fails, it can be easily replaced with fresh bark. The manufacturing technology of such a path is very simple - a trench is made 10-15 centimeters deep, a layer of sand is poured and compacted, and the rest of the space is filled with bark with a layer of about 10 centimeters.

More resistant to moisture and bearing a large payload is a coating of crushed stone or sand. The arrangement technology is the same as in the first case, only fine gravel, gravel or sand is poured instead of bark. With the right pillow equipment, such paths serve for many years, but it is better to protect them with curbs.

Perhaps there are deposits of cobblestones nearby. The paths of them have a fabulous look, are durable and decorate the landscape of the site. For the construction of such paths, stones are laid in a trench on a pillow of sand with the flat side up so that the surface is as even as possible. Gaps are filled with sand or small gravel.

The first thing that meets us behind the country gate is the garden path leading to the porch. From it in all directions: to the bathhouse, and to the garden, and to the garage - similar trails and paths scatter. It is always more pleasant to walk on a durable, well-groomed surface, especially when grass or clay soil is wet from the rain. Let's forget about designers and try to make garden paths with our own hands, and for this you only need desire and construction material, available and inexpensive.
There are no classifications - both by material for manufacture, and by location, and by size. We will take a division into types based on the method of device.
garden paths
This is a natural look, as the paths appear on their own, without special planning. Usually they are trampled by the feet of people or rammed with wheels of garden equipment and serve to connect the most important points of the site - houses, baths, gardens, gardens, gates. The usual dirt trail has disadvantages (mud after rain, puddles, overgrown with grass), so it is only possible as a temporary option. The path, by the way, can also be ennobled: it is enough to lay out a curb of cobblestones or paving slabs around the edges.
garden paths - best option for sites located in dry areas
Paths with a backfill base
It is easy to arrange them: you should dig a ditch, about 100 mm deep, lay out geotextiles along the bottom and edges (density of at least 150 g / m²), strengthen the sides with border tape. It will remain on the finished base to fill in pebbles, crushed stone, marble chips or screenings. If this option seems simple, you can additionally lay stone or concrete slabs on the surface - in an orderly or chaotic manner. For ease of movement, the plates should be drowned in the backfill so that they are flush with the surface.

Having picked up gravel or crushed stone of different colors, you can decorate the paths or divide them into zones
Solid fill tracks
The durable coating is ideal for heavy loads. Paving of garden paths takes place on a concrete base with further laying of decorative elements on it: tiles, paving stones, natural stone. The use of material of different colors gives the decor a natural look. It is better if the finished object will rise above the ground by 50-70 mm - this will save it from erosion by water and soil deposits.

Paths made of slabs or stone laid on concrete base, distinguished by reliability and durability
Use in the work of saw cuts and bars
A budget and favorite option for summer residents is wooden garden paths. The most popular are two types:
- using wooden bars;
- from wood chips.
If the climate is more dry than humid, you can use wooden blocks or thick boards, which are easy to purchase at any building supermarket. It is better to stay on hardwoods. Identical segments are cut (100 cm long, 30 cm wide and 15-20 cm thick) and laid on a prepared base - gravel or sand.
Each bar should be treated with fuel oil or special composition protecting against moisture and decay. For the same purpose on underground part the bar is applied with liquid asphalt, and sometimes they arrange a standard sand cushion. Such combined coatings are best laid in the fall, as in winter time soil subsidence occurs, due to which natural compaction is performed.
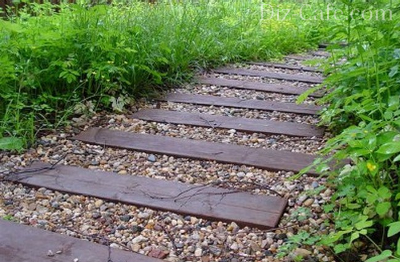
For paths made of wooden blocks, it is better to use fine gravel or crushed stone.

Using saw cuts of different sizes and colors, you can create unique track options.
Old fallen trees in the country are a real find for craftsmen. By sawing the trunks into pieces, from the resulting elements - saw cuts - you can make wooden garden paths that look equally good, crossing the lawn or winding among the flower beds. Not only trunks will be used, but also thick branches, with cuts from which it is convenient to fill the voids between large elements.
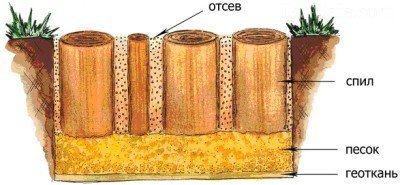
Screening strengthens individual elements, and the geofabric protects the path from grass sprouting
To wooden crafts served for a long time, they need to be treated on all sides with hot drying oil, it is better to repeat the procedure twice. A piece of geotextile or polyethylene is placed between the saw cut and the ground.
A short master class on laying paving slabs
With the help of pictures and descriptions, you can imagine how to make a noble and durable material.

Paving slabs irregular shape look more natural than straight
For work you will need:
- wooden mallet;
- rubber mallet;
- stakes;
- Master OK;
- building level;
- cord;
- rake;
- broom;
- watering hose;
- channel;
- manual rammer.
Materials: paving slabs (thickness 50 mm or 60 mm), curb stone, crushed stone (fractions 20-50), dry mix for plaster or cement M400 (M500), sand, geotextiles.
Now consider all the stages of work. The first stage is planning. It includes the creation of a drawing, the choice of a laying scheme and the shape of curly elements, the choice of a color (or several colors). At the same time, they calculate the number of tiles (including spare ones) and the consumption of the rest of the material.

There are many schemes for laying paving slabs based on the alternation of products of different colors.
Next, we do the markup. The accuracy of actions is one of the conditions for proper installation. A tape measure, pegs and a cord will help to determine the boundaries of the work. Sometimes it is necessary to walk along the intended path in order to understand how it is more convenient to lay it.

For the installation of a paving slab track, the accuracy of marking and the sequence of work are important
After marking, it is necessary to prepare the base. First you need to cut to a depth of 20 cm the top layer - turf. If the soil is clayey, drainage will help. Then you should create a sand or gravel cushion and a cement (concrete) screed.

A multi-layered base under the tiles is necessary so that the track is strong, does not settle and is not washed away by water.
Geotextiles can be laid between layers of sand and gravel, making the structure more durable. Upper layer- This is a dry mix purchased at a store, or a self-prepared composition of sand and cement. The layer of the mixture (3-4 cm) should be leveled with a rake and a channel.

Uniform distribution of the cement mixture is carried out using a conventional garden rake.

The channel for leveling the surface can be replaced with an ordinary wooden beam
Now we are laying the tiles. The laying direction is away from you, so as not to spoil the base. Products should fit tightly, but with a gap of 1-2 mm. Each tile must be rammed with a wooden mallet. At the end, you should check the level and trim with a rubber mallet. First, whole elements are laid, and only at the end paving slabs are cut and the missing pieces are laid.

For high-quality laying of paving slabs, simple tools are needed - a rubber mallet and a wooden mallet

For ease of installation, first of all, whole products are placed, leaving voids along the edges

The voids along the curb are filled with pieces of tiles of the required size.
A border is laid out along the edges, fixed with a solution of M100 and covered with sand. The seams between the individual elements are covered with sand- cement mixture, which is then moistened with water from a hose. Add the mixture to the places where it sank, and repeat watering. In 2-3 days the track will be finally ready.
DIY garden cement paths
Video instruction from 7 parts for working with ready-made forms
Paths made of natural stone: durability for centuries
Spectacular stone garden paths can be made from material left over from building a house or backyard decor, such as Alpine slide. The picturesque paths are created due to the uneven shape and different sizes of stones.

To create a beautiful path, stones of different sizes and colors are suitable.
The first stage is the calculation of the number of large stones. To do this, they can be laid along the future path. The basis for laying is a pillow of sand poured into a shallow ditch, directly on the ground.
Perhaps, for joining the stones, their processing will be required. A grinder or a more serious tool will help. dispose finished material in two ways: in the form of a pattern (relief, mosaic) or in a chaotic manner, alternating large stones with smaller ones. If you do not fill the seams between the stones with a cement mixture, after a while they will be overgrown with grass. This option is also possible, it looks more natural.

The diagram indicates the approximate thickness of each layer, which should be adhered to during installation.

Stone combination different types and plants - an example of a path suitable for a Mediterranean-style site
Stone paths and paths are appropriate when creating a landscape painting of any style.
A modern touch - the use of plastic modules
If there is no time to build a solid stone or tile covering, but there is a desire to quickly install paths in the garden with your own hands, you can use a temporary option - garden plastic tracks. Ready modules, most often the same in size and color, are sold in the store.

The color of the plastic modules is chosen depending on the area on which they will be laid. Most often these are green or black products.
In addition to low cost, plastic tracks have other advantages:
- retain their shape and appearance for a long time, slowly wear out;
- have holes so that water does not accumulate and go into the ground, that is, they do not form puddles and do not create a smell;
- plastic is practically indestructible;
- do not require constant care and attention, they are well cleaned and washed with water from a hose;
- resistant to chemical attack;
- quickly mounted and assembled according to the principle of the designer;
- equally easy to fit on any base - sand, turf, clay.
At the end of the summer season, plastic modules are dismantled, washed, dried and stored in a utility room until next year.

Plastic paths are a good option for creating temporary paths on lawns

Tracks on suburban area created not only for practical use, but also for decorating the territory
In addition to the options listed, there are other types of garden paths - brick, from parquet board, from concrete blocks, as well as all kinds of combined options. The basic rule for choosing the material for the track: it must be combined in texture and color with the house and other buildings.

