What to make a path from. Types of country paths, equipped with your own hands
It is impossible to imagine a suburban area without summer cottages: they not only connect the house with other objects, but also perform an important decorative function. By choosing the right material, you can create a harmonious picture in a single style, and by building paths in the country house with your own hands, you can turn several hundred square meters into a unique and comfortable territory.
The main reason for dividing country paths and paths into types is the material from which they are built. Its variety allows you to choose the best option for landscaping.
Natural stone is distinguished by its natural beauty and nobility, but its price is quite high.

Natural stone is ideal for the construction of curved paths: stone elements are arranged in a chaotic manner, so it is easy to make smooth bends
A tree is great for arranging a territory in a rustic style.

The natural textured pattern on wood cuts depends on the type of wood, but an interesting effect can be achieved using also special impregnations and varnishes
Brick is a wonderful material, especially if the house is also built with it.

For the device of garden paths, ordinary solid building bricks are not suitable, it is better to use special sidewalk types that are not afraid of water and frost
Paving slabs or paving stones will serve for a long time and faithfully.

Using paving stones of different colors, as well as a specific installation scheme, you can create an amazing original pattern, suitable specifically for your garden
Simple and inexpensive gravel paths are also appropriate in the garden.

Gravel is good not near a landscaped area around the house, but in a garden or near a stream - it blends better with wildlife
Concrete can be used to create unique paving slabs.

In hardware stores, you can purchase special plastic molds that are used to make road concrete elements with your own hands.
By combining materials, it is easy to achieve the style matching of the tracks to the surrounding natural and artificial objects.

You can combine completely different materials: natural stone and multi-colored gravel, wooden boards and river pebbles, brick and concrete
Layout of paths taking into account the landscape and climate
Paths are just as important a strategic part of a suburban area as a house, garage or bathhouse, so you need to think about their arrangement before building buildings and utility rooms. For convenience, it is better to draw up a diagram by drawing it by hand or using a computer design program. Having identified important points, it is necessary to connect them with paths - straight or curved, depending on the terrain.
It is better if all objects are present on the diagram, including a garden, a vegetable garden, greenhouses, a bathhouse, a gazebo - the paths are the connecting element between them. The material for the construction of communication lines should be combined with buildings and surrounding decor elements.

The paths at the summer cottage do not have to be of the same type: solid and step-by-step, straight and curved options are perfectly combined

By drawing up a diagram or plan of the site, you can designate which plants and shrubs will be planted - this will help when choosing material for the construction of paths
If it rains frequently in your area, be sure to think over a drainage system and dig plums along the edges of the roads so that water does not stagnate. When building summer cottages with your own hands, remember: freezing, water will spoil the material - wood, brick, concrete. Strong trees should not grow near the pavements, as their root system will easily break the integrity of the roads.
The more detailed the preliminary planning, the brighter the picture of the future summer cottage landscape will become and the easier it is to come to the choice of design elements
Analysis of the 3 best budget options
The owners of villas and luxury cottages, most likely, will not fiddle with sand and stones, but will invite a renowned landscape designer and a team of specialists. Anyone who is independently engaged in arranging a garden knows perfectly well that for the construction of original and comfortable paths it is not necessary to use expensive natural stone or collectible paving stones. Therefore, we will consider three options for creating paths from affordable and inexpensive materials: cement, brick and wood. Rest assured, the result will surprise you!
Option # 1 - cement leaf trail
Lovers of short-cut lawns will never trade silky green grass for dense bushes or a flower garden, and even more so they will refuse the path that crosses the luxurious carpet in front of the house. But there is a tricky option in which you can preserve the integrity of the lawn and at the same time arrange a kind of path that allows you to cross the grass cover directly.

Decorative concrete leaves are just an option that can be replaced with other elements: human footprints, geometric shapes, animal silhouettes
To build a miracle path, you will need an ordinary one and a plant that can be found somewhere nearby - a burdock, or rather, its large leaves.

Burdock leaves can be replaced with any others, as long as they are large. As an option - the use of several different-textured leaves
In a small container, knead the solution according to the instructions and spread the thick mass on a large burdock leaf. Isn't it a filling form?

Make sure that the cement mortar has the required consistency: too thick will lie unevenly, and the liquid will not retain its shape
After the sand-cement mixture has completely set, remove the sheet. We get an original decorative tile - the main element of the track.

As you can see, nature turned out to be the best decorator - a decorative leaf with a natural pattern will not disturb the harmony of the lawn or garden
It remains to prepare a place for laying. Using a scoop or small spatula, carefully remove a piece of turf so that a shallow hole forms.

The advantage of the device of the step-by-step path for the lawn is the absence of a special tool: for example, a child's scoop is enough for making holes
We lay the tiles in the prepared nest, then do the same with the rest of the elements. The path turns out to be light, airy, harmoniously complementing the lawn. It is pleasant and safe to walk on beautiful decorative leaves even in rainy weather.
Option # 2 - solid brick walkway
Brick is a universal material. You don't have to think about how to make a path in the country, if you have the required amount of this durable material at hand, as if specially created for the construction of reliable coatings. Its advantage is that it is ideal for almost any country style. Red bricks, like gray ones, look amazing against the background of a building made of similar material, go well with wood, and harmoniously fit into the natural environment. One piece of advice - you only need to use special paving material.

The advantages of a brick are obvious: it is durable, lasts for decades, easy to fit, does not slip even in rain, has aesthetic value
The main stages of construction:
- Determination of boundaries and extraction of soil.
- Preparation of sand and gravel base.
- Filling voids with sand.
The width of the trench depends on the size of the bricks and the pattern that will be laid out of them. The minimum width of the track is 0.9 m. We define the boundaries and mark them with pegs with a stretched construction cord. We take out the sod and dig out a shallow trench. Its edges must be reinforced with boards - in the next two years they will serve as an additional emphasis for the curb. Then they can be removed, and the grooves are filled with gravel chips or pebbles.
The brick base consists of two layers. Lower - coarse gravel and sand. After backfilling, the gravel mixture must be evenly distributed over the entire length of the track and compacted.

Determining the depth of the trench for laying a brick path is simple: you need to add the thickness of both layers of the base and the dimensions of the brick itself

Tamping the gravel layer is mandatory: loose material will provoke the movement of the remaining layers and, as a result, destroy the brick surface
The top layer consists of one sand. While smoothing it along the path, press at the same time to make the layer dense enough. It is better to tamp 20-30 cm segments, so the base will be of better quality.

Having made a sand backfill, it is necessary to level the surface: pull on a special device, while simultaneously pressing on it so that the sand lies in a dense layer
The next step is laying bricks along the boards. Before laying each element, dig a small hole, then place a brick in it and correct its position with a wooden mallet. Products placed on the end will play the role of a border.

To "hammer" bricks into sand, it is better to use a special rubber hammer: metal or even wood can damage the structure of the material
Taking into account the laying pattern, fill the distance between the curbs with bricks, easily hammering them into the sand and regularly checking the level.

Focusing on a specific element, do not forget about the integrity of the path: regularly check the horizontal position of the bricks using a level
The last stage is filling the gaps between the bricks with sand. Gently add sand until it is level with the bricks. Water the treadmill and repeat the last operation. Over the next few days, the position of the bricks can be adjusted.

An ordinary cleaning brush will help to evenly distribute the sand: it can be used to easily move the sand over the surface and push it between the bricks
Option # 3 - using wood cuts
If you compare wood with stone, then it certainly loses: wood does not differ in the durability and strength of granite or marble. Nevertheless, when arranging garden paths in the country, elements from this seemingly unsuitable material are used. Wood cuts, when laid down according to the technology, are excellent building blocks for creating a decorative path in a rustic style.

Choosing wood cuts, you kill two birds with one stone: you "attach" unnecessary sawn trees and decorate the territory with a beautiful and practical path
An old tree can be found right at the cottage or in the nearest forest. We saw the trunk into small segments - from 10 to 20 cm thick. Thick branches will also come in handy - small rounds are suitable for decorating the site or the edges of the path.

There are several options for arranging a garden path from saw cuts: in one they use flat parts, in the other - in the form of hemp
On the planned site, remove the sod layer and pull out a shallow trench.
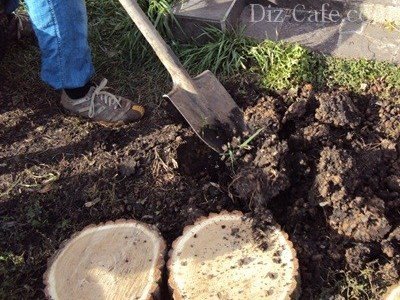
When extracting the soil when digging a trench, do not take it outside the dacha: it will come in handy for filling the voids of the path, and the remains can be used for a vegetable garden or flower garden
We fill the bottom of the trench with sand, a layer of 5 cm is enough. We tamp and level it.

Spread the sawn hemp along the path: it is easier to imagine how much of them will be required, and in the future it is easier to use when laying
We spread the cuts on the prepared base. Using the level, we give them a horizontal position; a wooden sledgehammer or a large hammer is perfect for this. In some places, voids are formed - they can be filled with small cuts.
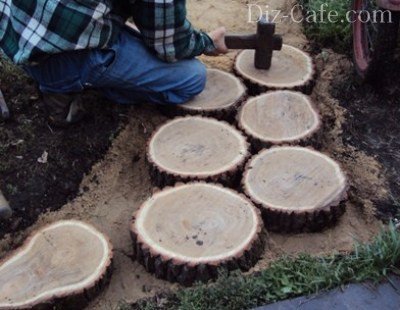
When stacking large items, do not worry about the large amount of voids that remain between them: they are easy to fill with small hemp, gravel or pebbles.
Fill the gaps between the wooden elements with sand or earth. In the spring they can be planted with lawn grass or small flowers - this will make the path look more artistic.
To determine how to lay out beautiful decorative paths in the country, just look around. Do not be afraid to use your own technological secrets and design solutions during construction - then the summer cottage will become truly unique.
Paths in the country house connect all objects on the site: a house, a gate, a summer kitchen, a barn, a gazebo, a greenhouse, a bathhouse, a vegetable garden, a shower. You can't do without them. In one area, they can be made of various materials, have all sorts of configurations, but must necessarily fit into the general view of the space. In the country, you can make tracks with your own hands, having previously drawn up a plan.
Paths in the country house connect all objects on the site: a house, a gate, a summer kitchen, a barn, a gazebo, a greenhouse, a bathhouse, a vegetable garden, a shower
Designers recommend creating curving in small areas - this visually increases the area. Trees should not grow near paths, as their roots can compromise the integrity of the pavement. Having drawn a diagram, estimate on the ground how convenient it will be to move from one object to another along the planned paths, so that later there is no desire to redo everything. It's complicated. The paths, even from scrap materials, but well-designed, give the territory a neat, complete and cozy look.
First you need to decide on the coverage. Most often it is made from paving slabs, concrete, stone, brick, wood, pebbles. The general requirement for all materials is strength, moisture and frost resistance. The surface should be non-slippery and easy to clean. To make the markings and prepare the soil for laying, you need the following materials and tools:
- pegs, cord;
- boards;
- shovel;
- sand, crushed stone;
- rammer;
- level;
- screwdriver.
Determine the boundaries of the track by adding a formwork allowance. Its width depends on the purpose. Usually, from the gate to the house, it is made wide and solid, but, for example, near the dog's enclosure, it can be narrow and intermittent. Pegs are put along the outlined edges, the lace is pulled. The sod is removed with a shovel to a depth of 10 cm, and the bottom is leveled in the resulting trench. Straight lines of paths are limited by boards at the same level, securing them with stakes outside. One to the other boards are screwed with a screwdriver. Sand is poured into the trench and tamped. Its depth and height of the pillow depend on the selected material for the coating and the technological features of the installation. The coating can be hard or soft.

Solid tracks
Hard surfaces include: paving slabs, concrete, clinker bricks, stone, wood.
Paving slabs are the most common option for paths on the site. The market offers many types, sizes, shapes and colors. There are plenty to choose from, including at an affordable price. Depending on the location, it can be laid on sand, gravel or mortar. In this case, it is necessary to observe the rule: it is necessary to pave the paths with a slight slope so that the water flows from them freely.
The tile is placed tightly, its position is leveled with a level and a rubber hammer, if necessary, sand is poured. The quality of laying is controlled with a wooden block: if the tile is raised, it is planted by tapping on the block. It is correct to start laying from the curb. After finishing the work, the seams are covered with a mixture of sand and cement and watered. In order for the track to retain its shape, it is limited by borders, setting them in a liquid solution.
If it is supposed to lay the tiles on concrete, then after the cushion of sand and crushed stone is made, across the track at a distance of 1 m along the entire length, they are installed on the edge of the board to ensure an expansion gap in case of temperature changes. Align them with the formwork, which should protrude 2-3 cm above the ground level. So that the concrete does not stick, the boards are treated with machine oil or drying oil.
To make smooth turns, the formwork is made of wet plywood, it can be bent as you like. The constructed frame is poured with concrete: cement (M500), sand, crushed stone in a ratio of 1: 4: 6, add as much water as the mixture will accept. To obtain a more plastic solution, a special plasticizer is used; liquid soap can be used. It is best to make the mass in a concrete mixer.

This is the most common option for paths on the site.
A monolithic concrete path is inexpensive. It looks decorative if you add dye to the top layer and arrange it like a stone. The first layer with crushed stone is poured onto a prepared base 4 cm thick and a grid with cells up to 20 cm is laid. When the solution hardens, a 3 cm layer of concrete is applied on top of it without crushed stone with a small amount of water, carefully tamping it. The surface is leveled, smoothed.
To decorate it like a stone, you can use bent reinforcement, applying a pattern to your taste. Usually, a pattern imitating a small stone is drawn along the edges of the path. To give the surface its characteristic porosity, you can sponge it in places. Until fully matured, the concrete must be protected from both the sun and rain. The slower it matures, the stronger the coating.
Gallery: paths in the country (25 photos + video)


Forms for garden paths
You can make paths from decorative concrete by purchasing a special dry mix and a plastic or silicone mold with a pattern in the store. Choose it with grooves that are shallow in depth and width, since dirt quickly accumulates in the volumetric gaps and the track loses its decorative effect. The shape drawing can consist of rhombuses, squares, fanning rectangles, all kinds of weaves. Countryside paths made of decorative concrete look very stylish and cost no more than those laid out with paving slabs. The work is performed in the following sequence:
- prepare the base, as described above, and cover it with crushed stone with a layer of 10 cm;
- poured with cement mortar and smoothed;
- sprinkle with dry powdery dye of the desired shade;
- stamp the surface with forms, laying them out close to each other and slightly tamping them;
- after 3 days, the track is washed with a brush soaked in a solution of hydrochloric acid;
- are coated with acrylic varnish, which protects against negative effects and makes them more attractive.

You can make paths from decorative concrete by purchasing a special dry mix and a plastic or silicone mold with a pattern in the store.
Instead of a dye, a hardener can be used, which, in addition to the pigment that gives color, contains quartz sand. Pressing can be started when the concrete mixture does not reach for the finger attached to it.
Stone and wood
For paths made of wood, larch is mainly used as the most moisture-resistant material. Solid decking is installed on piles of 10-20 cm blocks with a decking board with a pattern so that it is not slippery. The soil is leveled only under the blocks, they are placed on cushions of sand and gravel, isolating them from the ground and timber with roofing felt. First, the boards are completely laid out over the entire area of the track and only then they are attached.
Despite the fact that wood loses to stone and concrete in strength, it rots, tree cuts are used to create paths in a country cottage in a rustic style. Often for this, logs are used that remain after the dismantling of old buildings.
The trunk is divided into stumps 15-40 cm thick, the top layer is ground, the bark is removed and the part that will be underground is treated with an antifungal agent, after which it is laid on the prepared surface, leveled.
You can build paths from stone. They look very harmonious. It is not recommended to use shell rock and limestone, as they are short-lived and also slippery. Most often they are laid on the sand. Such a path will be made slowly, since each stone should be examined, choosing the smoothest side that will be outside. Often they have to be filed. After laying 2-3 m, the made segment is fixed by filling the gaps between the stones with a slurry of cement and sand (1: 3). It is convenient to do this using a kind of cone from an empty bag with a cut off corner. Slabs for stone paths must be at least 4 cm thick.

For paths made of wood, larch is mainly used, since it is the most moisture-resistant material.
An original new coating material - decking, or garden parquet. It consists of small sections made of hardwood planks. Garden parquet is laid on supports, adjusted in height so as to smooth out the differences in ground level. The basis for decking can be a sand and gravel pad, a concrete pavement with a drain, or wooden logs. The water underneath should not stagnate. It is mounted quickly and easily. At the end of the season, it is disassembled, washed, oiled with special oil and stored in a dry room.
Walking barefoot on asphalt is less enjoyable than walking on seashells, polished cobblestones, or sun-warmed logs. The road surface, without which the metropolis is unthinkable, is inappropriate in a country estate. Almost every day, the owners walk around its territory without shoes, and the kids generally crawl on all fours.
When doing gardening, it is important to pay attention not only to high-quality care of fruit plantations, but also to remember about the general arrangement and appearance of the garden. Hand-made garden paths not only create the convenience of moving around the household, but are also a special part of the overall design. In this article we will talk about arranging the tracks with our own hands.
Garden paths - how to combine beauty and convenience
A dacha, a private house, a cottage require not only the arrangement of the interior, exterior, but also embellishment of the area around. Often the owners want to combine practicality and aesthetics in one project. The idea can be realized by laying garden paths.
What you need to know and take into account during construction
Any design begins with an idea, a thorough study of the area and a plan. The first step is to determine the directions, length, width of future tracks, to present their shape, decoration. Next, you need to analyze the bearing capacity of the soil in order to choose the right type of building material and only then plan.

It is necessary to draw up a drawing on paper, it will be possible to correct, alter, supplement. There are several important factors to pay attention to:
- The constituent parts must be resistant to the aggressiveness of the environment - high humidity, fungi, corrosion.
- It is good to tolerate temperature fluctuations in different seasons.
- Provide for possible increased loads (car, loaded wheelbarrow).
- The optimal angle of inclination of the web to avoid the accumulation of water from precipitation.
Advice from a landscape designer - in compact areas it is better to lay not straight garden paths, but with undulating bends, turns. This visually expands the space, deepens the niches for plants.
From what to build a track, each owner decides independently, based on financial capabilities, needs and fantasies. Every cover needs a base. The ideal option would be a tamped earth mound or crushed stone pillow.

The most popular materials for do-it-yourself garden paths:
- A natural stone. It looks noble, aesthetically pleasing even with non-smoothed corners.
- Artificial substitute. The grace of nature, cut by man.
- Clinker bricks will add bright colors to the garden.
- Gravel or coarse polished pebbles will provide originality.
- Wood is an affordable, simple, but short-lived look. Looks impressive separately and in the composition.
- Decking - plastic garden parquet. New material, resistant to UV, water, mold, rot.
The decorativeness of the structure largely depends on the methods of laying the blanks. The canvas can be solid, even, or consist of separately located elements of different geometric shapes. Having laid out a path of large "leaves", "butterflies", "flowers", it is easy to get pleasure from comfort and a pleasant walk.

Varieties of garden paths
Everyone who has a summer cottage and even a small but own personal plot will think more than once about ways to decorate and transform it. There is not always enough finance to implement ideas and fantasies. Many will ask: "What then to do?" The answer is quite simple: if you want to refine the garden paths, but there are no funds for a landscape designer and expensive components, then you should pay attention to the available and more affordable materials.
For arranging garden paths with your own hands, various types of stones, boards, wood cuts, river pebbles and even plastic bottle caps are useful. Now a little about each of the options.
Natural stone paths
They fit into any site design. They look natural and, if styled correctly, can last forever.
These tracks look very impressive. If there are stones left after the nearest construction, you can use them. Or those that remain after laying the alpine slide will do. They are irregular in shape making them ideal for scenic trails.
 Natural stone walkway
 Initially, you need to calculate the number of pebbles. One of the methods is a rough layout of stones. This way you can estimate if the amount of material you have is enough.

Sprinkle the place for the path with sand and tamp it well. It turned out to be a kind of "pillow" for pebbles. They need to be processed, adjusted in shape, made more uniform. For good joining and grinding, you can use a grinder or other not too powerful types of tools. Having prepared the stones, they are laid in a mosaic composition.
Since all stones are different in size, they are adjusted to each other using a rubber mallet. At least one of the sides of the stone must be flat for the path to turn out right.

When the mosaic is ready, you need to start sealing the joints between the stones. Otherwise, they will start to overgrow. Although some may prefer another option, the most natural: cement-sand mortar is used for grouting.

Concrete paths
They are very similar to stone ones. First, make a bed, the depth of which is approximately 10 cm. Then pour sand on the bottom and tamp. Pour on top with a mixture of concrete and sand, set the formwork around the edges. While the solution has not frozen, pour pebbles into it. Lay out the intended pattern from it. A drainage system must be installed next to such a path.
Sometimes a concrete path is made using a ready-made form. It is not difficult to buy it at a hardware store. And then just pour the concrete mixture into the mold in the place you need, level it with a trowel, remove the excess and remove the mold. This is a very easy and quick way, in addition, you can lay out such a shape in at least several rows.
 How to make concrete paths with your own hands using ready-made forms
Wooden walkways
The paths made of wood will serve for a long time, but at the beginning they require maintenance. You can lay them out from sawn boards or timber, using what is left from the construction of the house.
 Wooden walkways
 Prepare boards and blocks, the latter can be replaced with steel corners or pipes. Treat them with protective impregnations or bitumen mastic. After soaking, nail the boards to the blocks. Mount the track from above using different caliber hemp. Paint them one or more colors.
But in domestic climatic conditions, the most modern impregnations will not save the boards from deformation, rotting and corrosion, therefore, imitation of wood is often used as a material for paths - tiles with a corresponding pattern.
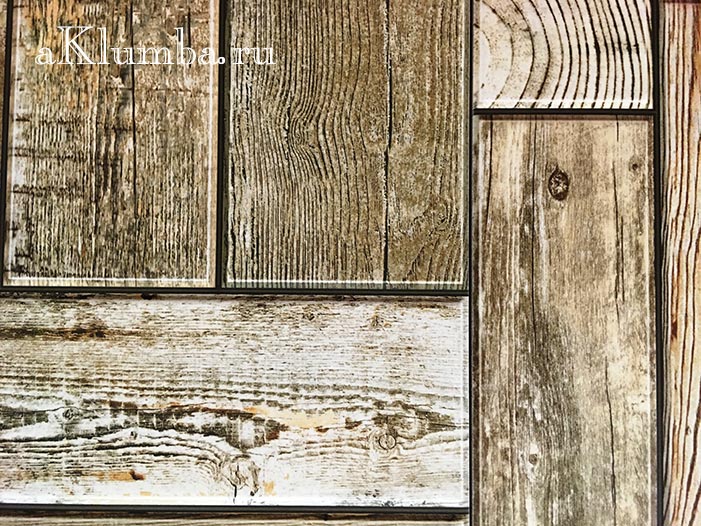
It will be possible to select such perfect samples that no one will detect the difference at a distance. It is felt only after tactile contact. The tiles reliably depict the natural texture of pine, beech, oak and other species in section - as a result, the ersatz turns out to be indistinguishable from the original.
DIY gravel garden paths
Gravel is a simple material that has good flowability, moisture permeability, and is relatively cheap. Paths of any width and length can be poured from it, it is even possible to give them different shapes. Such a path looks neat, harmoniously fits into any landscape. Doing it yourself will not be difficult.
 DIY gravel garden paths
 The order of execution of a gravel path
- First you need to mark the track along the site. The markings are carried out with pre-prepared wooden pegs. You can pull a string between the pegs if you find it difficult to determine the direction "by eye".
- Next, a bed is prepared according to the markings. To do this, dig a trench in the ground. The depth of the trench can be about 14 - 17 cm.
- Gravel is prepared. It is advisable, if possible, to view it and remove unwanted impurities (broken glass, sharp large stones, etc.). Busting gravel should be done with tight gloves.
- Gravel is backfilled to the depth of the trench. You can level it with a rake or with your hands (also use gloves).
- Next, the laid gravel is rammed.
- At the end, a curb can be placed along the edge of the walkway. This will give an even more effective and finished look. The stone is fixed with a cement foundation. It can be laid both flush with the canvas, and slightly above it.
This algorithm is also suitable for the construction of a garden path made of sand. Accordingly, gravel is replaced by sand, and then all work is carried out according to the same scheme.
DIY brick garden paths
It is a very fragile type of material. Before laying, check for strength. First, mark the path with string and pegs.
Remove the soil (25 cm), put a drain underneath. In this case, it will be simple, but the main thing is that the water does not penetrate. Crushed stone must be poured onto the drainage system on top. Boards are laid sideways along the edges. Then the brick is laid. You can come up with many different brick designs.
 Clinker brick path
 The garden path, lined with brick chips, looks great. It is permissible to pour it onto a concrete track. A beautiful mosaic is laid out of broken bricks. If the bricks are of different colors, beautiful patterns are laid out of them. You can leave space between them to fill it with small pebbles, pebbles or soil, so that later there was a green island.
 Homemade brick and stone path
 Sandstone path
They are made dry or use cement grout. This method is similar to laying a stone path, and the first is more natural and original.

Dig a trench by removing some of the soil. Pour sand there and tamp. The middle section should be higher than the edges. It is necessary to walk a little up the slope. This is such a dehumidification system. This is followed by the processing of pebbles.
Sandstone can be of very different sizes and shapes. Try each stone on before finishing.
Level the stones by making the gaps as small as possible. The processed stones are laid out as you like. For a classic track, you need a bucket of sand and the same amount of mixture with cement. Under each pebble, you must first put the first, then the second. Moreover, the cement should protrude slightly. You need to press the stone tightly. The made path must be washed so as not to spoil the aesthetics with the remains of cement. Seams are filled with soil or sand.
Saw cut path
Such a path will look very beautiful and attractive.
 Saw cut path
 Cuts must be taken of different sizes, laying them so that there is no free space between them. Before laying, round timber must be treated with an antiseptic composition.
 Garden path saw cuts
Another option is to use round timber in the form of curbs, and fill in a layer of gravel between them.
Staying at the dacha, you want to move away from city life, because all around, if not a forest, then a garden, some lucky people even have a lake or a river. In a word, whatever the surrounding landscape may be, it encourages closer proximity to nature.
An interesting idea is a forest trail. It represents fragments of common tree stumps. Round plates of different sizes are laid along the edge of the pond and concreted.

The side of an artificial reservoir is also made of them. It is pleasant to sit on such stumps to sunbathe, the contact of the feet with them also gives rise to positive sensations.

Plastic garden paths
Such country paths are sold as ready-made modules. Their installation does not require preparation and surface treatment. They are very simple and quick to attach, very economical, are characterized by strength and long service life. They can be laid out on any site, in the form of any composition. They are environmentally friendly and aesthetic.
River pebble paths
Working with these stones will be difficult, time consuming and will not end quickly. They are laid in a predetermined space in wet sand and compacted to the desired depth. The process takes several days.
 River pebble paths
 It happens that the design of suburban buildings is based on imitating the styles of bygone times - the antique era, British classicism, etc. Then you should choose slabs decorated in accordance with the general concept of the site and the residential building. They may have impressions of Mediterranean pebbles, ancient bricks, etc.

Tracks from plastic bottle caps
The most original and interesting way is to lay out the path or part of it with plastic bottle caps. Due to the fact that the covers have a variety of colors, you can make patterns and mosaics, even coming up with whole pictures.
The only drawback of this improvised material is its collection, because a lot of covers will be needed.
Reinforced concrete tile garden path
Stages of work:

 DIY ready-made garden path from reinforced concrete tiles
  Veneered ceramic mosaic tiles
  Paving stones, stone path
  The slabs were laid on a layer of sand, lawn grass was sown in between. The mowing is done with a conventional electric lawn mower. The photo was taken 3 years after installation.
 These are just the basic materials from which you can make suburban paths with your own hands. Human imagination is limitless, so they will probably come up with something else by the next summer season. Paths for summer cottages are made by hand from any, sometimes unexpected material. For example, from glass bottles. You can create combinations of different types of material in one composition.


Remember that such paths carry not only convenience and benefit, but also beauty, joy for the eyes, harmony. Imagine, invent, create.

The independent choice of materials for garden paths and the driveway to the cottage sometimes makes it difficult. Then you just need to allocate time for a scrupulous study of catalogs or funds for consultation with specialists. The result will justify all these costs.
Video master classes


Having a personal plot, I immediately want to equip it, improve it. And then plant, and this ... Fantasy is in full swing, and there are so many ways to realize your plans! You just need to understand what exactly we want and HOW to do it? And you don't need to rush in search of a newfangled designer right now, calm down, you can arrange everything YOURSELF! And our site will help you make the right choice.
What can give each garden a special individuality and exclusivity? Of course, garden paths!
There are many different types of garden paths that can be done at low cost. Moreover, there is nothing difficult in their manufacture, but the savings are obvious. Having done everything with your own hands, you will save on the services of a designer, and by correctly "seeing" and selecting materials from those already available on the site, you will also reduce these costs to zero.
The most popular summer cottage paths from scrap materials, which you can easily make with your own hands, we will now consider in more detail:

- Here's everything you need to get started:
- Gravel (pebbles, expanded clay), at the rate of 1 ton per 15 m ^ 2;
- Dense film or geotextile;
- Sand;
- Bumpers made of wood or concrete on either side of the walkway.
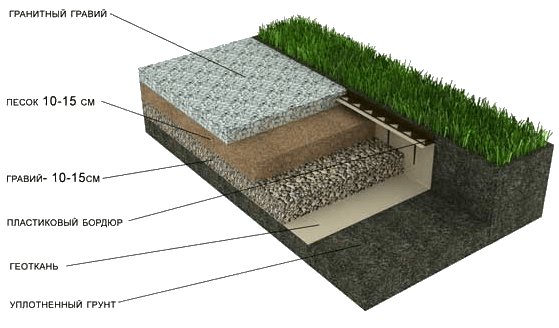
- Mark your future path on your personal plot, draw all its turns and bends (if any);
- On both sides of the future path, dig in the sides made of wooden blocks, or concrete strips;
- Remove the top layer of sod along the entire path by 15-20 cm;
- Take geotextile or dense film and lay it along the entire path, while trying to put the edges under the sides of the path;
- Sprinkle the cleaned area with sand 5 cm;
- Thoroughly level and sand the surface;
- All the preparatory work is completed, now you can finally start filling the prepared space with gravel;

- That's all for gravel roading!
Related video: the secret to a quality gravel path
Natural stone paths are considered the most durable and durable. However, to make them, you will need to purchase a natural stone, if there is none in your area.
- Prepare the following materials:
- Booth or chipped cobblestone;
- Sand;
- Sand ramming tool.
Stages of laying a stone path:
Work should begin with marking the future track, after which the sod should be removed from the place along which the track will be laid. Moreover, the depth will be indicated by the largest of the stones you have prepared (dig 5-10 cm more than the largest stone);

Then you should fill the entire path with sand and evenly level it, the height of the sand embankment should be about 10 cm;
Place stones on the sand, pressing them well into the sand. For large stones, the distance between the stones can be up to 8 cm, subsequently it is covered with earth and can, for beauty, sow with grass. For a small stone, a distance of 2-3 cm will be sufficient. Such seams are subsequently sealed with a cement solution;
The stone path is ready! Do you have difficulty in styling?
DIY concrete garden paths
For concreting garden paths, modern manufacturers have come up with a special plastic frame. With this device, your concrete garden path do it yourself will appear in the garden very quickly and will not require any extra time, or the delivery of a stone. What materials for garden paths are needed - sand, fine gravel or fine gravel, cement, water.
Related video: Concrete garden path, mold for making
- We prepare the path in almost the same way as the gravel path, only the trench for the path should be dug 20 cm wider than your finished path will be.

- We take out excess soil and tamp everything down well;
- Fix the formwork with pegs along the entire track on both sides;

- Attach transverse strips to the formwork every 2.5-3 m. This will help protect the concrete from cracking during operation;
Place the mold over the prepared sections of the walkway and start filling the mold with cement mortar. In this case, it is very important to ensure that the entire form is filled with cement evenly and there are no voids left anywhere. If, nevertheless, somewhere you did not notice the formed emptiness - do not worry, apply the form again and fill it with cement - everything will be corrected;

Compact the concrete thoroughly with a heavy flat object, possibly a board;
Move from one section of the track to another. At the same time, cover the finished one with polyethylene - so as not to inspire debris on freshly prepared concrete that has not yet completely hardened;

Fill the space between the cement tiles with earth and plant them with herbaceous plants - it should be very beautiful!
The remaining spaces around the path (remember, we dug a larger trench than necessary) can be covered with bricks, covered with earth or small pebbles.
Related video: We concreting the garden path with our own hands
An excellent and very popular material for your garden path can be a regular tree. Thanks to the variety of colors and wood structures, you can create a unique and very beautiful path!

When deciding on the device of garden paths with your own hands at low cost, you must first decide on the following points that will have a direct impact on the organization, cost and progress of work:
- planning and marking;
- choice of material for paving paths on the site;
- the choice of the base and the technology of laying the material;
- determination of the need for additional measures to increase the life of the coating.
All four points are technologically related to a significant extent. So, for example, the use of durable natural stone eliminates the need for a number of works to provide additional protection, and the construction of a concrete base increases the stability of the coating and makes it possible to lay softer and thinner slabs.
Drawing up a layout plan
Work on paving paths and sites at the summer cottage should begin with drawing up a plan. This will help determine the choice of the necessary materials, calculate their number and scope of work. With a plan in hand, you can estimate future financial costs and compare them with your ability to pay.
Take a plan of your site with buildings, trees, bushes, fences and gates marked on it. Draw how you are going to make your own garden paths.
It should be borne in mind that the paths should run no closer than 1.5 meters from the trees, and their minimum width should be 0.7 meters. Surface slopes should not direct rainwater towards buildings.
Paving materials
Gravel.What to make tracks in the country for cheap? Most of us want the coating to be beautiful, durable and affordable at the same time. We advise you not to be limited to one option, but to choose material according to the situation.
So, it makes sense to pave the territory near a private house with paving slabs made of natural stone or colored concrete, and make paths in the garden of parquet or plastic. At the summer cottage, you can also quite successfully use a backfill of fine gravel or. The most important thing is that you are satisfied with the combination of price, practicality and appearance.
A natural stone
 A natural stone.
 The device of country paths using materials from is the most durable and beautiful option. However, it is very difficult to call their use economical. The main types of natural stone slabs are made from basalt, limestone, sandstone, slate or labradorite. Less often, due to the high cost, shungite, granite and marble are used. The configuration of piece products can have strict geometric or irregular shapes of various sizes.
The choice of colors and shades of natural stone varies from white and yellow to dark blue and black. Some types of stone have patterns in their structure, the presence and color of which depend on impurities in the original material. The surface of natural paving slabs can be polished, rough or unevenly rough.
The main advantages of paths paved with natural stone include:
- high mechanical strength;
- durability and frost resistance;
- beautiful appearance;
- a wide range of textures and shapes.
The main disadvantage of such a track at a summer cottage is the high cost. In addition, granite, shungite, marble, labradorite and some other hard materials are difficult to process, which can complicate the process of their installation.
Clinker brick
This is a special type of brick, which, due to its increased density, does not absorb moisture and is great for making paths in the country with your own hands. Ordinary wall bricks are usually not used for this kind of coverings. The available colors are available in yellow, white, brown and red shades, which allows you to create original color patterns.

The use of clinker bricks for laying requires the presence of borders. They can be made from the same bricks, laying them at an angle "on the edge", well, or use ready-made concrete products. At the same time, the installation of the curb should be made flush with the surface of the path, which ensures the best drainage of rainwater.
The main advantages of brick coating are affordable price and durability. The disadvantages include the mandatory presence of a cement base for laying and the need for careful sealing of joints between bricks.
Colored concrete paving slabs and paving stones
 Paving slabs.
 Colored concrete pavement tiles are made from a high-quality mixture using the method. In the first case, piece products have a higher strength and frost resistance, but a poorer color palette. Vibro-cast tiles are more colorful and cheaper, but not as durable.
This material can rightfully be considered the most popular solution to the question of how to lay out tracks in the country. You can not only buy it in a store, but also make it yourself, in an amount sufficient for paving any site on your personal plot.
The advantages of colored concrete paving stones are considered affordable price, appearance, strength and durability. The disadvantage of such a path in the garden is the need for additional processing of the road surface in order to protect it from moisture.
Casting into molds for concrete at the place of installation
 Pouring concrete by molds.
 Due to the simplicity of the technology in the form and the low cost of its implementation, garden paths made of concrete mix are very popular among private developers. This solution can be safely called an economy option. Moreover, the surface of such paths in the garden resembles tiled masonry. She is beautiful and durable. In the case of a well-carried out sealing of seams and a technologically competent device of the base, it is possible to neutralize the main risk for surfaces made of this material - the germination of weeds and plants.
You can buy forms for the device of garden paths with your own hands in any building materials store. Manufacturers declare that only one modular form is enough for work, a maximum of two (for large volumes of work). The service life of such sidewalk pavement is 10-15 years. To give the concrete surface a more aesthetic appearance, it can be covered with liquid glass, paint or special varnish solutions.
Modular Rubber Plates
 Modular rubber plates.
 Correctly speaking, these modular slabs cannot be called purely rubber. They are made from polymers and rubber crumb, which is obtained by crushing car tires, ensuring the homogeneity of the mass during thermal sintering. The result is a durable, moisture resistant and durable material.
Fixation in place of laying is ensured by sleeve connections. The covering assembled from this material is a single rubber carpet of the required length and width. A feature of such tracks is considered to be exceptional ease of assembly. The slabs can be laid on a small sand cushion after removing a small top layer of soil.
 Base for rubber tiles.
 The service life of the material at temperatures of -45 ° + 65 ° C is at least 10 years. It is completely waterproof material. It is not affected by mold, mildew, insects and rodents. It is allowed to reuse such garden paths with their transfer to a new place.
Polymer sand paving slabs
This type of pavement pavement is obtained by molding a mixture of polymer materials heated to the melting point and fine sieved sand. The amount of sand varies between 60-70%. This technology makes it possible to obtain polymer paving slabs with a low coefficient of thermal expansion.
This material is comparable to rubber plates, but the polymer sand cover is much harder and more durable. To improve the appearance of the tiles, dyes are often added to the mixture, and white river sand is also used. Due to its exceptional strength, this material can be used anywhere.
 Photo of the road from saw cuts.
 The positive qualities include a beautiful appearance, durability, frost resistance, affordable cost and ease of installation. The disadvantage is the novelty of the material and its low prevalence.
Wood
How to make paths in the country in such a way as to create an eco-style atmosphere? Use . It is affordable and looks beautiful, especially after special processing. For arranging wooden paths, a terrace board laid on a beam is most often used, as well as cuts - transverse sections of trunks and large branches.
The material does not differ in durability, if it is not pretreated with special treatment to protect it from moisture. It is better to use hard woods as cuts (for example, oak, larch or aspen).
 Terrace board.
 Usually the length of the cuts is at least 35-40 cm, so that some can be buried in the ground to increase stability. The optimal diameter is within 10-15 cm, but in general the size ranges are not limited by anything and depend only on the type of wood and your capabilities.
The decking is laid across the path on a wooden beam, which must be treated with a bitumen composition. The timber is fastened to the metal stakes from the reinforcement. The board is nailed down.
Work on the arrangement of paths
So, we come to how to correctly make the road in the country. The full scope of work on the construction of sidewalks may include:
- markup;
- excavation;
- drainage layer device;
- base device;
- laying tiles;
- finishing work.
Here is a complete list of jobs, but for some types of materials, this list may be smaller.
Track mark
 Excavation and pegging.
 To carry out work on marking the path in the country with your own hands, you will need wooden or metal pegs, which must be hammered along the edge of the paths in accordance with the previously drawn up plan and planned design. When installing the curb, the width of the marking increases, respectively, by their thickness. A well-visible cord is pulled over the hammered pegs. After that, check the layout again.
Excavation
The structure of earthworks when arranging paths in the country includes removing the top layer of soil and digging a trench. Its depth should accommodate all subsequent fill layers so that the surface of the coating is at a height of 3-4 cm above the level of the adjacent soil. If in the future it is planned to import fertile land at the working site, then the volume of earthworks is significantly reduced.
Backfilling the drainage layer

Drainage is arranged for efficient drainage of penetrating surface water and groundwater during the spring rise. It is a layer of crushed stone or gravel poured onto a non-woven bedding laid along the bottom of the trench. The recommended layer thickness is 10-15 cm.
In order for the non-woven fabric not to be damaged by the sharp edges of stones, it is initially necessary to sprinkle a layer of sand 3-4 cm thick on the textiles.After filling in the trench, gravel or crushed stone must be well tamped so that there will be no subsidence in the future. Sprinkle a layer of stone on top with sand.
Installation of curbs
 Installation of the curb.
 Curbs are used to more clearly limit the boundaries of the path in the yard. They are usually installed after filling the drainage layer. Concrete and brick mortar. Plastic materials are secured with standard fasteners or metal pins.
Paving stones can be used as a curb. In this case, it is necessary to add additional sand under it. The best option for installing such a fence would be to exceed it by 3-4 cm above the level of the track. So that water does not linger on the surface of the coating after rain, small gaps must be left in the curb at regular intervals.
After laying tiles or paving stones, the curbs must be covered with earth from the side of the adjacent soil.
Base device
For laying paving slabs, it is required, which can be done:
- from concrete, for all types of paving slabs of the correct geometric shape and wooden coverings from decking;
- from a dry cement-sand mixture, for all tiles and slabs of the correct geometric shape, including polymer sand and concrete molded;
- in the form of a compacted sand cushion, for irregularly shaped or thick slabs made of natural stone, paving stones and wood cuts.
The concrete base under the decking can be made not in a continuous layer, but in the form of transverse stripes every 0.8-1.2 meters. It is enough just to provide support for the longitudinal bar.
 Tile path scheme.
 The concrete base is the most durable, but also the most expensive. For its construction, after installing the curbs, the drainage layer is covered with geotextiles along the entire width of the trench with a slight overlap on the walls. After that, a layer of concrete mixture is poured, not reaching the top of the curb to a tile thickness of +5 cm. A five-centimeter margin is needed for a layer of glue under the tile and the excess of the edge of the curb above the surface of the track.
The concrete surface must be well leveled using a plastering rule or a wide trowel. Use the building level to check slopes. The hardening time of the concrete mixture is 72 hours. Laying tiles on the path is only possible after this time.
The components of the concrete mix for pouring include cement, gravel and sand in a ratio of 1: 4: 3. To obtain a better plasticity of the mixture, it is recommended to add either a liquid detergent, which will be consumed 2-4 times more.
 Concrete base scheme.
 A dry cement-sand mixture is also a solid and reliable base. The fact is that over time, the cement will harden instead of the coating laid on it, becoming a single whole with it. The use of a dry mixture is cheaper, since, as a result, the installation of tiles on special glue is not required.
For its construction, the drainage layer is covered with geotextile, on top of which a layer of sand 5-7 cm thick is poured. The sand is rammed. After that, a mixture of dry cement and sand is prepared in a concrete mixer in a ratio of 1: 4. Then I pour the mixture into a trench, tamp, level and lay the paving material directly on this surface.
A simple sand cushion is used to install wood cuts, paving stones and large slabs of irregular geometric shape. These materials are firmly anchored in the sand, ensuring the stability of the track shape. Non-woven textiles should also be placed between the sand cushion and the drainage layer. This will prevent the germination of weeds and ensure water drainage without washing out the substrate.

Laying tiles
Paving slabs on a concrete base are required for a special adhesive mixture. Before this, the concrete surface of the base is primed and completely dried.
It is recommended to lay the first row of tiles along the curb for a length of 1 meter. After that - one row across the track and, focusing on the result, fill 1 sq. surface. Then you should continue in the same way, moving "towards yourself" and filling the path one square at a time.
 Styling options.
 Alignment in height is carried out due to the adhesive layer, which should not be thicker than 3 cm. If it turns out more, then the glue is applied in 2 layers, with a break in time. Tiles can be trimmed with a grinder and a diamond wheel.
With a cement-sand base, the tiles are placed directly on it, with their obligatory tapping (landing) with a rubber hammer. If during the check it was revealed that the tile sits low, then it is removed and a dry mixture is poured in its place.
It is better to start laying with such a base from the middle of the path. This will allow you to withstand the side slopes, and you will end up with the cut stone only at the edges.
The use of a sand cushion is effective when laying large irregularly shaped slabs and wooden cuts, i.e. materials with large gaps between individual elements. The cuts are simply buried in the sand, and the slabs are laid out on the sandy surface.
 Laying stone on sand.
 Laying paving stones on a sandy surface is allowed only if there are curbs. In this case, the correct geometry of the track will be maintained for a long time.
Final work
At this stage, the joints are sealed in order to protect against moisture penetration under the coating. Apply protective coatings, wash or clean the surface, clean the area. The easiest is to use a cement-sand mortar. It is a little more difficult to fill them with liquid cement. Used for covering concrete and other tiles. They do not allow moisture to penetrate into the material. On this, the question of how to make a garden path in the country with our own hands, we consider closed. Good luck!

