Flower stand as a trendy element of modern design. Simple and beautiful do-it-yourself flower stand Do-it-yourself flower stands made of metal
Being carried away by the cultivation of domestic plants, most people sooner or later face the question of where it will be possible to place the exhibits of their collection without prejudice to the living space, when there is no more space on the windowsills and on the shelves of the cabinets.
Thinking how to solve a problem economical use space, many come to the conclusion that it is necessary to purchase multi-tiered plant shelves, hanging shelves or floor structures for the location of home plants.
The easiest solution is to purchase a ready-made flower rack, hanging rope planters or hanging flower shelves on the walls. Such designs are sold in stores in a wide variety of types, styles and configurations.
In addition to buying, you can start looking for materials on how to make a flower stand yourself, using either improvised material for this purpose, or by visiting stores that sell necessary materials required to assemble these structures.

Making a flower stand with your own hands is interesting because the item created during the work will be unique. A person working on its creation can decide for himself what form, color, texture it will be - and not worry about the fact that somewhere in the world there is another, completely the same piece of furniture.
A beautifully made flower stand can be a highlight of the interior
It is known that when carefully made, a flower stand can become a real decoration of the interior, and not just an item that helps the owners of the room save space and place all their favorite plants in the room. Therefore, while building it, you need to be very careful, and not hope that the plants will completely hide the carelessness and negligence of the master.
Today, almost all houses and country yards decorate with fresh flowers. They enliven the room, make the air cleaner, cheer up. To save space or create an arrangement of pots, flower stands are usually used. But store copies are quite expensive and do not please with a variety of designs. Therefore, creative people who want to create interior items with their own hands may well make a flower stand themselves.
The main types of flower stands:
- forged coasters. Flowers look very elegant in them. They are durable, reliable and have an elegant look, but making them yourself at home most likely will not work, unless, of course, you are a professional master;
- wooden coasters. This option is the most common. They are more economical and fit any interior. The easiest way to make a stand for flowers with your own hands is from wood. The material can be boards, chipboard, natural material, for example, a piece of log with sticking out in different sides branches, etc. To make a wooden stand look even better, it is usually varnished;
- metal flower stands. Such stands, as well as forged ones, are not subject to self-manufacturing. The exception is combined products, in which the bases for pots are made of wood, and ready-made ones are used for supports. metal pipes with a section of 25 mm. But if you still tune in to metal flower stands, due to their reliability and resistance external influences, then you have to buy ready-made;
- flower stands, which are a composition of several different items. There are no longer any rules and regulations. It all depends on the imagination and quantity free space. Below is a master class on making one of the options for such flower stands, and photos as illustrations.
Master class number 1: flower stand + decorative bird bath
This stand is more suitable for decorating the yard or open veranda. For her, you can use pots of different shapes, or you can use the same ones. The color in which they will be painted depends on your idea and taste preferences. In our case, the pots are one-color, but you can paint them in different colors.

For work we need:
- one large and tall pot that will serve as a base;
- four smaller flower pots;
- one pot, which will be at the very top. It is smaller than the base, but larger than the intermediate pots. A decorative bath will be attached to it;
- a metal bar as a support for the entire structure. If the store does not have the size you need, then you can buy a longer one and cut it with a hacksaw;
- spray paint;
- spray primer;
- a small figurine of a bird made of ceramics;
- waterproof adhesive.

The sequence of work is as follows:
- prime the surface of the pots and after drying, cover with paint. Color can be one or more, according to your taste;
- we measure and add up the height of all the pots, add 600 mm to them and thus calculate the height of the support rod. Using a hacksaw for metal, cut off a piece and hammer it into the ground by 600 mm. This action will provide the structure with a stable position;
- through a hole in the bottom we put a pot base on the rod, set it straight and fill it with earth;

- then we put on all subsequent pots, one after another on a rod, fill it with earth and tilt it alternately to the right, then to the left;
- we install the topmost pot directly, like the base, we attach a plastic or ceramic bath prepared in advance to it. We glue a bird figurine to its edge and stand for a day until it dries completely;
- after all the work is completed, we plant flowers and enjoy the result.
Master class number 2: hanging flower stand
For placement on the veranda or indoors, a hanging flower stand is most suitable. Wood and rope are the main materials needed to make it. On it you can place flowers that you do not want to hide on the windowsill behind the curtains.

To make it we need:
- wooden board or shelves from old furniture;
- rope, not thick, but not thin;
- flower pots, in our case, four pieces, and you can take it if you wish;
- jigsaw;
- drill;
- paint and brushes;
- metal ring.

- in order to provide the product with the necessary strength, wooden bases, into which the pots will be inserted, should be made a couple of centimeters wider than the pot itself. To achieve this, attach the pot to the board with the wide side, circle it with a pencil, and then, measuring 2 cm in each direction, draw a square. This will be the size of the base. We draw such squares according to the number of pots;

- to outline the line of the internal cut, cut out a round template from cardboard paper. Its diameter should be less than the circled pot by 15-20 mm. After the template is made, circle it inside each of the base squares;

- now you need to cut a hole into which the pot will be inserted. To do this, attach the square to the desktop with a clamp, make a hole in its middle with a drill, insert a jigsaw through this hole and cut out the inner circle. In the process of work, be careful and do not rush, so as not to spoil the product;


- after the holes for the pots have been cut in all the base squares, drill holes for the ropes in all corners of each of them. Care must be taken to ensure that the holes on all the squares are in the same places;


- now you can think about the design. Paint wooden parts different colors or stain, depending on the style and interior of the room. The rope also needs to be painted, we chose black, but you can take any other of your choice. To do this, use acrylic paint;

- after that, the assembly of the structure follows. It must be produced taking into account the height of the plants that will be installed in the base. We start the assembly from above: threading the four ends of the rope into the ring, we stretch them into the corner holes of the first square and tie a knot under it to fix it;

- in a similar way, we fix all the base squares for the pots on the rope, and cut the remaining ends under the last one;
- after that, insert the pots and hang the stand in the desired place.
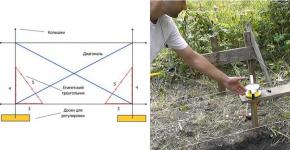
Master class number 3: floor stand for flowers
With graceful curved legs, this stand will brighten up any room. It consists of a triangular base with rounded sides on which the pot will stand, shelves of a slightly smaller size and the same shape, and three curved metal legs.
To make curved legs, you will have to bend metal tubes yourself. A special bending template will help us with this.
We will need materials:
1. For stand:
- 2 pieces of waterproof plywood 24 mm thick - one 37x37 cm, and the second - 22x22 cm;
- 3 copper pipes 1.5 cm in diameter and 68 cm in length;
- 3 bars with balls at the ends for the legs;
- polyurethane adhesive.
2. For template:
- a piece of fiberboard or MDF 40x80 cm;
- 5 bars 2x4x10 cm;
- clamps, screws.
Manufacturing sequence:

- on pieces intended for shelves, we make markings using a compass;
- cut out the details with a jigsaw, grind the edges with sandpaper;
- on the basis of a flower pot, we draw medians so that even ones appear along the rounded sides. We place the shelf exactly in the center, press it tightly and drill three holes in its corners. The drill must pass through both parts;
- we grind the edges of the shelves with sandpaper;
- we fix the wooden balls used for the legs with a vise and drill holes in them;
- we open the wooden parts with a layer of varnish, dry it, lightly sand it with sandpaper and apply another layer;
- we also grind metal legs, apply varnish or paint;
- we insert the legs into the holes on the top shelf, and at the level of the small shelf we rewind them with double-sided tape and glue them;
- we insert a bar with a tip in the form of a ball into the hole of the pipe leg and fix it with glue for greater reliability.

Making a template and giving the legs a curved shape:
- we mark the plate around the circumference and attach the bars to it with the help of screws;
- the tubes themselves are gently pressed against the bars by means of clamps;
- after the clamps are relaxed, the pipes spring back.
A beautiful flower stand, assembled from wooden or metal parts with your own hands, serves as part of overall design premises or area. Greenery and structural elements complement each other, so they should not cause a feeling of disharmony.
Often for coasters choose bent and forged metal, natural wood (snags, fin). But the object used as a stand may be completely unrelated to nature - the beauty of the composition in this case is achieved through contrast. These are coasters made from improvised materials and old things. The florist's fantasy turns unexpected objects into a wonderful addition to flowering plants.
How to make simple flower stands?
For those who have the skills to work with welding machine, it will not be difficult to make metal flower stands. From a thin rod and welding wire with a diameter of 0.5-1 cm, you can make many options for floor and hanging shelves for plants. The simplest thing is to twist several pieces of wire into a tight bundle, spread their ends to the sides and weld small shelves to them. From below, the ends are bred so as to form a stable base.
But those who are deprived of the opportunity to work with unyielding and hard metal need even more simple ways. original coasters can be made from wooden boards or plywood with a thickness of at least 1 cm. To work, you will need:
- board or plywood;
- durable and decorative cord;
- drill and drill, the diameter of which corresponds to the thickness of the rope;
- sandpaper;
- varnish or paint.
The wooden parts of the shelf can be square or rectangular. At a distance of 3-4 cm from the edge in the corners, you need to drill holes. Measure the rope so that its length matches overall size shelves, multiplied by 2, plus another 20-25 cm. Next, find the middle of each segment and tie them so that the knot is located approximately in this place. Pass the ends through the holes in board 1, align the knot in the center of the board, and secure the cord by tying the knots directly over the holes at each end of the rope.

Then measure the desired height of the next shelf, make knots for its support. If the cord is thin, and they turn out to be smaller than the holes, then a small piece of a strong stick should be inserted into each knot. In the same way, you should fix the rest of the details. The flower stand should be hung on a strong hook screwed into the ceiling.
Another option for a simple wall-mount stand can be made from leather or canvas straps. To do this, you need to take measurements taking into account the width of the board and the length of the fasteners above it. Fold the lengths of the belt in half, equalizing the ends. On desired height attach them to the wall with nails or self-tapping screws with dowels, aligning the caps flush.
Sand the board for the shelf, varnish or paint. Insert it into the resulting loops so that it is perpendicular to the wall. On the shelf you can put small pots with ampelous plants.
Reliable stands for large flowers
To make such simple but reliable coasters, you will need a hacksaw or electric saw. As fasteners, it is better to use wood screws of sufficient length. You will need a screwdriver to install them. You can also connect parts with nails.
best material for racks - wooden block 5x5 cm. Instead of a bar, you can use even thick branches of a tree, then the design will acquire a natural style.

The length of the supports is chosen arbitrarily. Before you make a flower stand with your own hands from such a material, you need to determine its design. There are 2 options:
- double-sided floor stand for flowers has an A-shaped profile of the legs;
- one-sided wall model consists of vertical and inclined racks.
Racks in both cases are connected by shelves for flower pots located on different levels. With an inclined arrangement of supports, the shelves are arranged so that they do not interfere with the plants of the lower row. In whatever version the wooden stand is made, the collection indoor plants will resemble a green hill.
Having measured the bars for the racks, the lower parts of the inclined supports must be cut at an angle that will correspond to the angle of inclination. In the upper part, you can connect them closely by choosing a piece of wood and overlapping the very ends of the racks. If desired, the supports can be crossed by making notches for the connection a little lower. To make the stand stable and strong, a crossbar is installed between the supports. Its fastening is carried out in the same way, in a half-tree way, if desired, leaving protruding ends.
Having made 2-3 identical supports, they are connected with shelves made of board or plywood 1.5-2 cm thick. For fastening, use a metal furniture corner or short bars nailed to the supports at the desired height. After the stand is ready, it is varnished or painted, decorated with natural material or carved wooden details.
Metal stand
Simple but convenient option– shelves different heights from the corner. Outwardly, the design resembles several parallelepipeds with 2 common faces. Its assembly begins with the rack, which is the highest.
On a previously drawn sketch, mark the size of the tallest of the stands connected together. Measure 4 identical segments for vertical supports and 8 for horizontal faces. Connect by welding, making 2 squares or rhombuses from short segments. They must be exactly the same, otherwise the design will warp.

Finished horizontal faces must be connected with vertical (long) racks. Handmade parallelepiped of the highest floor stand complement the side low parts:
- Between uprights weld the cross member at a height corresponding to the next flange.
- Make a rectangle, the length of which is equal to the same measure, and the width is equal to the distance between the vertical supports of the high stand.
- Cut 4 parts that will determine the dimensions of the lower stand. With their help, connect a rectangle from a corner and the same one - formed by verticals and a crossbar on a large shelf. If desired, make an even lower stand using the same algorithm.
A floor slide made of metal parts can be made angular. For this metal racks the lower shelves must be welded to adjacent sides of the highest stand. Each wing can be continued by adding the next level of shelves and welding them to the sides of the previous ones.
Sophisticated and beautiful coasters
A woman can also make these if she has welding skills. It is possible to bend a welding wire with a diameter of 0.5-1 cm according to a template if there are tools for cold forging(bends, templates, etc.) and a hammer weighing about 0.8 kg. Having drawn a sketch, you need to break it into simple elements and determine the size of each part.
If there are many identical parts, metal templates can be used. By hammering the wire between the turns of the template, it is easy to obtain identical arcs, spirals, curls, from which the forged pattern is assembled, welding them together.
How to make a flower stand from openwork elements can only be suggested by the imagination of the one who creates it. Most often these are natural forms: curved branches and tree trunks. Leaves and flowers are live plants placed on a stand.
IN garden design use the same stands on which containers and flowerpots with beautifully flowering and fragrant annuals are placed. Petunias and carnations, fragrant tobacco, mattiola and other flowers create living columns or hedges. Stands in the form of tapestries are placed near perennial climbing roses and liana.
Coasters made of natural material
floor and table stands from natural material, you can decorate the interior of almost any style. They are appropriate even in a minimalist setting, you just need to make them as concise as possible.
Fancifully curved branches, snags, and a fin will serve as the material for the coasters. The natural form does not even need to be supplemented. Sometimes recesses or hollows in the wooden base are ideal for placing containers. A high flower stand from a trunk or branch will require the installation of shelves or rings where flower pots can be placed.
Having found a suitable piece of wood, they clean it of rotten areas and exfoliated bark. After carefully cleaning all the defects to healthy wood, they determine the position of the driftwood in space: floor stands can be both horizontal and vertical. If stability is required from the driftwood, then from below you need to attach a wide base from a saw cut of wood or supplement the stand with a part that will support it.
To strengthen the flower on such a stand, you will need to install a small shelf from a saw cut or plank. You can also install a ring of hard wire with a thickness of 0.3-0.5 cm. You can strengthen it by drilling deep vertical holes in the wood. The ends of the wire, bent in the form of an open circle with protruding edges, are driven into them.
Shelves are attached to the ends of evenly sawn branches. If desired, the shelf can be strengthened directly on the body of a shapeless snag-fin or stump. Fasteners are self-tapping screws and a corner.
From a small picturesque part of the tree, you can make a table stand for a cactus or other slowly growing flower. Such plants can be placed in a natural recess of driftwood. Having adjusted the hole to the size of the pot, the wood is sanded and varnished, trying to preserve its natural beauty. Sculptures of small animals (lizards, snakes) or insects can serve as decor.
Flower stand can be made from different materials. Traditionally, it is metal or wood, as they combine low weight and ease of processing. Decorative coasters require complex processing, but driftwood has already been processed by nature itself. Decorating old things such as whatnots or stepladders, you can come up with completely exclusive coasters based on them.

Indoor plants make the house more beautiful and comfortable, clean it from carbon dioxide and saturate it with oxygen. Well, in order to indoor flowers harmoniously fit into the interior of the house, it is important to place them correctly.
The problem is that sometimes there are not enough window sills for all the flowers, in addition, it is not always comfortable for green spaces on the window sills, so in sunny weather they can be too hot, and the aggressive sun, reflected from the glass, can damage the leaves, and in frosts on the window they will be cold.

The ideal solution would be a flower stand. Moreover, well-chosen coasters themselves can decorate the room.


Kinds
Stands for indoor plants are different in their structure, configuration, material of manufacture and colors. Based on these criteria, several types of stands are distinguished.

Floor stands for flowers are hinged shelves on a stable vertical support. Moreover, the stand frame can be both mobile and fixed. This product can combine several shelves at the same time.

Shelves-stands are a rectangular frame, reminiscent of a bookcase with open shelves. Can be found modern models, the design of which has an oval or round shape.

Mobile stands are products different forms, consisting of 2 or more tiers with wheels that allow you to move flowers.

Unusual models are stands of unusual shapes and colors, for example, racks on which trailed parts and carved or concave supports are fixed, often such products are brightly painted. Unusual creative supplies can be seen in the photo of the flower stand.

Material
The most common materials for creating a coaster are wood, metal, plastic, stone and glass.

Metal. Metal flower stands are the most popular, because, due to their strength and stability, they allow you to place maximum amount flower pots.

Besides, if we are talking about the forged stand, it is also very elegant and elegant.

Forged flower stands can be made in different stylistic directions.

IN Lately manufacturers delight flower growers unusual shapes forged stands, for example, in the form of a medieval carriage, or Egyptian pyramid or a musical instrument.

Wood. wooden coasters for flowers - these are convenient, practical and inexpensive accessories for indoor plants.

Thanks to wooden supplies, you can not only decorate the interior, but also change the space by placing several flower pots in one zone, thereby focusing attention in the right direction.

Wooden products look great in the interior of Provence and in a minimalist style. More original analogues, for example, in the form wooden steps harmoniously fit into the interior, made in the stylistic solution of high-tech or loft.

Stand from natural wood it will become stronger if it is supplemented with metal parts, which, among other things, will add elegance to the design.

Many people think about how to make a flower stand on their own. In order to make a stand with your own hands you will need wooden frame and wicker elements, this stand is great for a rustic room.

Glass structures
It looks quite interesting in the interior design solution as a glass flower stand.

glass flower coasters can be of various shapes and colors, decorated with patterns, matte and transparent. This stand model is suitable for any style room.

Plastic
Plastic is popular with florists due to its plasticity, because it can be used to make a product of any shape and size.
Therefore, as an accessory for flowers, you should look at plastic models, because both low and high flower stand will be equally beautiful and comfortable.

In addition, plastic coasters are usually sold at an affordable price.

Photo stand for flowers