How to insulate the balcony inside the apartment with your own hands? Is it possible to insulate the balcony in winter? How to properly insulate a large loggia.
Want to warm balcony? Correct solution... But before insulation, you need to know that the most important element this operation will be heating the balcony. There are several heating options on the balcony and loggia.
Radiator on the balcony
The radiator on the balcony is very convenient. Judge for yourself: everyone can afford it, but you don't need to turn it on and off.
Forbidden Fruit - Bitter
However, this type of heating entails certain troubles. Already at zero degrees, the water in the radiator freezes, and it can burst. And then all the lower floors will "float".
That is why the Moscow authorities have forbidden to take the radiator out onto the balcony or loggia (Appendix 1 to the Decree of the Moscow Government dated February 8, 2005 N 73-PP, "Measures for reorganization", 3 p.). And it doesn't matter whether you insulated the balcony or not.
Warm water floor
A warm water floor is a polymer tube that is laid in a snake, snail, or, if you like, in the shape of another animal. Then it is poured with a screed and hot (55-60 degrees) water is allowed through it.

The water floor will be useful only if the balcony is insulated
With such a heater, the heat is distributed along a very convenient path for you. It rises up from the floor. This means that the floor will always be warm, and you can spank barefoot on the balcony, even in winter!
There is one more pleasant moment. The authorities allow you to make a warm floor on the balcony if it is not connected to central systems water supply and heating (the same document, "Measures for reorganization", 5 p.).
Electric floor on the balcony
An electric underfloor heating is an excellent replacement for water heating on a balcony or loggia - it will not flood the neighbors, and it is easier to install. However, such a floor also requires more money. 1 m2 of electric floor eats up 78 rubles of electricity per month! This is provided that you are using a thermostat that turns off the floor from time to time.
There are several types of electric floor:
A cable electric floor is laid in the same way as a water film floor - a kind of infrared floor
Cable floor
It is a cable with heating wire or wires. Such floors are far from safe - one spark can do a lot of trouble. Therefore, the cable floor is always installed under the screed.
Another disadvantage is that some types of heating cable (single core) emit electromagnetic radiation. However, the computer creates the same field, and everyone is still alive. And many are even healthy.
Infrared floor
Does not emit radiation and is fireproof. Therefore, the floor covering can be installed directly on top of it, which greatly simplifies the installation task.
They choose an infrared floor more often than a cable floor, not only because of the ease of installation. Its main advantage is that it acts on the principle of the sun. In other words, it does not heat the air, like a cable, but objects in the room. They, in turn, transfer their heat to the air. This makes the balcony warmer and more comfortable.
Fan heater on the balcony

The fan heater can be placed anywhere: on a windowsill, on a table or on the floor
This is a compact device known to many that sucks cold air, and serves in the room - hot.
A fan heater on the balcony is often used only as additional source heat. Why? Of course, it warms the air quickly and well enough, but it is not designed for permanent work. And as soon as you turn it off, it gets colder on the balcony - and you won't have time to gasp! Besides, he makes a lot of noise.
Convection heater
A convector heater (thermal panel) works on a principle similar to a fan. But you will not hear the noise from it, no matter how hard you try.
The convector can be left switched on 24 hours a day How the convector works
In general, the convector has all the advantages of a 21st century heater. Heats up quickly, turns off itself when necessary, just installed. And you can place it wherever your heart desires: on the floor, on the wall and even on the ceiling! Depending on which part of the balcony needs to be heated.
but the convector has its disadvantages ... Firstly, it dries the air, and this can cause a headache. Secondly, like all electric heaters, it consumes a lot of electricity. Heating 1 m2 of balcony per month in Moscow takes 324 rubles at least! This is if the balcony is well insulated. If not, the costs will increase many times.
Oil heater

It is convenient to move the oil heater around the balcony on wheels
This is another option electric heating balcony. The oil heater is a metal case with an electric coil and oil inside.
When the oil temperature reaches 70-80 degrees, the heater turns off. So don't worry about safety! However, as well as for health, because such a heater does not dry the air.
The oil heater has one more feature ... It warms up the room rather slowly, and then remains hot for a long time. However, if there are drafts on the balcony, such a heater, unlike other heat sources, will not have time to heat it even for a short time. The heat will dissipate faster than it comes in. Therefore, it is definitely impossible to do without insulation here.
Infrared heater
It works on the principle of infrared floors - objects are heated first. And a person will also feel the warmth from the influence of his rays.

Infrared heater - the second sun on your balcony
This miracle has its weaknesses. For example, a heater gives out a lot of light, so at night it can interfere if your bedroom windows open onto a balcony. It is also very fragile, and the lamps heat up to 200 degrees. So it's better not to stick your finger there.
But such a heater has the highest efficiency (coefficient useful action) - 98%. This means that exactly that much percent of the electricity consumed by the heater is converted into heat. Wherein, infrared heater consumes less energy than the aforementioned electric heaters.
In conclusion, we note that there are many more ways to heat a balcony. For example, put a carbon heater in there, which uses 25% less electricity! infrared. Yes, even an electric fireplace! The main thing is to insulate it well and correctly calculate the power of the heater. Otherwise, it will turn out that you are literally wasting your money.
Not so long ago, the apartment balcony was just an addition to the apartment itself; people went out onto it to breathe in the air, or to hang clothes to dry. The balconies were not glazed, so they could not be used for anything else. After that, the balconies began to be glazed, and they began to be used as a storage room, all unnecessary things in the house were stored here, gradually cluttering it. Nowadays, balconies are approached from a more practical point of view. The balcony is a continuation of the apartment; a full-fledged living space is made from it, turning it into a recreation area, an office and even a nursery. This result is achieved if the balcony is properly insulated.
The most effective external insulation is an external multilayer enclosing structure that protects the room from condensation, steam, mold and dampness, and the junction of the temperature difference occurs outside the room. This type of insulation requires certain skills, and in some cases, permission.

There are 5 more options for materials with which you can insulate a balcony:
- Styrofoam... The most affordable and economical insulation of our time. Due to its lightness, the material is easy to install and cheaper than mineral wool.
- Mineral wool... Highly effective material... Harmless and made from natural material natural origin. The low cost of insulation with mineral wool allows you to inexpensively and independently use it for insulation of walls, ceilings and floors.
- Expanded polystyrene(foam insulation). The material has the greatest amount good properties than mineral wool or polystyrene. It is protected from moisture, fits without the construction of a lattice, since it is quite rigid. It has a smaller thickness, which is beneficial when arranging a small area.
- Foil foamed polyethylene. Lightweight material having a cellular structure formed on the inside of the foil layer.
The latter option has a small thickness and cost, but differs in that it provides excellent thermal insulation and has high noise insulation, as well as waterproof. Lining is also used, but only with a well-heated room. Otherwise, it is necessary to install a basic insulation.
Scheme: how to insulate a balcony in a panel house yourself
In almost every panel house at modern apartment there is a balcony or loggia. And in order for the room to function as expected, the loggia must be insulated, and you can do it yourself.

Many people use the loggia for household purposes, such as:
- Warehousing of things;
- Drying clothes;
- At the expense of the loggia, they increase the premises of their apartment;
- They make an additional room or expand the adjacent one.
To implement all of the above ideas, foam insulation is necessary. A special waterproofing compound on a cement basis, by treating the surface of the walls and ceiling, creates a barrier so that moisture does not penetrate through the balcony partitions. In this case, special polyethylene is used, which keeps the insulation from moisture, so that mold and mildew does not develop after the formation of condensation and water accumulation under the finish coat.
The foam is quite airy, since it consists of 85% of air, it creates good sound insulation and thermal insulation.
Using a metal corner and "umbrellas" the slabs are attached to the balcony ceiling, and using a dowel drill to the walls wooden planks at a distance of 50 cm, forming a crate. To create a solid coating when insulating the floor, it is necessary to act according to the same scheme, only wooden slats you need to take a much larger thickness. In the cells formed by the crate, sheets of insulation cut out of the required size are placed, which are attached to the surface with an adhesive.
Modern technology of balcony insulation
Balcony strengthening technology consists of a complex renovation works, which are aimed at creating special structures that provide comfort and warmth in the room in which the renovation is taking place.

Glazing of the balcony and insulation are important. If the glazing of the balcony has not yet happened, then a huge number of window installation firms will help to cope with this task. This is the most important point in the insulation of the balcony, without it, full insulation will not work.
And to resolve the issue and start to insulate cold balcony in a new building, for example, it is worth using mineral wool... Waterproofing of the balcony wall is created due to the fact that the mineral wool is afraid of moisture and loses its heat-insulating properties.
To prevent moisture penetration through the balcony partition or wall, the rules, sequence and installation procedure must be followed.
The main covering is created from waterproofing building materials. For this, any foil-based material is used, the so-called special polyethylene. After that, the absence of cracks is checked, if they are detected, it is possible, starting not from the inside, but from the edges, to seal up with polyurethane foam.
- Build from bars wooden crate... You can use 400 x 500 mm wood slats.
- Finishing decorative panels made of plastic or wood are attached to these slats.
- The installation of the mineral wool should be started after fixing the lathing using a special adhesive based on cement.
If the base where the insulation is attached is wooden, it is possible to use construction stapler... To fix the space between the battens, a roll of mineral wool is taken, cut into pieces of the desired size and fixed with glue. The floor and walls are insulated in the same way.
We carry out the correct insulation of the balcony
On a pre-prepared floor, it is necessary to make markings for the construction of the lathing. The step of the lathing should exceed the width of the insulation sheets by at least 10 mm. According to this marking, the slats are laid, the extreme parts are laid with an indent from the walls by 5-10 cm. You need to fasten them with self-tapping screws.
Insulation sheets are laid between the rails, which are glued to the floor. liquid nails or glue.
A vapor barrier layer is mounted on top of the insulation. This is either PET film or foil. After all, sheets of plywood or chipboard are fixed to the slats using self-tapping screws. Then everything can be poured with cement, where you can install a warm floor, since no coating will provide heat in the same way as this type of insulation. It ends with a packing topcoat to choose from.

Correct insulation of the balcony means the following:
- External insulation;
- Glazing;
- Wall insulation;
- Floor insulation;
- Ceiling insulation;
- Finishing of the premises.
The insulation is mounted on a pre-treated with an additional waterproofing compound and cleaned, leveled surface. Cement mortar should be used to cover the joints of the plates and polystyrene.
We figure out how to properly insulate the balcony from the inside
Preparatory work needs to be done. Every surface, be it floor, walls or ceiling, must be carefully cleaned from small and large debris. It is necessary to dismantle the old floor covering and remove all cabinets, shelves, fixtures, etc.
If chips and cracks are found on balcony slabs, it is necessary to remove them, and then fill all cracks and holes with cement mortar. If the surface is uneven and in the way correct installation insulation, then you need to carry out the finishing plaster of the surfaces. The finished sub-floor and walls can be used for insulation work.

Foamed polyethylene foam is mounted as follows:
- A layer of FVP is laid on the surface of the wall.
- A crate is erected on top of it, polystyrene is laid in the cells, a layer of foamed polyethylene is placed on top.
- Finish coating.
On the walls, it is necessary to mark the location of the slats, and then attach them. Next, holes for dowels are drilled and polyurethane foam is applied to the surface with undulating movements. Foam sheets are attached using plastic mushroom dowels. All cracks that have formed need to be filled with polyurethane foam and glued with assembly tape. A waterproofing layer is laid. The resulting seams are sealed with foil tape.
Step-by-step instructions: how to insulate a balcony from the inside with your own hands
A marking is carried out, suspensions are installed along it, supporting the guides. Suspensions are installed, in the role of which a galvanized profile or a bar can be used, they are necessary to fix the guides.
Holes for suspensions are cut in the right places of the insulator (foam or EPS). Insulation plates are fixed with the help of polyurethane foam. Further, everything is revetted with finishing material.
How to insulate a balcony from the inside with your own hands (video)
It is easy to insulate a balcony using materials that are convenient and practical. If you follow the exact instructions, then there should be no problems with insulation. Simply, you need to show diligence and self-confidence, then everything will definitely work out!
DIY balcony insulation ideas: step-by-step instructions (photo examples)


Until recently, the balconies of city apartments served as a kind of storage room - there people kept preservation and various things. What is really there, on the balconies they carried out any unnecessary rubbish that it was a pity to throw away. However, today these premises are increasingly used as additional living space. And in order to realize such an idea, you need to take care of the insulation of the balcony.
If you insulate the balcony, you will be able to expand not only relatively cheaply living space apartments, but also significantly reduce the heat loss of housing. The fact is that it is through the balconies that most of the heat leaves. But for everything to be done efficiently, you need to know where to start. With a well-designed scheme, it will be much easier to turn a cold balcony into a small, but almost full-fledged room.

So, first, sketch out a rough work plan - it will include:

Important information! The balcony can be insulated both inside and outside. But in view of the fact that you will be doing the work on your own, that is, without the help of specialists, it is better to resort to internal insulation.
Stage 1. Choosing a heater
On modern construction market there are many thermal insulation materials, but for a balcony it is more suitable:

As for the foam and EPS, the laying of these materials is carried out practically using the same technology (the only exception is the form of adhesion - in EPS it is better due to the use of grooves).
It is better not to use mineral wool for the balcony - the installation procedure will be more laborious, and condensation, which inevitably forms on the balcony, is undesirable for this material. Expanded clay, for obvious reasons, can only be used for floor insulation (insulation technology will be described in detail below).
And if to all of the above we add the fact that the balcony should in no case be overloaded, then it becomes obvious: the most suitable option- This is foam plastic 4-5 cm thick, which is cheaper than expanded polystyrene or mineral wool.


Stage 2. We carry out glazing
If your balcony is already glazed, you can skip this step. The glazing procedure itself largely depends on the parapet installed on the balcony. If it comes about an iron crate, then you must build it up using foam blocks or ceramic brick... It is important that the thickness of the walls as a result exceeds the 10 cm mark. And if you have a reinforced concrete parapet, you can immediately start installing windows.

Today, many (especially fans of environmentally friendly building materials) prefer double-glazed windows with wooden frames. It is worth remembering that such structures must be treated with an antiseptic and painted regularly. You can learn about the installation of insulating glass with wooden frames from the video below.
Video - How to install a wooden window with double-glazed windows
However, most of the consumers still buy PVC windows. When buying, choose a special plastic profile, characterized by increased rigidity and strength characteristics. In addition, the profile must have good thermal insulation properties.

Even at plastic windows it should be:
- 5-chamber profile;
- 2-chamber (if you live in middle lane) or 3-chamber (if in a more severe climate) double-glazed window;
- reinforced reinforcement.
After installation of the PVC structure ordered according to the size of the balcony (the work must be done by specialists), you can proceed directly to the insulation.
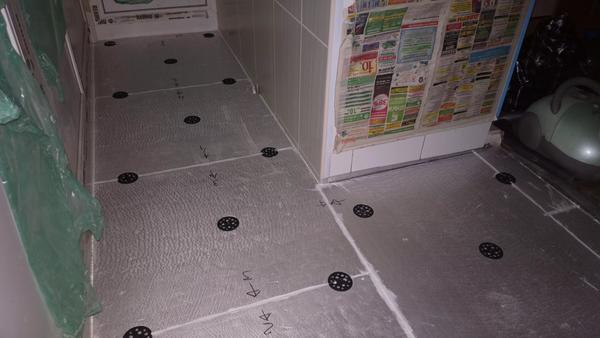
Stage 3. We insulate the floor
Consider how to insulate a balcony from the inside with your own hands using polystyrene foam (although the technology described below is also suitable for expanded polystyrene).
Table. Insulation of the floor on the balcony
| Steps, no. | Short description | Illustration |
|---|---|---|
| Step # 1 | First, prepare the work surfaces - seal all the cracks found in the concrete, as well as at the joints between the slabs and the wall, with polyurethane foam. |
|
| Step # 2 | Mark the floor for the subsequent construction of the lathing. In this case, it is important that the pitch of the lathing exceeds the width of the insulation sheets by about 10 mm. |
|
| Step # 3 | According to the previously made markings, lay the slats (the approximate size of the bars is 4x4 cm, however, it is necessary that their width corresponds to the thickness of the insulation material). The first and last slats should retreat from the walls by 50-100 mm. Connect the rails with self-tapping screws. |
|
| Step # 4 | Place foam sheets between the battens of the battens, gluing them to the floor with liquid nails or special glue. Blow out all the resulting voids with polyurethane foam. |
|
| Step # 5 | Lay on top of the insulation On top of the insulation, lay a vapor barrier layer (necessary to increase thermal insulation and prevent condensation). If you are using regular PET film, never place it on the “cold” side of the insulator. If you are installing foil insulation, use the foil to the foam. |
|
| Step 6 | Fasten plywood or chipboard sheets on top, and the thickness flooring must be at least 20 mm. Attach the sheets to the slats with self-tapping screws. |
|
| Step 7 | It remains only to lay the topcoat, which you can use as carpet or linoleum. |
|


Important information! There is another way of insulating the floor on the balcony with foam: sheets of foam are attached to the leveled and cleaned surface, and from above it is poured thin screed from a previously prepared solution of a dry mixture. Ceramic tiles can be used here as a topcoat.
Alternative option. We use expanded clay
As noted earlier, the floor on the balcony can also be insulated with expanded clay. This material is also inexpensive, and its installation is not difficult. Let's get acquainted with the algorithm of actions.
Step # 1. First, lay a waterproofing film on the floor with an exit to the walls of 10 cm.

Step # 2. Place the beacons around the perimeter in increments of about 25 cm, while being careful not to lean them too much against the walls.
Step # 3. Fill the floor with a layer of expanded clay 15 cm thick, distribute the material evenly over the surface.


Step # 4. Moisten expanded clay with cement "milk" (this water solution cement).


Step # 5. Pour the expanded clay with a layer of concrete or self-leveling mixture. This must be done carefully so as not to damage the structure of the insulator.

Step 6. Wait until the screed is completely dry. Then you can start laying the topcoat.

Stage 4. We insulate the walls
The technology here is practically the same as for floor insulation. Follow the steps below.
Step # 1. Mark the future location of the slats on the walls (as for the floor).
Step # 2. Attach the strips according to the given markings.

Step # 3. Apply to surfaces in a wave-like motion polyurethane foam... At the same stage, holes for the dowels should be drilled.
Step # 4... Attach the Styrofoam sheets using plastic mushroom plugs.

Step # 5... Blow out all the cracks formed with polyurethane foam, and then glue it with polyurethane tape.
Step 6... Lay a waterproofing layer on top - for example, penofol, which will also serve as thermal insulation at the same time.


Step 7... Cover the seams at the joints with foil tape.
Step 8. Mount the counter grill over the foam foam and install the finishing material.

Stage 5. We insulate the ceiling
This procedure is also performed using a similar technology, however, some differences still take place.
- First, make the markings along which the hangers for attaching the guides will be installed.
- Install the hangers themselves, necessary for fixing the guides (in the role of the latter, use a galvanized profile or timber).


- In the appropriate places, cut out small holes in the insulator (foam or EPS) for the hangers.


- Next, fix the insulation plates using the same polyurethane foam.

If the insulation weighs too much, then you can use dowels for fastening. Blow out the cracks with foam. Otherwise, there are no significant differences.

Finishing features
In most cases, balconies are lined from the inside with clapboard or profile, but drywall is also used, followed by wallpapering. PVC panels are also used for cladding. Concerning exterior decoration, then it is better to entrust it to professionals, especially if your apartment is located higher than on the first floor.


Important information! It is forbidden to go there central heating, therefore, if additional heating is required, you can lay a film "warm floor" under the linoleum.
You can also install an outlet on the balcony to which an electric heater will be connected. The described room is small, so heating will take a minimum of time. Note also that a glass unit weighs a lot, so the rest of the materials (including the insulator itself) should be with a minimum weight. By the way, this is another reason why it is better to give preference to EPS or foam plates.

Video - Balcony Insulation Instructions
Now you know about the strong and weaknesses materials suitable for insulating a balcony, as well as technologies for laying foam and expanded clay. Therefore, it's time to start working directly! Moreover, there is nothing complicated here if you are armed with step-by-step instructions and all necessary materials... If you do everything right, then turn the balcony into a full-fledged living room with all the ensuing advantages.
Is it possible to insulate the balcony in winter?
In residential buildings, most apartments have balconies. Some people use them as a workshop or storage room. However, for small apartment such a room provides an opportunity to fully increase the living space. At the same time, it is important to ensure a comfortable temperature inside. It is not always possible to insulate a room in summer or autumn. Is it possible to insulate a balcony in winter, and what materials are better to use? - the apartment owners have a question. We will try to answer it.
Is it possible to insulate a balcony in winter
Answering the question about the possibility of thermal insulation of the balcony room in winter, the builders give an affirmative answer.
After all, the general algorithm for performing work does not change depending on the season, temperature environment and includes the following steps:
- Preparation of the premises.
- Installation of double-glazed windows.
- Thermal insulation of the floor.
- Wall insulation.
- Fine finishing.

In order for the balcony to turn into a comfortable room in which it would be pleasant to be, the first step is to carry out work on the thermal insulation of this room
When deciding on the insulation of the balcony when negative temperature, you need to decide on the following questions:
- selection of specialists for thermal insulation works;
- material used for thermal insulation;
- external thermal insulation technology;
- internal insulation methods;
- the specifics of performing individual operations.
After competently performing the measures for warming the room, the temperature on the insulated balcony in winter should correspond to room temperature or differ from it by no more than a couple of degrees.
When performing work in winter time it is important to ensure:
- maintaining comfortable temperature conditions in the room adjacent to the balcony;
- the use of materials that retain their properties at negative temperatures.
In addition, the construction personnel should be able to work at low temperatures. Having ensured that all requirements are met, it is possible to carry out thermal insulation measures in winter.
How to close the balcony for the winter - selection of insulation
It is important to take seriously the issue of the selection of building materials for insulation. It is necessary to pay attention to a number of points:
- fastening method;

Many people think that insulating a balcony is an expensive, laborious process that requires the involvement of specialists.
- moisture resistance;
- ease of fixation;
- thermal insulation properties;
- vapor permeability level;
- manufacturer's warranty;
- fire resistance;
- strength characteristics;
- service life.
From a variety of materials, private developers and professional builders prefer the following heaters:
- extruded polystyrene foam. It is available in different sheet thicknesses. Sheet material known as penoplex and has increased thermal insulation characteristics with a cladding thickness of 5 cm. The material features a reduced level of thermal conductivity, moisture resistance, strength and low weight. Expanded polystyrene is easy to cut, which allows quick installation;
- mineral or basalt wool. These are common heat insulators that are supplied in roll form... The rolls are available in various thicknesses ranging from 20 to 200 mm. Construction wool ensures reliable heat retention thanks to low level thermal conductivity. Lack of material - reduction thermal insulation properties when absorbing moisture. Usage protective equipment – mandatory requirement when laying mineral wool;

There is no need to rush in matters of insulation. Both when performing work and when planning them
- foam. The use of this insulation makes it easy to make budget balcony do it yourself. With a thickness of 4–5 cm, it ensures reliable heat retention due to its low thermal conductivity. The low weight of the heat insulator allows for the insulation of dilapidated structures. Despite its advantages, foam is a fragile material with a limited service life. It collapses under the influence of temperature drops and humidity fluctuations;
- reflective heat insulators. Foil insulation is used relatively recently. They are a metallized coating with protective properties applied to a base made of polyethylene, mineral wool or polystyrene. Reflective insulation is characterized by low thermal conductivity, provides efficient reflection of thermal energy, creating a comfortable temperature environment. The main advantages of the material include ease of fixation and moisture resistance;
- polyurethane foam. In its initial state, it is a liquid fraction, which, after spraying with the help of special devices, forms a porous and seamless heat-insulating coating. Polyurethane foam quickly hardens after spraying, forming a porous layer of heat insulator, which impedes the access of cold air. A significant drawback is the need to use special equipment for application to the surface.
After consulting with specialists, you can choose the optimal heat insulator and calculate how much it will be required.
How to insulate a balcony to room temperature
Consider how to insulate the balcony room so that the temperature on the glazed balcony in winter matches or slightly differs from room temperature. It is necessary to observe the technology of thermal insulation measures and use high-quality insulation. Let us dwell on these issues in more detail.

The most important thing in the insulation of the balcony is the installation of metal-plastic glazing
Preparatory work
Exercise preparatory work according to the following algorithm:
- Take out furniture and belongings.
- Dismantle the old frames.
- Remove the existing cladding.
- Clean the surface to be insulated.
- Seal cracks and joints with foam or sealant.
Integrity should not be violated metal railings, since they can be used as a frame for installing insulation, attaching siding or lining.
Homeowners often decide to remove the partition and combine the room with the balcony. To do this, perform the following work:
- remove doors;
- remove framed windows;
- dismantle the pier.
After the opening is cleared, the following activities are carried out:
- Check the condition of the opening.
- Plan the surface.
- Close up cavities.
- Carry out waterproofing treatment.
After completing preparatory activities, proceed with the installation of double-glazed windows.

Due to the affordable price, almost everyone can afford PVC window structures
We seal the crate
The metal lathing is the basis for the installation of double-glazed windows. For its thermal insulation, you can use foam or mineral wool.
4.67 / 5 (3 ratings)
Who will refuse extra space on the balcony? This is a space that never gets in the way.
Someone will need it to store seasonal items. After all, in the apartment, as a rule, everyone square meter has its own purpose. Others redevelop and arrange.
And still others acquire a cozy corner where they can relax. All this can be realized if this room is insulated. Otherwise, it will be damp, cold, unattractive.
Many people think that insulating a balcony is an expensive, laborious process that requires the involvement of specialists. In fact, you can do everything yourself if you know how it works. Consider below how to insulate a balcony on your own, without making any mistakes.
Errors when insulating a balcony
As a rule, everyone advises what to do. But this is not always effective. But knowledge of the basic mistakes that can be made during construction work will at least save you from extra costs funds and their own nerves.
When insulating a balcony, you need to remember two main mistakes of novice builders:
- Buying cheap building materials. If you save on everything, without going into the essence technological process, you can face the consequences in the future. Poor-quality building materials will begin to let the cold inside the room, or even completely lose their attractive appearance.
- Rush. There is no need to rush in matters of insulation. Both when performing work and when planning them. It is necessary to draw up a clear plan for capital insulation, consult with specialists in the choice of materials and slowly do the work.
Preparation
As already mentioned, in order to normally insulate the balcony and not reap the consequences of improperly performed work, you need to act according to a clear algorithm. It starts with preparatory work. It is necessary to remove all unnecessary things from the balcony, remove the old frames with glass and take them out, clean the surface for work.
But which of the old structures should be left, and which is better to dismantle? If the railings or partitions remain of normal strength on the balcony, they will be useful for subsequent insulation. Outside, they can be hidden under plastic, and inside they can be sheathed with insulation. This will be an excellent base for making the structure more rigid. But if there are tiles on the walls of the balcony, it should be removed, it will only interfere with the installation.
After the surface is cleaned, it is checked for cracks. All destruction of floors is preliminarily covered with a classic cement mortar, and the gaps between concrete slabs blown out with polyurethane foam.
Strengthening the balcony parapet
The most important thing in the insulation of the balcony is the installation of metal-plastic glazing. But if ordinary windows can be safely inserted into the opening, with a balcony the situation is different. Parapet on which bulky is placed window frames, is not always ready for such loads, so it is better to strengthen it before replacing windows. At the same time, in order to ensure a rigid structure and not increase total weight, it is better to use reinforced mesh and cement, since brickwork will be both heavy and cumbersome.
Installation of windows
As soon as the preparatory work is done, they begin to actually install the windows. And here lies a mistake for many owners of balconies. Appreciating that the old wooden frame in excellent condition and will last for a long time, it is decided that it is not worth replacing it yet. This is a mistake in the category of saving money. In fact, even if the old wooden window in excellent condition, it is not able to provide the same heat retention qualities that plastic frame... The new design will last a long time, it will keep the same temperature at high humidity, temperature drops. And due to the affordable price, almost everyone can afford PVC window structures. Therefore, the insulation should take place exclusively with the replacement of the old glazing.
The choice of material for insulation
The next most important factor affecting the quality of insulation is the choice of insulation. They will have to sheathe the walls, ceiling, floor. Most often, foam or mineral wool is chosen as insulation, depending on the budget. These are the most successful materials in terms of thermal conductivity. Of course, extruded polystyrene foam is the best choice. It is easy to use, easy to cut and glue. In addition, the material has a long service life in high humidity conditions. But for such excellent characteristics you have to pay dearly.
You can save money by choosing regular foam. It has the same characteristics as the above material, but it has a slightly shorter service life.
Sealing cracks
Having chosen a heater and installing double-glazed windows, they go to next item insulation of the balcony - sealing the cracks. There is no escape from them, since all old balconies have this problem. And you need to eliminate the gaps, because even if you use all the most modern materials all the heat will go through these holes.
To eliminate cracks, I use special sealants or mastics. They are highly resistant to changes in temperature, humidity, and other atmospheric phenomena. They blow out the sealant with a special gun, then wait for it to dry completely, and only then install the insulation on the walls.
Insulation of balcony walls and parapet
When the material for insulation has been selected and all the preparatory work has been completed, you can proceed with the installation. By this time, there should be the following materials:
- polystyrene or penoplex;
- penofol;
- polyurethane foam;
- dowels with special caps;
- foil tape.
The installation principle is as follows: foam or foam is prepared for installation by choosing right size and, if necessary, trimming it. Then foam is applied to the wall and the insulation sheet itself with a thin layer, not forgetting to lubricate the foam joints with it. With the help of a level, the first sheets are installed so that they stand level, and then they are firmly attached to the wall with dowels. In this case, the dowels should be of such length so as not to punch through the wall.
The next stage is the installation of a heat insulator. To do this, take penofol (a material covered on one side with foil that reflects heat and does not allow it to leave the room) and glue the insulation with it with foil tape. In this case, you should not spare the heat insulator - you need to glue not joint to joint, but with an overlap of 3-5 centimeters.
Floor insulation
When the walls are insulated, they move to the floor. It requires the following materials:
- penoplex;
- polyurethane foam;
- wooden slats (with a thickness corresponding to the thickness of the foam, as a rule, 50 mm);
- self-tapping screws.
Wooden slats are laid on the floor along the balcony, the distance between which should correspond to the width of the foam + 1 cm. They are screwed with anchors or self-tapping screws to the floor. In this case, the self-tapping screw should go through every 30-40 cm of the slats. To make the workpiece even, laying must be done using a level. And if some elements of the floor are slightly lower than necessary, you can put a piece of plastic under them.
Then, penoplex is installed in the openings between the rails and all the cracks in the structure are blown out with foam to completely ensure thermal insulation.
As soon as the installation of the insulation is completed, decorative flooring is done. First, chipboard or plywood 2 cm thick is laid on top of it so that the floor can withstand the load. The canvas is screwed to the bars with self-tapping screws every 10-15 centimeters. The canvas on the balcony should be mounted across, and a gap should be left between the sheets, since then they can rub against each other and creak.
When installing chipboard on slats, you must not step on it, as this can deform the canvas, and the floor will be uneven. it common mistake when installing the floor. Until the canvas is fully secured, you cannot walk on it.
Do you need a warm floor on the balcony?
Warm floors are a popular solution today. They are installed in office rooms and living rooms... They are economical and practical. But is it possible to make such heating on the balcony? Yes, this will be the most the best option... The fact is that the radiator, if installed on the balcony, will only warm up the air, but the floor will remain cold. A warm floor will completely warm the entire room. But only specialists can install it. It is better not to do the installation on your own, since there are a lot of subtleties that can be ignored without work experience.
Is it possible to insulate the balcony in winter?
Some people are faced with the problem of a cold balcony in winter, when it is very difficult to insulate it. But is it real? After all, any construction works it is best done in summer, and some materials do not tolerate frost at all during installation. If you use insulation and foam that can withstand low temperatures, you can also carry out insulation in the winter. But it will be more difficult to do, and the installation itself will be more expensive, so it is better to do everything in advance.
But if you had to insulate in winter, what should be the actions? It should be understood that the cement used to seal the cracks quickly freezes in winter, without having time to grab. Therefore, you need to purchase either special additives that allow the solution to maintain plasticity, or use winter glue. Otherwise cement mortar will lose its strength and quickly collapse.
Polyurethane foam also depends on temperature fluctuations. Therefore, you need to acquire special option, which can be used for installation during frost. It should be remembered that foam is the same insulation as polystyrene. And if it does not fulfill its functions due to the fact that the owner saved money and bought "summer" foam in winter, you can not even dream of a warm balcony.
Thus, a warm balcony, although it is done in the summer, but in extreme cases (if not very severe frosts) it can be done in winter too. But it should be remembered that all materials used must be frost-resistant (the characteristics must contain the possibility of installation when low temperatures), and it is better to entrust the work itself to professionals, so that any violation of technology does not affect the final result.
Balcony finishing
The last stage of the balcony insulation is decorative. When the walls are insulated, the floors are installed, all that remains is to decorate and bring finished view... This requires the following materials:
- wooden slats;
- laminated panels;
- decorative guides;
- polyurethane foam;
- construction stapler;
- self-tapping screws;
- staples to the stapler.
First, they put wooden slats using self-tapping screws. It is convenient to do this, since wooden frame already available. In this case, you need to use a level so that the workpiece looks even. Reiki is placed on the ceiling and walls. Moreover, in the latter case, their thickness should be at least 20 mm. They are screwed to the walls with self-tapping screws, and if the wall is made of concrete, dowels are used. In order for the slats to firmly attach to the wall, it is recommended to first apply mounting foam on them, and the distance between the slats should be no more than 35-40 cm.
If you decide to insulate the wall between the balcony and the room, which is not at all necessary, fix the slats as described above.
As soon as the wooden frame is assembled, proceed with the installation decorative elements... To do this, prepare laminated panels and attach them with a construction stapler directly to the slats. So that the ends do not spoil appearance walls, they are hidden behind decorative guides. First, the ceiling is sheathed, then, according to the same principle, the walls.
As soon as the main room is insulated and decorated, it remains to complete the work on the parapet and complete the laying of the floor. First, the parapet is trimmed. To do this, the same wooden slats 20 mm thick are stuffed onto the parapet itself, creating such a frame when there is sufficient distance between the window sill and the rail to install decorative panel... Having installed the frame, they stuff the laminated panels with a stapler on the parapet. The joints are hidden under decorative guides, and the slopes are trimmed with the remains of the panels. At the bottom, the panels are hidden not under the guides, but under the skirting board. And on the slopes, they are fixed on polyurethane foam, additionally using the remnants of the guides and a stapler. So that the slopes are clearly separated from the rest of the wall, it is recommended to install at the corners decorative corners... They finish the work by covering all the seams and joints with a special sealant.
An alternative type of installation of insulation on the balcony can be viewed in the video material.
In the heading | with tags, |

