Do-it-yourself chipboard rack for home. How to assemble a rack with the right dimensions at home Make a rack for things
Tidy up even small room not as easy as it seems. Especially if it's littered large quantity of things. Spacious shelving will help to clear the place and organize the chaos. The design is universal in its essence - it can be installed in any room, and it will look organic. To learn how to make a rack with your own hands, you need to understand the types and materials of this design.
At the word rack, many represent a metal unpretentious structure, which is used mainly in warehouses. But such furniture is used only on an industrial scale or garages. They must meet the following criteria:
- high functionality: the more capacity - the better;
- strength - the best racks for pantries and garages are metal, they are durable and unpretentious;
- easy care - furniture made of porous materials or with an expensive paint coating requires delicate handling, so it is better to use wood and similar materials in technical rooms.

However, shelving living rooms I want to be more original. Do not limit your imagination when creating such designs. Indeed, in addition to the main function, the rack can become a worthy decoration of the entire room.
bottle rack
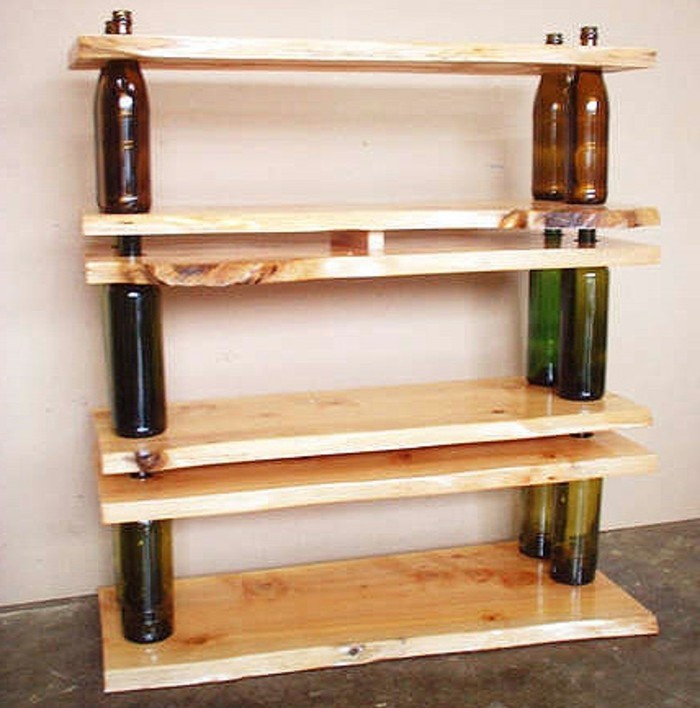
If you want to build a rack for the kitchen, you should take a closer look at the bottle design. It will appeal to collectors and connoisseurs of alcohol. To create a rack, a solid mass of wood and bottles of the same shape and height are used. To give the wood a noble shade, various impregnations and stains are used.
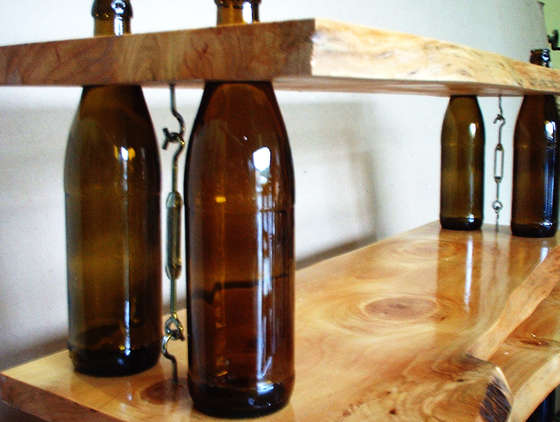
Note! Dark wood looks very noble with green glass bottles. And you can give wood a vintage touch with the help of artificial aging and firing.
Shelving ladder
V big houses or duplex apartments large space occupy the stairs. For savings usable space this interior detail can be combined with a rack. Hollow drawers made of solid wood or chip materials will hold a lot of necessary little things. Many book lovers keep their favorite volumes in such lockers. And the ladder is used as a cozy seat when reading. For greater functionality, drawers can be supplemented with original doors.
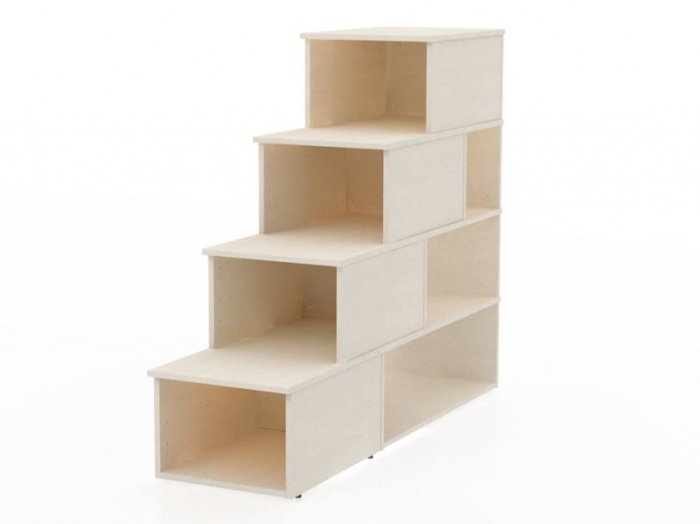
If there is already a staircase in your house, and you do not intend to redo it, then the rack can be placed directly under it. Create a design that repeats the outlines of the steps. The distance between the vertical racks of the frame should be equal to the width of the steps. This will create an organic composition.
suspended structure
Those who do not want to spend a lot of time and money on the rack will do suspended structure. It consists of shelves strung on twine. It is not used for storing heavy objects, but for small trinkets - completely.

In a similar style, glass shelving looks very interesting. Shelves made of colored and transparent glass are strung on metal cables, and beads or decorative supports are strung between them.
Steampunk furniture
Steampunk style fans will appreciate the shelving made of water pipes and fittings. The frame of the structure is assembled from them, and a solid array is used for the shelves. The rack will organically fit into the interiors in the style of:
- loft;
- steampunk;
- industrial, etc.
However, if you keep the furniture in restrained colors, then it will perfectly complement both the kitchen and the living room. A rack of this type perfectly saves space also due to the absence of rear pillars. The design is attached to one bar from above and to the floor. Shelves are strung on racks alternately. Even an unprepared person can assemble such a rack with his own hands.

Note! If you want to create a steampunk design, use copper frame paint.
Create a project
Before starting work, outline the appearance and parameters of the future design. For this, a piece of paper or editors for design is suitable. Before drawing a drawing, the following parameters must be considered:
- the height and width of the room in which the rack will stand;
- the size and weight of the items placed under storage;
- room humidity level.

The design of the rack is very simple: it consists of a frame and shelves. Wood and metal are most often used as the outer frame. If the rack will be located in a room with high humidity, moisture-resistant wood, plastic or glass are used for the shelves. The metal frame is coated with anti-corrosion compounds to protect against rust.
Important! In rooms where contact with moisture cannot be avoided, it is not recommended to use wood for the frame.

When you have decided on the purpose and location of the future rack, you can start measuring. Measure the height of items that are planned to be stored on the shelves, and add another 7-10 cm to the value.
Consider proper weight distribution. The heaviest and most voluminous items are placed on the lower shelves. The higher the shelf, the lighter the things stored on it should be. At the very top put various drawers, boxes and more.
At the racks on which it is planned to store books or jars with blanks, the legs should be placed close (half a meter ± 10 cm). If a metal profile is used for the frame, the step is increased to a meter.
Creating a simple shelving unit out of wood and metal
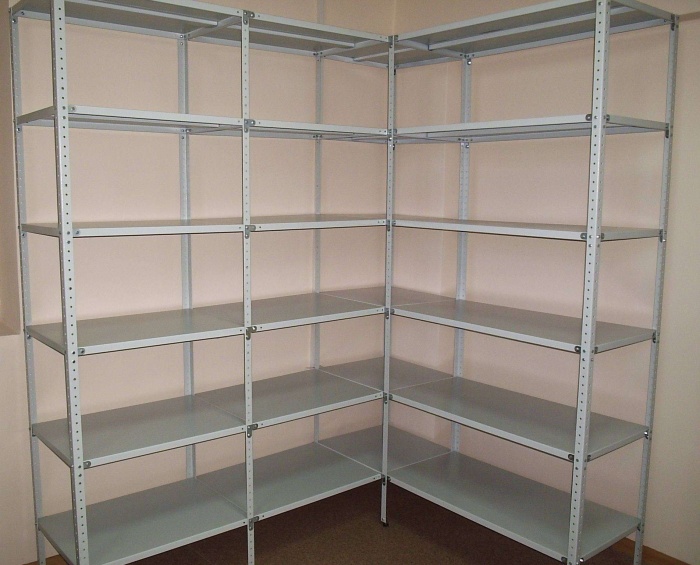
If you need simple and roomy shelving for a dressing room or pantry - use simple design from wood and OSB. For the frame, a beam with a square section with a side of 5 cm or more is suitable. If you are ready to spend more money on the structure, replace the OSB plates with an array.
Assembly steps
The instructions for creating a rack include the following steps:
- cutting timber - the material is cut for the frame according to the drawing;
- with the help of self-tapping screws or nails, a rectangular frame is assembled, assembly starts from the bottom corner;
- the frame is attached to the wall with metal fasteners and self-tapping screws;
- mark and saw OSB boards for future shelves;
- the shelves are laid on the crossbars of the frame and fastened to nails or self-tapping screws.
Note! Self-tapping screws are more durable fasteners.
Location of crossbars
If the vertical racks are located close to each other, the design does not need crossbars. This function will be performed by a thick OSB plate. If you want to create a more stable structure, you can't do without crossbars. To do this, you need to install longitudinal crossbars under each shelf. You can get by with one, but most often a pair of crossbars is used.
Important! To increase the strength of the structure, diagonal beams are attached to the back wall.

metal rack
To assemble a metal rack you will need welding machine or electric drill. The welded construction looks neater, besides, it is more reliable than the national team. If you do not have such tools, it is better to give preference to wooden furniture.
The instructions for assembling a metal shelving practically do not differ from the manufacture of a wooden one. The first stage consists of assembling the frame and attaching the structure to the wall. If weighty materials are used for shelves, then crossbars are not needed.
Note! To create a rack, it is better to purchase a metal profile, and not a corner. It is more convenient to assemble and maintain.
As a material for slaves, a tubular metal profile of square section with a side of 25 mm and a metal thickness of 2 mm is used. If a corner is used, the optimal size is 40 by 40.
For making light structures use supporting metal brackets. Dowels or self-tapping screws are used as fasteners. Shelves are laid on top of the brackets.
A lightweight version of the design can be made using metal support brackets. They are fastened with dowels to the wall, and on top they put shelves made of boards or OSB boards.
If you want to learn more about the manufacture of the rack - watch the video instruction. From it you will learn the tricks of construction and be able to assemble a durable and functional structure.
Shelving is a very common household item. Its main advantage is of an ergonomic and aesthetic plan: it is “airy”, visually compresses the space of the room a little, which is essential in small apartments, and when zoning a room, in housing of any class. Shelving designs are not complicated, they do not require a lot of work, and at least for those who live on a budget, it makes complete sense to build them on their own.
To make a rack with your own hands, you must first decide on its purpose. In addition to purely utilitarian shelving in garages, basements, workshops, on balconies (which will also be given due attention below), in residential premises, shelving is used mainly as general-purpose storage for small items, pos. 1 in fig. In second place in demand are bookcases, pos. 2. Second-hand booksellers and librarians are well aware that a book must breathe and will not last long in a closed bookcase.

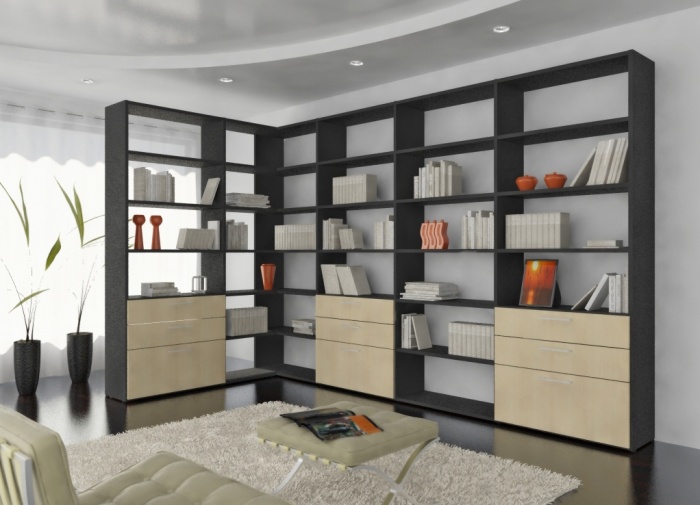
This is followed by corner racks (pos. 3) in a restless corner, which sooner or later forms in any inhabited apartment. With the help of a rack, you can arrange a work area, a mini-boudoir, etc. here. Finally, a rack-shelf for space zoning, pos. 4, and rack cabinet when using regular cabinet, you would often have to open several doors at once, pos. 5.
Note: shelving special purpose- for toys, in the kitchen, for flowers, tools, etc. - they do not fit into the household classification and will be considered separately.

The latter cases are the most difficult in terms of furniture design. The zoning rack must be particularly strong, stable and, preferably, attached to the floor, ceiling and adjacent wall. A rack-cabinet, in order to be equal in strength to a cabinet counterpart, must, firstly, contain a central rigid box in the power circuit (possibly not full height); secondly, its side sections must be strictly symmetrical, as shown in fig.
Power Circuits
Wooden
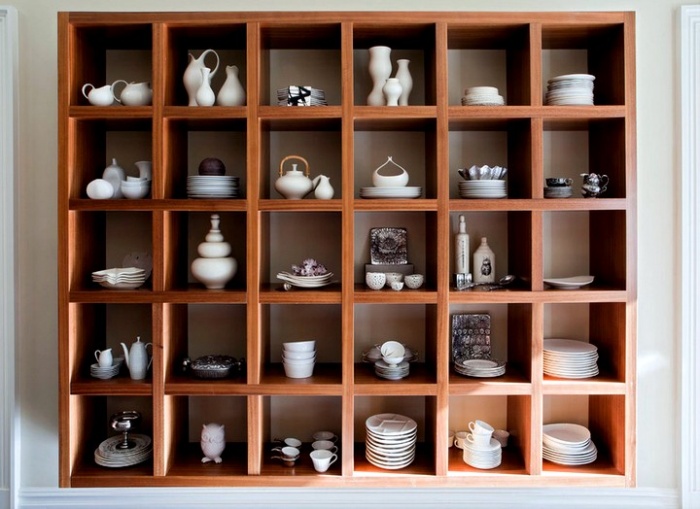
A wooden rack most often does not have a rear sheathing and solid vertical partitions, therefore its proper reliability is achieved by somewhat different means than with cabinet furniture. Sufficiently strong and openwork design have box racks. Their sidewalls are not necessarily solid shields, they can be stacked from flexible rods (broom effect) or bars and slats, pos. 1 and 2 in fig. Such racks are most suitable for zoning.

Where the appearance is not important, and the workloads are small (underwear, shoes, etc.), it is better to make a frame rack, pos. 3; are the least labor- and material-intensive. Loaded shelves in them can be included in the power circuit anywhere along the vertical and therefore they can be rearranged.
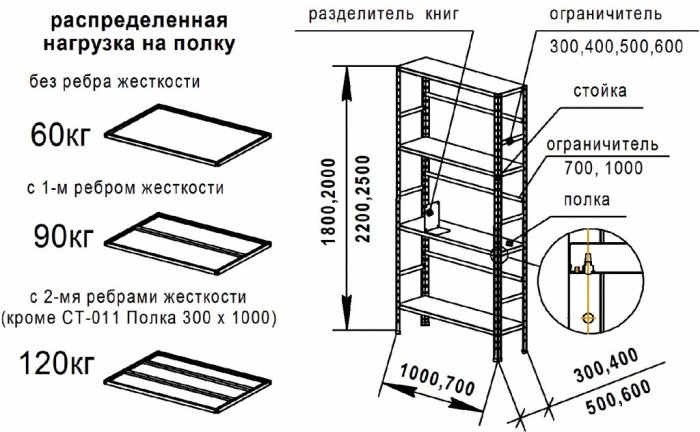
Beam shelving (pos. 4) looks like a frame one, and the shelves can also be arranged according to the contents, but the frame itself works differently and is much stronger: beam shelving from the available home master materials are capable of carrying loads up to approximately 800 kg per linear meter of shelf length. The price is higher than that of frame ones, labor intensity and material consumption.
wooden shelving the cantilever circuit does not have separate receiving, distributing and load-bearing elements; this is, in general, a broken strip of material in a complex way, the loads in which spread as necessary. It can have the most frilly configuration and that is why free-standing shelving is widely used in stylish interior design. However, they are suitable only for light things and are more or less durable only in corners, pos. 5, or reinforced with metal pipes, see below. However, the cantilever shelving gave rise to modular shelving, which, with no less aesthetic merits and the possibility of flexible layout, is quite durable.
Modular racks are all-assembled and type-setting. The basis of the first 3 elements: lattice, pos. 7, box, pos. 8, and ladder, pos. 9. From them you can collect products of the most bizarre type, there would be fantasy, and the step of the dimensional grid during design is the same. A hybrid stands apart in this row: a lattice of boxes assembled by a ladder, rotated 45 degrees, pos. 9. The strength is exceptional, from modules of this type you can collect long, with corners, room dividers without picking the floor with the ceiling.
Type-setting modular racks are made of flat (pos. 10) and bulk, pos. 11, modules. Flat in this case does not mean that they are completely devoid of volume, but that the usable volume, i.e. capacity, they themselves do not have. Flat elements of type-setting racks, as a rule, have a complex configuration and are purchased ready-made. On their own, amateurs most of all make typesetting racks from volumetric modules-boxes. Connect the modules with double-sided tape, Velcro, pairs of clothing buttons, etc.

Relatives of the module-lattice racks are cantilever, i.e. with overhanging shelves, pos. 12. They are the most "airy", so they are most often placed in the hallway of a small area. One of the design options for the cantilever rack in the hallway is shown in Fig. on right. Pipe racks can be replaced with chipboard plates or boards with a section of 150x18 mm, located as in pos. 12.
The box module gave rise to transformer racks of the Varna type, pos. 13. There is no transformation mechanism, as well as hinges: “Varna” is simply set up as it should. The necessary rigidity is ensured by the presence of a solid back wall for all drawers and the choice of material - class E1 chipboard.
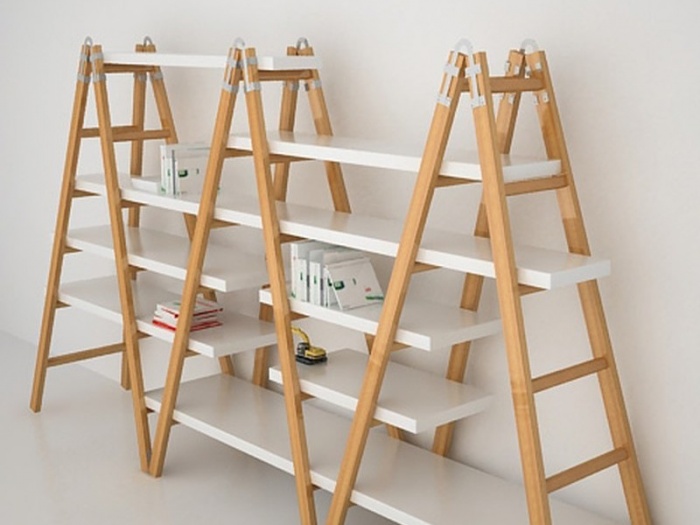
A rack of a bridge scheme, pos. 14. With a bearing capacity equal to that of a beam, it is less material-intensive, concentrated loads can be placed in the middle of the A-shaped racks, and a long length can be placed on top. In everyday life, the rack-bridge is also able to find a place for itself. Look, for example, what kind of rack was made by people endowed with imagination and ingenuity, from a pair of old crutches, pos. 15. Crutches, by the way, can be replaced with slats 15-20 mm thick made of hard, durable and resilient wood: oak, beech, hornbeam, birch.
Note: the same rack is also suitable for flowers (see below), because its structural elements are hardly noticeable.
on metal
Metal is more elastic than wood and is subject to plastic deformation, which is why it is generally more difficult to calculate and create spatial structures from it than wood. Therefore, a metal rack is built without taking into account the interaction of the base with the shelves, which can be made of any material. Metal racks are assembled mainly according to the least material-intensive frame and cantilever schemes, because metal is stronger than wood.
Heavy, bulky, costly, requiring difficult locksmithing and welding, racks from a corner or a professional pipe are still being made, probably by inertia. These days it is easier, easier and cheaper to assemble a rack from a profile. Special thin-walled shelving, it is available in a wide range. You will need a perforated profile for racks and a solid corrugated profile for shelf frames. The parts are fastened with self-tapping screws, and during assembly they are held in place by clamps, pos. 1 in fig. The structure is protected from skew by X-shaped ties at the back, pos. 2; a special profile is issued for them. Such racks hold a load of 400 or more kg / running meter. m, and collects the frame 1 person for an hour or two.

For balcony load bearing capacity shelving from a special profile is redundant. Balconies / loggias are designed for a load of 1.2-1.6 tf; glazing gives several hundred kgf, and even furniture, people. So the rack on the balcony can and should be made simpler, lighter and cheaper.
Here a profile for commodity racks, the so-called. trade. For an ordinary balcony with a width of approx. 1 m will be enough for a pair of vertical U-shaped connections with brackets, pos. 3. Under maximum load - 3-4 verticals. A wide range of accessories is sold for the trading profile, but apart from the verticals, we only need brackets. They are produced with the number of mounting paws from 2 to 5, but since it will still not be socks-panties that will lie on the rack, you need to take at least 3 paws; highlighted in color in pos. 4. The verticals are attached to the wall with self-tapping screws (4.2-6) x (60-80) in propylene dowels with a pitch of 70-150 mm, and the brackets are simply inserted into the profile.
About the pipes in the racks ...
Racks based on industrial pipes are quite expensive, because. applied shaped fittings and fasteners, on the left in fig. They look somewhat dry, so they put them most of all in offices. Amateurs most often reinforce cantilever racks with pipe inserts, in the center. In this case, the support heels are purchased ready-made or machined to order.

To tighten the inserts, oak or, better, propylene corks are tightly driven into them at the ends. In the first case, the seam between the pipe and the cork is shed with superglue (cyanoacrylate), and in the second, oblique notches are made on the inside of the pipe with a needle file and a cork with a diameter slightly larger than the inner diameter of the pipe is pressed in heated with promphen until plasticity begins. More precisely, the pipe is pressed: as soon as the cork begins to soften, it is placed on a hard surface and a pipe is put on it, heated in the same jet from a hair dryer. In any case, everything is pulled together with self-tapping screws.
If the design requires pipes to be connected in parallel and butt (T-shaped), as on the right in the figure, it is not at all necessary to spend money on shaped clamps. In parallel, the pipes are connected simply with metal screws, and end-to-end - as described above, with a cork.
... and about the rack of pipes
A special case is a rack in the cellar. Steel rusts, wood rots and molds. Here, a rack of pipes is most in place, only not from steel, but from propylene plumbing. How to make a rack of PP pipes in the cellar, see the video below.
Video: do-it-yourself rack made of pipes (plastic)
Connections
Hidden joints on dowels, in a blind tongue / groove, etc. furniture in racks are not reliable enough, and nothing really holds on the dowels in them. The reason is the insufficient number of intersecting stiffeners in combination with a small bearing area and a high center of gravity (CG).
If the rack is in the utility / utility room, it's okay: they are connected with self-tapping screws, steel corners, etc. with metal fasteners. But over shelving for living quarters, you have to contrive to hide more reliable open connections. For shelving on a frame, the simplest way is to hide the fastener heads under the shelves, on the left in the figure, due to their (shelves) being moved above support frames. The front edges are then ennobled with doweled chipboard strips, as described below.

If the rack is entirely assembled from boards or plywood, then its parts cut into each other halfway, as on the right in Fig. Please note that the grooves in the shelves are made at the back. Then the vertical racks will keep their front edges from sagging, and the rear ones - diamond-shaped pads of about 70x70 mm from any sufficiently strong material: plywood, plastic, metal.
In the case when the rack has a solid frame along the contour, it is best to replace the individual "pyataki" whole sheet Fiberboard 4-6 mm. Then the extreme parts are made wider by the thickness of the fiberboard, a fold is selected in them and the sheets of the back skin are fixed with small self-tapping screws with press washers. Each corner and crosshair should have a hardware, and between them - in increments of 70-250 mm, so that they are evenly distributed.
Note: in some cases (see below), a modular cardboard rack will serve well. Then there is no need to fuss, reinforcing the adhesive joints with wooden studs, such as, for example. in cardboard shelves: horizontal and vertical parts cut into each other halfway, as in fig. Glued with PVA, such a joint is quite reliable.
About plinth
Does the rack need a plinth? Definitely, and not just for the sake of hygiene. Especially the kitchen one, which is pushed more often, and wet, beating, greasy, loose is stored in it.
In a rack without a base or with a base without moving forward, the projection of its CPU falls on the center of the support (CO). In case of accidental impact, the overturning moment will be directed anywhere, on the left in Fig. If the plinth is extended by at least 7-10 cm, then the overturning moment is always directed towards the wall, in the center. An example of a rack in the kitchen made with this in mind is shown on the right, and due to the skillfully chosen design, the removal of the base is invisible.
Various shelving
Garage
The first place where you can’t do without a rack is a garage, at least for seasonal tires. After all, you can’t keep it abandoned at random. but standard width a garage of 4 m is not at all superfluous if the car doors are thrown open. Therefore, the garage rack, in addition to strength and convenience, should be compact. Drawings of one of the options are shown in fig. All parts, including the hinges of the shelves, are made independently from a 30x30 bar, plywood and a steel bar 6-8 mm.
And in fig. on the right - the rack for the garage is not folding, but modular from waste material: scraps of boards, plywood, timber. It is not necessary to connect them with through bolts; apparently, the author of the design had plenty of them. Self-tapping screws will also go, you need to wrap them from the plywood / board side into the timber. It is better to make 4 dips from above, according to the number of replacement tires.
Book
Books give a significant, and, importantly, stable static load. Collection of 3500 volumes (in ordinary apartment without prejudice to everyday amenities, and more will fit) pulls about a ton. Therefore, a bookcase should be:
- Durable.
- On the plinth, with or without extension - the ingress of moisture on the books during cleaning should be excluded.
- From plywood from 18 mm or solid boards from 24 mm - chipboard does not hold a long-term static load, it bends.
How the bookcase is arranged is shown in the figure below. In the power circuit, in addition to the base, bottom and roof, at least 2 solidly fixed shelves are constantly tied, evenly spaced in height. Adjustable notches are located in 5” increments, which is equal to twice the printing unit size. This allows volumes to be placed in folio to in duodecimo, with pocket editions stored separately in a mini-shelf; possibly cardboard.
The key points of manufacture are given on the right in the same figure:
- The back is sewn up with fiberboard so that the books and the wall do not wear out mutually;
- The sidewalls, on plywood pads, are sheathed with chipboard or with a second layer of plywood, 2 flat boxes are obtained, bringing the overall rigidity to the required one;
- Superimposed on the edges decorative overlays height 100-150 mm on dowels in milled grooves and glue. In addition to the rigidity of the shelves for deflection, the linings provide a microclimate favorable for books on the shelves.
Note: the width of the shelves take approx. 30 cm. Keeping books in 2 rows is inconvenient and not useful for them.
Toy
Children, in order to become adults, need to explore the world. The simplest way research - break it down and see what's inside. Or what will happen, in addition to the dragging and punishment, which goes without saying. With this circumstance in mind, a children's toy rack can be made in 2 ways.
The first - "protection from a fool", the rack is especially durable. An example of a practical design of this kind is on the left in the figure: a symmetrical shelving cabinet with a plywood back.
The second is to give him / them free will, and let them break. But really, so that intelligence, coordination of movements, spatial imagination and, in general, the ability to handle things develop. Here, the optimum is a modular collapsible rack, on the right in the figure, let them configure themselves in their own way.
So that it would not be a pity, they would suddenly break it completely, and so that they themselves would not be injured, the details are made in the same way as cardboard shelves:
- Spread a polyethylene (PE) film on a flat surface;
- Raw materials (initial sheets) are laid out on it and impregnated with a water-polymer emulsion (WPE);
- After drying, turn over and soak on the other side;
- Blanks (plates) for parts are cut out with an internal corrugation of cardboard oriented in adjacent layers mutually perpendicular;
- The corrugations of the extreme layers should be oriented along the long side of the part;
- If there are 5 layers, then the corrugations are oriented with a rotation of 45 degrees: 0 (along) - 45 (obliquely) - 90 (across) - 135 (obliquely in the opposite direction) - 180 (again along);
- PVA is glued at once, without exposure to tack and covered with PE film;
- Withstand 2-3 days under a small, 3-5 kg / sq. m, oppression, evenly distributed over the surface, books, stacks of old newspapers, magazines, etc. are convenient for this.
Shoe
From the point of view of the safety and durability of shoes (which is clearly felt at current prices from a budget point of view), you need 2 racks for shoes: in a small “dirty” shoe, they “shake” before cleaning, otherwise dust / dirt will rub into the skin / fabric, which will seriously reduce its service life. Sand grains are especially harmful here. Then, in a larger “clean” rack, out-of-season or not-so-used shoes are stored in conditions that contribute to their durability.
There are no problems with the “dirty” rack, it is a small box with lattice shelves, even rope ones, as in fig. "Clean" can be a shoe rack or shoe cabinet with folding shelves in the hallway. However, if in the house it is possible to shield, if not a dressing room, but at least some kind of nook with an even microclimate, shoes will only get better from this.
A drawing of a rack for long-term storage of shoes is shown on the next. rice. Construction - economical frame of slats 20x20; shelves type-setting trellised. If you remove 1 section with a width of 375, this rack will fit even in the closets of the infamous Khrushchev kopeck piece.
Instrumental
The simplest tool rack is a board with clips where tools are inserted, nails / hooks and hangers on which they are fastened, on the left in fig. For small tool- a board with holes where they are inserted with handles in the center. But much more economical and practical old fashioned way make a tool rack out of scrap wood and pieces of rubber (preferably reinforced durite) hose, on the right. And safer: the likelihood that the tool will fall out and have to be stabbed with a blade on the leg or prick your hand on the sponge is practically zero.
Floral
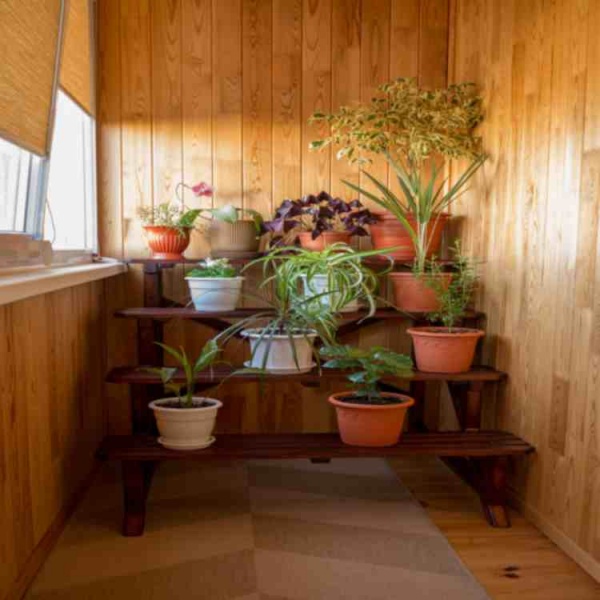
Rack for indoor plants must, first, open them all to the light; secondly, it does not visibly replace flowers and greenery. Single-column racks (two positions on the left in the figure) are “generally airy”, but their openwork appearance is technologically rather complicated and stability is low. Much simpler and more reliable whatnot for flowers, 1- and 2-sided, two pos. on right.
It is more difficult, but it allows you to place more plants on the same area and the whatnot-pyramid is almost invisible behind them, pos. 1 in fig. on right. If you spend more on material and make it whole from plywood, as in pos. 2, then it will be possible to keep even antagonist plants in one place, i.e. not enduring neighborhood with each other.
Many keep flowers on the balconies, arranging even greenhouses for orchids there. In this case, a bookcase will come in handy, the drawings of which are given on the left to the next. rice. The space inside the rack is not wasted there: a weak, 50-80 W, electric heater is placed in it, which heats mainly with thermal radiation. It can be made from 2-3 25 W incandescent lamps covered with a galvanized casing. It is the lack of root heating (the roots get cold, get cold and stop nourishing the vegetative parts) that explains most of the failures of the balcony plant culture. And from such a rack, when illuminated with Flora or LD lamps, you can get cucumbers, strawberries, even tomatoes all winter
Note: on the right in the same Fig. - portable spring flower rack for giving. Can serve as a greenhouse.
For violets
Violets in this case are not forest and not pansies, but not at all related to them Saintpaulias from the Gesnerian family. Uzambara violets or simply violets they were called by their homeland - the Uzambara mountains in South Africa. Due to their grace, diminutiveness and abundance of varieties, saintpaulias have become, and quite deservedly, literally cult plants.
The culture of the Gesneriaceae, among which there are many that will give odds to orchids, is a special topic. But from a technical point of view, a rack for violets should be moisture resistant, chemically absolutely and absolutely neutral and allow you to place illuminators: Saintpaulia culture is better not on the window, but with even illumination by LDC lamps, on the left in Fig.
The shelves of a self-made rack for the Saintpaulia collection can be made by gluing 2 pieces of PVC boxes for electrical communications 150 mm wide in the center. They also serve as good diffusers of light. Glued with mounting "Moment"; dichloroethane glue (not pure dichloroethane!) is very toxic and requires special precautions.
Assemble the rack for violets on pieces of PP pipes with a length of approx. 400 mm with inserts from the same pipes of smaller diameter and self-tapping screws. Self-tapping screws are driven with heating:
- Holes are drilled under them with a diameter along the body of the hardware without thread.
- Screw in until it is tight and even.
- They heat the heads of the hardware with a soldering iron (ordinary, electrical) until the plastic around it bubbles slightly.
- Quickly screw in until the head is sunk.
- The joints of the assembled rack for stability are carefully dug with superglue.
For seedlings
Shelving for seedlings, especially in the commodity economy, have a number of design features compared to domestic flowers. Which ones and how to make a seedling rack, see the video.
Video: do-it-yourself seedling rack


Whatever technological innovations and design solutions offered us by modern furniture manufacturers, shelving has been one of the most best solutions for . And we are talking not only about convenience, but also about the aesthetic component, because they can fit into the interior of any apartment, house or even a garage. If you want to create an unusual and practical DIY shelving for flowers or books, then you do not need to have any carpentry skills. enough to cook necessary materials and also be patient.
Experienced furniture makers know firsthand that in fact any cabinet is a rack with a back wall and doors. Therefore, having mastered the simple technology of assembling flower racks, you can easily make a full-fledged wardrobe of any size.
How to determine the dimensions
To create a rack for flowers, chipboard, MDF or plywood up to 20 mm thick are most often used. The boards that were used for are also quite suitable. Incidentally, natural wooden planks will be much better compared to plywood or chipboard.

The width of the shelves must be selected based on what you plan to store on them. So, for books or flowers, shelves with a width of 250–300 mm are quite suitable. But for car tires or, for example, a tool, the width should be larger - up to 700 mm.
As for the length of future shelves, here the choice also depends on what you plan to store on them. For light items (for example, for souvenirs or soft toys), a wooden shelf up to 1500 mm long is suitable. But to store volumes of books, you will have to reduce the length of the shelf to 80 cm. Otherwise, the shelf may bend under the weight of things. If you plan to place the future shelving in the garage to place heavy objects on it, then it is better to reinforce the shelves with metal corners or other amplifiers.
From the size of the future rack, as well as from the expected load on the shelves, a set is determined necessary fasteners. So, self-tapping screws for concrete up to 90 mm long are suitable for lightweight structures. For brickwork it is best to use dowels with self-tapping screws up to 52 mm long. But for a large and heavy shelving in the garage, it is necessary to additionally strengthen the structure with anchors or hooks.

How to make a rack with your own hands
- Screwdriver (ideally - a screwdriver);
- Dowels, self-tapping screws (length depends on the type of wall);
- The shelves themselves suitable material described above, we will give an example of creating a wooden rack with shelves measuring 19x305x183 mm);
- Beam-support with a size of 38x89x390 mm;
- Reiki 19x38x1830 mm in the amount of 10 pieces - necessary for creating crossbars and slats;
- Reiki 19x38x203 mm - necessary for creating racks.

Rack with shelves
Creating a rack with your own hands begins with the installation of strips, to which fasteners will be made. It starts with markings on the wall. You need to draw five horizontal lines 183 cm long on the wall. The lowest one should be at a height of 39 cm from the floor level. The distance between the rest should be 41 cm. This will be a sketch of the location of future flower shelves.

In the event that your garage or room is made of drywall, then you need to locate the main profile in order to fasten the entire structure to it. Use a special search engine or a simple magnet for this. Then mark the wall where the profile will intersect with the shelves.

Now cut the planks and crossbars of the required size. There will be five of them in total. Now each bar must be fixed in the place where you have already marked (they are mounted on the drywall profile). To fix the crossbars in those places where the planks pass, drill holes and fix the structure with self-tapping screws.

When the installation of the “skeleton” of the rack is completed, proceed to the collection of shelves. First, cut out three racks and prepare a support beam (later it can be removed). Now you need to calculate the length of the rail that will connect the edge of the shelf to the wall. This can be done using the formula a2 \u003d b2 + c2, where a is the length of the crossbar itself, b and c are the height and width of the shelf itself. If you plan to make a rack of the same dimensions as in our example, then the rail will be 511 mm long.

Fasten the resulting rail at the point where the crossbar and the rack intersect. Use self-tapping screws for this. To increase the strength of the structure, professionals recommend additional processing of all parts with glue.
Now it remains to fix the shelf. To do this, you will also need screws and glue. Please note that when using boards, it is recommended to drill holes of a smaller diameter than self-tapping screws. This will allow you to avoid splitting the material or deforming it. Repeat the procedure for everyone, and your design will be ready.

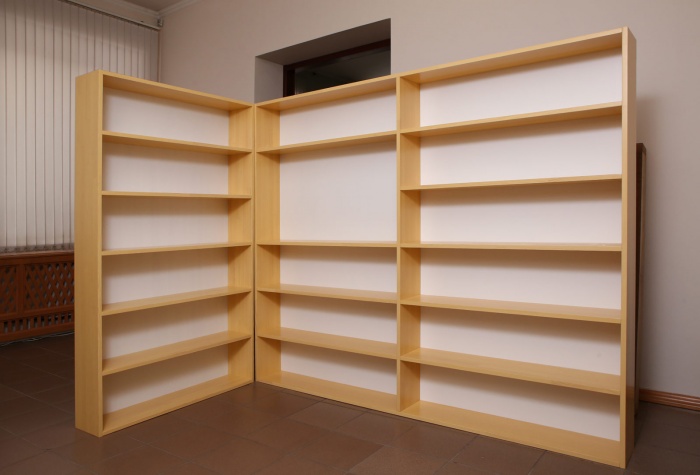
There are other types of shelving. For example, a rack with side walls. Such structures are reminiscent of bookcases. They differ from ordinary racks in greater strength and the ability to store heavier items. Also, designers often use such pieces of furniture to separate zones or in large rooms.

For a wood rack, you will have to additionally prepare a roller or brush, grinder and a spatula - this is necessary for additional painting work.
The shelving unit with side walls is mounted on a base (use boards up to 50 mm thick), which must also be attached to the wall. Since the walls in our houses are far from always even, measurements should be taken at the bottom, at the top, and also in the middle of the wall.

After installing the base, proceed to assemble the rack. To do this, prepare the side walls, install shelves in them, and then mount the structure on the base. As a result, you will get a closet without doors.
Conventional cantilever shelving is suitable for a garage, kitchen or closet as it provides open access to the items stored there. with side walls great solution for living room or nursery. It can store books, souvenirs, toys or boxes with small things.

As you can see, making a rack with your own hands is not so difficult. It is enough to prepare all the necessary materials. If you already have experience in creating such structures, share the comments below this article.
Recently, I was faced with the task of acquiring a bookcase. Approximately the same design as in the photo below. 180 cm high, 80 cm wide and 30 cm deep. Naturally, the first thing I did was go to the stores, but the minimum price without delivery of 2,700 rubles surprised me: it’s very expensive. It seemed to me that such a rack can be purchased in the region of 1000 rubles.
And then I was suggested the idea of \u200b\u200bself-assembly. No sooner said than done. And it turned out that it is not only easy, but also interesting!
The fact is that the main material for such racks is laminated chipboard (LSD LDSP), 16 mm thick. Accordingly, the first step was to determine the dimensions of the parts and find a place where all this can be filed.
Shelving dimensions
It is easy to see that the rack I need consists of 9 large parts: 2 side walls, 6 transverse shelves and a white wall. Color - light beech.
As I wrote above, I needed a rack 1800 * 800 * 300 mm. Accordingly, the dimensions of the parts were as follows:
2 side walls - 1800*300 mm.
6 transverse shelves - 80*30 cm
1 wall made of white fiberboard - 1750*830 mm.
The place where you can buy it all
In principle, it is enough to type in the search engine " cutting chipboard"and to understand where it is better and cheaper. In Petrozavodsk, for example, the Laminate Monza company at Kooperativnaya, 6 is doing this - http://mzptz.ru/.
That's where I went. Unfortunately, they don’t cut it right away, you have to wait a few days.
Arriving a couple of days later with a friend by car (after all, the parts are quite large and difficult), I paid 1485 rubles for the above.
But it wasn't all expenses. Additional needed to buy:
16 shelf supports 5 mm each. It is better to buy more for a spare. 1 piece = 35 kopecks.
8 hexagonal couplers 6.3 * 50 mm - it is also better to buy more for a reserve. 1 piece = 67 kopecks
And self-adhesive plugs so that the place where we drilled can be sealed.
I also bought 10 meters of "light beech" edgebanding from the guys in the warehouse. 1 meter = 7 rubles.
Total additional parts cost me 100 rubles.
Total for the cost of materials, the rack cost 1585 rubles. If necessary, the cost of delivery of materials can be added here. Thus, the materials are almost two times cheaper than in the store!
Assembly
And now - the most interesting. Shelving assembly. Here are the plates themselves. 
If you look closer, they look like this: pressed wood shavings from the sides. To prevent this from being seen, we glue the edge. 
First stage assembling the rack - glue the edge. First we do it with shelves. Here it is enough to glue only one side, because. the rest will be hidden. I recommend you practice first. So, we firmly install the stove so that it does not stagger. 
Next, take .... iron! Yes Yes. It turns out that the edge is glued with an iron (heat). We cut off the necessary piece of the edge, evenly install. 
And carefully, constantly making sure that the edge does not move out, we carry out with an iron. As a result of a chemical reaction, the edge is tightly glued to the end of the plate. 
Since it is wider than the stove, we take a thin knife and cut off the excess. It's important to keep everything straight. In fact, this is the most difficult stage, but you quickly understand how to hold the knife. Later, you can take a fine sandpaper and remove the bumps.
With two side walls we do the same, only we glue two sides: front and top.
I strongly advise you to watch the video on how the edge is glued - http://www.youtube.com/watch?v=R2oL9Jaq62I 
Second phase- drill recesses for shelf supports. To do this, we select a drill that is suitable in thickness and outline the recesses (i.e., we drill not through, but through the length of the shelf supports). In fact, they mean the distances at which our regiments will be. This is the beauty of self-assembly - you decide what you need and how you need it.
What we did on one wall, we also do on the second. 
Third stage- Drilling holes for screeds. Ties connect the side walls with the upper and lower shelves (optional - you can do it in the middle). I recommend for the lowest shelf to retreat 5-10 centimeters. 
We drill holes for the ties in the upper and lower shelves and twist them. 
As a result, we get such a framework. 
Fourth stage- attach the back wall. It's not difficult. Just put around the perimeter White list Fiberboard and attached to the frame. I tried attaching to construction stapler, but it didn’t hold well, so I nailed it with small carnations, 
Fifth stage- we insert shelf holders into the recesses, install the shelves, glue the plugs and rejoice :) 
That, in fact, is all. And this rack will serve as the basis for our online store -
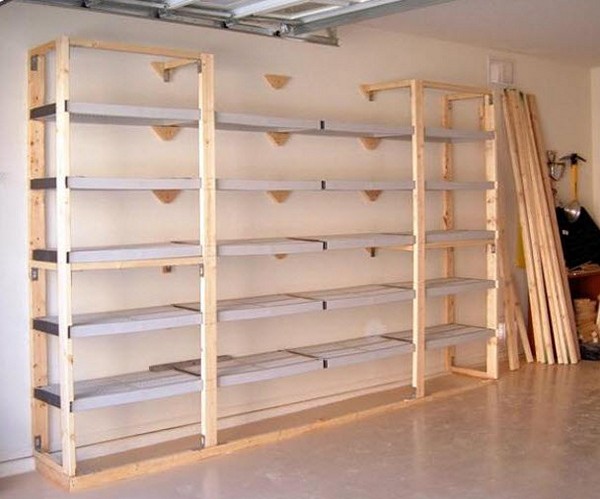
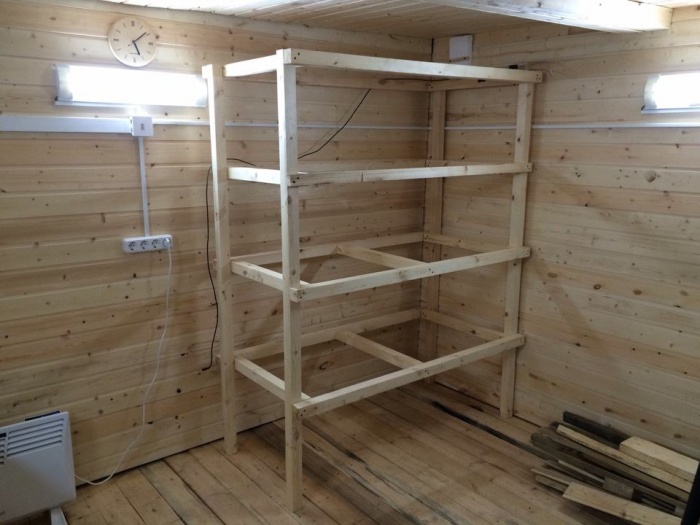
In small apartments, very often there is a problem of lack of space for storing certain items. If in a large living area it is possible to equip a pantry or a closet, then a small apartment excludes this possibility. by the most simple solution will be the installation of a wooden shelving.
But it will be useful not only in the apartment, but also on the balcony, where often a lot of things are stored and in the garage, where car accessories and tools must be put in their places so as not to waste time constantly searching for them. It is very interesting to enter a shelving structure for space zoning, for example, in a studio apartment.
Despite the fact that even a beginner can make a rack, there are still some nuances that will help you create a high-quality piece of furniture at a minimum cost.
Types of wooden shelving
A wooden rack is a structure consisting of several shelves mounted on a support board. Their number depends only on the desire and capabilities of the owner. Prefabricated wooden shelving will perfectly fit into any interior and will help to store various items, such as books, dishes, souvenirs, etc.
The functionality of those rooms where this piece of furniture can be placed is very diverse.
It is very convenient to install shelving in the nursery, where, due to the presence free space and the openness of the shelves, the child will be able to place all his toys and get them without the participation of adults.

In the office, the design will play the role of not only a place to store documents, but will also become an excellent decorative element workplace.
For the kitchen shelving is a must. Dishes can be stored there, as well as neatly arranged containers with bulk products.
On the balcony, a wooden rack is used to place seedlings or indoor plants in warm time of the year. Everyone knows that most plants need a little heating. Now you can buy special pieces of furniture with heated shelves, but self-made ones can also perform this function if each shelf is covered with foam. This material accumulates heat in itself and transfers it to plants.
Depending on the design, a suitable option can also be selected:
Original racks
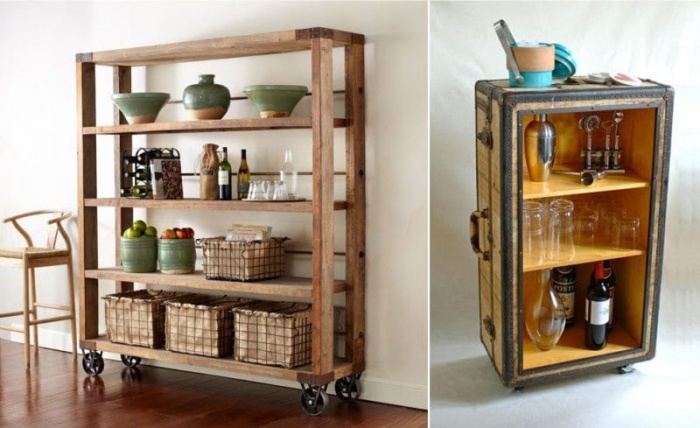
Such pieces of furniture should be given special attention, as they are created in accordance with individual project, which is suitable for a certain interior. Ordinary rough do-it-yourself wooden structures are only suitable for balconies or garages, but it is better to use something more original to decorate a living space. For example, the rack with bottles in the form of racks shown in the photo will fit perfectly into the living room or kitchen. On it, despite the external instability, books and even collectible bottles of wine can be stored.
Interesting in the interior, especially marine style Rope structures of wooden shelving for the home look like, which are attached to the wall with massive hooks. On such racks, of course, it is unlikely that it will be possible to store something heavy, but small souvenirs or photo frames are quite. It is very simple to execute such a design, it is enough to have a thick rope and a few scraps of wood. Shelves can also be made from leftover laminate.

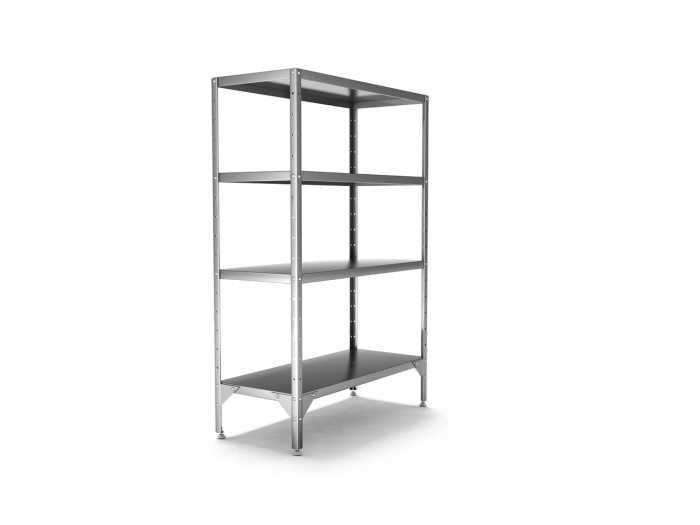
For interior in modern style suitable for metal constructions. One of these is the design of a rack with many shelves in a chaotic manner, which are interconnected by metal tubes. Due to the fact that the metal elements create rigidity, it is possible to abandon the rear wall.

If you plan to create a rack in a private house, then you can arrange it in the space under the stairs, as shown in the photo.

Do-it-yourself shelving
Making a wooden rack with your own hands is quite simple, if you study all the nuances of the work in advance and thoroughly prepare for it.
Project development
Creating a project for a future structure is very milestone which should never be missed. First of all, measurements are made of the place where it is planned to place the rack. If the rack is intended not for decorative purpose, and be used only in accordance with the storage function, it makes sense to carry it out in a simple form. For this, the height of the wall is measured, near which the furniture will be located, and the indicator that suits the owner is calculated.
Important! In the garage, the rack is best done to the full height of the wall.
Particular attention should be paid to the parameters of the shelves for the design, both in length and in width. Ideal for storing light items such as souvenirs and toys long shelves 1.5 meters, but jars with blanks and books require shorter ones - about 90 cm, so that there is no deflection. As for the width, shelves with a width of 25 - 40 cm will be suitable for storing books and jars, as well as growing seedlings, and for tools or larger items, those that will correspond to their size are arranged.
In general, the dimensions of the shelves completely depend on what will be placed on the rack, so first you need to figure out the approximate location of the items and add 10-15 cm to the calculated figures so that you can easily put and get the item.
Necessary tools
Professionals advise for self-manufacturing rack construction use only strong and solid wood. It can be pine, mahogany or oak. Materials made from pressed sawdust for installation are not suitable, as they are rather short-lived.
Important! The moisture content of wood for the rack should not exceed 12%.
The boards are impregnated in advance antiseptic impregnations and left for a few days to absorb the solution.
In addition to the boards, also for the manufacture of the rack you will need:
- Metal corners
- Shelf holders
- Bars for stuffing them into lower part shelves
- Furniture legs or wheels
- self-tapping screws
- Carpentry type glue
- Lacquer or other paint material who will be finishing
- Jigsaw and grinder
- Hammer
- Drill with appropriate set of drill bits
- Tape measure, level and pencil

Algorithm for manufacturing a wooden rack
To begin with, all the parts necessary for assembling the rack are prepared.
Prefabricated wooden racks are made from the bottom. For the bottom shelf, the thickest board should be selected, into which a 3 cm self-tapping screw can freely enter. The parameters of the shelf are selected depending on the project, which describes all the dimensions of the future structure. Also, if the length of the shelf is large, then it is better to mount transverse bars in its lower part to stiffen it.
The next step is the installation of the side walls. For them, not solid wood, but thick plywood can be used. From it are cut required sizes side walls, with inside the location of future shelves is marked. At the same time, it is worth remembering that the height of the shelves in the design is most often used, which is 42 and 21 cm. These indicators can be alternated to get a neat and functional rack.

Cutting wood shelves. Their size should correspond to the rack and be such that the owner has the opportunity to put and remove the shelf without restrictions.
Important! The thickness of the shelves must be at least 2.5 cm, but to give strength, they can be equipped with transverse bars from below.
The next step is optional and is performed only at the discretion of the wizard. If the wall at which the rack structure will stand completely suits the owner, then the back wall can not be mounted to it. If it is customary to mount the back wall, then it is cut to the size of the plywood rack and nailed to it with small carnations.
All parts are prepared, now you can start assembling the whole structure:
- To the bottom shelf, which is the base, the back wall is screwed onto the screws. If it is not there, then you can immediately mount the side ones.
- But before installing the side walls, you need to install holders in the places that are marked for the shelves, which can be metal or plastic.
- After the side walls are attached to the base with self-tapping screws. If necessary, a metal corner can be used.
- Also, shelves can be held not on special elements, but attached directly to the side walls. To do this, the shelf is already held inside the rack by an assistant, and the second master screws in the screws with outer side. To increase the strength of the shelves can be supported by metal corners.
Advice! At all stages of the assembly of the rack, it is imperative to use a building level that will eliminate any distortions.
To create a high-quality shelving design, there are a few tips that are optional, but highly desirable:
- The main design of the rack can end with a top cover. This is very convenient due to the fact that the rack will become stronger, and dust will not get on the top shelf.
- For additional strength, the holes after drilling are smeared with wood glue.
- If wheels are used instead of ordinary legs, then the rack can be moved. Also, the installation of these elements will help prevent distortion of the structure under heavy loads.
- If chipboard or MDF were used to make the rack, then their ends are treated with melamine film, which is easily glued with an iron. Such a strip is placed on the processed sandpaper butt and processed with a hot iron. Thus, the end will close and acquire an aesthetic appearance.
- For greater decorativeness, the rack can be supplemented with doors or other elements that will only decorate it.
Conclusion
Shelving for the apartment will be a very functional addition, on which you can place memorabilia or other items. It is possible to make this piece of furniture yourself, which will save money and get exactly the design that is needed. This is easy to do, just read this article, which provides detailed instructions for installation.

