Do-it-yourself bath in the country: project, materials and guidance on how to build a bath. Budget sauna: how to get significant savings without losing comfort Easy sauna
Almost every owner land plot, sooner or later, thinks about building a bath. After all, the bath is not just a washing room, but also important element country holiday... Turnkey construction of a bath can be ordered from professionals for a tidy sum, or try to build a bath with your own hands.
After reading this article, you can choose a project, find out the sequence of the construction process, get acquainted with boiler models and find the best option baths for their summer cottages.
Before starting construction, it is necessary to develop a project for a bath. To do this, it is not necessary to contact an architect, you can develop a simple project yourself, especially since now there are many computer programs for design.
Consider what size bath will work best for your family. What premises will be located inside the bath. What materials to make the foundation, walls and roof from, do not forget also about finishing the bath. An important point in the design is the placement of the boiler and the way it is fired.
Below you can familiarize yourself with the popular bath projects:

- The bath project is 4x4 meters in size.

- Baths project - 4x6 meters.

- Baths project - 5x6 meters.

- Baths project - 6x3 meters.

- Baths project - 3x3 meters.
After you have decided on the dimensions and materials for the bath, you need to make an estimate of the costs.
Foundation
For the construction of a bath, several types of foundations are used. Depending on the weight of the walls and the characteristics of the soil, foundations of the following types are made:

- Slab foundation.
- Column foundation for light walls.
- Pile foundation.
- Concrete strip foundation.
As practice has shown, the most reliable foundation for almost all types of soil, there is a concrete strip foundation, reinforced with reinforcement.
For the manufacture of tape reinforced foundation for a bath you will need:
- Cement.
- Sand.
- Gravel.
- Armature.
- Formwork.
- Roofing material.
- Wire.
- Shovels.
- Concrete mixer.
- Harness.
- Stakes.
- Tools (pliers, hammer, tape measure, and others).

In the place chosen for the construction of the bath, mark the trench for the future foundation. For marking, use a tourniquet stretched between the pegs. The width of the trenches is made based on the weight of the material for the walls. For a one-story bathhouse made of wood or brick, it is enough to make a trench 30-40 centimeters wide. Having installed the markup, do the following:
- Guided by the markings, dig a trench 50-80 centimeters deep.
- Tamp the bottom of the trench and fill it with water to shrink the soil.
- Cover the bottom of the trenches with tar paper for waterproofing.
- Backfill the trench with gravel to a third of its depth.
- Place the formwork around the edges of the trench.
- Make a frame reinforcing the foundation from reinforcement rods connected by wire.
- Install reinforcement cage into the formwork.
- Using a concrete mixer, make a cement slurry in the proportion of one part cement to one part sand and two parts gravel.
- Pour cement into the formwork, taking care not to allow air voids.
- After the concrete has dried, remove the formwork.

The foundation for the bath is ready!
Walls
The following materials are used for the construction of walls:
- Wooden bar.
- Logs.
- Boards.
- Brick.
- Blocks from various building mixtures(cinder block, aerated concrete, wood concrete and so on).
Since the construction of a bathhouse from logs or bricks is already widely described on the Internet, let's consider the option of building a frame bath from a bar of 15x15 and 5x10 centimeters and boards with a section of 2x15 centimeters:

- Make the bottom harness, for this take bars with a section of 15x15 cm and install them on the foundation, connecting them together with special metal plates and corners. There is another way to connect the bars, by cutting out spikes, grooves at their ends and then fastening them with screws or nails. When making the strapping, do not forget to put waterproofing under the bars.
- Install vertical posts from a bar of 5x10 cm. The distance between the posts is usually 50-60 centimeters. First of all, determine the position of the window and doorways and install the racks that surround them.
- In the process of work, fix the already installed racks with temporary strips so that they do not warp.
- Make the top harness by attaching it to the ends of the uprights.
- When making the final fastening of the upper harness, carefully monitor the position of the uprights, checking their evenness with a level.
- Be sure to reinforce everything corner joints diagonal racks, this will help to avoid distortion of the frame.
- Make a ceiling batten.
- After making the frame, produce outer skin the walls of the bath with a board with a section of 2x15 centimeters. If you do not want the appearance of gaps between the boards, then make sheathing - "overlap", laying the bottom edge of the board on the nailed board. By outward appearance, this method resembles siding wall decoration.

- Sheathed bath with outside, proceed to the installation of insulation. Foam or rock wool sheets are installed along the vertical posts of the frame.
- On top of the insulation, it is necessary to install a layer of vapor barrier, which is attached to the vertical posts using thin slats.
- After installing the vapor barrier, perform inner lining baths with clapboard or slats.
- Insulate the ceiling by laying vapor barrier sheets on the inner lining, then insulation. Sheathe the outside of the ceiling with plywood sheets.
Please note that the manufacture and insulation of the ceiling can also be performed after the installation of the roof.
Roof
There are three types of roof for a bath:
- Shed.
- Gable.
- Difficult - consisting of four or more slopes.
Usually, the first two options are used for a bath. Let's consider the option gable roof covered with metal tiles: 
Roof manufacturing begins with installation - Mauerlat. In case of frame walls, the upper stroke plays the role of the Mauerlat.
- Place the uprights on the bed.
- Connect the struts with purlins and braces.
- Install rafter legs, attaching them to the Mauerlat, girder and connecting the upper ends together. The distance between the rafters should be 50-60 centimeters.
- Install sheets of metal tiles.
- Sheathe the gables wooden slats or with sheet metal.
For a clearer acquaintance with the roof attachment, a picture is shown: 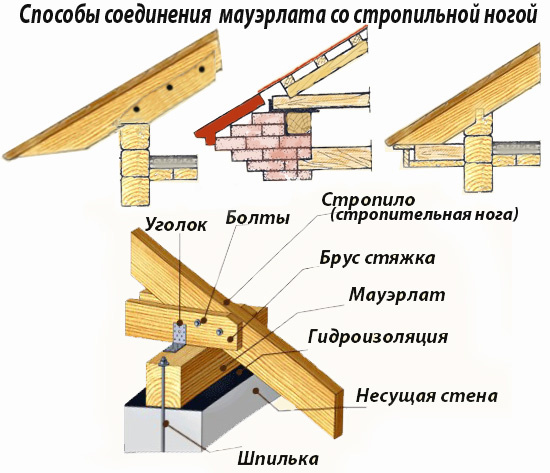
All sizes of roof elements are shown in the list: 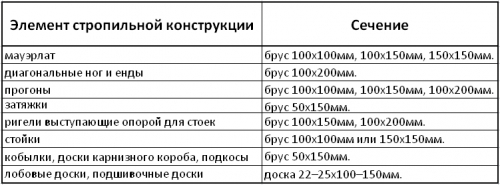
Please note that the less you tilt the roof, the more snow load will fall on it in winter. Also, a small slope of the roof can lead to poor water drainage and leaks.
Floors
Floor construction depends on the type of room. The common wood floors are made in the break room. In the washroom and steam room, the floors are made of two levels:
- The first level is made of concrete and has a slope towards the drain hole.
- The second level is a finished floor of planks with gaps for water drainage.
If you want to make a floor from porcelain stoneware or tiles, then they are simply laid on the first level with a slope towards the drain hole. 
In order to make a concrete floor and a drain in the bath, you need:
- In the center of the steam room and washroom, set plastic pipes with a diameter of 5-10 centimeters with a bell at the end. The pipes must go through the foundation to the street and connect to the sewage system.
- Lay a layer of waterproofing material.
- Spread a layer of gravel 10-15 centimeters thick over the entire area of the rooms.
- Make a grout and fill the floor with a slope to the hole installed on the drain pipe.
- Install a grate on the drain hole to prevent debris from entering the drain.

In the second stage, wooden floors are made:
- Install baths in all rooms wooden logs... Make the distance between the lags 30-40 centimeters. As a lag, you can use bars with a section of 3x5 cm. Or 4x6 cm.
- Nail boards with a section of 2x15 cm or 5x20 cm on the logs.
- In rooms where water is supposed to drain, leave gaps of 0.5-1 cm between the boards.
Do not forget to treat all parts with wood impregnation before starting the installation of wooden floors. When making floors, keep in mind that they should be higher, or at the level of the upper edge of the foundation.
Boiler
The model of a boiler for a bath will largely depend on your financial capabilities and the fuel that you will use for heating. If you know how to use welding, then you can make a simple boiler yourself, from thick sheet iron. If you prefer more advanced gas or electricity colas, they can be purchased from specialized firms.
The boiler in the steam room is installed in such a way that the combustion chamber is loaded with fuel either from the street or from the rest room (dressing room). The boiler itself, in order fire safety, located 10-15 centimeters from the nearest walls. The walls are at the height of the boiler, covered with iron sheets. A good solution would be to overlay the boiler with a brick, there you will reduce its cooling time and protect the walls from fire.
Arranging a chimney for the boiler, Special attention take a place where the pipe touches the ceiling. The chimney opening should be insulated with refractory material. Also, pay attention to the place where the chimney pipe exits through the roof. Usually, this area is prone to leakage, so you should carefully cover it up. Below are the options for boilers for a bath:

- Homemade boiler made of metal sheets.

- Gas boiler.

- Electric boiler.

- Solid fuel boiler.
Bath arrangement
After the bath is built, you need to equip it:

- Bring all communications on the site to the bath - electricity, sewerage, water supply.

- Place a sink, shower cubicle, light sources, and furniture for rest inside.

- Decorate the walls of the steam room with curly slats and make stepped shelves.

- Buy wooden tubs, buckets, ladles and brooms.
After the arrangement, you can safely invite guests, take a steam bath in your personal bath!
Instructions for assembling a mini-bath for a summer residence without a foundation, you can also watch in the video:
Options for beautiful and unusual baths
Besides traditional materials and design for a bath, there are many alternative solutions. Below we present photos of the most unusual baths:

- Mobile bathhouse made of "lining", built on a car trailer.

- Bathhouse in a huge wine barrel.

- Bath from plastic bottles.

- Bathhouse dugout, built right in the ground.

- Bath, arranged in an iron container.

- Forest sauna made of untreated logs.
![]()
- A beautiful bathhouse from a gun carriage.

- Bath from not edged boards.
At the end of the article, I would like to remind you that the heating of the bath is associated with fire and high temperatures. Therefore, when building a bathhouse from bricks, logs, cinder blocks or boards, pay great attention to fire safety. This warning also applies to the wiring device, since the rooms inside the bath have high air humidity and the risk of a short circuit due to condensation is very high. 
We hope that reading our article will push you to self-built baths!
For a Russian person, a bath is not a luxury, but a vital necessity. Even historians are convinced that love for a bath broom and good heat is literally in our blood, and even in the poorest villages nearby, new steam rooms were regularly built every five years (the old ones burned down). And Peter I, during a trip to France, could not stand two days without his own steam, urgently ordering to build a Russian bath right on the bank of a foreign river, which shocked the natives a lot. But what if building is so expensive today, and public steam rooms are not to everyone's liking? And if relaxing in the steam room is not easy useful procedures, but also valuable communication with friends, barbecue and the opportunity to breathe fresh air? Then we will learn the cunning tricks of modern Russian craftsmen who manage to build their steam rooms literally for vacation pay.
So let's take a look at the most successful projects construction of baths and their implementation, where the main task was to save as much as possible, but at the same time not to lose in the comfort of bath procedures. After all, as they say, the most budgetary bath is the vestibule of a summer commuter train.
What can and cannot be saved on when building a bath?
Agree, no savings are worth the loss of health, property or life. But the most sad situations occur when the question of cheapness is approached rashly: at first, such baths slowly poison their owners with the release of hazardous substances, and then either burn or quickly deteriorate. But this does not mean that it is better to give up and give all your hard-earned conscience construction crew- it's better to just give up dangerous use during construction from the very beginning:
- Uncertified materials and fakes, for which unscrupulous sellers ask for several times less. And at the same time they convince the buyer that “the differences with expensive material- no, there is simply no markup for the brand, my brother / matchmaker / son-in-law has had a bath with this for half a century, and nothing. "
- Materials that are strictly not intended for the construction and decoration of baths. So, if it is impossible to insulate the walls in the sauna with foam plastic, then it is impossible, and this is not a whim of the manufacturer. Again, a neighbor who, at his own peril and risk, insulated in this way and is now boasting is not an example.
- Unsuitable accessories for conducting electricity in the bath (wires, sockets), unprotected lamps or cheap Chinese products.
- Homemade stoves and water heaters that no one has tested for fire safety.
- Combustible materials and those that do not indicate that they can be used under conditions high humidity air and heat.
If you are building a bathhouse with your own hands and are forced to save as much as possible on materials, calculate your every step well, consult with experts and do not leave anything unattended “it seems to work”. And, finally, save on a limited budget better on cubic meters of the steam room, but not on the materials of its finishing. Such is the advice.
Let's take a little look at affordable heaters. So, basalt wool is made of stone (basalt). Its main advantage is that the fibers inside the insulation are not connected chemically, and another technology, and therefore, even when placed behind the foil in the steam room, hazardous substances will not be released. This insulation is non-flammable and insulates the firebox well. For a bath - the most the best way... If you want to save money, then put one layer of basalt wool and a couple of layers of another, cheaper material on the ceiling.
Penofol - porous propylene with plastic wrap and by spraying with foil. You can buy it in roll form, and attach directly to a bare wall. This material is a good heat bridge between the wall itself and the insulation.
- Purchase a stove without a remote firebox - so much less firewood will be spent on heating the steam room, and such a unit is inexpensive.
- Be sure to install a water tank - this is the fastest and most economical way.
- Make the foundation for the bath cheap and removable: it is much cheaper and easier with it to carry out repair work and change it to another.
- Pay maximum attention to the insulation of the bath - the less you "heat the street", the more economical the heating itself will be.
- Stick a bubble wrap on the window in the break room in winter - this will keep you warm by at least 50%.
- Instead of a regular shower or shower stall, put a traditional Russian tub. And healthier, by the way. And it is not at all necessary to pour only ice water into it.
- When purchasing lining, take short-sized bars - they are cheaper and look no worse.
- Build the roof of the bathhouse low, no more than the ratio of width to height 1: 3. This design will take a lot less materials, and the chimney also does not need to be made high.
Project # 1 - a compact sauna at a minimum cost
So, a step-by-step process:
- Step 1 - foundation. We will make the foundation columnar. To do this, you will need to get a 2 meter auger drill. As casing take ordinary cheap 110 mm sewer pipes. Insert the reinforcement from two connected rods.
- Step 2 - strapping. Place studs 500 mm long under the harness. Assemble the strapping 150x150, and prepare the frame posts with a height of 2200 mm. Treat the frame with Neomid 440 or some other suitable for the same purpose.
- Step 3 - walls. You can modify the walls directly on the harness, and just raise them. We cover the DSP. To do this, we pre-drill the plates, and then fasten them with self-tapping screws with a semicircular head.
- Step 4 - the roof. We cover the roof with eight-wave slate. We save!
- Step 5 - insulation. Now we put in any inexpensive insulation that is suitable for a bath. In this project - Linrock Light.
- Step 6 - oven. We put an inexpensive oven, you can make it yourself. But under any, we must additionally lay out a brick corner.
- Step 7 - finishing. We fix the lining, skirting boards, cash holders.
So a compact and inexpensive steam room is ready.


If the walls, due to savings, are not too strong, then the smaller the bath is in volume, the better - so its structural properties will be higher.
Project # 2 - arbolite is used
But good example construction budget bath from wood concrete - at a price it comes out not much more expensive than frame technology... So, the outer walls of the steam room will be 20 cm thick, inside there is a brick partition from the stove.
This is how the construction process itself looks like:
- Step 1. Digging drain hole dimensions 1.2x1.8x1.4 m
- Step 2. We dig a foundation 30 cm wide, up to 50 cm deep. We fill it with sand and ram.
- Step 3. We put the formwork, reinforce two rods at the top and bottom. We put vertical rods every meter. We fill the foundation.
- Step 4. We put EPSP in the washing and steam room, the mesh and fill the floors. In the washing room, we additionally organize a drain.
- Step 5. We put blocks, check the evenness of the walls with a level.
- Step 6. We make the roof using 50x100 boards. The optimal distance between the rafters is 55-80 cm. We cover.
- Step 7. We cook the oven or buy a budget ready-made one. The ventilation scheme is as follows: outside the air goes to the gap between the stove and brick wall where it heats up.
- Step 8. Install the shower tank in the attic.
- Step 9. We decorate the walls from the inside. If possible, use Izospan FB - a special material for baths, plus heat-resistant tape. Izolon is good for the ceiling, which can withstand temperatures up to 150 ° C.
Such is the budget and quite successful bath.
When choosing wood concrete, pay attention: according to its density, it can be heat-insulating and structural. The first has a density of 400-500 kg / m, the second - 500-850 kg / m. This material is used for the construction of self-supporting walls and has good heat and sound insulation.


Project # 3 - miniature log bathhouse in national style
And if you can't imagine a Russian steam room made of another material, like a bar, you can build such a relatively budget option.
- Step 1. Align the platform for the foundation from the dropout, knock off the "formwork" and leave only the opening for draining water from the washing room.
- Step 2. We spread the EPS, knit the reinforcement cage. We fill it with concrete, make a ramp for water and the foundation is ready.
- Step 3. Laying the log house. Under the first crown we put a board treated with an antiseptic, which we cover with roofing material on three sides. You can put moss on the board itself - it has antiseptic properties, and therefore the bath crown will last even longer.
- Step 4. Build the walls and leave them for a few months to shrink.
- Step 5. Fasten the rafters and cover the roof. We make a pipe passage through the overlap - it is easy to make it from a metal corner and a sheet of stainless steel.
- Step 6. Between the steam room and the dressing room we make a frame partition, insulate it with mineral wool and sheathe it with clapboard on both sides.
- Step 7. We spread the floor in front of the stove with porcelain stoneware. We leave a special hole in the floor for supply ventilation.
- Step 8. We take out the pipe from the stove through the roof. The passage is made of Master-flush rubber, which is resistant to temperature. Seal the joint with the roofing with MS-polymer.
- Step 9. We fix the shelves in the steam room and turn on the electricity.
Remember, the first step to huge savings when building your own bath is to build it yourself!


Project # 4 - a steam room on a light frame from improvised means
The bars for the bath frame can be made even from collected firewood, if desired. The main thing is only to choose from them without defects and knots, and be sure to treat with an antiseptic.
So, we are building a budget bath from available funds:
- Step 1. We make beams for the frame, process and dry.
- Step 2. We build a pile-rubble foundation: we pull out the soil by a meter with a drill, forget there thick pine stakes and make a backfill of concrete and stones on top. Next, fill in the pillars to the top.
- Step 4. Assembling the frame.
- Step 5. Dig a hole under the drain, insert a barrel with broken bricks and rubble inside, take a ladder there. This is not an insulated summer option, but for a winter one you can lay a heater or a heating cable.
- Step 6. and the ceiling, put a film on top of the insulation. We put Finnish foil paper for saunas on the walls and ceiling.
- Step 7. We put the oven. Take with the register, tk. you need water heating for the washing room - in order not to purchase a separate boiler. So, it has proven itself well - inexpensive and heats well.
Such a bath serves surprisingly for a long time, the steam pleases and it is a pleasure to spend time in it. And you can always find cons.


Mini-baths: cheap and cheerful
But if there is no money at all for the construction of a steam room, you should not despair - today there are many options to build a steam room out of nothing. Let's take a closer look.
Barrel bath
This is the most common, only of a more solid size. Part of it is covered by a wooden lattice screen, behind which the stove is hidden. There is a small bench in front of the screen. Even three people can steam at the same time in such a bath. But this option is only for summer: they rolled it out onto the site, put it horizontally, threw firewood into the stove and you can pour water on the stones. But as a low-budget option - very much even nothing.
Hiking bath
Such a bath is taken mainly on a hike, but if there is no other alternative, it can be used on the site. It will be inexpensive, because it is an ordinary tent in which a stove or an electric one is placed. This is no longer the same soft Russian bath, but as a temporary phenomenon it also has a right to exist.
Built-in mini-sauna
There is also a fashion to do in the bathroom. So, we transfer washing machine into the kitchen, and in its place we construct something that looks like a wardrobe. This is a small structure, about 1.5 m high, made of a frame and upholstered with clapboard. Inside there is one seat shelf and a built-in steam generator. The person sits down, closes the door, turns on the device. But his head remains outside - for the sake of safety. When using special aromatic oils and other SPA-elements are quite a good way to improve your health. We can say this is the smallest and cheap bath in the world.
Baths in the car
If you have the opportunity to get a non-working minibus or a car with a body, you can finish building a small bathhouse right in them. Our website even has detailed master classes on how to do this, and such an undertaking will turn out to be much more profitable than starting the construction of a steam room with pouring the foundation. Experiment!
Sometimes you so want to leave the hustle and bustle of the city, and go to the country. Silence, walking, doing what you love - what could be better! If comfort is provided at the dacha, you want to come again and again. One of comfortable conditions living in the country is a bathhouse.
Construction can, of course, be entrusted professional builders... However, to build and equip a bathhouse on summer cottage quite capable of independently. This saves you from additional expenses and allows you to carry out finishing and improvement in full accordance with your wishes and preferences. Therefore, this task is not easy, but it is quite within the power of a novice builder. The bathhouse built with his own hands will delight the owners even more. So, how do you build a bath yourself?

Firstly, as with any construction, you first need to decide on the project and the materials from which the bath will be built. The choice of the main material for construction depends on geographic location and operating conditions, as well as on their own capabilities.
Baths are made of bricks, aerated concrete and other stone materials, some prefer frame baths, however, many novice builders prefer to build a bath from wood. This light and durable material does not require the arrangement of a serious and expensive foundation, but it has excellent characteristics. With proper care, the operation of the bath will not cause much trouble.
And of course, preference should be given to a bar - a bath made of this material will retain all the advantages of a wooden structure and save you from problems and additional costs that may arise when building walls from logs. Erection of walls from a bar is similar to working with a designer - it can have different geometric dimensions and sections (rectangle, square, semicircular), and, in the case of a profiled bar, there are grooves for fastening. It is easy and convenient to build from a bar - what could be better for a novice builder!
How to choose a place to build a bath.
One of the most important points- the choice of the location of the future building. The site must comply with both existing legislation and ease of use. When choosing, basic recommendations can help:
- if there is a reservoir nearby, do not place the bath too close to it, as the building will be threatened by flooding;
- it is necessary to decide how the bath will be located relative to the house: separate building or will be attached to it, since each option has its positive and negative sides;
- it is believed that it is better to build a bath in the backyard, in relative seclusion;
- it is imperative to provide for mandatory ventilation during construction, as well as provide for wastewater disposal;
- it is highly discouraged to determine the location next to a nearby road;
- when placing a building, it is necessary to take into account the cardinal points and the direction of the wind: the best place- the southern part of the site, protected from the wind, so that it does not interfere with vacationers, it is better to have windows with an exit to the west;
- it is desirable that the bath be located at some distance from other buildings, and if it is an extension to the house, it is imperative to observe fire safety rules during construction, as, incidentally, when erecting a detached building;
- when determining the location of the bath and its size, it is necessary to observe the distance from the boundaries of the site established by the rules so that the neighbors do not feel discomfort in the future and do not make claims to the owner;
- it is recommended to keep the distance to the water intake (well or well) - no more than 20 meters.

At the beginning of construction, it is highly desirable to make a project, which should, among other things, determine the optimal construction area.

It is believed that the estimated area for 1 person should be approximately 5 sq. M. Thus, if the estimated number of visitors to the bath is 4 people, its total area should not be less than 20 sq. M.

The minimum composition of the premises is as follows: a steam room, a washing room, a rest room and a dressing room. It is important to determine the most convenient location of these rooms relative to each other, as well as their geometric dimensions.

First you need to complete several diagrams and drawings:
- general plan of the building;
- drawings of each room separately;
- a diagram of the foundation device;
- a diagram of the roofing device;
- a plan for fastening and laying out a bar;
- plan for the arrangement of the floor and ceiling of the bath;
- a diagram of the installation of the furnace, taking into account its structural features.

All the necessary drawings can be done independently, as well as found in many open sources. As a rule, timber baths have similar designs and you can easily choose the most suitable one. If you wish and have the necessary budget, you can order the design to a professional architect or builder.

The choice of building materials.
Below is a list of materials that will be needed to build a bath from a bar:
a) a bar of 150x150 mm, although it is possible to use a bar with a section of 100 mm or 200 mm;

b) batten(an edged board 150x50 mm 4 meters long is excellent);

c) hardwood boards for the ceiling (usually lining with a width of 100 mm and a thickness of 20 mm or more is used);

d) material for wall decoration (as a rule, the same lining is used);

e) material for vapor barrier (an excellent option would be to use a vapor barrier film);

f) waterproofing (it is advisable to use penofol, although plastic wrap is suitable);

g) ceiling insulation (a good option is mineral wool materials);

h) sheet asbestos for insulation of wooden structures from temperature effects, including for walls near the stove and elements located next to the chimney;

i) cement, sand and crushed stone for the foundation (recommendation - cement should be purchased before starting construction);

j) roofing material for the roof, which can be selected based on personal preferences and, most importantly, that it fits organically into the surrounding roofs of other buildings;


l) insulation for the intervening space (it is better to use jute, although moss or tow are perfect).

The best time to start construction is in spring, since after the completion of the main construction works it is necessary for the timber to dry and shrink. This requires at least 6 months.
Do-it-yourself bath - step by step instructions.
Step I - preparation of the site for construction.
Before starting construction, it is necessary to clear the site - remove shrubs, stumps, remove debris and everything that will interfere with the work on the foundation.


Step II - building the foundation.
It is best to build a bath from a bar on a columnar foundation, which is inexpensive and great for the construction of small wooden and frame buildings.

When constructing it, you first need to dig the estimated number of holes for the installation of supports. Their number is calculated as follows - the supports must be installed in the corners of the building and at the intersection of the walls, as well as with a certain step along their perimeter.

The step is chosen taking into account the type of soil and the estimated total weight of the structure. The depth of the holes should be 1-1.5 meters, although depending on the depth of freezing of the soil in a given area, it can change. To complete this type of foundation, in addition to the materials listed above, asbestos-cement pipes and fittings will be required.

At the bottom of the pit, it is necessary to fill in a mixture of sand and crushed stone 10-15 cm thick. Then install an asbestos-cement pipe of the required length in it, strictly vertically, and fix it. Several reinforcement bars should be placed inside the pipe.

After that, pour concrete mortar into the pipe and into the free space between the walls of the pit and the pipe.


After pouring the solution, you need to wait a few days, and then lay a half-brick wall between the posts.

Step III - wall erection and roofing.
The traditional material for the construction of bath walls is a bar of 150x150 mm in size. Before laying the first crown, it is imperative to put waterproofing on the foundation. Lower part the crown must be treated with an antiseptic. Most often, the timber is laid out in the "paw" method.


The first crown must be carefully aligned geometrically - all angles must be exactly 90 degrees. After the first crown has been erected, they begin to lay the beams for the set of walls. Laying out the walls, you need to make openings for future doors and windows and be sure to insulate each row with the selected heat-insulating material.

To connect the crowns, pins are used - metal or wooden pins.
After the walls are removed, the roof is installed. Depending on the selected roof shape, it is necessary to fix the rafters, which are attached to the upper rim with brackets.

When installing a sloped roof, the rafters are fixed either with two external or one external and one internal supports. When erecting gable roof it is necessary to reliably support the rafters from the bottom on the wall, and connect them together from above to form a roofing ridge.

Sheathing boards are attached to the fixed rafters, then hydro and vapor barrier, insulation are placed on them.

The installation of the roof is completed by the installation of the selected roofing material.

Step IV - interior finishing work.
Interior decoration must begin with a communications device - sewage, water supply, electricity. You should worry about the sewage system even during the design and construction of the foundation.

It is necessary to dig next to the future bath drainage well, which includes a sewer pipe buried in the ground with a slope for draining out of the washing compartment.

After the installation of the sewage system, a clean floor is made, which is made of wood or concrete. Concrete floor is more durable, most often it is faced tiles or porcelain stoneware.
If a wooden floor is chosen for interior decoration, it is usually made leaky. To do this, floor boards are nailed to the installed logs with a small gap, or a small drain hole is installed in the floor, closed with a grate.

In this case, the floor must be made with a slight slope towards the drain. Then the water entering the drain will be through sewer pipe discharged into a drainage well.

After the installation of the sewage system, it is necessary to carry out insulation, hydro and vapor insulation of the walls and ceiling with the help of appropriate materials, to conduct electricity and water supply.

After installing windows and doors, then carry out fine finishing premises using, for example, lining.

After finishing the finishing, you need to install the necessary electrical appliances.

Step V - installing the oven and shelves.
There are a lot of options for placing shelves, you just need to comply with the recommended sizes and the fact that they should be made of hardwood. The installation principle is simple - a stable frame is mounted, usually from a bar, and boards are attached to it.
The oven must be installed in full compliance with the requirements fire safety. Wooden structures must be isolated from exposure high temperatures working oven and chimney. In the case of a large furnace weight, its installation must be carried out on a specially equipped foundation. This is determined on a case-by-case basis, depending on the selected oven.

The stove is chosen according to the preference of the owner. It can be a traditional wood-burning stove, a metal wood-burning stove or an electric stove, sometimes it is advisable to choose a gas stove for a bath.
Step VI - choosing accessories
There are many bath accessories.

The main ones are:
- brooms (oak, birch and others);
- containers (buckets, basins);
- wooden ladle for adding water;
- wooden floor grates and much more.

Additional individuality can be added by the interior decoration of the premises, which remains at the discretion of the owner - here, depending on desires and financial capabilities, you can give free rein to your imagination.

It should be added that all the listed accessories can be made by yourself. The bathhouse is a great place to spend time in a pleasant, friendly company or with your family. It will be much more pleasant to realize that all this is done with your own hands, including useful and necessary devices: for example, hangers, lamps or ventilation grilles.
Enjoy Your Bath!
Video about building a bath yourself.
The bathhouse, built in Russian traditions, is considered ideal place to cleanse the soul and body. By visiting it regularly, you can maintain health, maintain youth and get real pleasure. It is not surprising that many decide to build a Russian-style bathhouse with their own hands.
Features of the Russian bath
The Russian bath, which was built by our ancestors, includes two sections: a dressing room and a steam room. Most big size of this room - 2.3x4 m, the smallest - 5x6 m. Baths with such dimensions are again popular.
1 - dressing room; 2 - steam room and washing room; 3 - shelves; 4 - oven
The device of a primordially Russian bath implies:
- creating an unsubmerged columnar foundation on the basis of boulders, devoid of a base;
- assembly of a log house from selected wild logs, that is, material that has not been subjected to any processing, except for removing the bark and drying;
- construction without the use of nails;
- plugging cracks with moss and tow;
- installation of a flat ceiling;
- insulation of floor and ceiling coverings with moss and peat;
- waterproofing the structure with resin and boot pitch;
- making a sod or shingle roof;
- creating a furnace from bricks.
Preparation for construction: drawings and dimensions
When composing a sauna project, one should not forget that several people will use the steam room and the washing room at once. Therefore, the area and dimensions of the bath should be determined without making serious mistakes.
The second version of the bath differs in the arrangement of the shower
To make it convenient for each user to be in the bath room, he needs to allocate at least 1.8 m² in the dressing room and 1.5 m² in the steam room. The average indicator of the total usable area of a bathhouse for a family is 10 m². At the same time, most of the space should be in the dressing room, and less in the steam room and washing department.
In order for people of any height to wash in Russian, the ceiling should be erected at a height of 2.4 meters.
When determining the height of the ceiling, take into account that soon the building will sit down
At the planning stage of the construction, it is necessary to reflect in the drawing the area for arranging the vestibule. This room may be needed as a place to block the path of cold air from the street.
For the vestibule, 2.32 sq. m
Adherents of tradition are recommended to build a bathhouse from high-quality coniferous wood. This material is not fragile, and most importantly, it serves for a long time. And the needles are also environmentally friendly and have low thermal conductivity, that is, they do not release heat and at the same time interfere with air exchange. Unique property this tree is considered to be resistant to various manifestations of the climate.
Such a wooden building should stand on a solid foundation.
For construction, you can take one of two types of coniferous wood:
- rounded round logs;
- solid bars.
Experienced builders advise to build a bathhouse from beams, since this material is cheaper, and it is much easier to build walls from it. In addition, a timber structure does well without a bulky foundation.
The timber structure looks simple, but it is easy to assemble
If you opt for rounded logs, you can be severely disappointed: the log structure settles for a long time, which is why it will not be possible to put it into operation earlier than a year and a half after construction. Unlike a log bath, a log structure can be safely used six months after the completion of construction work.
When buying bars, you should use a tape measure to check the material for compliance with the specified dimensions, and then make sure good quality construction raw materials. To do this, you need to do the following:

List of materials and tools
To build a Russian bath, you need to stock up not only with beams and bricks, but also:

To carry out construction tasks, you should arm yourself:

DIY step-by-step construction of an object
Construction takes place in stages:
- along the perimeter of the future structure and under its carriers inner walls create pits for the formation of a strip foundation;
- sand is poured to the bottom of the trench, the finished "pillow" is pressed and poured with water;
- the pits are filled with reinforcing rods and liquid concrete, the layer of which is smoothed with cement mortar;
Before pouring concrete, formwork is built from the boards.
- concrete is used to form the base for a brick oven;
- several layers are placed on the platform waterproofing material processed with bitumen mastic;
- collect the log house, connecting the beams according to the method "in the corners in the paw, and the ends in half a tree without a remainder", laying a heater between them and through each row setting the dowels at a distance of 20 cm from the edge;
The corners are connected in 4 steps, and the ends - in 3 steps
- prepare a platform for the floor, that is, a 10 cm layer of sand is poured, pressed, and then covered with a 10 cm layer of crushed stone;
- crushed stone is covered with roofing material canvases with adjoining edges for several centimeters;
- cement is placed on the roofing material, creating a screed with a slope, thereby equipping the waste water flow towards the sewer pipe built into the ground and leading to a separately dug hole;
- glue on the hardened cement screed facing material, on top of which a wooden crate is placed;
Wooden battens on the floor keep your feet from touching the cold floor
- floor beams are attached to the upper bars of the walls in a horizontal position;
- the installed beams are connected with iron brackets to the rafters - with thick beams;
- fasten the rafter legs to each other using ridge bars;
- the rafters are covered with a roll-up waterproofing sheet and wood flooring- the basis for the roofing material;
- create a ceiling, that is, not load-bearing walls boards are laid out every 2.5 meters;
- lay over the ceiling vapor barrier film and put insulating material.
Finishing
TO finishing works start after the shrinkage of the structure. First of all, all surfaces inside the bath are covered with an antiseptic compound.
Interior decoration implies the performance of such tasks as:
- installation of the lathing directly on the walls and ceiling;
- laying insulation and vapor barrier material in the gaps of the crate;
- flooring lining or other facing material.
Lining is laid on the ceiling and wall
If the most popular building material for interior decoration baths became only lining, then a lot of materials are in demand for facing the outer walls of the building:
- vinyl or metal siding;
- plastic lining;
- block house imitating the view of a log house;
- edged or unedged boards with a low price.
The material extends the life of the building
Finding stones for the bath room
It is customary to use igneous rocks in the steam room. Formed during a volcanic eruption, they are resistant to extreme heat. Igneous rocks that have a positive effect on the energy forces of a person include:
- polished or chipped jadeite, main feature which is beauty;
- talc chloride, capable of absorbing moisture and evaporating it to create the desired steam in the bath;
- basalt that can withstand high temperatures.
In addition to its benefits, this stone provides aesthetic pleasure.
Metamorphic rocks can be placed on the stove, which tend to normalize blood composition and improve well-being. We are talking about such stones as:
- white quartz, called hot ice, and when it cools sharply, it releases ozone;
- crimson quartzite, the second name of which is the royal stone.
Such a stone is ideally combined with brickwork.
To create steam in the bath, you can use full-crystalline rocks, for example:
- dunite;
- serpentinite.
These stones are able to regenerate cells of the nervous system, increase immune strength and have a beneficial effect on the functioning of the thyroid gland.
The length of such a stone is about 20 cm
If you want to move away from traditions, then it is better to use cast iron stones - balls produced by industry as steam generators in the bath. They instantly heat up the room and keep warm for long hours. True, cast iron stones are subject to rusting after a short service life and carry no properties useful to humans.
Sedimentary and siliceous rocks should definitely not be put on the furnace. Their structure is porous, which means that, when they cool down sharply, they become covered with cracks and small particles scatter in a zone of one meter.
Exploitation
The main requirement for using a bath concerns the creation of the desired temperature. In the steam room this physical quantity should be within 55-77 degrees. The temperature indicator is selected individually, that is, it depends on the preferences of the owner of the bath. It is customary to heat the washing room to 40 °, and the rest room to 20 °.
In order for the bath to serve for a long time and properly, you need to use it according to the rules:
- put in the firebox exclusively any dry fuel, except for firewood from coniferous wood;
- keep the door of the combustion chamber closed, thereby avoiding the escape of hot sparks;
- do not allow the chimney to glow until it becomes red;
- do not touch hot surfaces, including the walls of the water heating tank;
- monitor the cleanliness of the bath rooms;
- ventilate the sauna sectors after each firebox for four hours;
- try not to splash water on glass surfaces in the room (on windows and doors);
- clean and inspect the chimney for holes at least once a quarter.
The owner of the bath will have to carefully look after wooden surfaces... The elements inside the bath, made of wood, are supposed to be covered twice a year special means to protect against fungi and decay. External processing wooden walls buildings are recommended to be carried out after two years of operation. To do this, it is better to use antiseptics, which include wax.
Wood deteriorates over time and therefore needs careful maintenance
In order for a Russian bathhouse to produce the required amount of heat, one must be able to regulate the traction force. To do this, open the door of the ash storage chamber more or less. Excessive thrust will cause the furnace to heat up too much, and this will bring the time of equipment failure closer. If the force forcing air to enter the firebox is normalized, then the stones in the bath heat up to a standard temperature.
During the heating of the stove, the operation of the chimney should be monitored. The consumption of firewood will be reduced to a minimum, and the efficiency of heat supply will be increased, just not completely covering the chimney gate. But this is allowed to be done only after the absolute closure of the ash chamber.
Video: building a bath from scratch
You can get real joy from the construction of a Russian bath. It is clear that this work is impossible without skills and labor, but the result is a source of pride. This feeling is even stronger if the object was built on their own.
Since ancient times, the bathhouse has been a place where you can relax and unwind. These ancient buildings bypass even outdoor recreation in popularity.
How to build a bathhouse yourself?
Building a bath with your own hands is a difficult task and its implementation will require a certain amount of knowledge, which you will soon learn about.

To build a bathhouse with your own hands, you will need to familiarize yourself with the action plan:
- Design a bathhouse;
- Understand the stages of construction;
- Get a building material;
- Connect communications;
- Arrange the bath from the inside.
After getting acquainted with the stages of construction, it is necessary to determine the place where the bathhouse will be located, since a lot also depends on the location.

The best option would be if:
- the bath will be located on a hill, this will greatly simplify the installation of the water drain;
- there will be a river or a reservoir next to the bath;
- the window in the bathhouse will be located opposite the house, which will allow you to observe its firebox.


For garden house the distance will be no more than 3 meters, and for such buildings as a bath, this distance should not exceed 1 meter.


It is best to order the design and drawings of the bath from local designers, it will cost about 5,000 rubles. You can also search for ready-made sketches and photos of the bath on the Internet that best suit your preferences.

Bath made of bricks, stones or blocks
Brick, stone or blocks can be used directly as materials for a brick bath.

To build a bath, it is necessary to dig a pit and fill it with 20 cm of sand, then it must be filled with water for compaction.

The second step is to lay the rubble on top of 10 cm thick sand, which then needs to be covered with sand again.

The last step will be to install a drainage and drainage system for the building.

Bath from a bar
The first layer for the base of the bath will be 20 cm of sand, the second layer is crushed stone, and concrete pouring fits in the third layer. The reinforcement of the building will be the key stage.

You need to insert metal rods into the layers for more solid construction and as additional stability, metal plates must be laid in the middle, which are tied with a wire.

Note!

The next stage of work is the blind area, which is needed so that the base of the bath is not washed out with water.

It is best to make a blind area of clay, it is much stronger than concrete, and also does not form cold seams in the process. A layer of rubble must be poured over the blind area.

Next, you need to install a drain in the bath. First you need to dig a hole and bring its gutter to the edge of the foundation of the building, cover the walls of the hole wooden planks with reinforced wire, and then pour concrete over everything.

Frame bath
The foundation for such a bath structure is made using a simplified technology, which is the advantage of a frame bath. It is necessary to make a foundation of asbestos-cement pillars, which, after installation, are poured with concrete.

The next step is to mark the walls. Then you need to start connecting the boards using nails. The top is assembled from the boards and bottom rail... The walls for such a bath are made in a lattice structure.
Note!


The materials that are needed for the walls are bars, insulation, and materials for outside, For example OSB boards or a block house, and inside you can use the clapboard.

Materials for insulation and vapor barrier
It is worth insulating the bath outside only with the condition of heating in the building.

For wooden bath it is necessary to make a lattice that will be inserted into the insulation. In work you will need mineral wool the width of the layer will be 50 mm.
Bath floor
In case of frame bath, when it remains to insulate the floors, as well as to install floorboards, in addition to this, it is necessary to install logs, a sub-floor, and fix the structure for removing steam, then lay the insulation and check the waterproofing.

It is best to make the floor of concrete, as this will allow the bath to dry faster, and it will last much longer. Shields made of wood are laid on the concrete floor, they can subsequently be taken out to dry and calmly go about their business.

Note!

Do-it-yourself bath photo


