Gable roof. Calculation of a gable roof: principles for the selection of proportions and calculation of consumables leg, m
The roof is an important structural part of the house, performing a number of the most important functions. It protects from atmospheric attacks and removes precipitation, provides insulation and makes a solid contribution to the formation of your own building style. In order for such a significant structure to cope with the entrusted work perfectly, it is necessary to thoroughly think over the project and scrupulously deal with the dimensions.
Careful analysis and calculation of two pitched roof it is required both for independent craftsmen and owners of suburban property who use the services of construction organizations. Let's figure out how to do it right.
The roof, which resembles an inverted V in section, leads the list for a reason pitched structures... In terms of simplicity of construction and economy, the gable roof has practically no rivals. For centuries, proven in practice, laid the foundation for the construction of most roofing structures.
Unpretentious pitched planes do not require complex cutting of the coating and other materials, which results in an impressive amount of waste. No specific tricks are needed to implement intricate configurations. Precipitation does not linger on inclined surfaces, so there is no need to reinforce waterproofing. As a result, the device of a gable roof is often cheaper than a gable roof.
A roof with two slopes can be an independent object or part of a complex of structures of a similar or different shape. The simplest version does not have built-in dormer windows and awnings over entrance porch, i.e. there are no additional fractures, ridges and associated valleys.
The absence of convex and concave corners deprives the master of "pleasure" to suffer with a number of difficult operations. Again, the owners will not get the imaginary pleasure of the leaks that often appear at the joints of the pitched roof elements.
In principle, no one bothers lovers of fancy architecture to equip two ramps with numerous built-in structures. True, there are restrictions on climatic characteristics: in areas with a high volume of winter precipitation, the construction of roofs with numerous components is undesirable. In the gutters formed by excesses, favorable conditions are created for the accumulation of snow deposits. They will have to be cleaned faster than usual, and excessive diligence in the field of snow removal can cause damage to the coating with all the consequences.

However, adherents of simple and clear forms should not relax either. The roof configuration with an angle must be ideally matched and calculated, otherwise it will not be able to perform the entrusted work flawlessly.
Despite the deceptive elementary nature, there are tricks in determining the optimal form of a structure. It is impossible to overcome and bypass them without knowledge technological subtleties, because all the parameters of the structure are interconnected:
- The width of the gable roof depends on the dimensions of the box and the type of coverage, which in turn affects the selection of the slope steepness.
- The slope of the roof depends on the climatic characteristics of the construction area and on the type of roofing material.
- The combination of the above circumstances, width and slope, determines the height of the structure, which in the end may not meet architectural requirements and aesthetic considerations.
An impeccably designed roof has perfect proportions. Its width and height determine the rise and slope required to drain precipitation in a particular area. The lower is impossible for technical reasons, the higher is expensive and unreasonable if the unique architecture does not require it.
Note that as the steepness increases, the building budget goes up. Roofing material is selected according to the slope. Focusing on its weight and specificity, the rafter frame is designed and calculated. The calculation of the rafter frame is carried out taking into account the listed parameters and taking into account the loads acting from the outside on the structure.

The interdependence of the proportions of the roof, the complexity of the structure of the rafter frame and the nuances of the selection of the coating makes it necessary to determine the best shape by banal selection. If something does not fit, the supporting structures are replaced or reinforced. Fortunately, the assortment for construction market now there is plenty, and all kinds of methods have been developed to strengthen the structure.
If the upcoming calculations and data shuffling are intimidating, it is better to resort to a win-win solution - a standard project. It is not for nothing that abroad all houses of one settlement are equipped with roofs of equal height and covered with materials of equal color and characteristics. Typification allows you to maintain landscape identity and reduce design costs.
However, even a typical design solution is not a panacea for technical troubles and aesthetic flaws. We must not forget about the individual dimensions of the box, over which it is planned to erect a roof. Compatriots deny equalization in height and steepness, therefore it is still desirable for us to understand the proportions of the roofing structure.

Step-by-step calculations
The configuration and dimensions of any pitched roof is set by the rafter frame. Slopes are laid on the edges of the rafter legs, forming a dihedral angle. They construct roof systems from rolled metal and wood, use industrial-made structures and lumber in construction.
Let's take a look at the options available to apply the effort independent master, i.e. construction method of erecting a lumber roof frame.
Stage # 1 - choosing the type of rafter system
The method of constructing a gable roof is indirectly related to the dimensions, but without taking into account the difference in the structure of the structures, it will be difficult to understand the geometric parameters.

Two traditional technologies are used in the construction of gable roofs:
- Naslonnaya, according to which the top and bottom of the rafters have a solid fulcrum. The walls of the house, equipped with a Mauerlat, serve as the lower support. The top of the layered rafter legs rests on the girder that forms the ridge. The running beam is supported by a support system built specifically for it, on inner wall or on the stone gables of the box, erected before the roof device. The nesting method is mainly used when arranging large houses with an internal load-bearing wall or a row of columns.
- Hanging, according to which the rafters tops rest only against each other. The walls are the support for the bottom, as in the previous case. Hanging rafter legs form an equilateral triangle, the base of which is called a puff. Taken together, such a system does not create a thrust, i.e. does not transfer the bursting load to the box walls. The rafter triangles are either installed ready-to-install, i.e. assembled on the ground, or constructed from separate rafters on site. The absence of an upper support makes adjustments to the scope of use: the hanging method is used in the arrangement of only small buildings with small spans.
Schemes of rafter systems of both types include a minimum structural elements when overlapping boxes up to 8-10m wide.

When arranging spans larger, there is a risk of deformation of the rafter legs. In order to exclude sagging and deflection of wooden parts from lumber, reinforcing elements are installed: struts, contractions, side girders, etc.
Additional parts provide rigidity and stability of a large structure, but increase the load. We have already analyzed how the total load is determined and produced.

Stage # 2 - calculating the width
Both types of timber truss systems are built on floor beams or Mauerlat. How the roof width is calculated depends on the type of base:
- When mounted on floor beams, it is they who form the eaves overhang, i.e. determine the dimensions of the roof.
- When installed on a Mauerlat, the roof width is determined by adding three values. You need to summarize the width of the box and two projections of the width of the eaves overhang. However, in the calculations, only the load-bearing part of the roof width is used, which is equal to the width of the box.
The function of the Mauerlat in frame buildings is performed by the upper strapping, at the same time connecting the disparate elements into a single frame. IN wooden construction The upper crown, folded with a bar or log, serves as a mauerlat.
In the case of using the "beam" scheme of the device, so-called matrices are used - beams or logs, laid under the upper crown of the foot as an overlap.

Eaves overhangs roofs installed on the Mauerlat can be formed directly with rafter legs sewn to them with filly or brick ledge. The last option, of course, is used during the construction brick walls... The choice of overhang width is dictated by the type of roofing and the material from which the walls are folded.
- For slate roofs no more than 10cm;
- For bituminous shingles in the range of 30-40cm;
- For metal tiles 40-50cm;
- For profiled sheet 50cm;
- For ceramic tiles 50-60cm.
Walls made of logs and beams require enhanced protection from slanting rains, so the overhangs above them are usually increased by 10-15cm. If the maximum value of the overhang width recommended by the manufacturer is exceeded, measures must be taken to strengthen it.
It is possible to install external braces on walls or support pillars, which can simultaneously play the role of structural elements of a terrace, porch, veranda.

Stage # 3 - defining the slope
The angle of inclination of the slopes is allowed to vary within the widest limits, on average from 10º to 60º with permissible deviations round trip. Traditionally, both planes of a gable roof have equal angles of inclination.
Even in asymmetrical structures for residential buildings, they are mainly located at an equal angle, and the asymmetry effect is achieved by constructing slopes of different sizes. Most often, differences in the slope of the main parts of the roof are observed during construction. country houses and household objects.

The procedure for determining the optimal slope of a gable roof is significantly influenced by three factors:
- The type of covering, coupled with the weight of the sheathing intended for it. The type of roofing material determines the installation technology and the way the base is arranged for its fastening. The denser the roof is, the lower the slope can be. The fewer overlaps and joints between the elements of the covering, the lower the roof is allowed to be. And vice versa.
- Roof weight with. A heavy coating located at an angle to the horizon presses on the base only with its projection. In short, the higher the slope, the less mass is transferred to the floor. Those. under a heavy roof, you need to build a steep roof.
- Climatic specificity of the region. A high slope facilitates rapid removal of snow and water, which is highly desirable in areas with significant rainfall. However, high slopes are very sensitive to the effects of winds that tend to overturn them. Therefore, in regions with characteristic strong winds it is customary to build shallow structures, and in areas with abundant precipitation - roofs with a high slope.

IN regulatory documents, used in calculating the angles for the construction of gable roofs, there are units that can confuse home builders inexperienced in roofing. The simplest value is expressed in dimensionless units, the most understandable - in degrees.
The second version conveys the ratio of the height of the roof to half of its width. To determine it, a line is drawn from the central point of the floor to the top of the roofing triangle. The real line is drawn on the diagram of the house, imagined on the object. The value is indicated either as a percentage, or in the form of a mathematical ratio of the type 1: 2.5 ... 1: 5, etc. The percentage is trickier and more inconvenient.

Stage # 4 - determining the height of the skate
A roof with two slopes may or may not have an attic at the request of the owner. In the attic spaces of gable roofs, it is not supposed to arrange useful premises. For this there is. However, the height of the attic used for maintenance and inspection of roofs at an angle is not arbitrary.
According to the requirements of the fire service, the distance from the top to the overlap must be at least 1.6 m. The upper limit is dictated by the aesthetic beliefs of the designers. They argue that if the height of the roof is greater than the height of the box, then it seems to "press" on the building.
The height of the ridge top for suspended roofs arranged on beams is easiest to determine by the drawing method:
- We draw a diagram of the box of the house to scale.
- We are looking for the middle of the upper floor.
- From the middle up, we lay the axis of symmetry.
- On either side from the middle, set aside half the width of the roof - we get the extreme point of the overhang.
- Using a protractor from the extreme point of the overhang, draw a straight line at an angle recommended by the manufacturer of the roofing. Its point of intersection with the axis will be the top of the roof. Let's measure the distance from the top to the overlap and get the height.
To get a complete picture, you need to draw a second slope on the diagram in a similar way. Parallel to the lines of the drawn slopes, two more lines must be drawn at a distance equal to the thickness of the rafter legs on the same scale.
If you are not satisfied with the configuration of the roof, you can play with the height on paper, changing the position of the apex point and the slope of the roof within reasonable limits. The same manipulations can be carried out in one of the drawing programs.

When drawing the outline of a roof constructed using layered technology, the thickness of the purlin should be taken into account. With impressive power, it will slightly shift the position of the slopes.
Craftsmen believe that the calculations of the elements of the rafter system for the construction of a gable roof can generally be reduced to calculating only the cross-section of the run. This is the most loaded element, all others have the right to be thinner. For example, if calculations show that material 100 × 150mm is required for a ridge run, then a board of 50 × 150mm is sufficient for rafters, supports, struts.
The process of finding the height of structures with overhangs formed by filly differs little from the described method. It's just that the slope angle is drawn not from the extreme point of the overhang, but from the lower attachment point of the rafters to the Mauerlat. In any case, it is better to pick up variations with the steepness and dimensions of the gable roof planned for construction on "paper" than on the construction site.

Stage # 5 - calculation of material consumption
A normal owner thinks ahead of time about the construction budget. True, in the preliminary estimate, by definition, there will be inaccuracies. The process of erecting a gable roof will impose its own adjustments on the initial calculation of the material, but it will help to find out the amount of basic expenses.
The preliminary estimate should include:
- A bar for the device Mauerlat. IN housing construction use lumber with a cross section from 100 × 150mm to 200 × 200mm. The footage is calculated around the perimeter of the box with a 5% margin for processing and joining. A similar material is purchased for the bed device, if it is designed.
- Board for the manufacture of rafters. Most often, for the manufacture of rafter legs, a material with a cross section from 25 × 150mm to 100 × 150mm is used. The footage is determined by multiplying the length of the outer edge by the number. The material is purchased with a margin of 15-20%.
- A board or bar for making struts, braces and supports with a section of 50 × 100, 100 × 100mm, depending on the project. You also need a stock of about 10%.
- Material for the lathing device. Its consumption depends on the type topcoat... The lathing is erected either solid, if it will be produced, or sparse for corrugated boarding, metal tiles, ordinary tiles, slate, etc.
- Roll waterproofing, the footage of which determines the type of roof and steepness. High roofs are covered with a waterproof carpet only along the eaves, ridge and in convex or concave corners. The gentle ones are covered with a solid carpet.
- Finish coating. Its amount is calculated by summing the areas of the rays. If there are embedded dormer windows, then their areas are also counted. Only calculated as a rectangle, not after the fact. The amount of stock for laying is recommended by the coating manufacturer.
- Material for covering gables and overhangs.
- Corners, plates, screws, staples, nails. Anchors and studs are needed, their number will tell the project.
You will also need shaped elements for arranging through passages through the roof, valleys, overhangs, ridge. The presented sketch of the estimate is valid for a cold construction. For an insulated roof, it will be necessary to purchase insulation and vapor barrier film, bar for counter battens and material for roof sheathing from the inside.

In this article I will try to describe in detail how the gable is being built. This form is practically the simplest, suitable for a private house and its construction, from the point of view of monetary costs, is more profitable in comparison with other more complex roof configurations.
- in the second case, the rafters lie on the floor beams of the floor located below. A gable roof made according to this option will be described here.

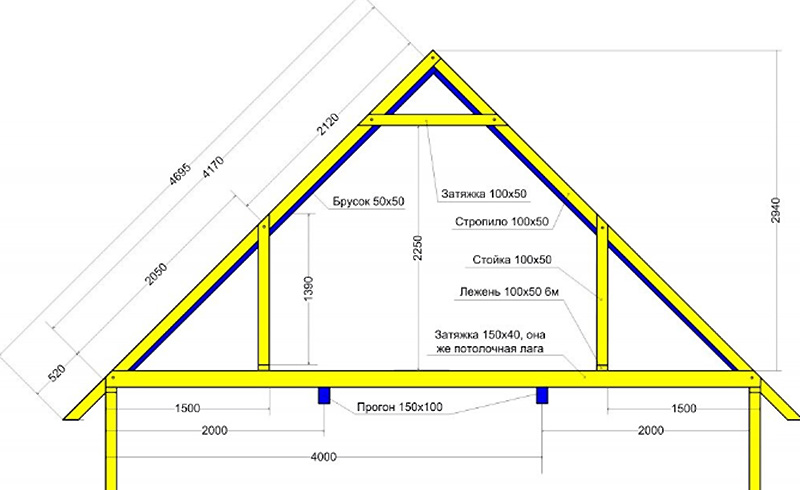
Take a brick box at home as an example. Its dimensions are 8x8 meters, height is 3 meters. Do-it-yourself construction of any roof begins with the installation of a maeurlat (Fig. 1). The methods of attaching it to the walls were described in the article, which you can read
We install the Mauerlat flush with the inner surface of the walls. Outside, it should be bricked up so that it cannot be seen. In this case, the upper surface of the Mauerlat should be 2-3 cm higher than the upper surface of the facing brick, so that the entire load from the roof is transferred only to the Mauerlat. No need to load.

Next, we install the floor beams. We do this in the sequence shown in Fig. 2. First of all, we put the beams indicated by the numbers 1,2,3,4. Their extension determines the width of the cornice. We usually take it from 40 to 50 cm at the request of the customer. As beams, we use a beam, the section of which is determined by making a simple calculation described in detail.In our case, it will be a beam of 100x200 mm.
After fixing the extreme floor beams, we pull the lace along the upper plane and expose the rest of the beams, if necessary, pulling up the Mauerlat under them, or vice versa putting thin plywood underneath (you just often order a bar 200 mm high, and they bring it from 190 to 210 mm, this is on our sawmills equipment). We choose their step taking into account the step of the future rafters. When using floorboards 50x150 mm as rafters, we make a step of 60-70 cm (it is better to take 60 cm, since roofing insulation has such a width).
Having installed all the long beams, we put the short ones (Fig. 2). It is enough to make their step about 1 meter. This scheme is slightly different from what we are used to seeing in similar pictures. We came to her after the gable ebb tide had sagged on one of our first roofs, although the ebb fillies were securely fastened. In this scheme, the possibility of sagging is completely excluded.
 We fasten all beams to the Mauerlat with 150 nails, you can also use metal rafter corners and self-tapping screws. In general, the use of various fasteners for rafter connections makes it easier to work. This is especially convenient for an inexperienced person, no need to make complex cuts and notches. We have already talked about this in the article ““.
After installing all the beams, we lay (without fixing) boards on them, you can floor, you can inch. They are needed just in order to walk on them calmly. In order not to clutter up the drawing, I did not show them on it. The next step is to install the ridge bar.

First of all, we put upstands from a 50x150 mm board according to the level or plumb line and fasten them with temporary spacers. In fig. The 3 spacers are shown on only one post, again so as not to clutter up the drawing. The step of the racks is no more than 3 meters. First we put the extreme ones, then, pulling the laces between them, we put the intermediate racks. After the construction of the entire rafter truss, the intermediate racks can be removed and living rooms can be easily made on the second floor.
The height of the pillars is chosen depending on what kind of roof shape you want to get. I usually advise customers to take it equal to the height of the first floor along the facade (the distance from ground level to the Mauerlat). This proportion is shown in the figures as well.
Having installed the racks, we put on them and fasten the ridge bar literally on a couple of self-tapping screws. We use a board of 50x200 mm as it (in principle, 50x150 mm is also possible).

Now we turn to the installation of the rafters. First we need to make a template from a 25x150 board. To do this, we apply it to the end of the ridge bar and to the beam (Fig. 4) and mark out two lines. Having cut off the board along them, we get a rafter template.
Of course, it is very good when the foot of the house is laid out with high geometric accuracy and floor beams are also installed. Then we can cut all the rafters at once according to the template and install them calmly. But to be honest, it is quite difficult to achieve this, and even more difficult when a new roof is being made on an old house.

In this case, we first make only the upper cut at the rafters according to the template. Then we take the resulting workpiece, apply it to the desired beam and mark the bottom cut, as they say in place. In this way, all the rafters are installed (Fig. 5). Please note that having installed one rafter, we immediately put the opposite one to it in order to quickly remove the lateral load on the ridge beam (otherwise it will bend it).
When the length of the roof slope is large and the standard 6-meter board is not enough, there are two ways to go. The first (I think it is preferable) is to order longer boards on the sawmill. Of course it will cost more. For example, at the end of autumn 2012, 1 cubic meter of 6-meter boards cost about 5500 rubles, and 1 cubic meter of boards 7.5 meters long cost 7000. But the installation of rafters is easier and faster than using the second method.
 The second method requires two boards to be spliced. This can be done by sewing on them a piece of board of the same section 1.5 - 2 meters long. See the figure for how this is done. It is better to do the joint at the bottom, and an additional rack must be installed under it.
We attach the rafter to the ridge beam with two or three nails. For fastening to the floor beam, we in recent times use metal mounting plates and screws and add a couple of nails. Sometimes we use staples. By the way, I've seen many times how people use staples, but they don't do it right. The staple should work in tension. Below, on the left photo - how not to do it, on the right - how to do it.


Having strengthened the truss, we begin to deal with the gables. First, we put additional racks, which will be the frame of the pediment (Fig. 7). The accuracy of the installation is controlled by a string stretched along the bottom of the rafters. Then we do window hole(fig. 8). Its dimensions and configuration can be made to whatever your heart desires. Please note that in the figure, the stand in the center of the window (supporting the ridge beam at the beginning) was simply cut. She no longer carries almost any load. Having finished with the frame, we sheathe the pediment with an inch (for example, 25x150 mm) (Fig. 9).

The next step is to hem the cornice boards around the entire perimeter of the house. The frontal board (sewn to the ends of the floor beams) is made from a board of 25x200 mm. From the bottom to the cornices we sew two belts from a 25x100 board (Fig. 10). There are more than enough of them to secure the exterior decoration soffit.
Now, if we are going to mount the drainage system and use metal holders for the gutters, they need to be installed on the stacks right now (under the waterproofing film). Moreover, it is also advisable to sheathe the frontal boards with siding at this stage. Then it will not be very convenient to do it. I have not shown this in the figure. In addition, we now only use plastic gutter holders, which are attached directly to the frontal board. It is more convenient with them and you can put them after the roof assembly is completed.

Next, we proceed to the crate. Primarily with the help construction stapler we fix the first strip of waterproofing film on the rafters (fig. 11). It is more convenient to work if you have already installed scaffolding around the perimeter of the house. In any case, you will have to put them when you make the roof, drain, sheathe the cornices with siding.
Having fixed the film, we nail the counter-lattice slats (25x50 mm) to the rafters. The need to use a counter grill is described in detail here: . Remember to leave space for the overlap of the subsequent waterproofing strip.

Then we make the crate. Now I will not focus on the rules for its installation. This topic is for a separate article. In addition, an instruction is attached to any roofing covering in which it is described in detail how to make a lathing specifically for this material (the pictures schematically show a lathing for a metal tile). I will try to prepare a new article on this topic in the near future.
In this way we cover the entire roof (fig. 12). After that, it remains only to make the gable overhang and gable ebb. The sequence is as follows:

To the protruding ends of the lathing with self-tapping screws, we sew the wind board of the pediment overhang (25x150 mm) from below (Fig. 13);

We insert and fix the gable overhang filly (board 25x150) with self-tapping screws. The distance between them is about 1 meter (Fig. 14);

We sew two belts to the filly from below (board 25x100). There are also enough of them to later sheathe the gable overhangs with siding (Fig. 15);

From pieces of board 50x150 of the required length, we prepare triangular fillets for the gable outflow according to the figure (Fig. 16). Then, fixing them on the outriggers, we also nail two belts (25x100) to them.
This completes our roof. What happened in the end and what will happen after roofing work and siding of the pediment and cornices with siding is roughly shown in Figures 17 and 18.


Roof construction is one of the most critical stages in building a house. To the most simple constructions include gable roofs with straight slopes. If it is decided that a do-it-yourself gable roof will be erected, then you must carefully read the step-by-step instructions and video. The functional parameters of the roof also depend on correct insulation, characteristics and quality of installation of the topcoat.
Preparatory stage
To determine the configuration and size of the roof, it is necessary to take into account the snow and wind load in the existing climatic conditions - the smaller the angle of inclination, the better design resists loads. But the small angle of inclination (40 degrees or less) does not allow full use of the attic space.
The shape and structure of the roof is developed in accordance with the design plan of the house: the key points of support of the roof truss system must coincide with the lines and points of location load-bearing structures the underlying floor. Thus, it is necessary to take into account the width of the house, the presence of a longitudinal load-bearing wall in the center. If the attic is not planned to be used as an additional usable area for permanent or seasonal residence, you can make a reliable roof with layered rafters. In this case, the rafters are attached to a ridge girder, which is supported by racks resting on an internal load-bearing wall.

Hanging rafters are the most practical and economical option for lightweight buildings. In this case, the rafter legs are connected in pairs with crossbars - horizontal bridges, which provide the necessary rigidity of the structure. The hanging rafter system rests on side walls structures.
If the width of the house exceeds 6 meters, in addition to the crossbars, which act as the basis for the ceiling, girders and racks are installed. The girder is a horizontal beam that acts as an additional support for the rafters that form the roof slope. Installation of the purlin requires the use of racks. The racks, in turn, rest on the beds - a special beam laid along the slope. Beds and racks serve as a wall frame attic room... Such a layered design allows you to make an attic or a spacious attic for household needs with your own hands.

If construction is required simple and secure roof, the gable design with an angle of inclination of 45-50 ° is optimal. Such a rafter system is suitable for installation on residential buildings and buildings for various purposes. When calculating materials, it must be borne in mind that the rafter system must be light enough to avoid excessive stress on the foundation, but at the same time strong. The section of lumber should be selected based on the dimensions of the truss structure.
Mauerlat installation
Consider step by step a method of building a roof with layered rafters and an attic room with your own hands. At the first stage, the upper strapping - Mauerlat - is installed on the longitudinal walls of the house. The harness absorbs the pressure of the entire roofing system and transfers it evenly building structures- walls and foundations.
Mauerlat is made of a bar (section from 50 × 150 to 150 × 150 mm), processed with special protective equipment to protect against decay and fire.
Mauerlat can be done in various ways:
- rolled wire is embedded in the brickwork, by means of which the bar is fixed on the wall (the wire is threaded through specially made holes and twisted tightly);
- long metal studs with a diameter of 12 mm or more are embedded in the masonry;
- a monolithic concrete beam with embedded steel pins is made in the upper part of the wall.

The studs should be spaced no more than 120 mm apart. The height of the protruding end of the fastener should be 20-30 mm higher than the total thickness of the waterproofing and the timber in which holes should be made in advance. The bar is put on the studs and tightly attracted by nuts with wide washers.
Construction of the rafter system
The do-it-yourself rafter system consists of a number of elements combined into a single whole. A rafter A-shaped truss is a rigid structure that works "on the spacer". If the roof is being built on a log house, the opposite walls should be reinforced with 100 × 150 mm timber ties at the level of the ceiling beams. This is done so that the walls do not move apart under load.

Planks are laid on the ceiling - additional elements made of a bar of 150 × 150 mm or more, which serve as a support for the racks and redistribute the point load to the floor surface. Laying the bed with your own hands should be done along the lines of the location of the walls of the future attic space. If the attic is not planned to be used, the bed can be placed directly under the ridge for the installation of support posts. If necessary, splicing of the timber can be done, but only in places where the joint will lie on the beam. The spike connection is secured with a bracket or a metal plate.
Repeating parts of the rafter system should be made completely identical to each other in order to build an isosceles gable roof, the weight of which will be evenly distributed even under atmospheric stress. For this purpose, do-it-yourself templates of identical parts are made.

Planks 50 × 150 mm are laid out on the ceiling of the house, a triangle of the required height is made from two rafter legs and a rack board (its length corresponds to the height future roof) connected by a nail. Two or three people raise the structure - the rack is installed on the central axis of the ceiling, the rafters are installed on the Mauerlat.
In the process of preparing the template, you can lengthen the elements by varying the height of the roof and choosing the most suitable option.
Having decided on the dimensions, it is necessary to make curly cuts on the rafters in the places of their contact with the harness. Rafter leg should firmly rest against the Mauerlat. Exist whole line fastening methods, you should choose the most convenient and reliable, it is advisable to use metal pads. The intricacies of the technology can be found in the video. The resulting rafter structure further acts as a template, and the support board helps to control the height of the installed trusses.
Gable
The pediment is an extension of the wall, limited by the roof slopes. If provided gable roof, the gables of the house are in the shape of a triangle. When installing the truss structure, first of all, the extreme trusses are installed, which later serve as a frame for the gables. It is necessary to strictly check the verticality of the structures and make sure that they have the same height. Attached at the top of the gables ridge girder, to which the rest of the rafter structures are later mounted.

Usually the gables are sewn up after the roofing work is completed, but this can be done at an earlier stage. Installation of boards 50 × 100 or 50 × 150 mm is carried out in the vertical or horizontal direction. The pediment, which you can build with your own hands, is often supplied with windows.
It is necessary to provide for the warming of the gables.
Roof insulation and roof installation
On the rafter system the crate is stuffed, the step of which is calculated based on the characteristics of the roofing material - its dimensions and rigidity, the method of installation. If the use is envisaged flexible materials(bituminous tiles, PVC films, roll bituminous roofs), it is necessary to make a continuous even flooring.

It is necessary to treat roof insulation as carefully as possible, otherwise heat losses will be very significant. Usually, a gable roof is immediately performed taking into account the use of certain materials for insulation - when building a rafter system with your own hands, the pitch of the rafters is calculated relative to the width of the sheet insulation. This allows you to build a roof with minimal economic costs, since the material for insulation does not have to be cut. In addition, this approach speeds up and simplifies the installation of the insulation and vapor barrier system.
In this high-quality video, you can see in detail how to make a gable roof yourself and make sure that there is nothing complicated about it.
If we talk about the broken shape of the roof, then for some reason many have questions. Meanwhile, it is nothing more than a kind of gable roof. Therefore, for those who decided to expand the space on the attic floor, better option just do not come up with. And lovers so original designs there are many.
A sloping mandsard roof can be built independently. You just need to know a certain sequence of actions for this. The main principle of construction sloping roof consists in the principle of supporting the rafters on the floor beams.
Before starting the construction of a roof, it is best to start by properly developing a project on paper, preferably in a cage. So it is possible in a fairly simple way to determine the height of the structure, the angles of inclination of the slopes, the size and location window openings It is even easier for people who have drawing skills or know how to work with graphic programs on a computer. When certain proportions are found, they simply remain to be adhered to.

After determining the desired proportions, you need to decide on the cross-sections of the elements of the rafter system, and then make strength calculations. For this purpose, you can use any suitable calculation program where such a possibility is provided, for example, "Calculation of the rafter system". Or make detailed preliminary calculations in an Excel spreadsheet.
After all the dimensions of the future broken attic roof have been fully calculated, you can proceed to its direct construction. Worth considering this process in more detail, literally in stages. Best to do it on someone specific example, taking, for example, a house with sides 8 by 8 m as a basis.
Phased construction of a sloping mansard roof
Step 1. First of all, you need to start by installing the Mauerlat and floor beams. The approximate parameters for calculating the cross-section of the beams are 100 by 200 mm. You need to mount the Mauerlat on inside walls, and outside with brick for aesthetic reasons. During installation, it is necessary to ensure that the upper part of the Mauerlat does not protrude beyond the facing brick by 2-3 cm.This is necessary so that the roof load falls on the Mauerlat, otherwise it will be transferred to the facing brick, which is fundamentally wrong.

The next step is installation beams... First you need to install the extreme floor beams. Their extension will determine the width of the cornice. The width of the cornice, depending on the wishes of the customer, can be 40-50 cm. The beams are special beams, the cross-section of which must be calculated separately, taking into account various moments (snow load, wind load and other factors).

First of all, we put the beams indicated by the numbers 1,2,3,4.
For the specified brick box measuring 8x8 meters, the cross-section of the timber is selected 100x200 mm. When the outer beams of the section are installed, it is necessary to pull the lace along the top and expose the other beams.
It is necessary to take into account the step of the beams, based on the step size of the rafters, which will be laid in the future. For example, if floorboards of 50x150 mm are taken, then it would be good to choose a step of 60-70 cm, it is even better to stop at 60 cm, taking into account that roofing insulation usually has such a width. After installing the long beams, you must install the short ones. The step for them is most often 1 meter. To attach the beams to the Mauerlat, 150 nails are suitable. Sometimes the use of self-tapping screws and metal rafter corners is allowed.
Step 2. Installation of racks begins, which should be placed strictly vertically. First of all, stands are installed from a bar measuring 100 by 150 mm at the edges, and then, when the laces are pulled, and intermediate ones, smaller, with a section of 50 by 150 mm. The distance between any elements should not exceed 3.

Temporary spacers are used to keep the struts firmly in place. The racks should be 10 cm higher in height clean ceilings in the premises.
It should be said about very important nuance... During construction new roof, when everything seems to be counted and laid out properly, the correct rectangle for some reason does not work. As a result, the shape of the house is obtained, in fact, narrowed in any of the directions. In principle, this should not bother you too much, but to facilitate subsequent work, you should still position the racks so that the correct rectangle eventually turns out. So it will be possible to make the rafters of the upper slopes using one template. Otherwise, you will have to use cords, and cut the finished elements accordingly. Excessive waste of time and effort is unlikely to please anyone.
Step 3. On top of the racks, girders are laid, consisting of boards, measuring 50 by 150 mm. The installation is taking place, having the same dimensions, missing racks, no other spacers are needed. These structures will serve as a frame for the intended walls of the room.

Step 4. In order to properly fix the girders, roofing corners and puffs, that is, crossbars, are installed on them. If it is based on the parameters according to the example, then in this case the length of the puffs will be 5.5 m. The cross-sections can be calculated in a special program. With a cross-sectional width of 50 mm, then, accordingly, the height will be over 210 mm. Various deflections are eliminated by means of suspensions. Of course, this will significantly increase the load on the rafters of the upper ramps, therefore, the dimensions of the cross-section of the rafters of the upper ramps obtained during calculations will be reasonable to increase from 50 to 150 mm to 50 to 200 mm.

A temporary support is placed under each of the puffs (crossbar). To do this, use the middle of the span. Sagging may form and must be reduced. A 25 x 150 mm inch is perfect. All these measures will allow you to safely move around the puffs. Breakdowns, as well as all kinds of sagging, are practically excluded.
To make the structure more rigid, you need to fasten the puffs from above, after they are completely installed, with a board measuring 25 by 150 mm. This very board should not be placed strictly in the middle, you need to step back from any of the axes by at least 20 cm.
Step 5. Then you can proceed to the installation of the side rafters. Pre-production of the template will be required, after which the upper cut is made. As for the bottom cut, it is marked in place, and then the rafters are attached and plugs for the insulation are installed.


Step 6. After that, the process of installing the rafters of the upper slopes begins. To make a template, a piece of board with dimensions of 25 by 150 cm is taken, which is then fixed on the extreme crossbar strictly vertically. Any of the corners of the board must necessarily coincide with the axis of the roof under construction. After all, the right edge of the board will coincide with the axis of the roof. Next, a suitable small board is taken, applied, and the upper and lower cuts are marked on it with a pencil.

Two rafters are made and installed according to the template. It is better not to use a ridge bar for this. After installing the first pair of rafters, it must be fixed with a strut so that a fall does not occur.

Further, all other rafters are installed. For a roof with a length of 8 m, 4 struts will be appropriate, a pair in different directions. We temporarily fasten the remaining pairs of rafters with an inch board, because the crate is not yet available.

Step 7. Pendants are sewn on, that is, boards measuring 25 by 150 mm. This is done so that the crossbars do not sag after the elimination of temporary supports. This board should also not be placed in the middle of the structure, otherwise it will simply interfere with the process.

Step 8. The final stage of the roof construction begins. Namely, the gable frame is installed and then sheathed. Only after that you can start making cornices, lathing, pediment overhangs and ebb tides.


After the sloping mansard roof is completely ready, you can proceed to roofing works... It is, without a doubt, no less important stage, but already, as they say, a completely different story. It is worth noting that all construction works, which were discussed, are best performed in three.
The last stage of building a house is the arrangement of the roof. Traditionally, a gable roof is erected for any residential building, a gable roof for outbuildings. Technological processes works on installation, fastening and arrangement of a roof with a truss structure in a gable roof version have been honed for centuries, and these operations do not change from the type of roofing materials (clay tile, corrugated board, metal tile, asbestos slate, metal or plastic).
Varieties of gable roof
People say: "the roof is a house", that is, it means not only the shape, but also the reliability of the structure, which has a long list of advantages:
- Variety of options for roofing and architectural forms roofs;
- Simple calculations and cost-effectiveness of the roof;
- Natural runoff of atmospheric precipitation;
- Simple geometric shapes roofs provide a low chance of water accumulation and roof leaks;
- Large usable attic area, it is possible to make an attic;
- Good maintainability, high strength, durability and wear resistance of the roof of two slopes.
The three most common gable roof options are:
- Symmetrical gable roof: This is the most popular solution due to its absolute reliability and simplicity of execution. Symmetrical slopes evenly distribute all the loads on the Mauerlat and the walls of the house. The choice of roofing material does not depend on the type and thickness of the insulation layer. The load-bearing loads can be easily increased by making the rafter system from a thicker bar, jibs and struts can be attached anywhere. A negative factor - a full-fledged attic in such an attic will not work - or there will be low sloping walls with many "dead" zones, or a small but rectangular room;
- Asymmetrical roof of two slopes: Different angles of slope of the slopes reduce the usable area of the attic, but you can make a full-fledged living space on one side. Because of different angles the slope of the roof the load on the load-bearing walls and the foundation of the house is distributed unevenly, which requires recalculation of the load capacity of the base and the load-bearing walls of the house, recalculation of the types of materials and their quantity, as well as changes in the methods of insulation, waterproofing and finishing;
- Asymmetrical gable roof with internal or external slope: Allows the construction of living spaces without regard to the roof structure. The disadvantages are the same as in the paragraph above.
Preparing for the construction of the roof of the house
The shape of the roof and its structure can be selected based on - the size of the building, the material of the load-bearing walls, geographic location plot. It depends on these and other parameters specified in the project what loads the gable roof can withstand during operation.

The angle of inclination of the slopes has a certain optimal range in which weather conditions least of all affect the formation of maximum loads on the roof. If the slope angle is ≤ 400, then this limits the possibilities of equipping the attic or a full-fledged room in the attic, and the slope angle ≤ 100 increases the load on the roof from rain, wind or snow. If you definitely want to have an attic or a room in the attic space, it is better to use the option of a broken asymmetrical roof, and if the walls of the house are more than 6 meters long, then the rafter system must be strengthened with additional girders. 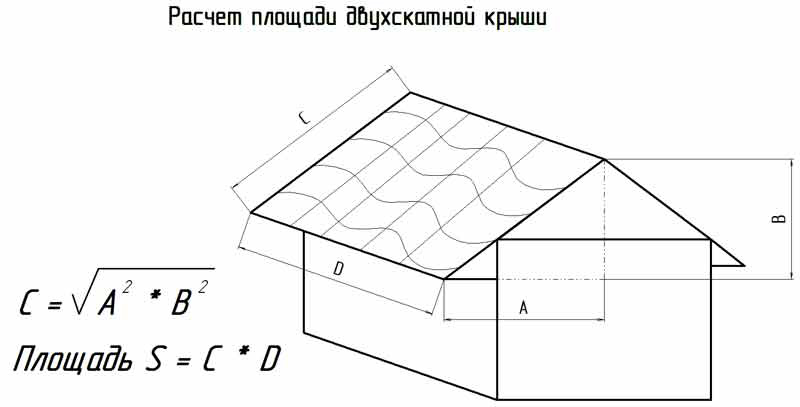
When calculating building materials for gable roof it is necessary to proceed from the axiom that the weight of roofing materials should be as small as possible so as not to load the walls and base of the house. Wooden elements will be stronger not only with an increase in their cross-section, but also with the use of suitable types of wood. The main parameter in calculating materials is the total roof area, and a symmetrical structure in this regard is calculated easier than others - it is enough to know the perimeter of one slope, double its area, and get an accurate result.

The main load from the weight of the roof is taken by the long walls of the house, so the rafter system is built on the principle of load distribution along the system. For home small size(≤ 6 m) it is more practical to use a system of hanging rafters (without props); when building a house of larger sizes, a system of layered rafters with a more complex configuration is used. 
A finished gable roof for a private house consists of the following elements and nodes:
- Mauerlat is a wooden (sometimes metal, if the roof is covered with rolled metal) a bar or log that is attached to the surface of the outer walls to support the rafters on it;
- The rafter system, the design of which is selected based on the project of the house;
- Braces (diagonal fastening of rafters to each other) and skates (timber along the ridge of the roof for fastening the slopes);
- Lathing - serves for the installation of the roof and elements of hydro-noise insulation;
- Warming and moisture protection;
- Roof covering.
How to mount the Mauerlat
Mauerlat on the walls of the house holds the weight of the roof, evenly distributing it on the walls and base of the house. The width of the bar for the Mauerlat should be equal to the width of the wall. The timber is impregnated with an antiseptic and substances that increase the fire resistance of the tree. The outer border of the Mauerlat should not protrude beyond the outer edges of the walls. 
The Mauerlat is attached in different ways. It is laid in a brick wall steel wireØ 8-12 mm, holes for wire are drilled in the tree, and through them the bar is tied to the wall. Also, the beam can be secured with brackets, threaded rods in one or two teeth, metal plates, wooden punches or anchors through the same holes in the Mauerlat. The gables and the lower edges of the sheathing are attached either directly to the Mauerlat, or to a smaller section bar, which is nailed (screwed) to the upper harness.
Floor beams
When arranging beamed ceilings for the roof of a private house, it is necessary to use wooden bar section 200 x 100 mm. The larger the area of the house, the larger the cross-section of the supporting beam should be. Beam installation begins with fastening the extreme elements along the long wall of the house. Then the points are marked at which the remaining floor beams will be attached. 
The lathing is mounted on longitudinal beams, which are located at a distance of 50-60 cm, and are attached to the Mauerlat with nails 200 mm long or in any of the above ways. Beams are moved beyond the edges of the walls to a distance that determines the width of the cornice - from 30 to 50 cm. The cornice will be nailed (screwed) from below to these beams. Since a pediment will be arranged at the ends of the roof, a cut-in is made into the groove on the transverse beam of the Mauerlat to attach the cornice and pediment. When erecting a sloping roof for an attic, the pediment will have enough big square, therefore, it is necessary to ensure the design of the ebb and the gable overhang. 
The rafters of a gable roof are several of the same wooden beams one length and section. After the installation of the floor beams, a ridge beam is attached, for which beams with a section of 100 x 50 mm are fastened with spacers along the central longitudinal axis of the house. The height of the racks in a typical gable roof scheme is equal to the distance from the floor to the upper surface of the Mauerlat. Instead of a skate bar, boards with a thickness of 50 mm can be used.
Before installing the rafter system, it is recommended to make a large-scale template. To do this, the board from the rafter structure must be attached with one end to the beam, the other to the ridge, and mark its length. This will be the template length of the rafters. 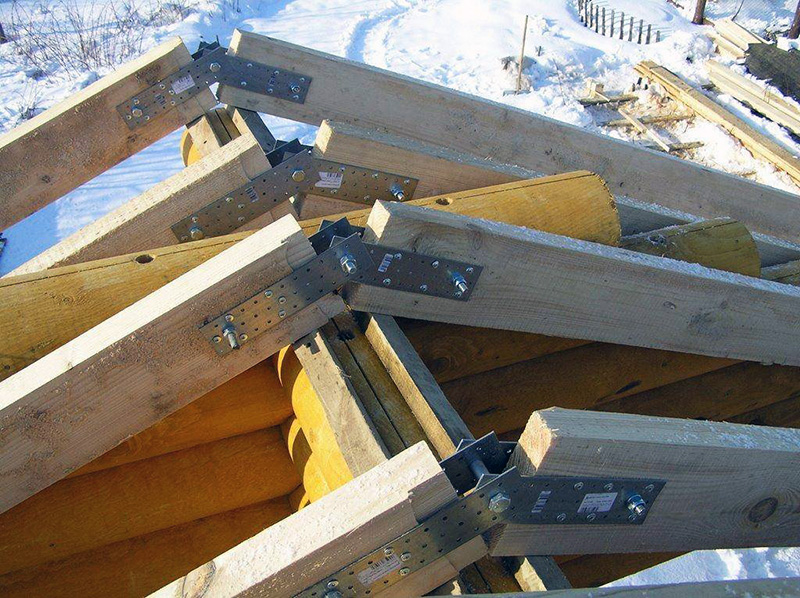
The rafter system is also mounted according to a template, observing the sequence of processes. After installing and securing from the lower end of one rafter, you must immediately attach the opposite rafter, and connect the beams with the upper ends to each other through the ridge. The rafters are nailed to the ridge beam, and to the floor beam - with steel brackets or a corner, self-tapping screws or anchors. For a roof of any shape with two symmetrical or asymmetrical slopes, boards are attached along and across the rafters to give rigidity to the system.
Pediment and cornice
The pediment is sewn up after the completion of the construction of the truss structure. Modern materials are increasingly replacing traditional wood when sheathing gables, and now they use clapboard, siding, corrugated board, and other durable decorative Decoration Materials... Any cladding material is attached to the frame, which is mounted in advance. Regardless of whether or not there will be a room or an attic in the attic, a window opening must be left in the pediment - for ventilation and minimal natural lighting of the space. 
The cornice must be equipped around the entire perimeter of the house - it is necessary for moisture and wind protection of the truss structure, the walls of the house and the foundation. Since every self-respecting owner necessarily makes drainages around the perimeter of the house, they are also attached to the cornice, and drain pipes to the walls. Plastic system drainage is mounted on plastic clamps. From the bottom of the cornice board or the cornice frame is painted, sheathed with siding, clapboard or corrugated board - in unison with the trim of the pediment. 
The roof is mounted on the lathing, and, based on the type of roofing materials, sheathing is first done with vapor barrier, hydro and heat insulating materials. For the roof, you can use ondulin, metal tiles, ceramic materials, soft shingles, etc.
- Self-tapping screws for roof construction must have the manufacturer's stamp and EPDM gaskets with a thickness of ≥ 2 mm, otherwise leakage of the roof cannot be avoided;
- Substandard protective covering fittings under the influence of weather conditions will quickly collapse, which will lead to leakage at the attachment points, and ugly appearance as rusty or dirty spots;
- The absence of a snow retention system is the possibility of unexpected snow melting from the slopes, which can lead to failure of the roofing and drainage system;
- Poor ventilation is the formation of condensation in the under-roof space.

