Do-it-yourself trailer step by step instructions. Do-it-yourself construction of a change house
It becomes relevant when there is no place for rest and storage of equipment on its territory. When cash are limited, but the problem of lack of temporary housing is acute, best option- the construction of a trailer by the type of change house. The advantages of such a structure and how to install it will be discussed further.
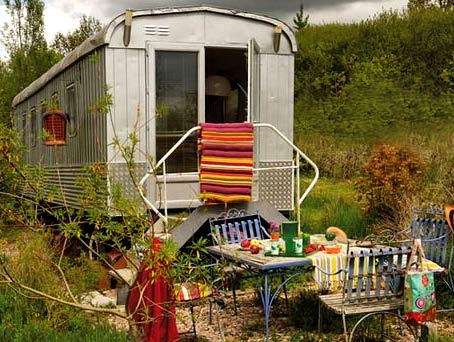
Stylish project and design country house from the car
The house is an attribute of country life. It is possible to build it with your own hands, but it all depends on source material. Consider all the advantages that change houses in the form of trailers are endowed with:
Among the shortcomings, one can single out the inability to retain heat in winter period, as well as the unreliability of the design itself with respect to break-ins and penetrations of ill-wishers.
Very fast and inexpensive construction
The answer to this question is of interest to many people who are on fire with the idea of building a trailer with their own hands. As for the cost, we can say that it will definitely be less than the wooden or metal counterpart of the change house. And the fact how quickly such a house can be made directly depends on the professionalism of the builder.
However, even inexperienced novice builders cope with the work in just two days.
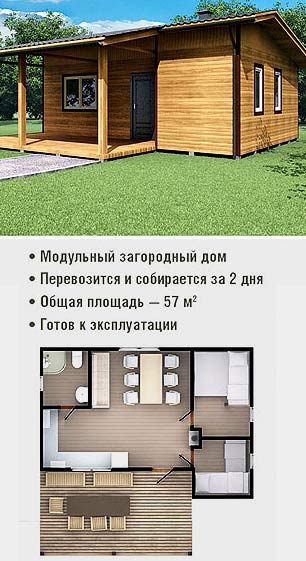
Design and layout of a modular house for a summer residence
This is several times faster than or sheet iron.
Stages of building a country house
Without anyone's help, it's quite possible. Let's consider this process in more detail, dividing it into stages.
Stage 1. Project creation. Site surveys are carried out prior to construction. The project includes the following elements:
- , which helps to graphically present information about building elements and prevent all kinds of defects before construction begins;
- Technical justification - it includes calculations of the number building materials, which is determined by simple mathematical calculations;
- The scheme and plan will help to assess how harmoniously the temporary home fits into the surrounding area.
The project should describe as accurately and in detail as possible exactly what the house will be like, what elements it will consist of and what dimensions it will have.
layout country house from a construction trailer
You can sketch the project yourself on paper, or you can use a special graphic editor that will do this work for you.
Stage 2. Clearing the area from debris. Particular attention should be paid to the soil. It needs to be leveled as much as possible with the help of any construction litter, well-packed and pressed.
Stage 3. Purchase of building materials and components. In this case, it is recommended to take the material "in reserve", since during operation it may be necessary to replace separate parts at home. You will need the following materials:
- bars;
- Ruberoid;
- Roofing material (metal profile, corrugated board, lining, wood);
- Heaters (foil and glass wool).
Wanting to save on building materials, they can be purchased at wholesale bases, without intermediaries. Also in vogue are prefabricated cabins, which are sold in already ready-made.

The project of a prefabricated multi-section change house
The customer only needs to assemble them according to the instructions and use them for their intended purpose. The cost of such a structure will be 10 times higher than assembling it yourself.
Stage 4. Foundation formation. For temporary housing, there is no need to organize a full-fledged foundation.
Quite enough to "raise" country house 30 cm from the soil level, hoisting it on monoblocks. This option is the simplest and most economical, will allow you to right moment move the wagon.
The perimeter of the structure is outlined and monoblocks are installed. For small dimensions, 5 monoblocks are suitable (4 in the corners and 1 in the middle of the car).
Stage 5. Organization of waterproofing with your own hands. Cover the foundation with roofing felt to prevent excess moisture from getting inside the trailer.

Warming and waterproofing of a summer cottage
Stage 6. Beginning of installation. Make a frame (base) between the monoblocks. For these purposes, wooden bars are suitable. In the same way, vertical supports are erected, to which the base of the wall will be attached. When the bases are ready, they mount the roof, making it a little flat. Roofing roof materials are attached at the very last moment.
Stage 7. Wall cladding. Using a screwdriver, the panels are screwed to the vertical lags. FROM inside the wall is insulated with a layer of foam or mineral wool. 
Stage 8. Arrangement of windows, doors and roof. The final stage of building a house with your own hands involves installing windows and doors, as well as covering and waterproofing the roof. For the latter, it is best to use suitable roofing materials, such as shingles, bitumen or ordinary slate. Before posting outer layer, the roof surface is covered with polyethylene.
If the plan has a porch, then its arrangement is dealt with in the first place.
The owners of dachas want to have a facility for storing inventory on their site. Many decide to make a suitable building - is it a shed or a change house - with their own hands, step-by-step instruction below. The purpose of the premises can be different (depending on the needs of the owner of the site), some believe that it will serve as a bathroom, a shower room, and a household unit. But most summer residents need a change house only for storing tools and equipment, in some cases - for storing beehives or cages for rabbits. This suggests that the building must be practical from all sides. Based on the needs, the types of frame change houses are also chosen:
- from wood;
- metal;
- portable.
A wooden frame is great for building a structure designed to last for many years. At the end of the work, it can be brought to the country house, assembled on site and left as a utility room, or equipped with other functions, a foundation, etc. The frame is built from wooden beam size 100x100 mm. With frequent transportation, the structure quickly loses its original qualities, but such buildings are distinguished by environmentally friendly material, good thermal insulation and a relatively low price.
Change house with a metal frame
This is one of good options construction of a unified building suburban area. Such a change house consists of a wooden frame built into a metal frame, welded from channels and corners. Metal carcass reliably protects the wooden part of the structure from deformation, so the change house can be safely moved over long distances.

This version of the built change house is rarely considered as an object for independent construction, but sometimes you can’t think of a replacement for it.
Transportable cabins
There are 2 options for transportable buildings for domestic needs. The first is made of metal, and the second is made of wood. Wood construction differs from previous options by the fact that it is completely absent decorative trim. The building has a simplified internal design. As bearing beams a wooden beam 150x100 mm or more is used. In order to install a change house, no additional preparation and rigid binding of the structure to the soil is needed.

Metal change houses are very reminiscent of trailers placed on construction sites. Qualitatively assembled change house metal can last up to 15 years with constant movement from place to place. The frame of such structures is usually made of profiled pipes. The walls are sheathed with heat and waterproofing, and the interior of the room is covered with chipboard. For more convenient use, do-it-yourself light, water, and heating are carried into the trailer. The disadvantages of this design include the high cost of the material, high weight and the need to constantly monitor the condition outer skin, so making a block container with your own hands is quite difficult.
Projects of cabins
Among all existing change houses, 6x3 m in size are considered the most practical. For each case, it is easy to make individual project change houses, starting from standard design. If the building is planned for temporary residence in the scheme of the main structure, partitions and openings must be added. An ordinary change house 6x3 has separate rooms:
- main - 3x4.5 m with heating and other amenities;
- intermediate - 1.5x1.5 m, used as a corridor;
- corner - for arranging a toilet, shower, etc.
The roof of structures for domestic needs is made only of corrugated board.
Change house frame diagram
The main frame of the change house is made of 2 rectangular wooden blocks measuring 100x100 mm. Between themselves, they are connected by vertical posts 6 m long and 3 m wide. The lower rectangle must be strengthened with a central longitudinal beam. From above, transverse logs for the floor are stuffed from a beam of 50x100 mm with a step width of 0.6 m. To get pitched roof, the height between the front and rear pillars must differ by 0.5 m. standard height ceilings in the change house, the racks located in the front should be 2.8 m, and the rear ones - 2.3 m. In addition, 2 additional vertical racks from a bar 50x100 mm to all end sides of the structure. The location of the racks should correspond to the places for doors and windows.

To the top of each of the corners, it is necessary to install diagonal braces from a 100x40 mm beam. Auxiliary corner posts that are not fixed by window and door openings should be provided with additional braces. The rafters are made of timber 50x100 mm, which are evenly distributed over the entire frame in increments of 0.6 m, while part of the rafters should extend beyond the level of the frame on both sides by 30 cm. The end rafters should be fixed to the upper end beams with transverse boards.
Making a change house is not a complicated process, therefore it does not require specific knowledge or expensive tools. But this does not mean at all that having mastered the theory of how to make a change house, you will not encounter certain difficulties. The amount of installation work assumes that it may take at least a month to independently build a room for domestic needs.
How to build a change house: building instructions
To independently build a change house, you need to adhere to a certain scheme that will avoid confusion in the process of performing work. For these purposes, it is necessary step by step instructions, which will allow you to perform all the actions in right order:
1. Location selection. Before starting installation work, you must select a suitable site. It is desirable that it be located on level ground. This will avoid additional land works.
2. Preparing the site for the foundation. Initially, you need to remove a layer of earth 30 cm deep around the entire perimeter of the change house. When preparing a place for the foundation, it should be borne in mind that it should extend beyond the building to a distance of 0.5 m. Sand should be poured into the place of the removed soil layer and carefully compacted.
3. Installation. The foundation on which the change house will be built can be made of concrete blocks, brick, stone, metal supports. At this stage of construction, it all depends on how long the building should stand. If you are installing concrete or iron poles, the depth under the supports should be at least 30 cm. To install a 6x3 change house, you will need 12 poles laid in 4 rows.
4. Fastening the frame to the poles. Before laying the crown, the pillars must be equipped with waterproofing. The base should consist of 5 bars measuring 150x100 mm: three longitudinal and two transverse, which must be aligned and securely anchored to the posts.

5. Installation of the bottom trim. A beam with a section of 100x100 mm is laid out along the perimeter of the structure. The strapping does not apply to the middle beam. After completing the installation work, a step of 50 mm in size should appear along the entire inner edge of the base.
6.Installation lag. To mount the floor log, a beam of 50x100 mm is required, which is installed edge-down on 3 longitudinal beams of the crown. To do this, you need to install them in the prepared slots in the bottom strapping.
7. Installation of vertical corner posts . Before fixing the racks from a bar measuring 100x100 mm, it is necessary to align them with building level and secure with a temporary double-sided brace.
8. Installation of the top trim. The mounting of the rear and end posts must be carried out at the same level. The front beam should be placed a little higher than the rest.
After completing these works, you can install horizontal bars measuring 50x50 mm, which will limit window and door openings. Temporary rack braces must be replaced with permanent ones made of 100x40 mm boards. Next, you need to install the rafter system, the crate and fix the roofing material. We proceed to the installation of the subfloor, for which a tongue-and-groove board measuring 150x30 mm is perfect. It is necessary to lay waterproofing and insulation on the subfloor. Next, you can do the installation of the flooring across the log, for which a 150x40 mm edged board is used. As outer skin change houses, you can use lining, edged board, thick plywood and other materials.
The interior of the room is usually sheathed with chipboard, fiberboard, plywood sheets or clapboard. Installation of partitions is carried out from a beam of 50x50 mm by attaching to the ceiling and floor, followed by sheathing. After everything installation work completed, you can proceed to the final arrangement of the change house, which consists of decorative works.
A metal change house today is practically a necessity on most summer cottages. In addition, such a structure serves as an indispensable place for the location various premises at the construction site. In addition, it is easy to make a change house on your own, since it consists of blocks, which, in turn, are made of a frame, and metal plates. Of course, such a building will be difficult to use for a long stay in it, but it is an indispensable option for giving.
The project of a modern metal change house with windows and air conditioning
Such a trailer can often be found at construction sites. Considering that most construction work can take much longer than one year, a small building for workers can temporarily replace housing.
In such cases, a metal change house can have the necessary minimum of amenities, which will allow you to relax a little after a hard day's work or even provide an opportunity to take a hot shower. Therefore, it is difficult to overestimate the need for such a structure on a site where there is clearly not enough space for certain needs. That is why there are many projects for which you can independently assemble and install such a design.
Self-manufacturing metal change houses is a fairly simple matter, but at the same time it must be taken with due seriousness.
 Layout of a homemade change house made of metal
 To do this, follow the basic rules for the construction of such premises and use the material and tools that are listed below.
If you follow all the conditions, you can be sure that the building constructed from metal blocks will serve you for many decades. And its high functionality and usefulness will pay off all costs in a few months of operation. In order to make a high-quality change house from containers and blocks with your own hands, you will need the following tools:

Before starting work, make sure that you have all the necessary material, as this will significantly speed up the manufacturing and assembly process, and also help to avoid unexpected difficulties during construction.
Materials needed for the manufacture of a metal change house

Carrying out the construction of a metal change house with your own hands
To carry out all the preparatory and construction work, you will need a little time, from several days to two weeks. Terms usually depend on the number of workers and their experience in the construction business. With a completely independent carrying out of all the work, you need to be prepared for a longer period. Therefore, it is worthwhile to carry out the correct all stages of construction, which will help to significantly save both time and finances.
If you want to build a quality building from blocks, you will need to make some financial investments. But it is worth noting that such costs usually fully compensate for themselves in a few months.
 Options for planning a change house from a metal container
 One of the most quality materials for the construction of such a structure, a building container is considered. The metal change house is distinguished by high rates of strength and durability of the structure, which is easy to assemble with your own hands.
Before starting work, it is worthwhile to carry out the planning, which was mentioned above. This type of work is a necessity when building a metal change house with your own hands. Compliance with this condition will help to build not only a room such as a change house, but also come in handy when or.
 Installation of a metal change house on a columnar foundation
 In addition, with experience in construction planning, you will be able to easily carry out repair work almost any metal structures, containers, etc. Therefore, before installation, try to lay out all your thoughts, requirements and the intended purpose of the change house on paper. Using this method, you can accurately calculate the total area of \u200b\u200bthe metal change house for a summer residence or construction site, which will let you know exact amount material. Such calculations will help save money when building with your own hands, especially when compared with buying a metal change house.
Having bought a plot, land, you think about the fact that you need to live somewhere while building a house. Such a temporary home in the country or garden plot is a change house. A small insulated structure, usually 3x6 or so in size. There are a lot of offers on the market: both wood and metal. But their quality is more than doubtful, the cheapest materials are used in construction. This is easy to verify by calculating the costs that you will incur if you decide to make a change house with your own hands. With the same dimensions, it’s cheaper for you, most likely, it won’t work, and if there is savings, then it’s small. You will consider normal materials, not the cheapest ones. But in terms of quality and durability, home-made change houses are many times superior to purchased ones.
Change house on the site is the first (or second after) structure that appears on the site
What and how are they built
Almost all change houses are built according to frame technology. As building materials for the frame, a wooden bar at least 100 * 150 mm or a profiled metal pipe 60 * 60 * 2 mm is used.
For sheathing, the choice of materials is much wider. Use:
- edged board;
- sheet material -,;
- profiled sheet;
- siding.
In any case, the lining is done on both sides - outside and inside. The outer one can also be metal, but inside they often make either lining or stuff plywood or OSB.

Thermal insulation is laid between the two skins. Although the building is temporary, spring and autumn, and sometimes summer nights, can be very cold. Therefore, without insulation - in any way. Any heater is possible. Better - mineral wool, cheaper - polystyrene. Most best performance- extruded polystyrene foam, but the highest price too. Just when choosing a heater, keep in mind that the foam almost does not muffle the sounds, so that the especially nervous will not be able to sleep. That's why optimal choice — mineral wool. What layer? If in mind, then in middle lane Russia, preferably 100 mm, but at least 50 mm.
Please note that the floor also needs to be insulated. Especially the floor. The bottom is very tight. Therefore, it should be double: first, a rough one, on top, across the board, they put logs, a heater between them, and then a finishing floor.
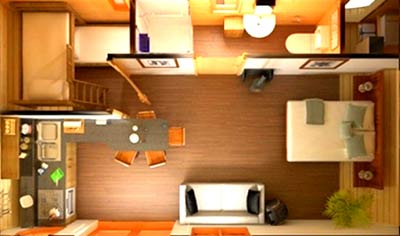
Layout and drawings
Despite the fact that the building is considered temporary, it often turns into a bathhouse or a guest house. Therefore, even in a change house there is such a thing as planning. Even temporary housing should be relatively comfortable.
Change house trailer
There are two main types of change houses: trailer and vest. In a trailer-type building, the entrance is on the side, there is no separation inside, in extreme cases they put a partition - 1.5-2 meters from the entrance. This room is used as a vestibule-dressing room and a warehouse for storing tools. This is the simplest possible option.

The drawings will contain graphic and numerical designations, their decoding is in the photo below.

vest
The most popular layout is the vest. This is when the entrance is in the middle. moreover, the middle is fenced off and used as a vestibule, pantry, etc. The purpose of the other two rooms may be different. Someone uses both as bedrooms, someone uses one as a kitchen.


Change house with toilet and shower
Not everyone agrees to lead a Spartan lifestyle even at a construction site or dacha, even temporarily. At least basic amenities are required. Although it's probably better to build them separately.

San block is on the edge - a wiser decision, especially if you make a separate entrance

with toilet
Having chosen a drawing, do not forget, when developing a frame for a change house, that racks must be placed at the junction of the walls. If doors are attached to the racks, they must be reinforced - double.
Foundation for a house
Since the structure is temporary and light, the foundations are usually posts or blocks. Mostly blocks. Preferably - concrete, standard. No - you can use any construction, but high density and not hollow.

They are placed on a prepared base. If the soils are normal, you can simply remove the sod and level the sites. For greater reliability, they dig a small pit under each block with a depth of about 20-25 cm. Crushed stone of the middle fraction is poured into it and rammed well. Blocks are placed on such a substrate.
Note! The top edge must be level (be in the same horizontal plane). It is also necessary to check the geometry of the foundation: the angles are strictly at 90 °, the diagonals are equal.
With a change house width of not more than 2.5 m and using a wooden beam for the frame, blocks are placed in each corner, as well as under those places where the partitions depart. If the building will be without partitions, the spacing step - every 1.5-2 m - depends on the cross-section of the beam and the planned sheathing, as well as the weight roofing material. With a width of 3 m or more, an intermediate beam is required, and a base for it. In this case, three rows of blocks are obtained.

To prevent dampness from entering the premises, waterproofing is laid on the blocks. You can - two layers of roofing material, you can - another waterproofing material, even films. Another option is to brush bituminous mastic. On this, the foundation can be considered ready.
Step-by-step instructions: photo reports with explanations
It is difficult to understand some things from the description. No matter how much you read, but until you do it, or at least look at how others do it, you won’t understand. That's why photos of the construction of change houses are useful: you can see how the nodes were made and find a solution for yourself. This is a kind of guide for those who decide to build on their own.
Construction of a wooden cabin
A change house was built from wood in the country. Dimensions 3 * 6 m, insulated - for temporary residence during the construction of the house. Used the following materials:

Since the prices of materials are very dependent on the region, it makes no sense to talk about the cost of construction. But according to this list, you yourself can determine with fairly high accuracy how much a change house built by yourself will result.
Please note that this list does not include roofing material (ondulin was planned) and there is no glass. Also, lining for interior decoration was not purchased.
Before the start of construction, all wood, with the exception of the lining, was treated with Senezh Ultra antibacterial impregnation. Coated in two layers. So the quality of processing should be normal.

The site for the building has been marked out. We decided to put the blocks on the sand bed. They dug holes with a depth of 25-30 centimeters, poured sand, tamped. Set up blocks. First, they put out the two extreme ones, put a flat board on them, and a level on it. So put the extreme blocks. Then intermediate boards were adjusted to the height of the board. So on all sides.


The next step was laying the floor joists. They were put in 50 cm, we will put racks through one. Made from a board 50 * 100 mm, placed on a narrow part.

We decided to immediately assemble racks with rafters on the ground, strengthen the joints with corners, and then install them in finished form. Collected from the same board 50 * 100 mm.

We knock down the front rack - it is longer, the back and the rafters


They nailed the racks with long nails. Then, for reliability, all attachment points were reinforced with corners and plates. They were already planted on self-tapping screws.
Bars 50 * 50 mm were nailed on the sides of the log. It turned out "nests" for laying foam. He was placed on mounting foam: and hermetic and reliable. A floor board was nailed on top.


Now the sheathing has gone directly. A lining of packs of 3 meters went to the short side, six meters were nailed to the long ones.

Having made the sheathing to half, they laid the crate under the roofing. They nailed a board 25 * 150 mm in increments of 30 cm, along the edges a pitch of 20 cm (so that the overhang could withstand). Then we continued with the trim.
In the places where the windows will stand, they put mortgages - a board that lies across the rack. The window frame will rest on it. They fastened with nails, through and through, but additionally the connections were reinforced with corners.

When back and deaf side wall were sewn up almost to the top, roofing material was rolled onto the roof. He will lie until we buy ondulin.


The outer casing is almost ready. Doors were bought without finishing - only a frame upholstered with fiberboard

While we were finishing nailing the lining on the outside, work was also in full swing inside - they put foam. The width of the sheet is 100 cm, the distance between the posts turned out to be 95 cm. Thin strips have to be cut off.

So that it does not “fall”, we grab it from above with thin corners, which we attach, of course, only to the bar of the rack.


We started lining the inside, but the lining ended. While switched to painting the outside. It turned out well, it seems.

We bought the lining, finished the interior decoration.

Started building the partition. It was assembled from the same boards - 50 * 150 mm. The joints, traditionally, were reinforced with corners. Sheathed - clapboard.


Roof insulation has begun. They used the same foam and the same technology - they propped it up with corners.

Joints with wall insulation were foamed with mounting foam.

After we started lining the clapboard.


Ceiling trim finished
Started installing roofing. We bought ondulin and laid it with an overlap on one wave. They were attached to each wave with special hardware purchased along with ondulin.

Mounting ondulin on the roof of a garden shed
Then we began to bring to mind interior spaces. The partition was also insulated with foam, sheathed on the second side with clapboard.


This is how it looks like in the final version
The lining inside is varnished on water based. It gives only a light tint in a little more dark color. Films on wood seem to be non-existent. If you look directly, it generally seems that the tree is not covered with anything. Only if you look from the side at a certain angle, you can see the shine.

On the floor, the varnish is already with a film: so that the wood does not wear out. Coated in two layers.
After we started finishing the overhangs. They were all sewn up with the same clapboard. In general, work with lining took the most time.


And this is a side view
Metal frame for shed
Metal was chosen as the basis as more reliable and durable. The idea that the change house may have to be moved also played its role. If the frame is made of metal, nothing threatens her.

The dimensions were determined based on the length of the corner whips: 11.7 m. The following dimensions emerged: 2.8 * 5.8 m, height - 2.5 m. The frame was welded from a corner with a shelf of 75 mm, 6 mm thick.
The foundation is made on self-cast columns: construction began in autumn, and there is still nothing more to be done. So it was decided to pour reinforced posts: six pieces. First, the site was marked out, after which the places for the foundation columns were determined.

Holes 50*50 cm were dug, the total depth was about 30 cm. Crushed stone was poured into the bottom with a layer of about 10-15 cm and compacted tightly. From above, the same amount of sand, also with a rammer. As a result, the backfill came out on the same level with the ground.
Roofing material is laid at the bottom so that moisture does not leave the concrete, and it “matured” normally, and did not dry out. Next, the formwork was assembled and the reinforcement was laid in it.

The site is dry, the water drains normally, so there shouldn't be any problems. , so that the reinforcement is either welded or twisted - it is not clear.

Everything is filled with concrete, covered with a film: the end of October, and in order for the concrete to be of a normal fortress, it needs to be wrapped.

The frame frame was cooked for a long time - all winter: frosts, workload, did not allow to act with the desired frequency. The base was cooked from a corner of 75 mm, 6 mm thick, 40 * 2 mm were used for reinforcement.

The beginning of the frame of the change house from the metal corner - the lower harness
The side parts were cooked as a whole, then with the help of 4 people they were placed in a vertical position and so fixed. On the racks to which the window frames and doors will be attached, profiled pipes 40 * 40 * 2 mm went.

The most inconvenient moment is to measure the diagonals alone. You have to constantly control them, and doing it alone is inconvenient. But everything must be set, otherwise it will be skewed.
To give greater rigidity, I welded strips of metal in the corners. I received them by opening a corner (40 mm). It was possible to buy a strip, but I used corner trimmings.

Stripes for rigidity in the corners of the frame

View from inside the corner
It was difficult when they put the frames: in the cold, only in thick gloves, and it is difficult to hold them tightly. Therefore, they propped up with boards, with everything they could. But the corner was kept strictly.

In order to have a rigid fastening to the frame, metal plates are welded at an angle.

Gradually assembled the entire frame.


We weld the plates in the corners: top and bottom

We weld a few beams at the top. Now the frame for the change house is "iron"

Now the skin remains. It can be anything: at least the same lining, block house, at least an economy option - plywood and OSB. To attach the bleaching to the corner, it is more convenient to screw the timber, and to it already attach the crate and everything else. The same situation for truss system: around the perimeter, a bar is screwed onto self-tapping screws with preliminary drilling, rafters are attached to it.
Related videos
Reading time ≈ 9 minutes
building country house for permanent residence or recreation involves the purchase of a site on which there are initially no buildings. Before starting construction work, it is necessary to take care of the preparation of temporary housing, which will allow not only to relax, but also to take a shower and eat. For these purposes, a change house is often used, which is quite capable of being built from available materials and installed on the territory of a summer cottage or even in the middle of a field. Learn how to make a change house with your own hands with detailed instructions, a list of materials, drawings, photos and video examples.
Varieties of change houses
The change house belongs to the utility rooms, but its construction and arrangement must be approached responsibly, giving preference to high-quality building materials. Only in this case it is possible to achieve an atmosphere close to home and conducive to relaxation.

To start the construction of a temporary building, you need to start preparing drawings. They will allow you to calculate the building material, designate the dimensions of certain elements, which will facilitate the construction procedure. In addition, it is worth deciding on the type of building in question. can be made of wood, frame, metal.

Wooden
This option should be resorted to when the building will be used in the future as a summer kitchen or a bathroom. Construction is carried out from a bar with a thickness of 70-90 mm. The structure itself is installed on pre-prepared concrete blocks or foundation.

If the room is not insulated, it can be operated from May to October, which corresponds to the most active work in the summer cottage. If you plan to stay in cold period, then you will have to take care of the insulation and installation of a heating source.
Shield
Temporary structures of this type are built according to the shield scheme. Most trailer parts are sold as a ready-made kit, which is brought to the site and assembled according to the instructions. The main advantage of such change houses is simple and quick assembly, the minimum number of tools used, affordable cost, and no need to use thermal insulation. Most often, such structures are assembled from plywood sheets and do not have a frame, which is their disadvantage.

During strong wind the structure can simply be deformed.
From OSB sheets
Today, construction often uses such material as OSB boards. They can also be used to create a change house, sheathing the frame from the outside. The material is similar in some parameters to plywood, but unlike it, it is endowed with better heat and sound insulation. Due to the fact that the strength indicators of OSB boards are lower, it is better to use them not for panel buildings, but for frame buildings. In addition, using such material, the cost of the change house will be more expensive, since wooden frame will have to be additionally insulated with polystyrene foam.

From profiled sheet
So that the temporary hut can later be used as a garage or other utility room, it is made mobile using profile pipes. Outside, the structure is sheathed with a profiled sheet, from the inside, for example, fiberboard is used. A heater is placed between these two materials. Change houses of this type have high strength, but are not cheap, due to the price of the materials used. Therefore, such a building should be preferred if it is planned to be used as a capital utility block.

From sandwich panels
The most comfortable building will be a change house made of sandwich panels, which stands out for its warmth and safety. The main disadvantage of this design is the complexity of installation. This is due to the fact that the panels are produced in large sizes.

The assembly procedure is similar to the construction of panel houses, when foam blocks paste over OSB boards, after which they are laid on a rough frame and fixed with mounting foam.
How to choose a place for a change house
One of milestones before starting the construction of a change house is the choice of a place for its placement. The building must stand on the site so that it does not interfere construction work, fit into the design of the site and at the same time it was convenient to use. If the construction is supposed to be on a “bare” site, then you don’t have to worry about the design.

When choosing a place, it is also worth considering the following nuances:
- it is determined whether the trailer will move to another place or remain stationary. If the house is supposed to be built over several seasons, then it is more convenient to place a temporary building at the exit from the site. If the change house is subsequently used under summer kitchen or a bath, you need to place it closer to the house;
- when constructing a temporary building that will be used in the future for a Russian bath or shower, it is important to take care of fire safety. In this case, it is located in the far corner of the site.
The dimensions of the change house are determined by personal preferences, as well as the functions that will be assigned to it. The most common sizes are 6x2.5m or 6x3m and 2.5m in height.

Building materials for construction
When the issue is closed with the choice of the type of change house, its location and drawings, you can start buying necessary materials to construction. To calculate consumables, you will need to draw up an estimate. If the building will be built of wood, you need to purchase a beam and a board for assembling the frame. For interior decoration, a lining with preliminary insulation walls. If the frame is metal, you will need to buy profile pipes.

Installing a trailer from sandwich panels, although it will be more expensive, but such a design will have a beautiful appearance and differ in long-term operation.
When choosing building materials, pay attention to such points:
- if the frame is planned to be made of wood, racks or beams are used for strapping. For these purposes, a bar with a section of 100x50 mm is required. In order to be able to insulate the change house well, the walls are made thicker, while not forgetting to increase the size of the timber;
- as a log and rafters, as a rule, a 100x50 mm edged board is used. For jumpers and jibs you will need a beam of 50x50 mm. The roof lathing is made of boards 25x100 mm;
- Temporary buildings are mainly insulated with mineral wool. Outside, the material is covered with wind protection;
- With outside the building can be finished with a profiled sheet, clapboard, block house. PVC panels are used inside;
- both traditional slate and profiled sheet or ondulin are suitable for covering the roof.
Step-by-step construction of a change house
The construction of the building is carried out in several stages. Let's figure out how to make a change house with your own hands according to the drawings, following detailed instructions with photos and videos.
Foundation
Change houses are often made of wood. Therefore, consider the construction on the example of such a design. wooden structure It is light in weight, so there is no need for a capital foundation for it. As such, concrete blocks are suitable, which are installed at the same level.

Blocks must be placed in increments of 1.5 m.
For temporary buildings made of metal, having a greater weight, a shallow columnar foundation is built using blocks resting on sand cushion. On such a foundation, the structure will stand for several years, after which distortions due to subsidence will begin to appear. If the building will be operated for a long period, then it is worth thinking about a columnar foundation made of bricks with waterproofing.

Frame assembly
When the foundation is ready, you can start building the frame. To do this, using a beam, perform bottom harness, after which the walls are erected. This stage consists of the following steps:

Then they proceed to the device of the floor logs, for which boards are mounted, set with an edge in increments of 50 or 60 cm, which is determined by the width of the selected thermal insulation.

From the sides, bars are nailed to them, where subfloor boards and thermal insulation with a hydrobarrier are laid.

When a layer of thermal insulation is laid, a vapor barrier is spread over the log according to the scheme, after which the finishing floor boards are mounted.

The walls of the change house made of wood are assembled on the floor. To do this, knock together the frame of one of the longitudinal walls with necessary elements for windows and doorways, install jibs. Having finished the first wall, you can immediately start assembling the second, and after that - the side ones.

The frames are lifted in turn, setting them vertically and fastening them to each other.
To make the roof sloped, one longitudinal wall is made 50-60 cm higher than the other.

When used for frame metal pipes, they are welded vertically in place, observing an angle of 90 ° and not forgetting to weld the stiffeners in a timely manner.


