Strong and reliable roofs made of new roofing. Roof from a metal profile - types, characteristics and installation Technology of a roof from a metal profile
Profiled metal sheet, or metal profile, is one of the most popular and demanded materials on the construction market. They are used for revealing walls, arranging roofs and even building small buildings. And it's all about the advantages of this material and the ease of its installation. Let's even say more: the appearance of profiled sheets on the market has significantly expanded the construction prospects.
Now you can easily make the roofs curved and bizarre shapes, while maintaining their complete tightness. Do you want to understand everything in more detail? So, a new bright metal profile roofing - at a minimum cost!
As a roofing material, the metal profile is wonderful. Light enough, strong, sealed and durable. Its rich color range and the ability to achieve almost any shape make it possible to turn any designer's idea into reality.
But for all its rigidity and low weight, combined with an affordable price for many, the metal profile has a serious drawback - windage. This is an additional force that helps the wind to tear the covering away from the roof frame. Why doesn't the same thing happen with ordinary tiles? Because it consists of many separate parts, but the sheets of the metal profile are usually large in area and at the same time light. Like a parachute.
That is why, if you cover the roof of a house with a metal profile in an area of increased wind load, use high-quality fasteners and think carefully about what angle of inclination will be optimal.
The second negative is the noise of the rain. Although, in fairness, it is worth noting that most owners of such a roof recognize the loud knock of drops as a minus insignificant. And modern means of noise insulation are able to completely solve this problem.
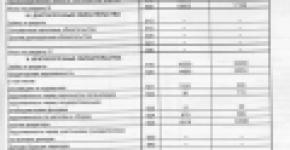
But not every corrugated board is suitable for the roof, but only certain brands, which are listed in this table:

Find a good supplier, buy quality material and read our instructions in detail.
How to bend the sheets for the installation of an arched roof?
Let's start with what kind of roof are you going to make? Simple geometry, arched or complex in design? After all, with such material everything is possible!
Arched metal profile is a demanded flexible raw material, which is mainly used for the construction of roofs of rounded or irregularly shaped buildings. The main advantage of the construction of such a roof is that solid sheets are mounted, without any breaks and ridge. Moreover, even with a small thickness, the bent arched metal profile is able to withstand point loads up to 20 kg.
It will not work to make such a roof using an ordinary wall profiled sheet. The thinner and cheaper the profile, the less durable it is, not to mention low resistance to weathering. But from the carrier - as easy as shelling pears. But there is a secret in this matter: the higher the corrugation of the sheets, the more difficult it will be to bend them. Therefore, purchase almost flat sheets for this purpose.

And now - about the metal profile bending technology itself. Do not try to bend the acquired metal profile with an ordinary hammer, as "experienced" builders sometimes advise. You will only damage the coating and make it uneven. The result will be no better than a crumpled tin can - neither in appearance nor in practicality.
You can entrust this business to local workshops, where a sufficiently large automatic line is installed to give the profiled sheets the desired angle.
So, if you need to slightly bend the profiled sheet for the roof device, follow these steps:
- Step 1. Arm yourself with an ordinary metal corner and a straight board.
- Step 2. Use a permanent marker to mark on the sheet where the center of the bend will be.
- Step 3. Lay the corner on a flat surface, and on top of it - a metal profile.
- Step 4. Lay the board along the drawn line, press it with your feet and press on the edge so that the material begins to yield.
- Step 5. In those places where the material begins to swell, knock with a hammer through the block.
- Step 6. Now repeat the same with each separate area.
- Step 7. To make the resulting angle even, after bending, carefully roll it with a piece of pipe wrapped in electrical tape - so as not to damage the coating once again.
Here's a second way, which is more complicated:
- Step 1. Mark the line of the future bend on the sheet.
- Step 2. Lay the sheet straight on the 40th corner.
- Step 3. With a 45 ° beveled steel roller, press along the line. For each pass (and you need to do everything 5-6 times), the sheet will bend by 10-20 °.
The evenness of the rib at the exit will be much better, only the coating will be slightly damaged - just tint it.
The finished bent profile is easily attached to wooden and tubular frames using a hand-held screwdriver:

How to cut sheets to the desired size?
The metal profile can and should be cut out for complex roof sections. But how? This is where there are many different subtleties and nuances. And the whole point is in the complex structure of the metal profile, which, unlike an ordinary sheet of metal, is a whole "layer cake": a metal base, protective and decorative layers. It is precisely the destruction of the latter that leads to corrosion and a significant reduction in the service life of the coating. That is why it is necessary to cut the metal profile correctly, and how exactly - we will now tell you in detail.
The traditional tools that are most commonly used for this purpose are:

What is such a roofing material most afraid of? Heating up! And when cutting with abrasive wheels in a high-speed tool, this is exactly what happens, and all layers in the place of the cut are burnt. The width of the damaged area reaches 3-5 mm, which is quite noticeable, which is why the so-called "edge corrosion" occurs.
Why can't you cut with a grinder?
Most often, such material is cut with ordinary metal scissors, and the use of a grinder is not recommended, which also cuts unevenly. The second danger is sparks flying out from under the abrasive tool. Their high temperature (like a fire) damages the polymer coating even tens of centimeters from the place of cuts.
Therefore, if you really have to cut the metal profile with a grinder, then replace the abrasive wheel with a cut-off wheel, although this is not the best option. There will still be damage, just in a lesser amount.

But do not use a grinder with a diamond disc, which supposedly heats up the metal profile less: this material will produce large burrs. All the advantages of working with this tool are only in its durability.
Working with hand scissors
And for adjusting profiled sheets of small thickness, ordinary manual sheet metal shears or special electric shears are more suitable for working with metal profiles. The modern market produces three types of them:
- Cutting.
- Knife.
- Slotted, with a special head for precise cutting without deformation.
The so-called nibblers are also convenient for cutting metal profiles. Their trick is that they cut the metal profile along two parallel straight lines at once, and the sheet no longer bends. In addition, thanks to the rotation of the holder, the profile can be cut at right angles already without burrs. But such a tool, of course, is not cheap.
Therefore, if you are working on your own object and it makes no sense for you to spend money on expensive roofing equipment, use the most common nozzle for a cordless drill, which is good for fitting metal profiles in hard-to-reach places.
Using an electric saw
Many experienced builders also prefer to use an electric saw in order to maximize the quality of the roofing material. In addition, this tool has more advantages:
- Twice the speed of cutting sheets due to the ease of working with the tool.
- Almost half the speed of the saw. Thanks to this, the metal does not melt, but is cut out with small sawdust.
It is only important to use the electric saw carefully, because small metal chips can scratch the skin. That is why, if you are new to this business, and you only need to cut a couple of sheets, get the usual classic cutting tool. This is a manual hacksaw for metal, easy to use and absolutely safe for humans.
Jigsaw for curved cutouts
But if you need to make curved cuts of the desired shape, you will need a jigsaw. Usually, such work is necessary when installing the coating in the places of passage of chimneys and ventilation pipes. In principle, there is nothing complicated, you just need to carefully and in advance make an accurate marking of the cutout on the sheet. The disadvantage of using a jigsaw is that it makes sense to use it only on those sheets whose profile height does not exceed 20 mm - otherwise the metal will simply tear.
Accidental Damage Handling
After trimming the sheets, immediately collect the formed sawdust and dispose of them. If left, these crumbs will rust in the rain, corroding a quality roof. A year or two, and the appearance of the roof of your house will be hopelessly ruined.
If it was not possible to avoid scratches on the sheet, you will have to deal with them. Ideally, just tint in the same color. Therefore, even before starting roofing work, get a cylinder with paint of the same shade.
The market also offers a new high-precision roofing tool MP. It is made of high-quality steel, does not need frequent sharpening, is convenient, and accurately and quickly cuts the desired shape from the metal profile.
And finally. The profiled sheet weighs a lot, and therefore, adjust it directly on the construction site. And remember the standards: the minimum sheet length should be 45 cm, and the maximum - 7 meters.
Installation of a metal profile roof: step by step
Well, here's the material purchased, trimmed, folded and ready for editing. Now a careful drawing of your roof, and mark out sketches of future sheets on it. Such a layout is simply necessary in order to use the available material as efficiently as possible.
Stage I. Preparation of sheets for installation
So, start your installation from the ground. Arrange the sheets in separate piles for each slab. Work in protective gloves, and hold the sheets themselves by the edge of the stamping line when moving. If there is wind on such days, watch out for the sheets - they can easily be ripped off even from the ground.

Stage II. Sheathing and waterproofing device
Next, we install the crate under the metal profile. The vertical pitch of the boards should be from 0.5 meters to 1 meter, and the horizontal pitch should be half as much, from 25 cm to 50 cm.And here there are some subtleties: the more boards go to the sheathing, the higher the soundproofing qualities of the roof will be. , the tree is capable of absorbing sounds.
And if the valley is later installed, then lay the planks with an inner corner before installing the metal profile.
Stage III. Purchase of self-tapping screws for metal profiles
Now we are dealing with the mount. Self-tapping screws with a press washer are traditionally used for fastening a metal profile for the purpose of facing facades or for interior work, but only those that have special seals made of artificial rubber are suitable for roofing installation. This modification makes it possible to maximally seal the places where the sheets are attached to the crate, and rainwater no longer gets under the roof.
The screws for the metal profile themselves are rods with a head and a sharp thread. They are made with a special EPDM gasket, which additionally seals the holes and prevents corrosion.
Also, special roofing screws for a metal profile are distinguished by the presence of a special drill tip, thanks to which it is enough to arm yourself with a screwdriver for work. Minimum fastening operations, minimum labor costs - and at the same time high work efficiency:
All these screws are produced with a ready-made paint coating to make them invisible against the background of the entire roof. And do not take the cheapest self-tapping screws. The fact is that the requirements for these fasteners are serious!
Stocked up with the right amount of self-tapping screws? Then let's move on.
Stage IV. Installation of roofing sheets
Before starting the installation of the metal profile, first install the eaves strip, and fix it with self-tapping screws in increments of 30 cm.
Prepare everything you need for work, and lift the sheets to the roof using the guides from the boards. Next, start the installation of the metal profile roof from the bottom left, gradually filling the rows and moving towards the ridge. Place each next sheet under the last wave of the previous one. Fix the sheets with self-tapping screws near the very joints:

Fasten the metal profile with roofing screws with a protective coating of the same color. Standard dimensions are 4.8x28 mm. Twist them perpendicular to the laid battens until the EPDM gasket is slightly compressed. Both under-twisting and squeezing harder is impossible. The lowest row of the metal profile should protrude 4 cm beyond the eaves of the roof, and each upper row should cover the lower one by 20 cm.
Screw the screws themselves only into concave waves in order to fix the roofing material well:
Stage V. Installation of the ridge and additional elements
After the profile sheets have been laid, install the upper valley strip at the inner joints - this way you will close the irregularities. And install the end strips over the wave of sheets and fix with self-tapping screws in increments of 30 cm.
When you start installing the roof ridge, first place a protective gasket under it and secure with nails. You need to fasten the ridge strips through the wave of the sheet, and make an overlap of 10-20 cm. Fasten the ridge caps at the ends of the ridge so that moisture does not get under the ridge.

Now we are working with the chimney. For him, they traditionally make strips of abutment to the roofing material, or get ready-made ones, which usually come in a standard size (like the chimney itself).

Remove steel shavings and all remaining debris from such a roof with a soft-bristled brush so as not to damage the coating with minor scratches.
A couple of months after the end of the installation, check the strength of the fastening of the self-tapping screws. Found loose ones? Pull them back in, and the metal profile roof can be considered completely finished.
When choosing a roof covering, it is necessary to focus not so much on the cost of the material, but on its operational, technological and technical indicators. Only a combination of all these characteristics will make it possible to create a reliable and high-quality roof. One of the materials, whose popularity is growing at an incredible pace, is the metal profile for the roof. It is distinguished by its durability, reliability and external beauty.
- by material of manufacture;
- along the width of the profile;
- by the size and shape of the corrugation;
- by appointment.
Currently, metals such as aluminum, copper, galvanized steel, and zinc-titanium alloy are used for roofing. The most common of these is galvanized steel roofing sheet. This material is strong, flexible, easy to work with, and relatively inexpensive. It can be used to mount roofs with different geometries. Sheets are made of cold-rolled steel and processed by hot-dip galvanizing. The zinc layer serves as a reliable protection against corrosion.
To increase the rigidity of metal sheets, they are profiled, that is, they are given a wavy shape. The size and shape of the “waves” may vary.

The metal profile for the roof is lightweight, durable and resistant to adverse weather conditions
There are the following types of profiled roofing sheets:
- the profile of grade C has a sinusoidal and trapezoidal waveform with a height of 8-44 mm, it is most often used for arranging light roofs;
- the NS profile has a wave height of 35-44 mm;
- profile of grade H has a wave height of 57-114 mm, is equipped with additional stiffeners, can be used for a permanent roof.

It is better to use sheets with a wave height of more than 18 mm as a material for the roof.
Laying of profiled sheets depending on the angle of inclination of the roof
To carry out the correct installation of the roofing profile, it is necessary to take into account the angle of inclination of the roof, since this indicator will affect the amount of overlap of adjacent sheets:
- when the slope is within 12-15 degrees, the overlap of the sheets should be at least 20 cm;
- with a slope of 15-30 degrees, an overlap of 15-20 cm is provided;
- if the slope of the slope is more than 30 degrees, then it is allowed to reduce the overlap to 10-15 cm;
- if the slope is less than 12 degrees, it is necessary to seal the horizontal and vertical overlaps with a special silicone sealant.
Preparatory work before installation of a metal profile roof
The laying of profiled roofing sheets should be started with a waterproofing layer, which will prevent the penetration of moisture onto the battens and insulation. The waterproofing membrane is laid horizontally starting from the eaves. It is fastened with an overlap of about 15 cm.
The metal profile must be installed on the crate, which is designed to provide the necessary strength of the structure, preventing fractures and deflections from the wind or under the weight of snow. The lathing for sheets with a trapezoidal profile can be made from a bar of 50 by 50 mm, 30 by 70 mm or 30 by 100 mm with a rafter pitch of 900-1200 mm. The manufacturer's instructions for roofing materials may contain more precise dimensions for the thickness of the battens.

First, they make a crate on which the sheets of the metal profile will be attached
Next, a cornice strip and end boards are installed, which are fastened with self-tapping screws. The eaves should be below the vapor barrier. The end plate is attached to the wave height of the metal profile, that is, above the crate. Under the valley, it is necessary to arrange a dense boardwalk, diverging on both sides of the gutter by 60 cm. The bottom lath of the gutter is nailed with temporary nails, and finally fixed together with the installation of the metal profile.
Important!
When laying flat roofs at the joints of the gutter, the use of sealing mastic is additionally provided.
Before installing a metal profile roof, it is also necessary to calculate how many profiled sheets will be needed to cover the roof. To do this, you need to measure its perimeter and the length of the slopes. The ideal option is when the sheets correspond in length to the slope. This will improve the waterproofing properties of the roof, as well as significantly reduce the complexity of installation.

Laying of short profiled sheets is performed in order in a horizontal direction, starting from the bottom
Basic installation rules
- Installation should start from the bottom corner of the roof. Profile sheets are overlapped and attached to the wooden crate with self-tapping screws.
- On gable roofs, the installation of the profile should be started from the right end. On hip roofs - from the middle of the hip.
- The profiled sheets are equipped with a drainage groove, which must always remain at the bottom during installation.
- When laying, the sheets are aligned not along the joint, but along the overhang.
- When installing corrugated board with a thickness of less than 0.7 mm, it is advisable to use structures such as skis or wooden platforms. This will prevent the formation of dents and other signs of deformation.
How to fix metal profile sheets
- The sheets are attached to the crate in the places of their tightest fit, that is, between the waves.
- On the extreme sections of the roof (near the ridge and near the cornice), fastening must be done in each "depression". This is done to ensure a more reliable fixation, since it is at these places of the roof that the strongest wind loads fall. In the middle of the slope, you can fix the profile, skipping one gap.
- At the edges of the roof, the profile is fastened to each lathing bar.
- In order for the adjacent sheets to adhere more tightly to each other, it is necessary to shift the attachment points in the abutting waves by 5 mm. On the upper sheet along the slope, this should be done in the direction of the overlap, on the lower sheet - in the opposite direction.
- In problem areas, for example, where the sheet is adjacent to various roofing elements (walls, chimneys, ventilation shafts), you need to use abutment strips.
- To connect the extreme flanges of the profile, it is better to use combined rivets with a diameter of 3.2-6.5 mm.

The thread length of the self-tapping screw must exceed the height of the parts to be joined by 0.5 cm or more
Important!
In no case should you use nails instead of self-tapping screws. Firstly, the chance of the roof covering tearing off in wind gusts will significantly increase. Secondly, one can only dream of tightness - water will seep in the places where nails are hammered.
Failure to comply with all of the above rules for installing a metal profile roof can lead to a violation of the integrity of the coating and a reduction in its service life. In order to prevent this and not to engage in frequent repairs, you can entrust the installation of the metal profile to professionals who know all the subtleties and nuances of this work.
Every year, especially for the arrangement of private houses, more and more people choose metal profiles for the roof. This coating looks decent on a residential or country house. The good characteristics of the profiled metal sheet provide a high bearing capacity of the material, and the absence of joints provides reliable protection from rain and other atmospheric precipitation.
The main characteristics of the material
Products are produced with a predetermined width of 900 or 1100 mm. The length varies depending on the wishes of the customer. The thickness of the sheets is 0.45-0.8 mm. The metal profile for the roof is manufactured in accordance with GOST 380-71. The roof is covered with products with a corrugation height of 44 mm. In suburban construction, bent profiles with sealed joints made of galvanized steel with a thickness of 0.6-1.5 mm, with a paint-and-lacquer coating and a length of 12.5 m are common.
Other characteristics that are at the same time advantages:

Sheets are marked in accordance with GOST 75-66: the designation of the sheet, the number and length in the package are indicated. The weight of the package must be indicated on the label the package number and batch data are marked... The roof is covered with a profile marked "H" and a wave height of 35 mm.
Single and gable roofs made of metal profiles
In summer cottage construction, roofing metal profiles are used to cover pitched roofs. The skat will last a long time provided the correct calculation of the angle of inclination of the roof, which directly depends on the area of the building and the materials used in construction. The angle of inclination of the roof can be 5-60 °. With its increase, the consumption of roofing material increases. A metal profile can be used if the slope of the slope does not exceed 25 °. The installation of a 2-pitched roof begins after the slope of the roof is established. The allowed value is 1: 7.
Calculation of the amount of material
 The first step is to calculate the number of rows. If the total width of the sheet is 1.19 m, and the working width is 1.11 m, the calculation of the sheets is performed along the horizontal slope. The length of the horizontal slope is measured and divided by the working width of the sheet. The horizontal overlap of the rows is respectively: 1.19-1.11 = 0.08 m.
To form a row the total number of sheets is calculated. The length of the sheets is also calculated, for which they use the following formula: D = A + B + C, where:
- A is the length of the slope.
- B - eaves overhang (0.05 m).
- C - vertical overlap of sheets (0.15 m).
The volume of the insulation material is calculated by multiplying the roof area by its thickness, that is, by 0.2 m. Fastening is carried out with self-tapping screws. The amount of waterproofing material is calculated by dividing the entire roof area by the area to be covered. The result will tell you about the required number of rolls.
Tools and materials for installation
Before starting work, everything you need should be at hand and in proper form. Installation of metal profile sheets provides for the following tools:

The following materials will be needed:
- waterproofing material;
- boards;
- wooden bars.
Basic installation steps
Installation begins with laying a waterproofing layer, which does not allow moisture to pass into the insulation, on the rafters and crate. For the convenience of work and to prevent errors, a roof plan is drawn up in advance with an indication of the parameters of its main elements:

A super-diffuse membrane is used for the backing device. A roof slope of 1: 7 (8) is taken into account. Work on such a roof is done with extreme care. The lining prevents the formation of condensation and protects the thermal insulation material. The lining is laid from the overhang to the ridge. Fastening is carried out with 25 mm nails, with a step of 20 cm. For fastening to the rafters, a counter-rail is used. The edges wrapped inward are fastened to the end board with nails.
Installation begins from the bottom corner of the roof, the profiles are overlapped and attached to the battens of the sheathing with self-tapping screws with rubber seals.
When installing a 2-pitched roof, the profiled sheet begins to be fastened from the right end. In the case of a hipped roof, they begin to attach the profile from the highest point of the slope. Sometimes an aluminum profile is used for hipped roofs.
First of all, the cornice strip is mounted with self-tapping screws. A profile seal is placed between the eaves strip and the sheet of roofing material. The eaves plank is carried out 3-4 cm behind the overhang. On one side of the profiled sheet there is a drainage groove, which must be located at the bottom.
 If the slope of the slope is insignificant, compaction is performed in the longitudinal seam, or the sheets are overlapped, two waves in size. In this case, the sheets are aligned along the overhang.
The profile is temporarily fastened with self-tapping screws near the ridge and overhang, the edge drops about 4 cm beyond the edge of the roof. The next element is mounted, its edge at the overhang is aligned with the previous sheet and fixed in the same way.
The sheet is connected to the previous self-tapping screws at the crest of the wave. The direction is from the overhang to the ridge in 50 cm increments.
After 3-4 sheets have been laid in the above described way, they are aligned along the line at the roof overhang and finally fixed.
The fastening to the crate is made at the bottom of the wave through one corrugation.
Further installation is carried out with an overlap of 20 cm and fastening to the lathing using roofing screws 4.8 × 35 mm.
During installation on the roof, they move along the already fixed sheets, the legs are placed in the grooves of the sheet on the sheathing beams. Workers' footwear should have a soft, non-slip soles. Facade cladding is made with a wall profile without a capillary groove.
Many novice builders are seriously interested in the question: how to correctly and competently build a roof from a metal profile with their own hands. By definition, a profile sheet is called a plate, for the manufacture of which thin metal is used (its width varies from 0.5 to 1 mm). Steel sheets are used for the manufacture of metal profiles or corrugated board. The required rigidity is achieved by additional rolling of the profile.
Thus, there is an appropriate height and configuration of the sections for the future roof.
What are professional sheets
Their surfaces are made to resemble waves and processed using special polymers. In addition to this, sections are galvanized.

After carrying out certain preparatory work, the blanks of the metal profile significantly improve their bearing characteristics. Now they are much better than similar roofing materials to cope with significant wind and snow loads. In order for the profile pattern to have good rigidity, additional ribs are used. This is an indisputable advantage in cases when the installation of slopes with a low angle of inclination occurs.
Technologically, laying profiled sheets on the roofs of modern buildings is not a particularly difficult process. You just need to know the basic techniques, as well as the subtleties of working with the proposed materials.
Before covering the roof with a metal profile, it is advisable to find out more about the materials used, how they are fastened in different ways, depending on which installation scheme is used in this situation.
A priori, a metal sheet (metal profile) is found in three varieties:
- brand "C". With the help of this type, the finishing of the walls is carried out;
- profile "H". It has higher strength characteristics, due to which it can be used for arranging roofs;
- type "NS". Fences are built from it, walls are faced with this material, roofs are protected.
Back to the table of contents
About the basic advantages of metal-profile sheets

Speaking about the main advantages of corrugated board, one can mention:
- small mass (weight ranges from 3 to 20 kg);
- fire resistance;
- environmental friendliness (the metal profile does not have any harmful effect on human health);
- durability (profile flooring is not afraid of ultraviolet light, temperature drops, or acid rain);
- low cost of metal profiles;
- aesthetic appeal;
- high degree of strength and reusability.
However, it is necessary to mention the negatives of this material. Since this raw material has a high level of noise, to eliminate this disadvantage, it is required to lay a heat-insulating layer of solid thickness, which, in addition to its main purpose, will play the role of a sound insulator.
If the outer decorative layer is damaged, then this can serve as the beginning of the development of corrosion processes. In the process of installing a metal-profile flooring, it is necessary to carefully monitor that the inter-joint zones are carefully sealed. Otherwise, the finished roof may leak.
Back to the table of contents
Construction stages

Installation of a metal-profile roof begins with the fact that a solid lathing is pre-built. This is the supporting base on which the deck sections will subsequently be attached. After that, the following operations are carried out:
- First, a cord is pulled along the cornice (edge of the crate). In the future, it is a reference point (it is along this that the extreme cut of the metal-profile sheets is aligned).
- The sections of the corrugated board on the roof should be laid starting from the ridge to the lower sectors of the sheathing. In this case, every second wave is attached. The end cut is fixed directly to the profile recess in each horizontal bar.
- In the middle part, the workpieces are screwed to the formwork beams with self-tapping screws in a checkerboard pattern. For the fastening to be strong, each "square" of the area must be reinforced with 4-5 self-tapping screws.
Metal-profile sheets are fixed only in the lower part of the section wave. If a roof is installed with an elongated slope, then the profile sheets are stacked here on top of each other with a 20 cm overlap. In other words, the sheets are "growing". Overlapping waves are attached to the crate at the same time.
Back to the table of contents
How metal-profile coatings are laid

There are two different ways to lay profile decking in multiple rows:
- Block: blocks of corrugated board are formed (4 sheets in each). Newly created segments are base cells. The future roofing structure is formed from them. Blocks are also overlapped. This is how the whole roof is assembled. Finished roofs are equipped with gutter (drainage) grooves.
- In this case, it takes three typical sheets to form a block (the finished segment resembles a triangle in shape). The elements are built up in the same checkerboard pattern (adjacent waves are also overlapped). Here, gutters are not needed, as the first row is completely covered by the following sheets.
The final choice of installation method is determined by the angle of inclination of the roof. So, on completely flat roofs (or those where the angle does not exceed 12º), it is required to additionally protect the horizontal and vertical joints of the sheets of roofing materials with silicone sealants. If the angle increases to 14º, the overlap of adjacent sheets should not be shorter than 20 cm. If the slope increases to 16-28º, then the overlap zone can be reduced to 15-18 cm. When the roof slope exceeds 30º, the size of the "common" sector is reduced to 10 -15 cm.
How to cover the roof with a metal profile? The technology by which the profiled sheet is laid on the roof is not very complicated. The only thing that is required for this is to know the necessary features and rules for working with this material. The corrugated board is not difficult to fix on your own, regardless of what kind and configuration of the roof.
A do-it-yourself roof made of a metal profile, as already noted, is mounted in compliance with the necessary technology and basic rules. Let's take a look at them.
First you need to make a high-quality crate, which will be distinguished by its strength and reliability, and on which it will fit.
Your attention! If the roof is gable, then the installation of the roof begins from the end, if hip - then from the center of the hip. You also need to pull the cord along the eaves, along which the metal profile will be aligned. By the way, it is better not to level the flooring along the end of the ramp.
The fastening of the metal profile on the roof should take place in the area of the ridge to the bottom of the sheathing for every second wave. If the fastening takes place at the end edge, then the fastening is carried out along the bottom of the profile into each bar located horizontally.
After that, the middle must be fixed with self-tapping screws in a checkerboard pattern. For reliable fastening, it is necessary to screw in 4-5 self-tapping screws per square meter.
It should be noted that the metal profile is attached only to the part of the wave located below, in contrast to slate.
A profile sheet for a roof with long slopes is made using the method of building up sheets that have an overlap of about 20 cm. The sheets are fastened simultaneously by nailing them to the crate for each wave.
There are two methods that are most often used in order to make a multi-row installation of profiled sheet flooring:
- First you need to make a block of four professional sheets. To do this, you need to lay the first sheet on the bottom row. Another sheet is attached to it from above, which will be the first in the second row. Another sheet is fixed on the bottom row, the same is done in the top row. Thus, there are four sheets on the roof. Then, next to it, with the help of an overlap, another block of the same is installed and so on until the entire installation is carried out. This method is most often used for a metal profile roofing device that has a drain or drainage groove.
- How to do it in another way? A block is arranged, consisting of three sheets, which are stacked as follows: the first row is made of two sheets, which are stacked and connected to each other. Then another sheet is attached to them, which is the first in the second row. After that, the block is aligned parallel to the cornice and fixed. Next to it, another block is attached with an overlap and so on until the very end. This method is used for fixing profiled sheets that do not have a drainage groove, since all sheets in the first row are covered with sheets of the next row.
Roof slope

How to cover the roof with a metal profile
When assembling roofs from a profiled sheet, you need to know the answer not only to the question of how to cover the roof with a metal profile, but also what angle of inclination the roof has.
In the event that the roof has a slope of less than 14 degrees, then adjacent sheets should be laid with an overlap of at least 20 cm.When the angle is increased to 15-30 degrees, the overlap value can be reduced to 15-20 cm.
If the slope of the roof from the corrugated board exceeds 30 degrees with your own hands, it is allowed to overlap 10-15 cm. If you have a generally flat roof, the angle of inclination of which is less than 12 cm, then additional sealing of horizontal and vertical overlaps with silicone sealant will be required.
Directly mount

Roof covering with metal profiles
It is best to fasten the profiled sheets using special roofing screws to structures made of wood. At the end of such self-tapping screws, there is a drill along with a polymer gasket. It is desirable that the self-tapping screw has a size of 4.8 x 35 mm.
In order to secure the ridge, self-tapping screws with a length of 80 mm will be needed. When installing such sheets, one should not forget to perform steam and waterproofing, as well as provide a gap so that ventilation of the space located under the roof can be carried out.
It is worth noting that with constant heavy rainfall, damage to the roof can occur if it was installed incorrectly initially. To avoid this and not engage in constant repairs, you need to immediately answer the question of how to properly cover the roof with a metal profile.
Let's talk about why the metal profile is used for the roof. This material is made from steel sheets, which are coated with polymer and galvanized coatings for protection.
The profiles acquire the required rigidity after rolling, carried out at different heights and configurations. It is noted that corrugated board is much stronger than analog wall materials.
The material is able to resist different loads due to the presence of additional stiffeners. The profile height can be higher than 20 mm. In order for the work to be done correctly and quickly, you need to do a few points.
So, how to cover the roof with a metal profile? Several rules.
- The slope of the roof has already been mentioned earlier. It must be measured very carefully, since it will depend on how strong the structure will be, as well as whether there will be an unpleasant outcome.
- Then you need to calculate how many sheets you need. You also need to decide if you need separate plates. Only after everything is taken into account, it will be possible to start preparing the material for work.
- After that, you need to pick up the sheets of the required length. It is advisable that they are of the same length as the slope so that you do not have to carry out unnecessary work. It should be remembered that the length of the flooring should be 4 cm longer than the length of the eaves.
- Before starting the installation, you need to check how flat the roof is. After that, the roof is covered with a layer of waterproofing, which will help the roof to serve without leaks for a long time.
- The next stage is to lay out the slats, thanks to which air circulation will be achieved between the waterproofing and the corrugated board. It will also help protect the material from decay and mold.
It is worth noting that roof profile iron is a very slippery material, so you need to work with it very carefully at a height.
Now you shouldn't have any questions about how to cover the roof. The main thing to remember is that in this matter you need to think over each step in advance and complete all of the above points.
Otherwise, you will have to repair the roof quite often or fork out for a new roof.