How to make a hook for a chandelier. How to hang a chandelier with a strip if there is a hook? How to hang a chandelier on a hook if the ceiling is concrete
If you need to hang a chandelier weighing several kilograms on the ceiling, then there are usually no difficulties. But when hanging a massive heavy chandelier, work needs to be done by choosing the type of fastener and The right way fastenings
The chandelier hangs at a height, is connected to electrical wiring, people pass under it, so the reliability of the fastening must be taken with full responsibility in order to prevent the lamp from falling on someone’s head.

If the lamp weighs less than a kilogram and is an electric socket with a light bulb, then you don’t have to worry about the hanging method and attach the chandelier directly to the electrical wires. I used this method of hanging during the renovation of the apartment since all the lamps were removed from the ceiling. If the chandelier consists of fittings and lampshades, then it is necessary to install special mount in the form of a hook or anchor.
How to hang a chandelier on the ceiling using a hook
If the chandelier weighs less than ten kilograms, then to hang it best mount a simple threaded hook on a straight section can serve.
There are hooks different sizes, so it is possible to choose based on the weight of the chandelier. A hook with a rod diameter of 2 mm will hold a chandelier weighing up to 3 kg, 3 mm - 5 kg, 4 mm - 8 kg, 5 mm - 10 kg, respectively. To attach a chandelier weighing more than 10 kg, you will need an anchor.

If you need to hang a chandelier on wooden ceiling, for example, in a log house, then it is enough to drill a hole in the ceiling with a drill with a diameter equal to the internal diameter of the hook thread and screw the hook into the ceiling.
If you don’t have a hook at hand, you can hammer a nail 80 mm long into the ceiling halfway and bend its protruding part into a half ring. A chandelier weighing up to three kilograms will hang securely.

In a ceiling made of concrete slabs, to attach the hook, you must first install a dowel in the ceiling. When purchasing a hook, a dowel is usually included in the kit. The hook shown in the photo with a rod diameter of 5 mm is designed for hanging a chandelier weighing up to 10 kg.

To install a dowel into the ceiling, you must first drill a hole in it with a diameter equal to the outer diameter of the dowel to the depth of its length. The dowel is driven into the hole and all that remains is to screw the hook into it.
Since there are cavities in concrete floor slabs, when drilling a hole, the drill may fall into the void. And after the drill is removed from the hole, sand and construction dust will begin to fall.

And there is an explanation for this. Ceiling slabs are made of concrete. To reduce their weight and increase strength, reduce thermal conductivity and sound insulation, round pipe-shaped cavities are made at the factory along the entire length of the slab. When stored at construction site gets into some pipes construction garbage, that’s why it can crumble.
If the thickness of the concrete to the inner cavity does not exceed half the length of the plastic dowel, and it does not fall through when driven into the hole, then you can screw a chandelier hook into the dowel. If its weight does not exceed 3 kg, then the fastening will be quite reliable.
If the chandelier weighs more than 3 kg, a metal dowel is required, for example, the Molli system, specially designed for fastening to any walls and ceilings, including hollow structures.
To install a Molly dowel in the ceiling, you first need to drill a hole, insert the cylindrical part of the dowel into it and, turning clockwise until it stops, screw in the hook, applying significant force at the end of screwing. It is better to tighten the hook using a lever, for example, by inserting a metal rod or rod into it. When twisted, the central part of the dowel cylinder will spread out to the sides and securely cling to the walls of the concrete slab. This dowel will support the weight of a chandelier up to 30 kg.
How to hang a heavy chandelier on the ceiling
using an anchor
To fasten products on a solid ceiling or wall with a load of more than 30 kg, a metal Anchor is used, which translates from German language means anchor.

To hang a chandelier on a ceiling weighing more than 10 kg, you can use not only a hook with a plastic dowel, but also a simple, inexpensive drive-in anchor that can withstand a weight of up to 30 kg when installed on a concrete ceiling.

As can be seen in the photograph, a drive-in anchor is a piece of metal tube, inside of which a metric thread, and the second half has a narrowing internal diameter and is divided into four sectors by slots. The outside of the tube has a diagonal notch for better adhesion to the wall material.

A metal liner is inserted from the threaded part of the anchor tube. To install a drive-in anchor, you need to drill a hole in the ceiling with a depth of 5 mm greater than its length, hammer the anchor into drilled hole and wedge it using special device. The device can be a metal rod with a diameter smaller than the anchor thread. Impacts on the rod will push the liner into the tapering part of the tube and the anchor collets will move apart, cutting into the concrete.
Main technical characteristics of drive-in anchors
Based on data from manufacturers of drive-in anchors, I compiled a table of their technical characteristics. Manufacturers recommend loading the anchor no more than 25% of the maximum load.
The load characteristics in the table are given for the ideal case of installing an anchor in high strength concrete, V natural stone or in brick without cavities. Therefore, taking into account the impossibility of taking into account the characteristics of the wall or ceiling material, I recommend choosing an anchor with a tenfold load reserve.
| Basic specifications drive-in anchors | ||||||
|---|---|---|---|---|---|---|
| Anchor designation | Anchor diameter, drilling, mm | Anchor length, mm | Drilling depth, mm | Internal thread | ||
| M6 | 950 | 8 | 25 | 30 | M6 | |
| M8 | 1350 | 10 | 30 | 35 | M8 | |
| M10 | 1950 | 12 | 40 | 45 | M10 | |
| M12 | 2900 | 16 | 50 | 55 | M12 | |
| M16 | 4850 | 20 | 65 | 70 | M16 | |
| M20 | 5900 | 25 | 80 | 85 | M20 | |
After the drive-in anchor is secured into it, you can screw in a fastening element of any shape, for example, a hook, ring or stud on which any structure can be secured using a nut. The drive-in anchor is perfect for attaching heavy wall cabinets, sports equipment, sewer pipes and any other heavy objects.

This photo shows ceiling mounting using a drive-in anchor. water pipe. A bolt is screwed into the anchor, onto which a bracket is attached using a nut, holding the pipe.
One of mandatory elements any repairs related to the ceiling surface - installation lighting fixtures. IN Lately Spots of various configurations have become most popular, but for the most part their main function is additional lighting. Classic chandeliers rightly take on the role of the main one. Purchasing them in a store does not resolve all issues - we still have to figure out how to hang the chandelier on concrete ceiling correct, if you have to deal with a clean ceiling base. We offer you a detailed instructional article with 51 photos and 2 videos that will help you with this.

Surface analysis, drawing up a work plan

To begin with, take a good look around. What way chandelier installation most suitable for you? Let us remind you that this can be done through:
- anchor hook;
- mounting plate;
- clamping suspension.


Of course, work with anchor hook It's always the easiest. But only if it is already installed, as is often the case in old apartment buildings. In this case, you can safely mount a heavy and massive chandelier on it.

If there is no hook, then first inspect the slab where you plan to fix it. For hollow concrete foundations perfect option - clamping suspension. And although it does not provide that reliable fastening, like the same anchor hook, will cope with a fairly large chandelier weighing no more than 7 kg without any problems.


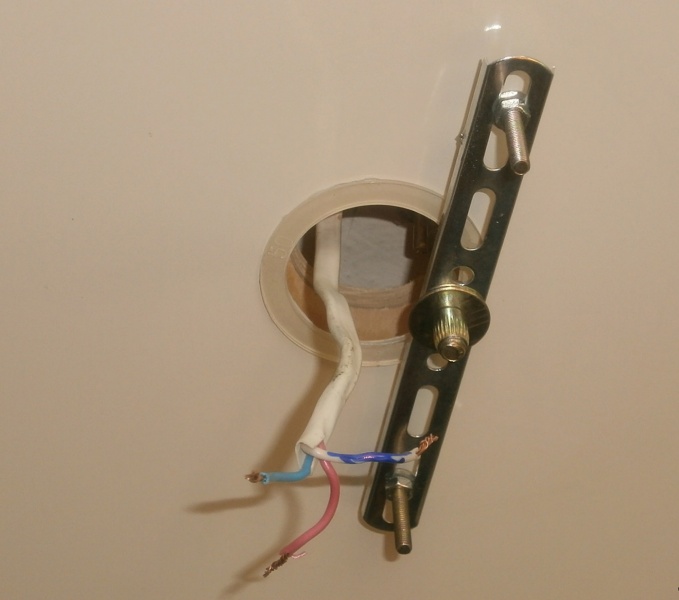
Mounting strip, which is often called an invoice among craftsmen, is the third option on how to properly hang a chandelier on a base ceiling. It can be used most often when the use of the two options discussed above is not possible. In the majority modern chandeliers The delivery set includes everything necessary to fix the lighting fixture in this way. So why not take advantage of this?

Required materials and tools

- hammer drill with drill;
- set of wrenches;
- knife with a sharpened blade;
- screwdriver;
- polyurethane foam for sealing wiring;
- pencil;
- dowels;
- anchor bolts;
- terminal connectors.

- hook;
- overhead strip included in the kit;
- hanging hanging hook.


Installing an anchor hook

As noted above, this is the simplest and reliable way hang the chandelier on a concrete ceiling base. In many old houses it is already prudently installed in advance, so the whole process takes a modest amount of time and does not cause any difficulties even for an unprepared person.

If the hook needs to be installed, then the operation algorithm will be as follows:
- select a fixation point on a concrete base;
- drill a hole of the required depth and diameter in the concrete base - take into account the size of the decorative cap of the lighting fixture;
- insert the anchor hook into concrete base and tighten it with a wrench.

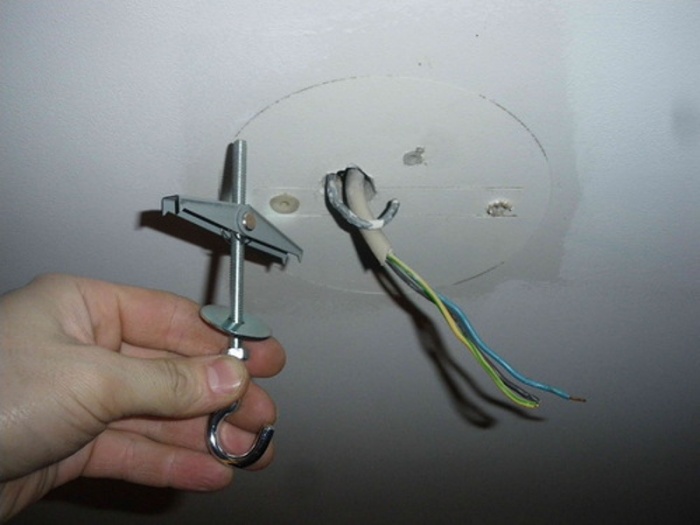
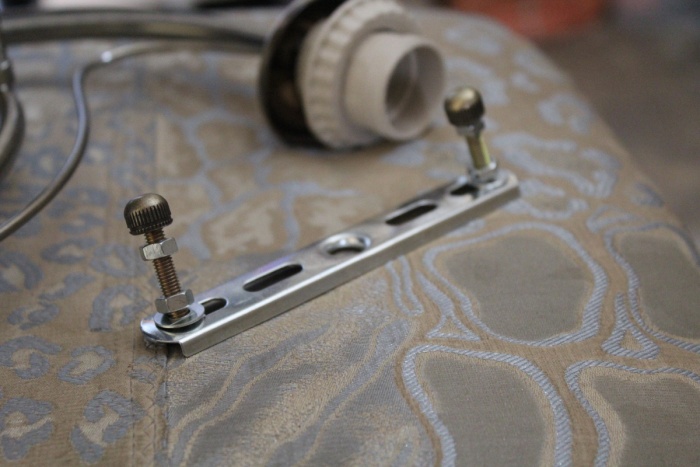
Installation of a clamping suspension


This option is relevant primarily for hollow concrete structures, as it provides good bearing capacity even with bulky light sources. The clamping suspension is reliable design, consisting of a spacer rod and a suspension bar with all necessary holes for fastening.


The correct sequence of operations when working with the gimbal:
- the prepared spacer rod is inserted into the hole in the concrete base;
- the hanging strip is placed inside the concrete slab;
- the spacer rod is threaded through one of the holes on the plank: if you want to reduce the distance from the ceiling to the hook, then choose one of the end holes.


Installation of trim strip

In terms of reliability, this installation method is in no way inferior to the two discussed above. Due to the fact that a newly purchased chandelier always comes with a version of such a strip, it is also noticeably lighter - there is no need to waste time on a tedious search for the necessary materials.
May be in the form:
- crosses;
- narrow plate.


The overhead strip is attached to the concrete ceiling surface with dowels and anchor bolts. Most often there are pairs of them - either 2 or 4.
Installation and connection of the chandelier

The main condition that requires strict execution is to comply with electrical safety precautions. To do this, pay attention to the following recommendations:
- turn off the electricity supply at the distribution panel;
- check the wiring location with a conventional tester;
- seal the wiring input: for this you can use polyurethane foam with active resistance
- fire or non-flammable mineral wool;
- Do not twist copper and aluminum wires together.


If you are dealing with a metal hook, then you can reliably protect yourself from short circuit will help him insulation. To do this, use regular insulating tape or a rubber cover. Both can be easily found at any hardware store.


It is also necessary to take into account some electrical features of old houses - they do not have grounding. In order to correctly hang a chandelier in such conditions, you first need to determine the phase on one of the wires of the power cable and connect it to the end of the lighting device, and the second to the one left on power cable. If the lamp still does not work, then that same second wire is grounding. In this case, it must be disconnected and secured to the other free end of the power cable.


Algorithm for direct installation of a chandelier on a concrete ceiling:
- take everything off her decorative elements to avoid damage and possible fall when fixing on the ceiling;
- on a pre-grounded hook and loop at the end of the chandelier output rod;
- connect the mounting ends of the chandelier to the power cable;
- if the fastening method you have chosen is invoice mounting plate, then after the previous point, place the cap on the plate so that it fits onto the desired holes, and use the nuts to securely fasten it;
- fix the decorative cap so that it completely covers the installation hole in the ceiling;
- Check the correct operation of the lighting fixture.


All stages of installing a chandelier on a concrete ceiling in one video
Conclusion
After carefully studying the proposed article-instructions, you will quickly understand how easy and, most importantly, correctly to hang a chandelier on a concrete ceiling, without spending a lot of precious time on it. In comparison with other conditions for installing lighting fixtures - for example, on suspended ceilings - a clean base requires a simplified algorithm of actions (read about how to attach a chandelier to a suspended ceiling if it is already stretched). In fact, the most difficult thing is not to make a mistake when directly connecting the light source to the electrical wiring. Only a serious attitude towards electrical safety issues and scrupulous adherence to the proposed work plan will help you easily overcome this stage and after some time enjoy the spectacular lighting on your concrete ceiling.


How to hang a chandelier from the ceiling? Such self installation– a troublesome matter for many. To carry out installation correctly, you will need certain knowledge and a thorough approach. Therefore, if you have never installed a chandelier, or if you have doubts about your own abilities, then abandon the idea and call an experienced electrician who will install the chandelier in half an hour. Remember, the main rule in this matter is don’t go where you’re not asked. Jokes with current are inappropriate. But if you have experience in carrying out similar work, then you can easily repeat the result. Our article will help you with this.
To hang correctly ceiling chandelier , you will need a stepladder, a voltage indicator, pliers, a thin screwdriver, mounting block with wire terminals and wire cutters.
Installing a hanging hook on the ceiling
Initially, you need to choose a “good” hook. To do this, it needs to be tested for strength. To make a hole in the ceiling, close to the wires sticking out of the ceiling, you need to arm yourself with a hammer drill or impact drill. It is preferable to secure the hook using anchor systems. After installation, the hook is insulated double layer insulating tape.
It must be remembered that the installation of any lighting devices must be carried out in accordance with the instructions from the manufacturers of these devices.
Instructions are included with the lamp. If the installation of a chandelier involves grounding, it must be connected without fail.
One of our articles discusses in detail. After reading the material, you will gain a complete understanding of lighting standards and will be able to draw a conclusion about the lighting of the rooms in which you live.
Please note that we have information about modern ones called light filters. After all, you often need to think not only about room lighting, but also about darkening.
Having figured out the question of how to hang a chandelier, it’s time to puzzle over the question of how to connect it. Before the beginning electrical work, must be disabled circuit breaker, which is located in the counter on the landing. To check that there is no voltage in the network, you need to touch the phase wires with the indicator (if there is voltage, the indicator will light up red). To do this, you need to find three wires on the ceiling: two of them are phase, one wire is neutral, there is no voltage on it. Three wires are needed for connecting the chandelier to double switch . You need to know that the neutral wire is sent to installation box, and two phase wires are output to the switch. The insulation must be stripped from all wires. Then push them apart different sides so that a short circuit does not occur. To once again make sure there is no voltage, turn on the lights in the room in which you are going to install the chandelier. When removing insulation from wires, remove it by about three to four millimeters.
Determining voltage in ceiling wires
 Now it’s time to find the neutral wire; the other two, accordingly, will be phase wires. To do this, go to landing, turn on the electricity, and then the switch in the room. Touch each wire in turn with the indicator. If the light bulb is on, then, as mentioned earlier, this is a “phase”. If nothing has changed, it is “zero”. After the neutral wire is found, it must be marked with insulation so as not to be “lost.”
Today, to facilitate work, new rules for the construction of electrical installations (PUE) have been established. From them it is known that the wires must be color-coded along their entire length: brown/black indicates the phase wire, blue indicates the neutral wire.
Determining the phase wires of the chandelier
Now you need to identify the phase wires of the chandelier. At the same time, do not forget that the wires of the chandelier must be marked. If it is missing, then you will have to determine the neutral wire and phase wires using the same scheme. The wires of the chandelier will be laid in a tube and brought out to the junction box. It is through this that you will connect the lamp to the wiring. Usually the box is hidden behind a decorative cartridge.
Now follow the following algorithm: alternately plug any two wires of the chandelier into the outlet. Do not touch the third wire. When the first half of the lights light up, remember the wires you plugged into the outlet. Leave one wire in the socket and swap the other with a wire that is not yet connected. The second half of the lamps should light up. If nothing happens, continue changing the wires until you achieve the result.
As a result, the following should happen: one wire should always be in the socket, and the other two wires, when plugged into the socket one by one, should light “their” row of light bulbs. The wire that remains in the socket all the time is the neutral wire.
At this stage installation work remember, that connection to electrical network is carried out with pre-de-energized wires!
Chandelier pendant
Now it's a matter of small things. Stand on a chair and hang the chandelier on the hook. The neutral wire, which is on the ceiling, must be connected to the neutral wire on the chandelier. The same must be done with phase wires.
Remember that wires of different metals cannot be twisted together.
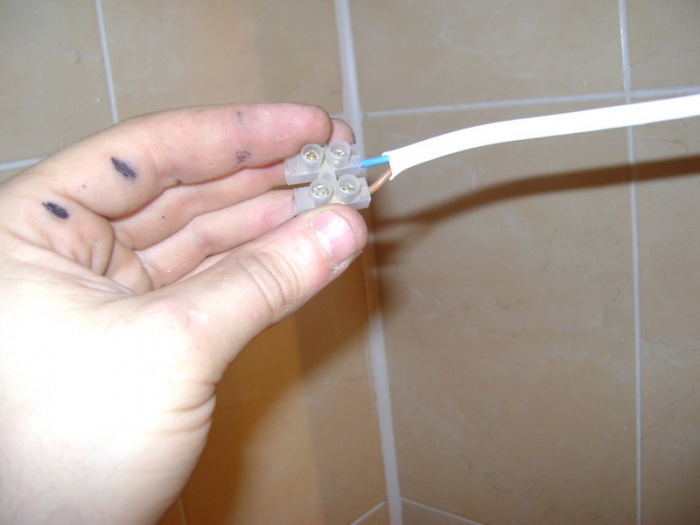
Copper wire with copper, aluminum wire- with aluminum. The only way! If there is an aluminum wire sticking out from the ceiling, and in the chandelier copper wire, then to connect them, you will have to use a special block. The wires in it are fastened with screws on both sides, and when turned on, the voltage will flow through the terminals, bypassing direct contact of the wires with each other.
Checking the chandelier
Before screwing the cap on the base of the chandelier, you need to check the quality of the work performed. The chandelier should turn on without problems and under no circumstances spark.
Installation of the lampshade
 You don't need a hook to install the lampshade. The lampshade is fixed to the ceiling using three fasteners: it is screwed through the holes made in the bottom of the housing. After this, the hook in the ceiling is removed.
If the ceiling is made of wood, then you can fix the lampshade ordinary self-tapping screws. If the ceiling is made of concrete slabs, then you will have to use anchor systems. If the ceiling is plasterboard, then you can attach the lampshade using metal dowels. They can withstand loads of up to fifteen kilograms.
How to hang a chandelier photo
Below are photographs on the topic of the article “How to hang a chandelier.” To open the photo gallery, just click on the image thumbnail.
Installation new chandelier- the event is quite important and significant. Before hanging it, you need to assemble it correctly. However, most products have a fairly simple structure, so this step can be skipped. To figure out how to hang a chandelier, you need to determine the type of ceiling covering, as well as the method of attaching the lighting fixture.
Connecting wires
It’s worth starting with basic actions. Before starting work, you should ask yourself a few questions:
- how many keys should the switch be installed on?
- how many wires will come from the ceiling.
If there are only two wires, you don’t have to think about the possibility of turning on individual parts lamp using two-gang switch. Without the presence of a third wire, such a task will be impossible.
If you have three wires and want to turn on the light in different parts chandeliers at different times, the wires that go to the socket, and the ground are collected in 1 bundle. The rest are divided into 2 other bundles.
Attention! It is important to ensure good contact wires Otherwise, the wires will become very hot, and the housekeeper will fail.
In order to carry out the work, you should prepare the following tools:
The key must be collected for one task - during the assembly of the chandelier itself. An indicator screwdriver will be needed to determine where the wire is connected. If the instrument lights up when you touch its tip, it means it is working.
After this, you need to touch the end of the screwdriver to the cartridge. The free hand is used to hold the wires. If you touch one of them with a screwdriver, the indicator built into the tool will light up. Wires made in the same color will be grounding.
Bundles that are separated must be inserted into terminal block and secure.

Chandelier installation
To understand how to hang a chandelier, you need to choose a method for attaching it. There are 2 main options:
- on the mounting plate;
- on a hook.
Hanging a chandelier on a hook is one of the oldest and most common options. Today this method is used less frequently. However, quite a lot of chandeliers that have such fastenings are still sold.
Some home craftsmen can solve this problem on their own. They simply replace the plastic hook with a homemade one, which is made from a welding electrode.
The mounting strip is a special product mounted to the ceiling. It is usually sold complete with a chandelier. Before installation, the plank must be properly prepared. It is necessary to fasten the screws on it so that the caps are in the inner part of the strip. However, you should not clamp them. Then you need to insert the strip into the chandelier. This must be done in a certain way. The strip should be flush with the edges of the lamp bowl. It is also possible that it will be below the edges of the bowl.
After checking, you must tighten the screws in the bar to prevent them from twisting. Then the strip is applied to the ceiling in order to mark the attachment points. After this, holes for dowels are drilled in the ceiling. With their help, the bar is installed and then mounted hanging chandelier. In the presence of wooden base The ceiling should be secured with self-tapping screws.

Connection
Checking for voltage is quite simple. To determine it, you should use an indicator screwdriver. When the tip touches the wires, it should not glow. After the power is turned on, the indicator will show voltage on only 2 wires. The remaining one is "ground". It must be connected to a common beam.
Attention! You cannot install housekeepers if the lamp is connected through a special device that regulates the brightness of the light.
To figure out how to hang a chandelier on different ceilings, it’s worth getting acquainted with their types and features.
Chandelier with power supply
Often, owners of apartments or private houses want to increase the brightness of the glow by using more powerful lamps. As a result of such modifications, the pendant chandelier may no longer function. To protect the transformer, it is worth monitoring the total electricity consumption of all lamps. It is necessary that it be less than the output power of the device.
For halogen lamps, the pendant chandelier is connected to a transformer. This prevents the bulbs from overheating and exploding. This is due to the fact that halogen products are designed for 12V.

Important! If a direct connection is made, the bulbs must be rated at 220V. If the condition is not met, the halogen lamps will simply explode.
It is worth remembering that all wires are carefully insulated. It is necessary to check their integrity throughout. This condition is mandatory requirement security.
Fastening to concrete floor
To install a chandelier on a strip, you should first mark its installation locations. To do this, you need to drill holes for the fasteners. When making a ceiling from slabs with voids, you should check how thick the concrete is in the place where the drilling will be done. In some cases, you have to step aside to secure the dowel more securely.
If it is impossible to hammer in a dowel in a certain area of the ceiling, you can simply change the position of the planks. You can also insert a wooden strip into the cavity of the slab. In this case, the bar is screwed with screws. To perform such work, you need to prepare the appropriate tools:
- perforator;
- anchors, dowels or screws;
- Victory drill;
- screwdriver
Note! Before starting drilling, care must be taken to ensure that the tool does not become dusty. It should also not be exposed to debris. To protect the hammer drill, you will need to install a disposable cup on the drill. You can also use half a rubber ball as protection.
It is worth remembering that the bar must be attached carefully, without unnecessary effort. Otherwise it can be bent. The part is installed depending on the chosen mounting method. Instead of a hammer drill, you can use impact drill. However, it is worth choosing it taking into account the power and volume of expected work.
Plasterboard ceiling
What are the features of hanging a chandelier on plasterboard ceiling? It's important to keep it attractive appearance, as well as high mechanical strength. To do this, you need to determine what type of chandelier will be. There are several recommendations:
- The place where a large pendant chandelier will be installed should be reinforced with a metal profile. This work is carried out while creating the frame of the final ceiling.
- If you are installing a small chandelier, you should purchase special fasteners. These include butterflies and folding dowels. In this case, no amplification is required.
When working, you must comply with safety requirements. Electrical system must be de-energized and ceiling structure installed as firmly as possible.
Attention! If it is impossible to de-energize the room, it is necessary to work in rubber gloves. This will ensure complete safety for the installer. Also, all work should be carried out only with high-quality tools.

Drywall is highly durable, which allows installation directly to the material. However, there are corresponding restrictions in this case:
- Since a sheet of plasterboard can withstand loads of up to 6 kg/sq. m, you should prefer a chandelier that is light in weight.
- It should also be taken into account that the plasterboard sheet may become deformed during repair of the device. For example, when you need to change a lamp, you should handle the chandelier very carefully. Also, you should not change the hanging product frequently. In addition, you cannot make new ones next to the old holes for attaching the chandelier.
First you need to consider the main options for mounting a pendant chandelier. First in ceiling material make a hole into which the dowel is then inserted.

Attention! The spring fastening element should be tightened using a nut. The butterfly is tightened using a self-tapping screw. A click will be heard. Included with the dowel is a hook. After such work, you can install the chandelier. Then the connection is made.
The wiring is connected while holding the chandelier under the ceiling. Only after that hanging device can be completely attached to the ceiling. This type of work is best done by 2 people. One will hold the chandelier, the other will connect the electrical wiring. If help is not required, it is better to make a small hook to temporarily hang the chandelier. This will eliminate mechanical damage hanging product.
Stretch ceiling
If the ceiling is suspended, you should think in advance what type of pendant chandelier will be installed. You also need to decide on the mounting of the lighting fixture.
In order not to spoil the appearance of the ceiling, as well as not to violate its integrity, you should choose the right chandelier. It can be designed for both energy-saving light bulbs and incandescent lamps. In the latter case, the cartridges should face to the side, not up. They should also be hidden in the lampshade. In the case of an energy-saving option, the pendant chandelier will not heat up.
Attention! When hanging a lamp from a tension structure, remember that from high temperature its surface may become deformed. To avoid this, it is better to screw LED light bulbs into the sockets.

In addition, before starting work, you should check the base of the lighting structure. If it has sharp edges, the film can easily tear. There are several ways to install a chandelier to a suspended ceiling:
- If the apartment has suspended ceiling, The best decision- hang the chandelier on the hook. This method will be the simplest and most reliable. However, this method can only be used in the case of hanging chandeliers.
- If over tension structure located concrete slab, and the hook has already been fixed by the builders, it is necessary to determine the height of its installation. It may be chosen incorrectly.
- If you need to change the location of the chandelier hook, you should use an anchor to install a new fastener. The old one is cut off with a grinder.
- There is also another method - a wooden embedded element is mounted in the place where the chandelier is attached. The hook is attached to it.
Hanging a chandelier on the ceiling is considered perhaps the simplest task, until it turns out that there is a hook sticking out of the ceiling, and the newly purchased beauty must be attached to a bar. It must be said right away that it is unlikely that it will be possible to solve the problem “in an amicable way.” The only exception to this rule is the case when the lamp is not heavy, and the hook is firmly concreted into the ceiling. In this case, the plank is put on a hook, and the hook is bent towards the ceiling, making room for a decorative bowl, and pressing the plank to the ceiling. The reliability of such fastening must be assessed locally, but it has a right to exist. In other cases, get ready for more serious work.
Attaching a chandelier to concrete floors
When attached to concrete floors, the hook to which it was planned to attach the chandelier may interfere decorative trim, fit tightly to the ceiling. The simplest thing is to bend it to the ceiling. But here you need to pay attention to the method of attaching the suspension. If it is walled with alabaster, then when you try to bend the hook, you risk getting in its place big hole, which will prevent the installation of the strip on the ceiling. You can try to bite the hook with wire cutters and carefully break it off, or cut it off with a hacksaw.
If the alabaster has already crumbled, you will have to lay it again. Before laying, you should make sure that the length of the remaining wires is sufficient to connect the lamp. If the wires are too short, you need to extend them in advance and reliably insulate them. In this case, the junction should not get inside the mass of alabaster.
Attaching to a plasterboard ceiling
When sheathing with plasterboard, the place and method of installing the lamps is determined in advance, but even here the situation can be corrected.
- If the lamps are light, they can be attached directly to plasterboard sheet using self-tapping screws and butterfly dowels.
- Heavier lamps are attached to the base of the ceiling. Instead of self-tapping screws, anchor bolts are used if the distance from the ceiling to the sheathing allows. It is important here not to overtighten the bolts that hold the fastening strip, since there are no embeds under the drywall. First you need to tighten the anchor tubular wrench to wedge the anchor, and then unscrew them and attach the strip, which can simply lie on the heads of the bolts.
- If the distance between the sheathing and the base of the ceiling is large, the bolts in anchors are replaced by studs, which are screwed into the anchor using two nuts. The length is cut locally, since it is impossible to determine exactly how much stud the anchor will “tighten.” With this type of fastening, you can do without a fastening strip altogether by choosing the distance between the studs equal to the distance between the holes in the decorative bowl.
To avoid the troubles described above, plan in advance not only the placement of the lamps, but also their type. Correcting unexpected situations is more difficult than preventing them.