Plasterboard structures can be found in almost every modern interior, because it is practical, cheap and aesthetically pleasing. You can create them yourself by fitting into any style. Be it classic or high-tech, the variability of forms allows you to design a unique design of a plasterboard ceiling in the kitchen, which will become the highlight of the room. About the features of this material - in our article!
Types of ceilings for the kitchen
Plasterboard ceilings are a type of suspended structure that is installed to serve decorative or practical purposes. But due to the low resistance of the gypsum board to moisture, it is not recommended to mount it in the bathroom, where this indicator is quite high. But for the kitchen, this is an excellent solution that will help hide surface imperfections or hide communications.
Obviously, not only because of this, products from gypsum plasterboard are so popular. The fact is that it is a very plastic, malleable material, with the help of which it is possible to form both figured decor and smooth, perfectly even partitions with a complex lighting system. Based on the form, installation method and purpose, there are three types of plasterboard ceilings, each of which should be discussed in more detail.
Plasterboard single-level ceilings
This type is the simplest option, which can serve as an independent element of the interior or the basis for more complex structures.
Single-level plasterboard ceilings in the kitchen consist of a metal frame that is firmly fixed, cladding and recessed lighting fixtures. Even a beginner in repair work can build this, the main thing is to securely fix the base.
GKL sheets are fitted to each other, and all joints are carefully puttyed - this helps to create the effect of a perfectly even coating. An empty space is formed between the drywall and the main partition along the height of the suspensions, in which built-in lighting is usually hidden.
In general, despite their simplicity, single-level ceilings look quite stylish and are able to blend harmoniously with minimalistic or modern style. To expand the design possibilities, you can play with colors, patterns, make the coating matte, glossy, or simply paste over with wallpaper.
Single-level plasterboard ceilings have a number of advantages over other types. Firstly, they do not lose their appearance even because of the subsiding foundation. Secondly, they allow you to visually align the original finish without reducing the height of the room so much, which is especially important for small-sized kitchens. Thirdly, it will protect against too noisy neighbors, providing better sound insulation. Simple solution for simple design.


Multilevel plasterboard ceilings
Having learned how to create a single-level structure, you can stop at this, or you can "attach" to it a second or third level (smaller in area) for a more complex view. The second option refers to multilevel plasterboard ceilings and requires a certain skill from the creator.
The following drywall tiers can be not only straight, but also curved, for which it is necessary to use a special curly frame and sheets. At the same time, it is necessary to carefully think over each level so that it does not put pressure on the visitors of the kitchen, does not deform the space. Depending on the desired effect, a certain type of multi-level ceilings is chosen, of which there are only three:
1. Frame products. This is a kind of box with steps, which is located around the entire perimeter of the room. The center of the room becomes the highest point, making it seem more spacious. Levels can be symmetrical or asymmetrical, completely changing the geometry of the space. The impression is enhanced with spot lighting.
2. Diagonal structures. They help to divide the kitchen into two parts, visually highlighting one of them. This is done as follows: a dividing line runs from corner to corner, on one side of which there is a protruding part, and on the other not. Accordingly, they are at different levels. For more effect, you can experiment with colors or types of coatings.
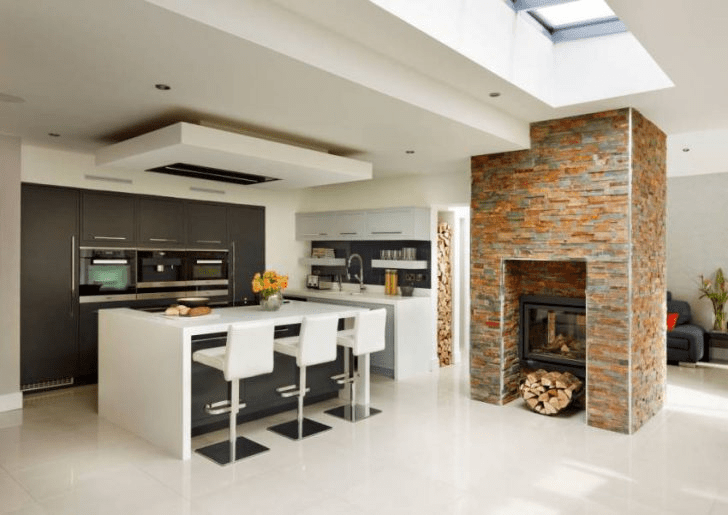
3. Zonal view. Suitable for rooms that combine several zones at once. This is true for kitchens combined with a dining room, as well as a living room. You can select any part of the room by building a second level of the desired shape above it. Such a ceiling above the bar counter or dining table will look stylish, additionally illuminating this part.
Thus, along with the complexity of the installation work, the functions of multi-level plasterboard ceilings also become more complicated. With their help, you can visually change the size of the kitchen, make it more voluminous, highlight certain functional parts. But the main thing is that your interior will become more diverse and unique.


Shaped plasterboard ceilings
Such ceilings are also called combined models, since they can combine several types at once to implement complex design ideas. These are not just smooth curves or clear stripes, but complex shapes that, as a result, will become the central object of the kitchen. There are practically no clear classifications here, as unique ideas rule the show. But we will try to highlight the main motives of the combined structures in order to demonstrate their capabilities.
- Like a drawing on a canvas, plasterboard figures "grow" on a single-level ceiling, acting as an independent design element. Depending on the interior concept, these can be flowers or even silhouettes of living creatures. To make the "image" stand out more, it is highlighted at the edges.
- A popular motive for modern style is abstract patterns that give the kitchen a mystery and uniqueness. For example, you can create a spiral deformed structure and apply multiple shades when painting.
- The effect of a UFO hovering over the kitchen can be achieved by using fitting sleeves and metal pins, which are attached to the base in a special way. It feels like a plasterboard structure is floating in the air without touching the ceiling surface.


Determining the shape of the plasterboard ceiling is one thing. But in order to fully reveal the full decorative potential, it is also necessary to think over the lighting system.
There are two options for lighting ceilings:
1. Open type, when the luminaires are mounted in a hole or suspended, forming a separate part of the upper ensemble.
2. Concealed type, when the lamps are hidden in special niches between the plasterboard sheets and the original surface. This is a more popular option, which creates soft, unobtrusive light, as well as the effect of a floating structure.
The most interesting thing begins when choosing lamps, since their range and possibilities are quite wide.
- Spot. The most common type of luminaire for suspended ceilings. There are models with the function of controlling the direction of light, although they are more expensive.
- LED strips. They are easy enough to be mounted in the resulting niches. You can control the strength and intensity of the lighting with a special controller. The advantage of this type is also the relative safety of the devices, since they do not generate heat. To enhance the atmosphere in the interior, you can purchase multi-colored lights.
- Neon. It is a neon tube, which, due to its flexibility, can take a curved shape, smoothly outlining the figures from the gypsum board with unusual light.
- Chandelier. A familiar type of lighting, the installation of which, probably, any owner has encountered. For plasterboard ceilings, the same principle is used. At the same time, chandeliers are often combined with other lighting options, placing it in the center of the ensemble.
When choosing the best option for lighting a plasterboard ceiling for a kitchen, keep in mind that solving practical problems is more important than decorative ones. Unlike the living room, where we spend most of the time relaxing, in this space it is important that the working area is as illuminated as possible, without creating inconvenience during cooking. The ability to adjust the light output is a very handy feature.


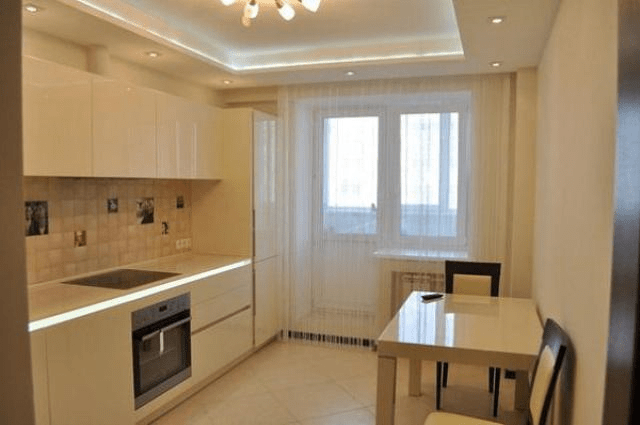
Owners of small kitchens probably know that this space should be filled with a minimum number of items, decorated with minimal decor and "painted" in light colors. But the design of the ceiling can also take meters away, or vice versa - save.
Of course, for rooms with low ceilings, it is not recommended to install additional elements on its surface. But what if she's not perfect? Plasterboard single-level ceilings are the ideal solution to all problems.
For decoration, it is recommended to choose light shades that are several tones lighter than the walls. Avoid drawings, patterns, or lines that create a borderline for the ceiling, making it smaller and smaller in size. Acting on the principle "the less is the better", you can take advantage of all the advantages of gypsum plasterboard structures and transform the interior.


Plasterboard ceilings are an excellent solution for the kitchen, which will allow you to hide surface imperfections or become a design advantage of the room. Some may be surprised by the variety of design options, but in fact there are even more of them. Proof of this, as well as an additional source of inspiration, is our selection of photographs. Happy viewing!


In modern realities, a plasterboard ceiling in the kitchen, regardless of the size and proportions of the room, remains the best solution to the problem of finishing the ceiling space. First of all, because of the perfectly flat and flat surface of the gypsum plasterboard. Any, even the most fantastic, ceiling construction in the kitchen, thanks to the high stability of drywall, will retain its original shape, design and quality after 20 years.
Duplex plasterboard ceiling in the kitchen
The main advantage of drywall, which made the material extremely popular, was and remains the ideal geometry of the sheets. To get an absolutely flat and flat ceiling surface, you only need to fulfill two conditions:
- Competently plan and fix the suspension mounting system to the ceiling;
- Mount plasterboard ceilings in the kitchen and seal the joints between the plates as carefully and thoroughly as possible.
Achieving the same quality using plaster, even on a gypsum base and with mesh reinforcement, is an order of magnitude more difficult, and in addition, considerable experience and skills in working with ceiling plastering will be required. Whereas even a novice finisher who is familiar with the basics of assembling drywall structures can assemble a suspended ceiling from plasterboard in the kitchen.

Pros of drywall on the kitchen ceiling
In addition, the construction of a suspended plasterboard ceiling allows you to solve a number of secondary problems:
- Improve sound insulation and thermal insulation;
- Remove and hide behind the plaster screen the lines of kitchen communications, primarily ventilation, electrical wiring and pipes.

Advice! It is possible to build a suspended ceiling from plasterboard only for kitchen premises in houses aged three years and older.
In new buildings, before proceeding with the full decoration of the ceiling and walls, you have to wait for the complete end of the shrinkage processes. Otherwise, there is a serious risk of the harness breaking and breaking.
If it was only about decorating communications in the kitchen, then one could do with a suspended ceiling with tiles or plastic panels. This solution is simpler and cheaper to implement in practice. They resort to finishing the ceiling space with suspended structures if it is required to build a special design ceiling from plasterboard in the kitchen.

Varieties of plasterboard ceiling structures
Almost always, the design of a plasterboard ceiling in the kitchen, a photo, is developed at the stage of planning the interior of the kitchen, determining the layout of the furniture set, arranging lighting and a place for rest.

Designing a kitchen ceiling design is considered a rather difficult task, since it is necessary to link into one whole, at least, the decorative wall decoration, the design style of kitchen furniture and the lighting system.
Formally, all suspended ceilings for the kitchen, assembled on the basis of sheet plasterboard, are divided into two large groups:


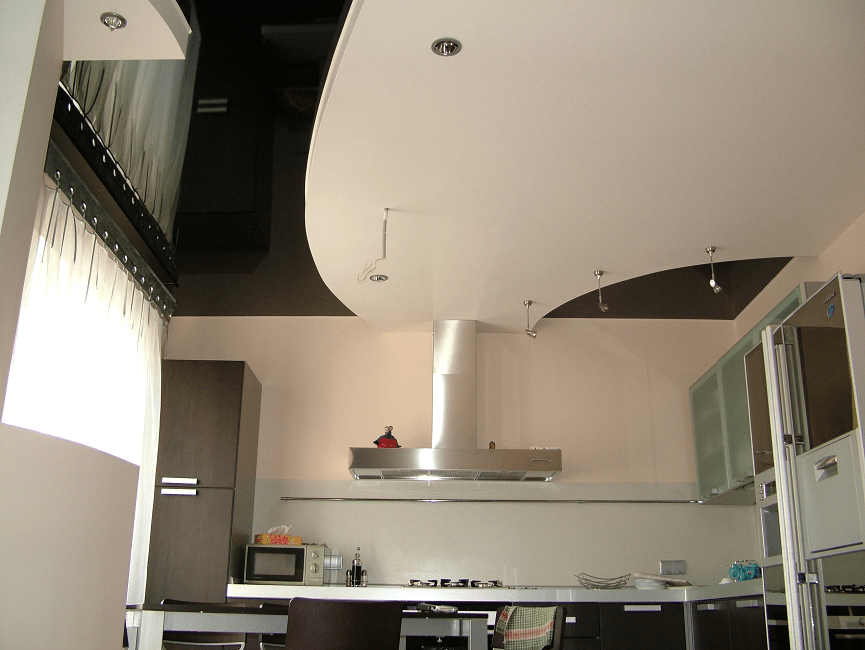
Box-shaped structures are widely used for masking ventilation pipes, laying tunnels for kitchen umbrella hoods located in a non-standard location, and redistributing lighting. As a rule, the lower level of the ceiling is located above the countertop, wall cabinets, in the area of the ceiling plinth. In the center and in the recreation area of the kitchen, the upper level is usually located, which provides maximum comfort and a good supply of fresh air.
Figured plasterboard ceilings in two levels are used mainly as a decorative element. The kitchen is usually planned as utilitarian, with the maximum level of functionality, so the number of decorative elements is not as large as in the case of a hall or a bedroom. Figured plasterboard ceilings in the kitchen photo make it possible to make the interior of the room more spectacular and relaxed.

Plasterboard ceiling design in the kitchen
Planning and developing the design of a plasterboard ceiling in the kitchen, photo, requires considerable effort, since almost always you have to find a compromise between the shape and size of the tiers of the suspension system and the maximum thickness of the entire structure. Unlike stretch ceilings, plasterboard structures have one serious drawback - each level "steals" 15-20 cm in height from the kitchen space.
Therefore, for small kitchens, they are limited to the simplest options for two-level ceilings. But even in such conditions, a two-level plasterboard cladding, speaking in terms of interior design, allows you to "expand and raise" the space of the room.

Simple and functional plasterboard box ceilings
The main advantages of drywall box structures are two of the most obvious. Firstly, the box is ideal for almost any room interior. The small second level, which runs along the perimeter of the ceiling, turns out to be equally appropriate both in a large spacious kitchen with a corner set and light colors of decoration, and in a small room.
Secondly, the box-shaped decorative plasterboard finish is relatively easy to make with your own hands. At the same time, the simplicity of the design does not at all mean the primitiveness of the design.
For example, a simple plasterboard skirting with spotlights and interior lighting allows you to achieve the effect of high ceilings in the central part of the room.
At the same time, most of the ceiling surface remains under the upper tier, that is, the kitchen room practically does not lose volume, as might be expected due to the use of a suspended decor structure.
The simplicity of the box structure does not mean that its design is limited to primitive plasterboard frame structures. For example, the skillful use of boxes with a podium in the center of the ceiling provides the effect of a screen, when all the main colors of the kitchen interior are collected and concentrated on the ceiling.

How to enhance the design of box ceilings
Another technique widely used in planning suspended plasterboard box ceilings is associated with the simultaneous use of a stretch polymer ceiling and a standard plasterboard box.

The mirror surface of the polymer membrane, illuminated by the plasterboard frame lamps, perfectly reflects the light, due to which the height of the ceilings is visually almost doubled.

A similar effect of a visual increase in the height and volume of the kitchen space can be achieved using multi-level ceilings laid with steps, as in the photo. Due to the use of three levels, the peripheral part of the ceiling space loses in height, but in this case such a loss does not play a special role, since the lower level occupies the corner zone.
Shaped plasterboard ceilings
A truly complex and original design of the ceiling surface can be obtained only with the help of complex curly constructions from plasterboard sheets. In comparison with box-shaped structures, a figured ceiling is a real aerobatics in kitchen design, therefore, serious experience in working with a profile and drywall is required for the development and installation of such structures.
Curly ceilings can be simply stunningly beautiful and look organic in almost any kitchen interior.

The curly ceiling concept allows you to realize two of the most popular modern design ideas:
- Kitchen room zoning;
- Color saturation and complement to the interior of the kitchen.
Thanks to the use of curvilinear inserts of complex geometric shapes with the help of ceiling decor, you can divide the kitchen room into several important zones.
The cooking area remains darkened and less bright, the dining table sector is illuminated more intensely and brightly. The resting place is equipped with the most comfortable type of lamp.

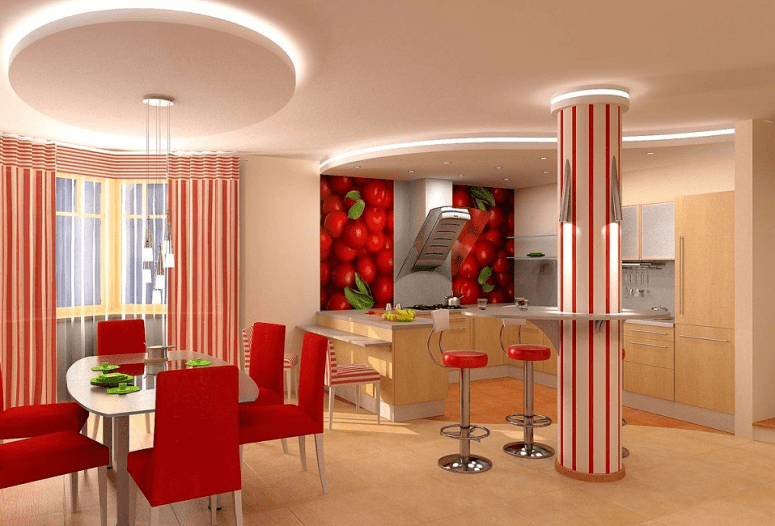
Several curved and circular sections on the kitchen ceiling can soften the contrasting bright red used in kitchen furniture.
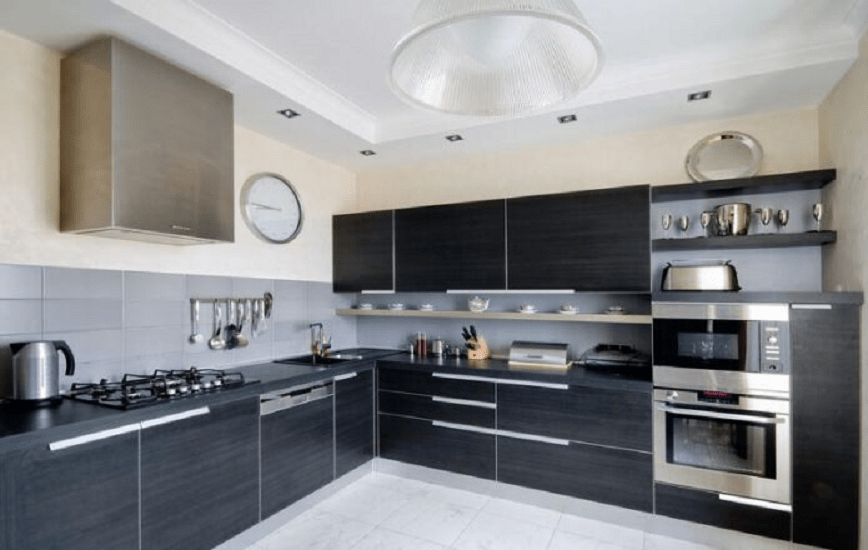
The monochrome division into black and white zones of the plasterboard ceiling is not only able to enhance the color scheme of the interior, but also helps to skillfully hide the details of the ventilation system hidden behind the suspended decor.
An interesting and new solution is considered to be the use of inserts with stained-glass windows and photowall-paper on the upper tier of the suspended ceiling.

Illuminated plasterboard ceiling in the kitchen
To a large extent, the expressiveness of the kitchen interior depends on the correct location of the lamps, their type and the number of lighting points. Traditionally, three types of lighting are used for plasterboard suspended ceilings.

The most common illumination option is the distribution of spotlights on the suspensions of the lower tier. This type of luminaire creates uniform background lighting throughout the entire kitchen area.
A more modern version of the backlight is based on two and three-color LED strips. The tapes laid in the upper tier of the suspended plasterboard ceiling provide soft diffused light; if necessary, you can change the color and saturation of the backlight, thereby enhancing the color background of the kitchen interior.

The third type of backlight is used for localized lighting. This can be the front door to the kitchen, the dining table, or an additional cutting table by the countertop.

Do-it-yourself plasterboard ceiling in the kitchen
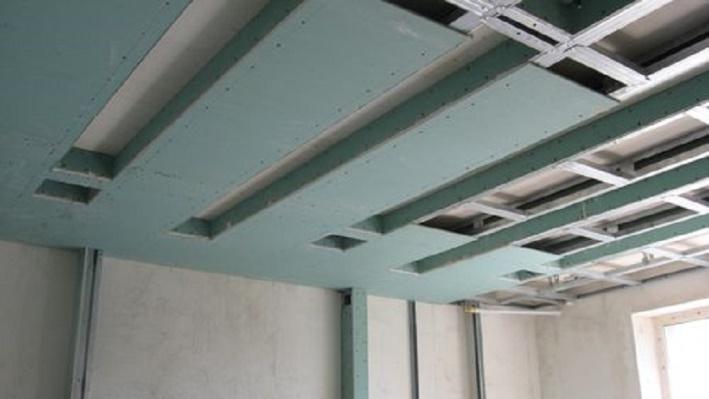
Regardless of the characteristics of the room, only moisture-resistant green gypsum boards and galvanized UD and CD metal profiles are used to assemble a plasterboard suspended ceiling. No wooden lathing or conventional plasterboard. All elements of the ceiling structure must be moisture resistant, since the kitchen has always been and remains the largest producer of water vapor and condensation.
Marking of the future suspended structure
It is necessary to start work by applying the marking lines for the installation of the supporting metal profile on the walls and ceiling surface. It is best to rent a two-beam laser level for these purposes.

We fix the device on the wall, turn it on and adjust it, use a ruler or tape measure to measure the distance from the horizontal laser beam to the ceiling.

At the lowest point of the ceiling surface, the distance from the laser beam to the ceiling must be at least 4 cm, therefore we adjust and lower the marking line issued by the laser to fit at least 5-6 cm.After the final adjustment along the laser line, you need to pull the painting cord or duplicate horizontal markings with a simple pencil.

For your information! In any room of the kitchen or other living space, the ceiling ceilings always lie crooked, with a slope and height difference on the walls up to 5-6 cm.
After applying horizontal markings on the walls, it is necessary to draw the ceiling lines for the installation of the supporting profile of the CD suspension, in increments of 60-70 cm.
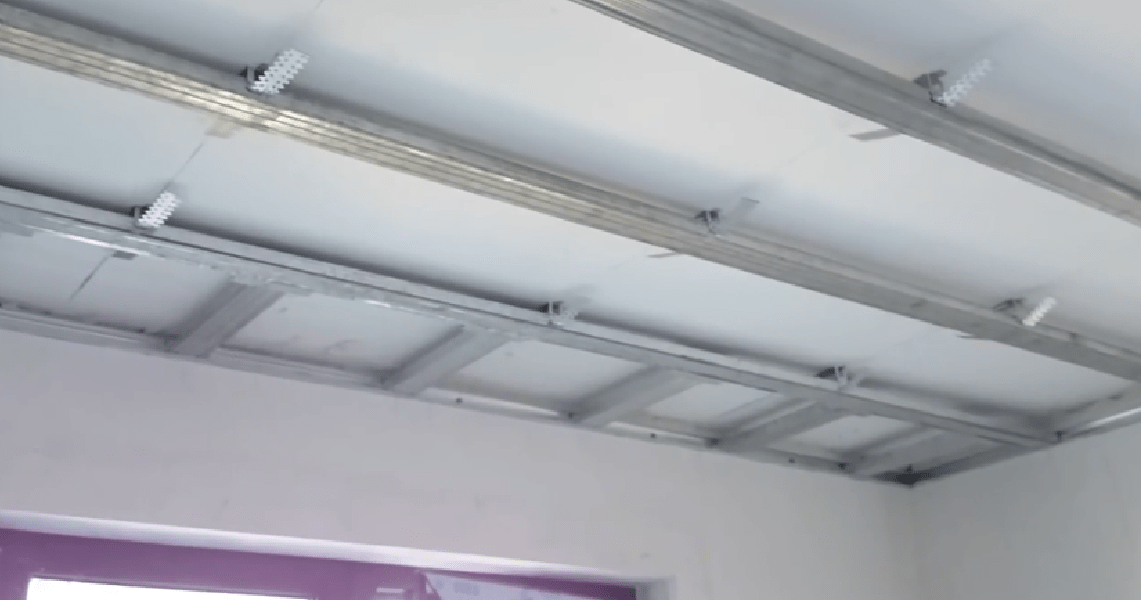
Installation of a profile on the kitchen ceiling
The first step is to install and fix the UD profile guides on the walls of the kitchen according to the horizontal markings. To do this, we drill holes in the wall and profile with a step of 30 cm, we hammer in the plugs and wrap the mounting screws.

To install the galvanized profile CD, mark the installation points of the U-shaped strip on the opposite walls of the kitchen. Each section of the CD profile is wound inward and placed on the shelf UD of the frame. Until the crabs are installed, the CD strips remain “hanging” in the air, relying only on the UD strips sewn to the walls of the kitchen.

Such a design will clearly not withstand the weight of drywall, especially if the kitchen ceiling is two-level, with numerous inserts and insets. Therefore, the next stage in assembling a structure from sheet plasterboard will be the installation of "crabs".
Each "crab" is a short perforated tape that is wound behind the supporting profile and sewn to the kitchen ceiling. Then the edges of the tape are folded back and placed on the “cheeks” of the CD profile.

Before attaching the edges of the ribbons under the profile, a marking cord is pulled between the opposite walls of the kitchen, along which the height of the installation and fasteners of the CD profile is adjusted.
Reinforcement of the suspension system and installation of drywall
Two-level ceilings in the kitchen with additional boxes and decorative elements always require reinforcement of the suspension system in the places where additional loads are attached. Despite the apparent lightness, gypsum plasterboard, which is 98% gypsum, has a significant weight, therefore, at the place of installation of the boxes, you always need to attach additional spacers and assemblies that increase the rigidity of the supporting frame.
Be sure to put jumpers and spacers in the places where fixtures or ventilation elements are installed.

If additional suspended podiums or built-in niches are provided in the design of the kitchen ceiling, for each element it will be necessary to cut its frame from the galvanized profile, which will subsequently be sheathed with pieces of drywall.
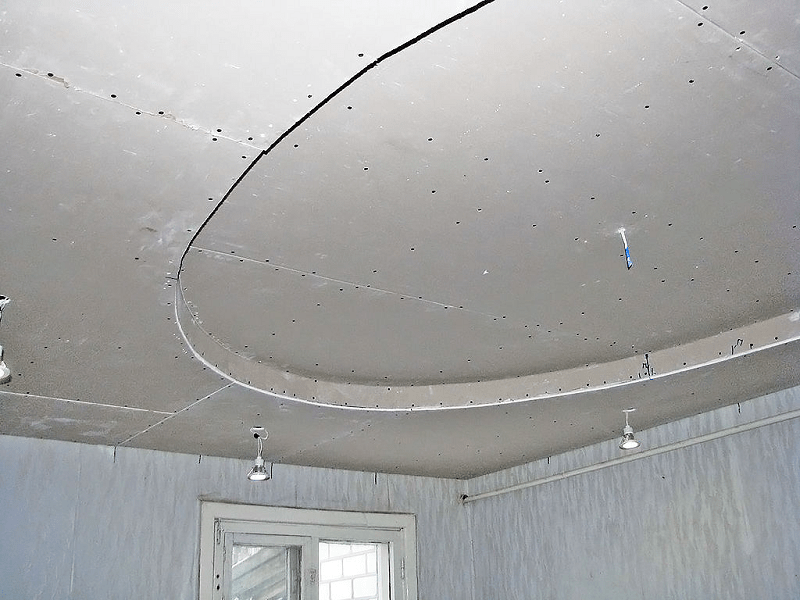
For fixing curved figures, the suspension profile is retrofitted with a mounting rail with split edges. Every 4-5 cm, a cut is made on the horizontal flange of the profile, which makes it possible to bend the bearing profile exactly along the curved contour of the drywall sheet.
The lines of joints of drywall sheets are also reinforced. To prevent cracking of the seams between the kitchen ceiling cladding, both edges of the mating sheets must be attached to the CD backing profile.
The bulk of the drywall is attached to the kitchen ceiling with self-tapping screws. In places of transition from the upper level to the lower material can be glued with acrylic glue, for example, "Moment" or "Liquid nails".
Finishing the assembly of the ceiling in the kitchen
After laying drywall, in order to relieve stress in the ceiling lining, first of all, the seams are cut at the transition points. After that, all joints are cleaned, primed and sealed with plaster putty.
Next, the lower level of the ceiling is assembled in a similar way, all the transitions to the upper level are glued with a mesh and sealed with putty. At the end of the work, the hanging decor is primed and painted with acrylic enamel.
Conclusion
The plasterboard ceiling in the kitchen is de facto becoming the standard or typical solution to problems with curved ceiling ceilings. Low cost of work and good decorative data make it possible to compete with the most expensive tensioning systems. In addition, the plasterboard structure is easy to maintain and repair, which cannot be said about more modern types of kitchen ceiling finishes.
Consider the advantages and disadvantages of plasterboard ceilings in the kitchen, and also talk about which form it is desirable to choose for the kitchen.
Advantages and disadvantages
Gypsum plasterboard, or gypsum plasterboard, is an environmentally friendly material consisting of gypsum lined with cardboard. Installation of such a ceiling takes 1-3 days, depending on the area of the room and the complexity of the drawing. But the ceilings are perfectly flat, beautiful and durable.


pros

Minuses
- Installation should be carried out by an experienced technician. Any error in the design, an uneven frame will lead to cracks.
- A neat paint finish is required so that no seams are visible.
- Plasterboard ceilings are not recommended to be installed in new buildings. A house that is still shrinking will lead to distortion of the frame and the appearance of cracks.
Thus, plasterboard ceilings for the kitchen are ideal. Moreover, they can be combined with popular tensioning structures.

Varieties of designs

A distinction should be made between the ways in which drywall is attached to the ceiling.


Combined ceilings are perfect for modern styles when drywall is combined with. In this case, you can also think over the play of the color palette by choosing the color of the stretch ceiling to match the color of the furniture or making it, on the contrary, contrasting.

Types of plasterboard ceilings
Types of plasterboard ceilings are distinguished by the number of levels:


Choosing a plasterboard ceiling design for the kitchen
With the help of the shape of the ceiling, you can not only emphasize the style of the interior, but also visually change the shape of the entire room:


Please note that the shapes that you use for drawing on the ceiling must be repeated in the interior. The combination of, for example, curly smooth curves on the ceiling and furniture with strict rectangular lines looks extremely sloppy and inorganic. Conversely, a strict square on the ceiling, suitable for a minimalist style, will look contrasting if you have furniture with smooth, rounded shapes.

To achieve completeness in the interior, you can continue the ceiling pattern on the wall. So, for example, wavy lines smoothly flowing into the same lines on the wall create a unique interior. It would be good to repeat the semicircle above the working area of the kitchen, setting, for example, a semicircular island. The same bar drain can be distinguished if you build a drywall box above it of the same shape as the counter itself. By the way, in this case you will not need to spend money on lamps, since built-in or chiseled lamps on the ceiling provide excellent lighting.
Choosing paint
Drywall is considered a versatile material that can be painted or pasted over with wallpaper, finished with textured plaster, decorative molding, and even create frescoes.


Since we are talking about the kitchen, where you have to clean up more often, painting is considered the best option. Consider which paints work best:
- Water-based paint is the most economical option. The ceiling is bright. But you will have to repaint often, since the water emulsion is easily soiled and does not like moisture. The undoubted plus of this choice is a large selection of color palette.
- Water dispersion paint - moisture resistant, does not wash off for a long time. This ceiling can be wiped with a damp cloth. Also has a rich color palette.
- Acrylic or latex based paint is an excellent choice for plasterboard ceilings. Thanks to this paint, a coating is created on the ceiling that is resistant to steam and moisture. The surface can be easily washed.
- Silicate-based paint is also moisture resistant. The advantage of this paint is that the addition of aniseptics is not required.
- Silicone paint has absorbed all the best from acrylic and silicate. It is plastic, easily bridges cracks up to 2 mm, and after application forms a protective film.
Important! Pay attention to the combination of colors and interior style. So, classic styles prefer matte surfaces more, therefore it is better to choose matte paints in soft pastel colors for painting. But the glossy ceiling will perfectly emphasize the modern design of the kitchen.

Thus, plasterboard ceilings are capable of radically transforming the interior of the kitchen, making it stylish, functional and beautiful.
The choice of materials for finishing the kitchen is always not easy, since something is constantly being prepared in the room, steam is released, fat and oil fly in different directions. Therefore, in order not to become a constant hostage of cleaning, materials are chosen for the kitchen, which are subsequently easy to clean. Is drywall such a material, would it be appropriate in the kitchen? What are its advantages and disadvantages? We will analyze these questions below.

One of the undoubted advantages of a false ceiling in the kitchen is the ability to hide flaws. If your ceiling has defects, then the suspended ceiling will completely hide them. Also, such a coating does not require any surface preparation. There is no need to putty or prime the ceiling.
Plasterboard does not deform, unlike plastic, so you can place lighting fixtures as you like, without fear of damaging the material. At the same time, it is cheap, even together with the purchase of the rest of the materials necessary for fixing, you will not have to spend a lot of money. In addition, its installation is very easy, which saves on hiring specialists. Anyone who has at least some idea of repair work can install a drywall structure with their own hands.

The appearance of drywall structures is diverse. Single-level, multi-level. The choice is so wide that it will definitely bring any project to life. If you want to make waves on the ceiling, circles, squares, steps, or somehow unusual to design a light zone with various light elements, all this allows you to make drywall.
All of the above refers to the advantages of a plasterboard ceiling, but it also has disadvantages.
Drywall does not tolerate moisture. In other rooms, this may not have played a role, but in the kitchen, where steam rises and the possibility of flooding, it is very likely that this can be fatal. Also, frequent cleaning seems to be very dubious, you cannot wipe it with a damp cloth, which complicates the cleaning process. You can use waterproof gypsum boards, but this will raise the total cost in price. Also, to repel moisture, drywall is covered with moisture-resistant paint.
Of course, installing the right ventilation system in your kitchen will save your ceilings. There should be a hood above the stove and then drywall will be an excellent choice for finishing the ceiling in the kitchen.

How to make a plasterboard ceiling with your own hands
Plasterboard ceilings in the kitchen can be made independently, without calling specialists.
Required tools:
- Level
- Roulette
- Perforator
- Screwdriver
- Gon
- Pencil
- Hacksaw
- Spatula and putty
- Reinforcing tape
Lighting. They must be purchased before installing the ceiling.
Based on the type of lighting, decide how many centimeters below the suspended ceiling will be from the main one. If you have spotlights, then you need to retreat more than 8 cm, if not, then 5 cm will go.

An important stage of work is marking. Draw a horizontal line across the entire area of the room. You want to measure all 4 corners and the center of the room. The lowest angle will be the starting point. Mark the desired distance from the floor and draw a horizontal line along the level to all corners. If you have a laser level on hand, it is better to do this work with it.
Drill the holes for the dowels along the drawn lines with a drill, a distance of about 35 cm. Screw in the profiles. After fastening the profiles, it is the turn of the hangers. They are fixed on the ceiling at a distance of 65 cm. For the convenience of work, mark the markings in advance. The main profiles are inserted into guides and fixed on hangers. After that, they need to be bent.
The secondary profiles are attached to the main profiles at the joints of the drywall sheets. You now have a frame for the sheets. Next, it's up to the wiring. You need to lay all the wires in the grooves. Route the wires to the location of the lamps. Next, it's up to the wiring. You need to lay all the wires in the grooves. Route the wires to the location of the lamps.

After all of the above, it is the turn of fastening drywall sheets to the frame. This process is not easy, it takes place in several stages. Before installation, you need to determine how many sheets are required. There are usually more sheets than the perimeter of the room, so they need to be cut. Cut the sheets with a hacksaw or clerical knife, the ends should fit exactly into the frame. The cardboard is cut on both sides and then gently breaks if the knife does not go right through. The cut edge should be straight. Trim if necessary with a knife.
Now you need to cut holes for the lamp, lamps, sockets. Place the lighting fixtures on the sheet and carefully cut the hole with a hacksaw.
Sheets are attached to the frame either longitudinally or across. If you decide to mount across, then the sheets must be placed perpendicular to the bearing profiles. If longitudinal, then in parallel with the bearing profiles. In the presence of additional laths, the installation of sheets is carried out from the corner, if not, then from the end or center. Install self-tapping screws 10 mm from the edge of the sheet, screws from the front side perpendicular to them. The screws must not go through the cardboard. Do not install the sheets close to the wall, they must remain on the profile. When attaching, it is better to work in pairs: one holds, the other holds. The sheets are fitted to each other and fastened to the frame with screws.

It is best to wait a couple of days before applying the putty. So you can find out if there are any defects. The putty can be used to treat the joints or the entire ceiling. It depends on the quality of the putty itself, it is better to apply a cheap one around the entire perimeter and paint with a roller. Before work, prepare the seams by first cleaning them with a knife. Apply a small layer of putty, then tuck the reinforcement tape inside and apply another layer of putty. After that, you should wait a couple of days until the seams are completely dry. Remove all irregularities with sandpaper. After drying, the surface is painted.

If you decide to make a multi-level ceiling, then you do not need to paint at this stage. On a piece of paper, draw a drawing of the future curly frame and outline the markings on the ceiling. The width of the second level is equal to the width of the first. Fix the guide profile, attach the main guides to it. The profile needs to be bent along the radius of the required sections. Route the lamp wires to the desired locations. Saw the sheet of the required shape and attach to the profile, as before on the first level. Then it remains only to close the resulting box with a sheet of drywall and install the lamps. Putty the box, wait a couple of days and paint. Your ceiling is ready.

Ceiling design in the interior of the kitchen
Which plasterboard ceiling to choose in the kitchen depends only on your imagination. There are general types of designs that you can change depending on your desires.
The most common option is just a flat single-level ceiling. It hides all flaws and takes up a minimum of height.

A little more difficult to install, but multi-level ceilings look more beautiful. The second level can be made curved, straight, wavy. But it's best not to do it if you have a low kitchen. Tiered ceilings will eat up a lot more space.

Shaped ceiling. Very difficult to install, better not to do it yourself. This design can be decorated with a central decorative element.

Frame ceiling. One of the simplest options for a multi-level ceiling. Consists of several steps. Typically, this design is complemented by several lighting zones.

Diagonal ceiling. The main design element of such a ceiling is various wavy or straight structures.

Zoned ceiling. Such a ceiling allows you to divide the room into several zones. It is very convenient when decorating the kitchen, you can divide the dining area and the cooking area.
Plasterboard ceilings often go side-by-side with different lighting layouts. You can create a spectacular design with a chandelier as the central element.

There is also an option without accents, just distribute different lamps or LED strips along the radius of the ceiling, creating different lighting. This option is convenient for creating different zones and degrees of lighting.