How to securely hang a chandelier on a concrete ceiling. How to hang a chandelier on concrete ceilings A chandelier is hung
How to hang a chandelier from the ceiling with your own hands? It would seem like a question. Slide the upper cap of the chandelier down, hang it on a hook, connect the wires, slide the cap on - that's all. But even in this, the simplest case, difficulties can arise. Which? Let's figure it out.
How are chandeliers hung?
There are four ways to hang chandeliers:
- The ceiling hook is the oldest and most reliable. Requires a solid ceiling and special attachment in him.
- Standard mounting plate(bracket) - due to the distribution of the load on several attachment points with a small weight, the chandelier is quite reliable when fastened with dowel-nails to plastic sleeves.
- The cross mounting plate works similarly to the straight mounting plate, but has more attachment points. It is used for chandeliers-plafonds adjacent to the ceiling.
- The I-beam mounting platform is designed for mounting heavy chandeliers at several points.
All these mounting methods do not allow you to pull the chandelier close to the ceiling in low rooms. Mounting strips are curved to allow wires to exit. Further in this article, the refinement of the mounting plate will be described, which allows you to press the chandelier close to the ceiling.
Installation of regular fixtures of chandeliers is simple: self-tapping screws in clips-sleeves. The diameter of the self-tapping screws can be determined by the mounting holes in the mounting plate; self-tapping screw length - 40-60 mm. For low ceilings, it is preferable to use ceiling chandeliers, without a rod.
Much more attention should be paid to safety when installing chandeliers: when working on a hill, even a slight electric shock is fraught with a fall and serious injury. It will also consider various non-standard situations related to the suspension and installation of chandeliers: suspended ceiling with a chandelier, how to hang a chandelier on drywall.
Phase indicator and wire phasing
First of all, you need to check the phasing of the wires for the chandelier. The neutral wire (neutral) is common, and the phase wires are connected to the lamp sections through the switch.
Phase / zero wiring is determined by a special device - a phase indicator. It can be purchased at any electrical supply store. The indicator is inexpensive. Phase indicators come with a neon light bulb and a quenching resistor and electronic ones.
The indicator looks like a screwdriver. When using it, the device is lightly clamped between the index and middle fingers of the right hand in the place intended for this; it is either highlighted in color, or has a notch and is separated from the sting by a safety cuff. TOUCH INDICATOR STING DURING OPERATION DANGER TO LIFE!

When checking the phasing, the thumb touches a special metal terminal on the end of the device handle, or a button in the electronic indicator, and the indicator sting touches the wire under test. If it is phase, the lamp flashes or the corresponding symbol appears on the display. IT IS IMPOSSIBLE TO HOLD THE WIRE WITH THE OTHER HAND, EVEN FOR THE INSULATION! The indicator works ONLY ONE - RIGHT - HAND!
Before checking, turn out/turn off BOTH plugs. Then the ends of the wires for the chandelier sticking out of the ceiling are exposed, the ends are spread apart, the plugs are turned on, and the switch is turned on. A stool is placed on a rubber mat, and from it, with the right hand, a phase wire or two phase wires are found with an indicator if the chandelier switch is double. Then the switch is turned off without touching the plugs, and the phasing is checked again. Now the indicator should not glow when you touch any of the wires.
If the phase remains somewhere, the switch must be switched to a phase break, and the neutral wire, if the switch is unipolar, should be switched directly. This work is simple, and picking the wall is not required. But, if you are not an electrician, then you need to invite a specialist for it. No jokes with electricity are in vain.
Search wiring
Before drilling holes for fasteners in the ceiling, you need to determine where the wiring lies so that you do not interrupt it when drilling. For reliability, the search for wiring must be done under load, i.e. under current. Give the load on the wiring as follows:
- Turn off the plugs and the chandelier switch.
- The wires sticking out of the ceiling are temporarily increased to the floor; joints are insulated with electrical tape.
- Instead of chandelier sections, cartridges for incandescent lamps are also temporarily connected.
- Light bulbs are screwed into the cartridges by at least 60 watts, and better - by 100-150 watts.
- Plugs and switch included; you can start looking for wiring.
The search for wiring is best done with an electronic indicator; neon indicator works only in direct contact with live parts. There are special devices - wiring finders, but they are more expensive, and the accuracy is no more than two thicknesses of plaster. If the wiring is also hidden in strobes, then the error will be about 5 cm, which is not enough. The indicator at any depth of occurrence gives an accuracy of 1-2 cm.
The indicator is led by placing a finger on the button along the ceiling perpendicular to the intended direction of wiring. When the phase icon appears on the display, make a mark with a pencil and drive on. When the icon disappears, a second mark is made.
Then the same place is passed in the opposite direction; there will be two pairs of marks. In the middle between the internal and lies the wiring. Then they shift by 15-20 cm along the wiring and the search is repeated until the end of the working area.

Mounting the chandelier on regular fixtures
Mounting a chandelier on standard fixtures comes down to wiring power wires for sections of light bulbs. When checking the phasing of the wiring, the neutral wire must be immediately noted somehow, at least by bending it close to the ceiling with the indicator sting. Then the plugs are turned out / turned off and the wires are brought into the chandelier.
In modern electrical appliances, the neutral wire is always yellow with a longitudinal green stripe, and all wires are pre-wired into the connector - the terminal block. The neutral wire of the wiring is connected first: insert it into the neutral terminal and tighten the screw. Then the phase wires are connected. They push the cap to the place - the work is over.
And if the wiring in the room is of two wires? Or grandfather's chandelier, or antique, and you can't see where the phase is, and where is zero?
In the first case, a small piece of the same wire section is added to the phase wire (PLUGS - OFF!) And both sections of the bulbs are switched on for one phase. The whole chandelier will be turned on with one switch.

chandelier
If the wires in the chandelier are not marked, and there is no terminal block, then the chandelier needs to be ringed. This is done by a regular tester. RINGING THE CHANDELIER WITH A CONTROL LIGHT FROM THE 220 V NETWORK IS DANGEROUS TO LIFE!
For continuity, we screw the SAME into all the cartridges of the chandelier, i.e. one power and brand, incandescent lamps; better low-power, 15-25 watts. Housekeeper light bulbs are no good, dialing them will not work.

The scheme of the chandelier is given in the figure. From it, a person familiar with electrical engineering or at least not forgetting Ohm's school law can see that if the resistance of one light bulb is R, then there will be R between zero and FI; between zero and FII - 0.5R, and between phases - 1.5R. To ring three wires in pairs, six measurements are needed.
"Special" chandeliers
Recently, chandeliers have appeared on sale, equipped with a remote control for adjusting the light, a fan, an air ionizer or even an air conditioner (more precisely, its evaporative unit). When buying such products, the following rules must be observed:
- See how it connects right now. If, in addition to the usual terminal block for household wiring, some strange ends stick out there, ask for instructions and read it.
- If it is not clear from the instructions how to hang such a chandelier yourself, ask if its installation is included in the price of the product, and what are the seller's guarantees.
- All of a sudden a store works on the principle of "sold and forgot", it is better to look for the same thing elsewhere.
Chandeliers with additional features- products are quite specific; there are few firms or craftsmen involved in their installation, and “special” chandeliers are not cheap.
emergency situations
And how to properly hang a chandelier on the ceiling if there is no regular fixture, or it cannot be used? To do this, you will have to stock up on a tool for working on concrete, stone, wood, drywall, and work.
Low ceiling
The standard version is a chandelier-plafond and fastening with a cross bar. But what if the room is low, but you still don’t want to install a ceiling? In this case, you can gain 10-15 cm by hanging a chandelier with a rod on the ceiling without a hook.
To do this, the standard mounting plate is straightened, cut so that it is hidden under the cap, and new holes are drilled in it for self-tapping screws. Next, the chandelier needs to be slightly modified:
- Lights and, if possible, all fragile details are removed from the chandelier. It is better, if the design allows, to remove the rod immediately.
- The wires of the chandelier are removed from the terminal block.
- In the rod, immediately behind the thread, drill in a row along the rod, three holes 4-5 mm. You just need to make sure that they are all under the cap.
- Three pieces of fishing line are passed into the holes of the removed rod. Their ends are attached to the ends of the wires of the chandelier and tightly wrapped with narrow tape.
- The rod is put in place, gently sliding over the wires and pulling up the pieces of fishing line until the ends of the wires come out of the holes. If one is caught, it is corrected with a wire hook or tweezers.
- If the rod is non-removable, then pieces of fishing line are inserted into the holes one by one, starting from the bottom, and the wires are also brought out into them.
- The wires are reintroduced into the terminal block.
The purpose of this refinement is to bring the wires to the side so that they are not pressed against the ceiling and transferred by the edge of the rod. Attention: if the rod is fixed or curly, the cap must remain on it. Otherwise, he will not get dressed later because of the wires sticking out to the side.

Next, a mounting plate is installed on the rod between two regular nuts, and the chandelier is attached to the ceiling with screws. Most likely, nuts will not be needed: in most chandeliers, the bar is attached to the rod by flaring.
Connect wires. It may turn out that the terminal block now does not fit in the cap - it's okay, it is completely removed, and the wires are connected by soldering; joints are insulated with electrical tape. It is not recommended to connect the wires with a twist: there will be problems with a flashing chandelier later.
Now we mount the chandelier to the ceiling with self-tapping screws. We do not tightly wrap the screws into the sleeves, otherwise the chandelier will become oblique.
Option for weak but dense ceilings: laminate, MDF, plywood. Instead of a mounting plate, we make a circle with a diameter of 5 mm less than the inner diameter of the cap. In the center - a hole for the rod; in a circle - 4-6 holes for self-tapping screws. You will also need to make a hole for the wires.
If you need a hook
Fixing a chandelier to a concrete ceiling on a plank or I-beam does not raise any questions. And if the chandelier you like is hooked, but it is not at home? A little work - and a very reliable hook you can put yourself:
- If a hook-screw is used, then in the ceiling we drill a hole with a diameter of 10 mm more than the diameter of the screw, and a depth along the length of the thread + 10 mm.
- Lubricate the thread of the hook with a thin layer of consistent (thick) lubricant.
- We tightly wind two copper wires with a diameter of 0.8 - 1.2 mm onto the screw thread. At the beginning and at the end of the thread, we leave a mustache of 10 mm and spread them 90 degrees. When viewed from the end of the screw, the mustache should diverge in four directions perpendicularly.
- We spray the hole inside with a spray bottle, or stick a richly moistened cloth into it with a stick, hold for 1-2 minutes and take it out.
- Cooking 50-100 g of alabaster or gypsum mortar; it is convenient to do it with a disposable plastic cup. When mixed with water, the solution heats up. Mix until creamy consistency.
- Using a stick (not a spatula), as quickly as possible (alabaster and gypsum harden quickly), we fill the solution into the hole until it is filled.
- Just as quickly, into the still liquid solution, we push the hook with the wire wound around the thread; the whiskers of the wire will be bent.
- We remove the squeezed out solution and wait for it to solidify in the hole. The solution should not only solidify, but also cool down to room temperature. This takes at least 2 hours, but it is better to wait a day. Now the chandelier can be hung.

If a hook with a support platform for fastening with self-tapping screws, we make sockets for them in the same way, but we take a thinner wire - 0.4-0.6 mm. And you will have to knead a separate portion of the solution for each nest - it hardens very quickly to a mushy state.
Such nests serve for centuries without shrinking like plastic. When wrapping / turning the hook 2-3 times, the socket does not loosen. If necessary, it is easily cleared of filling with a narrow chisel and redone. When repairing a gypsum-alabaster nest, you can plaster it, and then dig a hole in the plaster for a hook.
Chandelier in the stretch ceiling
Installing a chandelier on a stretch ceiling is the most difficult case. First of all: a chandelier with incandescent lamps and a stretch ceiling are incompatible. Even from a three-arm chandelier with 40 W lamps, spots will appear on the ceiling in a month, and within 3 months it will begin to creep. Economy light bulbs in chandeliers recessed into the ceiling quickly burn out due to poor heat transfer; The only option here is LED bulbs.
Then, installing a chandelier in an existing stretch ceiling is impossible: it will have to be removed and a new one installed. Trying to cut holes in already stretched ceiling useless - the film or fabric will immediately spread.
And finally, before calling the ceiling masters, you need to prepare a fixture for the chandelier. The regular fixture of the chandelier is not designed for installation in stretch ceilings, therefore, if the chandelier is hung on a hook, it must be installed in the ceiling in advance.
For mounting on planks or I-beams on the base ceiling, you need to attach a pillow made of waterproof BS or MDF plywood, at least 16 mm thick, on the brackets, as shown in the figure. A wooden or ordinary plywood pillow in the inter-ceiling space will soon dry out, and this will end in an accident.

According to the installed pillow, the ceiling mounts will take measurements and make holes in the panel, framed by grommets. Through them, the chandelier will be attached to the pillow with long fasteners, with a gap for the “play” of the ceiling. Wide holes are additionally reinforced with "spider" supports, but this is a subject for a separate discussion.
If it is supposed to drown the chandelier in a stretch ceiling, then it should hang in place during the measurement. But still, a chandelier in a stretch ceiling is not the best option on expenses. Only due to the uneven distribution of the load due to the presence of holes, such a ceiling is more likely to sag and lose its appearance than a solid one.
Chandelier on plasterboard ceiling
Attaching a chandelier to a plasterboard ceiling is also not easy, but still easier than in a room with a stretch ceiling. There are three possible cases here:
- The chandelier weighs up to 3 kg and is mounted on a hook. In this case, you need a special butterfly hook. It consists of a specially designed plastic clip and a screw hook. A hole is drilled in the drywall under the butterfly clip, the hook is screwed into the clip one or two turns. Then the clip is inserted all the way into the hole and the hook is turned to failure. The inside of the butterfly unfolds into petals, which fix the hook.
- Chandelier - up to 7 kg in weight. In this case, only fastening on slats (console) is permissible. A butterfly dowel is used for each attachment point; simply a mole. By design, it is similar to the cage of a butterfly hook, and when a self-tapping screw is screwed into it, it opens in the same way to the sides inside the interceiling space.
- Heavy chandelier. To hang it on a hook, you will need one collet pin with a diameter of at least 12 mm; for mounting on a bar - at least two 8-10 mm each. To install a collet stud in the base ceiling, holes are drilled through drywall along the diameter of the stud sleeve and a depth in its length. The stud is screwed a little into the sleeve, inserted through the hole in the drywall into the base ceiling until it stops, and again the stud is screwed all the way. The collet diverges and wedged in the base ceiling, and a threaded end remains on the outside, onto which you can screw a hook with a threaded socket, or several ends - you can put a pillow on them under the chandelier bracket.

Note: hanging a chandelier on a hook through drywall is unreliable - the collet is held in the ceiling by friction. Therefore, for suspension to a plasterboard ceiling, it is better to choose chandeliers with a cantilever mount.
How to shoot chandeliers
And how to remove the chandelier from the ceiling, if necessary? All described methods of fastening allow dismantling in the reverse order of installation.
In the first place, again, safety precautions: turn off the switch, turn off or unscrew the plugs. Then we remove all fragile parts from the chandelier: crystal pendants, etc. Next, we turn off the wires, isolate their bare ends, and only after that we proceed to disassemble the mount.
With a stretch stretch or plasterboard ceiling, we remove only the chandelier itself. We do not touch pillows, butterflies, collets and other auxiliary parts. This is especially true for collets and butterflies: these are disposable parts, they are not designed for re-assembly.
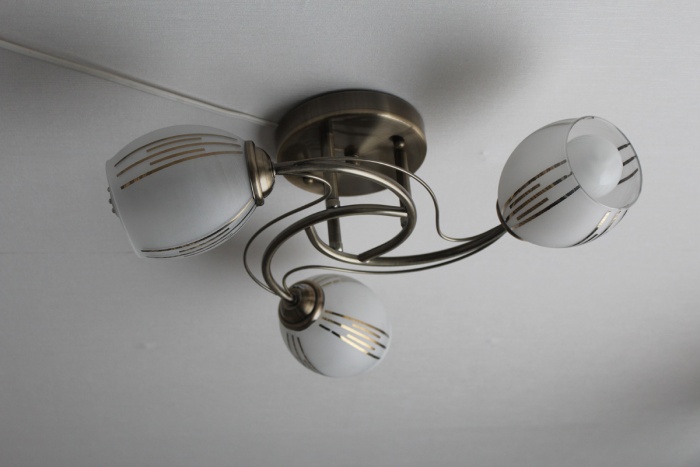
Lighting is the most important component of any room. In living rooms, suspended ceilings are traditionally installed. ceiling lamps- chandeliers providing uniform distribution light throughout the area. With the same type of fastening methods used throughout the country, hanging a chandelier was always easy. Modern models may differ in fixation options, there are ceilings made of various materials, so it is worth considering the process in more detail.
Mounting options
 Modern ceiling lights are not always designed for a traditional hook-shaped mount located in the center of the ceiling. They can be equipped with their own fasteners, in most cases included in the kit. It happens that you have to deal with a situation where the chandelier is designed for the traditional method of fastening, but the hook is missing for various reasons.
In these cases, it is not necessary to contact a specialist. It is quite possible to fix the chandelier on the ceiling yourself. Installation does not require special skills, if you study the features of all options.
traditional hook
Until recently, all chandeliers were designed to be mounted on a hook mounted in a floor slab. This method is still considered the simplest, most convenient and reliable.

The luminaire at the attachment point has a reciprocal ring put on the hook. The wire connection, hook and ring are closed with a special decorative cup.
The biggest problem has always been the lack of a hanging ring on the lamp. This was sometimes found in light kitchen shades designed for one lamp. Usually, a not very successful, but simple method was used to solve the problem: a knot was tied at the end of the lamp cord, the loop of which was put on the hook. It is difficult to call this method correct and safe, but it was often used even by professional electricians.
 Nowadays, such problems are extremely rare, because modern lamps do not imply dangerous handling of current-carrying wires and must have a fastener. Currently, more often you can encounter a situation where the old hook could not withstand long-term operation or careless handling and broke off. In this case, you will have to replace it with a new one.
To hang a chandelier without a hook, you will need to choose a new one. Wherein it is worth paying attention to the mass of the suspended lighting structure:
- For fixtures weighing less than 4 kg, it is quite possible to use a threaded hook screwed into a polymer dowel. Such kits are sold in almost any hardware store.
- For heavier luminaires, it is highly recommended to use anchor hooks. Recently, they are increasingly found on sale and are no longer a rarity.
 Please note that a conventional dowel hook can only be used with a concrete slab or wooden ceiling. To fix the chandelier to the concrete ceiling, you need to drill a hole of the appropriate diameter and insert a dowel into it. In the case of a wooden ceiling, the threads can be screwed directly into the wood, and it is advisable to wrap the hook for the entire length of the thread so that the connection is strong, otherwise the thin boards will not support the weight. WITH plastic panels use threaded connection it is forbidden. Even drywall is not designed to be threaded or with the included dowel.
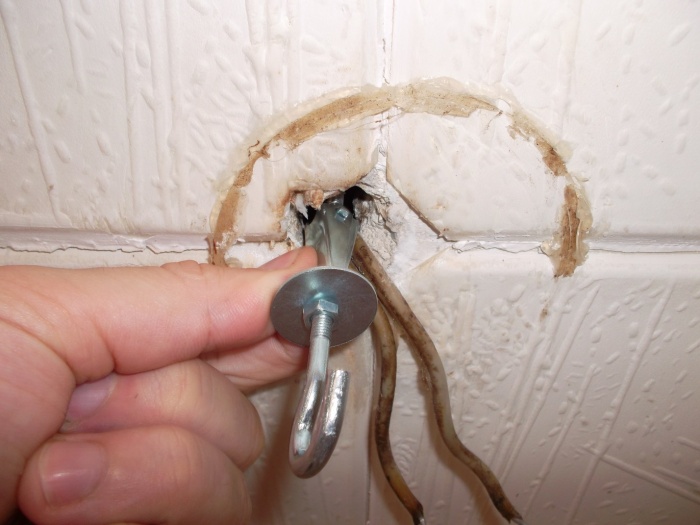
Anchor mechanisms are able to withstand a significantly greater load. It is they who are recommended to be used for hanging a heavy chandelier. A hole of the required diameter and appropriate depth is drilled in the ceiling.
A hook is inserted into it and tightened by rotation until it stops. To make tightening easier, you can use wrench or pliers. The hook body is securely fixed in the hole with the paws spread apart to the side.
Even if the purchased lamp has a small mass, it would be useful to think about a possible subsequent change of the chandelier. If it turns out to be heavier, you will have to change the method of attachment again. Better buy now anchor hook, which will save you from possible inconvenience in the future.
Mounting bracket
Sometimes the lamp comes with a special bracket. It can be a straight bar or a cross. The device has holes for mounting to the ceiling and threaded studs for fixing the chandelier body.
 The design involves direct attachment to the ceiling surface. If an existing hook interferes with fixation, it can simply be sawn off. But it is better not to do this, because in the future it may be needed. It is recommended to bend it with a hammer and place the bracket next to it. If necessary, the hook can be unbent with pliers and reused. This approach will eliminate the need to mount a new hook at the next change of the chandelier, if a different method of fixation is required.
Mounting the bracket is usually carried out using self-tapping screws and dowels. Holes are drilled in the ceiling according to preliminary marking, into which dowels are inserted. The mounting plate is attracted to the prepared points with self-tapping screws. The bracket in the form of a cross allows you to more securely attach the chandelier if it has a significant mass. At the final stage, the luminaire body is fixed on the bracket with screws, bushings or decorative nuts included in the kit.

Direct placement
Some ceiling lights are designed for direct mounting to the ceiling surface. In this case, holes for fasteners are provided in the body of the device.
Hardware is selected depending on the material of the ceiling. Self-tapping screws, screws, special dowels can be used.
Special conditions
IN traditional ways installation of a chandelier, the fastening of the lamp to a solid and solid foundation- concrete or wood. Ceiling modifications may dictate special suspension requirements.
Drywall and plywood
Fixing a chandelier to a plasterboard ceiling is quite simple if a special bracket is used. Many fixation points allow you to distribute the load and use ordinary self-tapping screws. But bond strength can be significantly improved if you take special dowels for drywall.
 The most popular mount is called molly. Such a dowel belongs to expanding mechanisms and resembles an anchor in terms of the principle of operation. The hardware is inserted into a pre-prepared hole until it stops. The rotation of the head is carried out with a conventional screwdriver or screwdriver. The screw tightens the cylindrical expanding element, which firmly protects the dowel from moving and falling out of the hole.
If the chandelier is designed to be hung on a hook, other fasteners in the form of so-called umbrella dowels will help solve the problem. The device consists of spring-loaded plates fixed on a straight section of the hook. With the force of the hand, the umbrella is compressed and pushed into a pre-prepared hole in the drywall. After passing through the hole, the plates are unclenched and securely fix the hook from falling out. It remains only to tighten the fixing washer with a nut.
Stretch ceiling
To mount a chandelier over a stretch ceiling, you will need a special bracket that creates a new base surface. These brackets are produced industrially, but can also be made from improvised materials. The fixtures are a rigid base that is attached to the concrete ceiling with legs. Serial samples have height adjustment brackets, which allows you to adjust the structure to any location of the leaf relative to the concrete slab.
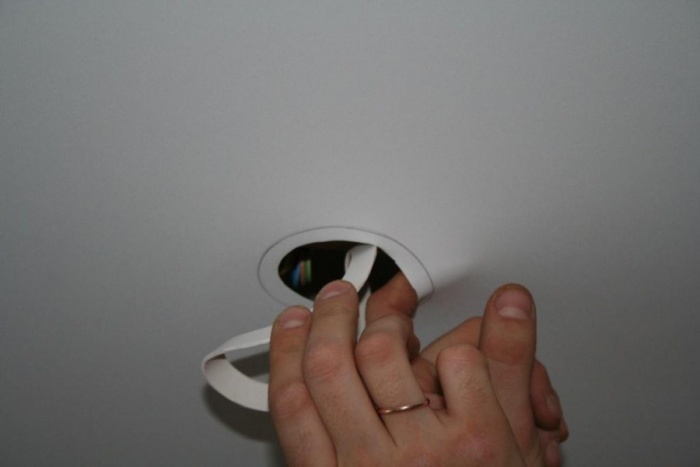
 In the place where the chandelier is fixed, it is glued to the fabric mounting ring, in which you can make a slot. On sale there are also special transparent stickers that protect the canvas from a heated lamp.
Brackets can be used for more than just fixing a mounting plate. In the center there is a hole for removing wires. Usually, a hook fixed in a concrete base can also be passed through it. Stretch ceiling brackets are versatile and suitable for a wide variety of chandelier mounting methods.
Connection technology
All electrical work must be carried out under relieved stress. This must be done not just with a switch, but by turning off the machines on the electrical panel. It is recommended to additionally check the voltage at the wire contacts using an indicator screwdriver.
Most older fixtures do not have wire color coding. By the old rules, this was enough. But when using screw cartridges, it is desirable to place the phase on the central contact, and zero on the screw. This will provide additional protection against damage. electric shock when accidentally touching the screw conductor when replacing the light bulb.
In addition, the rules for breaking the electrical circuit are not always observed in houses, as a result, the neutral wire opens, and the phase always remains on the chandelier, which creates a certain danger. For this reason, it is recommended that even a simple lamp replacement be carried out when the voltage on the shield is removed. Only in this way can a full guarantee of protection against defeat be given.

If the chandelier wires are color-coded, it becomes easier to connect the device. The neutral conductor comes from the shield. The phase wire is opened by a switch. If the wiring of the apartment is not marked, you can determine the phase and zero using an indicator screwdriver.
Some modern models luminaires have additional protective grounding. If the wiring in the apartment is equipped with grounding, it is strongly recommended to use it, since there are no extra moments in matters of electrical safety.
Wire connection
It is important to remember that all twist connections are currently not allowed. It is possible to pull with the replacement of the twist with a special connecting device, but during installation new chandelier It is strongly discouraged to use the old dangerous methods of connecting wires, which can lead to overheating, short circuits and fire.
Modern fixtures incorporate special contacts for connecting wires. Usually they are represented by screw terminals. It is enough to insert the stripped section of the wire into the contact hole and tighten the screw.

If the chandelier and wiring just end with wires, you need to purchase special clips. They come in several varieties:
- Tubular screw blocks. The wires are securely clamped with screws, ensuring acceptable contact and insulation of the connection.
- Pads with lamellar current-carrying jumper. The wire is pressed through the washer, so the contact is more reliable and there is no risk of chafing the wire with the sharp edges of the screw. When uncovered, these types of pads have less insulating properties, so it is recommended to use models with covers.
- Push-in terminal blocks with latch or spring. There are self-clamping designs that are easy to use, but are usually designed for less current. They are more resistant to vibration, contact is not lost over time, since there is no screw that can be unscrewed.

Modern chandeliers may have various ways mounts. Knowing the features of all options will allow you to easily install the lamp yourself. It is possible to reliably and beautifully hang the chandelier even on a stretch ceiling. Compliance with safety requirements and regulations electrical work will allow you to successfully make a connection and maintain its reliability for many years.
Hello, dear readers and visitors of the site.
After buying a chandelier, the question always arises of how to install it. In this article I will tell you how to hang a lamp or chandelier without calling specialists.
There is nothing complicated in this and you can easily cope on your own. But some subtleties and nuances need to be mentioned.
There are several ways to mount and install the chandelier in the ceiling:
- on a metal hook
- on a bracket or bar
- directly to the surface
Consider each mounting method in more detail.
Installing a chandelier with a hook
This is the simplest and convenient way chandelier fixtures. We hang it on a metal hook pre-installed on the ceiling. In my example, an old-style metal hook is shown, installed during the construction of the house.


1. How to hang a light chandelier
If the chandelier is not heavy and weighs up to 3-4 (kg), then you can use just such a metal hook with a thread.

Using a perforator, we drill a hole in the ceiling, insert a plastic dowel into it and screw in the hook. The fixture for the chandelier is ready.
Also, using a metal hook with a thread, you can install a chandelier in the ceiling with wooden floor. The hook just needs to be wrapped (twisted) into the wooden base of the ceiling.
I would like to draw your attention to the following. Installation of a hook into a plasterboard ceiling is prohibited. In this case, the metal hook must be attached to concrete base ceiling.
2. How to hang a heavy chandelier
If the chandelier is heavy and weighs more than 5 (kg), then it is better to use special anchor bolts with a diameter of 10 sq. mm or more. with spreader hook.

We drill a hole in the ceiling of the required diameter. After that, we insert the anchor into it and tighten it until it stops. Such fastening of a chandelier is very reliable.
Chandeliers that are designed to be mounted on a hook have a special decorative cup.

The cup moves freely in height and is fixed in the upper position to hide places.

Mounting a chandelier with a bracket (bar)
And now we will look at how to install a chandelier without a metal hook. I consider this method of fastening somewhat more complicated than the previous one, but not so complicated as to resort to the paid services of specialists.
Included with the purchased chandelier is a special metal bracket or bar. We install 2 screws into this bracket or bar, adjusting the distance between them, and then tighten them with nuts. After that, we fix the bracket on the ceiling with a puncher and two dowel-nails.

Previously, a chandelier on a metal hook was installed at this place. The purchased new chandelier is attached with a bracket, so I bent the hook to the ceiling, which you can see in the photo. You can generally cut the hook, but it doesn’t bother me at all in this position.


Tighten the two fixing decorative nuts.


The chandelier is installed and ready for use.


Now I will not dwell on this, because. this is the topic of a separate article. Read on for upcoming issues.
P.S. So, in this article, we got acquainted with how to install a chandelier using metal hooks, brackets and directly to the surface. Now let's move on to connecting it. Read about it in my next articles.
The installation of a new chandelier is a rather important and significant event. Before you hang it, you need to properly assemble it. However, most products have a fairly simple device, so this step can be skipped. To figure out how to hang a chandelier, you need to determine the type of ceiling covering, as well as the method of attaching the lighting fixture.
Wire connection
It is worth starting with elementary actions. Before starting work, you should ask yourself a few questions:
- how many keys to install the switch;
- how many wires will go from the ceiling.
With only two wires, you can not think about the possibility of switching on separate parts lamp with the help two-gang switch. Without the presence of a third wire, such a task would be impossible.

If there are three wires and you want to turn on the light in different parts chandeliers at different times, the wires that go to the cartridge, and the earth are collected in 1 bundle. The rest are divided into 2 other bundles.
Attention! It is important to ensure good contact wires. Otherwise, the wires will get very hot, and the housekeeper will fail.
In order to carry out the work, you should prepare the following tools:
The key must be collected for one task - during the assembly of the chandelier itself. An indicator screwdriver will be needed in order to determine where the wire is connected. If the tool lights up when you touch its sting, then it works.
After that, it is necessary to touch the end of the screwdriver to the cartridge. The free hand is used to hold the wires. If you touch one of them with a screwdriver, the indicator built into the tool will light up. Wires made in the same color will be ground.
Bundles that are separated must be inserted into terminal block and fasten.

Chandelier installation
To understand how to hang a chandelier, you need to choose a method for attaching it. There are 2 main options:
- on the mounting plate;
- on the hook.
Hanging a chandelier on a hook is one of the oldest and most common options. Today, this method is used less frequently. However, there are still quite a lot of chandeliers that have such fasteners.
Some home masters can solve this problem on their own. They simply change the plastic hook for a homemade hook made from a welding electrode.

The mounting plate is a special product that is mounted to the ceiling. It is usually sold complete with a chandelier. Before installation, the plank must be properly prepared. It is necessary to fix the screws on it so that the caps are in the inside of the bar. However, you should not pinch them. Then you need to insert the bar into the chandelier. It needs to be done in a certain way. The bar should be flush with the edges of the lamp bowl. It is also possible that it will be below the edges of the bowl.
After checking, it is necessary to tighten the screws in the bar to prevent them from torsion. Then the bar is applied to the ceiling in order to mark the attachment points. After that, holes for dowels are drilled in the ceiling. With their help, a bar is installed, and then mounted hanging chandelier. In the presence of wooden base the ceiling should be fixed with self-tapping screws.
Connection
Checking the presence of voltage is quite simple. To determine it, you should use an indicator screwdriver. When touched with a sting to the wires, it should not glow. After the power is turned on, the indicator will show voltage on only 2 wires. The rest is "ground". It must be connected to a common beam.
Attention! It is impossible to mount housekeepers if the lamp was connected through a special device that regulates the brightness of the glow.
To figure out how to hang a chandelier on different ceilings, you should get acquainted with their types and features.
Chandelier with power supply
Often, owners of apartments or private houses want to increase the brightness of the glow, using more powerful lamps for this. As a result of such modifications, the pendant chandelier may cease to function. To protect the transformer, it is worth monitoring the total electricity consumption of all lamps. It must be less than the output power of the device.
For halogen lamps, the pendant chandelier is connected to a transformer. This avoids overheating and explosion of light bulbs. This is due to the fact that halogen products are designed for 12V.

Important! If a direct connection is made, the bulbs must be rated 220V. If the condition is not met, halogen lamps will simply explode.
It is worth remembering that all wires are carefully insulated. It is necessary to check their integrity throughout. This condition is mandatory requirement security.
Fixing to concrete floor
To mount the chandelier on the bar, you should first mark the places of its installation. To do this, you need to drill holes for fasteners. When making a ceiling from slabs with voids, you should check how thick the concrete is in the place where the drilling will be performed. In some cases, you have to step aside to secure the dowel more securely.

If it is impossible to hammer the dowel in a certain area of the ceiling, you can simply change the position of the planks. You can also insert a wooden rail into the cavity of the plate. In this case, the bar is screwed with screws. To perform such work, it is necessary to prepare the appropriate tools:
- perforator;
- anchors, dowels or screws;
- victorious drill;
- screwdriver
Note! Before starting drilling, care must be taken that the tool is not dusty. Also, it should not get trash. To protect the puncher, you will need to install a disposable glass on the drill. You can also use half a rubber ball as protection.
It is worth remembering that the bar must be fastened carefully, without extra effort. Otherwise, it can be bent. The part is installed depending on the selected mounting method. Instead of a puncher, you can use impact drill. However, it is worth choosing it taking into account the power and volume of the proposed work.
Plasterboard ceiling
What are the features of hanging a chandelier on plasterboard ceiling? It is important to keep it attractive appearance, as well as high mechanical strength. To do this, determine what type of chandelier will be. There are several recommendations:
- The place where a large pendant chandelier will be installed should be reinforced with a metal profile. Such work is carried out even when creating the frame of the finishing ceiling.
- If you are installing a small chandelier, you should purchase special fasteners. These include butterflies and folding dowels. Strengthening in this case is not required.
When working, it is necessary to comply with safety requirements. electrical system must be de-energized, and ceiling structure installed as firmly as possible.
Attention! If it is impossible to de-energize the room, it is necessary to work in rubber gloves. This will ensure the complete safety of the installer. Also, all work should be carried out only with high-quality tools.

Drywall is highly durable, which allows installation directly to the material. However, there are certain restrictions in this case:
- Since the drywall sheet is able to withstand loads up to 6 kg / sq. m, you should prefer a chandelier, which is lightweight.
- It should also be taken into account that drywall sheet may be deformed during the repair of the device. For example, when you need to change the lamp, you should be very careful with the chandelier. Also, do not change the hanging product frequently. In addition, it is impossible to make new ones next to the old holes for attaching the chandelier.
First you need to consider the main options for attaching a pendant chandelier. First in ceiling material make a hole into which the dowel is then inserted.

Attention! The spring fastening element should be tightened with a nut. The butterfly is pulled up with a self-tapping screw. At the same time, a click will be heard. The dowel comes with a hook. After such work, you can mount the chandelier. Then the connection is made.
Wiring is connected while holding the chandelier under the ceiling. Only after that hanging device can be completely fixed to the ceiling. This job is best done by 2 people. One will hold the chandelier, the other will connect the electrical wiring. If help is not implied, it is better to make a small hook to hang the chandelier temporarily. This will exclude mechanical damage hanging product.
Stretch ceiling
If the ceiling is stretched, you should think in advance what type of pendant chandelier will be installed. You also need to decide on the fixture of the lighting device.
In order not to spoil the appearance of the ceiling, and also not to violate its integrity, you should choose the right chandelier. It can be designed for both energy-saving light bulbs and incandescent lamps. In the latter case, the cartridges should look to the side, not up. Also, they should be hidden in the ceiling. In the case of an energy-saving option, the pendant chandelier will not heat up.
Attention! When hanging a luminaire from a tensile structure, it should be remembered that from high temperature its surface may be deformed. To avoid this, it is better to screw LED bulbs into the sockets.

In addition, before starting work, you should check the base of the lighting structure. If it has sharp edges, the film can easily tear. There are several ways to mount a chandelier to stretch ceiling:
- If the apartment has a stretch ceiling, The best decision- hang the chandelier on the hook. This method will be the simplest and most reliable. However, this method can only be applied in the case of hanging chandeliers.
- If over tensile structure located concrete slab, and the hook is already fixed by the builders, it is necessary to determine the height of its installation. It may be incorrectly selected.
- If it is necessary to change the location of the hook for the chandelier, use an anchor to install a new fastener. The old one is cut off by a grinder.
- There is also another way - a wooden embedded element is mounted at the place where the chandelier is attached. The hook is attached to it.
One of required elements any repair related to the ceiling surface - installation of lighting fixtures. Recently, spots of various configurations have gained the greatest popularity, but for the most part their main function is additional lighting. The role of the main one is rightly assumed by classical chandeliers. With their purchase in the store, all questions are not resolved - it remains to be figured out how to hang the chandelier on concrete ceiling right, if you have to deal with a clean ceiling base. We offer you a detailed article-instruction with 51 photos and 2 videos that will help you with this.

Surface analysis, drawing up a work plan

For starters, take a good look around. What way chandelier mounting suits you best? Recall that this can be done through:
- anchor hook;
- mounting plate;
- clamping hanger.


Of course, work with anchor hook always the easiest. But only if it is already installed, as is often the case in old apartment buildings. In this case, you can safely fix a heavy and massive chandelier on it.

If the hook is missing, then first inspect the plate where it is planned to be fixed. For hollow concrete bases perfect option - clamping hanger. And although it provides not such secure fastening, like the same anchor hook, it will cope with a sufficiently large chandelier weighing no more than 7 kg without any problems.


Mounting plate, which is often referred to as an invoice among masters - the third option on how to properly hang a chandelier on a base ceiling. It can be used most often when the use of the two options discussed above is not possible. Most modern chandeliers The package includes everything you need to fix the lighting device in this way. So why not take advantage of this?

Necessary materials and tools

- perforator with a drill;
- set of wrenches;
- a knife with a sharpened blade;
- screwdriver;
- mounting foam for sealing wiring;
- pencil;
- dowels;
- anchor bolts;
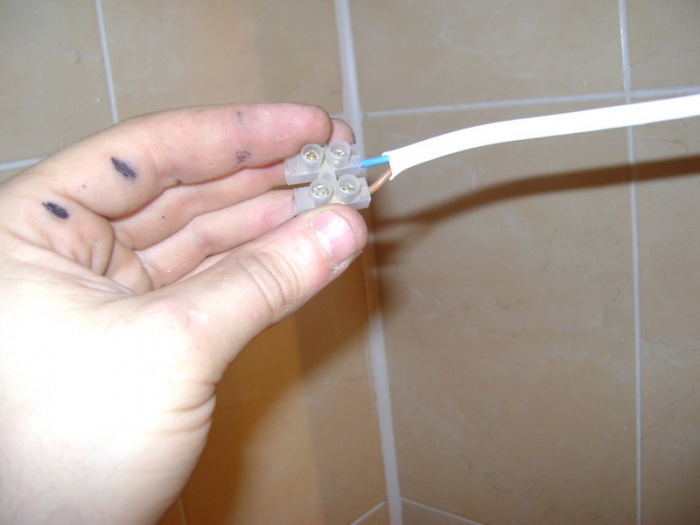
- terminal connectors.

- hook;
- patch plate from the kit;
- hanging hook.


Anchor hook installation

As noted above, this is the simplest and reliable way hang the chandelier on a concrete ceiling base. In many old houses, it is already prudently mounted in advance, so the whole process takes a modest amount of time and does not cause any difficulties even for an unprepared person.

If the hook needs to be installed, then the algorithm of work will be as follows:
- select the fixation point on the concrete base;
- we drill a hole of the required depth and diameter in a concrete base - we take into account the size of the decorative cap of the lighting device;
- we insert the anchor hook into the concrete base and twist it with a wrench.

Gimbal installation


This option is relevant primarily for hollow concrete structures, as it provides good bearing capacity even in the case of bulky light sources. The clamping bracket is robust construction, consisting of a spacer rod and a suspension bar with all necessary holes for fastening.


The correct sequence of operations when working with a gimbal:
- the prepared spacer rod is inserted into the hole in the concrete base;
- the hanging bar is placed inside the concrete slab;
- the spacer rod is threaded through one of the holes on the plank: if you want to shorten the distance from the ceiling to the hook, then choose one of the end holes.


Installing the trim strip

In terms of reliability, this installation method is in no way inferior to the two discussed above. Due to the fact that a variant of such a bar is always included with a newly purchased chandelier, it is also noticeably lighter - there is no need to waste time on a tedious search for the necessary materials.
May be in the form:
- crosses;
- narrow plate.


To the concrete ceiling surface, the patch plank is attached with dowels and anchor bolts. Most often there are a pair of them - either 2 or 4.
Installation and connection of the chandelier

The main condition that requires strict execution is to observe electrical safety precautions. To do this, pay attention to the following recommendations:
- turn off the power supply at the switchboard;
- check the location of the wiring with a conventional tester;
- seal the wiring entry: for this you can use mounting foam with active resistance
- fire or non-combustible mineral wool;
- do not connect copper and aluminum wires twist method.


If you are dealing with a metal hook, then reliably protect yourself from short circuit help him insulation. To do this, use a conventional insulating tape or a rubber cover. Both can be easily found at any hardware store.


It is also necessary to take into account some features of the electricians of old houses - they lack grounding. In order to hang the chandelier correctly in such conditions, you first need to determine the phase on one of the wires of the power cable and connect it to the end of the lighting device, and the second to what remained on power cable. If the lamp did not work, then the same second wire is grounding. In this case, it must be disconnected and fixed with the other free end of the power cable.


Algorithm for direct installation of a chandelier on a concrete ceiling:
- take everything off her decorative elements to avoid damage and possible fall when fixing to the ceiling;
- on a pre-grounded hook-loop at the end of the chandelier's output rod;
- connect the mounting ends of the chandelier to the power cable;
- if the mounting method you have chosen is an overhead mounting plate, then after the previous paragraph, put the cap on the plate in such a way as to get on the desired holes, and use the nuts to securely fasten it;
- fix the decorative cap so that it completely covers the mounting hole in the ceiling;
- check the correct operation of the lighting device.


All stages of mounting a chandelier on a concrete ceiling in one video
Conclusion
After carefully studying the proposed article-instruction, you will quickly understand how easy and, most importantly, correctly hang a chandelier on a concrete ceiling without spending a lot of precious time on it. In comparison with other installation conditions for lighting fixtures - for example, on stretch fabrics - a clean base involves a simplified algorithm of actions (read how to attach a chandelier to a stretch ceiling if it is already stretched). In fact, the most difficult thing is not to make a mistake when directly connecting the light source to the wiring. Only a serious attitude to electrical safety issues and scrupulous adherence to the proposed work plan will help you easily overcome this stage and after some time enjoy spectacular lighting on your concrete ceiling.