How to make slopes on interior doors. Do-it-yourself installation of door slopes
Professionals managed to bring the technology of installation of windows and doors to perfection. Special attention in this work, slopes that protrude obligatory element. According to the current terminology, slopes are the surfaces of the walls around the door.
Peculiarities
After installing the door, you want to relax, but the most important stage is just ahead. After installing the product in the opening, it turns out that the door slopes look, to put it mildly, ugly, they can spoil the first impression and the joy of replacing the door. A perfectly reasonable question arises, but what can be done to make the walls look attractive.
The most popular options are to plaster and then paint or cover the space with laminate. Both options are practical, but when working with a laminate, you will have to do a crate. If there is no experience in conducting construction works, and you want to spend a small amount, then plaster remains the most attractive option.


There are several reasons why you should choose wall plastering. Among the main advantages:
- no need to make a crate, which on the interior doors will take away part of the space in the aisle;
- there is no need to involve specialists in the work;
- low cost of the material;
- it takes half the time than in any other case when making slopes.


But this method also has disadvantages that you should be aware of:
- it is necessary to additionally cover the slopes with paint;
- from an aesthetic point of view, not the best option.
Working with laminate requires not only experience, but also patience. Creating a crate takes more time, you will need additional tools:
- hammer;
- glue;
- screwdriver


It is necessary to spend money not only on the purchase of material, but also on dowels, wooden beams, decorative corner and self-tapping screws. But, from the point of view of aesthetics, this is the most attractive design option for door slopes.
Kinds
Slopes can be classified into two large groups, without taking into account the material from which they are made and the place of installation:
- internal;
- external.
Internal ones carry not only a functional load, but also an aesthetic one, so working with them is especially important.


There are quite a few options for how you can finish the surfaces of the walls around new door, no matter if it is interroom or entrance. According to the material of execution, they are:
- wooden;
- cork;
- plastering;
- drywall;
- plastic.
Depending on what material the slope will be made of, the installation technique is also different.


materials
Emphasize new metal door finishing slopes will help. Among the most requested materials:
- dye;
- ceramics;
- wallpaper;
- tree;
- drywall;
- a rock;
- laminate;


PVC panels are a modern and inexpensive finishing material with aesthetic appeal and reasonable cost.
Device
In places where the front door adjoins the walls, heat escapes, so foam is used around the structure. It helps to quickly close the gaps and achieve the necessary tightness.
The panels are easily mounted on the safe door, and you will need to purchase corners and platbands if simple plastering is not expected.


Such an element makes it possible to carefully close the structure after installation:
- cracks;
- mounting foam;
They can be considered as additional protection against draft, outside smell, noise. If you look at it in a section, it looks a bit like a sandwich.


The first layer consists of:
- primer;
- plaster;
- corners;
- finishing.
The surface must be prepared before applying the primer. You can use a brush or roller. Sometimes after its application, if it is necessary to insulate the opening, polystyrene is laid.


Plastering is the easiest way to finish openings, but you can use drywall, which is superimposed on a pre-applied layer of plaster. Be sure to use a level or beacons, since the surface must be flat.
The use of drywall allows you to qualitatively prepare the opening for further finishing. It's cheap and lightweight material, most often it is used for the installation of interior doors. The cut sheets create a flat surface without extra loss time, working with plaster will require experience and patience. A layer of plaster is best used on front door, because there the surface of the wall can be exposed to moisture, and drywall does not withstand it.


Trim or corner are installed along the edge, which acts as reinforcement for further application of putty and grout. Be sure to apply a finishing primer at the end.
The second slope layer is decorative trim, which may be different. Some decide to just paint the surface, while others use ceramic tiles and even natural stone.


Surface preparation
Before installing door slopes, it is necessary to prepare the surface. The work consists of several sequential actions:
- With door structure they remove the locks and handles, cover it with a film that is easily attached to a simple adhesive tape, and cover the floor with ordinary cardboard;
- old plaster is removed with a perforator;
- construction debris is taken out, freeing up space;
- the gaps that appear in sight are filled with mounting foam, before that, experts advise moistening the surface from a spray bottle with plain water, which improves the adhesion of the material to the surface door jamb;


- the foam dries out after 8-12 hours, after which the excess is removed with a knife;
- the surface is treated with antiseptic impregnation;
- if an electric cable is provided, then it is worth laying it at this stage;
- you can start plastering or mounting the frame.


Do-it-yourself installation
It is not easy to make repairs yourself, you just need to study the issue more carefully. If you decide to plaster the slopes, then, in addition to a small container for the solution, you need to prepare and construction mixer. Its use guarantees the absence of lumps and the uniformity of the applied composition.
You can’t do without a level during finishing, the length of which should be at least two meters. Plastering is done with spatulas, one should be narrow, the other wide. The primer is easily applied to the surface of the joint with a flat brush.
After the preparatory work, the cut edges of the mounting foam must be sanded using sandpaper. The use of a primer is essential as it provides better adhesion of the plaster to the surface. Experts recommend applying the primer several times, but only after the first layer has completely dried.

Now you can start plastering the surface. The composition is applied in a thick layer starting from the upper slope of the door. A wooden lath will allow you to quickly level and remove excess plaster. A perforated metal profile pressed into the corners helps reinforce them.
The top coat must be completely dry before applying the top coat, which is necessary to hide small irregularities.


Laminate, PVC is attached to the frame, for which it is first necessary to make a 2x4 cm timber.
The beam is sawn to the size of the slope, on each part of the doorway, planks are attached perpendicularly, 4 on the sides and three on top. Nails can be used as a fixing element.
You can beat the corners only if you bend the plastic panels. From the end, their structure is hollow, there is a void along the entire length, so cuts can be easily made. It is very easy to do this with a simple clerical knife. The cut-out modules are attached to the frame by means of self-tapping screws, the bent panels are attached to the wall.
You should work in the following order:
- mark the border of the finishing elements;
- 5 holes are drilled in the wall, which in the future will cover the finishing panel;
- wooden plugs are driven into the recesses, into which self-tapping screws should be screwed, thus fixing the finishing material on the wall.


Drywall as construction material allows you to quickly finish the slopes.
- At the first stage, it is necessary to drill holes over the entire surface of the opening, the distance between which should be 20 cm. Dowels are installed in them, where screws are not completely screwed in. It is necessary to choose the dimensions of the starting rail, which will play the role of a guide. To do this, you need to measure three sides of the opening. The upper guide should be the width of the opening, since on the sides the sheets of material will rest against the slope from above. The first top rail is screwed to the wall with self-tapping screws.
- The sheet of drywall at the next stage is cut out according to a pre-made markup. If you do not follow the technology, then the edges will turn out to be torn. Be sure to use a ruler or anything that can replace it during installation. The top layer of paper cuts through easily, then the knife is a little more difficult to sink into the plaster, but you need to make sure that its tip becomes visible from the back side. If an adhesive mixture is used on which drywall will be planted on the wall, then it is important to read the instructions from the manufacturer well in order to maintain proportions.

- The adhesive mass is placed on reverse side sheet of material, smear and dowels. The edges of the strip are inserted into the guide, and the drywall itself is pressed against the base. The same should be done on the sides. The excess glue that appears is removed immediately, since it leads to deformation.
- Beacons are necessarily used, which allow you to keep the sheet in an unchanged position. If there are gaps between the sheets, you can use excess glue to fill them. Finishing processing is possible only in a day.


MDF slopes look good. Before installation, the wall surface must be treated with a lime-cement mixture. . After it dries, a primer is applied. Before cutting the material, it is worth carefully measuring the corners of the joints and cutting off the corners. If you attach elements to each other, there should be no space between them. The first is the upper part of the opening, which is applied adhesive composition. The sheet is supported until it is well fixed in place. The second set the side parts. Corners can be fixed on liquid nails.


If you want to finish the slopes with paint, then, depending on the material, you need to choose the composition. Previously, the door is removed, impregnation is applied to the tree, if they are varnished, then stain. For other dyes, drying oil can be used.


You can also glue the slopes with any wallpaper, there is no specially created for this product. The drawing will not look attractive, so it is advised to take plain ones. The technology consists of several stages:
- glue a large sheet of wallpaper next to the doorway, which should cover the entrance in size;
- cut it in a horizontal direction so that you can completely close the slope;
- using a rag or roller, smooth the material over the surface so that there are no bubbles under it;
- repeat the steps on all sides of the opening.


Wet rooms are trimmed with sustainable materials, this also applies to slopes. Stone or ceramic tiles are ideal for embedding. Before installation, the surface must be plastered and leveled. Experts do not advise picking up heavy tiles, as they will not adhere well to the wall. The order of work is as follows:
- the material is cut in accordance with the dimensions of the slope using a glass cutter or tile cutter;
- glue is prepared in accordance with the manufacturer's instructions;
- the composition is applied to the surface using a spatula, which helps to evenly distribute it;


- the area of application of glue should be equal to the area of the glued tile;
- the reverse side of the tile is also covered with a composition;
- the material should be pressed a little to the surface, checking the correct position with the level;
- the second and subsequent tiles are installed with a gap of no more than 3 mm, while it must be free of glue, for this it is best to use beacons.


The composition under the tile will completely dry out only after 4 days, after which the plastic beacons can be removed and the free space filled with grout.
Door slopes in an apartment are a great opportunity to experiment with design. Be sure to take into account the purpose of the door, that is, whether it is an entrance door or an interior door, the purpose of the room, what material the box in the opening is made of.
Some types of materials are not so easy to mount; skills and experience are required, as well as the availability of tools.
- When using drywall, tiles or wood, you will need to make sure you measure correctly before installing the slopes. The slopes in front of the front door should not have free cavities, this will increase the durability and reliability of the cladding.
- Finishing with wood panels or plastic looks more attractive than painting surfaces. Drywall allows you to hide all the errors. Using this option, you get rid of unnecessary expenses when purchasing materials needed to level the walls. This method can rightfully be called economical and simple, since you can handle the installation yourself.


- Plastic panels are rarely used for decoration doorways, because the material does not withstand physical impact and breaks even with a small impact. This option is never reliable and durable. But wood is durable and reliable material which will serve for a long time. This finish is suitable for different rooms.
- Finishing work must be carried out taking into account the size of the doorway and the materials used. Thermal insulation is necessary as an additional installation step for entrance doors, since they must not only be durable, but also not create drafts in the apartment. When working with the front door, you need to pay a lot of attention to sealing the holes. Most often, mounting foam is used for this, which, after application, expands in volume, thereby filling the entire hole, leaving no free gaps inside. After complete drying, the excess foam can be easily cut off with a simple knife, thus leveling the surface for further decorative finishing.


- The plaster can be used directly on brickwork or already installed MDF panels. If you have to work with it, it is worth studying in more detail the features of the material and the process of its application, since this is one of the most difficult options for finishing slopes.
- The advantage of perforated corners can hardly be overestimated, since they can significantly reduce the time spent on leveling the surface. The solution falls on them easily, and they themselves are completely hidden from view after applying the plaster.
- It must be remembered that before starting work on finishing slopes, especially if it is an entrance door, it is important to close all gaps. If this is not done, then cold air begins to penetrate into the gaps, which condenses into the wall, wet spots appear on the wall, and subsequently mold, decorative trim falls off.
- Surface preparation is important for plastering walls. The work takes a lot of time, but it is recommended to process the surface in several layers. First, a layer of primer is applied, which improves the adhesion of the plaster to the surface. To achieve a perfectly flat surface, a profile fixed with dowels must be applied.


- For the manufacture of the solution should be used cement, sand, mortar, you can buy a ready-made mixture. The technology of applying to the surface involves starting work from the slopes of the upper region. First, a thick layer of plaster is applied, after which the excess is removed. To ensure smooth slope angles, it is recommended to use a perforated profile. It is fixed on the surface of the applied plaster mixture. Only after that a finishing layer is applied, which should be thin. It helps eliminate unevenness and roughness.
- If working with MDF panels, the base must be made of lime-cement mortar. After drying, it is applied to a surface previously treated with a primer. The panels should be divided into three parts, each of which corresponds in size to the side of the doorway. A special glue is applied to the surface, then the panel is installed.


The work on the installation of slopes is carried out in strict sequence, if you skip at least one stage, the end result will only disappoint, and the materials will be wasted.
For information on how to properly trim the door slopes, see the following video:
When installing the front door to an apartment, it is necessary to remember two popular sayings: “ greeted by clothes..." and " the retinue makes the king". What is it for? Entering the premises, the guest forms his first impressions of the hosts and housing precisely through the doors. Therefore, they should look presentable, emphasizing the prosperity in the house, be in harmony with the decoration of the hallway and, at the same time, be reliable protection from uninvited visitors.
However, this effect cannot be achieved without work on the device of slopes, both from the outside and from the inside. They are the same retinue mentioned earlier, which turns even the most ordinary door v essential element apartment interior. If anyone doubts, they can look at the photo below, which shows a doorway without finishing the door slopes.
What are slopes for?
Near the installed front door there is always a part of the unfinished wall. Along its plane from the side landing and apartments install platbands. Slopes are placed on the front of the doorway. They are needed for several reasons:
- give the door an aesthetically finished look;
- isolate the entrance hall from the penetration of noise and cold from the entrance;
- ensure a harmonious transition from the front door to the inner surface of the wall;
- hide the mounting elements of the door frame from intruders;
- close up recesses, cracks, cracks in the doorway.
When are installed
Installation of slopes on the front door is carried out:
- when replacing the door unit. It will not work to install a new door without damaging the walls nearby, especially since the installation recommendations directly state the need to remove old slopes;
- damage to the material from which the slope is made: cracks, shedding, deep scratches, etc. appear. Defects can appear both as a result of mechanical impact, and during the operation of the door due to microvibrations;
- changing the interior of the hallway. Finishing the slopes of the front door from the inside with your own hands is also carried out with the new design of the corridor, when the doorway begins to fall out of general style. The fact that the slope affects general form premises, began to pay attention recently;
- the appearance of mold or fungus. A rather unusual, but with enviable regularity, appearing reason. It is almost impossible to get rid of such a misfortune without replacing the slopes. Treatment with antiseptics does not help, as the problem is hidden inside the finishing materials.
Options for finishing the slopes of the entrance doors
Options for finishing jambs can be very different, unusual, but harmoniously fit into the design of the apartment.
Plaster
One of the most conservative methods of finishing slopes is plastering. It was first used several centuries ago and immediately became the undisputed leader. With the advent of new finishing materials, the popularity of plastered slopes has fallen sharply. The method has many advantages:
- no power tools are used in the technological process;
- lower finishing cost compared to alternatives;
- high strength - simultaneously strengthens the ends of the walls in the doorway;
- insulates the technological gap;
- easy to clean from contaminants;
- tolerates fluctuations in temperature and humidity without consequences;
- long service life.
Reverse side of the process:
- labor-intensive work;
- a lot of dust and dirt;
- plastering skills required;
- it takes several days for the solution to gain strength;
- not the most attractive look - you can only paint or wallpaper.
The last point is debatable. The appearance of a reflective decorative film with a 3D effect largely eliminates the problem. In addition, you can use decorative plaster which is not cheap in every sense.
Drywall
Finishing slopes with drywall leads by a huge margin among budget options. And this is not surprising, since the method has many positive aspects:
- low cost of finishing;
- high heat and sound insulation;
- environmentally friendly materials;
- simple installation technology accessible to novice builders;
- GKL can close openings of any shape;
- long period of operation.
The disadvantages of experts include:
- poor resistance to water - when the apartment is flooded, in 90 cases out of 100 it will be necessary to change the slopes. They will definitely draw in moisture from below, even if moisture-resistant types of drywall are installed;
- the need for finishing (priming, puttying, painting, wallpapering, pasting with decorative films);
- low strength.
The last point can also be argued with. There are several ways to increase the strength of drywall sheets several times:
- put it on solid glue, without the formation of voids;
- buy plasterboard with a thickness of 12.5 mm (wall);
- when installing the crate, do not allow distances between the profiles of more than 20 cm.
Tree
Another the old fashioned way finishing slopes - facing them with natural wood. To many, strangely enough, this seems to be a manifestation of provincialism.
But expensive wood species with their capabilities artificial aging, at the same time in several ways, allow you to get a very beautiful, rich-looking coating with a very long service life, both for metal entrance doors and for wooden ones. All minor damage can be repaired. A few more pluses:
- with their help, almost perfect insulation of the space between the door frame and the wall of the opening is carried out;
- environmentally friendly material;
- you can buy it in a store, or you can make slopes on the front door with your own hands, putting into practice the most original design ideas.
In apartments, this method is rare due to the high cost, unlike villas and cottages, where it comes first.
Laminated MDF panels
Slopes made of laminated MDF panels are gaining popularity. Particularly in demand are extensions made from this material.
For reference: jambs can also be sealed with non-laminated MDF boards, which is much cheaper. The only problem arises: how to finish the slopes of the front door inside the apartment - paint or paste over.
Using MDF panels for slopes has many advantages. They:
- hold medium-strength impacts without collapsing. When heavy and bulky pieces of furniture are brought into the apartment, the risk of damage is reduced to zero;
- are produced in various designs (relief, colors, imitation of precious woods, etc.), which makes it easy to fit into any interior, from classic to hi-tech;
- easy to install by one person;
- have good noise and heat insulation properties;
- can be installed with both wooden and metal doors.
There are few cons, but they are significant:
- panels are very expensive, second only to wood, as well as natural and artificial stone;
- scratches from sharp objects;
- constant care is needed - the accumulated dirt is difficult, and often almost impossible, to wash;
- cannot be installed in rooms with high humidity air, which, however, has nothing to do with apartments.
PVC panels
Attempts to transfer the experience of installing slopes to plastic windows from PVC panels on the entrance doors does not give the expected result, despite the simple installation, varied design and low cost of PVC. Here are a few reasons:
- thin material comes into disharmony with the material of the door, although if you try hard, you can pick up acceptable types of panels;
- easily deformed and damaged - there is no gentle operation, as on windows;
- does not hold geometry well at deep slopes.
Sandwich panel
The canvas of the slopes of the sandwich panels is made of plastic. But it has a significant difference from slopes made of PVC panels: the inside is not hollow with stiffeners, but is filled with polyurethane sealant. On sale you can find material with a thickness of 10, 24, 32 and 40 mm and a width of up to 1.5 m.
Among the undoubted advantages:
- beautiful appearance;
- simple care is the most undemanding material in this respect;
- not afraid high humidity and sudden changes in temperature
- simple installation technology - all work is performed in one step;
- no finishing required;
- allows you to finish a wide slope, up to 1.5 m, with one sheet;
- has a completely flat geometry.
High-quality panels have the same disadvantages during operation as PVC panels: they scratch and do not wash well. Inexpensive sandwich panels turn yellow over time, and also crack under mechanical stress (impact).
Natural and artificial stone
Fashion is a capricious lady. Then he comes without asking, then he leaves. This fully applies to slopes made of natural and artificial stone. They were very popular at the end of the last century, but then faded away. Now the fashion is back. They buy not only inexpensive, sandstone, stone, but also natural, very expensive, marble and granite.
The stone has many advantages:
- there is no need to level the surface of the jamb;
- you can do all the cladding work yourself - the technology is similar to laying tiles;
- the material is combined with any interior;
- stones have unique patterns, shades and texture;
- not afraid of water, frost and fire;
- safe for the health of the owners of the apartment;
- durable - difficult to damage;
- has a long service life, exceeding the service life of doors.
Among the disadvantages:
- very high price for most types of stone, including artificially created ones;
- requires virtuoso work when finishing walls on the border of two materials: slope stone and wall material.
If finances allow and everything is done correctly, according to the instructions, then the stone slopes look fantastically beautiful. This is the case when the price matches the quality.
We looked at the basic finishes that are quite common. In practice, many other finishing materials are used (laminated chipboard, ceramic tiles, parquet, one-sided sandwich panels, etc.).
It makes no sense to consider them separately, no - they are derivatives of those considered (laminated chipboard is similar in installation technology and characteristics to MDF panels, tiles with natural stone, single-sided sandwich panels with double-sided, etc.). There are also rarely used materials: laminate and lining.
clapboard
Any material made of wood has undoubted advantages. In the case of lining for slopes, experts and designers talk more about the minuses:
- difficult to fit into the interior;
- making small slopes is problematic;
- capriciously refers to changes in humidity;
- treatment with antiseptics and fire-fighting impregnations is needed;
- high price, approximately equal to MDF and slightly lower natural wood from a solid array.
As a result, experts advise in such cases it is better to spend a little more money, but make a choice in favor of natural wood.
Another option for finishing slopes “for an amateur” is laminate. Him:
- sufficiently high strength;
- Large selection of colors and textures, making it easy to match necessary material under the design of the hallway;
- good thermal insulation properties;
- simple care.
Among the cons:
- good conductor of noise;
- afraid of changes in temperature and moisture;
- service life does not exceed 15 years - one of the lowest rates among all materials used for sealing jambs.
Do-it-yourself instructions for finishing slopes
All slope device technologies can be divided into three basic types, which are encountered with variations in everyday practice.
Materials and tools
1. Plastering with a cement-sand mixture. This is the cheapest, but at the same time labor-intensive method. For work you will need:
- cement with sand or dry cement mixtures;
- deep penetration primer;
- putty;
- fiberglass or sickle;
- metal perforated corner to strengthen the outer corner;
- finishing materials (paint, wallpaper or decorative film);
- masking tape to protect the door frame;
- short rule;
- level;
- Master OK;
- paint brush (roller) for priming the wall;
- priming bath;
- a container for mixing the solution;
- an electric drill with a nozzle mixer for mixing the solution;
- a set of spatulas;
- grater;
- fine sandpaper or paint mesh.
2. Sticking finishing materials on the wall using various adhesive mixtures. This method of finishing is more expensive, but simpler and shorter in duration than the plastering process. In addition, it provides a huge selection design solutions when decorating the interior of the hallway and front door. For work you will need:
- finishing materials (drywall, PVC panels, chipboard, MDF, natural wood boards, etc.);
- adhesive mixture (specialized glue, putty, polyurethane foam, dry gypsum plaster);
- primer;
- antiseptic solutions;
- level;
- a set of spatulas;
- paint brush;
- cuvette for primer;
- construction pencil;
- roulette;
- a long, even object for drawing a cutting line on panels or plasterboard;
- cutting tool (drywall knife, panel saw or grinder with a cutting wheel);
- a container for stirring the solution or glue, if it was bought dry;
- construction mixer or electric drill with a nozzle.
When working with drywall, you will need a perforated corner to strengthen the corners and a sickle to seal the joints of the upper slope with the side ones.
3. Fastening slopes to the crate. The method is available only with a significant gap between the jamb of the doorway and the frame. If it is 2-2.5 cm, then the only option is glue.
The method has many advantages: quick installation, a convenient opportunity to hide various cables, the ability to make an opening with a significant “dawn” and install hidden lamps to illuminate the inner doorway. Disadvantages of the method, neither consumers nor experts note.
During the work you will need:
- facing materials;
- bar for the frame - made of wood, metal or metal profile;
- dowels with self-tapping screws for fastening the crate to the wall;
- self-tapping screws or "liquid nails";
- antiseptic;
- puncher with a set of drills;
- screwdriver or Phillips screwdriver;
- construction knife for drywall;
- grinder for cutting metal;
- wood file;
- level;
- plumb;
- roulette.
When working with GKL, the materials listed in paragraph 2 will be additionally required.
With everything you need at hand, you can get to work. Consider how to make the slopes of the front door with your own hands from various materials.
Plastering
Step by step work is performed in the following order:
- the ends of the walls are prepared for the application of a cement-sand mortar: the old plaster is removed, the remaining fasteners are removed, the surface is cleaned of dirt, loose pieces of brick and exfoliated concrete. The foam that comes out from under the box is cut off;
- the jambs of the opening are primed, twice. The second layer is applied after the first has dried. The beam above the door is processed by Benonokontakt, also twice;
- the outer corners are reinforced with a perforated corner, which will also serve as a beacon when applying the mortar. It is fastened with putty;
- near the door, a second beacon is placed on self-tapping screws, also from a plaster corner;
- the frame and the door leaf are covered with plastic wrap, which is fastened with masking tape;
- diluted CPS in the ratio of sand and cement 1 to 1, for applying "spray";
- spray is applied;
- after the first layer has dried, the second layer is applied - the primer. The solution for it is prepared according to the instructions, with the addition of fiber to reduce shrinkage and prevent cracking. The soil layer should not exceed 3 cm - otherwise the procedure must be repeated;
- after the soil gains strength, but does not completely dry, a finishing operation is carried out - a thin, 1-2 mm layer of liquid mortar is applied, in the language of plasterers - a coating that allows you to get a smooth surface. If the slopes are pasted over with wallpaper or decorative film, this is enough. Under the paint, the surface of the plaster is puttied.
The technology of plastering is considered in detail in the work: "".
Drywall
The technological process of installing drywall slopes completely coincides with the installation technology of panel slopes made of MDF and chipboard. And here and there you can mount on glue or on the frame.
Therefore, using the GKL as an example, we will show a step-by-step algorithm of work when attaching to glue, MDF - to the crate.
When working with glue it is necessary:
- clean the surface of the walls from dust and dirt, remove excess mounting foam, and then treat with an antiseptic and a primer (or a primer with an antiseptic already added at the factory);
- on the floor and on the door frame, apply with a pencil the lines of the slope;
Attention: if you plan to run drywall behind the box profile, then the width of the sheet should be 1 cm larger, the slope line is drawn only on the floor, a groove is cut into the mounting foam for the slope.
- measure the slopes, and then cut the GKL sheets to size;
- glue the upper slope, for which apply the adhesive mass in heaps (when using mounting foam, it is applied with a thin snake);
- for better fixation of the slope, two or three stops are installed;
- after the glue has set, the side slopes are attached, the joints are sealed with sickle and putty. After the putty dries, they are cleaned with fine sandpaper, after which the surface of the drywall is puttied;
- after the putty has completely dried, the slopes are painted or pasted over with a decorative film.
You can also use the combined method: it is attached near the box wooden block. GKL is attached to it with self-tapping screws. From the side of the apartment, the sheet is taken for glue. The only thing you need to remember is to lay the insulation between the wall and the drywall on the side of the door by 2/3 of the width of the slope.
The process is described in detail in the work "".
MDF panels
The frame method is used with a technological gap of more than 3 cm. For frame elements for drywall, you can use all types of bars, including a metal profile, for panels only wood.
The work is carried out in the following sequence:
- the tree is treated with an antiseptic, after which it is cut to size;
- with the help of self-tapping dowels, the bar is vertically attached to the opening close to the box and flush with the edge of the wall on the other side;
- horizontal strips are fastened if the panels are fastened with liquid nails (when fastening with self-tapping screws, two vertical strips are sufficient);
- all cells are filled with insulation - the procedure is mandatory;
- the dimensions of the slopes are measured;
- the panel is cut in accordance with the obtained measurement results;
- via liquid nails or self-tapping MDF screws attached to the crate.
PVC panels
A more or less erudite landlord knows that plastic panels are attached using special profiles mounted on the wall. These stripes are always visible and taken for granted. But only not in the case of slopes.
Here you can mount the panels in a special frame (they will be located horizontally) or take them with glue. However, there is a limitation here: the width of the slope cannot exceed the width of the panel, because seams are not provided.
Operations are performed in the following sequence:
- preparing the surface of the wall. If the height difference is more than 2 mm per meter, the surface is plastered or puttyed. The type of work depends on the curvature of the surface: a large difference is eliminated with plaster, up to 1 cm - with putty;
- walls are measured, after which slopes are cut. As in the case of drywall, when the panel is launched behind the door frame, its width increases by 1 cm. It is necessary to cut it from the side of the spike;
- to increase adhesion (adhesion), the wall is treated with a primer, and the plastic on the back side with sandpaper;
- the adhesive mass is applied around the perimeter with a continuous tape, and inside the panel - with a snake;
- the slope is pressed against the wall and immediately comes off. In this way, glue is applied to the wall, which is absorbed into the pores and sets. After 5-7 minutes, the slope fragment is glued completely.
Laminate is available for flooring. However, Russian craftsmen have found another use for it: facing slopes. The process completely repeats the technology of slopes from PVC panels. Lamellas can sit on glue (only mounting foam is used) or installed in a pre-installed frame.
artificial stone
When working with stone, artificial or natural, the main thing is to draw up a diagram of the location of each element, draw it in real scale on the slope and wall, if it comes in the form of a casing, and also lay it out on the floor.
The stone is fixed with glue or a special mixture according to the seamless method. Seams are present when facing slopes with ceramic tiles. The wall should not have differences exceeding 1 cm. If more, then the DSP is leveled.
Clapboard
The lining is attached to wooden crate self-tapping screws. To prevent the material from cracking, the holes for the screws are pre-drilled with a drill. The diameter of the drill should be 1-2 cm less than the cross section of the screws. Hats can be sunk and sealed with a special compound, or they can remain visible. It's a matter of taste of the owner.
Conclusion
The choice of slopes has become a headache for the owners due to the huge number options. Can be used:
- plaster, including decorative;
- drywall;
- natural wood;
- laminated MDF boards and chipboard;
- PVC panels;
- artificial and natural stone;
- lining;
- tile;
- laminate;
- sandwich panels one- and two-sided.
For fastening facing material the adhesive method and the frame method are used. The main thing when choosing is to fit the slopes into the interior of the apartment.
Related videos
Finishing the slopes of the front door can be done different ways. Each of the available options has its own advantages and disadvantages and is selected individually. There are many factors to be taken into account, which are overall design interior, possible financial costs, as well as the skills needed to complete all stages.
How to trim the slopes of the front door? This question always arises when there is a need for this kind of finishing. There can be many reasons for doing this:
- Installation of a new structure. This is the most common situation. During the installation work, adjacent areas are destroyed. It often happens, especially in old houses, that there is a complete shedding of the old layer of slopes, because they are made of plaster. It must be taken into account that the new door must be installed correctly, without distortion, in order to exclude subsequent repair work.
- The appearance of defects. Over time, any finish becomes unusable. The same situation occurs with slopes, especially if they frame the entrance. Cracks, shedding, traces of mechanical impact appear on the surface. It is very important to assess the situation in time in order to install new door slopes without unnecessary work.
- Changing the general appearance of the room. Indeed, a new do-it-yourself facing of entrance and interior doors is necessary when the design of adjacent rooms changes. Sometimes it seems that the door slope is an area that does not affect the overall appearance of the interior. This is an erroneous opinion, because even such a seemingly insignificant detail plays an important role.

On a note! There is another reason for replacing slopes, which is the appearance of mold and mildew. This situation will require cleaning the surface to the ground, cleaning all affected areas and impregnation with antiseptics. You should immediately find the causes leading to the appearance of this problem.
What material to choose for the slope device?
There are many options that allow you to do the slopes of the front door with your own hands.
- Plaster.
This finishing material used everywhere. It must be borne in mind that this option has the lowest cost. All work is carried out independently, without the use of special tools. More recently, this method was one of the main ones, but recently its popularity has begun to fall. There are many reasons for this, among which stands out - not the most beautiful visual appearance. Of course, this state of affairs is easy to fix if you use decorative and textured plaster.
- Drywall.
The popularity of GKL plates is only growing. This material allows you to perform all the work quickly enough. But this is true for large areas. If only finishing the slopes of the front door from the inside, then there will be a need for additional manipulations. The fact is that during installation, numerous cracks (joints) appear that need putty with putty.
- MDF panels.
This should include the laminate. Such products are great for finishing work. The panels are installed very simply, the resulting surface has an excellent decorative appearance. But there is one drawback, if the width of the opening is greater than the material used, then it becomes necessary to perform docking. Laminate forms less noticeable seams, but they also impair visual perception. MDF front door trim
 - Natural tree.
Of course, making door slopes with natural wood is a rather expensive procedure. But we must not forget that it turns out very beautiful coverage which has unlimited durability. If necessary, restoration work can be carried out. All activities must be carried out in compliance with numerous technological nuances.
- chipboard materials.
This option allows you to veneer even very wide openings. Many mistakenly perceive chipboard as an exclusively material for the manufacture of furniture. In fact, for facing areas adjacent to the front door, thinner sheets are used, which have very impressive characteristics.
Advice! Currently, there is a large selection of chipboard. For installation, sheets are used that have a thickness of 6 to 10 mm.
- PVC panels.
Plastic slopes are an option that is more suitable for working with window openings. The fact is that this species products often comes into disharmony with the material of the input structures. Of course, modern technology allows you to choose suitable solution, but this is not always possible.
- Decorative stone and brick.
There is an opinion that this method is rapidly going out of fashion. In fact, the situation is not so sad. Such material allows you to get an individual and reliable surface. It should be borne in mind that the laying of parts will require a large amount of time. Many masters pay attention that in the future it will be very difficult to complete the finishing work of the walls. After all, for work you will have to use a limited set of options. So, for example, cladding with any kind of panels will be difficult - it is difficult to fit them under the masonry.
- Extras.
This material is most suitable for mounting slopes on interior doors. A box of such designs suggests the use of this option. Therefore, door manufacturers are developing a whole line of extensions that are completely identical in color and texture to the door leaf.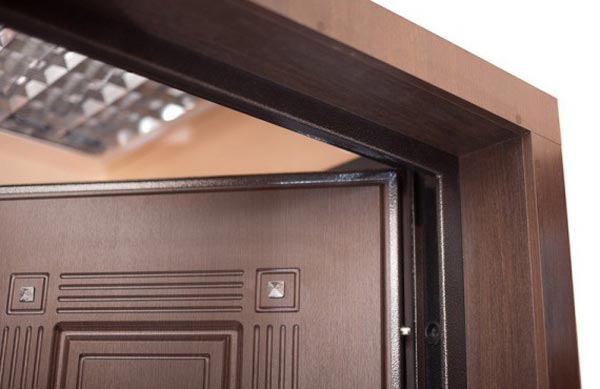
Preparatory activities
Installation of slopes on the front door begins with preparation. It is important to perform the work qualitatively in order to avoid correcting possible problems.
The activities are:
- The surface is cleared of the existing remnants of the old layer. If the coating crumbles, then it should be completely removed to the base.
- If a new structure was installed, then excess foam remains. It is cut with a clerical knife. It is impossible to allow the removal of excess.
- All joints and gaps between the box and the wall are smeared. Sealing is carried out around the entire perimeter.
- Sections of the walls are finished with plaster. If sheet and panel materials are installed, then the slopes of the front door are sealed without carefully leveling the surface.
- Be sure to treat with antiseptic and priming compounds. This will help prevent mold and mildew. It will also improve adhesion if the door slopes are finished with decorative mixtures after installing the front door.
- A complete absence of areas that may contain small cracks should be achieved. It is these, sometimes imperceptible defects, that are the source of drafts and unpleasant howls when it comes to entrance openings.

Slopes on the door are mounted only after full preparation.
Technological aspects of working with some materials
Each of the materials has its own characteristics and technological aspects, which should be considered in more detail.
Work with plaster: simple and decorative (textured)
Slopes on the front door with conventional plaster are done as follows:
- being prepared right amount mixture, which should be enough for 35-40 minutes of work. If there are surpluses, they will quickly lose their properties.
- The solution should be applied in layers that are equal to 1-1.5 centimeters. It is taken into account that more than two layers require reinforcement with a reinforcing mesh.
- To obtain a flat surface, beacons are installed. They are fixed on a small amount of plaster.
- Experience should be realistically assessed. If it is not enough, then a wooden lath is laid along the outer edge around the entire perimeter. It should protrude to the width of the applied layer. That is, it will serve as a guideline in order to prevent distortion.
- After drying, beacons are removed, which are left behind small defects. They are removed with a newly prepared solution. When removing rails, care must be taken. Corners can be reinforced with perforated corners.

After the surface has completely dried, the slopes for the entrance doors are finished decorative materials. It can be paint, wallpaper. But decorative plaster () will look much more interesting. It is applied after the primer:
- The decorative mixture is laid on the surface.
- With the help of various devices, a relief is formed (watch the video). If a decorative mortar is used, then the coating is obtained by proper spreading.
- In the future, depending on the material used, paint, varnish or waxing is carried out.
As such, stucco can still be a great solution for finishing slopes, especially if you're doing a simple interior renovation or renovation.
Drywall: installation on putty
How to make slopes of the front door using plasterboard plates? The work is carried out according to the following principle:

How to close the joints and cracks that have appeared? Indeed, when fragments of plasterboard are installed on the front door with their own hands, then finishing measures are necessary. They lie in the fact that the corners are formed using perforated overlays, and the surface is covered with a layer of putty.
The installation of gypsum boards differs from plastering in that the base is formed much faster. The job does not require special skills.
MDF panels: fastening to the crate
Finishing slopes with MDF panels is carried out on the crate. This method is preferred for situations where mounting seam more than 4 cm.
The product should be installed using the following technology:
- A wooden beam is mounted around the entire perimeter of the opening. Parts are stacked horizontally. Fixation is carried out on dowels.
- It is advisable to treat the planks with an antiseptic before installation.
- The resulting cells are filled with insulation.
- All areas are measured. Panels are cut out. They are put into place.
- Fastening takes place on self-tapping screws, which are screwed into the very edges. They will be covered with decorative corners.
- Thus, all elements are fixed on the frame.
See photos before and after finishing with MDF panels:
 sheathing slopes MDF: doorway before and after finishing
 Chipboard: installation on vertical racks
Do-it-yourself door slopes using chipboard are not the best solution. But at correct installation- the coating will be durable.
- The whole process almost completely repeats the work with MDF panels. The difference is that the wooden beam is installed vertically. That is, you need to get two racks that are fixed at each edge.
- For work, LDPS is used, which is most suitable in thickness. After taking the dimensions, the parts are sawn.
- In order not to repair the material due to water ingress, all open ends are coated with sealant.
- The elements are fixed through pre-drilled holes, which at the initial depth should be slightly larger than the diameter of the cap. This will allow you to drown the screws so as not to damage the front side. All holes are covered with special wax or sealed with overlays.
- All corners and joints are closed with decorative corners.
This method is convenient if the slopes of interior doors are faced, which are less susceptible to moisture.
PVC panels: adhesive mount
This material is rarely used for such work. Also, many people mistakenly believe that you can give preference to the cheapest options. In fact, such a choice leads to the fact that the coating begins to deteriorate immediately after installation: defects appear, color changes.
Most often, plastic panels are fixed with glue:
- Carefully performed preparatory work. The differences should not be more than 2 mm per 1 m.
- The panels are cut according to the dimensions taken from the areas to be lined.
- It should be borne in mind that the fastening is carried out on glue. Therefore, before installing the slopes on the door with your own hands, all surfaces must be pre-treated. A primer is used for the walls, and the plastic is slightly sanded with inside sandpaper. Such procedures will increase adhesion.
- Glue is applied with a snake. It is important to consider that excess mixture is removed immediately, otherwise the surface may be damaged, which will lead to repair or replacement of parts.
- The elements are pressed against the base, but are not held, but immediately come off. After waiting a few minutes, they are finally installed.
- Now it remains only to fix the decorative fragments.
 The most simple and fast way PVC installations panels on slopes - this is an adhesive fastening
 Modern versions of PVC have sufficient strength and beauty. Alternatively, sandwich panels are used.
Decorative stone and brick (tile): the main thing is to draw up a diagram
How to make slopes on doors made of artificial stone or similar materials? The procedure is:
- It all starts with drawing up a diagram. It should reflect the actual position of the elements. If brick laying can be drawn on paper, then more work will have to be done with the stone.
- Initially, the surface is marked. It is immediately taken into account whether the details will lie only inside the opening or frame the outer part.
- Detailing is done on the floor. It should be detailed enough.
- Now start lining. The stone is attached to glue or a special mixture. It is important to consider whether suture or seamless technology will be used.
- After laying, if the surface is not protected, it is varnished.
We invite you to watch this video:
Thus, slopes for doors can be made of various materials. Each option is selected individually.
Even new and beautiful doors will have an unattractive appearance without properly executed slopes. Modern building technology allow you to use the most different materials. In addition to improving the appearance of the doorway, slopes help solve a number of other problems. If they are made correctly and competently, they increase the tightness, heat and sound insulation characteristics of the door, and also prevent physical breaking.
Functions and arrangement of door slopes
A door slope is the area around a door or empty opening. Application modern technologies and materials allows you to perform a variety of designer finishes of this place, after which it becomes one of the decorations of the room, emphasizing the tastes and preferences of the owners of the house.
A properly executed door slope at the entrance to a house or apartment will help get rid of many problems, ranging from noise and cold penetrating the house, to increasing the safety and comfort of housing.
The door slope should harmoniously fit into the surrounding interior.
The door slope performs the following functions:
- heat-insulating. After its proper finishing, heat or cold from the street will not penetrate into the house;
- noise canceling. A correctly executed slope will not allow extraneous sounds to enter the housing from the street or from the entrance;
- aesthetic. By choosing the right finishing material and installing it in accordance with the developed technologies, you can decorate the room in an original way and make it bright, memorable and unique;
- protective. After installing the slopes, the burglary resistance of the door block increases.
Finishing the slopes begins after the door is installed. First, the installation of the upper part is carried out, after which you can proceed with the installation of the side elements.
Features of the slope device in the doorway
If you look at the door slope in the section, you can see that it is made according to the principle of a sandwich and consists of several layers arranged in a strict order. Only by observing the installation technology, you can correctly install the door slopes and get not only a high-quality, but also a beautiful result.
The door slope consists of the following layers:

Materials used for finishing door slopes
There are many options for finishing door slopes, so when choosing materials, you must take into account your preferences and financial capabilities, as well as interior features. Most commonly used:
- PVC panels. The choice of plastic thermal insulation panels is one of the best options when finishing the slopes of the entrance doors. This is due to the high heat and sound insulation characteristics of the material, its durability and sufficient strength. The main advantages of finishing slopes with PVC panels:

- Drywall. This is the most common finishing material, with which you can easily and quickly arrange doorway. To work with drywall does not require special tools and skills, so it is quite possible to cope with its installation on your own. After laying drywall, you will have to use finishing materials, their choice depends on the preferences of the owners. Finishing can be done in two ways:

- Plaster. To use this finish option, you need to have certain skills. You can take not ordinary, but decorative plaster, this will allow you to get a more beautiful and original result. Often, perlite mixture is used for these purposes. Its only drawback is its high cost. One centimeter of such material, in terms of its thermal insulation characteristics, corresponds to laying in one brick. Any plaster must be applied in several layers and wait a certain time until they dry. Therefore, such work is carried out for a long time and requires the application of serious physical effort.
For plastering door slopes, you must have the appropriate skills
- MDF panels. They allow you to decorate a doorway of any width. This finishing material, as well as drywall, can be mounted on glue or on a frame. For wide openings the second option is more acceptable. In this way, slopes with a width of up to 80 cm can be finished. MDF panels can be lined with natural veneer, after which they are varnished or laminated with a variety of colors. This allows you to beautifully decorate the doorway and choose the finishing material for any interior.
MDF panels can be trimmed with slopes up to 80 cm wide
- Decorative rock. Although this is an expensive material, but finishing the door slopes with it allows you to get a beautiful and original solution. In order not to load the interior, it is recommended to use decorative stones medium size. The main advantages of this option:

- Other options. If you want to make an exclusive and unique door slope, you can use natural materials. It can be cork bark, bamboo tess and other materials. Their advantage is that they do not cause allergic reactions, therefore they can be used in a house where people and small children are sensitive to dust and foreign odors. In addition, static electricity does not accumulate on them, so dust does not stick. natural materials perfectly combined with all types of doors and help to create a harmonious and peaceful atmosphere in the house.
Natural wood does not cause allergic reactions and looks very beautiful
Video: how to hide crooked slope angles
Plastering door frames
Although plastering door slopes requires certain skills, if there is a desire, then, adhering to the developed technologies, it is quite possible to cope with this task on your own.
To perform the work you will need the following tools:

In order to save mortar when sealing large potholes, they can be filled with pieces of foam, and then plastered.
You can plaster door slopes with different compositions:

Ready mixes are easier to work with, but homemade cement-sand mortar will cost less.
Technology of plastering door slopes:
- Surface preparation. Since this is a dirty job, it is necessary to cover the door leaf, floor and nearby objects with a film or tape. After that, poorly adhering plaster, brick or other materials are removed from the surface. To obtain a high-quality result, it is recommended to completely remove all old plaster. The gaps around the door frame are filled with foam. After it dries, the excess is cut off with a sharp knife.
All remnants of old materials are removed from the surface of the slopes, having previously closed the door leaf with a film
- Displaying guides. In order to get a flat surface, you need to set the guides. A perforated corner is installed outside the doorway, fixing it with a solution. The role of the second guide will be performed door frame. The plaster should not completely cover it, so a template is made of wood or thick plastic to level the mortar. If the work is done with a spatula or a rule, then beacons will need to be set.
Using a template, level the layer of applied plaster
- Black plaster. In order for the solution to adhere well to the surface, it must be cleaned of dust and primed. You can not use a primer, then the surface is slightly moistened with water before applying the plaster. Using a spatula or paint bucket, throw a solution on the wall, and then level it with a rule or template. At this stage, it is not necessary to achieve special evenness, but it is necessary to control the condition of the corners and remove excess mortar. It is more difficult to cope with the upper slope, but this work can also be done independently.
When applying rough plaster, it is not worth achieving a special evenness of the surface.
- Clear plaster. The first layer should dry for 12-16 hours. To determine the readiness of the surface, you need to try the coating to the touch - it should not float, but crumble. For finishing application, a more liquid solution is prepared compared to that used for rough plaster. It is thrown and well leveled. To get the most even surface, the rule must be moved along a zigzag path.
To obtain the most even surface, the rule must be moved along a zigzag path
- Grout. At this stage, the maximum even surface is achieved. It is possible to start work only after 16-24 hours, when the plaster is completely dry. They make a sufficiently liquid solution and distribute it no longer with a spatula or template, but with a special grater. The work is done in a circular motion. If you plan to putty slopes, then this step can be skipped.
If the surface is puttyed, then the plastering can be omitted
- Finishing. It is recommended to prime the surface again, and then putty it. Apply a layer first starting putty, and when it dries (it will take 4-8 hours), the finishing composition is applied. After it dries, using a special mesh, the surface is leveled, eliminating all, even the most minor irregularities.
After puttying the slopes, they are leveled, achieving a perfectly flat surface.
If the plastering of the slopes is done independently and for the first time, then a perfectly flat surface for painting may not work right away, but even a beginner can prepare a slope for wallpapering.
Video: plaster door slopes
Sometimes interior doors are not installed, but it is still necessary to arrange slopes in such an opening. The technology for performing work is similar to that described above, the differences will be only in the way the guides are installed:

The nuances of installing door slopes
Thanks to the existing variety of materials, the owners have the opportunity to experiment and choose the one that perfectly matches the interior of the room. It is necessary to take into account the purpose of the door, as it can be an entrance or interior door. In addition, before choosing a material for finishing slopes, you should evaluate your capabilities, since some installation options require special skills.
Expert advice:

To obtain a high-quality and beautifully designed slope, it is necessary to strictly adhere to the technology for performing work, which will be different for each material. If you skip at least one of the steps or perform it incorrectly, the result will be ugly, and the materials will be damaged.
Installing a new door is a joyful event for every owner. However, the work is not limited to the installation of the box and the canvas alone - in the end, it is necessary to arrange the slopes so that the design looks beautiful and organic.
To carry out this event, of course, you can invite a specialist. However, does it make sense to overpay for the services of a third-party master, if such a simple job can be done on your own?

For the design of slopes (- article), materials such as plaster, polyvinyl chloride-based panels, drywall and MDF panels are most often used. Study the presented guides, choose the design option that suits your case and get to work.
First step. Seal with mounting foam all the gaps between the base and the door frame. Let the foam dry and carefully cut off the excess foam with a sharp knife. Carefully sand down any unevenness with sandpaper.
Second step. Proceed to surface treatment for future trim elements. Apply a coat of primer to ensure better adhesion of the plaster to the surface.
The primer usually has to be applied in several layers. Focus on the situation - as a result, you need to get a perfectly flat and smooth surface. Start applying a new layer of primer only after the previous leveling layer has completely dried.
Third step. Start plastering. Buy ready facade plaster or prepare a mortar with your own hands from a mixture of lime, clean fine sand and cement.

Start plastering from the top door slope. Apply the mixture in a thick layer. Level and remove excess putty with a wooden slat.

For additional strengthening of the outer corners, mount a perforated corner profile. It must be pressed a little into the still damp plaster mixture.
Let the top coat dry completely and apply the top coat. plaster mixture. It should be thinner. The main task of this layer is to level small irregularities. Wait for the final plaster to dry completely. Simple door slopes are ready.

Plastering is the most budgetary option for decorating slopes. Whether to give preference to this method or choose some other way of finishing - each owner has the right to decide independently.
Video - Door slopes

Beautiful and inexpensive slopes can be made from plastic panels. First, the frame is prepared, and then the finishing is performed directly.
frame
For the frame, prepare a beam with a section of 2x4 cm. Plastic panels will be attached to the frame.
Saw the timber into blanks according to the size of future slopes. Fix 4 perpendicular strips on each wall part of the doorway. Attach 3 strips to the top. Use nails to fix the elements.
Side elements
Finishing panels should be slightly wider than the surfaces decorated with them. Finishing elements will need to be bent so that they beautifully “beat” the corners.
From the end, the plastic panels have a hollow structure. voids correct form are present along the length of the elements. To give the panel the desired shape, make appropriate cuts along the voids mentioned. An ordinary clerical knife will help you with this.
If desired plastic panels you can even finish the columns, so there will definitely not be any problems with finishing the corners of the slopes. The joints will be barely noticeable.
Make cuts exclusively on the reverse side of the trim elements.
Attach the cut modules to the frame. For fixing, you can use self-tapping screws or small nails. Fix the bent elements to the wall surface. Work in this order:
- define the border of the trim element;
- make five holes in the wall so that in the future they are covered by the edge of the panel;
- hammer wooden plugs into the prepared recesses;
- screw the panel to wooden corks using self-tapping screws (nail down).
- Install all panels according to this algorithm.
Beautiful slopes for the door can be made from drywall.
Video - Installation of a drywall slope on the front doors, part 1
Video - Installation of a drywall slope on the front doors, part 2
First step. Drill holes around the entire perimeter of the opening at a distance of about 200 mm. Hammer the dowels into the holes and screw the screws into the dowels, slightly without twisting the end.
Second step. Determine the appropriate dimensions for the starting rail. To do this, you need to measure three sides of the opening. Cut the guide to your measurements.
You can make the upper guide along the width of the opening, since in the future the side sheets will rest against the upper slope. You can make the side guides a little shorter.

Third step. Screw the starter rail to the wall with self-tapping screws. The long side, at the same time, should be placed outside the door slope, and the short one - inside.

Fourth step. Mark the strips on the drywall sheet required size. Cut out the drywall according to the markup.
It is very important to observe the cutting technology. Otherwise, the cut edges will be ugly.
For cutting, attach some long, even object to the marking line, for example, a piece of a mounting profile. Cut through the top layer of paper. Gently tapping the cut strip from the back of the sheet, break through the plaster, and then cut through the second paper layer.
Fifth step. Prepare the glue mixture. Follow the instructions specific to your glue.
Sixth step. Apply a homogeneous adhesive mass on the back side of the drywall strips. Also glue must be smeared with pre-mounted dowels.

Seventh step. Proceed directly to the finish. Bring the edge of the strip into the starting guide. Align the trim element and then press it to the base. Fasten the side slopes in the same way. Remove excess glue immediately, otherwise in the future it will lead to deformation of the drywall.

Slopes need to be supported with spacers while the glue dries.
You can fill the gaps between the base and drywall with the removed excess glue.
Give the slopes 12-24 hours to dry and you can proceed to finishing: puttying, painting or other finish of your choice.
Such slopes will serve for many years without any complaints.

Beautiful door slopes can be made from MDF.
First step. Prepare the basis for future door slopes. To do this, treat the base with a simple lime-cement mixture. Let the mixture dry and apply a primer over it.
Second step. Cut the MDF into three slopes of the required dimensions. Before you start cutting, carefully measure the angles of joining the sides of the opening. Next, you need to cut the ends of the trim elements in accordance with the measured angles.

Before proceeding with the installation of panels, make sure that the joints are correct. To do this, attach the connected elements to each other. Try not to have any gaps - they will spoil the appearance of the finish.
Third step. Apply the desired amount of adhesive mixture to the top of the doorway. Press the appropriate trim element to the adhesive and support it until the adhesive dries completely. Fix the side elements in the same way.
For the best possible fixation of the elements, place spacers between them.
Hide the gaps between the base and the fixed slopes with plastic corners. To fix the corners, use liquid nails or other suitable glue.
Try to choose panels for the manufacture of slopes, the appearance of which would be as close as possible to appearance door leaf. Such a finish will look as holistic and beautiful as possible.
Thus, a wide variety of materials can be used to equip door slopes. Select suitable option, follow the provisions of the instructions given, and you will be able to cope with the tasks set as well as any specialist.
Successful work!
Video - Do-it-yourself door slopes
