What materials can a shower cabin be made of. How to make a shower cabin with your own hands
Small-sized apartments, in which there is not enough space to install everything you need, are far from uncommon in modern cities. So a shower without a shower stall in such apartments is also not uncommon.
But in order to swim comfortably in such conditions, you need to equip the bathroom space, taking into account all the rules and decorate it beautifully.


Peculiarities
Despite the popularity of this type of shower, they still seem strange and incomprehensible to many. Therefore, before talking about the process of installing and decorating such a design, you need to understand its features, as well as determine all the possible pros and cons.


pros
A shower without a massive shower enclosure has many advantages.
- First of all, this design does not take up much space, and the bathroom seems larger. The boundaries of the shower space are not defined by walls or even a light partition. This is very good, especially for small baths.
- The next positive point is that it is very easy to care for such a shower. No need to constantly clean the tray, just wipe the wall after taking a shower and periodically wash the floor. It is this plus that attracts many, because most showers with glass walls are bad just because prints and stains constantly remain on such a surface, so you have to mess around with cleaning several times a day. In the case of such an unusual design without walls and partitions, cleaning is minimized, and you do not have to spend a lot of time.
- A shower without walls, if you get used to it, turns out to be very convenient to use. This is true for children, the elderly and for those who have some kind of health problems. There is no need to climb into the box or open and close the door - just turn on the hot water, and you can take a shower. If in the process of bathing a person becomes ill, then getting out of such a shower is much easier.
- In addition, it should be noted that she looks very good. Especially if you somehow show your creative fantasy and beautify the environment. In this case, the design of the walls and floor, and the use of light curtains, also help.
Minuses
However, this design also has disadvantages.
- Firstly, if you do something wrong, then there may be a risk of flooding the neighbors from below. So you should always seek the advice of professionals, or even entrust the work to the masters, not relying on the fact that you can do everything well without having any skills.
- Secondly, after taking a shower, the room can smell unpleasant. This is due to the fact that the shower floor is not installed correctly. More precisely, for the reason that it is not raised up and a water seal is not installed under the base.
- And, finally, it is simply unusual for many to take a shower in the bathroom without a full-fledged shower cabin. But this cannot be called a significant disadvantage, since there is always the opportunity to buy a bright curtain that will replace the usual partitions.
- But in the event that a large family lives in the apartment, and the bathroom is combined with a toilet, installing such a shower is unlikely to be a reasonable solution. Still, this option is more suitable for modern studios and bachelor apartments.


Design
A shower without a shower stall is very simple design, which is not complemented by walls or partitions. Equipping a bathroom in this way is very simple.
Stock
First thing to do in the bathroom good stock where all the water will go. There are two types of drain that you can choose for such a shower: linear or point. The linear drain is located on the floor, usually closer to the wall or to the corner.
The design is very compact and suitable for small rooms. If necessary, the drain can be integrated with a siphon for additional space savings. The dot option is located in the middle of the shower.
If you make a mistake at this stage, then the water will not leave, and the bath may well be flooded.


Tiles on the floor and walls
Separately, it is worth mentioning the options for finishing the floor in the bathroom. This is also important, since not all materials withstand such conditions, that is, high humidity and frequent temperature changes. The best option- finishing the floor, and in some cases the walls with ordinary tiles.
It is important to consider that the bathroom flooring must be non-slippery. Therefore, it is preferable to choose tiles with a rough surface. In this case, the likelihood that a person slips on a wet surface and falls is excluded.
In addition, tiles, tiles and mosaics react normally to humidity, which means that similar materials can also be used to decorate the wall in the place for taking a shower. This is convenient because the room will remain well-groomed and tidy for a long time.


Design
Very important point- decorating the bathroom. There are many interesting ideas creating an attractive interior in this room that will inspire both lovers of the classics and connoisseurs of modern art.
The first step is to decide where the shower will be located. The best option is, of course, the corner. It is there that he does not take up extra space. Although, as a rule, it all depends on the features of the arrangement of the bathroom, and in some cases free place remains only in the center of the room.


Then it is worth deciding how the shower area will be allocated. As a rule, a space with a shower is highlighted either by color or by another finishing material. Most often, this is either a tile or a mosaic, since they react well to water and do not deteriorate under its influence. There are many interesting options finishes, including ready-made mosaic panels or full-fledged paintings that are laid out on the wall or floor using tiles.
Combinations of contrasting colors and dark inserts on a light background also look original. In some cases, the space allotted for the shower is trimmed with some patterns, which looks very good against a plain background. Patterns can be both abstract and geometric or floral.
If you do not want to highlight the shower space, then you can limit yourself to using a transparent curtain with a light pattern. It seems more airy and does not stand out at all against a colored background. Such a detail certainly does not violate the integrity of the interior.


Looks interesting modern finish illuminated rooms. It can be both monophonic and colored, resembling a garland. For this, waterproof lighting options are used, for example, high-quality LED strips.
If the shower room is combined with the toilet, then you need to make sure that there is still at least some personal space. To do this, you need to create a partition using a curtain made from any suitable material. The curtain can also be part of the interior, if you choose it correctly.
In general, there are many interesting ideas for decorating even the smallest shower room in a house or apartment. You can verify this later by looking at real examples of finished rooms.


How to do it right?
It is quite possible to make a shower without a full-fledged shower cabin with your own hands and it is not even as difficult as it seems. main feature such a washing space - there is no tray, as in a conventional shower room. This means that the base is flush with the floor. So the floor turns out to be single-level.
But at the same time, it still consists of several layers.
- The main one is the base, covered with either polystyrene foam or any other means of thermal insulation. A screed is made on top of all this.
- Then a new layer of waterproofing, on top of which again goes the screed.
- The final touch is the finishing of the floor with a beautiful facing tile.
Despite the fact that the floor consists of many layers, creating it is not as difficult a task as it might seem at first.

Styrofoam laying
The initial stage of work is the laying of expanded polystyrene. The thickness of this layer, as a rule, reaches fifty millimeters. It is also an insulating layer.
Immediately after laying it, you need to consider the possibility of water drainage. Either a tray or a ladder is mounted to the outlets. It is preferable to choose the ladder, since there are many varieties of it. It can be round, square, rectangular, horizontal or vertical. Everyone chooses the option that is best suited for a particular bathroom.
If the shower cabin is installed in a city apartment, and not in a private house, then you need to take into account the fact that the ladder is installed in a special hole, which is located directly on the floor surface, this is done to save space. In country houses, as a rule, trays are used, the length of which, depending on the size of the bathroom, can be either 0.5 or 1.5 meters.


Screed
The next layer is concrete screed. After it - waterproofing. There can be two or even three such protective layers. Most masters try to arrange them so that the surface of the protective layer protects not only the floor, but also the lower part of the walls. This allows you to extend the life of the shower space.
After the waterproofing is finished, you need to additionally glue all the joints between the wall and the floor so that there are no seams and empty space. Next comes the screed again. True, this time it is performed using a metal reinforced wall.

Facing
The final step is surface finishing. facing materials. It can be tile, mosaic or classic tile. In some cases, pebbles or even smooth stone are also used.
By the way, here it is worth considering a separate point - the correct slope of the tile. It should be directed towards the drain hole. This is done so that the water does not flood the entire room.
When everything is finished with the floor, you can proceed to attaching the shower. This is where it all ends. So it turns out that installing such a design can save a lot of time, since you don’t have to spend time installing a partition or installing a full-fledged box.


Beautiful examples
A bathroom with a shower without a shower cabin is unusual and original solution for modern apartment. And in order for it not to look unnatural, you need to properly equip the room and decorate it. There are many interesting ideas for decorating such a space.


Light room
The first example is a charming bright room in which you can truly relax even for a short time, which is spent on taking a shower. Almost the entire surface of the walls and the floor is tiled in shades of coffee color.
So that everything does not seem too boring, the surface of the walls is finished with different types of tiles. Bottom part- in even squares, and the upper one - with a material that is more reminiscent of a brick. In the middle, the wall is complemented by an original stripe decorated with a pattern. From above, the wall remains white.
The shower space itself does not take up much space. The fixture for the watering can is fixed on the wall, and there is a point drain on the floor, where all the water goes. This is convenient, since there is neither a pallet nor an elevation that would break the harmony.


Despite the fact that the bathroom is quite compact in size, there is also a place to store things. First of all, this is a niche in the wall. The designers here very correctly beat the space of the room, deciding to make a niche in the corner so that there would be more space for all kinds of jars and bottles. There is also a place for a small lamp. Since the niche is located high enough, water will not fall on the light source, and the lamp will be safe.
Another place to store things is a small elevation, reminiscent of benches in baths and saunas. Its surface is finished with the same tiles to maintain harmony. It can be used as a place to store towels and clothes, and as a bench. In general, despite the fact that this room does not have a shower box, it looks very attractive and stylish.


In shades of gray
The second option is a shower without a shower, which is located in the very corner of the bathroom. The bathing area is fenced off by a low ledge, which does not allow water to flood the entire space in the bathroom. This was done for the reason that in this case both the bathroom and the toilet are combined in one room.
The whole room is decorated in two main colors - gray and white. But here such a combination does not seem boring, but very stylish. Moreover, you can dilute the interior of the bathroom with the help of bright accents, for example, colored towels, bathrobes or jars of cosmetics.


Dark and stylish
For lovers of elegance and dark colors Like the following example of bathroom design. It combines several interesting shades: dark brown, coffee, gray and metallic. All of them are in perfect harmony with each other and create a pleasant atmosphere for relaxation. The shower in this room is modern, made of metal. There is a table in the corner, and above it there is a mount where you can hang a towel.
They also did a good job with the lighting. There are diode lamps above the shower, and next to it - original lamp. Since the room is large enough, there is room not only for a shower, but also for a sink with a mirror above it and for a toilet. Everything is thought out, so there is enough space.
The color division into zones also looks interesting. Each part of the bath is made in a new color to visually stand out from the rest.


multifunctional
The last example is a multifunctional bathroom, in which a lot of useful things fit in a very small space at once. First of all, it is worth noting right choice colors. Since the room is small, it needs to be visually enlarged in some way, and white copes with this task as well as possible. The space is completely decorated in this color and this is a very right decision.
The shower area is located in the far corner. On the wall - a shower fixture, drain - in the center of the washing space. It is separated from other areas by means of an opening glass screen. When folded, it takes up almost no space. But, unfolding, it protects the rest of the bathroom from splashes.
On the other side of the room are a toilet and a bidet. This area is decorated with original towel holders and beautiful framed paintings. On the other side of the shower is a sink with a drawer for storing cosmetics above it. In general, the room looks as stylish as possible. It combines several zones at once, but at the same time there is enough space for everything you need and there is free space.

A shower without a shower cabin is a stylish and modern addition to the bathroom. It takes up little space, is easy to install and looks very unusual. If you do not make any mistakes during installation, then this design will be convenient to use and will last no less than a regular shower.
Modern shower cabins have a wide variety of functions, so many people prefer to entrust the work of installing it to professionals. However, subject to certain rules, you can easily make a shower cabin with your own hands.
Shower accessories
As a rule, many of the elements included in the shower cabin kit are assembled directly at the factory, since they have a complex device. To assemble the remaining blocks into a single structure, you do not need to have professional skills, it is enough to skillfully handle tools.
The external equipment of the cabin includes a pallet with a special frame equipped with a regulator, and doors with rails for fixing to the roof.
In the event that the shower room is limited to these components, its installation will require a corner with two adjacent walls. A pallet is installed in it, to which door guides are attached. They are additionally fixed to the walls with anchor bolts. To make holes for the anchors, you will need a puncher. Fastening of parts to each other is carried out with self-tapping screws or bolts.
Certain requirements are imposed on the walls: their surface must be perfectly flat and finished with moisture-resistant material. As a finish, you can use plastic panels or ceramic tiles.
Main and additional functions

The shower cabin includes a panel equipped with nozzles that regulate the water jet. With a minimum configuration, it is attached directly to the wall using stainless anchors.
To increase comfort and functionality, the kit may include additional elements, for example, the back wall, in the presence of which there is no need to install the device exactly in the corner, at the same time it also serves as a shower panel.
Manufacturers add variety to the design by adding hydromassage, saunas, jacuzzis. Despite the fact that this significantly increases the cost of the booth, your expenses will be justified.
Assembly of all parts before installation

Before proceeding with the installation, you should assemble the structure in a lighted spacious room. This is necessary to check the configuration.
If a defect is detected during the trial assembly, this will greatly simplify the procedure for returning a purchase.
Not required for initial assembly. silicone sealant and most fasteners. For this, simple bolts are suitable. Don't neglect this step. Please read the instructions carefully and inexpensive models and the quality of its translation. Cheap designs are accompanied by a description translated automatically, so the essence is not always possible to make out.
Having dealt with the instructions, if necessary, having bought the missing fasteners, making sure that all the seams match, you can start the installation according to the diagram.
Installation work

- Initially, you will need to fix the pallet and connect it to the sewer drain system. After completing the installation, check the joints for leaks. This is done as follows: a large amount of water is poured into the pan, and the drain junction is examined for leaks. This stage is quite simple, the main thing is to set the upper edge of the pallet strictly in a horizontal line, adjusting it with the help of special nuts.
- When you have finished installing the tray, proceed with the installation of the back wall or shower panel and then connect it to electrical network and the water supply system.
- Having finished with the previous stage and having checked the quality of the work performed, proceed to fixing the doors and rails. This process requires accuracy, since a slight misalignment will entail unpleasant consequences and the need for rework.
- After installing and checking the doors, it is time to install the ceiling panel. At correct execution all the previous stages, this work will not take much time and effort.
- Installation can be greatly simplified and the chances of possible breakdowns using a large amount of sealant. As a rule, a colorless sealant is used, but white or other desired color silicone can be used in conspicuous places to improve the aesthetic appearance.
- The last step will be the installation of a decorative screen on the pallet, decorative overlays and adjustment of all structural elements.
When connecting the structure to electricity, a separate line must be provided and an RCD installed.
Features of installing a shower cabin without a pallet

Shower equipment without a tray is a simple and cost-effective option. Also, there will be no difficulties during cleaning.
Installation must be carried out according to a number of rules:
- First, you need to prepare the site for the structure. It is important to note that floor waterproofing is required.
- Secondly, it is necessary to consider what materials the pallet will be made of. Brick and concrete are best suited. What is beneficial for the latter is the shape and size of your choice. In addition, high-quality finished brick or concrete base practically does not concede to the appearance of an expensive shower cabin.
Necessary:
- foresee the slope under the drain;
- in case the drain becomes clogged, make a threshold that will prevent water from entering the room;
- make good waterproofing;
- perform floor insulation;
- cover the floor surface with ceramic tiles.

It is very important to make high-quality waterproofing of the floor, as a large accumulation of moisture contributes to the appearance of mold and fungus.
In order to perform waterproofing work, you need:
- completely remove the old screed to concrete;
- apply waterproofing in 2-3 layers;
- cover the walls with bituminous mastic;
- equip an inclined drain;
- apply a screed to the floor of the entire room;
- lay out ceramic tiles on the walls and floor;
- fix a flexible shower;
- install glass doors or curtains.
On the walls, the level of waterproofing must be raised by 15-20 cm in case of emergency flooding.
Water pressure regulation

A rather significant point affecting the operation of the shower cabin is the adjustment of the water pressure. Unfortunately, in many localities, the water supply is intermittent, so installing a booster pump to create optimal working pressure and a spare water tank is a must.
This is especially true for structures equipped with a hydromassage function. This requires a certain water pressure, the exact numbers are indicated in the instructions (mainly 1.5–4). The volume of the spare water tank must be at least 200-250 liters.
Today, manufacturers offer many models of shower cabins with various built-in functions, the installation of which even an experienced professional can confuse. To solve this problem, you can contact the manufacturer, the masters of which will perform all installation work. However, this will be very costly for you. But if you are completely confident in your abilities, carefully approach the study of technology, instructions and proceed with the installation work.
Pallet manufacturing

What materials and tools are suitable for making a pallet? Brick, cement, waterproofing compound, sand, self-levelling compound - as far as materials are concerned. And from the tools for work you will need:
- level;
- trowel;
- plaster beacon;
- drill;
- nozzle "mixer";
- metal grid;
- roulette;
- paint brush;
- putty knife;
- tray drain.

When installing a pallet, what the base will be plays an important role. First of all, you should completely complete the plastering of the walls, make the floor screed, and only then proceed to the manufacture of the pallet. To avoid mold, the wall adjacent to the pallet is treated with waterproofing. First, waterproofing with a paint brush is applied to the subfloor, then on top of the screed and then under the tile.
For comfort, you can arrange an electric floor heating system. It is advisable to mount the system both under the pallet itself and around it.
When the first layer of waterproofing dries well, the markings of the future brick pallet are applied. It doesn't matter what brick the pallet is made of.
For this purpose, you need red or silicate brick. As a base for a brick, a solution of sand and cement or a special mixture purchased at a hardware store is used. For strength, a metal mesh is laid on the base.
The next step is to determine the location of the drain and the location of the system for draining water. Then you need to fix the construction beacons and make a concrete screed, carefully aligning it with the beacons as a rule.
The water drainage system must be best quality because its replacement is very difficult.

After some time, the surface of the screed is leveled with a trowel or spatula. When the screed is dry enough, it must be impregnated with a waterproofing mixture to prevent moisture from entering the concrete, as well as the formation of mold and fungus both in the bathroom itself and in neighboring rooms.
The self-levelling compound is finally spread over the already dry surface. After it is completely dry, waterproofing is applied, but more carefully to ensure the protection of the joint between the wall and the floor, as well as the water drain. The structure is now ready for ceramic tiling.
Tile shower cubicle

When facing the shower cabin, a simple ceramic tile, but it is important to pay attention to the fact that it is better to choose non-slip for facing the pallet.
You can veneer the pallet and walls with mosaics - it will be much more beautiful.
Materials and tools for tiling:
- directly tile or mosaic for the floor;
- tile adhesive (preferably water-repellent);
- level;
- rubber spatula;
- comb (notched trowel);
- roulette;
- tile cutter or grinder;
- rubber mallet;
- construction knife;
- crosses for seams;
- grout for joints (selected according to the color of the tile, and it is better if it is water-repellent);
- drill with a nozzle "mixer".
After tiling all surfaces with tiles, it is necessary to carefully wipe all the seams with grout, and after it dries, treat it with antifungal impregnation.
Selection and installation of the door

It is possible to use a plastic or glass door purchased at a hardware store. As an alternative to a transparent door, you can:
- corrugated glass;
- frosted glass;
- colored glass;
- with sandblasted or three-dimensional image.
Glass for the door is best to choose from thick tempered glass. The glazier will process the end of the door. When the thickness of the glass is already known, you can purchase a door mount - a motion limiter, canopies, hinges, latches, door handles - for convenience on both sides of the door. Glass can be pasted over with a special film with decor. Using mirror film there is a big advantage with outer side the door, it serves as a mirror, and this is significantly cheaper than buying a separate mirror in the bathroom.
Shower cabin with curtains

If you decide not to install doors, then you need to install a special ceiling cornice with the subsequent fixing of the curtain made of washable material. This option is the easiest, but not the most practical, as the curtains get dirty quickly, and it is very inconvenient to wash them. If the ceilings are high, then you can fix the cornice on the walls.
Shower cabin made of polycarbonate for giving

Recently, a shower cabin made of polycarbonate has become very popular. What is polycarbonate? This is a new generation material made from synthetic polymers. Ready-made polycarbonate sheets are monolithic and honeycomb.
Advantages:
- durable shockproof building material;
- bends well, and this allows you to give the desired shape;
- Polycarbonate sheets are lightweight - much lighter than tempered glass. For this reason, there is no need to strengthen the base and provide for additional fastening;
- not afraid of temperature changes, does not darken, does not deform (if a thermal gap is left during installation).
To make such a cabin, you first need to weld a hard metal carcass their square pipe, on which polycarbonate sheets will then be attached.

It's easy to make. Rectangular design it is welded from straight sections of a square pipe (it is also possible from a simple pipe, but then it will be difficult to attach sheets to it, since the drill will slide off a round surface).
Can do wooden frame but it quickly rots.
If the cabin will have a rounded shape, then the blanks are first bent and only then the structure is welded. Then the door is fastened, everything is painted, and the frame is sheathed with corrugated board. If a large container with water is installed on top, then a more powerful frame is made.
Photos of interior solutions


Video: installing a shower cabin
A shower stall is a great way to save space in a bathroom, especially if it's small. A high-quality cabin with many functions is quite expensive, and you don’t really want to buy a cheap design. Having shown a little imagination, you can make a do-it-yourself shower in a private house, which will be ideal for your bathroom, while its cost will be much cheaper than that of a store counterpart.
Features of the construction of the shower
The first step is to determine the location of the shower. The design should be located in such a way that it does not interfere with free movement in the bathroom and does not cause inconvenience when using other items located in the room - a washing machine or washbasin.
The shower room is a source of high humidity, therefore, in order to avoid the appearance of fungus and mold, it is necessary to take care of the ventilation system. In any humid room, an electrical appliance becomes a particularly dangerous object, so for lighting it is necessary to use lamps that are protected from water ingress. They are easy to find in the store by marking IP 65 or 67. Wiring should be laid in a place that prevents accidental contact with moisture.
Attention! In places of high humidity, it is desirable to use lamps powered by a 12 V source with an emergency shutdown device.
The construction of a shower cabin in a private house is divided into the following stages:
- waterproofing of walls and pallet;
- drain system device;
- laying communications;
- facing of the pallet and cabin walls with finishing materials;
- plumbing installation.
Choosing a shower tray
To make the job easier and save a little money, you can buy a ready-made pallet. For the installation of showers, acrylic trays are the most popular - they are inexpensive, light in weight and have a warm surface. The disadvantages include low strength and the need to build a podium.

Another option is an enameled pallet. It's over robust design, but when moisture gets on the surface, it becomes slippery, which is a rather dangerous property.
The choice of pallets is not limited to this. On sale there are models for every taste and budget - from copper to ceramic and glass, from small size to extensive. A variety of shapes allows you to choose a tray suitable for any shower design. On sale there are semicircular and square, rectangular and corner products.
Despite this diversity, some still prefer to build a pallet for the cabin with their own hands. For this purpose, bricks, blocks are used or a monolithic concrete structure is cast. This is a difficult and time-consuming process that allows you to create a shower tray of any size and configuration. After the construction of the structure, waterproofing is done and the pallet is tiled.

Another option that can be implemented in a private house is a shower room without a pallet, when the cabin floor is flush with the bathroom floor. Violation of technology during the construction of such a structure can lead to the formation of puddles, and as a result, fungus and mold. The shower floor should have a slight, barely noticeable slope of a few degrees to drainage hole closed with a decorative lattice. This design is the most practical, since the floor surface has no protrusions and is easy to care for.
Installation of the drain system
The easiest and most common way to drain water is to use a siphon. At the stage of the construction of the pallet, it is necessary to provide access for servicing the drain system. Revision windows close decorative grilles, hatches or lined with the same material as the rest of the shower surface.
To ensure the possibility of eliminating congestion, the angle of rotation drain pipes should not exceed 45°, and at best - 30°. For unobstructed drainage of water, pipes are laid with a slope of at least 2 ° per meter.
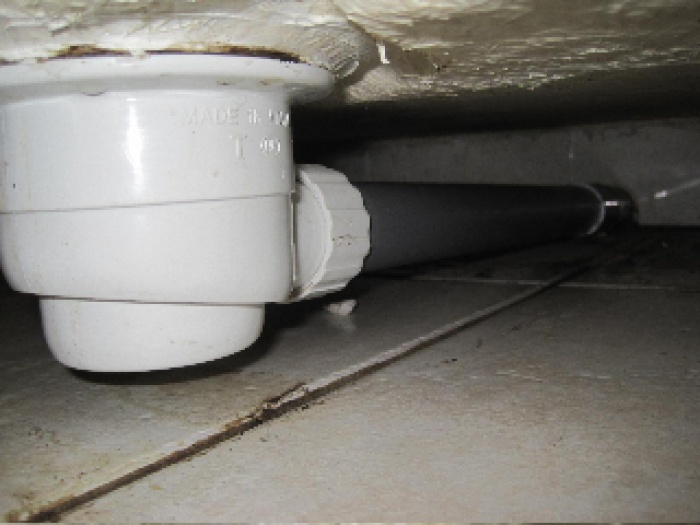
Another shower drain system in a private house - sewer ladder, which is a funnel with a removable dirt trap. Such a system is reliable and durable, the drain rate is up to 0.8 liters per second. Compared to the siphon, it is more compact - the height of the ladder is not more than 120 mm. When arranging the ladder, in order to prevent the return flow of water, it is necessary to install a water seal.
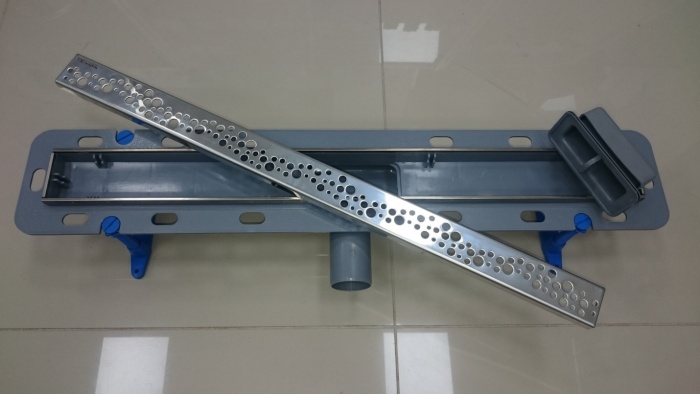
An analogue of a sewer ladder is a drainage channel. It differs from the previous system in a larger drain area, capable of passing up to 1.2 liters per second. There are several options for installing a drainage channel: located in the center of the shower and in the wall. The first option, the most common at home, and the second, due to the complexity of installation and the need for a niche in the wall, has not been widely used.
Arrangement of the shower tray
Before starting the construction of the pallet, the foundation is first prepared. To do this, it is necessary to carefully remove dust and debris, prime the base.
The next important step is the waterproofing device. For this purpose, use special formulations used in the construction of swimming pools. It is necessary to coat the surface at least twice, but the number of layers may be more depending on the composition used. The reliability of the entire structure depends on the quality of this procedure. At the point of contact between the wall and the floor, a waterproofing tape is glued to prevent water from entering the rooms under the shower.

If it is planned to fill a monolithic structure, a formwork is constructed according to the design of the shower cabin. At this stage, a drain is laid to avoid the ingress of the solution, it must be covered.
After the waterproofing layer has completely dried, you can proceed to the screed device. Using the level, beacons are set with a slight slope towards the drain. For the shower cabin, it is recommended to use solutions containing water-repellent additives. If desired, such a solution can be made independently by adding liquid glass to the concrete.
Advice. For the device of additional thermal insulation of the floor, it is recommended to first lay sheets of expanded polystyrene, and pour a reinforced screed on top.
After the final hardening of the concrete, the waterproofing is repeated, and then a pallet is built using bricks, blocks or concrete.
Shower cabin without tray

The construction of such a shower is best done at the stage of building a bathroom. This will allow you to correctly calculate the required level of screed and lay all communications.
A box is laid out around the place where the shower cabin is planned. This is necessary to bring the rest of the bathroom area into a horizontal plane. All the necessary communications are laid inside the box and the screed is poured flush with the bathroom floor, but already with a slight slope of several degrees to the drain hole.
Shower wall requirements
If the house is built of concrete or brick, then it will be enough to make high-quality waterproofing similar to that produced during the construction of the pallet. To level the walls of the cabin, a sanitizing plaster is used, consisting of two layers - the first does not allow moisture to pass through, and the second promotes salt crystallization, preventing it from appearing on the surface.
When building a shower with your own hands in wooden house other ways of finishing the walls will be required. Used to isolate the cab. moisture resistant drywall or special aquapanels with better resistance to moisture. It is very convenient to hide communications behind such a lining. In some cases, a brick wall is built. For such a design, it is necessary to build a separate foundation.

The walls of the shower cabin are tiled, after which the joints are grouted with a special water-repellent compound that prevents moisture from penetrating into the walls.
Choice of shower doors
Installation of doors is the final stage in the construction of a shower cabin. They are necessary to separate the wet area from the rest of the bathroom space. The material for the manufacture of doors is tempered glass, triplex or more cheap option- cast acrylic.

It is better if the pallet has a rectangular design, as in the photo. Doors for a shower cabin of this design can be easily picked up in a specialized store. If there is a pallet of complex shape, it will be necessary to make doors according to custom order which will cost much more.
Shower door installation sequence
It's always nice to use something made by yourself. The area of the shower cabin will take no more than 1 m2, but how much spicy sensations can it bring when taking water procedures on a hot day!
The shower cabin fits perfectly into the interior of the apartment and serves great alternative bathroom. It does not take up much space, saves time for washing. But often the boxes offered for purchase do not meet all the requirements that are so necessary - either they are too small, or the design and functionality do not suit you. In order not to waste time looking for the right model, you can make a shower stall yourself.


Device and advantages
A do-it-yourself shower cabin can practically not differ from a purchased design. However, such a hydrobox will already meet all the requirements of its owner and fit perfectly into the room. And besides, if something suddenly goes wrong and a breakdown occurs, it will be clear what happened and what exactly broke down, because the whole structure, each bolt was selected and mounted by hand.


The decision to create a shower cabin, as a rule, is due to the fact that:
there is not enough space in the apartment, or rather, the bathroom is small, and a huge bathroom is an unaffordable luxury;
the house has a complex architecture with nooks that can be “beaten” in this way and equip a full-fledged washing place;
in a private house, I want to create an ideal corner with a "tropical shower", hydromassage and other technical innovations;
in the country or in the garden you need a place where you can wash.


To make a shower cabin yourself is within the power of a person who understands plumbing and has done it at least once overhaul. When arranging the box, you can cheat and install some of the completely finished parts: be it a pallet or walls with doors. Ready-made purchased structural elements will greatly simplify the entire assembly process, however, the decision to install them will slightly limit the possibilities of an individual project, fit it to certain limits, because already finished elements have a strictly verified standard size.
There are several options for building a hydrobox:
Assembly of a ready-made kit - just buy and assemble the shower on site without any preparatory work.
Installation of the cabin on a finished pallet or bath. Here walls are selected and decorated, installed plumbing equipment. There is no need to prepare the floor (leveling is carried out only in case of obvious defects and differences in height).


The construction of a hydrobox based on a homemade pallet. At the beginning, an appropriate pedestal with sides is made, and then the installation and decoration of the walls is already underway. Walls and doors are made either to individual sizes or bought ready-made.
Full self-assembly of the hydrobox, all parts are unique and homemade.
Construction of a shower structure without a pallet with ready-made doors and walls.
The construction of a hydrobox without a pallet with unique partitions and doors, made to order or with your own hands.
An independent cabin device will not save you from spending money. If you choose low-quality and cheap materials, you may be able to save money, but this money will still be spent on repairs later.


Often, self-assembly can even come out a little more expensive than the purchased option. But it's worth it, as the finished kit will be fully functional, unique and practical.
The process of assembling a homemade shower stall will take place in several stages:
erection and preparation of walls; if the box is placed in a ready-made room, then this step can be skipped;
construction of a hydrobarrier of walls and a pallet;
creation of a water drain system with the possibility of servicing all hidden plumbing;


laying communications;
purchase finishing materials and further wall cladding;
installation of walls and doors.


wall requirements
The washing area where the cabin will be installed is a very humid place. Accordingly, there will be a large load on the internal walls and corners. Mold, fungus, leaks (and, as a result, flooding) are the troubles that threaten the owners of homemade shower boxes who have not taken care of protecting the walls.
Theoretically (and practically too) hydroboxing can be installed against any walls. Even wooden ones. But they must be protected from moisture. Not all types of wood are resistant to water.
One of the ways to protect the walls is to additionally cover them with moisture-resistant drywall. Of course, and additional processing Moisture-repellent compounds will also not hurt.

In addition, good moisture-repellent properties have:
walls tiled (tiles or mosaics) and if they are fixed with appropriate compounds resistant to high humidity;
walls sheathed with PVC panels;
walls made of glass, brick, stone.
In addition, you need to take care of the ceiling, ventilation system, electricity. The top can be sewn up with panels or tiles, covered with plaster, which contains protective components.


It is desirable to conduct electricity outside the area in which there is high humidity. The optimal solution will be the installation of LED 12 W lamps. They do not get very hot, economical, but at the same time they illuminate the space well.
It is also worth considering that very often after taking a shower, soap and lime deposits remain on the surfaces of the walls. When choosing materials for their decoration, you need to understand that you will often have to wash them.


materials
Any shower cabin consists of several parts: internal walls and ceiling, external doors, partitions, a pallet (or a specially prepared floor area), as well as plumbing.
Walls can be built from any building material, but if they are made of wood (or other material that is unstable to moisture), then it is advisable to cover them with moisture-repellent compounds. Better yet, sheathe it with special drywall. And then it to embody the decorating idea and more protection glue with tiles (mosaic) or install plastic panels.
You can also build walls of glass blocks. This solution will create a warm and bright space.


When arranging a cabin-corner, external walls can be made of polycarbonate, plastic, glass. Doors (both hinged and sliding) can be made from the same materials.
The walls and partitions of the shower cabin can be made from several types of materials at once. For example, they can be half bricked, and the second part will be made of glass.


The pallet is usually factory made of acrylic or enamel. For a homemade pallet, bricks are used (and, of course, cement composition, screeds, as well as waterproofing - for example, bituminous mastic), but other materials can also be used (construction of a drywall structure, wooden formwork and monolithic concrete). In addition, a layer of insulation - expanded polystyrene - can be provided in a homemade pallet.
If the cabin is built on the basis of the bath, then only doors and partition walls will be needed, which will act as a “curtain”.


There is an option to build a hydrobox without any doors and external walls. Walls and doors, on the contrary, are replaced with a water-repellent fabric, a curtain.


When choosing building materials, preference should be given to those solutions and mixtures that contain special additives that increase resistance to high humidity, mold and fungi.
Models and forms
Standard sizes hydroboxes vary from 80cm to 1m wide. In the first place there is very little space and quite uncomfortable. In meter-long booths, there is already more room, so you don’t have to worry that some awkward movement will accidentally knock down cosmetics or shelves.
The advantages of homemade cabins are that they can be made in almost any size in length and width, height. But if the dimensions are still small, then you should strive for a figure of at least 90 cm. In such a hydrobox, you can comfortably wash yourself, but there will be nowhere to turn around.


In their shape, booths can be both rectangular and square, as well as rounded. Rectangle and square are quite easy to reproduce with self-construction of a hydrobox, unlike rounded options. To recreate the semicircle of the house, you will need polycarbonate, which will need to be bent.


Determining the location in the room, very often they resort to such a variant of the booth as a corner. It is built into the corner of the room, so the manufacture of internal walls is out of the question. They are ready. The corner can be drawn in a semicircle, trapezium or at a right angle.


You can arrange a bath in the form of a shower. To do this, you only need partitions and doors. As a result, there will be a space in which you can not only take a shower, but also soak in the bathroom.


We determine the place
In a small apartment, every meter counts. Therefore, the decision to install a hydrobox is quite justified. The bathtub is being removed to make room for washing machine and there is room to change. It is important to consider that the box should not interfere with movement around the room, create inconvenience when using other interior items (washbasin, washing machine).


In a private house there is much more space for installing a booth. In addition, a place for boxing can be thought out at the design stage of the house. But if this has not been done, then it is quite possible to build it after.


If the cabin is installed in a country house or in a garden, then it can be placed where there is free space and access to water.


Choosing a base and a drain system
The fundamental decision in the self-assembly of a shower enclosure is whether or not to use a tray. It is from the foundation that all work on the creation of a hydraulic structure begins.
The choice of base also determines which drain system will be installed. A deep pallet, both self-made and ready-made, provides for laying pipes without bricking.


The bottomless option implies a hole in the floor and a grooved channel into which water will go.


The use of a siphon is the simplest and most affordable solution for collecting and draining water. When using a pallet, the main thing is to provide access to the structure. Pipe laying should be carried out at an angle of 30-45 degrees. The slope of the sewer pipes, which will help avoid stagnant water, is two degrees per meter.
The arrangement of the ladder is considered more reliable system water drainage. Yes, and besides this system takes up less space. When installing the ladder, it is also necessary to create a water seal that will protect against the reverse flow of water and drains.


The simplest ladder consists of several parts: grate, glass and the base itself with a hole for connecting the structure to the sewer pipe. Due to this structure, the possibility of blockage is minimized. Due to the fact that the grille is removed, there is access to the internal parts of the device. If you make timely cleaning of parts, then you can not think about blockages. A shower stall is not a place where a lot of garbage accumulates in the drain. But if, nevertheless, a blockage occurs, for example, at the entrance to the pipe, then it is enough just to push it inside the pipe. When it is laid correctly, then the blockage will pass through it.


Installing a drainage channel is considered a more difficult task. But it has a large area for collecting water. The drainage channel can be mounted in walls, as well as in the floor.

The full functioning of the shower cabin is impossible without a specially equipped water supply. From an aesthetic point of view, it is better to hide it. Shut-off valves will be located away from the box in a separate niche. But still, it is not worth walling pipes into the wall. It is best to make a strobe-niche in the wall and, having laid pipes in it, fill it with cellulose insulation (ecowool).


If the cabin is far from the sewer riser, then you need to take care of the waste pump. It is advisable to install pumps with magnetic valves.

Finished pallet
Using a ready-made pallet greatly simplifies the process of building a box. It can be acrylic or enamel. Each of them has its own advantages and disadvantages. So, the acrylic pallet feels warmer. But enamel is non-slip.


In addition, there are also pallets made of copper, ceramics, glass. But such options are quite expensive, although they have a number of advantages.
The main drawback of any pallet is its standardity. hard to pick up ready product according to your own measurements.


Installation of the finished pallet is as follows:
first of all, the base on which the container will be placed is leveled, and a rough screed is made;
pipes are laid and plumbing is installed (ladder or siphon);
the finished product is installed and fastened.


Do it yourself
Homemade pallet made from bricks. It is also possible to build a frame and its further sheathing with drywall. But the use of bricks is more reliable. For its masonry, cement with special additives is used. If such additives are not at hand, then you can add PVA glue or liquid glass to the solution.
When the contour is laid out, you can take care of the rough screed. After that, cover with waterproofing in several layers. For these purposes, bituminous mastic is usually used. If insulation is needed, then the screed is laid in several layers - a small layer cement mortar, insulation, screed, be sure to coat each layer with waterproofing.
The final layer will be a tiled coating - tiles or mosaics. They provide an anti-slip finish. The adhesive layer should be small and, of course, there should be additives in its composition that increase resistance to moisture.


The construction of a homemade pallet begins with the manufacture of a frame, formwork or small brickwork. A ladder, funnel and pipes are installed in this space. For your information: the height of the pallet wall should be such that, after it is lined, a drain elbow, a concrete screed can fit there and at the same time the slope is observed. During work, it is necessary to protect the plumbing and the ladder as much as possible from getting construction debris. At the time of work, you can plug it with newspaper or other paper. Do not neglect waterproofing and, having built a formwork or a brick side, you need to walk it in several layers along the walls to the height of the future screed. It is worth laying fasteners for racks in the brickwork if glass (plastic) fences inscribed in a metal frame are planned.
When the concrete screed has dried out, you can proceed to facing the sides and floor. And if until this moment a slope for water has not been provided, then it can be done at the expense of finishing works. It is necessary to reduce the thickness of the tile adhesive. The closer to the funnel, the smaller the layer.

Some points regarding a homemade monolithic concrete pallet:
For a concrete pallet, insulation is simply necessary, you can also make floor heating (but this is a matter of taste and individual preferences).
In the process of creating such a pallet, waterproofing is also required in several layers and with gluing around the perimeter with a waterproof tape.
After the waterproofing layer, there is a layer of insulation along the walls. In addition, a damper tape is also laid around the perimeter.


After the beacons are set, the slope is formed, first half the solution to half the height of the screed. Moreover, the solution itself should contain a minimum of water. After that, the second half of the solution is laid, which is prepared according to all the rules. It can be aligned with the rule.
When it's all set, there's a layer coating waterproofing, and then facing with ceramics. When erecting a hydrobox in a multi-storey building, it is worth breaking the screed layer into two and smearing each with waterproofing.


You will see how to make a homemade shower tray in the next video.
without foundation
Building right space shower cubicle without a pallet begins with the construction of the field. The main thing in its arrangement is to provide a slight slope, literally a couple of three degrees, no more. The drain system will be hidden. But it is worth remembering that it is necessary to form a gutter with a grate with the ability to access it.
The design of a barrier-free space is best done when the screed is just being formed in the room. This makes it easier to determine the height around the perimeter of the room.
The first steps in this direction will be the installation of sewerage and communications.

After that comes the design of the perimeter of the washing zone. A dividing box is being built in this area. With it, it will be much easier to bring the level of the main floor to 0 degrees. The base for the booth can be made when the main screed of the room is already completely dry and seized. The angle of inclination in the wet zone is small - 1-2 degrees. It is worth considering that when arranging a warm floor, the screed is created in two steps. The first layer is reinforced, waiting for setting, and then placed on it heating mats. These mats are covered with a second thin layer of mortar suitable for this purpose.
When the draft floor is ready, it is necessary to make waterproofing. After that, you can already move on to finishing work.


Making a corner and installing fences
The shower cubicle is the simplest in terms of construction. In fact, it is built into a corner, that is, the erection of internal walls is not required. You just need to think about where to place the hood. As a rule, it is made out on internal walls.
Usually the walls are made of tempered glass, covered with a special film that will protect against splinters. In a private house or on the street, the option of erecting glass block fences is quite acceptable. They are made of glass, which means they will transmit light, but they will not shine through.
Even as a material for the construction of partitions and fences, polycarbonate has proven itself well. His undeniable dignity is that you can give it even the most intricate curved shape. With it, the corner booth can be framed in a semicircle.


A glass cabin is inconceivable without doors. Built-in doors can be hinged, sliding, and there are also options with the installation of accordion doors. To install them, you need a certain set of accessories that is attached to the frame.
All of these materials have good performance characteristics and can provide decent waterproofing.
To build fences, you will need to build a frame into which the main materials - glass or plastic - will be embedded.


You can assemble a corner or a simple booth with a pallet according to the following scheme:
First make a frame. As a rule, such a structure is made of metal profiles, corners, guides. It will securely hold a fairly weighty glass or plastic. But if there is no need for a heavy frame and a light material is used, then its analogue can be made, for example, from nickel pipes.
Install on the edge of the pallet wall profile, align it strictly vertically. Mark the drilling points for the subsequent fixing of the profile.
In non-impact drilling mode, make the required holes. Install the dowels in the holes and mount the profile.
Hang wall panels. The seal should not interfere with free closing, but at the same time it should fit well to the base.
Fix doors and walls.


If you need to build a barrier-free space, then you need to know that doing it right is not an easy task. The main thing here is the installation and installation of the floor. But on the other hand, such a cabin will delight its guests for a long time. modern design. You can conveniently arrange shelves in it, equip it with a seat, put a good shower with a massage effect.

The sequence of work is as follows:
drill holes for mounting frame parts;
fix profiles;
install partition walls together with seals;
installation of special fittings and installation of the door (s);
cabin sealing - all seams are treated with silicone sealant.


When the body of the shower enclosure is fully assembled, you can take care of the installation of the remaining plumbing: faucets, faucets, shower heads. Soap dishes, handles, holders, mirrors and other fittings are fastened through seals. And finally, you can connect the water supply, check everything for tightness, leaks. If the latter are not available, then we can say that the hydrobox is finally assembled.
In order for the shower stall to serve for a long time, it is necessary to take care of it - regularly wash and clean, ventilate, and then there will be no plaque and musty smell of stagnant water. It will not be superfluous to periodically check the performance of all hidden and explicit plumbing details of the structure.

Special processing seams between the tiles will protect against the occurrence of such unpleasant phenomena as the appearance of black stains, mold, fungus. It is also desirable that after each wash the booth is cleaned. It is enough to rinse the surfaces first with warm, and then cold water, wipe dry with a towel or napkin. The main thing is to regularly inspect and clean the structure.
When cleaning plastic and chrome surfaces, do not use active chemical substances, coarse brushes and sponges. For glass surfaces, mirror and glass cleaners are suitable. But for an acrylic pallet it will be useful special agent. In the absence of such, a soapy solution will help to cope with the dirt. The enamel pallet is more resistant to strong agents. A homemade tiled pallet can also be cleaned with strong and even abrasive substances, but the latter are best used only in extreme cases.
Full-fledged shower boxes, which can be found in any hardware store, are far from always convenient to use. Limping quality, small internal dimensions, high price. In this article, we will tell you in detail and show how to make a shower cabin with your own hands: from installing a pallet and drain, to installing doors and tiling.
Such a cabin (shower corner) will be cheaper, better and more convenient!
Shower cabins come in several types, for example, the most popular options are - a flat drip tray or a simple floor drain. In this case, it will be possible to freely enter the booth for children and the elderly. The space in the bathroom in the apartment will increase significantly in size and the space will take on a different look.
V narrow room an excellent option would be a built-in cabin of suitable dimensions, for the device of which you only need curtains or glass doors. It is inexpensive, practical and convenient.
Shower cabin without tray (tile tray)
When planning a water treatment site, please note that using shower trays is not always the most rational solution. Even at the repair stage, making a shower with a tile tray is much easier and more reliable.
Showers located in fitness centers can serve as an example. The same floor can be made in a private house or in the country. When installing a drain ( professionals call it a ladder) a sewer pipe is brought to the place of installation of the ladder, the border of the shower room is lined with bricks, and its inner part is poured with concrete and waterproofed.

Advantages of this shower option:
- convenient cleaning of the floor surface after a shower;
- Maximum reliability of all elements and plumbing (we select it ourselves);
- the possibility of stumbling somewhere is reduced to “no”;
- the ability to choose any size of the cabin in accordance with the room.
See also: with photos and comments about convenience.

Use of flat shower trays in the floor
Shower trays are an alternative option. It is cheaper, but at the same time - not so convenient and reliable. You can choose a shower base with low sides, including acrylic ones.
The location of the sewer pipe will depend on where the drain hole is located on the pallet. Therefore, you need to take care of laying communications (water and sewer pipes) in advance.
The installation process will not cause any particular difficulties. There are adjustable legs under the base.
Ready-made shower trays are a simpler option, but some will find it less aesthetic and convenient. Such pallets are sold in almost any plumbing store, they are easy to install and do not require special knowledge during installation.

Benefits of prefabricated pallets:
- light and quick installation using prefabricated parts;
- pallet height adjustment with legs;
- the use of a special border for sealing joints;
- Possibility of installation on wooden floor, with preliminary protection from moisture.
Cons: Outdated appearance, not reliable materials that can sag and even break over time.
Instructions for self-assembly
Shower cabin technology with my own hands happens in stages. In progress installation work, it is very important to comply with all requirements for the reliability of communications and waterproofing.
Brick pallet
Before installing the pallet itself, you must perform preparatory work with a base. If a concrete screed has not been previously made in the room, it must be done. After the rough screed dries, the place intended for the location of the pallet must be treated with waterproofing. It is usually treated in 2 layers with an interval of 4-6 hours.

As waterproofing material some use a polymer film, but this is fundamentally wrong. It's better to prioritize bituminous mastic. The insulation technology involves applying the material not only to the base of the floor, but also to the walls in places of wetting ( therefore, you need to take care of this even at the repair stage, before laying the tiles on the walls).

After that, experts recommend once again forming a screed, and re-waterproofing. It is important to leave 1-2 centimeters in height from the drain point, because. in the future, it will be necessary to form a finishing screed and finish it with tiles.
Multi-layered work makes it possible to provide high level leakage protection, to the rooms below. Also, in this case, resistance to the formation of fungi, mold, and other harmful microorganisms increases.

- to create more comfortable operating conditions, at the first stages of creation, it is worth taking care of heating. It can be represented by a floor heating system, under a rough screed, or a sheet of expanded polystyrene. In the latter case, it should be borne in mind that the entire structure will rise in level by several centimeters.
- each stage must be accompanied by geometric checks;
- strengthening the base can be done with a metal mesh embedded in the screed.

After the screed and waterproofing are dry, you can start pouring the self-leveling mixture. This layer is also primed and waterproofed. It is on the quality of this layer that all the characteristics of the structure depend.. To achieve maximum performance, attention should be paid to the corners, and the seam around the drain.
The solution of the filler floor must be made a little thicker than usual in order to be able to form a slope towards the drain.

According to standard technology, the sides of the pallet have a height of one brick, but if desired, they can be made higher. The main thing is to ensure that in the process of taking a shower, the water does not exceed the height of the fence.
Plum formation
- observance of a slope of 3 degrees, in the area where the drain connects to sewer pipes. This angle size is sufficient to ensure optimal water flow rate, while minimizing the risk of blockages and water stagnation.
- tightness of all connecting elements;
- for a drain system, it is better to give preference to high-quality plastic pipes and fittings, as they are not exposed to corrosive processes and external influences;
- rigid fixation of the drain ladder. Concrete pouring is carried out only after the reliability of the system fastening has been checked.

Pallet tiling
The technique of laying tiles in a pallet is not much different from the standard finish, but there are some features. First of all, they relate to the choice adhesive mixture. It must meet all the criteria for moisture resistance. The same parameters must correspond to the material for processing the seams.

Tiling technology:
- the beginning of laying occurs from the corner;
- the application of the adhesive solution is carried out with a notched trowel in order to achieve the necessary evenness;
- the mixture is applied to the base, not to the tile;
- fixing the tile occurs by pressing it to the base;
- alignment is carried out by tapping with a mallet;
- special crosses provide the same thickness of the seams.
Often, mosaic tiles are chosen for home-made booths, because. it makes it easier to work with corners and smooth transitions.

Glass walls and doors
After all the work on the formation of a shower tray with your own hands is completed, you can proceed to fixing the walls and doors of the future design. To do this, in building stores, you must initially select the elements that are optimal in size.

Manufacturers present a wide range of glass walls and doors:
- faceted - products in which the edges have original shape, through the use of special processing technology;
- curved - stencil glass;
- stained glass - the finished product is glued together from different sizes, and color design, elements;
The easiest to install are hinged doors. Their installation does not require special knowledge and complex fittings. Hinges are already included with glass doors, so you just need to correctly install their supporting parts on the wall.

In this process, it is very important to take appropriate measurements so that the door does not cling to the pallet, or a gap does not form ( against the wall, and between the door and the edge of the pallet). Having measured the distance from the edges of the door to the center of the hinges, these dimensions must be transferred to the walls. After that, using a drill, holes are made in the marked areas.
Upon completion of all work, the supporting part of the hinge is screwed into the wall, so that the pin is located with the open part up. This arrangement is necessary for the smooth putting on of the doors.

