How to install drywall guides. Installation of a profile for drywall: rules for assembling frames and battens
Today, drywall and structures made of it are often used in repair and finishing work, since this material has a number of advantages over others.
Do-it-yourself installation of a profile for drywall with your own hands, but this requires accurate calculations and adherence to the rules.
There are two ways of laying drywall sheets - frame and frameless.
The latter involves gluing sheets on a smooth surface using gypsum glue... In this way, the walls are aligned.
Wall cladding frameless way
The frame method is the creation of a base from profiles, which is then sheathed with plasterboard sheets.
There are many options for joining parts, but it is most correct to use a cutter. The pliers-notch is a device that allows you to create notches without much difficulty.
Before starting work, correctly calculate the number and type of components.
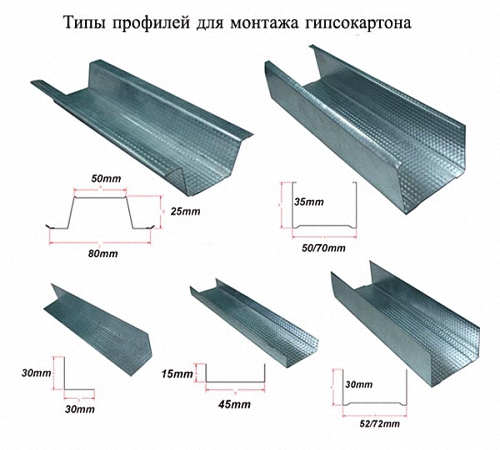
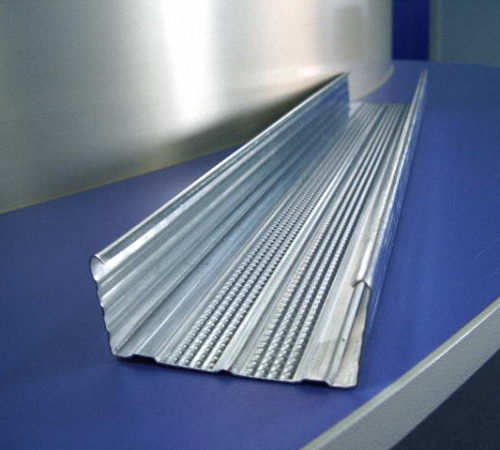
Plasterboard sheets are classified by purpose and thickness. The same applies to the metal profile - it is available in four versions:
- ceiling (PP or CD);
- ceiling guide (PNP or UD);
- rackmount (PS or CW);
- guide (PN or UW).
The first symbol in the designation corresponds to the section of the profile, the second indicates the area of application: type W is used for wall decoration, and type D - when working with ceilings.
 Installation of a volumetric structure for subsequent cladding
 Preliminary work
First, carefully consider the wall or ceiling on which the profile is to be mounted. Determine what material it is made of, what is the indoor climate.
Based on observations, choose the type of drywall and fasteners.
Suitable for rooms with a normal environment standard sheets... For a bathroom, kitchen or basement, choose an option with moisture resistance properties. When arranging technical or garage premises, warehouses, stoking rooms, in places where high-temperature equipment is located, use fire-resistant sheets.
When installing ceilings, determine the height to which the surface will fall, and in accordance with this, select suspensions.
 Varieties of frame elements for plasterboard
 In accordance with the fittings from which the walls are made, dowels and self-tapping screws for metal and wood are used different sizes... The thicker and more complex the wall, the larger the size of the plugged dowel or screwed in self-tapping screw.
Selection of tools
When installing a profile, use:
- drill or hammer drill;
- metal scissors, hammer;
- different types of levels or plumb lines;
- painting knife and thread, tape measure, pencil;
- screwdriver or cutter;
- elbow or flight tire;
- sealing tape;
- dowel-nails and anchor-wedges;
- suspensions, profiles, their connectors;
- self-tapping screws.
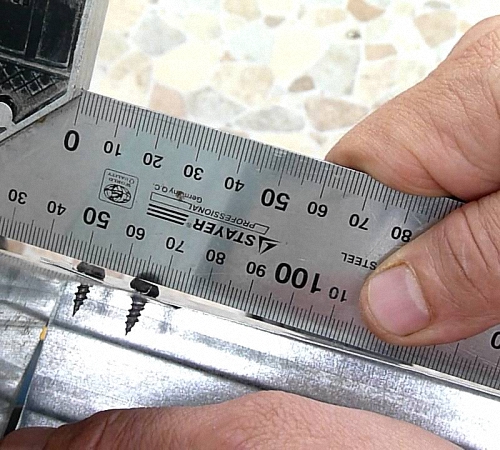
The correctness of the installation of the guide profiles is checked using building level of one kind or another.
To make the frame a single whole, self-tapping screws are used to connect the profiles. But now everything is much simpler - most builders began to use a cutter. It is easy to work with it, no special skills are required. The pliers help you effortlessly create a drywall frame. This tool looks like a pair of pliers.
 Types of drywall sheets
 Stages of profile installation
Work on the preparation of a strong and durable base for drywall:
- Level and plaster the floor, adjoining walls or ceiling;
- Carry out markings for the frame on the floor, wall or ceiling. The thickness of the plasterboard, finishes and putty is added to the marks. At this stage, a laser or water level is useful;
- Attach profiles to ceilings or walls, remembering to apply sealing tape. If wall installation work is carried out, then first install UW profiles on the floor and on the ceiling using dowels and self-tapping screws with a step of half a meter.
- At the edges of the guides and where door or window openings are planned, rack elements (CW) are placed front side in the middle. In this case, self-tapping screws are used for metal.
If you have a cutter at hand, the following steps are taken to connect the profile:
- correctly position the two connected profiles relative to each other;
- push apart the handles of the device;
- a working element is brought in for both sides of the parts;
- bring the handles in one motion. You will hear a kind of click, which will indicate the connection of the profiles;
- push the handles apart and carefully pull out the device.
 Cutter
 In practice, it turns out that this type of connection is not inferior to screws in terms of strength and durability.
Another plus of working with a cutter - self-tapping caps do not interfere with the tight fit of drywall sheets to installed frames and do not leave visible indentations on the outside. After all, there are no screws and screws.
Choose a reinforced one for work, that is, a universal cutter. It fits all profile sizes. But if you plan to work only on the ceiling, you can purchase an inexpensive cutter designed for ceiling work.
So, first, the profiles are fixed to the lower guides, then they are set vertically and attached with the upper guides. It is very important to leave space for the plasterboard strips of the structure.
- Rack profiles are placed vertically along the entire length of the structure. To do this, first make an indent from the adjacent wall by 55 cm, then place the first profile, and the following ones already in increments of 60 cm;
- Designate openings for windows and doors using guide profiles. As a result, a frame of the desired shape is obtained.
 Openings for doors and windows in the structure
 At this stage, the installation of the profile is completed. Recheck everything carefully, because the profile for drywall is the supporting element of the system!
At each stage of work, their own devices are used, they allow you to make the work process as convenient as possible.
Video tips from experts:
If you seriously and decisively get down to business, prepare in advance, find out the necessary information and nuances, you can avoid the most common mistakes when installing a profile and at the end get a high-quality and durable result.
 Plasterboard structures in the nursery
 So, the article describes the initial stages of work to create plasterboard structures... The surface of the drywall is smooth, therefore, immediately after sheathing, they proceed to the cladding and creative mind works - painting, wallpapering or other finishing.
In contact with
The use of drywall involves the creation massive construction from the profile. It ensures the stability of the floors and without it it is impossible to imagine a single project.
This article will look at how to properly attach the drywall guides.
Profile types
Today there are many varieties of drywall profiles, which differ from each other in functional purpose and method of connection.
Therefore, before figuring out how to install, you should familiarize yourself with the main classifications:
- Guide (NP)... It is not difficult to guess from the name that given variety the profile serves as a guiding link in the structure. It is actively used for the manufacture of various structures.
- Rack (SP). This view serves as the main element in any design. It is inserted into the guide profile, which must be fixed around the entire perimeter of the surface.
- Ceiling (PP)... It is the main element in the manufacture of the ceiling. Installation of drywall guides is carried out using special fasteners ("crabs" and hangers).

- Guide - ceiling (NPP)... Performs the same role as the guide, but exclusively for plasterboard ceilings.
- Corner (UE)... Designed for finishing the corners of plasterboard frames after finishing.
Related articles:
Mounting
Now it's time to start exploring the basic steps for installing the guides. If you are going to perform such an operation for the first time with your own hands, then it is better to start from the very beginning.
Toolkit preparation
To mount the profile, you will need the following tools and materials:
- Ceiling profile (60-27 mm).
- Guide profile (27-28 mm).
- Cutter.
- Direct suspensions.
- Grinder (can be replaced with scissors for metal).
- Special knife for cutting gypsum boards.
- Screwdriver (or small hammer drill).
- Self-tapping screws for drywall (25 mm).
- "Klopiki" (that is, screws for metal - 4 mm).
- Dowels (6 and 8 mm).
- Level (laser is best, but its price is much higher than water level).
- Roulette.
- Marker (waterproof) or construction pencil.
- A thread.
- Plumb line.
- Single-level X-connector ("crab").
Assembling the frame from the guides
The time has come to move from theory to practice. Our instructions for attaching a profile for drywall will be disassembled using the example of installing a frame for a wall.
It is needed for further sheathing with GKL sheets.

- The first step is to apply a markup on a piece of paper in order to prevent fatal mistakes in the future.... Do not forget about scaling, as in the case of incorrectly selected proportions, all work will be in vain. For convenience, you can use special computer programs that will take some of the work for themselves.
- Only after design can you start installation... Fastening the drywall guides should be done with 8 mm dowels. It is better to cut the material with metal scissors.

- Then, on the guide profile (located on the floor), mark the places where the rack profile will be attached. In this case, the distance from the wall to the first joint venture should be no more than 30 cm. This is done so that thinned edges do not form in the corners.
Tip: do not use the marker for line-out, as it may wear off.
It is best to use a construction pencil.
- After putting a mark on the NP located on the floor, it must be transferred to the one on the ceiling... To do this, you need to use a level or plumb line. It is very important not to allow even the slightest mistakes at this stage, as they will lead to a distortion of the entire structure.
- Then you can mount the suspensions to the wall on dowels-6 mm, observing a step of 80 cm... It is necessary to insert the joint venture according to the marked marks into the NP and, applying a suspension, mark the holes for future fastening. Using a punch (or powerful drill) it is required to drill holes into which the hangers will be fixed.

- When all suspensions are fixed, you can insert the SP-profile into the holes made... First you need to pull the line between the two guides. She will be the guarantor of the accuracy of the installation.
- Only then can you start attaching the guides. This is done with self-tapping screws and a cutter. If any moments are not clear, the thematic video presented on our portal will help you.
- The joint venture is attached to the suspensions with the help of "klopiks"... This must be done in such a way that it touches the line lightly without creating gaps. Otherwise, the evenness of the structure will be in question.
- After the vertical joint venture is mounted, it's time to start installing horizontal guides.... This is done using drywall crabs. First, it is required to cut the profile into pieces equal to the selected step of the vertical joint venture (usually 60 cm).
- They need to be inserted between vertical joint ventures, strictly perpendicular... These elements should be located at a distance of 40-60 cm from each other. Fastening is best done with self-tapping screws, while it is advisable to regularly check the perpendicularity using a level.
That's all, we can say that the installation of the drywall guides is complete. If you did everything correctly, you should have a flat and stable structure that can be sheathed with drywall (or other similar material).
The strength is determined by many factors: the quality of the posts, the fastening material, as well as the number of attachment points and the distance between the profiles. The number of racks in the frame will ensure the reliability of the fit of the sheathing sheets, as well as the number with which they will be fastened. Separately to the bearing surfaces, which strengthens the rigidity of the entire structure. However, the types of walls are different.
Scheme metal frame from profiles to the ceiling  Scheme of a metal frame for a partition
 Installation diagram of a metal frame with double sheathing gypsum board
From this, the amount of distance between separate elements drywall bases.
In the repair of premises, the types of frame structures are mainly applicable:

Each of these structures is assembled on the basis of (less often wooden slats) and .
The strength of such a foundation depends on many factors, the main of which are:

Of course, it is possible to create a base for drywall with a minimum distance between the rack frame profiles, but this will be economically impractical, and the structure itself will have excessive strength.
 Drawing for a partition with a distance between posts
 However, it is not worth saving on material, if you need to install the required number of racks, then they must be present. Such savings will simply be dangerous in the further operation of the structures. For one sheet of drywall, you need 3 rack profiles: 2 at the edges and one in the middle of the sheet.
Stretching the distances between the rack profiles leads to a significant weakening of the entire structure, which can lead to its destruction.
There are certain rules and regulations for the assembly of various types of structures, ranging from wall to partition types. The video shows the process of installing a frame for drywall.
Requirements for the distance between profiles
To create wireframes, use Various types metal profile. and rackmount CW, used for building on the wall, as well as assembling bases for or siding. collected using the same profiles, respectively.
 Column profile, European marking CW
  UW guide profile used in the frame for leveling walls, creating partitions
 So, what is the distance between the profile when assembling different types frames.
- The frame on the wall inside the room is assembled from the specified types of profiles and connected to each other. The base racks for drywall are inserted into the guides that are securely fixed to the floor and ceiling surfaces.
 Rack profile fixed in the PN guide
 One must have at least 2 racks. Taking into account the width of the gypsum board at 1250 mm, the distance between them should be 600 mm. Moreover, the extreme racks must be mounted so that adjacent sheets are joined on them. More often, for greater strength, a third post is added, then the distance between the profiles is reduced and is 400 mm. Such a frame is considered reliable when quality material and the proper number of attachment points... There must be jumpers at a distance of 500–600 mm from the floor and ceiling, staggered in each space between the rack elements.
 Cellular frame on the wall for drywall
 - The base on the indoor ceiling is assembled from the PNP and PP profiles. One of the elements of such a frame is slats located across the room and connected to the load-bearing ceiling by straight or adjustable suspensions. Step for ceiling profiles should be no more than 600 millimeters. Jumpers are required for this type of construction. They are prepared from the same rack-mount profile and placed at a distance of no more than 600 mm.
 Straight hanger for frame base
 - Partitions are assembled from guides installed on the floor and ceiling. The frame posts should be located at a distance of 400 mm, one from another, with a minimum of three pieces per sheet of drywall. This will create solid construction, on which you can hang a heavy object.
 Creating a solid partition
 - Facade frames designed for siding or its vinyl and PVC counterparts are assembled according to a similar principle. Metal racks the bases here play the role of transverse frames, strips of material are attached to them. The distance between them should be no more than 500–600 mm. Cross bridges are required.
 Facade lathing made of metal profiles
 Insulation of the facade using metal profiles
 These parameters must be observed without saving on material. Reducing the number of profiles and increasing the gap between them is unacceptable, since such a structure will be fragile and simply dangerous to use. Over time, drywall, with its weight, will contribute to the occurrence of deformations and even destruction in the structure of such a base.
Before installing drywall, you should prepare the frame on which it will be mounted. For these purposes, a special profile is used, differing in size, section and configuration. We will talk about the features of mounting a profile for drywall and its purpose further.
Profile for drywall: characteristics and general information
Drywall is a material that is quite easy to use. However, in order to fix it on the surface, a special structure should be built from the profile. In the process of performing these works, difficulties often arise.

The construction of a metal profile structure for fastening drywall allows this material to fully perform its functions. Since the frameless drywall fixing is made of gypsum sheets, which are used to decorate the room. At a time when frame structures differ in shape, size, have arched openings, etc.
The absence of lathing will not allow for leveling the walls, finishing the ceiling or installing partitions.
There are two options for profiles used in the installation of plasterboard structures:
- wooden;
- metal.
The first option is distinguished by a lot of disadvantages, among which, first of all, the low duration of operation, in comparison with metal. In addition, a wooden profile is more susceptible to moisture than a metal one.
Steel profiles are several times more expensive than wooden ones, this is their main drawback. Despite this, they have a lot of advantages, among which we highlight:
- high resistance to all external influences;
- availability of purchase;
- simplicity and reliability in use;
- duration of operation, galvanized steel is used for their manufacture, 6 mm thick;
- this profile is easy to restore;
- a variety of profile options that are suitable for use in certain situations.
The main types of metal profiles for drywall
In accordance with the purpose, all profiles for the installation of drywall are divided into:
- basic;
- guides.
The dimensions of the profile for drywall vary in relation to the design features that are being built from it.
The first option is marked with Ps and PP. It is designed for places with high traffic. It is on this type of profile that gypsum plasterboards are attached. The two versions of the guide profile differ at the edges in the form of the letter P or C.
There is a PN marking for the guide profile. It is a horizontal bar, which is the basis for fastening vertical posts... It is this profile that forms the basis of the steel frame.
We suggest that you familiarize yourself with the main options for a drywall profile made of metal:
- PN - are guide profiles for ceiling purposes, since it is on them that drywall is attached, which is used in the process of finishing ceilings;
- PP - a kind of ceiling main profile, used in the process of fixing drywall to the ceiling, it is fixed around the perimeter of the room, when installing suspended ceilings;
- PN - profiles for wall purposes, perform the function of a vertical rack in wall structures.
Tip: Ps profiles are used partially, that is, they are installed in segments, in order to save material. This does not affect the final quality of the design.

There are two other profile options that are rarely used:
- angular - help to form corners plasterboard partition, they are installed directly on the already installed drywall and protect it from the effects of various mechanical stimuli when arranging the ceiling corner profiles fixed around the perimeter, when arranging walls, they are attached to the floor and ceiling;
- arched - they are used in the process of constructing arches, in addition, with its help, they form radius and various kinds of asymmetric shapes of walls or partitions; to fix such a profile, simple self-tapping screws are enough.
Please note that the maximum bending radius of the arched profile is 50 cm, with a greater load, there is a risk of destruction of the structure.
Features of fastening a metal profile
To fix the material, special suspensions are used, with the help of which the interval between the wall and the profile is adjusted. Thus, before the construction of the structure, it is not necessary to pre-align the walls.
If the ceiling height is more than two meters, then to install the profiles, you will need 5 hangers attached to the ceiling or wall. With their help, the evenness of the entire structure is adjusted.
Please note that the base of the metal frame structure- guide type profile. It is fixed with dowels and self-tapping screws. The average hole spacing is 200 mm. Thus, the structure will be securely attached to the wall.
Some types of profiles already have a pre-defined drilled holes, for beginners it is better to choose just such materials.
In order to facilitate the procedure for installing a profile for drywall, we suggest that you familiarize yourself with useful tips to conduct this process:
1. Two plasterboard sheets can easily fit on the wide wall of the profile, but keep in mind that each of them should be evenly spaced on it.

Tip: Calculate the installation of vertical racks so that the spacing between them is six centimeters less than half of the drywall in width.
2. Screws are installed in close proximity to the wall, to provide a more reliable fastening.
3. Hammer in the self-tapping screws exclusively at right angles, otherwise, unscrew the self-tapping screw and reinstall it.
4. All caps of self-tapping screws are recessed by 0.5 mm in the profile.
5. Vertical racks have a special place for the installation of engineering communications. In most cases, though, wires and pipes run directly under the drywall.
6. When finishing a private house, you should take care of the presence of additional heat and sound insulation.
7. When purchasing profiles and guides for plasterboard, you should increase required quantities materials by 10%, to compensate for various types of cuts and technical issues.
Features of installing profiles for drywall around the perimeter of the room
First, you should make a marking of the plane along which the frame will be installed. Next, prepare the tools in the form:
- two plumb lines;
- fishing line;
- rulers;
- hammer with nails;
- chalk.
Nails are used to fix the plumb line to the wall, it must be fixed to the ceiling, but hang down to the floor. The second plumb line is attached in the same way. Please note that the plumb lines should not touch anything, as the evenness of the vertical will be disturbed.
The fishing line is pulled along the wall in three places: top, bottom and center. The highest point on the wall will serve as the installation site for the metal frame. Departing from her place, check the accuracy of the breakdown. Parallel to the pre-stretched line, pull another part of it against the side wall. Connect the sections of the woods located on the two walls with a ruler, so make marks according to the location of the plane.
Repeat this procedure for all other walls and ceilings. Using the rule and chalk, sketch out the perimeter of the structure.

Installation of a profile for drywall guide type
In order for the further structure of the profiles to be even and correct, it is first of all necessary to correctly fix the guide profile, which is the basis of the frame, which takes on most of the entire load.
To fix the guide profile, you will need:
- puncher;
- electric drill;
- hammer;
- fasteners;
- scissors for metal;
- pliers.
Install the guide profile on the wall, according to the previously made markings. To make it easier to work, it is better to start the whole process from the bottom. Step back 0.3 m from the top of the profile and drill a hole that should be a few millimeters longer than the length of the dowel-nails. Make two more holes in the center and bottom and install the dowel nails.

Check the evenness of the entire structure according to the given markings, if necessary, correct the profile and hammer in nails. Next, measure the distance that remains to the end of the wall and add twenty millimeters to it, since the installation of the guides is overlapped.
Using scissors to cut metal products cut the side sections of the profile and bend it outward, cut off the central part and align with pliers. Install the next part of the profile, while at the joint area, drive in an additional dowel-nail.
Set the profile along the markings and fix it with dowel-nails. In the same way, all subsequent guide profiles are installed along the perimeter of the walls and ceiling. For additional strengthening of the entire structure, dowels are used, installed in increments of thirty centimeters. Before that, it is recommended to once again check the structure for evenness and compliance with the markings.
Do-it-yourself drywall profile installation: vertical sections
Vertical profiles should be fastened in accordance with the size and type of installation of the plasterboard sheets. From the beginning of the wall, a distance is measured equal to the width of the drywall sheet, a mark is made. It is here that the vertical profile will be located, which will become the junction of two sheets. The mark indicates the transverse center of the metal profile.
In the same way mark all vertical sections of the profile mounting. The gypsum plasterboard is divided into two parts according to its width, each of them should not be more than fifty centimeters. Make marks on the floor surface, they will indicate the middle part vertical profiles.
Throw a plumb line from the ceiling to the floor, and mark the places where the vertical profile is attached to the ceiling. Use the first mark to transfer the dimensions to the ceiling surface. To check the correctness of the work, throw a plumb line from the ceiling to the floor, if the marks coincide, then the marking does not require adjustment.

To fix the vertical profiles on the ceiling, you will need:
- electric screwdriver;
- self-tapping screws for metal;
- fishing line;
- pliers;
- regulations;
- pencil;
- suspension in the amount of three pieces;
- hammer;
- fasteners;
- electric drill.
On the center of the wall, measure the distance between the ceiling and the floor. Transfer all measurements to the surface of the profile, while subtracting one centimeter. To avoid errors, use a pencil to mark the size over the entire workpiece. Cut off the side sections of the profile, bend its edges outward, cut through the central part. Use pliers to align the cut. Thus, the guide will connect to the vertical profile.
After installing the workpiece on the wall, mark it around the perimeter. Further, the wall is divided into three sections, on which marks are made and the workpiece is removed.
Install the hanger according to the marks made, drill holes in the hanger with a perforated drill and fix it on the marks with dowel-nails. With the help of plumb lines, drywall is very conveniently attached, in addition, with their help, it is exposed in the required direction.
Install the second suspension and return the workpiece. Attach the vertical profile to the surface of the rail using metal screws. Fix the top first and then the bottom. Please note that the height of the profile is less than the total height by one centimeter, therefore, you should take care of the presence of an allowance of 0.5 cm at the top and bottom.
On the surface of the vertical guides, fasten the screws on which the fishing line is fixed. The lateral sections of the suspensions need to be bent, and a vertical profile is set along the line. This process will require more than one person.
Please note that the profile, in no case, should push the line or move away from it. It is possible to check the evenness of the structure using a rule.
Tip: If you find even minor errors, you should resort to correcting them at this stage of the work. After installing vertical profiles, errors cannot be corrected.
Installation of horizontal fragments from a metal profile
The horizontal parts are bridges that increase the strength characteristics of the structure. These components are fixed directly to the structure, not to the wall. In order to save material, in the process of fastening the horizontal parts of the profile, the principle of fastening drywall should be applied, that is, to install jumpers in the areas under the drywall.
Please note that in the process of installing drywall, the principle of a checkerboard pattern should be used, that is, first the whole sheet is laid, and then half of it. This will help prevent long seams and strengthen the structure.
To complete this process, you will need:
- screwdriver;
- self-tapping screws with scissors for metal;
- pliers;
- crabs;
- marker.

Where the cross-section intersects with vertical construction a special part is installed, which is called a crab. If an even cross does not form, you should perform the following actions:
- measure the distance between the middle sections of the two verticals;
- cut the workpiece and install it in place;
- use a marker to mark the sections of the profile installation;
- use metal scissors to cut desired site profile;
- the pliers will help align the cuts and bend the side sections at right angles;
- install the profile and attach it with self-tapping screws;
- check the evenness of the resulting structure.
Video installation of a profile from drywall:
The work on creating a frame from a metal profile for drywall is perceived by many as a very simple event that does not require compliance with certain rules. Because of this, situations are obtained in which the created surface of the gypsum boards turns out to be with numerous disadvantages, to eliminate which you have to make a lot of efforts and financial costs.
Of course, the job itself is not that difficult. Literally everyone can cope, but there are some nuances that must be taken into account. And also to carry out the installation steps correctly.
There are two main materials for the construction of the lathing - wooden beams and metal profiles. It is the second type of material that is most preferable.

The metal profile is such due to certain characteristics:
- For the most part (with proper storage and transportation) - has no drawbacks (curvature). But, if you choose a bar, you will have to sort out a lot of material.
- Metal elements can be used in almost any room, and also ignore temperature fluctuations. This means that the surface will not undergo deformation.
- Galvanized parts can last for a very long time. Therefore, they can be used even in rooms with big amount moisture. Also, they are not affected by fungi and rot.
- For profile attachment there are various elements that allow you to create a reliable and sturdy structure.
Material selection
It is worth paying attention to the choice necessary materials, especially when choosing details of the lathing. There are the following types of profiles that allow you to create a frame for walls made of plasterboard:

- Guide (PN). This element is intended to create a structure that will serve to secure the rack profile. It is from the fixing of this type of profile that the way the surface will look in the future will depend.
- Rack (PS). It is used to create lathing or other partitions. It can be given various curvilinear options.
A separate place is occupied by parts for ceiling structures: ceiling profile (PP), ceiling guide profile (PNP).
You should also consider the use of such additional elements:

- Corner profile (PU). Maybe - external and internal.
- Arched profile (PA). Used to create arches.
- Suspension (U-shaped). It is used for fastening the structure to walls and ceilings.
- Connector ("Crab"). It is very convenient for fastening perpendicular parts together.
- Extension. Connects different sections of the profile.
- Dowel and self-tapping screws (for metal).
It is at this stage that many do very important mistake... It consists in acquiring a non-specialized profile. Namely, they confuse ceiling elements with wall.
Required tool
Naturally, fastening a metal frame under drywall is simply impossible without using special tools... But do not worry, every home master will always have everything you need.

What you need:
- Jigsaw with metal saws or scissors for cutting galvanized steel.
Attention! It should be noted right away that you cannot use a grinder. The reason is pretty simple. The torque of such a tool is very high, and the galvanized profile is quite thin. Because of this, there is a rapid heating of the cut material and its deformation. And also the destruction of the protective layer and the appearance of rust will follow.
- Plumb line and level (or more modern electronic devices). Only the use of these devices allows you to create an even frame from a metal profile.
- Ruler, tape measure and pencil (marker).
- Drills or hammer drills to create holes in walls. Their choice depends on the surface material. And also do not forget about drills or drills.
- A set of screwdrivers, or better a screwdriver. With the necessary skills, you can also use a drill (setting the required power).
Installation work
Everything that needs to be prepared, the tool is waiting in the wings. It seems that work can already begin. After all, the sooner you start, the sooner everything will end, but you should not rush. First you need to decide what events will be held. The installation of the frame has features when different types work.
 Installation of a frame for creating partitions from gypsum plasterboard has significant differences from the installation of a lathing for plasterboard wall cladding
 Walls
In principle, working with walls is considered the easiest. It is with her that it is best to start, if this does not contradict the stages of repair work.
Advice! To avoid the unpleasant (rattling) noise that may occur after installing the metal crate, a sealing tape is glued between the surface and the guides.
Getting started:

The hangers have the peculiarity of going beyond the profile. That is, protruding "ears" are formed. They need to be bent. This should be done inside, so as not to interfere with the installation of gypsum boards.
If you want to give the frame for drywall additional rigidity, then horizontal screeds are used for this. They are easy to make from the profile itself, which is cut into right size(with a small margin). Pay attention to their fastening.

Often they do this:
- Scissors for metal cut the ends of the profile along the edges.
- The ribs are folded. Through them, the screeds are screwed to the racks. The central section remains without a self-tapping screw, otherwise a knoll will turn out.
Partitions
These structures are created to separate a room, as well as to completely separate one from another. In principle, the scheme of work is similar to the one presented above, but there are some technical features.

Features of creating door and window openings
A frame made of metal profiles for drywall often needs to create various openings in it. Do the following with doors:
- Going to door frame... In which, previously, the door leaf is hung. To set the necessary gaps (after all, the box is not fixed) - insert wedges from fiberboard or hardboard.
- Now they begin to set up the racks that adjoin the doorway. They are placed vertically and reinforced wooden beams... Apply polyurethane foam and attract the box with self-tapping screws.

On a note! The described method is rather laborious, it is more suitable for cases when the doorway was not provided in advance. Therefore, it is better to spend time on preliminary calculations and marking, as well as to determine the size door leaf... Then you can immediately create a doorway (with the necessary margin) and quickly install a door in it.
When creating a light window, there are the following features:
- It is necessary to install two horizontal jumpers (top and bottom).
- Vertical posts are best done with wooden mortgages.
Measures to strengthen the frame and increase noise insulation
It should be noted that a simple lathing does not have sufficient rigidity. Therefore, if necessary, then you need to give it reinforcement. This is usually needed in rooms where pieces of furniture will be placed on the walls.
The easiest ways:
- Instead of SP and NP 50 mm each - take 75 or 100 mm.
- Decrease the step between the uprights.
- The vertical elements are installed in pairs.
- Use mortgages in the form of a wooden bar.

On a note! If possible, a completely different option is used. Namely - drywall on the frame is laid in two layers. In this case, overlap the seams of the first layer.
They also pay attention to sound insulation. The fact is that the hollow frame has a significant sound effect.
- Lay in the frame mineral wool... Therefore, they are immediately determined with a step of vertical posts and jumpers.
- When creating partitions, a double-sided frame is made. Then each GKL plate is attached to its side of the crate.

Any work requires care, even if it seems that making a frame for drywall is very simple.

