Installation of metal-plastic windows according to GOST. DIY installation of plastic windows: a step-by-step process of installing plastic windows
When they talk about installation according to the standard, they usually mean the installation of PVC windows in accordance with GOST 30971. Or, more precisely, its latest version from 2012, because the previous ones did not want to know anything about plastic windows. In the context of the standard, a number of recommendations are given, as well as requirements for the execution of certain units. To many, the words will seem rather blurry, but the drawings in the applications are quite descriptive. Be that as it may, in practice, no one installs PVC windows in accordance with GOST, strictly in accordance with the letter of the law. But some do it because they know that insulated plastic slopes better than plaster while others just save vapor barrier film at the expense of the customer. It is these two and similar cases that we must accurately distinguish if installers visit our house.
Installation options for PVC windows in accordance with GOST 30971
Window installation
Requirements for the seam and fastening of the plastic window frame
In the initial chapters of the standard, along with some characteristics and numbers, instructions are given that indirectly hint that the installation of PVC windows is supposed to be done in Russia. What are even the words that the assembly seams are made from compounds with an expiration date. Good, yes? Otherwise, we would now take overdue foam somewhere in warehouses at a bargain price, and we would carry out the entire installation with it. The seams themselves are divided into categories into A, B and C. According to their resistance to moisture penetration and maximum deformation.
For us, it is more important that the seams can be:
- Regular. These can withstand temperatures up to minus 30 degrees Celsius.
- Frost resistant. This includes all other seams that are more resistant to cold.
It is clear that for most of our regions the first type of installation is not suitable in any way. The division is again based on the type of materials used. That is, when we take the foam, we make sure that it keeps the forty-degree frost. Further requirements are much more specific. Here is some of them:

According to GOST, the frame can be placed on anchors or pins, but in the examples, anchor plates are used everywhere. These are such thin scraps of flat steel profiles that easily bend to the shape of the opening and cling to the frame with one end and the wall with the other. Fastening is carried out using self-tapping screws and dowel-nails. Some people call this approach a sham. Be that as it may, to prevent moisture from entering the seam from the profile, the frame is trimmed with PSUL at the end.
In cases where the fastening is carried out on the anchor, the profile is punched through. It is important to isolate the attachment points here. Because according to GOST 30971, as we said above, the polyurethane foam must be fenced from all sides. Recall that the anchor plate runs parallel to the profile at the starting point, so a vapor barrier membrane can be mounted under it, and the PSUL can be covered from above. In those cases where the steel axle goes straight into the wall, something else needs to be done. For example, prime the entire surface of the opening together with the holes for the anchor with waterproofing, and cover the holes in the profile silicone sealant, and from the inside of the seam. That is, the technology becomes a little complicated, and everything ingenious is - as you know - simple. Consequently, the proposed methodology is not entirely correct.

Frame fixing
In any case, the job of the builder is to insulate the seam. And how he will do it is a purely personal problem for everyone. GOST gives only general recommendations on this score. And another burning topic is the problem of mounting clearances. We already wrote in the topic about wooden houses that some foremen are literally fighting here for every millimeter. The fact is that the more space around the perimeter of the frame, the more expensive the work, because building materials leaves more. Blowing also increases. At the same time, if the house is new, and the gap is too small, then the window will simply crush when it shrinks. This is especially true for wooden walls... So there you go! In GOST there is not a word about shrinkage, the degree of moisture content of the timber, but temperature fluctuations are widely played out. And this is how it happens ...
In the course of the text, a rough drawing of disgusting quality is given, where two sizes are given. Below is a table, where it turns out that these are gaps depending on the material and color of the profile. In particular, for plastic, these distances are slightly larger than for aluminum. Appendix B gives a very common formula, according to which, according to the idea, builders should check their conjectures about the size of the mounting clearances around the perimeter of the frame. It multiplies the temperature difference with the coefficient of thermal expansion of the profile material (wood, steel, aluminum, PVC) and the length of the window. A correction factor is also introduced. For all materials, except for painted PVC (0.5), it is equal to 0.4.
The result is a certain value that can be taken as the minimum mounting clearance. That is, you can sit at home, calculate everything in advance, and when the installers bring the profile, you can surprise them (pleasantly or unpleasantly) with knowledge of the issue. If the gaps are too high, then most likely the price will bite, and if the gaps are too low, the window can crush in winter. And in any case, GOST does not take into account the shrinkage of the house. We focus on this.
The process of installing the frame of a plastic window into the opening
Please note that the linear dimensions of the window change depending on the temperature. This is most likely another reason for using anchor plates. In this case, they serve as springs, preventing deformations from causing significant damage. As for the anchors, they must be recessed into the frame. And that's why.
Let's say our frame is punched through at the attachment points. In summer, when temperatures are high, plastic expands rapidly. Its linear dimensions change faster than the wall. Therefore, if something connects these two elements, then deformations will occur in the profile. Please note that this cannot be said about the foam, it holds around the entire perimeter, which blocks the specified factor. Thus, if anchors are used, they should not be rigidly connected to the profile.
We said about this now, because GOST is silent about it, and the need to drill a wall is already on the nose. You will need wedges to mount the frame. GOST mentions spacers and says that they should be made of plastic, or special hardwoods, properly processed. As a result, it is much cheaper to buy mounting wedges from the store than trying to swim upstream. Before installation, the opening is thoroughly cleaned. In GOST it is written that any interfering factors are removed, including snow and ice. Irregularities are eliminated with various compounds. There should be no defects exceeding 1 cm in size.

Window frame perimeter
While the mortar dries, the frame is prepared plastic window... To do this, two strips of a vapor barrier membrane are glued along its perimeter. One for each side. If there is a window quarter, then the PSUL is mounted along its length with an inward indent of 1 - 2 mm. We remind you that the membrane is glued with one edge under the anchor plates, which must be placed around the perimeter at a distance of no more than 70 cm with an indent from the corners of 10 - 12 cm.
Before installation, loose walls are primed with special mixtures or reinforced with foil, and materials with strong water absorption are also treated accordingly. On the prepared base, mounting wedges are placed on the sides, approximately equal to the calculated gap. A plastic window frame is installed on them. The structure is symmetrical in the opening and leveled. Wedging begins, during which it is necessary to ensure the design clearance on each side of the frame.
Wedges by themselves do not hold the profile, they are needed only at the installation stage. It is clear that if the temperature drops in the future, these elements will lose their load. Before foaming, the cleanliness of the opening is checked again, and in place. The surface is moistened, after which the seam is blown out by about two-thirds. In the future, the polyurethane foam will expand and take up the entire space. When the composition has dried, then the vapor barrier membrane along its edges is attached to concrete base... No operations are performed with the PSUL along the perimeter of the window quarter.
Thus, a seam isolated from the street turned out, and you can begin Finishing work... In GOST 30971 there are several sketches of how to lead and slopes. According to one of the options, no finishing is done at all. The work of the wizard is limited to what we have already described. As for the slopes, it is proposed to make them from wood, plaster or drywall. There is no PVC in this list yet, and everything that is made from sandwich panels is not regulated by the standard. But because of this, they did not use less polymers in the decoration. Because insulated and beautiful slopes are great, and PVC installation panels are much easier than the plastering process.
That's the whole installation of PVC windows in accordance with GOST, about which there is so much gossip. Not a word at all about the ebb. However, the order of their installation is extremely simple.
Thus, the insulation must somehow be protected from the penetration of direct moisture or water vapor into it, and for moisture that has nevertheless got into the insulation, it must be ensured that it can evaporate outside so that none of the described problems threaten the assembly seam. For this, special vapor barrier and waterproof vapor-permeable materials have been created, which we produce. The former are installed from inside the room and prevent the penetration of moisture contained in room air inside the assembly seam, that is, to the insulation. The latter are installed outside. These materials protect the insulation from the penetration of direct moisture (water) from the outside. And also, which is very important, being vapor-permeable, they ventilate the inner part of the assembly seam, allowing it to breathe. Thus, condensed water is removed from the seam, or water vapor that got there from the inside of the wall - (from its condensate plane). Stagnant processes inside the insulation are eliminated, figuratively speaking, it "breathes out". Such a mechanism of action of special materials to protect the main element of the assembly seam - insulation from the harmful effects of moisture.
However, moisture is not all that insulation and the entire assembly seam can suffer from. Let's dwell on two factors that have the most critical impact after humidity.
In second place is ultraviolet solar radiation... This radiation destroys the insulation (polyurethane foam, used in almost 100% of window installations) in a very short period of time. So, in the southern regions of Russia, the process of almost complete destruction of polyurethane foam can occur in a couple of months. V middle lane it will take a year and a half, depending on the cardinal direction of the window structure.
Conclusion - the insulation must be protected from the harmful effects of ultraviolet radiation. The problem is successfully solved by the same vapor-permeable waterproofing tape that protects the insulation from direct impact water from the street.
In third place is the linear expansion (movement) of the window structure due to temperature fluctuations (thermal expansion). And such movements are significant and can reach from 5 to 10, and in some cases even 15 percent of the width of the assembly seam itself! At the same time, the insulation does not suffer, since it is well resistant to deformation loads and, moreover, is glued to the wall and window frame. It is clear that the means of its protection must be resistant to such colossal deformations.
Imagine, if you apply plaster or solid sealant, at what point will it collapse, or tear off the smooth plane of the plastic window frame? (GOST allows use to protect the outer contour certain types acrylic sealants. It should be elastic (not drying to the end), vapor-permeable materials with good adhesive properties). Here again the same vapor-permeable waterproofing tape successfully solves the problem, since it is not afraid of 15 and even 30 percent shifts.
Installation of PVC windows in compliance with the rules given in GOST 30971, adopted in 2012, will allow you to significantly extend their service life, avoid glass fogging and protect window openings from moisture. How to install a plastic window in accordance with GOST, and what materials to use for this, you can find out by reading our article.
For high-quality and fast work, you will need the following set of tools:
- Perforator.
- Electric jigsaw.
- Drill screwdriver.
- The nail puller.
- Sledgehammer.
- Level.
- Yardstick.
- Pencil.
- "Bulgarian".
- Silicone gun.
- Square.
- Scissors for metal.
- Putty knife.
- Slick.
- Rubber hammer.
- Pliers.
- Brush.

Depending on the type of window opening and window model, you may need additional tools not included in the list.
In addition to tools, to install a plastic window, you must have the following consumables:

- PSUL is a pre-compressed self-expanding sealing tape. PSUL has various thicknesses and widths and is designed to hide the outer foam seam.

- Vapor barrier tapes - needed to hide the foam seam inside the room. There are metallized and fabric-based tapes. Metallized tapes are used for "dry" finishing of a window opening (plastic slopes, drywall or PVC panels). A fabric-based vapor barrier tape designed for finishing materials on water based(plaster, plaster and so on).

- Diffusion tape- is necessary as a lining under the window cornice. This tape has the ability to let air through, but not to let water through.

- Underlay under the windowsill- is a tape on a metallized base, with a layer of insulation, serves as a heat and vapor barrier.

- Anchor plates- window mounts connecting the frame with window opening... Anchor plates allow you to fix the window in the opening without through holes in the frame.

- Self-tapping screws - attach the anchor plates to the window.

- Dowel screws - connect the anchor plates to the window opening.

- Priming compound- designed for surface treatment, at the place of gluing vapor barrier tapes.

- Wooden wedges- are needed for intermediate fixing of the window in the opening and setting the level.

- Base profile- is attached to the bottom of the frame and serves as a window stand and a mount for the cornice and window sill.

- Plastic window sill- comes complete with a window, but, if desired, can be replaced with window sills made of other materials.

- Drain - rarely included in the basic set of a plastic window, usually ordered separately.

- Polyurethane foam - used for filling joints and as an additional fastening element.
Preparatory work
Dismantling
If it is necessary to dismantle the old window, do the following:
- Remove all leaves from their hinges.
- Remove the glazing beads and remove the glass from the fixed sections of the window.
- Detach the trims, drain and sill from the frame.
- Remove the mortar and foam between the frame and the window opening.
- Using the grinder, cut off all frame fasteners.
- Pull the frame out of the opening.
- Remove the remaining foam and mortar at the location of the frame.

Window preparation
Before installing a plastic window in the opening, it is necessary to make a number preparatory work:
- Remove the window sashes from the hinges by knocking out the awning rods with a hammer and screwdriver.
- Remove the glass units from the fixed sections of the window. To do this, you need to knock out the glazing beads from the fastening grooves, this can be done with a rubber hammer and a wide chisel, or a spatula.
- Attach the support profile to the bottom crossbar of the frame. When connecting the profile and the frame, use - PSUL as a gasket between them.
- Install anchor tapes around the perimeter of the window. The strips are screwed to the frame and base profile with screws. For ease of installation, bring the ends of the anchor strips inside the room. Depending on the size of the window, from 2 to 4 fasteners are installed on each side of the frame.
- Glue PSUL on the top and side posts of the frame, so that the tape protects the outer seam after filling it with polyurethane foam.
- Paste diffusion tape on the base profile with outside window.
- For protection inside seams, glue vapor barrier tape to the frame.

Window installation in the opening
After all the preparatory work, install the frame in the window opening:
- Secure the frame to the opening with wedges.
- Check the correct horizontal and vertical position of the frame with a spirit level.
- Having set the frame in the correct position, through the holes in the anchor strips, mark the places for the dowel screws.
- After drilling holes with a punch, fix the frame in window opening on anchor tapes.
- Using a brush and a primer, treat the bonding points of the vapor barrier tapes and PSUL.
- Fill the space between the frame and the window opening with low expansion foam.
- After the foam dries, trim off the excess.
- Glue PSUL and vapor barrier tape to the window opening.

Installation of drain and window sill
- Spread out the diffuser tape and place the drain on it.
- Attach the drain to the support profile using self-tapping screws.
- Cut the window sill to fit the slopes of the window opening.
- In the place where the window sill will be located, lay a metallized tape with insulation.
- Insert the window sill into the support profile and fix it with screws.
- Seal the gaps between the frame, drain and windowsill with silicone sealant.

Final work
- Insert the double-glazed windows into the window sections, securing them with glazing beads.
- Install the flaps in their places.
- Check the operation of the window handles and mechanisms.
The plastic window is installed, it remains to finish the slopes of the opening and then remove the protective film.
Look detailed instructions for installing a plastic window using GOST standards, you can also in the video:
Before the start installation works it is necessary to completely free the window opening and the space next to it:
- remove everything from the windowsill,
- remove the curtains,
- clear the approach to the window by moving the furniture at least 1.5 meters away from the window.
Protect the room from dust and dirt by covering the floor and furniture with cloth or thick oilcloth.
For ease of installation, connect the 220V power supply through an extension cord, prepare garbage bags.
Dismantling the old frame
After the room is ready for the appearance of dust and debris, they begin to dismantle the old window frame.
The sash is removed from the window. Dismantle window frames... If necessary, dismantle (knock off) the slopes.

The old window frame is dismantled, and, as a rule, it is seriously damaged. If you want to use old windows, for example, in the country house, you should stipulate the option of keeping old windows when ordering.
The old ebb, the old window sill is being dismantled.
PVC window installation

The sashes are removed from the plastic window, the double-glazed window is removed. A window frame is inserted into the prepared opening and fixed on anchor bolts or mounting plates. In this case, it should be strictly observed that the frame is level, and not along the opening (in houses there are often cases when the horizon line of the window opening is far from ideal, the frame should also be level vertically). Otherwise, the window will not function properly.

The gaps between the wall and the frame are foamed with polyurethane foam. The foam serves both as an insulating function and as a fastening element. The overall result largely depends on the quality of this stage of installation. The foam should be applied evenly and fill all recesses and cavities in the opening, taking into account the expansion rate of the foam.

The installation of a plastic window in most cases implies that a new window sill and a new ebb will be installed along with the new window. An exception is the case when the apartment (house, room) is renovation work and the sill can be installed on its own.

If the window to be mounted opens onto a balcony (as in this case), then it is quite expedient and functional to install a window sill instead of an ebb (from the outside of the window).
If you have a good old ebb tide, then you can save it for a new window, but in this case it will need to be restored (restored) - payable service, the cost of which is slightly different from the cost of the new ebb.
The window sill is cut out under the opening and attached to the window (to the support profile). If the opening under the windowsill is small, then it foams. Otherwise, it is necessary to masonry or seal the opening with mortar. When installing a window sill (window sill), control that it has a slope from the window within 5 degrees, and the overhang beyond the inner surface of the wall is no more than 60 mm.
When installing the window sill, it should be taken into account that its edges go beyond the finishing of the inner slope to a depth of at least 15-20 mm.

Advice: when choosing the width (depth) of the window sill, it should be borne in mind that the window sill is "recessed" by 2 cm under window frame so the width installed window sill will be 2 cm less)

All gaps between the window and the opening are filled with foam, and when it dries, they are isolated. The outer layer of insulation is designed to protect the insulation layer (which is the foam layer) from moisture penetration into it, as well as from destructive sun exposure.

So, the main part of the work is finished. However, for finishing the opening lacks slopes (which are both a decorative addition, under which you can hide the mounting foam, and a functional element that increases the thermal insulation and sound insulation of the window opening). Plastic slopes will give the window a finished look, moreover, it best combination with plastic windows.
Installation of plastic slopes

Plastic slopes are installed on the same day as the window for panel and block houses and on the second day for Stalinist houses.

Either a Belgian sandwich panel (in the picture) or German VEKA plastic slopes with removable platbands are used as slopes.
The differences between the various plastic slopes are not significant, but you should be aware of them.
The Belgian sandwich panel can be installed at dawn (not at right angles to the window), which visually enlarges the window opening. Choice plastic slopes VEKA is justified for more accurate gluing of wallpaper with already installed slopes. Thanks to the removable casing, the edges of the wallpaper will be neatly hidden underneath.
Advice: if you have a renovation in your apartment, then it is better to install the trims on the slopes from the Belgian sandwich panel after gluing the wallpaper yourself - it will turn out neater and prettier).
Installing accessories on windows

At the final stage, a double-glazed window is installed in the window frame and the sashes are hung. Installation of additional accessories is carried out, fastening additional elements fittings and components, such as: step ventilator, retainer, mosquito net, blinds, etc.

The window is ready. Upon completion of all work, an acceptance certificate is signed. In it, if necessary, the customer indicates his comments on the work performed, if any.
Almost immediately after completing all the work, the PVC window can be used. The exception is windows with large opening sashes, which are not recommended to be opened within 24 hours after the installation of the PVC window.
The plastic window is much better in functionality than the old ones wooden windows... If follow simple instructions for its care and operation, it will serve you forever.
Don't forget to remove the protective film from the outside of the PVC window!
According to GOST 30674 "Window blocks made of PVC profiles":
Deleting protective film from the front surfaces of the profiles should be done after the installation of products and the finishing of the mounting opening, taking into account that the duration of exposure to sunlight on the protective film should not exceed ten days.

If repair work is still underway in the room where the windows were installed, the protective film may remain on the product until they are completed. However, from the outside, the film should not be exposed to sunlight for more than 10 days.
The adhesive base of the protective film loses its properties under heat and UV exposure and can spoil the aesthetic appearance of the plastic profile.
General requirements for installation in accordance with GOST
GOST 30971-2002 “Seams of assembly units for joining window blocks to wall openings. General technical conditions»Put into effect by the order of the State Construction Committee of the Russian Federation from 01.03.2003.
Due to the need for adjustments project documentation for design and construction organizations, the transition period for the development of GOST is established until 01.07.2003. The republics of Azerbaijan, Kazakhstan, Kyrgyzstan, Moldova and Uzbekistan have joined the Russian norms.
What's new? New standards bring significant formalization of window installation and require numerous documents. Among them, it should be noted the need for each installation company to have "Instructions for the installation of windows", approved by local authorities, the need to develop assembly assemblies of windows for each facility under construction and coordination of assemblies with the customer, it is recommended to analyze the thermal fields, and it is also provided for the registration of certificates of delivery - acceptance window openings before installation, acts of hidden works and certificates of acceptance of the completed installation of windows.
Of particular interest in the standards are the Appendices:
- Appendix A (recommended) presents drawings with examples of window installation;
- Appendix B (recommended) sets forth requirements for fastening windows in openings;
- Appendix B (mandatory) represents the actual requirements for the installation of windows in general and, in fact, is the main working document;
- Appendix D (recommended) describes the requirements for the method for calculating thermal fields (isotherm analysis).
In general, Russian installation standards bring us closer to the standards adopted in Europe, and, in particular, in Germany.
GOST requires window firms a large number formalities and has more requirements for testing joint structures and materials used for them.
Formalization is justified by the fight against Russian negligence.
The testing of materials and seams in general is justified by the fact that until now in Russia there have been no detailed standards for installation at all, there is no accumulated scientific experience in determining the properties installation materials and the quality of the seams. Of course, for the consumer there is no need to know all the provisions of this GOST, this is the duty of professionals.
Without delving into the intricacies, we can talk about three basic principles of installing windows, which should be paid the closest attention.
Three layers of joint
The content of the main part of the norms is devoted to the rules for filling the mounting gap between window blocks and openings on the basis of the principle "from the inside is denser than from the outside." Each mounting assembly must have three layers of embedment: outside - protection from climatic influences, in the middle - insulation, inside - vapor barrier. Can be used different materials for outer layers and different polyurethane foams, but, in one version or another, these three termination planes must be present.
Outer layer is designed to protect the insulation layer from moisture penetration into it, and must be vapor permeable in order for the insulation to be ventilated through it. That is, outer layer must be waterproof and vapor permeable.

These requirements are due to the fact that when moisture penetrates into the insulation, its thermal insulation qualities fall. The best way PSUL (pre-compressed sealing strips) correspond to modern requirements for the outer layer. These are special mounting tapes that are glued to the window frame before installing it in the opening, and then, expanding, they fill all the leaks of the quarter in the opening.
With serious advantages: optimal construction physics and technological simplicity, they also have disadvantages. It is convenient to use these tapes in new construction when the opening has good geometry. But when replacing windows in old houses, when the slopes are uneven, and even more so, plaster, their use is difficult. Another drawback is that the plaster does not apply to the PSUL.
In limited form, it is possible to use silicone outside. In this case, certain rules should be observed: the thickness of the silicone layer should be half of the width of the joint to be filled, and the silicone should be glued only on two sides and work in tension, its other sides should remain free.
A sealant can be used when insulating an assembly seam. Although, it is not clearly spelled out in the GOST, but there is no ban on its use, no matter how much the supporters of mounting tapes want. An example of the use of silicone outside and inside the room is shown on node A.14 in GOST 30971-2002. It is unacceptable, of course, as you can sometimes observe on objects, just anoint with silicone over the foam - this is an imitation of the protection of the seam, but not the protection itself.
Central layer- heat insulating. Currently, polyurethane foams are used for its execution. It is best to use foams made specifically for window installations. These foams fill the joint evenly and do not need to be trimmed once they have hardened. Other foams, after the installation is completed, hang in shreds from the side of the room, and they are cut off, breaking the protective outer crust.
The inner layer- vapor barrier. Its function is to protect the insulation (foam) from moisture vapor penetration into it from the side of the room. For these purposes, when plastering slopes, vapor barrier tapes are used, mainly based on butyl, as well as paint vapor barriers for moisture resistant drywall... It is possible to use silicone according to the rules mentioned above.
Lack of cold bridges
Assembly seam- this is the node where the joining of the wall and window structures takes place, which have completely different properties, including in terms of heat engineering. And it is important to execute the knots in such a way that cold bridges do not appear on the window slopes.
Basically, the problem of cold bridges is the problem of single-layer wall structures that were used in houses of the past (solid brick, expanded clay concrete, etc.). In this case, the weak zone is the wall itself around the window frame due to its low resistance heat transfer. An area with a surface temperature below the dew point appears on the slope. In this area, firstly, there are high heat losses, and secondly, condensate falls out on it. If moisture condensation on the slope occurs frequently, then later on these places can form a fungus (mold). The same applies to quarter-cut openings. In their absence, the danger of cold bridges seriously increases, and here you should especially carefully consider the heating technology of the junction nodes.
Important recommendation- in the absence of quarters, use window frames with a width of at least 130 mm. With a narrow window frame, high-quality sealing of the seam is difficult and there is a high probability of cold bridges. The options given in GOST with false quarters from the corners or from the platband are possible only if there is exterior plaster, and still remain problematic from the point of view of heating technology.
In the presence of the wall effective insulation (mineral wool or non-combustible polystyrene foam), the window should stand either in the plane of the insulation, or behind a quarter of the insulation. In walls where aerated concrete is combined with external cladding and brick quarters, as a rule, cold bridges also do not arise due to the good thermal properties of aerated concrete.
Fastening the window unit in the opening
The specificity of plastic windows is that they have significant thermal linear expansion. That is, when the windows are heated by the sun's rays, the bars of the box and sashes increase in size. As calculated thermal expansion values for windows white should be applied 1.5 mm per 1 running meter, for colored windows - 2.5 mm per 1 running meter (the difference in thermal expansion is due to the fact that white window profiles heat up much less than colored ones).
In accordance with this factor, the window is fastened to the wall. The corners of plastic windows must remain free, the extreme fasteners are placed at a distance of 150 mm from the inner corners of the frames. The rest of the fasteners are placed along the entire perimeter with a step for white profiles no more than 70 cm, for colored ones no more than 60 cm. Near the imposts, fasteners are also placed at a distance of 150 mm from the corner. The gap between the box and the wall must be at least 15 mm. This is due to both thermal expansion of the windows and the fact that it is very difficult to fill a thinner seam with foam insulation evenly.
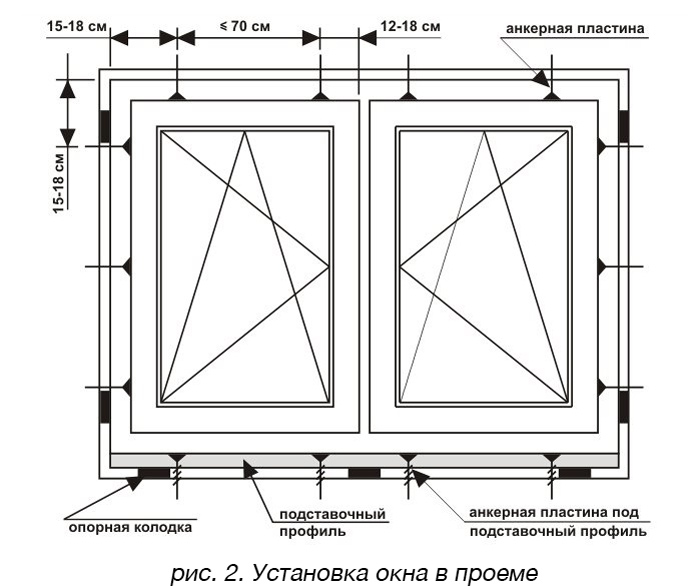
Bearing blocks are placed under the lower corners of the box and under the imposts. The pads are also placed from the sides as follows: if you look at the window from the inside, then with one pivot sash, the pads are placed on the side opposite to the hinges at the top and on the same side as the hinges below. With two flaps, respectively, four pads are placed.
Schematic diagrams of the nodes of the junction of window boxes to the walls

1 - window board;
2 - foam insulation;
3 – vapor barrier tape;
4 - flexible anchor plate;
5 - support block for the window sill;
6 - plaster mortar;
7 - dowel with a locking screw;
8 - an insert made of antiseptic lumber or a leveling layer of plaster mortar (recommended only for the lower unit);
9 - waterproof vapor-permeable tape;
10 - noise-absorbing gasket;
11 - drain;
12 - insulating self-expanding vapor-permeable tape (PSUL);
13 - sealant in a thin layer

1 - foam insulation;
2 - insulating self-expanding vapor-permeable tape (PSUL) or vapor-permeable mastic;
3 - frame dowel;
4 - sealant;
5 - vapor barrier tape;
6 - interior slope finishing panel;
7 - plaster leveling layer of the inner slope.
Thermal gaps must be taken into account especially carefully when designing large-sized glazing elements: when making bay windows, showcases, glazing to the entire floor height. These are three basic principles when installing modern windows, although, of course, there are many nuances and subtleties that depend on various designs walls and from the materials used for sealing the seam. And - as we said at the beginning of the article - the human factor is very important - responsible and quality work installers.
When can you install windows
With the entry into force of Moscow Law No. 42 "On Silence", disturbing the peace of the neighbors is an administrative violation. Please carefully read our instructions for conducting noisy work in order to comply with the requirements in force in Moscow and the Moscow region in various buildings.
How much is the installation of windows in accordance with GOST
The cost consists of two components: the cost of work (hours) and materials.
The assembly seam will comply with GOST for the installation of windows, using both expensive and economical materials. The use of one or another will affect the stages (duration) of work and the final cost of installing windows.
Video instruction for the installation of plastic windows
Standard installation
Installation of plastic windows assumes adherence to GOST standards. Home owners do not always prefer to install windows according to all the necessary rules and regulations.
Installation diagram of a plastic window.
Experts strongly recommend that all residents adhere to these rules, especially those who have at their disposal office rooms, shops, various public institutions. Most buyers are sure that the quality and reliability of the entire structure depends on the profile. But apart from this, assembly and, accordingly, installation plays a key role. Sometimes the owners who hire specialists do not think about whether the installation will be done in accordance with GOST. The manufacturer of the profiles always indicates that the assembly should be done in this way, but the installer may not follow these rules.

Installation diagram of a plastic window.
Installation in accordance with GOST is optional. This is more of a recommendation. If the homeowners decide to install windows, guided by the requirements of the standard, it is necessary to invite qualified employees, preferably from a large construction company. A contract is concluded with this company, which includes a certain point, which indicates that the installation will be carried out exactly in accordance with GOST.
When buying, the seller must select the appropriate profile that will meet the specific conditions. The structure should be checked for optimal air exchange and heat transfer, for the level of sound insulation, dust penetration, etc. As a rule, well-known supplier companies have certificates that the window structures have passed the necessary checks. Accordingly, it is better to purchase goods from them.
Basic requirements during installation
It is important to take into account the fact that most problems with plastic windows arise if the installation is done incorrectly. Therefore, if you decide to install plastic windows, you should not save on the installation process. Today in Russia there is GOST 30971-2002. The rules given are for correct installation... First of all, the GOST indicates the types of profiles, also examples and different options mount. During the installation process, it is important to follow certain rules: there should be no cracks, openings. This is necessary for isolation from the cold. In the places where the window is fastened vertically and horizontally, three seams are made: internal, external and middle. Moreover, in order to properly mount the window, it is necessary to take into account the expansion of the plastic when heated.

Window installation scheme in the opening.
It must also be remembered that the choice should be guided by sanitary standards and tightness standards. The optimum will directly depend on this. temperature regime and humidity level. In order to find out such standards, it is necessary to consider the requirements of SanPin 21.2.1002-00, where the norms of ventilation and heating in a dwelling are prescribed. If you do not follow these rules, there may be a risk of infection with fungus or mold, this can occur due to excessive moisture levels.
It should be noted that the installation in accordance with GOST is a guarantee of your safety and the favorable functioning of the window structure. In addition, installation according to the required standards ensures a favorable microclimate in the house.
When installing, the joints must be positioned in 3 levels. The first is able to protect the room from the penetration of precipitation and water. The second (inner) level must protect against the penetration of vapors. The third level is done using construction foam... The types of walls are also spelled out in the standards, which must also be taken into account. You need to know all the installation rules. It is convenient to use them both during the purchase and during the installation process. It is worth repeating once again that you should buy only high-quality, certified products. The seller must provide you with documents where all are registered technical features products.
Installation Requirements
The quality certificate must be awarded not only to the company that sells the windows, but also to the one responsible for the installation. It is important that qualified specialists undertake the installation of the structure. The emergence and implementation of the certification system will lead the business to high level... Today, the buyer makes high demands on the quality of structures and service in general.
Before installation, you need to do everything required measurements by comparing them. It is important to know what loads the structure can withstand, the wind load is determined. From this it is concluded whether it is necessary additional installation frames with metal plates. Some windows may leak air. In this case, the frames are installed to normalize the thermal insulation.

Window installation diagram.
It is important to carefully prepare the room before installation. It is necessary to remove all extraneous things in advance. It is recommended to cover the furniture with a wide cloth or film. Appliances the room must be isolated from dust. First, pull out the sash and carefully remove the frame. The opening must be free from unnecessary details, all slopes are checked using a level.
After the structure is delivered, it is necessary to separate the frame and glass units. The frame is inserted into the opening using special wedges. Then you should mark the frame and determine how it will be located in the opening. After the frame is fixed. For this, anchor bolts and self-tapping screws are used. The glass unit is fixed with glazing beads. In order to make all measurements correctly, you need a laser ruler. It is important that the entire structure is firmly fixed. For this, there are certain rules, for example, the distance between the points of the fasteners should be about 70 cm. The distance to the fasteners from inner corner there should be a maximum of 15 cm.
The structures of the walls are different from each other. The choice of fasteners depends on the characteristics of the wall. Basically, fasteners are made using anchor bolts, anchor plates and self-tapping screws. Most practical way- use of anchor plates. It is important to correctly install the slopes that cover the opening between the profile and the wall. For installation, remove the remnants of the plaster from the old window, level the unevenness with a putty.
Instruments
- hammer;
- puncher;
- a crowbar for pulling out old nails;
- building level;
- polyurethane foam and a construction gun for working with it.
The installation of plastic windows should be carried out only by experienced specialists, it is advisable to carry out the installation, following all the requirements and rules of GOST. In the firms that are engaged in the installation of plastic windows, there are quality control departments, where you can contact if you have problems with the installation.
Load more

