How to lay out a brick chimney diagram. Do-it-yourself brick chimney masonry DIY brick chimney masonry
A chimney is an indispensable element in the construction of stove heating. This design is needed to remove the products of combustion of wood, coal, gas and other materials burned in the furnace.
There are different types of chimneys, differing in pipe material and cross-sectional shape, but despite the emergence of new high-tech materials, the square (rarely rectangular) brick chimney remains the most popular.
There are 3 types of chimney designs. They differ in the way they exit the furnace, the number of connected heaters, and so on.
Each type has its pros and cons in the application, as well as some installation features.
Wall-mounted chimneys
Wall-mounted chimneys are the most common type of construction. In this case, the pipe is simply an extension of the stove, going up through the roof. The advantages of such a system:
- Compact and rational use of space. In any case, the space above the stove would be empty (due to safety requirements), and the chimney is the only element allowed in this area.
- Ease of installation. The construction of a brick chimney is very simple and does not require any skills (the skill of laying bricks has probably already been obtained during the construction of the furnace).
The disadvantage of a mounted chimney is that it is mounted for one particular appliance. If there are several stoves in the house, each will have to build its own chimney or use a different type of design.
Indigenous chimneys
In this case, the chimney is a common riser, to which several heaters can be connected using metal pipes, and the stoves can be located both in different rooms and on different floors.
Of the disadvantages - additional space is required not only for installing a chimney, but also for supply pipes. Also, quite complex cross-sectional calculations for each element of such a design in order to ensure normal traction.
Wall chimneys
The chimney got its name because it is always located near the main wall (internal or external). If the chimney is located against an external wall, then most of its structure is on the outside of the house and requires an additional foundation. When installed indoors, the chimney must run inside the wall.
The advantage of a wall chimney is that several appliances can be connected to it on different floors, but they must be strictly one above the other.
Also, the internal wall chimney is a kind of additional source of heat, since the hot pipe gives off heat in all directions, including rooms adjacent to the main wall. True, the efficiency of such heating is minimal and is simply an additional advantage of a wall chimney.
The main disadvantage is the high cost of materials and the need for additional space.
How a brick chimney works
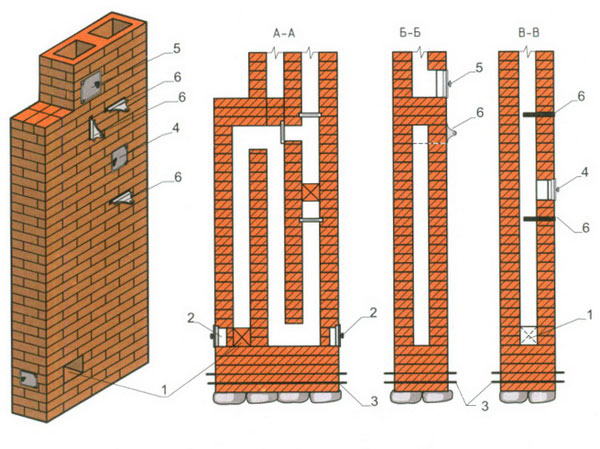
A brick chimney consists of several sections, some of which are indoors, and some are outdoors.
The design features are such that when passing through the attic floor, the pipe walls should be as thick as possible in order to reduce the risk of fire in the truss system. At the same time, going beyond the roof, the structure of the chimney itself must cover the hole in the roof so that atmospheric precipitation does not penetrate into it.
- In most cases, the chimney pipe is a continuation of the stove, i.e. on top of it, the required number of rows of bricks is completed to the attic floor.
- The next element is fluff. In the fluff, the width of the pipe is 2-3 times its usual size while maintaining a constant internal section. The thick walls of the pipe are a kind of buffer that protects the flammable elements of the attic system from contact with the heat passing through the pipe. At this level, the air is still too hot due to the close proximity of the furnace.
- Next comes the riser - a piece of pipe from the attic floor to the top of the roof. It is a brick pipe in its usual section.
- At the place where the pipe exits the roof, according to technology, there should be an “otter”, but it is often neglected. The element is similar to fluff, but is installed in such a way that a brick peak is formed above the roof, repeating the angle of the roof. An otter is needed in order to close the hole through which the pipe exits from precipitation. Usually, a special apron (metal or other material) is placed around the otter to provide better protection.
- Further, the neck of the pipe rises above the roof - the external analogue of the riser.
- The whole structure ends with a head, which is a small visor. It is rather a decorative traditional element of the pipe, since its protective functions are minimal. For this reason, the head is also often neglected.
- A metal cap is installed on top of the head, which protects the chimney from rain and debris getting inside.
Laying a brick pipe is a rather painstaking process. If you have not done laying just bricks, then you should not try.
It is better to turn to specialists. But if you held the trowel in your hands, then it can be done with your own hands. How to lay out a brick pipe - we will consider in detail today. A video will also be presented in this article, where you can see everything clearly.
Chimneys: classification
By design, chimneys are divided into:
- prefabricated;
- mounted;
- Brick indigenous;
- Wall
The laying of a brick pipe is determined by its design. There are generally accepted provisions that must be followed when choosing any design.
- Brick mounted ones are a kind of massive assembly that hangs over the stove masonry. The optimal thickness of the masonry is not less than half a brick. Brick indigenous are an assembly that stands separately in the form of a riser. The assembly is constructed from an asbestos-cement pipe having a diameter of about 150-250 millimeters.
- The design team is constructed using heat-resistant concrete in the form of free-standing blocks. But wall mounted in the main wall of the house in order to save the volume of the building, its area.
- The chimney, which is built into the load-bearing wall, must be located indoors.
Attention: The chimney is not advised to be installed in the outer walls, because the outside air can cool the flue gas, reduce draft and form condensate on the inner walls of the duct.
- As a result, it becomes impossible to obtain high efficiency from a furnace with this tube. If they don’t come up with another method for arranging the wall pipe, then they install a pilaster with a ledge towards the building. When installing this assembly, an important condition must be observed: the work must be carried out with the maintenance of the main distances from the smoke to the outer wall. The distance can be 1.5 bricks, 2 bricks and 2.5 bricks.
- The location of the pipe is only vertical, without retreat in the inner area.
- If there is a pull in the assembly, then it must be more than one meter.
- The internal section of the pipe should fluctuate within 140x140 mm. In order to create optimal traction, a pipe height of at least five meters is recommended.
- If the height is less than 5 meters, then a deflector-diffuser is used to create traction. With the simultaneous use of a fireplace and a stove in a building, two chimneys are installed, since with different drafts one of the hearths may begin to smoke.
- If the building is built of wood, then a thickening of approximately 1 or 1.5 bricks is erected in the pipe junction areas.
- Structures from a chimney that are prone to easy fire are covered with sheets made of metal or asbestos-cement sheets. To eliminate the possibility of drifting the pipe with snow, its height should be about half a meter higher relative to the roof. If the pipe collapses, this can happen precisely as a result of this, because moisture can get here. So don't neglect it.
- The end of the pipe head can be protected by a steel edging or a metal cap.
- In the place where the chimney exits, the installation of the passage through the roof is carried out in order to minimize the risk of moisture entering the attic.
- The passage unit can be made by hand from sheet steel.
- The deflector on the pipe performs the function of preventing the draft from tipping over in the opposite direction. If there is no deflector, then the pipe head should probably be beveled.
Pipe laying
Now let's look at how to fold a brick pipe and provide for everything. The sequence of work is quite important here. It is also necessary to observe the masonry technology. Everything is done in the following order.
Need a tool
To build a chimney quickly with your own hands, you will need some tools and fixtures.
They should include:
- Master OK;
- Devices for measurements;
- sheet iron;
- Clamps for laying bricks;
- Hearth, red, and also fireclay bricks;
- Sand-lime mortar;
- asbestos-cement slab;
- Pickaxe;
- trowel;
- Solution container
Work order
The main component of any stove or fireplace is the chimney. It performs the role of eliminating gases and harmful substances resulting from the combustion of fuel.
There are several main types of chimney:
Traction and location
Of course, the chimney must certainly be in a vertical position, and inside it must be impeccably smooth and without indentation.
- The optimal internal section of the chimney is more than 14x14 cm. Only in this case, all harmful gases and vapors will be freely removed. The height must be at least five meters from the level of the grate.
Attention: If it is not possible to take the pipe to the desired height, then you can install a deflector-diffuser, which significantly improves traction.
Trumpet: its device
The chimney of the furnace consists of concrete elements.
These should include:
- Riser;
- neck;
- Smoke damper;
- Metal cap;
- headline;
- masonry
Attention: It is worth taking note that the laying of the chimney must be done as tightly as possible.
- As a rule, a special stove brick is chosen for the chimney, based on red clay, full-bodied and refractory fireclay bricks.
- But the double silicate brick M 150, endowed with high resistance to frost, will also fit perfectly, and it is this property that we will need when we take the pipe to the roof.
- Let's go back to the solution. Since hazardous products of combustion pass through the brickwork, the joints between the bricks should not be so tight.
Caution: Due to the fact that a conventional mortar is permeable to carbon dioxide, it is recommended to resort to a mortar based on sand and clay.
So, we proceed directly to the masonry.
Brick for chimneys is described above, but a combination can also be made here. For example, make the head of a brick pipe brick and use a metal insert inside.
In this option, it will only be necessary to make rings of a brick chimney with good sealing.
Do-it-yourself brick pipe is made in the following order:
- First, lay out several rows without using a mortar, adjust the brick. Now we carefully look at whether protrusions have formed and whether everything fits normally.
- The next step is to apply mortar to the surface of the bricks. Here we will definitely need a level. With it, we check the horizontal masonry guide. But with a suspension we measure the vertical guide. A more secure bond is guaranteed if the brick is soaked in water before applying the sand-and-clay mortar.
- After we have laid out five rows, lightly wipe the inner area of \u200b\u200bthe masonry with a damp cloth. This will ensure complete mashing of the brick pipe from the inside, which guarantees the tightness and tightness of the joints.
- The correct geometric shape is achieved thanks to the usual rectangle made of metal, with which we check the evenness of the masonry. The same method is used in the laying of pillars and is of great help in the work.
- The best option for the output of combustion products is a rectangular masonry. It is this form that is convenient to use. In the device of the chimney, it is always important to observe the vertical direction and try to lay it out in such a way as to avoid slopes. If this is not possible, then the slope should be in the range of 60 degrees. It is in the slope that the greatest air resistance is achieved.
Ventilation
We note the fact that a plug is provided in the chimney, which radically affects the amount of natural air draft. It should be made in the forefront of the chimney.
- Right next to the removal of the pipe to the roof, you will need another window, which is necessary for easy cleaning of the pipe from dirt: dust, plaque.
Removal to the roof- This stage will seem to many too complicated and cause a storm of fear. You shouldn't be so worried. Thanks to the presence of accurate instructions, the removal of the pipe is a fairly easy task, which will not be difficult to cope with.
- To implement our plans, we need material that we will lay between the roof and masonry. In most cases, mineral wool is taken in the form of a slab for these purposes. Next, we make a rectangular hole in the roof. It should be wider than the pipe by a couple of centimeters.
- Then we install mineral wool between the roof and the masonry. It serves as a good seal and is a mandatory fire safety rule, since the chimney can easily heat up from hot gas.
- As mentioned above, the layout of the takeaway can be made from a different type of brick. The cost of this will not change significantly, but this fact will significantly affect the technical parameters for the better.
Firstly, condensation can be avoided by using frost-resistant bricks.- The issue can be successfully resolved if you install a transition from a pipe to a sandwich. No matter how, namely the sandwich will instantly eliminate all sorts of troubles associated with the formation of condensate.
But here it is already necessary to proceed from your own tastes and design preferences.
The next step is waterproofing all joints of the roof and chimney. For these purposes, you can apply mastic. Then we put the headband. A chimney for a brick pipe can be made by yourself or purchased at a specialized store.
Everything is ready! Our chimney can function!
The chimney is laid out in the same way as the stove. You can apply masonry in 4.5 or 6 bricks.
- Pipe laying in the attic should be carried out according to the beacon. To do this, after laying out the first three rows in the attic, we release the plumb line from the roof plane to the corner of the masonry, absolutely any. Where there is a plumb line, we hammer in a nail. In the place where the plumb line was leveled or in the seam of the corner of the masonry, we hammer in a nail, and between them we tie a thread of silk. The masonry must be carried out along the control corner, always with a check using the square every three rows.
- If a pipe is laid above the roof, then for greater assembly reliability, it is recommended to purchase clay-cement mortar instead of a cement-sand mortar. To do this, in the clay-sand mixture, which was used for laying the furnace, we include one liter of cement per ten liters of water. Mix the mixture thoroughly using a mixer.
- The head of the pipe is more of a decoration, which means that it is not required to do it. If you nevertheless gave your choice in favor of building a head with your own hands, then in no case do not change the internal section. If it is changed, then a swirl of smoke in the channel is inevitable.
- In order to protect the pipe from atmospheric precipitation, a cap made of galvanized iron must be installed in its upper region. The cap will help protect the channel from moisture.
Brick pipe part of the work cannot be done with one material, and the second part with another. This is a complex structure and therefore it is necessary to think over everything from the very beginning.
There is an instruction on the rules for its manufacture, you should not deviate, listen to the recommendations and then everything will be at the highest level.


Is a chimney. If everything is done in accordance with the technology, then the smoke will go up - out, and the heat will spread around the room. The process of laying a brick chimney can be perfectly performed by a master or an experienced builder. If you want to save time and money, you can also build a brick chimney with your own hands, for this it is enough to follow a few recommendations.
During the laying of the chimney, it is necessary to adhere to some rules and regulations, thanks to which the operation of the heating system will be absolutely safe:
- Exclude the presence of horizontal sections, as exhaust gases will be deposited on them.
- If the roof is flat, then the outer part of the chimney must be at least 1 m high.
- In cases where the roof has a pitched shape, it is necessary to calculate the distance from the place for the chimney to the ridge, if it is less than 150 cm, then it should rise 50 cm in height, if about 300 cm - at the same level.
For the correct calculation of this parameter, it may be necessary to consult a specialist in order to comply with all fire safety standards and regulations.
We calculate the size and configuration

Before proceeding with the masonry, it is necessary to make some calculations. You can do this process on your own. With the correct calculation, a high-quality chimney will come out, which means that the amount of fuel for heating will be minimized, all combustion waste will go outside without difficulty, and fresh air will circulate in the room.
A correctly calculated chimney height parameter will allow you to organize good traction, which means that the combustion process will be of the highest quality and efficient.
Fire safety must be calculated depending on the thickness of the walls: wide ones will heat up for a long time, while one layer of brick will warm up in just an hour.
It is necessary to make calculations for each parameter on an individual basis, depending on the room, the roof, as well as the type of heating system.

The second important preparatory stage is the choice of building material. During the laying of the chimney, only brick and cement mortar will be needed. It is very important to choose the right type of brick. It is worth choosing a refractory and of the highest quality type, in which all sides are as smooth and even as possible. The shape of each element must have identical dimensions.
Then you need to proceed to the selection of components for the solution. The composition should include: sand, clay, water, cement. Each component affects the quality of the chimney: fine sand, high-quality cement, clay without impurities. Having such source materials, you can independently build any chimney.

Chimney masonry tools:
- grinder (for cutting bricks of a certain size);
- ruler;
- marker (for data accuracy).
Before laying a brick chimney, one important point must be taken into account - the mortar layer must be small in order to obtain a strong and reliable structure. The laying process is standard - as for the construction of any building: each row should be moved half a brick to the side to get maximum adhesion.
When forming the cutting and otter, experts recommend using metal rods that must be built into the brickwork, but the reinforcement should not cross the smoke channel. How to make the clogging of the chimney minimal so that the soot inside practically does not settle on the walls? It is necessary to smooth the walls of the structure with plaster.
During the construction of the walls of the chimney, small holes should be left so that the cleaning process does not bring inconvenience.

The riser must be folded in the attic (roof), while it must be made close to. A hole is made directly in it (or the roof is partially disassembled), through which the pipe will be passed out. The height of the riser must be higher than the height of the ridge.
After about 10–15 rows, it is necessary to complete the neck of the chimney, the parameters of which are performed as desired. At the very end, arrange a cap, on top of which you can install a cap or weather vane.
To complete the construction, it is necessary to make fastening and thermal insulation, which ensures the efficient operation of the heating system.
As you can see, you can build a brick chimney yourself, if you take into account the recommendations of experts and follow the technology. To get acquainted with the visual processes, it is enough to watch a special video in which all the little things are taken into account. If you have questions on the topic, then write them in the comments to the article.
Video
After watching the video, you can get acquainted with the technology of laying a brick chimney for a fireplace:
Scheme
Thanks to these schemes, you can carry out high-quality brickwork:


Photo


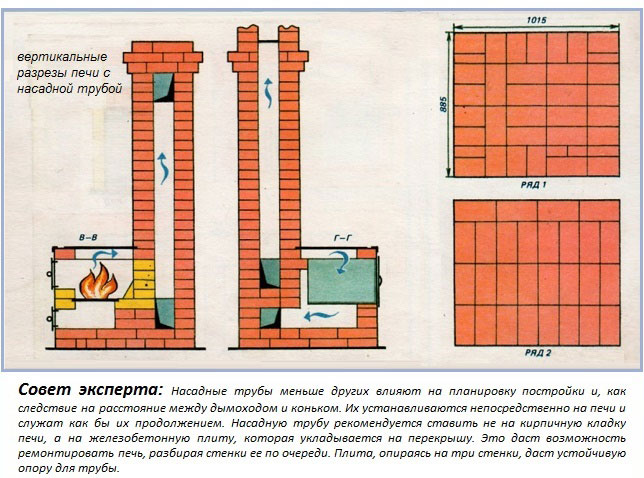
Chimneys are used to remove combustion products and generate draft in furnaces. By design and location relative to the furnace, chimneys are root, mounted and in the form of a channel in the main wall. Pipes installed on the furnace are called mounted pipes. This is actually a continuation of the smoke channel of the furnace; they are convenient because they do not take up space in the room. Indigenous chimneys are arranged in the form of a pipe riser standing separately at the furnace on its own foundation.
Their use is especially justified in wooden houses with a group arrangement of heating devices. In brick buildings, it is better to arrange smoke channels in the internal capital walls.
Wall chimneys do not take up living space and do not require the cost of materials.
The determination of the cross section of the smoke channel of the pipe is carried out depending on the heat transfer of the furnaces. The size of the cross-section of the channels must correspond to the amount of flue gases flowing through them and be at least 130x130mm for furnaces with heat transfer up to 3500W. For furnaces with a heat output of more than 3500W, the pipe section is made 130x250mm. For Russian stoves and fireplaces with a large portal, the chimney section is 260x260mm.
Depending on the size of the channel, the masonry is carried out in different ways: in four “four” bricks, five “five” bricks or six “six” bricks.
The chimney consists of the following parts:
Chimney masonry does not differ from stove masonry.
The difficulty is laying it at the place where it passes through the attic floor and the expansion device above the roof. The main requirement is the verticality of the array, dense filling of the joints, and the achievement of a smooth surface of the smoke channels.
The laying of the built-in pipe is a continuation of the laying of the furnace, since it is installed on its ceiling and is carried out on the same mortar until it passes through the attic floor.
At the point where the pipe passes through the ceiling, a horizontal cut is arranged - the walls are widened. Horizontal cutting is done for fire safety.
The cutting and the pipe are placed simultaneously with the dressing of the seams, the outer wall gradually expands, and the inner channel goes in one section.
This is achieved by overlapping the outer masonry by 4 cm in each row.


Non-combustible thermal insulation, such as basalt mats, must be laid between the cutting and wooden beams.
In a freshly cut wooden house, cutting should be done taking into account the shrinkage of the walls, lowering it lower by 4% of the height of the walls.
It is better to lay the riser within the attic space using a beacon.
To do this, 2-3 rows of pipes are laid out above the cutting. A plumb line from the roof plane is lowered to one of the corners.
Masonry brick chimney
A nail is hammered into the point on the roof lathing from which the plumb line is lowered. A nylon thread is tied to the nail, and the lower end of the thread is tied to a nail hammered into the seam of the chimney masonry in the corner. The laying is carried out along this corner, checking after 3-4 rows with a square or measuring the diagonals.
The greatest difficulty is laying pipes above the roof.
There, the masonry is led to a complex clay-cement mortar. I make the solution like this: in the clay-sand mortar, from which the furnace is used, I add 1 liter of cement, a little water for 10 liters and mix thoroughly with a mixer.
If the pipe is laid without adding cement, then it may turn out like this.
The riser of the pipe is brought out above the lower edge of the roof by 2 rows and they begin to lay the otter - the expansion of the pipe that protects the riser from precipitation.
Lay it with careful dressing of seams. The first row is increased by a brick overlap by a quarter in one direction to form an overhang over the roof towards the slope. The second row begins the formation of an overhang from the sides and makes it an overlap on both sides of a quarter of a brick.
The inner walls of the channel are strictly vertical. Since the pipes can be of different sections, and the roof has a different slope, the otter is placed individually each time. Here is one of the options for the ordering of the otter and the ordering of the fluff.

Laying fluff is a rather laborious and time-consuming job. To increase productivity, fluff can be made of reinforced concrete. For reinforcement, 5-7 mm reinforcement is used at the rate of 4-5 bars on each side of the plate.
Two bars of reinforcement must necessarily lie on the brickwork.
The slab for fluffing can be made on site or separately with subsequent laying. In both cases, it is necessary to make formwork. When manufactured on site, the formwork is fixed as firmly as possible. The width of each side of the formwork must be at least 250mm from the "smoke". Between the fluff and the ceiling, it is imperative to put a heat-insulating material. In this photo it is two layers of 5mm asbestos.


When passing through the ceiling with a double-circuit metal pipe, the hole in the ceiling is closed with a sheet of galvanized iron, on which a basalt insulation is placed and wrapped around the pipe.

Sometimes, to simplify laying, instead of laying an otter, I make such a belt.

Above the otter, put the neck of the pipe of the same section as the riser.
Finish laying with a head. To protect the pipe from atmospheric precipitation, it is desirable to install a cap made of galvanized iron or other material on it. The cap protects the upper part of the pipe and prevents the penetration of moisture into the channel.
The head of the pipe plays only a decorative role, it can not be done.
If a head is made at the pipe, then the internal section in this place should not change so that there are no swirls of smoke in the pipe.


In order for water not to stagnate on the horizontal surfaces of the otter and the head, they are plastered with a slope.


The height of the pipe above the roof has a significant effect on the operation of the furnace.
If the pipe is located in the zone of wind backwater, then in windy weather, smoke can go into the room. To prevent this from happening, it is necessary to set the height of the pipe relative to the roof ridge according to the figure.

If you do not follow this rule, then this can happen.
After the laying of the pipe is completed, so that precipitation does not fall into the attic and does not damage the pipe riser, it is necessary to close the gap between the pipe and the roof with galvanized iron or other material.


Here is a version of the pipe without the otter.
To prevent water from flowing down the pipe under the roof, an incision is made through the pipe with a grinder to a depth of 10 mm.


Then the apron sheet is inserted and the groove is filled with sealant.


You can learn more about laying chimneys and working on the roof from the video guide “Do-it-yourself stoves”.
Here are pictures of the finished pipes.


Protective materials for wooden structures
Furnace pipe insulation: thermal insulation
You can wrap the chimney with foil insulation
Help - sandwich pipes
Pipe insulation in a traditional Russian bath
Protecting the oven from fire
If you decide to build a bath, then do not forget about the high-quality insulation of the stove, chimney, walls and ceiling. Otherwise, you may have serious problems with the ignition of the ceiling of the building. Therefore, we will try to dwell in more detail on the topical problem today - do-it-yourself pipe insulation in the bath.

Protective materials for wooden structures
Due to the fact that the chimney and the furnace heat up quickly, a fire can occur. Moreover, according to tradition, wood is the material for the bath.
Back in the old days, it was customary to insulate walls, a ceiling, a stove, a chimney with an asbestos layer, clay and other available materials that conduct heat energy rather poorly and are resistant to elevated temperatures.
So how to overlay the pipe from the stove today? Insulation of the chimney structure is necessary both for the purpose of fire safety and protection against condensate, so that cooling is slower and the smoke exhaust system lasts longer.

It is a mistake to think that a few metal sheets will be enough to isolate from fire, with which the ceiling around the chimney is upholstered. After all, the metal also heats up quickly, so it will not protect against fire, and as a heat insulator it will also not work.
Red brick is not always needed for pipe lining, although it is endowed with excellent thermal insulation properties.
The reason is that such a design is not suitable for every bath in design.
To better understand how to wrap a chimney pipe from fire, consider two options for insulating materials in the form:
Furnace pipe insulation: thermal insulation
This is a unique material, the structure of which includes foamed polyethylene, located between a pair of foil sheets.
With the help of thermal insulation, you can qualitatively insulate the chimney, and on your own.
The thickness of the thermal insulation varies from 2 to 10 mm, and the thicker the material, the greater its resistance to high temperatures.
The top layer of the foil serves as a reliable protection of the pipe from significant overheating. With the help of a wire or adhesive tape of a metal craftsman, a thermal insulation is attached, which is then wrapped around the chimney.
You can wrap the chimney with foil insulation
Modern material includes two layers: heat insulator and foil. The second - plays a reflective function and can save up to 90% of the thermal energy in the building. Folgoizol is a harmless material compared to other analogues, since compacted food acts as a foil. The material is resistant to ultraviolet and elevated temperatures within the range of -65 to +175 degrees Celsius, a good insulator.
Who still does not know how to insulate the chimney pipe in the sauna, we recommend covering the steam room ceiling, walls and chimney with foil insulation. As a result, you will get a room that is similar in design to a thermos. In the sauna, heat will remain, and the bath will quickly gain temperature, and then slowly cool down.
Help - sandwich pipes
For those who wish to equip a safe chimney in the bath, we suggest using a sandwich pipe.
This design includes several sections that are easily placed into each other, i.e. looks like a layered cake.
We lay out a brick chimney
Here are the main components of a sandwich pipe:
- stainless steel layer (inside);
- insulation in the form of basalt / mineral wool (in the middle);
- steel with zinc coating (outside).

This creative design represents the insulation of a chimney built into a common system and is designed to solve two problems at the same time:
- protection against soot accumulation inside;
- maintaining the optimum outside temperature.
It is easy to assemble a sandwich pipe on your own and use it for a sauna with an iron stove or a bath.
What to do if you built a Russian steam room with a brick stove? Below we will consider how to overlay the pipe in this situation in order to protect it from ignition.
Pipe insulation in a traditional Russian bath
At elevated temperatures, refractory red brick retains its operational properties, therefore it is in demand when building a chimney in a bath with a stone stove. In this case, you are guaranteed protection of the pipe from fire and long-term preservation of heat.
The service life of the structure depends on how competently the brick pipe is folded. Do not save on materials during the construction of the chimney, because.
then the repair will cost you much more.

Let's take a closer look at how to isolate the pipe in the bath from the ceiling:
- With the help of asbestos, overlay the outlet of the pipe on the ceiling and through the roof.
- Using galvanized material, insulate the walls from the inside of the pipe.
Standard iron sheets are completely unsuitable for this purpose due to their tendency to corrode.
- Run a box around the pipe at the points of its passage through the ceiling.
- Pour expanded clay inside the box to retain heat and protect wooden floors from ignition.
You professionally wrapped the pipe, but the work on arranging the chimney did not end there.
The next step is to insulate the furnace, ceiling and walls of the bath.
Protecting the oven from fire
Modern metal stoves are mounted on a foundation, while sheathing with sheets of the same material at the back and side of the wall. If you yourself beat the furnace only with metal, then its appearance will not be very aesthetic. It is better to make the outer masonry with red brick, which isolates the stove from fire and retains heat in the bath.
Due to the fact that asbestos releases toxic substances at elevated temperatures, it is not recommended to use it in a steam room.
Natural felt is considered harmless, which, moreover, is a good insulator. At a price, this material is more expensive than asbestos sheets, and when smoldering, it emits a specific smell (felt does not light up), which can be immediately felt.

If you intend to install the stove on a wooden floor, then first it is better to lay a felt material in a couple of layers, then lay out a brick in three rows. For walls and floors, it is advised to lay sheets of metal as an insulator, the height of which varies from 50 to 70 cm.
And you will no longer have questions about how to wrap the chimney pipes.
Before starting construction work, smoke brick channels must be prepared, corresponding to the special design of the furnace, the features of the internal layout of the premises, the structural differences of the roof.

Further, until they cover the neck of the cut (blank). It should be noted that regardless of the external size of the inner section, the vertical smoke along the entire length is the same and is approximately 140x270 millimeters (average parameters, but in fact it may vary depending on the power of the heater and the size of the smoke).
After five rows of doors, the cut begins to adhere to the external dimensions of the first row of approximately 590 x 450 mm, which is achieved by inserting half and a quarter of the bricks. To avoid deflection in the flue section, insert 60mm brick slabs inserted inside. In the third row, the dimensions of the brick chimney change again and are already 510 × 650 millimeters.
Brick slabs are also inserted inside. The outer dimensions of the fourth row are made of 570 × 710 millimeters, and inside - bricks with a thickness of 90-100 millimeters. The fifth and sixth lines are made of solid brick and strictly follow the dress code. If necessary, cutting can be continued for another type.
After the wall is completed, the brick-and-brick structure is moved to the attic, where the hoist is installed.
To reach it outside, there must be a first opening on the roof. The foundation is built very quickly and easily, since it involves the implementation of conventional masonry and does not require manipulation of the dimensions of the pipes.
When it comes to the roof, all work moves towards the roof. The vortex pattern continues to rise one or two rows above the roof, after which the construction of the otter begins.
 This segment of the chimney consists of nine types, while it is arranged so that the outer dimension of each successive row exceeds the previous block of bricks.
At the same time, the size of the smoke channel must remain the same, so carefully select the interior panels with which it is configured. At the beginning, the bricks are laid in such a way that only one gap is formed in front, and the external size of the chimney does not change at the edges. In the third row, the otter becomes wider due to the front bricks, which means that the front ledge gradually begins to appear on the sides.
In the fourth line, the side projections increase in length. The more their length increases in the fifth line, the greater the difference between the chimney and the roof slab. In the sixth order, this gap is almost completely closed, and in the seventh case, the formation of the side surfaces is completed.
As a result of all the transformations described above, an anterior and two lateral projections are formed, the last protrusions remain.
As you can see, at the moment there is nothing that even many experienced builders would ask the question of how to build a brick chimney, because the matter is quite complicated and requires the most attention and compliance with all technological requirements.
The last fourth projections are formed in the eighth order. Of particular importance is the observation of the ligation of bricks and the careful selection of brick slabs, which allow the smoke channel to remain unchanged with a constant change in the external dimensions of the pipe.
Brick chimney - we build a reliable structure independently
Finally, the ninth type of otter is defined similarly to the eighth, and at the same time, the neck of the chimney already begins at this stage. Its size may vary depending on the height of the chimney. At this stage, you must adhere to the rules and regulations that apply to the height of the chimney above the roof, as this will have serious consequences for the draft during the operation of the stove (see "Chimney with hands"). 
So, we figured out how to build a brick chimney, but you need to look for some of the nuances and problems that you will have to face in the process.
During the implementation of the wall, it is necessary to control the thoroughness of the ligation of bricks with each other, especially for half, quarter and other parts and brick slabs.
It won't be much of a problem for a skilled stove worker to distribute a portion of the required size from an entire brick, but for those with little experience it can be very difficult.
The best way out of this position is to buy a special grinder. This makes it easy to obtain masonry elements for the chimney of the required size, which is especially important if the panels are needed to form a smoke channel between the cutter or otters.
It is important to remember that the thickness of the seam directly affects the strength of the brick, and because it is thinner, the chimney will become stronger.
In this regard, you must carefully measure the location of the future installation, in accordance with these data, use the cutting line of the knives, and only after that you cut. Sometimes it may even be necessary for some bricks to be irregular in shape, so a mistake here can cost broken bricks and waste time.

To summarize all of the above, it is easy to understand that it is very difficult to install a brick chimney with your own hands on a person who does not have enough experience.
But don't give up, because this is an easy way for beginners to take advantage of the building. Also read: "Do-it-yourself wind chimney."
Alternative brick chimney design
If the above method of laying a chimney seems too difficult and impossible for someone, then don't give up and don't give up. There is an alternative way to install a brick chimney that has the least amount of skill. This means doing normal masonry, in which the entire chimney coming out of the pipe and ending in the head will be the same size.
There is a logical question: what in this case cuts and tears? They will also be, but they will also be made of concrete. Also read: "Chimney diagram for a gas boiler."
Brick brick for gas boilers and ventilation, detailed video instruction:
Before starting work, it is necessary to first place metal rods, wire or fittings with a diameter of 5-7 millimeters.
When installing a chimney in places where it is necessary to cut an otter, the envelope parts must be installed in brick. It is important to ensure that metal elements do not cross the smoke channel. After completing the chimney wall, it is only necessary to install the support in the right place, prepare the cement mortar and fill it (see also: “Do-it-yourself chimney cleaning - methods”).
As you can see, even without a lot of experience and with minimal brick brick knowledge, your hands for building a chimney without resorting to the help of builders, but instead opted for the installation of metal pipes, which, when performed, are much worse than brick chimneys.
If you have something that does not work right away, without panic, just study the circuit more carefully, see the advice of experienced craftsmen, try to figure out what is causing the problems, the next attempt will surely be successful.
The reward for hard work and inertia will be a good and functional chimney that will last over a decade and keep your heating equipment working properly.
Also read: "Chimney installation in the bathroom."
The technology of laying a brick chimney in itself is quite simple and understandable, since, unlike the brick oven itself, the pipe usually does not have internal channels that are complex in configuration. However, despite the relative simplicity of the design, one cannot but take into account the enormous importance of this department of the furnace, since the quality of the heating of the house and the safety of both the building itself and the people living in it directly depend on it.
Therefore, in order for all the work to be successful, it is necessary to approach it with the utmost care, relying on the recommendations of experienced craftsmen and on the developed and tested design schemes.
When erecting a chimney, it should be remembered that the evenness of the inner walls of the channel is no less important than the aesthetics of the outer masonry. Not only the stability of the required draft in the furnace depends on this circumstance, but also the duration of operation of the chimney without cleaning, since the smoke rising through the pipe leaves on smooth walls, without protruding mortar and deep seams, a much smaller amount of fuel combustion waste, and the channel overgrows much slower.
What are brick chimneys?
Chimneys of brick ovens can be of different types, depending on the place of their installation, the design of the furnace, and also on how many heaters will be connected to the pipe. So, there are three main types of chimney brick pipes: these are mounted, root and wall.
Mounted chimneys. The most widely used constructions are packed pipes. They are good because they are compact and do not take up any additional space in the room at all, but are simply a vertical continuation of the furnace.
A mounted chimney is, in fact, a continuation of the furnace up. Very often, the ordering of the furnace immediately includes the layout of the initial section of the pipe.
They are erected on top of the last row of bricks covering the furnace, around the left hole.
Then the pipe is passed through the attic floor, attic, truss system and rises above the roof.
Root chimneys. This type of pipe is installed in cases where it is planned to connect a metal stove to it, or several heating appliances located on one or even several floors.
The root chimney allows you to connect metal furnaces to it. As well as several heating devices located at different levels of the building.
In addition to metal, brick ovens can also be connected to such a pipe. This type of chimney is especially convenient if it is necessary to build two stoves in the house in neighboring rooms.
For example, for the kitchen you need a stove with a hob, and for the next room - only a heating one. In order not to lay out a separate pipe for each of them, a root chimney is built between the rooms, to which both heaters are connected.
Not only two, but also three or four stoves located on different floors of the house can be connected to a pipe of this type. In any case, it is necessary to calculate the size of the internal chimney channel very accurately, otherwise normal draft may not be ensured when several devices are operating simultaneously.
Wall chimneys are built near the main (external or internal) walls or built into them. They can be used, just like the main ones, to connect several furnaces located on different floors of the building.
The convenience of this design lies in the fact that it is, as it were, outside the living quarters, without occupying their area. For example, on the first floor of the house a fireplace can be built and connected to the wall chimney (there the pipe will be more similar to a wall-mounted one according to the principle of structure), and on the second floor a smoke outlet of a metal stove is embedded (as in the version with a root requirement).
The disadvantages of this version of the chimney are the considerable cost of the project and the complexity of the work. Firstly, the construction of this structure will require much more building material.
Secondly, the chimney, if it is partially on the street, requires serious insulation measures, otherwise in winter, with temperature changes, condensate will form in the internal channels, which will significantly reduce the efficiency of the heater. Therefore, if this chimney option is chosen, then it would be more prudent to sacrifice the indoor area and lead the pipe along the inner wall of the house.
Parameters of brick chimneys
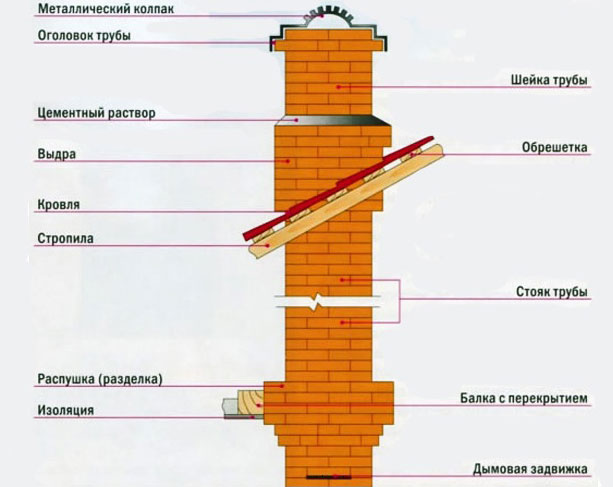
The main sections of the brick chimney
A brick chimney is divided into departments that have an owl purpose and are named differently.
These features must be immediately clarified so that in the future it will be easier to understand the description of the work on the construction of the pipe (Figure 5).
1 - Pipe head. Laying out this part of the chimney, the bricks are shifted to the outside to form a kind of “visor”, as if hanging over the lower sections, partially protecting the walls of the chimney from precipitation.
2 - The neck of the pipe is located immediately below the head and has the same perimeter over its entire height, without protrusions, extensions or narrowing.
3 - "Otter" has a more complex masonry scheme, since a protective function is assigned to it. Firstly, the “otter” masonry, hanging over the gap formed at the junction of the roofing material and the pipe walls, closes it from the penetration of precipitation, and forms a space for the installation of a waterproofing material.
Secondly, its expanded walls become a guarantee of safety - at the place of passage through the roofing, due to the increased thickness, the necessary level of thermal insulation is created.
4 - A metal or other sheet (apron), mounted in the lower part of the otter, forms a kind of ebb, which closes the junction of the brick wall of the pipe and the roofing material.
5 - "Fluffing" - this expanded part of the pipe, located in the area of \u200b\u200bits passage through the attic floor.
The walls of the "fluff", like the "otter", are thicker than other flat sections of the chimney - this is necessary for fire safety, since the attic floor very often consists of flammable materials, and they cannot be allowed to overheat.
6 - Roofing structure.
7 - The riser is a straight section of the pipe, which has an even masonry along the entire height and is located in the attic space from the “fluff” to the “otter”.
8 - Attic floor.
9 - An umbrella cap is often fixed on top of the head, which will protect the internal chimney channel from water and debris entering it.
The main function of the chimney is to effectively remove combustion products from the combustion chamber into the atmosphere.
How to build a brick chimney: a storehouse of useful tips for self-building
To do this, the chimney is connected to numerous channels located in the furnace structure, with which it must interact harmoniously. If the stove and chimney are built correctly, in accordance with the developed parameters, then during the operation of the heater, good draft should be created inside the channels, which will contribute to the timely removal of smoke to the street. However, at the same time, this should not lead to the fact that the heat generated by it will fly out of the furnace literally “into the pipe”.
In a word, everything needs a “golden mean”.
Scheme of the correct ratio of the height of the chimney pipe, depending on the location on the roof (Figure 6):
If the chimney exits through the roof covering at a distance L1 not exceeding 1500 mm from the ridge (when measured horizontally), then its upper end edge must be raised above the ridge by at least 500 mm.
The chimney pipe passing through the roof at a distance of 1500 to 3000 mm from the ridge (L2 in the diagram) must be at least at the level of the ridge.
The chimney, installed from the ridge more than 3000 mm (L3), must, with its upper edge, be located on a conditional line drawn through the point of the ridge at an angle of 10 degrees to the horizontal.
In any of the above cases, regardless of the distance to the ridge, the height of the pipe above the roofing cannot be less than 500 mm. This fully applies to all flat roofs.
At the end of the topic of chimney parameters, there is an important remark. Do-it-yourself calculations are great, but the role of a properly designed and built chimney is so important (both for heating efficiency and for safety) that professional design is always the best option.
Self-activity in such responsible matters is a very risky business.

A brick chimney is a classic solution that has been used in everyday life for quite a long time and does not lose its popularity, despite the fact that more and more modern solutions are being introduced today.
This structure is being built at the stage of building the object and can have a different configuration.
- Features of brick chimneys
- Types of bricks used for the chimney
- Pros and cons of brick construction
- Preparation for work
- Step by step description of work
- Features and nuances of masonry
A little about chimneys made of bricks
The heating system and the outflow of combustion products in the house must be organized without fail.
For this purpose, in particular, a brick chimney is used, through which exhaust air is removed during the operation of heating appliances. Usually, a diverting structure made of such material is used for single heating and heating devices.
By configuration, a brick chimney can be square or round.
But the second option will cost more due to the complexity of the masonry. The diverting structure is being built in parallel with the construction of the walls of the building. Today it is allowed to build a chimney with a side length of at least 140 mm, and if the configuration is round, then the diameter should be 140 mm. In former times, the allowable limit was 150 mm.
We watch a video, a little about the installation work of a brick chimney:
The thickness of the walls is also regulated by certain standards.
It is not recommended to violate the integrity of the structure with holes for the cable and so on. The brick chimney must be solid, and in addition to this, the inner surface of the pipe must be as smooth as possible, without brick protrusions and cement sagging at the seams.
Type of brick for chimney and their features
 Gas heating determines the type of material used in the construction of the outlet structure.
The difference between them lies in the value of the maintained temperature.
So, in the first case we are talking about 800 degrees, and in the second - about 1,000 degrees.
All other options, such as lightweight, porous or hollow material, are prohibited. Unlike the walls of the house, brick chimneys of various types cannot be plastered from the inside.
The erection of different parts of the structure is marked by the use of a cement mortar that is different in composition.
For that part of the chimney, which is located above the roof, a cement-sand working mixture is used.
Brick chimney - what you need to know
For laying below the roof level, cement-lime or lime mortar should be used.
If we compare brick chimneys of various types with other structures, for example, with a sandwich chimney, then in this case a single-walled solution is used. "Sandwich" is a double-walled version, that is, it is assumed that the chimney consists of two pipes: a larger and a smaller diameter.
Advantages and disadvantages of brick construction
Brick chimneys of various types have gained a high degree of popularity due to a number of features that will be discussed below:
- Increased resistance to high temperatures, as already mentioned, fireclay bricks withstand a limit of up to 1,000 degrees, while combustion products from the stove and fireplace reach the border of 750 degrees;
- An increased degree of thermal conductivity ensures a high efficiency of heating equipment, since brick chimneys of various types do not contribute to the rapid outflow of heat;
- The cost of construction from this material is low;
- Aesthetic value is no less important, especially in cases where a building is built in a certain style.
But in addition to the advantages, a brick square chimney has a number of significant disadvantages:
- The corners of the structure contribute to the formation of vortex flows, which in turn are a factor in counteracting the outflow of combustion products;
- The walls of the discharge structure are not always perfectly smooth, which contributes to the deposition of soot on the rough surface, and this eventually leads to a decrease in the working space, as a result of which traction deteriorates;
- Regular exposure to aggressive environments and temperature changes, which contributes to the formation of condensate, leads to the fact that the chimneys for red brick stoves are gradually destroyed.
In view of the foregoing, and also, taking into account the features of other types of diverting structures, the user decides for himself which option is preferable.
But still, the most common today is the laying of a brick chimney.
Preparation for work
The beginning of construction work of any type is the preparation of a project. In order for the outlet structure to function effectively, it is necessary to take into account a number of rules:
- The dimensions of the pipe, namely its height and diameter, are determined by the characteristics of the heating equipment. But a brick multi-format chimney pipe cannot be less than 5 m.
The relationship between these parameters and the traction force is obvious, since the larger the pipe section with insufficiently powerful heating equipment, the weaker the air outflow will be. And if the pipe diameter is too small, then even if there is sufficient height, the chimneys for red brick stoves will “smoke”.
- The construction of the outlet structure in rooms that are well heated is carried out without pipe insulation.
But on the site adjacent to the ceiling (up to 60 cm in length), the sandwich structure is mounted.
- The construction of a brick chimney implies the need to provide free access for maintenance. For this, the butt joints of the structure are located at different levels with the ceiling. Otherwise, if difficulties arise in the operation of the system, it will be very problematic to get to the desired section of the pipe.
Watch the video, the beginning of the pipe:
It is important to have a good idea of what elements make up the construction of a brick chimney.
So, the main components of the design:
- Overhead pipe - conducted from the furnace itself;
- Fluffing - this is the name of the laying of a brick chimney pipe, which is made with a broadening of up to 300 mm, but at the same time the original inner diameter of the pipe is preserved;
- Riser - rises in the attic and leads to the very roof;
- Otter - laying a chimney pipe, which is carried out with a widening of up to 100 mm and is an obstacle to the penetration of precipitation into the room;
- Neck - built on the principle of a riser and erected immediately after the otter;
- The head is the last section with a broadening that crowns the pipe.
Description of works
About what kind of brick a multi-format chimney is laid, it has already been said above.
Having dealt with the stages of work, you can proceed to the beginning of the masonry:
- An overhead pipe is being built. Laying is carried out by means of a dressing method. At this stage, you should stop before reaching about 6 brick rows to the ceiling.
- A do-it-yourself chimney made of red brick is further built with a broadening, which is called fluff.
The recommended dimensions of this element are: 140X270 mm along the inner perimeter of the pipe, and 590X450 mm are selected from the outside. Construction is carried out using plates to get the desired result. The next row has the following parameters: 510x650 mm, while plates with a thickness of 60 mm are also used. The result is a row with dimensions of 570x710 mm. When the widening is ready, another row of the same dimensions is erected, taking into account the dressing.
- A brick multi-format chimney for a metal furnace is built further in size than the overhead pipe, but above the fluff.
This part is called the riser. At this stage, you must first prepare the outlet for the pipe in the roof.
- Chimneys for red brick stoves are built after the riser is taken out of the roof no higher than 2 rows. Then the laying of the otter begins. This is another expansion. In height, this section is equal to nine rows, each of which is wider than the previous one by about half a brick. Brick plates are still installed inside the widening. As you can see, it is really possible to build a brick multi-format chimney for a metal furnace and other heating equipment on your own, but these sections with broadening are the main difficulty.
- When thinking about how to build a red brick chimney with the highest quality, one should take into account the need to block the hole formed between the roof and the pipe.
This is done by increasing the width of the rows of bricks.
- When choosing which brick is suitable for the chimney, you need to take into account the aesthetic side of the issue. Since during the construction of the neck it is desirable that its quality and color harmoniously fit into the overall picture of the house.
The head is built on the principle of fluff.
Masonry features
In addition to which brick to choose for the chimney, you should also pay attention to the thickness of the seams. The thinner they are, the more durable the structure can be as a result. If it was not possible to give a beautiful shape to the widenings, you can correct the flaws with a concrete mixture.
We watch a detailed video, the stages of work:
The sleeve of a brick multi-format chimney is not a prerequisite.
But such a measure allows you to get a completely sealed pipe, which will increase the reliability and efficiency of the design. The sleeve involves the installation of a stainless steel pipe inside the brick walls of the chimney. This option is only possible on straight sections.
Thus, in addition to the main stages of work, there are a number of nuances that you also need to know about in advance so that the chimney design turns out without flaws and lasts as long as possible.
Hello, friends!
Agree, in our age of glass and stainless steel, sometimes you really want a little warmth and comfort. Remember how we used to draw a house with a chimney as a child? And also a Russian stove and a brick chimney have always been an integral part of any fairy tale.
The chimney is an important part of the heating system, which is a vertical pipe folded in a certain way.
The function of the chimney is to remove the products of combustion and ensure the flow of oxygen (draught) necessary for the combustion of fuel.
How is the chimney
A brick chimney consists of several parts located inside and outside the room. The walls of the pipe in contact with the ceilings should be as thick as possible. This is required by fire safety regulations. Going beyond the roof, the bricks of the walls must cover the hole in the roof.
There are three types of construction - simplified, classic single and extended with ventilation holes.
The schemes of all brick chimneys are approximately the same. Consider the basic, classic:

- . It is made in various types and forms. Designed to protect against the penetration of atmospheric precipitation, dust and dirt into the pipe. Attaches to the protruding parts of the head.
- head. Consists of protruding bricks. Protects the neck of the pipe from drops flowing down the protective umbrella.
- Neck of the pipeline.
- The waterproofed surface of an otter. Designed to remove precipitation that has fallen on the neck. Most often it is isolated with a cement layer.
- Otter. Part of a pipe with thickened walls. It is located in the place where the chimney passes through the roof. Thicker walls are regulated by fire safety rules, they protect the insulation and other combustible layers of the roofing cake from overheating.
- Roof;
- crate;
- truss system;
- Riser. Located in the attic.
- Fluff. Part of the pipe according to the principle of operation is similar to the otter. It has the same thick walls that protect the ceiling between the living space and the attic from overheating. Sometimes, instead of fluff, a metal box is mounted, filled with loose non-combustible materials (sand, etc.). The thickness of this protective layer is 100-150mm.
- overlap;
- Insulation. . Serves to protect wooden floor beams from overheating;
- . Allows you to regulate the removal of combustion products.
- The neck of the pipe connecting the stove to the chimney.
Principle of operation
The basic principle of operation of the chimney is based on the difference in air temperatures inside the chimney and outside. This difference creates traction. The higher the pipe and the temperature difference, the greater the thrust. Because the density of cold air is greater than warm air, there is a pressure difference at the base of the house and the top of the pipe. This difference provides an influx of cold air into the house. Thus, the stove in the house not only heats, but also creates natural ventilation.
The thrust depends on the cross-sectional area of the channel and the height of the pipe. For example, to create good draft in a fireplace, the cross section of the chimney should be at least 1/10 of the area of the inlet.
At the same time, too wide a pipe reduces traction. Therefore, it would be more correct to increase its height. For stoves and fireplaces, the optimal height of the pipe is 5 m from the level of the grate.
Types and designs
What kind of brick is needed for the chimney?
Only red burnt bricks are suitable for chimneys. The use of silicate is prohibited, due to its instability to high temperatures.

It is impossible to save on bricks, this is fraught with the destruction of the entire structure and large expenses for its alteration.
Red brick has its own characteristics and is divided into 3 grades:
- The first grade is the best option for a chimney. Differs in the highest density of clay, low porosity, has smooth faces and equal edges. Frost-resistant. When tapped, it produces a moderately sonorous sound. Color from scarlet to orange.
- The second grade (not burnt) is acceptable for use. It has a pale red or pinkish color, deafly responds when tapped. The brick is quite porous, the ribs are crumbled. It can be used in a chimney device, but subject to additional processing.
- The third grade is burnt, not suitable for laying pipelines. Dark red, fragile, sonorous. Easily splits under the influence of temperature difference and mechanical influences.
A higher cost option is fireclay bricks. It is more often used in the construction of furnaces and fireplaces, rather than outlet pipes. It is a derivative of special fireclay (refractory) mixed with quartz. Withstands temperatures up to 900C.
Advantages and disadvantages
Like any design solution, a brick chimney has its advantages and disadvantages.
- Resistance to high temperatures of exhaust gases;
- Brick retains heat for a long time;
- Low cost of the material;
- Aesthetic appearance, style.
- Swirls occur at the corners of the chimney;
- Soot lingers on rough walls;
- The large weight of the structure, and, accordingly, the increased load on the foundation.
The service life of such a chimney
The service life of brick chimneys is short. In a good version, this is 7-12 years.
To increase the life span of the pipeline, you can protect it from the outside and inside, care and regular cleaning.
Do it yourself or order
At the beginning of the 20th century, when there was no gas and electric heating, stoves made of stone and brick were ubiquitous. There were many good laying masters, much more than now.

If you decide to order a fireplace or stove and turn to the help of a specialist, be sure to pay attention to his professionalism. To do this, it will not be superfluous to look at the documents confirming his qualifications and get acquainted with the portfolio of works. A poorly built chimney is life-threatening. Insufficient traction will lead to the formation of dangerous carbon monoxide, which kills more than one and a half million people every year. In addition, the occurrence of reverse draft may cause a fire. Even if the catastrophe can be avoided, the chimney will still have to be shifted, and this is double spending.
Therefore, do not save on a good master. But overpaying, for example, for fireclay bricks recommended by many stackers does not make sense. Ordinary red - withstands temperatures up to 800C, and at a price - almost 2 times cheaper.
If it was decided to make a chimney yourself, carefully read all the requirements of building codes and fire safety.
All the necessary I will give below. In addition, you should accurately calculate the dimensions, draw up a drawing, familiarize yourself with all the necessary literature and watch a couple of dozen videos on the topic.
The chimney can be of 3 types:
- Nasadnaya. Here, the furnace acts as the base. The minimum wall thickness of the furnace is 2 bricks.
- Root. Settled on a separate foundation. The flue pipe of the boiler or furnace is connected to the chimney by means of a connecting reversible sleeve.
- Wall. It is a channel in a load-bearing wall.
By the way, a brick pipe is not needed for a metal furnace - an ordinary iron one is enough.
Building regulations
The device of chimneys for private houses and baths is regulated by the following building codes:
- SP 7.13130.2013 "Requirements for fire safety";
- SNiP 41-01-2003 - "Air conditioning, ventilation, heating";
- VDPO - "Rules for production work, repair of smoke channels and furnaces."
Fire safety requirements for chimneys
The requirements for fire safety of chimneys are reduced to the following main points.

- The wall thickness of the discharge pipe must be at least 120mm;
- Between the inner layer of the roofing cake and the chimney, a fire-prevention retreat must be provided - at least 130 mm;
- When using combustible insulation in the design of the attic floor, it is imperative to organize protection in the form of a sand backfill;
- Fluff must end at least 70 mm from the upper and lower boundaries of the overlap;
- The distance from the inner surface of the hot chimney to the combustible floor structures (fire cut) should be 500 mm or more;
- The walls of the furnace recede from combustible structural elements by at least 250 mm;
- The distance between the upper edge of the furnace and the roof slabs is 350 mm for periodic furnaces and 1 m for continuous furnaces. This condition swings the furnace, made of three rows of bricks. If there are 2 rows, the distance must be increased by one and a half times;
- Do not connect two heat sources to one chimney system.
Traction force
The traction force is provided by a properly selected pipe section and its height. The cross section of smoke channels made of brick is calculated based on the power of the heater.
The height of the chimney pipe is calculated using special programs and formulas, but there is one rule - the elevation of the chimney above the ridge should be less than 500mm (if the distance from the chimney to the ridge is less than 3m).
In a vertical brick chimney, draft is generated by convection.
A prerequisite for the occurrence of an upward flow is the temperature difference between the ambient air and the exhaust products of combustion: the larger it is, the stronger the thrust.
Therefore, for the normal functioning of the chimney, it is important to take care of its insulation. How to arrange the insulation - I will tell a little later.
Making and installing a chimney with your own hands
Before you start assembling the chimney with your own hands, you need to familiarize yourself with the finished drawings and draw up your own according to your calculated dimensions. I will attach approximate drawings and diagrams for clarity.
Drawing and diagrams
fig.1 Fluff device:

Fig 2. Scheme of connecting the furnace and chimney:

Calculation of the height of a brick pipe
For normal traction, it is necessary to correctly calculate the height of the pipe.
The optimal length from the grate is at least 5m. This parameter varies depending on the pipe section.
Another calculation option is to build on the height of the ridge (as indicated in SNiP). Let me remind you that if the pipe is located at a distance of up to 1.5 m from the ridge - its height should not be less than 0.5 m above it, if further - it can be flush with the ridge and higher.
If the desired distance exceeds 3 m, the height of the pipeline outlet is calculated by the following method - a conditional line is drawn from the top of the ridge along the roof slope with a slope of 10 degrees downward relative to the horizontal. It is necessary to make such calculations on the drawing.
Calculation of the chimney section
Let's summarize the data on the dependence of the chimney cross-section on the power of the heating device in the table:
| Power, kWt) | Pipe section dimensions (mm) |
| <3,5 | 140×140 |
| 3,5-5,2 | 140×200 |
| 5,2-7 | 200×270 |
| >7 | 270×270 |
If the power of the furnace is unknown, it can be approximately calculated using the formula:
- W is the power of the heat generator, kW;
- Vt – furnace volume, m3;
- 0.63 – furnace load factor;
- 0.8 – fuel combustion coefficient;
- E is the calorific value of the fuel, kW*h/m3. Depends on the type of wood and the moisture content of the wood;
- T is the burning time of one load of fuel.
This formula only applies to stoves and does not apply to fireplaces.
Installation video
And of course, some useful videos on the topic:
Mounting Features
The easiest option for installation is a mounted chimney. How to lay out the pipe with your own hands? Consider the method of laying a classic chimney for a sauna stove:
- We calculate the parameters of the chimney using one of the methods given above;
The standard section of the channel for a bath stove is 250 × 120 mm - this is just the size of a red brick, in addition, you will need half bricks. They can be bought or cut off;
The solution is laid with a thickness of not more than 1 cm, a clay composition with the addition of cement is preferable;
- We prepare everything you need - bricks, mortar, tools;
- Measure for fluff, gate and otter;
- Masonry should start from the stove, checking each row with a building level. Periodically clean the channel from excess solution;
- Tip - after laying the first two or three rows of bricks, fasten the ropes at the corners of the future chimney and stretch them to the ceiling (strictly vertically). They control the position of the chimney;
- At the installation site of the gate valve, it is necessary to fix the frame;
- Continue laying bricks until fluffing. Before fluffing, it is necessary to count the number of its rows. For one row, the diameter of the channel increases by ¼ of the width of the brick. Brick leads must be tightly attached to the floor beams, there should be no gaps between them, otherwise the chimney will stagger
- The fluff should be laid according to the scheme (see above, Fig. 1). It can be changed based on its size;
- After laying the fluff, we continue laying the chimney;
- We begin to lay the otter from the underside of the roof, the increase in the cross section of the chimney when laying the otter should occur, taking into account the slope of the roof slope, gradually;
- Tip - to increase stability, metal plates should be embedded in the otter;
- If necessary, cut the ends of the bricks;
- Header device. To do this, increase the outer perimeter by a quarter of the brick;
- Finish row. We mount a bird net in it. From above we fasten the protective cap with dowels.
Common errors and installation problems
The main mistakes made when laying a chimney on your own.

- The choice of low-quality bricks;
- Too thick seams;
- Wrong composition of the solution;
- Incorrect calculation of the height of the chimney;
- Non-observance of uniformity when laying the channel;
- Failure to comply with the fire safety requirements listed above.
Due to laying errors, turbulences, loss of channel tightness, and poor traction occur. All this leads to a deterioration in the performance of the chimney.
Maintenance and cleaning
During operation, soot deposits form on the pipe walls, which must be removed. Professionals recommend cleaning the chimney at least 2 times a year - at the beginning and at the end of the heating season.
There are several cleaning methods:
- Folk methods
Periodic burning of aspen wood and potato peelings helps to blow out all the soot from the walls of the chimney;
- Chemical method
A special log-chimney sweep is impregnated with chemical compounds that interact with deposits in the pipe and contribute to their destruction;
- mechanical cleaning
The most efficient method. For mechanical cleaning, you can invite a professional with special equipment, or you can try to clean it yourself with a brush. Cleaning takes place not only from the roof, but also from below, through the cleaning doors.
Sometimes starting a fire can be difficult. One of the reasons is the presence of condensate, which impairs the movement of gases.

If the chimney is not insulated, heat transfer from hot gases to the environment is observed. With a significant difference in temperature inside and outside the chimney, a “dew point” occurs. At this point, the condensate vapors are converted to liquid. This liquid destroys the chimney.
How to insulate
The easiest way to insulate brickwork from the outside is with a stucco finish. To do this, a special mesh is put on the pipe, on which several layers of plaster are applied. Practice shows that the life of a chimney protected in this way increases by 2-3 times.
In addition, materials with a low heat transfer coefficient are used for insulation - mineral wool, glass wool, basalt fiber.
In recent years, polystyrene concrete has become popular for insulation. From it you can make a protective casing for the chimney of any shape.
Some unfortunate craftsmen cover the chimney with insulation, without arranging a metal casing, and cover this entire structure with foil on top. Such a system is fundamentally wrong and will do more harm than good.

