Making a polycarbonate canopy attached to the house, photo instructions. How to make a polycarbonate canopy: equipping a covered area for a summer residence Designing a canopy for polycarbonate
Polycarbonate is a modern high-tech material that is increasingly used in construction. It is made by extrusion from polycarbonate granules and is, in fact, a polymer plastic. Popularity is due unique properties substances: it is transparent, has a very high strength and low weight, moreover, it is plastic and tolerates low temperatures well. Excellent replacement for outdated PVC panels.
Types of polycarbonate - material properties
There are two main types of polycarbonate:
- monolithic;
- cellular.
Cellular polycarbonate device - main characteristics
The device of cellular polycarbonate is quite simple, it is a panel consisting of several layers of transparent or matte plastic, firmly connected by vertical stiffening ribs, which are located in the direction of the fibers of the material.
Due to the presence of air in the voids between the layers, the panels have excellent thermal insulation. Despite the rigid structure, the sheets are easy to bend even in a cold state, which makes it indispensable for the construction of objects of complex shapes.
Table of dependence of the main parameters and characteristics of cellular polycarbonate.

Monolithic polycarbonate - useful properties
Unlike honeycomb, monolithic polycarbonate consists of a molded sheet of plastic and has a number of useful properties:
- lasting;
- transparent or matte;
- very lightweight;
- absorbs ultraviolet light.
The scope of its application is not limited only to construction, this material is successfully used in all areas of industry, including high-tech.

Polycarbonate structures - the main advantages
Absolutely all polycarbonate structures, be it a carport, a canopy over an entrance, a roof or a greenhouse cover, have a number of indisputable advantages:
- excellent appearance(variety of shapes and colors);
- low cost;
- protection against the negative effects of UV radiation;
- the ability of the material to be transparent or matte;
- durability;
- ease of installation and maintenance;
Polycarbonate awning structures - roof shape
There are a lot of polycarbonate canopy structures, but they are all divided into groups according to the number of slopes:
- single-pitched;
- gable.
It can also be classified by the shape of the slope:
- straight;
- arched;
If you dig even deeper, then the products differ in the structure of the roof, which can be held on the rafters or the truss, the presence of the crate and so on.
Polycarbonate canopy over the garage entrance
Types of polycarbonate canopies - classification by purpose
Being an excellent alternative to metal and wood, polycarbonate is actively used as a covering for awnings, which have a wide range of applications.
Carport made of polycarbonate for a car or "Auto canopy"
A polycarbonate carport is a great way to protect your car from external negative factors. The shape of the car canopy can be anything, for example, arched, polygonal, arched or classic rectangular - it all depends on your imagination. Do not forget about environmental friendliness, which is especially important for a summer residence or a country house.
Polycarbonate swimming pool enclosure - indoor pavilion
The polycarbonate pool canopy has many useful features. It protects people from the bright sun by preventing heatstroke. Creates shade and prevents water from blooming. The water-repellent texture of the panels does not allow drops to linger, letting them flow down under their own weight. The indoor pond is protected from dirt and foliage.
The solution is more expensive, however, as a result, you get completely different results:
- You can use the pool in winter and summer;
- full protection against dirt and water bloom;
- a lot of shade, so necessary on a hot day;
- a rigid construction that is not afraid of even the strongest winds.
Polycarbonate porch canopy - roof for the entrance lobby
To protect the entrance to the house and the adjoining area (porch or veranda) from bad weather or the scorching sun, a polycarbonate visor is being constructed.
The variety of shapes and colors makes it possible to fit the canopy into the architectural composition of the building as aesthetically as possible. You can choose clear or matte plastic, thereby ensuring required amount sunlight.
Polycarbonate canopy over the front door to the house Polycarbonate canopy on a metal frame above the front door Polycarbonate canopy in the yard
Polycarbonate canopy over the balcony - an alternative to glazing
Installing a polycarbonate canopy over the balcony is an excellent solution if your balcony loses its functionality during the first rain or snowfall, because it is simply impossible to get out on it.
Suitable for greenhouse lovers transparent canopy made of plastic, which will provide plants with sufficient sunlight.
Such a roof will protect from precipitation and slow down the aging of the balcony, especially if it is made of wood, prevent the formation of mold and other fungi, which is extremely important if you use it as a storage room.
A canopy over the terrace made of polycarbonate is a guarantee of a comfortable stay
What could be better than relaxing in a country house in the fresh air. But so that the scorching sun or rain does not spoil the pleasant pastime, install a polycarbonate canopy over the terrace, which will not only create shade, but also shelter from the weather.
Under such a roof, you can organize a summer kitchen and enjoy outdoor cooking.
Polycarbonate gazebo canopy - modern roof
If you are puzzled and do not know what material to cover the gazebo, then pay attention to the polycarbonate canopy. The advantages of this material make it the best option for roofing.
You can make a transparent roof or a colored matte roof that will create interesting lighting and complement the landscape design of the site. In any case, such a roof will provide complete protection from ultraviolet rays and precipitation, but what else is required from a canopy for a gazebo?
How to choose polycarbonate for a canopy - which is better?
Now you know what types of plastic are and how to use it. It remains only to choose polycarbonate for the canopy. Which is better?
For the roof of all the structures described above: porch, balcony, terrace, veranda, pool, car parking and others, cellular polycarbonate is perfect, which will allow you to make a canopy of any shape and color.
The thickness of cellular polycarbonate for the canopy - choose smartly
It is worth considering the choice of the thickness of cellular polycarbonate for the canopy, which should be selected, guided by the type and purpose of the future structure, in the most careful way. The key points here are: the pitch of the lathing, the calculation of snow and wind loads, and the bending radius.

For the roof of outdoor structures, do not use the thinnest sheets. There is an opinion that buying a panel of lesser thickness can save money, but this is not the case. The fact is that in this case you will have to use a more frequent step of the crate, which will lead to additional costs... But buying the thickest panels, trying to maximize the strength and reliability of the structure, is also not worth it. The thickness of polycarbonate sheets should be selected, starting exclusively from the purpose and features of the structure.
- Honeycomb panels, 4 mm thick, are perfect for building greenhouses, greenhouses, advertising structures.
- 6-8 mm - for a wide range of applications, for example, for the construction of canopies, all kinds of awnings, stained-glass windows, various partitions, roofs.
- Sheets 10 mm thick are used for vertical surfaces: noise barriers, skylights;
- 16mm panels withstand heavy loads and are excellent for roofing large areas such as car parking.
Polycarbonate canopy frame
When designing the base of the structure, it is necessary to take into account the longitudinal (q) and transverse (d) steps of the frame. For longitudinal bearing supports, a step of no more than 700 mm is recommended, for transverse - it is calculated based on the thickness of the sheet, and for 8-16 mm panels it is no more than a meter. If the thickness of the plastic sheet is less than 8 mm, then the step is made up to 700 mm.

Choosing the color of cellular polycarbonate
Along with the thickness, it is important to choose the right color of cellular polycarbonate. The panel can be of various colors and degrees of transparency: turquoise, milky, blue, green, bronze, matte, transparent, etc.

When choosing a color, the main thing is to take into account the purpose of the structure. For example, turquoise, blue and green panels are ideal for building a polycarbonate canopy over a pool, but will be completely unsuitable for building canopies over retail counters, completely distorting the color of products and goods.
To cover the greenhouse, of course, you should use transparent sheets, but for a canopy over the recreation area, they are not at all suitable, since they do not protect at all from the sun's rays.
Is the quality of cellular polycarbonate important?
The quality of cellular polycarbonate directly depends on the manufacturer. Choosing products famous brands, you can be confident in the reliability and environmental friendliness of products. A high-quality product has a special layer of protection against ultraviolet radiation, applied to the surface of the sheet. It perfectly protects the material itself and everything under it from the aggressive effects of sunlight.

It is also important the amount of secondary raw materials used for the manufacture of sheets, which should not exceed the established norms. Reputable companies adhere to strict standards to ensure the highest quality polycarbonate.
Consequences of savings
How to make a polycarbonate canopy with your own hands - video and photo instructions
To make a polycarbonate canopy with your own hands, you should carefully consider an action plan and outline the main stages:
- Design;
- Arrangement of the site;
- Frame assembly;
- Installation of panels;
Polycarbonate canopy project - design stages
Having chosen a place for the product, you need to draw up a project for a polycarbonate canopy:

When designing any structure, the load is calculated taking into account the effect of external factors (wind, snowfall) on the structure. Based on the results, the material is selected and corrections are made to the product design.
For example, the distance between the supports depends on climatic conditions and ranges from 1 to 1.5 m. With a large amount of precipitation and, accordingly, large snow loads, this parameter will take on a maximum value.
Arrangement of the site under a canopy
Arrangement of the site begins with a marking. In the places where the frame racks will be located, we dig a depression of 50-150 cm, depending on the height of the canopy, and install embedded parts in them. We put them exactly vertically and fill them with concrete. Subsequently, the racks will be screwed to them.

It is advisable to lay along the perimeter of the site drainage pipes or make grooves-grooves to drain excess water.
The final coating can be laid on the leveled area. What do you prefer?
Concrete screed
If the soil is not subject to displacement and is sufficiently stable, then you can make a concrete screed with a frame made of reinforcement. For this, a wooden formwork of the required height is built along the contour of the site. On top of the sand, in the resulting form, concrete is poured in an even layer of 5 cm, on which, without waiting for solidification, it is laid reinforcement mesh... All this is again poured with a layer of concrete.

The thickness of the concrete screed must be at least 10 cm. If you plan to use a polycarbonate canopy for your car, then it is better to play it safe and increase this value.
The concrete will harden in 2-3 days and the formwork can be removed. However, it is not yet possible to operate the site. V best case it needs to settle for a month so that the concrete completely gives up moisture and gains strength - then it can withstand any weight.
Paving slabs

If the soil is unstable and prone to swelling, then perhaps after a year concrete screed will crack and become unusable. Therefore, you need to choose a different coating. An excellent alternative can be paving slabs, when laid, a monolithic layer does not form. Due to this, moisture from the ground evaporates better and the base is less prone to swelling.
The tiles are laid on a compacted sand cushion without any binding mixtures. It is “nailed down” with a special rubber mallet and firmly pressed against the adjacent flooring elements. After the completion of the laying process, they pass over the entire surface with a tamping machine and water the area with water. It is advisable to put a curb around the perimeter, which will not allow the coating to creep.

If the site is large, then boards should be laid, which will divide the "cushion" of sand into cells. This will allow you to tamp the substrate harder and achieve a flat surface using the same boards as the level.
Instead of tiles, you can use paving stones, clinker brick or natural stone.
Lawn grill
A lawn trellis or eco-parking is an option for lovers of environmentally friendly materials that are ideally combined with the natural landscape. It is a very rigid plastic lattice with many small cells through which the grass grows.

The polymer grill distributes the weight evenly over the entire area, so that the lawn will always have a well-groomed appearance. The advantages of eco-parking:
- durability (up to 25 years);
- frost resistance;
- water disposal;
- does not require maintenance.
But, lawn grill differs in relative high cost.

Polycarbonate canopy frame - creating the base
The drawing shows that the frame for the polycarbonate canopy is made of load-bearing metal racks with a section of 80 mm and other structural elements with a section of 40 mm.
To the previously installed embedded parts, we attach the support posts and connect them with horizontal beams along the perimeter and along the width of the roof. Next, we collect the rest of the structure. In our case, these are arcuate shaped pipes that are attached to load-bearing beams using vertical struts.
 Why exactly an arched shape? Because leaves, dirt, snow do not accumulate on such awnings. After precipitation, no water remains on the roof. And, of course, the appearance of the polycarbonate arched canopy is quite interesting.
For fastening the frame elements, welding or hardware is used: washers, nuts and bolts. If you bought a prefabricated polycarbonate canopy, then there will already be holes in the racks and pipes of the sheathing. Otherwise, you will have to make them with a drill.
Installation of polycarbonate canopy - installation of sheets
The service life and overall reliability of the structure depend on the quality of installation of a polycarbonate canopy. Installation of panels is not very difficult and requires only basic building skills. The simplest tools will be required:
- a circular saw.
- screwdriver;
- drill;
- construction knife.
In order not to damage the polycarbonate sheets, cutting is carried out in a protective film. With a panel thickness of up to 8 mm, a construction "clerical" knife is used. In other cases, you can use circular saw... To avoid material damage, use cutting blades with fine and undivided teeth.
Polycarbonate protective film
The sheet is mounted with a protective side from ultraviolet radiation to the sun. Usually, she is covered special film with a drawing with installation instructions. After the canopy is covered with polycarbonate, all the protective film is removed from the panels.
Video: how to properly fix polycarbonate
In the case of an arched structure, like ours, the sheet can only be bent along the line of the channels. Fastening to the frame is carried out with stainless bolts or self-tapping screws with a pitch of 30-40 cm. For reliable fixation of the panel, special thermal washers are used for cellular polycarbonate with a diameter of 30 mm. They have a silicone base, thanks to which they perfectly seal the connection.

Taking into account the thermal expansion of the plastic, a hole is drilled at the attachment point with a diameter exceeding the dimensions of the thermal washer or self-tapping screw by 2-3 mm. To avoid damaging the material, holes should be drilled between the stiffeners. Then there is a direct fixation of the sheet to the frame. It is important not to pinch the hardware, otherwise, the polycarbonate may burst.

The sheets are fixed to each other with an aluminum or plastic H-shaped profile. standard size(usually 6 meters). Before starting the connection, a protective film of 50 mm is removed from the ends of the sheet. Then the edge of the panel is inserted into the profile by at least 20 mm, and it is imperative to leave a gap of about 5 mm, since the plastic tends to narrow and expand under the influence of temperature.
The open ends of the panels must be sealed with aluminum tape - solid at the top and perforated at the bottom. The solid tape serves to protect the honeycomb from moisture, dirt and insects, while the perforated tape prevents dust from entering and helps to drain condensation.
For more better protection, the joints can be treated with a special acrylic-free sealant.
Following these rules, you can easily make a polycarbonate canopy over the porch with your own hands, and without serious construction experience.
Video: DIY polycarbonate canopy
The video clip shows the process of assembling a polycarbonate canopy.
Storage and care of polycarbonate
Constructions made of polymer plastics are easy to maintain and maintain. For example, to clean a polycarbonate canopy for a summer residence , it is enough to wash it with plain water, even without using any detergents. You can use a sponge or cloth made of soft tissue... In no case should you use aggressive cleaning solutions containing alkalis, aldehydes, salts, isopropanol, methanol and others. To avoid damaging the UV protection layer, do not use sharp objects.
Storage of polycarbonate
The process has a number of features that must be taken into account. Sheets should be placed vertically only. Can't take off protective film so as not to damage the surface. It is also worth limiting direct exposure to sunlight and rain. During transportation, strong mechanical stress should be avoided.
Conclusion
With the development of science, more and more materials with unique operational properties appear. Synthetic substances have an undeniable advantage over natural ones:
- cheap;
- have a pleasant appearance;
- durable and unpretentious;
In addition, they are made in accordance with high environmental standards.
Polycarbonate is an excellent substitute for metal or wood. It is durable, reliable, withstands any stress well, protects against ultraviolet radiation, is flexible and plastic, and also has excellent anti-corrosion properties. Cellular polycarbonate can be applied as thermal insulation material, and the abundance of colors and plasticity allows you to bring to life the most daring design ideas.
With the advent of such a material as polycarbonate, the process of making various awnings and canopies has become much easier. The excellent strength and flexibility of this product makes it possible to create the most complex structures with unusual geometry. At the same time, the ease of installation allows you to create a polycarbonate canopy with your own hands, even for novice craftsmen.
What you need to know
Before starting work, it is necessary to carefully study the varieties of this material and their properties. It is also worth knowing all the advantages and disadvantages of such structures in order to understand all the consequences of using a material such as polycarbonate. The price, size and some other parameters for certain models are completely different, which should be taken into account.

Sheet thickness and strength
It is very important to choose the right thickness of the material. It depends on what loads the sheet can withstand and to what radius it can be bent. Such information should be sought from the manufacturer or in specialized literature, which will help you create a polycarbonate canopy with your own hands, taking into account the specifics of the product.
It must be said right away that we are talking about honeycomb material, the insides of which consist of specific cells. The fact is that monolithic products of this type are very heavy, although they have simply enormous strength. A solid 12 mm sheet can stop a bullet fired from a pistol.
It is believed that a material of 4 mm is not suitable for creating canopies, and products of 10 mm or more can already be used for full-fledged roofs. Therefore, it is worth paying attention to sheets with a thickness of 6 to 8 mm. They are ideal for such work, and their cost ranges from 250 to 350 rubles per square meter.

Colour
V recent times the question of which polycarbonate is better for the canopy also applies to the color of the material. This is due to various advances in the field of production, which allow these products to be produced in different colors. There are also models with printed protective coating which prevents the penetration of infrared radiation.
The choice of color is a purely individual matter, but the ability to filter particles or light waves must be approached very carefully. The fact is that infrared radiation contributes to the heating of the protected surface, which is very important when arranging parking lots for cars. However, if the polycarbonate canopy to the house overlaps the plants, then they will not be able to receive the necessary lighting, which will affect their development.
Preparatory work
Before proceeding with manufacturing, it is very important to create a high-quality drawing of the future design and correctly purchase everything you need. Usually, experts, when telling how to make a polycarbonate canopy, recommend using the services of a designer, who will also make an estimate. However, if you have minimal skills, you can do this work yourself.

Drawing
- First of all, you need to compare the area that needs to be covered with the dimensions of the sheet. At the same time, a calculation is made of how many pieces of material will be needed, taking into account its location, as well as the angle of inclination or radius.
- The next step is to create a drawing of a structural truss or frame. Moreover, it must be designed in such a way that the jumpers are located at the joints of the sheets. It is also recommended to make a kind of stiffening ribs, which would be placed in the middle of the coverage area.
- Typically, polycarbonate canopy drawings also contain building and floor installation diagrams. At the same time, sometimes even small foundations and supports have to be created. It all depends only on the type of building.
Purchase
This stage is very important and requires a separate approach. The fact is that polycarbonate is a very specific material for which you need to purchase a special fitting and fasteners. In this case, it is very important to take into account the model of the selected material.
If you make a polycarbonate canopy with your own hands, then the easiest way is to come to the market directly with a drawing that you can show to the seller. He will not only select the necessary adapters and special screws, but can give advice or suggest his changes to the project. However, from the very beginning, it is worth calculating the number of necessary elements and their type yourself, which is easier to do using special software.
When purchasing metal for the manufacture of frames, it is recommended to immediately agree that long elements are cut to size. This will help save on transport and save the performers from additional work.
It should be noted that the cost of profiles for polycarbonate is very different. Regular plugs can be purchased for 50-70 rubles, but connecting strips can cost up to 700 rubles.

Step-by-step installation
When you create a polycarbonate canopy with your own hands, you should adhere to a certain work plan. This will save time and avoid mistakes during assembly. At the same time, the correct sequence is observed, which makes it possible to do several stages at the same time.
Base and seats
When making canopies and canopies from polycarbonate, they use both supports and wall mounting systems. Therefore, it is worth considering the option of manufacturing using both methods.
- First of all, you need to install the supports. They are made from a profile or ordinary pipe, which is installed in a pit at least 80 cm deep. At the same time, concrete is poured, and the quality is controlled using a plumb line.
- If you plan to install a canopy over the site, then the placement of the supports should be thought out in advance. The easiest way is to lay them together with the reinforcement and concreted with the base. You can also create special dimes in advance, to which, if desired, you can weld metal.
- The attachment points to the walls must first be cleaned and leveled. The tightness of the frame connection should be maximum. In this case, it is also worth applying markings to the surface in order to avoid distortions during the installation process.
If during work it is planned to pour concrete, then it is worth remembering that for its complete solidification it is necessary to withstand at least a week. At this time, you need to deal with the farm or frame. Especially when you consider that they still need to be primed and painted.

Frame
They make trusses or a frame for a canopy from a profile pipe, since it is this material that is best suited for polycarbonate. The price, dimensions and methods of fastening of all segments are selected individually. For example, cheaper rods can be used as jumpers, but the base must be very strong in order not only to withstand the weight, but also gusts of wind.
It is believed that it is best to use welding to connect all structural elements. However, some craftsmen prefer bolted fasteners. They are more practical and reliable, but take a lot of time and money to manufacture.
It makes no sense to describe the structure itself, since it is made exclusively according to an individual drawing. However, immediately after creation, the product is treated with a primer and painted. It is best to immediately use a special dye composition that can be applied directly to the rust.
After the trusses are dry, they must be mounted on supports and fixed to the wall. If at the same time the paint was damaged, then after installation, the affected area is additionally treated. The result should be a solid and reliable structure that can withstand heavy loads.
Sheathing
Usually, the manufacture of polycarbonate awnings does not have difficult stages, but this process should be treated very carefully. Even at the acquisition stage, you should pay attention to the principle of fixing a specific type of material, the type of adapters, connections and plugs used. That's when they pick up the right tool with fitting.
Most often, the connecting elements are first pre-fixed and the sheet itself is installed in them. It is fastened using special self-tapping screws that do not violate the tightness of the structure. Then the ends are closed using separate plugs.
Some specialists first prefer to seal the ends of the sheet, if, when adjusting it, it was cut and the internal cavities were opened. This does not reduce the quality of the material and creates an obstacle to the ingress of dust and moisture.
If the sheet needs to be bent, then fix it first from one end, and then along the radius. In this case, it is imperative to fasten the sheet in the middle so as not to create points of tension. This work is best done with two people to save time.

- The protective film is removed from the sheets only after the material has been fixed. It will prevent accidental mechanical damage in the form of scratches. However, this does not mean that the product can be handled carelessly.
- If awnings are made of polycarbonate in the yard, then first you should pay attention to how the shadow behaves during the day, and only after that create a design project. So you can take into account all the moments with the sun's rays under finished system and take additional measures if necessary. For example, install additional side sun protection.
- The right color for the material will create the appropriate setting and level of comfort. Therefore, when choosing it, you need to take into account the wishes of all people who will operate the product.
- It is best to create semicircular structures with a small radius. So snow cannot collect on the surface in winter, creating additional loads. Shed systems are also very practical, allowing you to divert rainwater in one direction, which is very important when creating canopies over an entrance or resting places.
- For proper drainage of rainwater, some sheds should be equipped with storm drains. However, it is much easier to immediately think through this moment when designing to reduce costs and installation time.
- If desired, the frame and supports can be made of wood, but finished structure will have more rough look and shorter service life. However, with the right approach to design, you can get a real work of art with an original style and high-quality finish.
Output
Given the relative simplicity of this installation, we can safely say that even a novice master will cope with this work. However, it must be borne in mind that a specialized tool will be required in the form welding machine and a puncher. It is also worth getting a ladder or other structures that allow you to work at height.
Special attention should be paid to the fact that there is simply a huge number of different designs such products that differ in shape. In this case, you can always create your own own system trusses with original slopes or broken corners. Therefore, the final choice of the project depends only on the manufacturer's imagination and the maximum possibilities of polycarbonate.
Translucent plastic visors different colors have a lot of advantages: aesthetics, strength, durability and low weight of the coating. Additional advantage similar products - beautiful canopy made of cellular polycarbonate easily assembled with your own hands. One condition: in order not to spoil the material, it is necessary to study the installation technology.
Selection and calculation of the structure
Scope of application polycarbonate roofs quite wide - durable and lightweight material is used for the construction of awnings over verandas, swimming pools, and parking lots (example shown in the photo). Often, the coating is used for the manufacture of a variety of canopies attached to the porch of a private house or adjacent to a garage, cottage and other structures.
All these buildings are divided into several types, depending on the purpose and shape:
- By design - a partition, open canopy and a completely enclosed structure (for example, a summer cottage, a winter garden).
- In shape, they are single-pitched, gable, arched and domed.
- By location - free-standing and attached.

Any type of structure consists of two main parts - the supporting frame and the actual polycarbonate coating. The purpose of the calculation is the optimal selection of the thickness of the roofing material and the installation pitch of the rafters or lathing arches, depending on the snow load.
Reference. Manufacturers produce polycarbonate with a thickness of 6, 8, 10 and 16 mm in sheets of 6 and 12 meters. The price of products directly depends on the thickness.
If you are trying to save money and buy the cheapest 6 mm sheet, then to increase bearing capacity you will have to make a reinforced crate with an interval of 60-70 cm between the beams. As a result, you will lose on the cost of work and materials for the supporting structure.

Options for awnings attached to a residential building
And vice versa: an inexpensive frame with a large spacing of jumpers will have to be covered with thick, expensive polycarbonate. How to make the best choice:

Note. Similar load tables are available from most polycarbonate manufacturers, whose products are sold in hardware stores.

An example of a drawing of a building intended for a car
Materials for making a canopy
The amount of building materials in each case is individual and depends on the size of the structure. If you want to build a car visor made of polycarbonate with your own hands, you need to purchase components according to the drawing:

Advice. A proven way to facilitate the task of calculating and selecting materials is to contact the company where you plan to order polycarbonate. Experts with sales experience can offer several design options, you just have to choose the appropriate project.
Unlike single-slope canopies, arched canopy harder to assemble - you need an industrial machine to shaped pipes make arcs. By planning self-assembly worth considering alternative solution- install a canopy from a prefabricated set of ready-made metal structures. If the design and dimensions of the building differ from the proposed standard range of products, you can place an order for individual production elements of the frame.

To assemble a visor attached to a house or installed on a balcony, you need to prepare brackets and anchor bolts for fastening to the wall. When choosing polycarbonate sheets, pay attention to the presence of UV protection in the form of a colored film, which contains information about the manufacturer and methods of correct installation. More useful information about polycarbonate, see the video:
Frame device
Work begins with the erection of a supporting structure under a polycarbonate canopy, installed on supports. Since the weight of the structure is small, it is not required to make a deep deep foundation. The base must be able to withstand the mass of snow in winter and wind loads, without allowing the uprights to tilt or fall.
There are 3 ways how to make a high-quality foundation for a visor:
- Drill holes in the ground to a depth of 0.8-1 m, put up supports and fix with rubble stone. Other options are full and partial concreting, used in.
- If a canopy is being built for 1-2 cars, fill reinforced concrete slab according to the size of the car, and attach the pillars to the monolithic base with anchor bolts. A similar solution is used for the device of the canopy over the entrance with a ready-made.
- Supports for a covered terrace, a greenhouse with garden beds or a carport can be placed on screw piles twisted into the ground to a depth of 1-1.5 m.

Installation options for vertical supports in the ground
Production further work depends on the selected project. A common option: pairs of posts can be connected by trusses, which are tied into a single structure with purlins, as shown in the drawing. The elements are fastened to each other by bolts or by welding, at the end of the work they are primed and painted in 2 times.

Installation of polycarbonate panels
From a specialized tool, you will need small core drills that match in diameter with the dimensions of the thermal washers. The fact is that polycarbonate expands significantly from heating by the sun, therefore, it is impossible to screw the sheets directly to the crate. Fastening is carried out using the following technology:

Note. To prevent the polycarbonate from cracking at the moment of fastening, maintain a minimum distance from the edge to the washer of 4 cm. Adjust the medium tightening torque on the screwdriver.
Having dealt with the fastening method, proceed to laying polycarbonate panels according to the instructions:

Important! Provide a 3 mm thermal expansion gap between the end connection profile and the polycarbonate sheet.
The joining of adjacent elements on the ridge of the gable roof and the abutment to the wall is carried out using special profiles. During installation unusual designs in the form of arches, polycarbonate is allowed to bend, but only across the stiffeners. In this case, the end caps should be taken longer length, and after fixing the panel, cut it in place.
More detailed visual instructions for making a polycarbonate canopy are presented in the next video:
Related entries:

The presence of sheds on the backyard plots testifies not only to the good taste of the owners, but also to their desire to improve the comfort of rest and living. it looks very original with its own hands, gives the space an exclusive look, serves for a long time, can be used to create closed areas for various purposes. The emergence of polycarbonate among building materials made it possible to create original designs with minimal loss of time and money, while the actual performance indicators far exceed the previously used materials.
There are two ways to carry out construction work:
- Installation of a polycarbonate canopy can be done with the involvement of specialized construction companies. Advantages: proper quality and speed of installation is guaranteed. Professional specialists provide assistance in design and calculations, provide advice on the best option canopy taking into account physical characteristics soils, architectural features structures and climatic zone of residence. Disadvantage - all services need to be paid, in some cases the price may be equal to the cost of materials for the manufacture of awnings. The technology can be viewed in the video below.
- On one's own. If you have a little construction and installation experience, you can perform work without involving third-party contractors. Advantages - the overall estimated cost construction. Disadvantages - you need to have free time and have some knowledge of how to build yourself.
Physical and performance characteristics of polycarbonate
The use of modern equipment and innovative additives makes it possible to create a material with unique properties.
1. The transparent polycarbonate has a light transmittance of up to 90%. The value may vary depending on the presence of different shades of mineral dyes. Due to the high transparency, it is possible to save electrical energy for lighting. Sheds can be used to equip flower beds, greenhouses, etc. The development of plants under sheds is no different from the development of open areas.

Light transmission polycarbonate 90%
2. High rates of mechanical strength. The material is plastic, which allows it to absorb sudden dynamic loads without cracking. It does not have the effect of permanent deformation; after removing the loads, it completely restores its linear dimensions and geometric shape.
3. Excellent indicators of mechanical strength in relation to specific gravity. Polycarbonate has special stiffening ribs that increase bending resistance. In terms of impact resistance, it exceeds the performance of glass by an order of magnitude. It can be standard one- or two-chamber, reinforced, four-chamber.
 Single Chamber Polycarbonate Sheet
 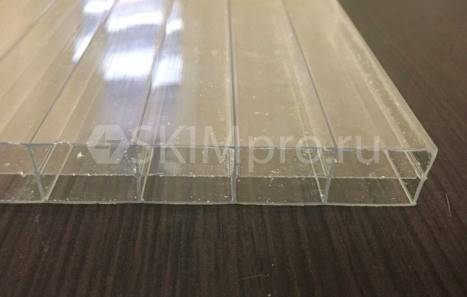 Double chamber polycarbonate sheet
 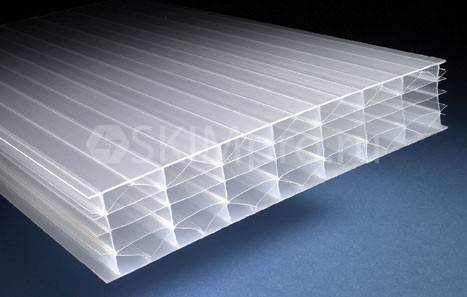 Four chamber polycarbonate sheet
4. Low specific gravity makes it possible to achieve significant savings on foundations and load-bearing structures.
5. Innovative additives make it immune to harsh UV rays. The strength of intermolecular bonds remains unchanged throughout the entire period of operation - microcracks do not appear, the values of strength and stability do not deteriorate.
6. High plasticity allows the use of materials at temperatures up to -50 ° C, strength indicators do not deteriorate at temperatures up to + 115 ° C.
7. A wide range of thicknesses, sizes of slabs and color solutions... It enables designers to correctly implement their most daring projects.

8. Service life exceeds 25 years. Polycarbonate has excellent technological characteristics, it is easily cut and processed with ordinary tools. During use, the amount of unproductive waste is minimized.
The following awnings can be made using polycarbonate:
- Visor over a balcony, loggia or entrance doors... Excludes the ingress of atmospheric precipitation, reliably protects from wind and direct sunlight.
- Carport for one or more cars. Due to the use of a canopy, it is possible to abandon the construction of a major garage, the car is protected from rust, the interior trim does not fade.
- A canopy for a patio or open gazebo. The comfort of rest increases, the labor costs for maintaining the cleanliness in the building are reduced.
- A canopy over the pool. The time for taking water procedures increases.
Balcony Sunshade Multi Car Carport Patio Carport Pool Carport
Rules for choosing material for canopies From the right choice the thickness of the material depends on the reliability of the structure. The thicker the sheets, the more load they can withstand, the simpler the metal supporting structure can be. Which polycarbonate is best for a canopy?
The length of the panels is 6 and 12 m. A special aluminum profile, standard length 6 meters. The profile can be one-piece (panels are inserted into the technological grooves from both sides) or split. Detachable has a universal purpose, can be used on different types designs. Consists of upper and lower clamping parts, tightened together with special screws. It is used on panels of different thickness, there is a possibility of manual adjustment of the compression force. If the panels have been reduced in thickness for some reason, the profile can be screwed on more strongly and the leaks in the joints can be eliminated.

The ends must be closed with an end profile, before closing the honeycomb they are sealed with silicone. This prevents microorganisms, moss and mildew from growing in the cavities. Such microorganisms significantly impair the appearance of the structure. In some cases, they can have a negative effect on the amount of transmitted light, which is one of the disadvantages of polycarbonate awnings.
 Canopy uncovered by profile
  End profile for polycarbonate
For fixing polycarbonate sheets to metal or wooden frames special self-tapping screws with rubber gaskets are used. How to make a canopy is shown in the video. The screw heads can be covered with decorative caps. Supporting frame for a canopy can be made from square and round pipes, angles, I-beams, channels or wooden beams, the dimensions are selected taking into account the maximum loads, the area and type of the canopy roof.
Which is better - polycarbonate or corrugated board for the canopy There is no definite answer. The corrugated board is made of sheet steel, it can withstand increased loads. But polycarbonate has a universal application, the installation of a polycarbonate canopy is more cost-effective.
Stages of designing canopies Draft design You need to start the construction of canopies with your own hands by drawing up a draft design load-bearing structures... To do this, you should have theoretical knowledge of calculating the maximum loads in the nodes of the structure, calculate each element for bending and compression. The maximum wind and snow loads are taken into account, the types of roofs and the angle of inclination of the slopes are determined.
Types rafter system awnings Depending on the engineering features and specific operating conditions, the canopy can be:
- Single slope inclined. The angle of inclination of the slope is not less than 12 °, the structures are used for the construction of structures small size, the simplest canopy. Model No. 3
- Dome. Round or elongated. It can withstand significant snow loads, has an original design look. During the manufacture of the frame, all dimensions should be accurately maintained; in terms of execution, it belongs to complex options. Model No. 6
- Arched. The length is selected individually, it is used to cover a small height. Model No. 4
- Gable. Versatile, structures are used for the construction of large sheds. Model No. 2


After determining the types of roofs, you need to start designing the foundations.
Types of foundations The light weight of the structures allows the use of the simplest and cheapest foundations. Due to this, construction time is significantly reduced and their cost is reduced. Taking into account the physical characteristics of the soils and the possible load for the sheds, the following foundations can be used:
Screw pile. Metal piles are screwed into the ground according to the plan of the pile field (see video). The depth and diameter are selected individually. The ends of the piles are aligned horizontally, metal platforms are welded to them for fastening the vertical supports of the canopies. Advantage - it is possible to completely prepare foundations within one day, they are used in any climatic zones and on any soils, including swampy ones. Have positive user reviews. Grillages for awnings are optional.

Greenhouse on screw piles
Columnar. The depth is about 60 cm; to compensate for the swelling forces, a sand cushion is poured. Dimensions around the perimeter no more than 40 × 40 cm. Can be made of concrete (reinforced or unreinforced), cement blocks or ready-made factory structures. Advantages - the lowest cost, there is no need to level the site. Manufacturing time, taking into account the hardening of concrete, no more than 14 days.

Bearing support with burial 60cm
Shallow tape. Suitable for large heavy structures, allow you to put side walls for awnings to protect from wind, snow and rain. In terms of cost, they belong to the expensive category, the production time is at least three weeks.

Shallow foundation
The choice of foundation can have a significant impact on the cost of a structure, and the maximum number of factors should be taken into account when making a decision.
Bearing vertical supports Made of round and square pipes, long products or wooden beams. With their help, you can build wooden canopy... Installed on foundations, they serve to fix the roof rafter system. Height and possible forces are taken into account during manufacture. The distance between trusses and supports should take into account the total area of the canopy.
Assembly and installation technology The assembly of the structure begins with the installation of vertical supports on the finished foundations. During the pouring of concrete, anchor bolts are installed in them, the distance between them must correspond to the distance between the holes of the lower platform of the supports. Each pore is constantly monitored for its vertical position; it is forbidden to deviate the vertices in any direction. The distance between the supports corresponds to the length of the roof elements. Assembly can be done by welded seams (not collapsible version) or using hardware (collapsible version). A do-it-yourself collapsible polycarbonate canopy allows, if necessary, to dismantle the structure and install it in a new place. After dismantling, all structures retain their original characteristics and are ready for re-installation without prior preparation.
 Concreting of racks
  Anchoring the uprights with anchor bolts
 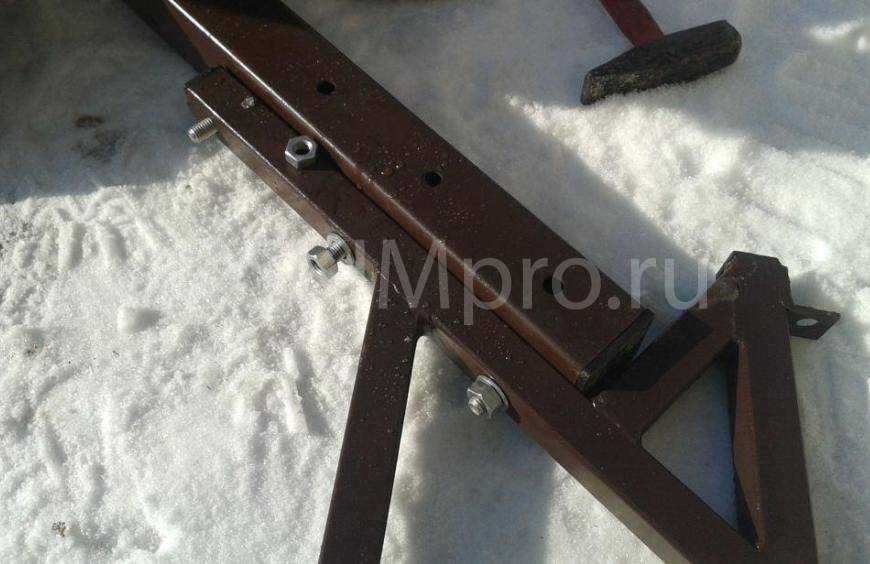 Fastening arches
If the canopy is made on industrial enterprise, then it has working drawings for installation, each part is numbered, its position in the unit and the method of fixation are indicated. Self-fabrication of metal canopy structures requires care and compliance with existing industry requirements, building codes and rules.
After installation, the elements of the canopy are checked for compliance with the position, the assembly stages provide for the gradual fastening of the structures. If deformations occur, the cause is found out and eliminated. Before screwing polycarbonate onto the awning, stability tests should be performed. During the tests, the structures are loaded with forces that are twice the calculated ones. Due to this, a safety factor is achieved, a long-term and safe operation canopy.
How to attach polycarbonate to a metal canopy frame Sheets are cut with an eclectic jigsaw, a grinder with a cut-off thin disc or an assembly knife. The specific tool is selected depending on the thickness of the material. Installation of polycarbonate begins from one of the sides, only after complete fixation of the previous sheet can the fixation of the next one begin. For fastening, special self-tapping screws with rubber washers are used. Washers seal the coating, compensate for the difference in the linear dimensions of materials due to thermal expansion, and prevent the appearance of microcracks. Self-tapping screws should be tightened carefully; surfaces should not be damaged. If there is a desire, then the heads of the self-tapping screws can be closed with decorative caps.

The voids at the ends of the polycarbonate sheets must be sealed. Otherwise, in a few years, mosses and mold will begin to grow in them, not only the appearance will deteriorate, but also performance characteristics... When attaching the sheets, you should pay attention to the front and back moan. Laying polycarbonate on the canopy is carried out only with the front side, it has a special protection against harmful effects ultraviolet rays, the correct laying is indicated on the packaging of each sheet. During production, it is covered with a protective plastic wrap, which has instructions and drawings. It is recommended to remove it before installing the sheet on the seat. Otherwise, the self-tapping screws will hold the film, in these places it will not come off, but tear. There will remain pieces that are very difficult to remove. In addition, the protective film is much easier to remove when the sheet is on the ground. If it is installed on a canopy, then the work becomes much more difficult.
Practical advice
- It is strictly forbidden to bend the polycarbonate sheet across the honeycomb. Adhere to this rule not only during the installation of the canopy, but also during the transportation or storage of materials.
- There is no need to specially drill holes for self-tapping screws, this operation is performed simultaneously on the sheet and the frame.
- When designing, always consider the safety factor. Do not use the thinnest sheets. As practice shows, premature repairs are much more expensive than purchasing durable polycarbonate.
- Don't work alone. This is not only difficult and dangerous, but also has a negative impact on the quality of the installation.
- Strictly follow the safety rules, do not rush, work carefully. Exercise extreme caution when working with power tools.
Compliance with the recommended rules ensures that the installation will be carried out taking into account building codes, the canopy will be reliable and will serve for a long period of time.
DIY video instructions for installing a polycarbonate canopy
A light construction on a personal plot will protect you from bad weather at any time of the year. Before starting the design, you should carefully look at the photo of the polycarbonate canopy. This will allow you to choose the most suitable option.
The canopy is easy to make yourself, it will preserve natural light. It is easy to organize a comfortable resting place under it.

The transparent design features good mechanical strength, she became great alternative glass elements in modern construction. A polycarbonate canopy will be an ideal solution for a car, gazebo, pool. This design fits organically into the surrounding landscape.

The advantages of polycarbonate
To erect a structure above the entrance to a building or above a car, a composite sheet is used. It bends well and provides a diffusing effect. The modern polycarbonate canopy will prevent the sound from the rain. It washes well, but you shouldn't use organic solvents for it.
Don't forget to visit this useful ideas about landscape design!

Polycarbonate has the following advantages:
- Attractive price.
- The strength and reliability of the resulting structure.
- The ability to get a design of any shape.
- Transparency of the material.
- Not afraid of temperature changes.
- Simple installation.


The disadvantages of the material include the fact that over time, under the influence of ultraviolet rays, its transparency decreases. After 12 years, it becomes brittle.

To get visually monolithic structure, apply special methods welding of composite elements. You can also use gluing for this material.

Monolithic polycarbonate looks more presentable, but is more difficult to process. It needs a solid foundation. It is often used by builders to simulate glass elements.

Calculation and preparatory work
To get a durable visor and frame with minimal costs, you need to correctly calculate. To do this, you need to know the area of the canopy. It is important to consider that the thickness of the sheet is selected so that it can withstand snow in winter. The reliability of the structure mainly depends on the foundation.

Then the vertical load is set. Many cottage owners and country houses are interested in how to make a polycarbonate canopy. You can cope with such a task on your own, without involving specialists in this task.

First of all, it is required to develop drawings, which must indicate all dimensions. It is also necessary to determine the location of the power elements and their number. It is imperative to take into account the strength of the air currents characteristic of the area where the canopy is being installed. If it is mounted for a car, then its dimensions must be larger than the vehicle.


The next step is to determine the thickness of the support elements. You should take care of the tools for performing the work. The amount of materials that you need to purchase depends on the created project.

Before installation, you should take care of the arrangement of the site under it. Most practical solution will become a tile. Before laying it, mark the places where the supports will be installed, which should be poured with concrete. Subsequent operations are performed after 3 days.

DIY polycarbonate canopy
In order to correctly install the structure, all dimensions of the polycarbonate canopy must be verified. The height of the vertical elements must be the same; the longitudinal beam is laid out on them. It is attached using electric welding. The second beam is mounted on the vertical wall of the building. Metal elements are fixed between them.

A special coating is applied to polycarbonate, which is necessary to reduce the adverse effect of sunlight on the structure of the material. From above, the manufacturer provides a special protective film on the coating, it is removed after installation.

Before laying, the sheets are cut with an electric saw. For fixing polycarbonate, special kits are purchased, which include linings, seals, self-tapping screws.

At the final stage, decorative stripes are attached to the canopy, which cover the seams. To close the inner cavity of the material from dust and exclude moisture ingress, the side ends are sealed with perforated tape.


Installation features
Self-performance of work will save financial resources. If you are interested in how to make a polycarbonate canopy, then you must take into account that all work is carried out in accordance with the developed scheme.

This will allow you to build a reliable and durable structure. It looks aesthetically pleasing; it is possible to choose a suitable color for the sheets of material.

Competent installation implies the presence of special expansion gaps. Polycarbonate has a high coefficient of thermal expansion. If this condition is not met, then the material quickly loses its performance characteristics. There is no need to tighten the screws too much.

For private households, a structure can be chosen in which one of the supports is the wall of the house. The material allows you to make a separate structure, for which metal elements are used. A practical canopy will decorate the personal plot and will perfectly fit into the surrounding environment.

Photo of polycarbonate canopy