Picket fence. Fence made of wooden and metal picket fence Do-it-yourself fence made of metal picket fence
In Russia, wood has long been widely used as a building material. They build from it log houses, window frames, interior items, kitchen utensils. This natural material allows you to create an atmosphere of inner comfort and coziness. A wooden picket fence is one of the most popular types of fences in suburban construction, which is simply indispensable when arranging a site in rustic style. Such a fence, on the one hand, outlines the boundaries of the site for us, and on the other, its territory is not obscured.
Picket fences can be given any height, shape, color, and even clearance distances, due to which they acquire original look and complement the design of the suburban area with their appearance.
Fence from wooden picket fence used as a secure fence personal plot, element of territory zoning, decorative frame beds and flower beds

Stems with flowers, filling the gaps in the gaps between the vertical slats, give the fence a more attractive look.
The continued popularity of this type of fencing is due to a number of its parameters and properties, the main ones being:
- Versatility. Wooden fences fit perfectly into any landscape of the area. They go well with any other bases, organically fitting into the interior, made of stone or brick, concrete or metal.
- Ease of installation. The installation of a picket fence can be done independently by any summer resident and owner country house without resorting to the services of professional masters.
- Convenience of care. Fence care consists only in the timely painting of the surface and the elimination of defects that may occur during operation as a result of mechanical influences and seasonal precipitation.
- Reliability. A high wooden fence will act not only decorative element landscape design, but also reliable protection site owners.
One of the advantages of a picket fence, compared to a traditional solid fence, is the ability to plant plants right at its base.
- Support pillars. They can be made of metal pipes or thick bars.
- Fences. Narrow slats are made from edged or planed boards.
- Veins. Cross bars, placed horizontally between the support pillars, 2-2.5 meters long, are made of bars with a cross section of 40 mm.
When choosing a material to make a fence from a picket fence, you can go in two ways: purchase a ready-made picket fence or make it yourself from boards. The first way saves time. The finished fence can be installed on the day of purchase. But a significant drawback can be poor-quality raw wood, which acts as the basis for the picket fence, which, during operation, will “lead” the fence. Choosing the second path, the owner will need to make an effort to spend several days manufacturing all the elements of the fence. But as a result, he will have a picket fence that fully corresponds to his ideas and wishes.

If the material is not sufficiently dried, it is necessary to use special dryers for the forest, because under natural conditions, drying can take several seasons.
The service of drying the wood, as well as cutting the crossbars and pickets, can be ordered at a place where they manufacture wood products. When preparing the material yourself, you must carefully file and sand all the tops.

Design options for the tops of a wooden picket fence
bottom of wooden support pillars should be washed with hot brew. This will prevent wood decay and extend the life of the structure.
Installation and installation of fencing
The arrangement of the picket fence is carried out according to the same principle as the construction of other types of fences. First of all, the direction of the future fence is determined. It must be freed from weeds, bushes and tree branches that will interfere with construction. Then, on the cleared territory, beacons are stretched and a place under the poles is marked along the stretched cord. The distance between the posts should not exceed three meters. Otherwise, long spans between the supports can cause the crossbeams to sag under the weight of the pickets.
Support posts can be installed directly into the ground, but to create more solid construction they are best erected using a cement-sand mortar.
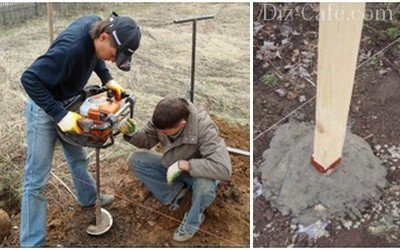
To install the posts, you will need to dig a hole with a drill, the depth of which is determined by the height of the fence. On average, a depth of 1.3 m is sufficient
The posts are installed on a 20 cm gravel cushion, which helps prevent the support from being squeezed out when the soil freezes. Vertically fixed columns are covered alternately with layers of concrete and soil mortar.
After installing the posts along the line of the fence, you can install veins between them. In principle, there are two ways to install a fence: in the first, the crossbars are first attached between the posts, and then a picket fence is nailed to them, and in the second, the spans are assembled separately and fixed to the supports already in blocks.
The first picket is fastened vertically, and the rest are aligned according to the T-shaped pattern, in which the width of the leg of the letter "t" is equal to the step of the picket, and nailed
On average, the distance between the shtaketins is equal to the width of the planks themselves. You can fix the cross planks on wooden support poles using self-tapping screws, bolts or ordinary nails. The veins are attached to the metal posts on a specially welded corner for attaching the timber.
Finishing and decorating the fence
The finished fence remains only other negatively influencing factors.

It is necessary to repair all cracks and chips with putty compounds, impregnate the fence with an antiseptic, and then cover with varnish, stain or paint
On freshly planed boards, film-forming agents do not adhere well and do not last long. To "roughen" the surface of the wood, you can clean it with medium-grain sandpaper.

Stain is an excellent preservative that protects wood from the development of microorganisms and mold.
The varnish will protect the wood from moisture. Using stain and clear varnish, you can also imitate different types of wood.
Photo
To protect the site from outside penetration, wind and noise, fences of various designs and quality are used to delimit the territory. For many centuries, wooden fences have been popular, which can take various appearance. Do-it-yourself wooden fence is designed in various shapes. It can be the simplest palisade or a solid solid fence, where the tree goes well with stone pillars. It is quite possible to make such a fence with your own hands, you only need to create a project, and then prepare the material.
Forms wooden fences.
Types of wooden fences
Wooden fences can take on a different appearance:
- Solid, divided into ordinary ordinary, palisade, "dog ears", royal, peak, concave, double concave, convex.
- Picket fence, classified into convex, palisade, ordinary ordinary, peak, concave, double convex, "cat's ears".

Construction of a wooden picket fence.
A classic wooden fence is made from a picket fence, wooden, metal, brick pillars. All shtaketins come with small gaps between themselves, they do not reach the level of the soil a little. A herringbone fence is a type of solid fencing. The boards are nailed parallel to the ground with a slight angle, resulting in beautiful drawing herringbone. The boards are overlapped, between them there is a minimum air gap to provide ventilation. Below is a strip foundation.
The fence of the "Cross" variety is also solid, the bars for it are laid parallel to the ground, the foundation is used tape. The cross section of the fence bars is best taken round or with recesses for mounting. The result will be more decorative.
The fence, made in a checkerboard pattern with a clearance, is popular. This is a very interesting fence, the boards are nailed on both sides of the crossbar in a checkerboard pattern. Gaps remain between the boards, resulting in the so-called double fence, the strength and reliability of which is exceptionally high. Outwardly, the design looks attractive, but it is difficult to care for it, since it will no longer be possible to paint over the inner surfaces of the board with a brush or roller, only an airbrush is used.

Elements of a wooden fence.
The fence in the form of a lattice is one of the most attractive. It is made up of wooden slats, which stray in the form of a lattice. Boards serve as the base, wood is also used for supporting pillars. Such fences are translucent, but decoration options are great for them. climbing plants. After installation, the fences are painted with white paint to give the structure additional lightness and elegance, although in fact such a fence is strong and stable.
The Ranch fence is a low fence. What is special about this design? The boards are nailed in several rows in a horizontal direction, creating an attractive cascade. The support poles are made of wood, they are dug into the ground. Usually the number of rows does not exceed 4, such a fence is mounted inside the plots, the functions are strictly delimiting.
How to install a wooden fence yourself?
Flame retardants provide protection against open flames. As fasteners, only galvanized nails or self-tapping screws, metal plates, corners are used. Some experts advise nails to be greased with drying oil before work.
Materials and tools
Before starting work on the construction of the fence, it is necessary to prepare materials and tools. To make a fence you will need:

Attaching a picket fence using a template (dimensions are in millimeters): 1 - cord; 2 - template; 3 - board to which the cord is attached.
- processed wooden boards;
- bars for transverse veins;
- support posts for fencing;
- nails and screws for fasteners;
- bitumen or creosote is used for waterproofing;
- drill, ordinary shovel;
- pegs for marking, rope;
- cement, sand, gravel or ready-made dry mix, which is enough to dilute with water;
- capacity for concrete mortar;
- saw, jigsaw;
- hammer;
- building level.
Do-it-yourself fence installation
First you need to markup. To do this, wooden pegs are installed around the perimeter of the site, between which a rope is stretched. This will be the length of the fence, with the help of such a simple markup, you can get the following data:
- Determine the position of the two extreme pillars, between which there will be a gate or gate.
- Determine the length of the fence, according to which the amount of material is calculated, the points of the supporting pillars are calculated.
- When calculating, it must be taken into account that the extreme and corner pillars must be made more massive, since they will bear the largest load.
After that, you need to remove the markings, leaving the pegs in place of future support pillars. The next stage of manufacturing is digging holes for support pillars. Even during the markup, it is necessary to ensure that the distance between them is the same, since the appearance of the structure depends on this, the composition of the sections between the pillars. Smaller or larger sections can only be near the corner posts and near the gate. After that, with the help of a drill or a shovel, digging holes begins. Their depth should be approximately ¼ of the height of the column.

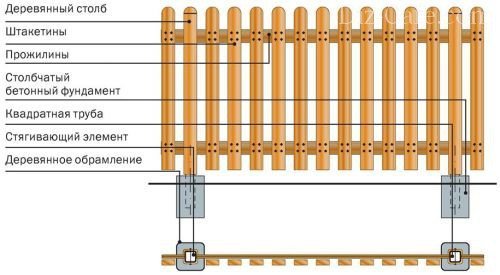
Scheme of assembling a fence from a picket fence.
Before installing poles, you must lower part treated with bitumen. This will protect the wood from rotting. A layer of sand and gravel is poured at the bottom of the pits themselves, after which the pillars are evenly installed, and their concreting is carried out. In this case, it is better to do the work together, since the support must be strictly vertical. The corner and extreme pillars are placed first, the rest are already placed between them. Each post is carefully placed in a prepared hole, after which it is poured concrete mix. For fasteners, you can use temporary props that will not allow the pillars to tilt when the concrete dries.
It takes time for the concrete to dry, usually a couple of weeks, after which you can start assembling the fence. Do-it-yourself wooden fence must be assembled from the installation of transverse bars, they are fastened with nails to the posts. Nails should be driven in at a slight angle to ensure the most reliable fastening.
The pickets themselves are already nailed onto the installed bars. The distance of the boards is determined only by the appearance of the fence, there are no special rules. Usually guided by external attractiveness, the level of protection from wind, noise and dust, from penetration into the site. To make sections more attractive, it is recommended to use a special method. First, markings are made on the crossbars, after which the boards are nailed through one. Thus, it turns out to achieve an even step shtaketin. The last step is to install a wicket or gate, which are mounted on the extreme support pillars. They must be reinforced to support the weight of the structure.
Finishing the finished fence
When the fence is completely ready, it can be painted or varnished. The choice of finish depends on the landscape and your own preferences. But you should not forget about the decorative and protective coating, because without it the tree will quickly begin to be negatively affected. external environment. It is recommended to paint the fence about once every 2-3 years, but it is important to do it the first time immediately after installation. If the paint is not suitable, then you can use special oils for impregnation or a colorless varnish, which allows you to preserve the natural texture of the wood.
When choosing a fence made of wood, it must be remembered that the wood is selected only dry, easy to process, but as reliable as possible in use. The installation itself usually does not cause any problems, the work can be completed in a couple of days, not counting the drying of the concrete solution for the pillars.


- Materials and tools
- Manufacturing technology
A picket fence is one of the most popular types of fencing used to ennoble country cottage area. The main thing is to implement it correctly. Such a fence has secured its popularity due to a number of advantages, the main of which are the low cost of construction and appearance.
Materials and tools
Installation of a wooden fence does not require special devices, unless we are talking about combined structures consisting of several different types of materials, such as stone or brick. Bearing vertical and horizontal fence supports can be made of wood or metal.
To install the fence you will need:
- wooden beam 50x50 mm;
- wooden beam 20x40 mm;
- nails or screws;
- antiseptic;
- paint material.
A square beam is needed for the manufacture of vertical supports, and its length is planned in accordance with personal wishes: everyone determines the height of the future fence for himself.
The support is buried in the ground by at least half a meter, therefore, 50 cm must be added to the desired height of the element for the fence.
A beam of a smaller section (20x40 mm) is intended for horizontal reinforcement of the spans of the picket fence. Its quantity will directly depend on the length of the installed fence. Nails or self-tapping screws are suitable as fasteners. The second option is more preferable, because the screws do not loosen during the operation of the structure.
Fasteners must be purchased from galvanized metal, which does not rust from exposure to atmospheric phenomena.
Antiseptics and paintwork materials a lot on the market. You need to choose tools designed for outdoor work. Of the tools you will need a hacksaw for wood or a jigsaw. If you nail the boards with nails, you will need a hammer, and it is better to fasten the screws with a screwdriver. Useful shovel for mounting support posts.

Manufacturing technology
A step-by-step do-it-yourself picket fence assembly scheme will help you properly organize and complete the work from start to finish.
- At the first stage, it is necessary to properly prepare the wood: all natural material you need to soak several times with an antiseptic using a regular paint brush. The process is quite laborious, but it cannot be ignored. Such a measure will help protect the tree from exposure environment, will protect from rotting, extending the service life.
- Now you can start installing the supports. We start by marking the places for their installation. In places where the fence changes direction (at the corners), we install pegs and stretch a strong rope between them. Then you need to calculate the number of supports. To do this, we measure the distance between the pegs and divide it into equal intervals, the length of which does not exceed 2 meters. The resulting value will be the step between the supporting pillars, and at the place of their installation it is necessary to dig holes, taking into account the fact that the support must go into the ground at least half a meter, below the freezing point. For a long and reliable service, the supporting structures are wedged with coarse gravel and rammed with earth. To increase the period of use of wooden supports, laying the roofing material in the holes dug for the columns helps, and the supports themselves are wrapped with the same roofing material in the places they are buried in the ground.
- At the third stage, transverse fence rails are usually mounted. The main thing is that each vein is located strictly horizontally. It's easy to control building level. Horizontal supports are mounted in two places (at the top and bottom of the fence), however, in the case of a high fence, you will have to install an intermediate guide. The veins are fixed to the vertical supports of the picket fence with self-tapping screws or nailed.
- The final step is to install the wooden planks of the picket fence directly onto the fence. The longest, but very simple process is to ensure that each picket is screwed strictly vertically at regular intervals. If you pull the thread on the bottom edge of the pickets, this will ensure one level of their placement.

At the fourth stage, the assembly process ends - the wooden picket fence is now ready for use. It remains to paint it in any chosen color, however, many craftsmen additionally decorate the hedge using simple tricks. This applies to the design of the upper edge of the shtaketin, which is given a certain shape.
Fence sections can be made in the form of a wave or an arc. To do this, markings are applied to the fence, trimming is done according to the template. The fences are sharpened on both sides in the form of a sharpened pencil - this will save the courtyard from unauthorized access.
Often there are picket fences with carved planks - we are talking about the creative approach of the carpenter. You cannot call such work simple.
Alternative to wooden poles
No matter how the future supports are prepared and processed, wood is inferior to metal in terms of durability. If you want a wooden picket fence to last for a long time, and its service life is not limited to 15 years, it is better to use a metal base, which is mounted in exactly the same way, with the exception of a few points. The columns are made from metal pipe with a cross section of 40 mm, fixed in the ground with a concrete solution.
To ensure optimal adhesion of the bearing element to concrete, trimmings of reinforcement or metal plates are welded to the bottom of the vertical supports.

Horizontal veins are made from a metal pipe of smaller diameter and welded between vertical supporting elements, following the horizontal placement using a level. Then each picket is fixed to the previously built metal carcass pointed screws. It will turn out a wooden picket fence, but reinforced with a metal base.
Even if the fences become unusable over time, they can be replaced, the supports will remain the same, and this is a cost savings.

The wooden picket fence has many options, and as a basis here can be used brickwork, which in combination with natural wood gives a special effect. Instead of brick, if funds permit, spans of stone are laid out. For such massive construction a foundation is required. And this is a more laborious process.
A picket fence is one of the most popular fences among the people. This is due to its strength, durability and reasonable price of building materials. Such fences can be created with your own hands in just a few days. Further in the article, we will talk in detail about the types of these structures and the rules for creating your own picket fence.
Versions
A picket fence is a fence that is made of vertically mounted rails and crossbeams. Reiki can be from the very different material: metal, wood, plastic, polymer composite, polyvinyl chloride, etc.
In addition, the slats do not have to be vertical - some craftsmen make elegant fences with a semicircular, horizontal or crossed picket fence.
Important! When constructing a fence made of wood, self-tapping screws for fastening shtaketin must be moistened in drying oil. This will extend the life of the fence.
Make a fence layout different ways best when working with wooden material, since it is easier to correct in relation to length and width. This is especially true for those people who want to build a fence with their own hands for the first time and at the same time want to dream up with possible options layouts.
The most popular options remain:

There are a lot of execution options, but translating some of them into reality (without experience in building fences) remains an almost impossible task. The simplest option: order an elegant picket fence from the master (you can come up with a drawing yourself), and then simply install it in a vertical form.
from wood
The most popular type of private fencing summer cottages. Wood remains one of the most affordable and environmentally friendly building materials. To install a fence from it, you do not need exotic tools and special skills or knowledge.
Moreover, professional craftsmen can build you a unique decorative fence from a wooden picket fence, which will be much more difficult to create from another material. 
metal
In this case, the rails are made of special metal alloys, which are coated with a polymer coating. They have different lengths, depending on the needs of the buyer (180 cm, 230 cm, 260 cm, etc.).
Unlike corrugated board, a metal picket fence leaves gaps between which sunlight can enter your site. The tops of metal rails can be made in the form of W, such a design is a kind of protection against intruders. 
Made of plastic
Plastic-based picket fence is gaining more and more popularity in Lately. In most cases, this is due to the low cost of the material and the wide choice various designs on the market.
The plastic fence has a profile hollow design, which is why it is quite fragile, especially when exposed to negative temperatures and ultraviolet (the source of the latter is the sun's rays).

But science does not stand still, and today you can buy quite strong and flexible plastic, and a fence made of it will be as durable as that of metal. For example, polyvinyl chloride is a strong, flexible type of plastic that can withstand high mechanical loads.
Recently, picket fence made of wood-polymer composite (WPC) has become more and more popular. WPC fences are able to withstand frosts down to -60 °C and heat up to 100 °C. WPC does not fade in the sun and does not contain harmful additives, so it is increasingly used as source material for making fences.
Did you know? The longest fence in the world is located in the southeast of Australia. Its length is 5614 km. It was built in late XIX centuries to protect sheep from wild dingoes hunting them.
Installation and installation of fencing
Installing a picket fence is not the most difficult task, but it still has its own nuances and rules. Next, we will talk about this in detail. 
Necessary tools and materials
To make a wooden fence, we need:
- wooden posts that will be used to install supports;
- timber - 40 * 40, about 200-250 cm long;
- pickets prepared for installation;
- stakes and cord for marking the site;
- concrete and crushed stone for the installation of supports;
- bituminous mastic, roofing material and antiseptic (for waterproofing supports);
- manual or electric drill, roulette;
- wheelbarrow;
- concrete mixer (if you are going to buy ready-made concrete, you will not need it);
- tamper;
- bayonet and shovel;
Important! At the time of buying finished material from wood, pay attention to its smell. Raw material with a “scent” of mold indicates that rotting processes have begun in the wood.

If you are going to construct a fence from metal fence, need to get the following materials and devices:
- welding machine;
- screwdriver or electric drill;
- rivets or screws;
- level;
- Bulgarian;
- prepared metal pickets.
In addition, you will need supports, concrete, a drill and other accessories for constructing a fence frame. We have described all this in the list for a wooden fence.
If you are going to enclose your site with a plastic fence, it is best to immediately purchase ready-made fences, the whole point of installing which is to install supports and attach ready-made plastic sections to them. These sections have already been built (plastic pickets are attached to the crossbar).  You can buy the whole structure unassembled, but then you will have to fix the pickets yourself, using rivets or glue. The tools required for installation are the same as in the previous cases.
Installation of supports
The durability and reliability of the fence will depend on the quality of the installation of the support posts. Supports can be hammered deep into the ground with a sledgehammer, can be concreted, but best of all - installed in a concrete-filled parapet.
The last installation option has several advantages at once:
- the construction of the fence will be more stable and reliable;
- the fence will not come into contact with soil moisture, which will significantly extend its service life;
- water from neutral territory will not be able to freely enter your site.
The distance between the installed supports should be within 2-3 meters. You need to deepen the pillars by 1-1.5 meters, although this is not strict rule. Experts note that the support must be buried in the ground by at least 1/4 of its length.
Video: how to install a support post
Wooden supports must be treated with an antiseptic and bituminous mastic. These substances significantly extend the life of the posts, because an untreated tree can completely rot in 10 years (the period also depends on the type of wood).
In addition, the supports can be wrapped in roofing material, which prevents excessive moisture from entering the wood.
Metal poles can be concreted without pre-treatment, however, like plastic ones. The last two materials will not be significantly affected by contact with concrete or soil in the next few decades.
Important! When installing plastic or metal supports be sure to put on a protective cap on the top that will not let water into the post.
During installation, be sure to control the ideal verticality of the supports relative to ground level. It is recommended to install the crossbeams 5-7 days after the installation of the supports (if the concreting method was used).  In case you just drove the posts deep into the ground (without concrete pouring), the cross bars can be installed on the same day.
Each span should contain two crossbeams, which are attached parallel to each other and perpendicular to the main supports. Metal cross-sections are fastened with anchors or a welding machine.
The second option is only suitable for those who have knowledge of welding metal structures. After the final fixing, the cross-sections are covered with primer (to protect the metal from corrosion).
If you install wooden beams, they must first be coated with an antiseptic, and then painted in any color you like. You can also fix wooden cross-sections with anchors.
However, if your fence is small, having only decorative value (that is, it will not be subjected to serious stress), the crossbars can be fixed with a few screws or nails.  Plastic crossbars are fastened with rivets or special glue. However, in the vast majority of cases, for plastic fences on a support, there is special mount where the cross sections should be placed.
Just a few words about the fence made of plastic picket fence:
- if you purchased a fence on which the pickets need to be attached yourself, then special connecting elements (and instructions for use) should be included in the kit;
- in most cases, plastic pickets are attached to glue or rivets;
- it is best to buy ready-made fences, which are installed in just two steps (digging in the support posts and inserting the sections into the connecting mechanisms).
Attaching the fence to the crossbar is very simple, you just need to remember important rule: the distance between adjacent rails must be the same. To control this distance, it is necessary to prepare a template, which can be wooden blocks, Matchbox or level (with which you control the evenness of surfaces). It all depends on how tightly you want to arrange the pickets relative to each other.
As for the connecting elements: for metal pickets, you can use special metal screws or rivets, for wood - nails or self-tapping screws. It is only important to choose optimal length connecting elements (so that they do not completely penetrate the diameters).
Each fence must be fixed with two connecting elements on top and two on the bottom. At the end of the work, the heads of nails, self-tapping screws or rivets should be painted together with the picket fence.
Secrets of Longevity
The durability of a plastic picket fence will directly depend on the quality of the material. We advise you to buy durable composites, for example, wood-polymer.  Such material can withstand both moderate mechanical loads and extreme weather conditions.
If you do not throw stones at such a fence, it will stand on your site unchanged for decades. To on for a long time protect wooden and metal fences, it is necessary to treat them regularly protective coatings: varnish, primer, stain, etc.
Did you know? Polyvinyl chloride, on the basis of which they are made plastic fences, also used to create artificial leather, window profiles and airbags in cars.
It is advisable to paint the fence every 2-3 years, such procedures will protect the metal from oxidation, and the wood from decay. If you are the owner metal fence, then only the supports and cross-sections should be painted, since the pickets themselves are already covered with a special protective coating. 
Benefits of picket fences
The advantages of these types of fences include:
- Ease of installation. Even a beginner can build a fence; for this, it is only necessary to be guided by the rules that are described in detail in this article.
- Ease of maintenance. Metal and plastic fences only need to be cleaned of dirt and dust, while wooden ones need to be covered with protective varnish or paint every 1-2 years.
- metal and plastic products protected by a special polymer layer that prevents corrosion and various biological damage.
- You can create a design that will let sunlight into your site.
- The cost of picket fences is moderate, especially when compared with concrete or stone fences.
- You can build a very beautiful decorative fence from wood - you just need to use your imagination and attract an experienced specialist who will turn your idea into reality.

Disadvantages of picket fences
Among the disadvantages of this type of fences are the following:
- Compared to corrugated fences, fences are more labor-intensive to install.
- A tree can lose its decorative beauty after 10 years (crack, split, etc.). This can happen even with proper care, because a lot depends on the type of wood and the climatic conditions of a particular region.
- A picket fence is fragile and can break under the weight of a person who tries to climb over it.
Now you know what picket fences are and how to properly install them on your site. Play with your imagination, connect your imagination and skills, and you will definitely succeed.
Ecological natural material is considered the best for construction and home improvement. First of all, it is in harmony with the nature of the person himself, and also it is easy to operate and easy to construct.
It's about wooden picket fence, which, along with modern fences and fences, does not lose its relevance and novelty. And, what is also important, it is quite possible to make a fence from a wooden picket fence with your own hands, at your own discretion.
Traditional fence: pros and cons
Fence owners have already appreciated all the pros and cons of fencing. The score points on the account of the fencers are:
- low cost of consumable material;
- basically easy installation, which, perhaps, can be complicated by personal preferences in design and decor;
- the beauty of the structure as a whole, which will give the owner's site originality;
- a wide range of wiring diagrams.
There will be minuses, especially for those who don't like extra hassle:
- Wood is very short-lived, requiring constant care.
- In order for such a fence to please you for more than one year, it is necessary to paint it annually, and, if necessary, fragmentary repairs.
- It should also be borne in mind that a wooden picket fence is not a big metal fence for you, so it is unlikely to protect against intruders.
- Wood is a highly flammable material and can be easily damaged mechanically.
The service life of a tree varies from 5 to 10 years and depends on many factors: climatic conditions, location and soil on which it is installed.
We choose the material - get to work
 Among existing species wood most suitable ash, mulberry, acacia, oak, aspen, Siberian larch are considered for the construction of wooden fences.
Details of the future building can be purchased at ready-made- having bought a picket fence on the market, or you can make it yourself from boards.
But in one case or another readiness of wood must be taken into account, because the raw normally not processed subsequently deforms, and the absence of any defects, knots and cuts.
Before installation, all parts of the fence must be treated with an antiseptic to extend the life of the product as a whole.
The next step should be choice of fence mounting method and his appearance. How to lay the picket fence: horizontally, vertically or with a ladder, a lattice, in a checkerboard pattern - the choice is up to the owner.
- classic fence.
- Ladder.
- Lattice.
- Chess.
- Vertical.
Familiar to us since childhood: vertical poles and longitudinal logs, on which boards are attached with a small gap between them.
Very original way fastening the same vertical boards to the logs, only with an overlap (slate). Very good option, because with him the fence looks equally beautiful both outside and inside.
This sectional fence, where each part must be made separately, and then attached to the main supporting mount.
The section is a downed square wooden frame, on which boards are subsequently attached perpendicularly in two directions (a schematic prototype of a conventional chain-link mesh pattern).
It is an analogy to the classic fence, only in a bilateral manner. A number of front boards, and towards him the gaps of the gaps are closed by a number of purl boards.
Back at the core classical scheme. Wide longitudinal logs are stuffed between the bearing pillars. One significant nuance of such a fence is that it cannot be called a fence due to the low height of the building, it is rather exquisite decor for flower beds and rose gardens.
Your own master
 In the working notebook, the master himself must first of all be reflected - length and planned height future fence. It should be decided whether the fence will have a monolithic base, or a small gap between the ground and the fence.

You may be interested in how to make a metal picket fence.
Bringing beauty and finishing touches
 There are many ways to make your fence beautiful and original.
by the most in a simple way is painting the fence in two or three colors, highlighting sections of the triangular top, for example, as shown in the photo.
However, you can work a little, in pursuit of beauty:
- First of all, it can be an external decor. Additional slats with a certain pattern stuffed on the main picket fences.
- A more difficult decor method to perform at home. When each board is pre-cut at a certain angle, during assembly, forming a wavy or figured relief.
- A variety of removable parts are also acceptable, attached in turn to the tops of the fence.
- Can also be used uneven height method, attaching picket fences to the logs in waves or with a certain slope.
A fence made of wooden picket fence will certainly decorate any suburban or suburban area. First of all, he will an element of personal pride of the owner, as it will be made by hand and original.
See in the video what are the types decorative fences from a picket fence and not only:

