Calculation of the frame of the greenhouse from the profile pipe online. Features of manufacturing a greenhouse from a profile pipe
A home-made frame for a greenhouse made of a shaped pipe has a lot of advantages over a finished structure, not to mention saving money for its purchase, a greenhouse made of profiles is reliable, a design feature eliminates snow accumulations on the roof, and a strong frame allows lighting and heating to be installed in the structure.
A profile pipe is a pipe that has a square or rectangular cross-section. Manufacturers offer cold-rolled and hot-rolled tubes, solid and welded. There are no increased requirements for the profile for the manufacture of the greenhouse frame, so you can purchase those pipes that are cheaper.
Since the greenhouse does not imply large mechanical loads, and the project must reasonably combine the quality characteristics and the cost of the entire project, then a small profile should be chosen for the frame.
For the construction of a greenhouse frame, a profile with cross-sectional sides of 2 * 2 cm and 2 * 4 cm will be optimal. Rectangular pipes are used on supporting structures, square ones - for the construction of transverse lintels and oblique stops (if they are provided for by the project).
Manufacturers offer pipes in standard lengths of 3, 6 and 12 linear meters. When drawing up a project, you should take this circumstance into account and expect to use a profile without scraps.
Since the main threat to metal, which is not protected from the destructive action of atmospheric moisture, is rust, then a profile pipe with anti-corrosion galvanizing or special spraying would be an ideal choice for building a greenhouse. Here, additional protection is required only at the joints.
Note! For reasons of minimizing the cost of building a greenhouse, pipes for the frame can be selected from a material of plain steel, without anti-corrosion factory treatment. To protect the finished structure from corrosion, it is enough to clean the metal from rust, prime and paint.
Advantages and disadvantages of profiles for the manufacture of greenhouses
Manufacturers offer ready-made greenhouses of all sizes and shapes. However, building such a structure on your own is both interesting and profitable.

Profile tube greenhouses are more robust. They are heavy, which means they can withstand winds very well.
Due to the combination of the mechanical and translucent properties of the profile and polycarbonate, greenhouses made of these materials are very popular. The construction of a greenhouse, however small, begins with the development of a project. You can use ready-made drawings and diagrams presented on the Internet, or, armed with patience, develop the necessary sketches yourself. Drawings of a polycarbonate greenhouse with your own hands from a profile pipe will help you accurately calculate the required number of elements for construction, avoid possible mistakes and protect you from senseless waste of material.

We build a greenhouse with our own hands. Types of greenhouses and greenhouse designs
Before proceeding with the development of drawings for the frame of a greenhouse from a profile pipe, it is necessary to decide on the model of the greenhouse. Which polycarbonate greenhouse shape to choose? Greenhouse and greenhouse structures can be ground-based or recessed, with or without a foundation. Taking into account the ability to create a wide variety of structures from a profile, there are several basic forms of frames for greenhouses:
- arched (semicircular, arcuate) shape - the roof of such a structure has a semicircular shape, which allows snow not to linger on the surface of the greenhouse in winter. Differs in ease of installation and the ability to use all of its space for fairly high crops;

- gable structure - the traditional shape with a gable roof. This design is more difficult to assemble and requires a powerful frame arrangement. It can be used to cultivate plants of various heights;
- single-slope structure - such greenhouses are most often attached to an existing structure (house or summer kitchen), allowing you to save space on a summer cottage or personal plot. This design saves material and has good thermal insulation. A significant plus is the proximity of communications. Single-pitched greenhouses can also be installed as a separate building;

- tent or domed structures - unique structures with excellent ability to withstand external factors: snow and wind load. They have maximum illumination and can become a memorable decoration of any personal plot;
- greenhouse-bread bin - a model of a polycarbonate greenhouse with an opening top. This design resembles the shape of a breadbox. It can open in one or two directions. It has easy access to plants for care, the lid can be fully opened to provide ventilation in extreme heat. Usually small in size, used as a greenhouse, can be easily transferred to a new convenient place on the site;

Do-it-yourself drawings of a polycarbonate greenhouse from a profile pipe must take into account all the features of the selected form of construction. As an example, you can use the photos of greenhouses and greenhouses available on the network with your own hands.
Do-it-yourself profile types for a greenhouse made of polycarbonate. Photo examples of frames
Various types of materials are used to assemble the frames of greenhouses and greenhouses. It can be wood, plastic or metal profile. Often there are models made of a hat profile, a profile for drywall, an aluminum profile. Each type of profile pipe has specific properties and its use is determined by the mode of operation of the greenhouse. For lighter options for seasonal use, a plastic or galvanized profile is quite suitable.

In structures planned to be used throughout the year, material with high strength values is usually used, since the supporting structure must withstand additional loads in the form of snow cap pressure or strong gusts of wind.
The popularity of the use of a profile pipe for the construction of a greenhouse frame is explained by the following properties:
- due to stiffening ribs, pipes have good resistance to loads and do not deform under their action;
- low cost of the profile;
- light weight;
- a properly selected pipe allows you to construct any type of frame structure;
- simple installation process;
- high strength in all climatic conditions.

The dimensions of the section of the profile pipe used in a particular design are determined by the functions assigned to the profile: the stronger the frame must be, the larger the section is used. In the drawings of greenhouses from a profile pipe with dimensions of 2x6 m, the cross-section for the lathing frame is 20x40 mm, for the bundle of structural elements - 20x20 mm.

If the selected frame structure made of a profile pipe has a semicircular shape, it should be borne in mind that when the pipe is bent, the main load will fall on the edges of the pipe, while the middle of the profile will not be subject to deformation. In this sense, profile pipes are successfully used for arched structures. The only question is the availability of a special device for bending pipes (pipe bender). It should be noted that it is rather difficult to obtain a geometrically correct arc shape with manual bending.

If you do not have a pipe bender, it is recommended to opt for a rectangular frame with a gable or pitched roof. Such a greenhouse frame is made from a 20 * 20 profile pipe with your own hands (drawings, photos of finished structures can be found on thematic sites). Calculations, drawings and frame diagrams will help to calculate the required number of profiles and avoid the acquisition of unnecessary material.

When developing with your own hands the frame drawings for a greenhouse from a shaped pipe, it is recommended to take into account the standard length of the profiles being sold. The size of the greenhouse is selected so that as little waste as possible remains when cutting the required sections.
Designing polycarbonate greenhouses: sizes, prices for polycarbonate sheets
The use of polycarbonate for covering greenhouses has become possible due to a number of properties of this material. Polycarbonate sheets lend themselves well to cutting, they can be easily bent to the desired shape, they are durable and resistant to deformation. In addition, the ability to transmit sunlight and protection from ultraviolet radiation contribute to the intensive growth of the grown crops.

The thickness of the polycarbonate sheet for covering greenhouses is selected taking into account the season of operation. If you intend to use the greenhouse only from spring to autumn, a thickness of 5-10 mm is sufficient. For heated structures operating all year round, a 15 mm sheet is used. The price per square meter of cellular polycarbonate sheet, depending on the thickness of the sheet and the structure of the cells, ranges from 150 to 700 rubles.

When developing with your own hands drawings of polycarbonate greenhouses, some features should be taken into account:
- sizes of standard sheets of cover and their economical cutting;
- expansion of the material under the influence of temperature;
- possible radius when bending sheets for semicircular shapes;
- the ability to withstand the load from external climatic factors;
- the presence of a number of components: connecting strips, perforated tapes, end profiles, thermal washers, self-tapping screws.

The width of a standard polycarbonate sheet is 2.1 m. Stiffeners are located along the sheet. When creating drawings of polycarbonate greenhouses with your own hands (the video will guide you in coating technology), you need to take into account that the edges of the sheets should be placed on supports from the profile.
It is also necessary to take into account that the distance between the posts is taken equal to 1.05 m or 0.7 m. The carbonate sheets are arranged end-to-end, connecting with each other with special connecting strips. Fastening is carried out by means of self-tapping screws with the use of thermal washers for the tightness of the joints.

The diagrams also take into account the presence of gaps when joining polycarbonate plates on the plane and in corner joints. The holes for self-tapping screws must be made with a larger diameter, taking into account the thermal expansion of the material. If this is not taken into account, the coating can warp under the influence of high temperatures in the summer season, and in cold weather, plastic rupture may even occur.

A very important point in the design is the location of the cellular polycarbonate sheet. The panels should be installed in such a way that the cells (honeycomb) are located vertically and the condensate can flow freely through the sheet channels to the outside.
Do-it-yourself construction of a foundation for a greenhouse from a profile pipe
In order to have an idea of the specific costs of materials for the construction, the drawings of a greenhouse from a shaped pipe must reflect the presence or absence of a foundation for it. Regardless of whether the foundation will be erected, marking and preparation of the site for construction is carried out. At this stage, the choice of a place for the greenhouse plays an essential role. It should be well lit, away from garden trees, and positioned to accommodate the prevailing wind direction.

The most common types of foundations for greenhouses are wooden frames made of beams, wooden boxes, shallow strip foundations, columnar and point foundations. When choosing one or another foundation, it is necessary to take into account the weight and size of the future greenhouse structure, its functionality and the coating material.

If the greenhouse has a light structure and is covered with plastic wrap, there is no need to arrange a solid foundation under it. When erecting a columnar base, the fact that this option is quite economical is taken into account, but the greenhouse will not be protected from cold air getting inside.

If wooden blocks are used under the base of the greenhouse, it is necessary to take into account their treatment with antiseptic compounds and waterproofing. This will help extend the life of the wood base to 5-6 years. In the case of using metal channels, they are subjected to anti-corrosion treatment.

In the diagrams and drawings of a polycarbonate greenhouse with your own hands from a profile pipe, the dimensions of the perimeter trench for the strip foundation, its depth and width are reflected. As a rule, the depth of the ditch for the strip base is 30-40 cm, and the height of the base is 20-25 cm.
The project provides for the required volume of mortar (in the case of pouring the foundation) or the number of bricks (blocks), if a brick base is assumed. In addition, the calculation includes the necessary elements for fixing the greenhouse frame to the foundation: corners, brackets, hardware.

Under the construction of greenhouses, assembled from light types of profile, the foundation is not arranged. The design of such structures provides for an increase in the length of the frame profile by 80 cm on both sides. These parts of the profile are driven into the ground and, thus, serve as a support for the structure.
All the calculations recorded in the project will help to orientate as much as possible in the exact amount of purchased materials and determine the costs of building a greenhouse.

After the basis for the greenhouse has been chosen, they begin to develop a drawing of the greenhouse with their own hands. Videos on this topic will help you understand the design details.

Do-it-yourself arched polycarbonate greenhouse: drawings, photo materials, sketches
Arched structures are great for both small suburban greenhouses and massive greenhouses intended for commercial purposes.
Answering the question of how to make a greenhouse from shaped pipes with your own hands, we can safely say that the development of drawings and the preparation of correct calculations is paramount. Arch-shaped pipe greenhouses have their own design features. The main determinants are the height of the structure and the dimensions of the standard cover sheets. Polycarbonate sheets are traditionally sold with parameters 6 x 2.1 m. The length of a sheet of 6 m will limit the height of the arched structure.

To obtain an arched shape, the sheet is placed in a transverse (relative to the frame) position. In this case, the radius of the semicircle will be 1.90 m, and the width of the structure will be 3.80 m. Taking into account the geometric formulas, the height of the greenhouse will be equal to the radius, that is, 1.90 m. This height of the greenhouse is not suitable for everyone.

In order for the arched greenhouse to have a height that meets your needs, you can resort to arranging the basement. Moreover, stopping at a basement height of one meter, you can get the width of the greenhouse up to 2.4 m, and increase the total height of the entire structure to 2.2 m.Correctly setting the main dimensions of the greenhouse, you can develop drawings and sketches for the manufacture of greenhouses from a profile pipe do it yourself.

Another feature of the arched forms of the frames is that the profile must be bent into the desired shape. If a special pipe bending machine is not available, you can purchase ready-made arched profiles or create an arched shape from small lengths of segments connected by metal plates.

For the design of a small (4-5 m) arched greenhouse, two arched frames will be enough: the initial and the final one. In the case when the length of the greenhouse is 6 m or more, the required number of support frames is calculated, which must be a multiple of the thickness of the polycarbonate sheet. In a separate diagram, the dimensions of the window and door opening are indicated.

Further, a drawing is being developed that clarifies the features of installing a polycarbonate greenhouse cover with your own hands (the video will help you understand the process in detail) with an indication of the fastening step. He should take into account that polycarbonate panels in arch-type greenhouses should be located with ribs along the arc.
It is also necessary to take into account that the bending radius of polycarbonate sheets should not be less than that provided by the manufacturer for this material. Polycarbonate sheets from the ends should be covered with punched tape. For clarity, you can use a selection of photos of polycarbonate greenhouses.

Drawings of the frame of a greenhouse with a gable roof
Projects of greenhouses with a gable roof provide for the implementation of the greenhouse frame with your own hands from a 40 * 20 mm profile pipe. Such a profile will be able to withstand a significant load in the form of a snow cap or gusty wind.

In the drawings, a diagram of the supporting frame is displayed, including the dimensions of the walls, the angle of inclination of the roof, in which ventilation vents are traditionally installed. If you are planning a small greenhouse, you can envisage an option with a pitched roof, one edge of which will be located above the other, providing water flow and snow melting.

The angle of inclination of the rafters in the roof of the gable structure is 25-30 degrees. Such a slope will facilitate the descent of precipitation from the surface. The roof is considered to be rather flat and does not require the arrangement of the rafter system with auxiliary slopes.

In structures of this type, it is assumed that a more durable profile (20x40) is used for the main posts and base, rafters and ridge girders. For horizontal lintels, you can use a 20x20 profile pipe. The drawings provide for the location of the vertical posts in one meter increments. It should also be borne in mind that in the case of covering the greenhouse with polycarbonate sheets, the connecting lines must fall on the profile. The rafters are also placed at a distance of no more than one meter from each other.

The design of a greenhouse with a gable roof has several features. Here it will be necessary to carefully approach the cutting of polycarbonate sheets for gables. If all dimensions are kept according to the drawings, it will lead to an economical use of polycarbonate.

Seasonal greenhouse projects
Seasonal greenhouse structures do not have specific requirements for reliability and strength. Drawings of these structures are easy to design and do not involve complex calculations. The frames of such greenhouses can be built from lightweight shaped pipes, and the covering material can be polyethylene film or sheets of thin polycarbonate. As a rule, light greenhouses and greenhouses are not equipped with foundations.

The type of frame of a seasonal greenhouse does not really matter - the main criteria are ease of assembly and the budgetary cost of the structure. Several recommendations will help you avoid mistakes when building small greenhouses:
- when developing drawings and sketches, the presence of ventilation hatches at various levels should be taken into account. This will contribute to high-quality ventilation of the greenhouse;
- fastening of polycarbonate sheets should be carried out by means of fastening profiles that do not damage the plastic surface. In addition, they can be easily dismantled at the end of the season, eliminating the possibility of deformation of the light frame of the greenhouse;

- the project should provide for the option of simple disassembly of the frame for transfer to another place or storage for the winter.
Design features of the greenhouse-bread bin
The main advantages of a greenhouse-bread bin are:
- unusual ergonomic design;
- the minimum number of connecting lines;
- regulation of greenhouse ventilation by opening the lid to the required angle up to 90 degrees;
- ease of assembly and full use of the greenhouse area.

An example of a drawing of a greenhouse-bread bin in the form of a chest: 1 - a bed (edged antiseptic log 120, 4 pcs.); 2, 8 - wall strapping (timber 35x35, 8 pcs.); 3, 6 - wall sheathing (tongue-and-groove board s15); 4 - safety cord; 5 - support pole (wooden rod 40, 2 pcs.); 7 - technological scaffolding (board 200x35); 9 - staples (wire 5, quantity - as required); 10 - card loop (3 pcs.); 11 - frame strapping (timber 40x30, 4 pcs.); 12 - frame of the frame (wire 5); 13 - frame covering; 14 - clamping glazing bead (rail 20x10, 4 pcs.); 15 - handle (steel strip 30x3, 2 pcs.)
The drawing of such a greenhouse provides for the construction of the upper part of the frame of two half-arcs, which are fixed to the base on hinges. The greenhouse frame is made of a small section shaped tube. The radii of the covers are selected taking into account the fact that they can easily open without interfering with each other. The difference in diameter is equal to the width of the polycarbonate sheet - this ensures that there are no gaps when closed.

The size of the greenhouse is selected individually. The length can be from 3 to 4 meters, the height is no more than one meter. The width is taken taking into account how the greenhouse will open - from one or both sides. For one-sided opening of the greenhouse, it is advisable to choose a width of 0.7-1.2 m so that it is comfortable to care for the seedlings.
Drawings of greenhouses of various types
There is an option for a simple greenhouse made of a light metal profile. Such a greenhouse is going to be assembled without a foundation. A strapping made of a thin profile acts as a base. Drawings can represent various shapes and parameters of such greenhouses.
Light structures are assembled according to the principle of a constructor. The only drawback is that a thin frame with a low weight can easily deform. In this regard, the diagram reflects the distance between the posts not more than 0.5 m. The frame elements are connected to each other using tees and crosses, and fixation to the strapping is performed with a glass fastener.

The structure of a greenhouse from a light profile can be assembled in any shape: with a gable or a pitched roof. To give the structure rigidity and strength, it is possible in the project to provide for the use of an aluminum profile and the arrangement of one of the types of foundations: brick, stone or concrete.

From an aluminum profile, you can assemble a gable structure greenhouse using internal struts (inclined installed racks), which will provide the structure with the required rigidity. The disadvantage of this design is that due to the inclined posts, the usable space inside the greenhouse is reduced. Such a frame can also have individual dimensions and be located on the foundation or on the prepared surface of the site.
Having certain knowledge and using the existing drawings, you can independently develop a project and build a greenhouse of any shape and different sizes on your personal plot using various materials available to you.
The erection can be divided into several stages:
- The choice of the construction site.
- Foundation preparation.
- Installation of the frame.
- Sheathing with covering material.
- Sealing the structure.
It is advisable to prepare in advance drawings of greenhouses from a profile pipe with dimensions.
Choosing a construction site
To begin with, it follows, on which we will build our greenhouse. It should be even, without tall trees, if possible - not far from the house (in case of winter operation, it will be easier to carry out by connecting to the heating source of the house).
Foundation preparation
On which we are going to build a greenhouse, there can be 3 types:
- Brusovy. It is made of timber with external treatment to prevent corrosion. The service life of this type of foundation is up to 10 years.
- Brick. The use of this type of foundation becomes rational in cases where the installation of the greenhouse has to be carried out on an area with a natural slope. Service life - up to 30 years. It is carried out by making brick-wide masonry on a finely dispersed mortar mixed in a 1: 3 ratio (cement - sand).
- Concrete. This type of foundation is the most durable, but its construction is associated with the greatest laboriousness. To erect it, you need to dig a trench, one bayonet deep and wide with a shovel. Then, either equip it with a frame welded from reinforcement - in this case, the service life of the foundation becomes from 50 years, or simply fill it with concrete (up to 60 years). The concrete should be mixed in a ratio of 1: 4: 3.5 (cement, sand, small pebbles or broken stone).
The choice should be made based on considerations of durability, cost, as well as the conditions in which the construction of the structure is carried out.
Frame installation
 Installation can be performed from various elements of rolled metal, but the most practical of them is a profile pipe.
Is a metal pipe with a rectangular section. Nowadays, a profile pipe is one of the most common elements of rolled metal.
It is classified according to the lengths of the sides. It is most often used for the production of frame structures, due to the following features:
- load is evenly distributed along the edges a rectangle, the shape of which has a profile cross-section, which provides increased strength of the finished frame;
- affordable price per running meter the profile pipe makes the use of this material the most profitable for the installation of frame structures;
- rectangular cross-section simplifies the sheathing procedure cellular polycarbonate;
- the use of a profile pipe guarantees durability of the structure.
The optimal types of profile pipes for mounting a greenhouse frame are profiles with sides 40x20 and 20x20, the difference between which is in calculating the specific load per unit surface area.
Also, the choice of the profile used depends on the type of greenhouse from the profile pipe that we are going to build. They are lancet or pyramidal.
Photo
Look at the photo: drawing of the frame of the greenhouse from a profile pipe


Do-it-yourself greenhouses from a profile pipe
Arched
Greenhouses with a semicircular vault. Installation of this type of frame is associated with the need for uniform bending of the profile... This design is preferable for the production of a low-cost greenhouse, promotes dispersion of sunlight and reduces the likelihood of snow accumulation during operation in the winter.
For the installation of an arch-type greenhouse, it is worth using a 40x20 profile for supporting frames, 20x20 - for longitudinal lintels.
Bearing frames are made by bending a shaped tube. This raises the question how to bend a profile pipe for a greenhouse... Bending can be done either manually or with a pipe bender.
Consider the option of hand-made supporting frames.
A pair of plugs are cut out of wood or plastic, with which the end of the pipe is plugged. Sand is poured inside, compacted as the pipe is filled. This is done so that, when bending, the load on the inner surface is evenly distributed.
The middle of the profile is marked, then it is fixed on a concrete ring with a diameter of 3 m. The bending is performed simultaneously in both directions, at an angle of 90 degrees to the fixation point.
TIP # 1: For uniform bending, the bend can be heated with a torch or blowtorch. This minimizes the risk of breakage or sharp bending.
TIP # 2: If the greenhouse is installed during the winter season, water can be used instead of sand. It should be poured into the profile and allowed to freeze. ATTENTION: This method requires increased attention, freezing must not be allowed, otherwise the profile may break from the inside.
In addition, there is the option of bending the profile pipe using manual profile benders. A home-made machine, of course, will be inferior in presentability to a factory one, but it will be able to perform its direct functions no worse.
To create a professional bender at home with your own hands, you will need:
- A corner or channel, from which the frame is welded, on which the machine structure will be located.
- Legs made of pipe or metal profile.
- Bending shafts (you can order them from a turner or at a metal warehouse).
- Transmitting chain mechanism. If possible, you can use the transmission gears from the VAZ 21-06 timing mechanism.
- Tensioner (from the same place).
- Shaft guide. It can be done by welding two 20 mm corners together.
- The driving element of the guide. It is made of a 40x20 mm profile pipe.
- Adjustable screw.
- The handle is made of scrap material.
- Fastening the main shafts with bolts, having previously made slots for them in the channel.
Lancet
House-shaped greenhouses. They can be single or gable. Mounting requires skills in owning a welding machine.
Installation of greenhouses of this type is carried out by fastening separate parts of the profile pipe with "tacks" so that the lintels form windows of 40x60 cm, 60x60 or 80x60, depending on the type of cladding used (the narrower, the heavier).
Using a lancet type frame ensures direct sunlight gets inside the greenhouse, plus makes it possible to equip the walls with reflectors. Recommended for greenhouses in which it is planned to grow especially light-loving crops.
Pyramidal
The pyramidal frame of the greenhouse made of a profile pipe is more rational for construction, or basic folding,. In fact, this is a “cap” that covers a certain area of soil in order to form a microclimate under it.
Sheathing with covering material
For sheathing the finished frame, the following materials can be used:
- glass;
- sheets of cellular polycarbonate.
The use of plastic wrap is the least durable cladding option. It will have to be changed every year.
- a pretty good option for cladding. It provides an excellent level of light transmission, as well as the tightness of the structure, with proper processing of the joints. Among the negative characteristics of glass as a covering material for greenhouses is its weight and fragility.
- modern synthetic material, the most rational for using it as a covering for a greenhouse... And drawings of greenhouses from a profile pipe can be easily found on the Internet.
This is due to the following features:
- The combination of "strength-lightness" makes it possible, if necessary, to do without the construction of a capital foundation.
- ... For this type of material, it is about 90% - this is more than enough for the normal growth of greenhouse crops.
- Thermal insulation - the honeycomb structure of polycarbonate implies the formation of an air gap.
 Consider the process of sheathing the finished frame with sheets of cellular polycarbonate:
- depending on the type of mounted greenhouse, it is marked out, then a polycarbonate sheet is cut, in order to preserve the most integral plane;
- at the points of contact of the sheet with the metal frame, we install rubber pads, with them we also forgive the place of joint of the sheets - this will facilitate further sealing;
- the sheet is sewn to the frame with self-tapping screws, with the obligatory use of thermal washers. Holes for self-tapping screws are drilled in advance, 1-2 mm larger than their diameter - this will prevent cracking of the sheet structure during thermal expansion;
- cladding should be made at the rate of 30 self-tapping screws per six-meter polycarbonate sheet. It is not necessary to sew up every point of contact with the frame - polycarbonate does not like a large number of holes;
- the polycarbonate sheet should be mounted with honeycombs downwards - this is how the likelihood of condensation accumulating in them is provided;
- By gluing the honeycomb holes with special tape, you can prevent the accumulation of dirt and insects in them.
IMPORTANT: For cladding, it is worth using reinforced polycarbonate with UV protection. The side reinforced with a protective foil must face the street.
Sealing the structure
The joints of the sheets should be treated with silicone or sealant., in order to give the structure tightness, which is a prerequisite for the formation of a microclimate.
For the same purpose, the gap between the foundation and the sheathing sheets is treated with polyurethane foam of a fine-pored structure.
ADVICE: A little trick that can help with heating in the winter - before filling the beds, place cow or horse manure under them, then tamp, cover with earth on top. Preya, it will give off some heat that may possibly save the root system of your loving crop from sudden frosts.
As you can see, a greenhouse made of a 20 profile pipe at home, with your own hands, is quite real. In addition, with the responsible implementation of the recommendations given above, it does not require large expenditures of labor and finance.
Of course, the choice of the type of material remains at the discretion of the master, but when using the materials specified in the recommendations, the price-quality ratio acquires the most acceptable parameter.
We hope now you know the answer to the questions. how to make a greenhouse yourself from a profile pipe, whether it is necessary to order a greenhouse project from a profile pipe, what is the difference between a greenhouse made of pipes and other metal greenhouses.
Useful video
Watch the video: greenhouse frame from a shaped pipe, dimensions, arcs, drawings
If you find an error, please select a piece of text and press Ctrl + Enter.
Made with their own hands, today they are quite common. This is due to several reasons, one of which is expressed in the ease of installation, and the second in the budget of the work. If you are a thrifty home craftsman, then it will be possible to build such a structure without even purchasing material. In order to make the assembly, you do not need to have special skills, you just need to follow certain tips. After the greenhouse is ready, it does not have to be serviced, and if a strong variety is chosen as a covering material, then the greenhouse does not even have to be disassembled for the winter. Unlike greenhouses, the frame of which is based on other materials like wood, it is distinguished by its strength, in addition, its elements are not capable of infecting the decay processes, and fungal infections are not terrible for the installation. This type of greenhouse is resistant to deformation that can be caused by elevated temperatures.
Varieties of forms of greenhouses
Most often, an arched greenhouse is erected from a profile pipe with your own hands. It is suitable for growing small plants in its space. One of the features of such a greenhouse is the ability of the roof to self-cleaning. After all, debris, as well as precipitation, will constantly fall on the surface. The form can be tunnel. These units have standard dimensions. Thus, its height is limited to 5 m, while its width is 10 m. If there is a need to grow tall plants, then it is worth choosing a tunnel form for construction. If strong winds prevail on the territory of the building, then such a greenhouse will resist them.
A gable greenhouse can be made from a profile pipe with your own hands. If you choose such a shape, then you can install a fairly high structure, inside which you can move at full height. This form is used for growing greenery, fixed on supports, as well as upright and climbing cultivated plants. If there is a need to distribute the area of the site rationally, then it is worth choosing just such a form. Sometimes a pyramidal shape is also used in construction, a greenhouse of this type will also take up little space.
Determining the location for the greenhouse
Before proceeding with the construction of a greenhouse from a profile pipe with your own hands, you need to determine the place where it will be installed. Among the main features of the installation site, one can single out the presence of a sufficient amount of light during the day. You should not start work if there are tall trees nearby that provide shade. It must be taken into account that there must be a convenient approach to the greenhouse in order to be able to bring water and fertilizers into its inner space.

If it is supposed to build an elongated greenhouse, then it is preferable to place it from east to west. When constructing a structure with a sash intended for ventilation, it must be located on the southern slope.
Preparation for construction

For a greenhouse from a profile pipe with your own hands, you need to prepare pipes that will form the basis of the frame. The diameter of these elements should be limited to 40x20 mm, it is these blanks that will be able to provide strength and stability. But in the manufacture of a bond between the frames, it is necessary to use pipes, the cross-section of which is 20x20 mm. Initially, it is necessary to prepare a design diagram. If there is a need to build a greenhouse that will have a more impressive usable area, then you should use a semicircular frame, and not a gable frame, but if you decide to choose it, you will have to stock up on a pipe bender. Its cost is quite impressive, so it is impractical to purchase it for the manufacture of one greenhouse. It would be good if it would be possible to rent such equipment.
Parameter definition

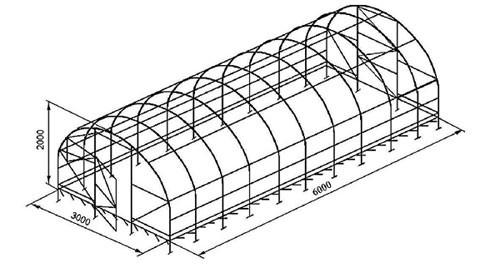
Before making a drawing for a greenhouse from a profile pipe with your own hands, you must take into account that the frame must have a length equal to 6.05 m. This parameter is due to the standard one sold in stores. As for the height, it is necessary to stop the choice at 1.7 m. This indicates that the profile will need 3.4 m. From the length of the segment, a piece of 2.65 m will remain. If we take into account the angle of inclination of the roof slope, then, as a rule , the angle is 30 0, but the width will be 2.24 m. If you remove 24 cm from the resulting width, this will allow you to cover the structure with a standard polycarbonate sheet, in addition, overhangs will be left on the sides for water drainage.
If you prefer just such a greenhouse, then this will allow you to do without tools, the cost of which is high.
Definition of foundation structure

Before you start building from a profile pipe with your own hands, you need to take care of the foundation. The options for its construction may be different. The basis can be materials that can be found on the site, it can be a railway sleeper and even a grillage from a screw pile. But the most popular among summer residents is the foundation built on the basis of concrete. In this case, the structure will be shallow. The foundation will be laid on one bayonet of the shovel.
Foundation construction
Before that, it is necessary to carefully level the site and prepare the foundation pit. Then, along the perimeter, it is necessary to lay an anchor for the installation of shaped pipes. The next step will be to prepare a solution, among the ingredients of which will be pebbles, sand and cement. The prepared mixture can be poured into the pit and left in this state until the mortar sets.
Work on the installation of the frame

The next stage involves making a greenhouse from a profile pipe with your own hands, which indicates the need to assemble the frame. For this, it is necessary to weld a profile to the embedded elements, the cross-section of which is 40x20 mm. This structure will act as a secure base for securing the auxiliary and main frames. In order to eliminate distortions, the installation of frames should be carried out on a smooth and solid surface. If you need to make a cut, do not rush to cut the entire segment, initially you should only make an incision in the bend area. After that, it is recommended to bend the pipe so that it is possible to obtain the frame of the required configuration. Then you can start welding the joints on the workpiece, which must first be assembled.
When working, a greenhouse scheme from a profile pipe should be used, it is not difficult to make it with your own hands. It is worth remembering that the end frame acts as an important supporting structure; it is necessary to mount a door and a window in it. It is recommended to do this on a frame that has been previously laid on the platform. The door frame must be welded from a pipe, the cross-section of which is 40x20 mm, as for the vents, it must be made from a 20x20 mm profile.
It is necessary to take into account the width of the polycarbonate canvases, which is 2 m, this will determine the distance between the arches. The length should be selected so that the joints are on the profile pipe. With frame pipes 40x20, a step of 1 m can be provided. The frames of the frame must be mounted at a distance of 1 meter, after which they must be reinforced with 20x20 pipes. For this, the sections should be welded flush with the main profile. This joint helps to cover the greenhouse with an even layer of material.
Installation of frame elements

The diagram of a greenhouse from a profile pipe with your own hands should be prepared in advance. The assembly of elements vertically should be started from the end frame with the door. In order to ensure accurate mating with the vertical plane, it must be reinforced with corner braces, which must be welded to the horizontal base pipe. A horizontally located bundle of profile pipes must be mounted with an indent of 10 cm from the bend of the frames, which will allow the polycarbonate to be well fixed in length and width.
Shelter anchorage
In the work, it is necessary to use a drawing of a greenhouse from a profile pipe, with your own hands it will turn out to make a better assembly. At the last stage, it is necessary to strengthen the polycarbonate, this must be done by means of self-tapping screws 3.2x25 mm with a press washer.
Good day to all.
When you decide to build a greenhouse, the first question arises: what material to use? In this article, I decided to make an overview of how to make a greenhouse yourself from a solid profile pipe. With it, you can make a reliable frame that will last for many years.
On the Internet, you can find many tips for assembling a structure, but most experts describe the process of manufacturing from a pipe, but not a profile one.
It should be understood that a profile pipe, unlike its traditional counterpart, has a rectangular or square shape.
Despite its low weight, this material is quite durable. If you intend to make an arched greenhouse, then it is recommended to use a 40 × 20 profile. For lintels, a 20 × 20 pipe is better suited.
The advantages of a profile pipe
- Durability.
- Large selection of coverage.
- Simple fastening.
- Easy assembly.
- The ability to make a design of any shape.
Bending the material can be the only difficulty. In this case, you need to accurately bend one pipe and then use it as a template. First, it must be filled with sand.

There are several options for the shape of the greenhouse, but I decided to focus on the review of making an arched type. If you have small skills in such work, then there should be no problems with the assembly.
When choosing a place for a future greenhouse, you need to take into account the maximum illumination, so it should look strictly to the south. Surface drops should not exceed 10 cm.
For the manufacture of arches, you need to prepare a profile with a section of 20 × 40 in the amount of 10 pieces (profile pipe). The approximate length of the pipes should be 5.8 m (you can cut them immediately upon purchase, or take 6-meter pipes). To form arcs, it is recommended to use a pipe bender; if you do it by hand, it will be difficult to achieve high accuracy.

For the frame lintels, you need to prepare a profile with a section of 20 × 20 mm in the amount of 40 pieces. The length of the pipes is 67 cm.
With the help of pegs and a rope, make a markup of the future structure. To achieve a flat design, you need to check the markings along the diagonal.
Dig a pit to a depth of 80 cm, then fill it with cement mortar until the level of the longitudinal base, the height of which should be about 15 cm.
In the next step, the transverse bases are welded to the longitudinal ones. To give strength and reliability, it is recommended to use metal corners.
Lay a brick under the base; if necessary, a small groove can be made for the masonry.
Before erecting the frame, you need to lay out the sheets of polycarbonate, lay the arcs on top and circle them with a marker. You can cut the material with a construction knife, while leaving a margin of about 2 cm.
When the solution has completely solidified, you should proceed with the installation of the frame from the profile pipe. The first arch must be welded to the longitudinal bases.
It is important to note that the installation of the first and last arch is a responsible step, therefore it is recommended to use a plumb line.
With the help of jumpers, the remaining arches are sequentially welded. Experts recommend starting to weld the arc to the top lintel. After the last arch is installed, you need to weld the end jumpers from the profile with a section of 20 × 20, since they do not carry a large load.

Polycarbonate is attached to the structure using special self-tapping screws with washers. Before sheathing, the protective film must be removed from the sheets. The first piece should protrude outside the structure by about 15 cm.
After fixing the polycarbonate, you need to cut out the holes for the vents and doors. All joints must be treated with silicone.
The service life of such a homemade greenhouse is more than 10 years. At the same time, the structure does not require any maintenance.
Greenhouse drawing and assembly (video)

When preparing a drawing of a greenhouse structure, it is important to take into account that the pipe has standard dimensions from 3 to 12 m.Therefore, you need to find out this point from the seller. This will avoid overpayments and work without scraps.
Important! The section of the profile pipe for the main parts should be 20 × 40, as well as 20 × 20 for the connecting elements.
The following data must be specified on the diagram:
- Foundation.
- Vertical racks.
- Roof structure.
- Top harness.
- The vents and the door.
- Spacers.
First of all, you need to decide on the distance between the uprights. Experts recommend 1 m. In the case when the greenhouse is supposed to be covered with plastic wrap, the distance can be reduced to 0.6 m. This is necessary to reduce the load on the pipe. If you need to increase the distance, then you need additional reinforcement.

A slightly different approach is needed to create an arched greenhouse. After all, here it is required to correctly bend the profile pipe at a certain angle. If it is assumed that the height of the greenhouse will be 2 m, then you need to purchase a 12-meter pipe. The distance between the arcs, it is recommended to make no more than one meter.

All arcs are attached to each other, in addition, to secure the structure on each side, you will need to use a profile. In the seme, indicate additional spacers at the fronts.
It should be understood that, if necessary, any details can be made from the pipe, therefore it is possible to create a single-slope, triangular, spherical shape of the future greenhouse.
You probably understand that the structure will turn out to be quite heavy, so you need to prepare the base. The foundation is made at the discretion of the owner of the land plot. It is recommended to immediately insert the anchors into the cement mortar, to which the frame is welded for reinforcement.

The assembly process is simple:
- For vertical uprights, cut the profile pipe to the required size.
- Weld the vertical posts to the base, while using the building level.
- On top of the racks, you need to fix the stroke.
- Measure and cut parts for vertical posts.
- Connect and fix all uprights with crossbeams.
- Make a door and install it in the intended place.
Some gardeners and gardeners prefer to make a frame on the ground, and then fix it on the foundation. To avoid distortions, such work should be done only on a flat surface.
To independently make an arched greenhouse from a profile pipe, you will need to use a pipe bender. If it is absent, you need to do the following to fold:
- Cut the material to the desired length.
- Make cuts.
- Bend the pipe.
After installing the frame, you need to fix the polycarbonate. But there are several nuances here:
- The front side is the one on which the protective film is applied.
- You need to fasten the sheets with self-tapping screws with a rubber cap.
- The sheets are interconnected by metal plates.
- The joints are treated with a sealant.
- After fixing the material, remove the protective film.

