How to make beautiful and neat plastic board beds. Do-it-yourself high beds: step by step we make beds from boards in the country How to make beds from boards
Curbs around garden and horticultural plantings are a practical solution that has many advantages. However, not all summer residents are in a hurry to fence vegetables and herbs, citing the complexity of the work and the high cost of materials. Consider the most popular ways of erecting curbs, we will try to dispel doubts and offer options for how to quickly and inexpensively make a fence for beds from scrap materials. The variety of techniques allows you to create beautiful and practical fences for any type of plant.
The benefits of garden fences
Some summer residents adhere to the traditional method of cultivating the land and do not understand why they enclose the beds.
Wooden fencing
Dividing the garden into mini-zones with the construction of fences has a number of advantages, both practical and decorative:
- Reducing weeds. Framing the beds significantly reduces the area for weed growth. In addition, when the boards are buried in the ground, a kind of barrier is created that prevents the spread of pests and diseases to neighboring crops.
- Strengthening loose soil. The fence for the beds prevents soil shedding and reduces weathering and erosion. The use of fences is especially important for sandy and sandy substrates.
- Getting an early harvest. Installing the sides for the beds allows you to create a "thermo-vegetable garden" by filling the erected box with different organic matter. In warm plantings, the soil temperature is higher than when organizing a traditional vegetable garden, so vegetables are planted and ripen faster.
- Ease of maintenance. It is much easier to weed, loosen or harrow the ground.
- Convenience of lawn mowing. When mowing grass, bed curbs protect the plantings from damage from lawn mower knives.
- The attraction of a flower and vegetable lawn. The aisles remain clean and the garden looks well-groomed.

Growing crops in separate boxes
The fence can become an integral element of landscape design. The combination of multi-colored border ribbons for the beds or the original use of familiar materials will allow you to zone the site and create a bright garden-garden composition in the country with your own hands.

Zoned vegetable garden on a personal plot
Requirements for garden fences
The requirements for planting framing primarily depend on the purpose of the fence. Fences for flowers should be in harmony with the style of the entire garden, and borders for garden beds are selected taking into account the type of vegetable crops and the way they are grown.

Beautiful fence for the garden
General requirements:
- Strength. The boards must withstand the pressure of the ground and not creep on the sides when the soil gets wet - especially during thaws and spring floods.
- Resistance to mechanical damage. In case of an accidental impact with a rake or a shovel, the material should not deform and crack.
- Durability. It is optimal if the constructed frame will last at least 5-10 years.
- Ease of assembly. Fences that are difficult to install should be erected for perennials - shrubs and flower beds. When arranging ridges, it is advisable to provide for the possibility of dismantling and transferring the structure to another place.
- Environmental friendliness. The material must not release toxic substances. This requirement is especially important when choosing polymer fences, since some plasticizers are poisonous when the temperature rises. Harmful elements can get into the soil, and then into the roots, stems, leaves and fruits of plants.
- Profitability. Fences made of scrap materials most of all correspond to this criterion: boards, old bricks, plastic containers.
Advice. For a structure, you should not choose a material that is very hot in the sun. In such structures, the soil dries out very quickly, and the plants experience a moisture deficit.

Layout of a plot for growing vegetables
- the minimum height of the fence is 15 cm if there is fertile soil on the site, 30 cm - if an embankment or partial replacement of soil is expected;
- for planting potatoes, beets and other root crops, a raised ridge with a height of 40 cm is suitable;
- when constructing compost thermo beds, the height of the box must be at least 60 cm;
- the width of one row is within 120 cm - this will allow you to effortlessly reach the middle of the plantings during tillage or harvesting.
We make fences with our own hands
There are many techniques for framing garden ridges in the country. To choose the best option, it is necessary to compare the positive and negative qualities of each method.

Practical use of picket fence
Wooden railing - variety of options
The wood meets most requirements. This material for the beds is economical, safe, easy to install and strong enough. The only drawback is susceptibility to rotting in high humidity conditions. However, this risk can be minimized by treating the curbs with an antiseptic composition.
To create wooden fences for beds with your own hands, a bar, lining, edged material, slab, hemp, long boards or a picket fence are suitable - any household blanks are used. The options below will help you decide on the formwork model for the beds:
- a multi-tiered ridge made of profiled timber will become an adornment of any summer cottage or personal plot;
- picket fence for beds - the elements should be placed end-to-end to prevent soil from spilling out;
- high warm plantings, framed by a croaker - an alternative to the traditional greenhouse;
- organization of natural farming on high ridges of boards.
When choosing a material, you need to pay attention to the type and condition of the wood. Suitable wood species:
- ash and oak - high-strength, durable wood, minus raw materials - high cost;
- pine is an inexpensive, soft material, easy to process; lack of wood is susceptibility to moisture;
- cedar and larch - they have a long service life;
- acacia - has good performance but is difficult to handle.
How to make boards from boards with your own hands
We will analyze step by step how to fence the beds with boards with our own hands. The proposed option is suitable for setting up a garden in the open field, the size of the box is 1 * 1.6 m.

Homemade board fences
Materials and tools:
- boards 150 * 25 mm, length 2.5 m - 4 pcs.;
- boards 150 * 25 mm, length 3 m - 2 pcs.;
- board 100 * 50 mm, length 2.5 m - 1 pc .;
- screws;
- tape measure, pencil and ruler;
- screwdriver and saw.
Work progress:


- "Increase" the height of the boards with one more row of boards.
- Fix the upper shelves - first screw on the longitudinal sides, and then - the transverse ones.

Fixing the upper shelves
Move the formwork to the desired location and fill with fertile soil.
Practical metal fencing
A French vegetable garden with metal sides for the beds looks very neat. Due to the rigidity of the material, it is possible to achieve clear geometric lines. The most durable and durable is the galvanized framing of the beds - galvanized steel coating is preferable to iron.

Application of metal structures
Features of metal garden fences:
- ready-made modular fences are very mobile - they are easy to assemble, disassemble, transport and reinstall;
- high cost of a metal box;
- such a structure will not "float" during the rainy season and after the snow has melted;
- metal products are susceptible to corrosion; in the absence of galvanizing, the sides will have to be painted annually;
- the metal has good thermal conductivity - near the fence, the soil can heat up to a critical temperature, oppressing the roots of plants.
Advice. It is better to install fences for beds with a polymer coating - the layer reduces the thermal conductivity of the metal and protects the soil from overheating.

Purchased galvanized fences
When creating fences with your own hands, galvanized corrugated board is often used. Let's consider in stages how to make a fence for the ridges:
- Determine the dimensions of the beds from the profiled sheet, apply markings on the metal sheet and cut them out. For cutting, you can use metal shears or an electric saw.
- When planning the product, it is important to provide that the direction of the waves of the metal profile should be transverse relative to the earth's surface. The height of the formwork is calculated taking into account the depth of 10-15 cm.
- Mark the location of the beds on the site and dig a shallow narrow trench around the perimeter of the site.
- Expose the prepared sides, align them in level, overlap and rivet them.
- Fix the U-shaped profile on top of the corrugated board - it will hide the sharp edges and protect the metal from moisture.
Durable stone fences
You can build an unusual decorative fence with your own hands from stone. The form, the order of the layout, the dimensions of the elements used are all at the discretion of the performer. Do-it-yourself options for erecting stone curbs for beds are presented below.
Dry method. Large cobblestones are used as a fence. The first row of boulders is buried 5-8 cm into the soil, ensuring the stability of the structure. Subsequent cobblestones are laid out on the sand and earth sprinkling.

Dry stone laying
You can fence the beds with sandstone, limestone, basalt or pebbles. It is undesirable to frame the beds with granite - the mineral acidifies the soil, impairing its nutritional qualities.
Laying on mortar. The method is more laborious, but it allows you to build a solid monolithic structure that does not require any maintenance. This approach involves the use of both large and small stones in construction.

Fixation of stones on sand-concrete mortar
The use of a curbstone. To overlay the beds, some summer residents buy ready-made decorative plates. A wide range of suitable curbstones for garden beds allows you to create original fences in different colors.

Curb stone in the arrangement of vegetable plantings
The disadvantage of this method is the limited height. The curbstone is not suitable for the construction of a raised thermo-bed.
How to make a decorative pergon around the garden
Gabions and pergons - bulk decorative fences. The mesh steel frame is filled with stones of different fractions. The design is simple in execution, does not need a foundation, is affordable and fits perfectly into any landscape design.

Gabions - an original way to decorate the garden
To create a pergon with your own hands you will need:
- durable galvanized mesh with a wire thickness of 2-3 mm;
- clamps for fixing the frame;
- geotextile for the substrate;
- filler - pebbles, stones;
- shovel, pliers, tape measure, level.

Fixing the sides of the frame
Work progress:
- Prepare the sides of the box from the mesh. In the finished form, the bed will be framed with rectangular blocks - the height and width are selected arbitrarily.
- Along the perimeter of the landing site, mark a strip with a width equal to the base of the fence. Level the soil, compact and cover with geotextiles.
- Assemble the frame, fixing the position of the formwork with wire. Screw the fasteners inward to keep the structure neat. Leave the top of the prepared basket open.
- After installing the four boxes, fill the mesh frame with stones and screw on the upper part.

Filling the mesh box with stones
Available plastic fence
The easiest and fastest way to fence vegetable plantings with your own hands is to edging the beds with plastic. A wide range of ready-made solutions for summer cottages is on sale.
Curb tape. Flexible, lightweight fencing for lawns, flower beds, paths and raised ridges. The tape is supplied in rolls of different lengths, the width of the strip is 20-50 cm. The set includes plastic pegs for fixing the fence. Available in flat and corrugated "curbs".

Plastic curb tape
The tape installation technology is very simple:
- Mark the boundaries of the beds on the site.
- Put pegs evenly along the contour of the "vegetable" area.
- Attach the tape to the wedges, partially deepening the curb into the ground.
Important! It is necessary to tighten the tape well - this will ensure the rigidity of the fence and prevent the appearance of sagging.

Assembly technology for garden polymer panels
An alternative to flexible tape is straight flat panels. They are tougher, but only suitable for creating straight mini-vegetable gardens. Thanks to the teeth on the underside, it is easier to install plastic edging for garden beds.
Volumetric panels "Garden Board" and "Stone". Products emit natural building materials. With their help, various gardening compositions are created. Polymer modules are decorative and practical, the only drawback is the relatively high cost.
Do-it-yourself assembly will not cause any difficulties - the kit is equipped with panels, pegs and plugs. The task of the contractor is to prepare the site and fix the curb.
Garden constructor - flexible fencing. Bumpers for beds made of plastic panels are designed to create ridges and flower beds of an unusual shape. The elements of the curb are combined into a closed single chain. Changing the direction of the "snake", in a few minutes it will be possible to create an unusual fence for growing summer cottages.
Budget slate fencing
For those who are looking for how to fence the beds in the country inexpensively, the option with the use of slate is suitable. Asbestos-cement slabs are resistant to moisture, easy to handle and install, durable and affordable.
A fence for garden beds in the country is often erected from flat or wave slate. On sale there are special asbestos-cement strips of standard dimensions: length - 3 m, thickness - 16-40 mm.

Strengthening the sides of the slate fence
Instructions for edging the beds with slate with your own hands:
- Determine the dimensions of the future ridge and, according to the size, make blanks for the sides of the box. When calculating the height of the side, it should be taken into account that 20 cm of slate will go down when installed in depth.
- Mark on the ground and dig a trench 20 cm deep around the perimeter.
- Install slate sheets in the dug holes in a strictly vertical position.
- Fix the sides - cover with earth and tamp.
- Prepare holes for fasteners in metal corners and asbestos-cement sheets.
- Bolt the corners to the slate.
- To give rigidity and stability to the entire structure, it is advisable to install metal supports. Weld the metal plate to the reinforcing bar - the self-made support is fixed with bolts to the sides of the fence.

Fastening the sides of the box with a metal corner
By analogy, you can block the beds with wavy slate. To strengthen the high sides, it is necessary to build a frame of reinforcing rods and boards. Attach slate sheets to wooden elements with nails.

Wavy slate framing option
Before you frame the beds with asbestos-cement sheets, you need to think about safety measures. Sawing slate produces a lot of dust, so it is important to protect your eyes and respiratory tract. Moisten the cut site with water.

Compliance with safety measures when cutting slate
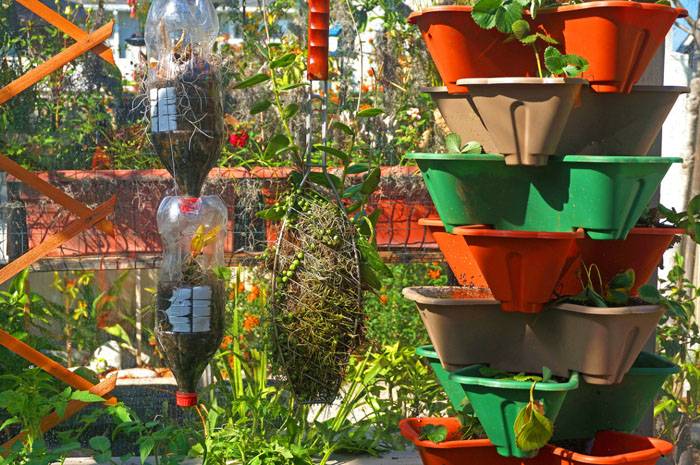
Plastic bottle fencing
It will not be difficult to fence the beds with plastic bottles. To implement a simple option, you will need PET bottles with a capacity of 1.5-2 liters, a shovel, sand and multi-colored paints.

Fencing with plastic bottles
Do-it-yourself step-by-step algorithm for fencing the beds:
- Pick up containers of the same volume. It is optimal if the containers are of the same color, but it is difficult to collect many identical bottles. Therefore, it is better to paint them in one color better from the inside.
- Filling bottles with small pebbles or sand will give them the lack of strength and ensure stability.
- Determine a place in the country for the formation of a bed and carry out a markup.
- Dig a trench 8-10 cm deep around the perimeter, the width of the ditch should correspond to the dimensions of the bottles.
- Turn the filled containers upside down and place them in the trench as tightly as possible - the elements should not wobble.

Strengthening the plastic structure
Fenced beds can be reinforced at the corners with support posts. Make holes in the bottles in advance, stretch the wire and tighten it tightly on the side stakes. Such a coupling will prevent the elements from falling out during the tillage.
With a creative approach to the issue, even from used containers, it will turn out to build beautiful garden fences. They can have an unusual shape, consist of several tiers or be complemented by decorative elements.

Creation of ridges of an unusual shape
It is not difficult to build a fence for planting vegetables. When choosing the right material, you need to compare your own strengths, time and money costs for the implementation of your plan. Compliance with the selected technology will help you easily "streamline" the garden and increase its efficiency.
We will send the material to you by e-mail
City dwellers love to spend time at dachas, where someone organizes only a recreation area, while someone plants flowers, vegetables and grows fertile trees. Spending several hours a day or a week in the process of cultivating the land, the question arises of how to make the beds with your own hands, not like everyone else. Interesting ideas come to mind of many summer residents and owners of private houses. Consider original photo examples and a few instructions for creating such beauty.
Beautiful flower garden without unnecessary hassle
How to create beds with your own hands is not like everyone else: interesting ideas of ready-made options
When decorating their garden, many people think about how to create beds with their own hands, not like everyone else. Interesting ideas come to mind, but the process from implementation becomes difficult and not everyone succeeds.
You should not despair at the same time, you can take a ready-made version as a basis, and on its drawings to bring your own original creation to life. Keep in mind that not only the structures themselves will decorate the site, but also the combination of garden paths and the grown crops themselves will be included in the overall landscape design.
Here are some interesting photos of decorating the beds in the garden:


- Big. In terms of area, such a structure exceeds 12 m². In such open spaces, plants are planted that practically do not need weeding: potatoes, beans or pumpkin.
- Hilly option. The height is from 80 to 100 cm, and there are no requirements for the length. To create, the top layer of the soil is cut off and fences are made of metal or chipboard. In the middle of this structure, a small depression is made where water accumulates during watering.
- High. For such a design, it is worth choosing sunny areas. It is advisable not to exceed 1.5 m in width. The ridges are different in height, but do not forget that this option needs frequent watering.

- Deep. Instead of a hill, you make a trench where you put peat, compost and manure, on top of everything you put soil, the height of which does not exceed 25 cm.
- Narrow vegetable bed. Most often used in greenhouses. Also suitable for open ground. In such structures, plants are planted with small overgrowths on top, but a strong root system.

When choosing a garden bed option, it is worth considering the characteristics of the crops that you plan to plant. Some plants prefer moist soil more, so high ridges are rarely chosen for them.
How to equip the beds in the country with your own hands with photo examples
To equip your garden, it is worth considering not only the shape and subtype of the garden itself, but choosing the material for its framing, as well as equipping the paths. Why do around the landing site? There are several reasons for this:

- The aesthetic side. Such designs look neater and more interesting.
- Weeds will grow less. For their development, the free area is reduced, and it is much more convenient to weed.
- Ridges do not crumble from rain or watering.
- The soil moisture remains longer after irrigation.
Important! Choose the right material for making the beds. It must be breathable and not emit toxic substances.
Good options come from:
- flat slate for beds: an inexpensive option that will serve as an additional decor, but do not forget that it is quite fragile;

- wood: natural and easy to install, but short-lived and requires processing from decay;

- galvanized steel with polymer coating: long service life, but not cheap;

- stone or concrete: durability and beauty, but this option carries material costs, and also requires a certain skill in laying;

- curb tape: the easiest and most affordable way of registration.

The paths between the beds can be left as they are, sprinkled with small pebbles or covered with paving slabs. It depends on the option you choose for the decor of the garden plot.
How to make a fence for the beds with your own hands
The simplest options for fencing, which do not require a lot of time and have an affordable price: flat slate and curb tape. In the second way, you can create any forms for planting fruit crops.

To make an interesting decor on your site, you first need to buy a flat slate for the garden bed. The average cost is from 300 to 500 rubles. depending on the thickness of the material. The classic size of one element: 100 x 150 cm.
The installation of flat slate itself will be reduced to several simple steps:
| Photo example | What to do |
|---|---|
 | After choosing a place and size for planting vegetables, cut the material to the desired height and length. Dig a trench half the depth of the purchased slate along the perimeter of the flat ridge. |
 | Place the blanks in the prepared trenches and backfill them with soil. Be sure to tamp the soil to keep the structure stable. |
 | Use metal pegs to secure the structure. And pour the fertile soil inside. All is ready. |
To make it easier to work, watch the video on the topic:
It is hardly easier to use the borders for the beds with your own hands. The softness of the material allows you to make any shape, and for strength, the material is not only dripped into the trench, but also plastic pegs are used. Here are some interesting photo examples of finished works:


Related article:
In the article, we will consider in detail why it is useful, what types of garden curb tapes are on sale and how to install this device correctly?
Photos of unusual beds in the country with their own hands
It is not at all necessary to spend a lot of money on fencing for planting fruit crops; you can use the simplest and most affordable materials that you have left from construction or other work. Often, trims from boards, bricks or pieces of corrugated slate are used.

Lovers of doing everything on their own, as well as decorating the garden with bizarre shapes, often make from scrap materials. Photos of some of the works are presented below:


Related article:
Diy photo of strawberry beds: features and examples of creation
Strawberries are planted in almost every vegetable garden. Juicy and unpretentious berry is a favorite delicacy of adults and children. But in order for it to really turn out delicious, you need to properly prepare the garden.

Today there is a wide choice of material that allows you to accelerate the growth and productivity of bushes. For example, the price per meter for a spunbond is only about 100 rubles, and such a canvas has many advantages:
- creates unique conditions for berry growth;

- has an excellent ability to pass air and water;
- does not allow weeds to develop;
- the soil under the canvas warms up faster;
- extra whiskers do not take root, and slugs are practically absent.

If you do not want to spend money even on such a simple and convenient material, you can make beds from plastic pipes. Here are some interesting photo examples:


Interesting DIY strawberry beds from car tires
When coming up with an option suitable for planting a delicious berry, various materials at hand come to mind. Including tire beds for strawberries. Moreover, you can create a unique vertical structure that takes up little space in the garden and gives a large harvest.

For work, the tires of the right size themselves, a chisel, a wooden block and soil with seedlings will be useful. Additional casing is not required, as the tires have a metal cord that provides proper structural strength.

The seedling holes are made with a chisel, and the tire itself can be placed on the block. Make a few holes and the simplest design is ready. Here is a video on one of the ways to create.
Video: we grow strawberries in tires
Instructions on how to make a strawberry bed from a pipe with photo examples
Planting strawberries in a pipe (horizontally) is a common option in areas with little free space. Moreover, the material itself can be both metal and PVC. Here are some fun examples:


You can even use a sewer pipe for your strawberry bed. Let's take a closer look at how to make a design for a delicious berry:
- Prepare two pipes with different diameters, while the thin ones should be 20 cm shorter than the thick ones.
- In the large one, drill holes with a large diameter (7 cm) at a distance of 15 cm.And in the small one, three rows of holes are made with a diameter of 0.5-1 cm and an interval of 8-10 cm.

When the preparatory work is completed, assemble the structure. To do this, place plugs on the pipes. You deepen the thick one into the ground, and a small irrigation pipe is attached to it in the center. The soil is filled up, and bushes are planted. To make it clear, watch the video on the topic:
Interesting designs of vertical beds for strawberries from plastic pipes. Here are some photo examples:


How to make multi-tiered designs for strawberry beds with your own hands
Modern materials, as well as improvised means, allow you not only to do it yourself, but from the photo to recreate real pyramids with beautiful bright bunches of strawberries. And also to make multi-level "houses" for flowers.

Making a pyramid for growing strawberries on your own is not so difficult. You can use various materials for the fence: wood, metal, plastic. And also all kinds of improvised means:
- flower pots;
- tires from cars;
- cutting pipes of different diameters;
- fruit and vegetable boxes.

There are no exact criteria for the shape of the base. You can make it round, square, rectangular, polygonal, and even wavy. Consider an easy way to make a multi-tiered strawberry bed:
| Photo example | Sequence of work |
|---|---|
 | Let's take a classic pyramid as a basis, but with a sharp top. We will assemble from wood, as it is easier to fasten it. |
 | Collect the first tier. It should be the largest. The width of the strawberry bed should be 40 cm. A stainless steel mesh can be laid down, it will keep the roots from pests and prevent waterlogging. |
 | Pour sawdust and shavings, as well as dry grass at the bottom of each tier. That is, you get a mesh - sawdust - grass. Then a layer of earth. It is advisable to leave the total height of the pyramid at the level of one meter, otherwise it will be inconvenient to care for the berries. |
 | It is better to make the sides of the levels at an angle, and before planting, treat the entire structure with varnish or paint to protect it from decay and increase its service life. |
To make it easier and faster to work, watch the video on the topic:
Photo of beds for strawberries from bags
Vertical strawberry beds are ideal for small areas. They can be purchased ready-made in the store or made by yourself. And the second way is a real flight of fantasy. In addition to the considered methods of erecting beds from pipes, tires and wood, you can make a unique decor with fruitful bushes from bags.

The process of growing strawberries in bags is no different from a classic or vertical bed, but very interesting options for creating beds are not like everyone else's.


The advantages of do-it-yourself slate beds with photo examples
The use of flat slate for beds has been known for a long time. Every gardener has seen such designs at least once. The material for the sides has a number of advantages:
- durability due to the absence of corrosion and decay processes;
- looks nice and neat;
- easy to mount high structures, and even multi-level options;
- affordable cost;
- is available for sale in any city or online store.

Despite the ease of installation and undemanding additional processing, slate has negative sides that must be taken into account when choosing fences for planting strawberries:
- gets very hot in the sun, therefore, the beds should be watered more often;
- exposure to mechanical damage: if accidentally hit with a shovel or cart, the slate will crack.

But from the wavy material, very neat and beautiful beds are obtained:


How to make wavy slate beds with your own hands
From the photo above, you can see that creating a bed of corrugated slate is not necessarily even and rectangular. You can make structures in several levels or beveled corners, choosing the best option for your site.

Sometimes slate scraps left over from the roof are used. This is the cheapest option for arranging a vegetable garden, since it does not bear additional costs, but there are inconveniences of working with different pieces. The easiest way is to buy corrugated slate sheets of the same thickness and length. Moreover, the average price for them varies between 200-300 rubles. for 7-8 waves. Average dimensions: length - 1.75 m, width - 1.13 m.

To lay such a fence in the ground, it is enough to dig a small trench along the perimeter of the future ridge. Put the slate in straight lines in this hole, about half the total height, and dig in with earth. To understand the sequence of actions, watch the video on the topic:
Features of do-it-yourself flat slate beds
Many summer residents prefer to make the fencing of the beds with slate, as it is affordable and simple. And also, no specific skills and abilities are required, as is the case with laying a stone curb.

Moreover, such a practical and harmless material has several recommendations for installation as a fence for flower beds or beds:
- For convenience, a full sheet of flat slate is sawn in half or divided into parts 1 and 0.75 m.

- Elements should be fixed to each other using metal corners, painted with a special varnish against corrosion. This prevents the ridge from spreading.

- If you want to change the color of the material used, do it in advance, and not after installation.
And also observe safety precautions and carry out the installation with construction gloves so as not to injure your hands on sharp corners or self-tapping screws. As a result, you can get a beautiful vegetable garden that stands out against the background of neighboring beds:


Price for slate for garden beds
If you don't have any pieces left over from your roof repair, you can buy slate strips for your garden beds. The price for them is different, depending on the thickness of the material:
Pre-cut strips are easier to work with as they eliminate the need for cutting. At the same time, you can find very cheap options with and without delivery, as well as order a kit through online stores.

The very installation of flat slate for the beds does not take much time. Watch the video instructions to understand all the stages of work:
How to make beds in a greenhouse: photos of interesting works
The greenhouse is the place where summer residents like to plant heat-loving fruit-bearing plants. You can see peppers, tomatoes, cucumbers and much more in them. Some equip the area for a greenhouse or insulate the structure so that they can harvest all year round.

For whatever purpose the greenhouse is used, this is a small space, if you do not take into account the commercial options, where you need to arrange several beds.
Advice! Try to think in advance how many plants will be placed in the greenhouse in order to calculate the number and width of the beds.

Curbs that protect fertile land from creeping are collected from a wide variety of materials. There are beautiful creations made of wood or neat metal structures, and curb tape and improvised means are also applicable. Here are several options for arranging a greenhouse:


Related article:
A variant of the successful arrangement of the beds in a 6x3 greenhouse with a photo
There are many design options, one of the most common is 3x6 greenhouses. How to arrange the beds in a long and narrow space is a question that worries many. There are several general options for the location of planting sites in a greenhouse:
- Two large ridges with longitudinal and transverse aisles. Less drop off space but easy access for careful planting maintenance.

- Long wide two beds along the walls of the greenhouse. In the middle there is a passage with a width of 50-70 cm. This arrangement allows you to plant different crops, adjusting the distance between them, and take care of them calmly.
- Three identical parallel ridges. Usually the structures are narrow, making it easy to weed the entire area around the plants.

- There is a wide landing site in the center, and narrow along the walls. It is easy to maintain, but provides a little useful area for the plants.

When choosing the location of planting sites in greenhouses, keep in mind that the beds near the walls should not be more than 1 m wide. And the dimensions of the central one cannot exceed 3 m. This is due to the need for free weeding and loosening of the soil.
How to make a garden bed in a 3x6 greenhouse: photos of practical ways
Most often, gardeners opt for a large ridge in the middle and small small ones on the sides. This is the best way to plant several varieties of plants in one greenhouse so that they do not interfere with each other's growth and fruiting.

If you opted for a 3-meter-wide bed in a greenhouse, then position it exactly in the center, leaving enough space for passage. The path can be covered with small pebbles or covered with foil so that unnecessary weeds do not germinate.
It is not difficult to make a bed with a width of 3 meters on your own. First, you need to decide on the material of manufacture. And then dig a small trench around the perimeter and deepen the structure of the tour. Be sure to tamp the soil from above.

It is worth making a layer of organic fertilizers under the soil and laying drainage to prevent waterlogging of the soil. Here is a video example of how to redo the beds and make 3 narrow identical stripes:

- Natural material. Components are selected depending on the type of soil and stacked on top for a natural greenhouse effect. Files, dense fabric, leaves collected from autumn, humus and much more are used.

When there is no need for heating, since the greenhouse is located in a warm or temperate climatic zone, other unusual options are used for planting plants. For example, you can arrange vertical placement of beds in a greenhouse. In this case, it all depends on the imagination of the author and the crops for planting.

Below are beautiful photos of the beds in the greenhouse, which you can recreate on your own:


Autumn and spring preparation of the beds: how to make the yield higher
Professional gardeners know about the need to prepare any soil in the fall and spring. Such prevention prevents large weed growth and increases yields.

First of all, the area for planting plants is dug up. Moreover, in the fall, this is done as late as possible: almost before the onset of frost, and large clods of earth are left to freeze the roots of weeds and pests. And in the spring, on the contrary, they loosen to enrich the soil with oxygen and quickly dry out after a snowy pore. If there are perennial fruitful shrubs on the site, then the need for wrapping for the winter depends on the variety planted. For example, maiden grapes do not need insulation.

Important! For any crops and plants that will decorate the garden or be useful, it is worth following the individual care recommendations.
Let us consider in more detail the features of soil preparation for winter and spring planting.
Spring preparation of beds for planting: basic recommendations
Spring is the most active period in the life of any summer resident and owner of a vegetable garden near the house. Seedlings are already growing on the window, which very soon should be transferred to open ground or a greenhouse. But you cannot just "poke" the plants into the ground, otherwise they will die or not bring the desired harvest. That is why a lot of time is allotted to the spring preparation of the soil.

- The soil should be loose. For this, a vegetable garden and a garden are dug up. On large areas, they are used to facilitate the work process. In modest gardens and greenhouses, a shovel is still in the hands of summer residents.

- Recharge the soil before planting. During the constant digging in spring and autumn, microorganisms necessary for fertility die. To replenish their balance, you can purchase the following drugs in specialized stores: "Emochki", "EM-1", "Baikal-1" and others.

- Harvest protection from pests is worth taking care of already at the preparatory stage, and not after the appearance of the harvest. For this, drugs are purchased, for example, "Metarizin" and are introduced into the soil along with other types of fertilizers.

It is worth considering the peculiarities of the culture that you will sow in the selected area. For example, preparing a garden for carrots in the spring includes several stages:
- Despite their unpretentiousness, carrots do not like poor soil. At the same time, you should not overdo it with fertilizers either, since the taste of the vegetable and its shape change.

- You should not add manure to the garden bed, for carrots, he and compost are the worst helpers in growth.
- The bed should not only be well dug up, but also loosened with a hoe or rake. The better and deeper you dig the soil, the better the harvest will be.
- Before sowing, the seeds are soaked for a day, and then dried a little before planting.

- Do not forget to moisten the garden well under the vegetable that loves moisture. Do not forget about watering during the growth period.
- It is advisable to change the place for planting carrots every year and avoid clay soil.
Observing such recommendations, the harvest of an orange vegetable will be at its best. Less requirements for preparing the onion bed in spring. The main criterion for obtaining a good harvest is the choice of a place for planting. The vegetable grows best in the sun or partial shade, but bulbs should not be planted in swampy areas of the site.

See the video material for all the nuances of growing onions:
Autumn preparation of the beds for winter: features and rules for planting garlic
Autumn is not only a pleasant time for harvesting, but also the process of preparing the soil for the next season, as well as wrapping up frost-resistant plants and removing dried branches on the eve of winter.

- Loosening the soil. It is not necessary to dig deeply, it is enough to remove the remnants of plants and loosen the beds to a depth of 3-4 cm. But this should be done before frost.

- Digging deep is not good for all soil types. If sand and loose soil predominate in your garden, then you cannot dig in the fall. But in clay soil, digging is necessary.

- It is worth feeding the "tired" land before the cold weather. You can add manure, humus or other organic fertilizers, which are also selected according to the type of soil.
By following the proposed three tips, it will be easier to dig the ground in the spring, and the first shoots will appear much earlier.

But the work in the garden before the onset of cold weather is reduced not only to digging and removing old plants, but also to planting some crops. For example, to prepare beds for garlic in the fall, you should adhere to certain rules:
- The garlic bed is best done using fences. For example, you can make a structure out of slate or wooden planks. This will help prevent creeping in the spring after the snow has melted.
- The height of the ridge should not exceed 20 cm. This rate is deduced from the rate of soil warming up by the first spring rays.
- Pour black soil into the prepared structure. If there is no special soil, be sure to apply fertilizer to enrich the land for a high yield of garlic.

- Keep a close eye on which crops used to sprout in a given location. If you have harvested beans, cucumbers or tomatoes, then be sure to process with copper sulfate before planting the garlic.
- The bulbs should be planted before the cold weather, at the end of October. It is better to cover the ground with any suitable material after landing. And the cloves themselves must be placed vertically in the soil, bottom down. The distance between the garlic is 8 cm, and 25 cm should be left between the furrows.
To make it easier to grow garlic on your site, watch the video
The beds are such a simple summer cottage construction, and they also need our close attention. Indeed, not only the yield of garden crops, but also the appearance of the site where we not only work, but also rest, depends on their location, height, content and shape. And we, of course, would like to see our summer cottage oasis beautiful and well-groomed.
The beds should be located from north to south: this way the soil warms up better, and vegetables receive more sun. If your site is located on a gentle slope, build beds across it, and if the slope is already very steep, organize terraces (also across) and build boxes-beds there. This will prevent the soil from being washed out by flood waters and rains. Details of the implementation of the idea in life will tell the material.
Raised bed
For an earlier and more bountiful harvest (and just for beauty) it makes sense to do it.

To do this, in the place you have chosen, dig a hole 40 cm deep, and put the selected soil aside for now. Choose the length of the pit arbitrarily, but make the width 1-1.2 m, so that later it would be convenient for you to care for the plants. Along the perimeter of the pit, install a frame made of stones, bricks, logs or other material at a height of 40-50 cm. Cover it from the inside with plastic wrap, and put a steel wire mesh on the bottom of the pit (this will protect the crop from harmful ones).

Fill in the first layer with long-decomposing organic material: board trimmings, shavings, fabric ( not synthetics!), branches, paper, cardboard and so on. Fill the garden bed with these "goodies" by about 1/3, sprinkle it a little with earth and spill it well with water. Next, fill the garden bed to the top with soil mixed with manure, compost, mineral fertilizers and spill water again. That's all the wisdom. Just keep in mind that next year the earth will settle by 15-20 cm and the top layer will need to be updated, so prepare the fertile land in advance.

Also see the material about raised or high beds:
How to arrange the beds in a small area
If you have a small area, and you want to organize as many beds as possible, in addition to the usual arrangement, use any horizontal surfaces and overhead structures.
You can combine the recreation area with decoratively decorated beds using multi-tiered, spiral designs and other options.

When arranging the garden, do not forget that its surface should be strictly horizontal: in order to avoid the accumulation of moisture in an elevated place and waterlogging - in an underestimated one.

Read also about a small garden plot:
Features of tillage in the beds
The land in the beds is usually dug up twice (in spring and), adding the necessary mineral and. When digging in the fall, it is better to leave the earth blocky in order to keep as much moisture as possible in the beds. In addition, with such digging, the larvae and eggs of soil pests almost completely freeze out. You can replace the autumn digging: fill the soil with a thick layer of peat, sawdust, rotted compost, and so on. In the spring, remove the not rotted layer with a rake and dig up the ground. Digging on a shovel bayonet for a garden with vegetables or flowers is quite enough. And if the soils on your site are light and crumbly, spring digging can be replaced by loosening.How to make beautiful bumpers for garden beds
Of course, not all summer residents are concerned with the beautiful design of the sides for the beds. Many use dividing paths, some simply knock down the boards with a square or perimeter, and install these structures on a horizontal surface. But we want to arrange everything beautifully, right? Therefore, I present to you several photos, where you can clearly see how you can beautifully arrange the sides of the beds with simple improvised or purchased material.Here are used ready-made plastic bumpers purchased in the store. 
The sides of these beds are lined with white bricks. 
Here the sides are lined with paving stones. 
This bed is decorated with colored slate bumpers.

On these raised beds, the bumpers are made from ordinary plastic crates. There are doubts about their strength, but, undoubtedly, the beds look original)) 
To decorate the sides of the garden, you can use any available material: boards, large stones, bricks, cut pieces of slate, vine,
A little work, imagination and improvised materials - and your usual garden can become a worthy decoration of the summer cottage. With proper planning and location, plantings will be able not only to yield crops, but also to delight the eyes of owners and guests.
This is not as difficult as it might seem at first glance. Look at the beautiful garden and vegetable garden photo ideas in our article, and you will understand that even a beginner can cope with decorating a summer cottage.
It is only necessary to correctly plan the site, taking into account the features of the relief and lighting.
 Location
If you want to create a beautiful garden on your site, you need to follow certain rules:
- For the placement of the beds, it is best to choose a sunny, well-lit area.
- Landings should be located from north to south - so they can evenly illuminate and warm up.
- Small, well-groomed, beautiful beds look better than fields overgrown with weeds and vegetables.
- If the area is on a slope, place them perpendicular to the slope for even heating and distribution of water. Consider creating terraces - this is an effective design for a garden in a summer cottage with an uneven landscape.
- If the site is with a complex and uneven landscape, then choose the north side for the garden, and the south for the garden.
- High plantings should not be placed higher than 70 cm from the ground, otherwise they will be difficult to care for.
- The use of suspended and vertical structures will help to rationally use the entire site.
Size matters
When deciding on the size of plantings to create a beautiful garden, heed the advice of experts:
- Do not make the bed wider than one and a half meters, otherwise it will be problematic to reach the middle.
- If the planting is located near a fence or under a wall, then the optimal width will be no more than 80 cm. The main thing is that you can easily reach the opposite side.
- Choose the length at your discretion, adjusting to the size of the site.
- Do not skimp on the distance between plantings - narrow paths will cause a lot of inconvenience in the process of working on the site.
The form
Look at the beautiful beds, the photos of which are presented below. The variety of forms is limited only by fantasy. Square, rectangular, in the form of segments of a circle, round - choose what you like best. The main thing is that you can easily reach the plants in the center.
Beautiful beds do not have to have a clear geometric shape, they can be created by following the contours of the relief. This arrangement not only uses the maximum free space, but also looks original and spectacular. How beautiful to make the beds in the garden, you can see in the photos in our article. 
Mixing cultures
It has long been known that a properly selected neighborhood of different crops on the same bed increases yields and improves the quality of fruits. By creating the decoration of the beds by mixing crops, you can get a vegetable garden that resembles flower beds in its colors. See in our article the ideas of a beautiful garden in the country with your own hands in the photo, demonstrating how the plants were originally selected in one area.
Spicy herbs look very bright, and with their aroma they repel many pests. It is a good idea to place these plants around the edges. When choosing crops for mixed planting, remember to consider their height. Taller plants should be planted in the center or on the north side. See below for examples of how to beautifully decorate the beds in the country, the photo of which is below.
 The types of beds in the garden are varied. We will look at the main ones and show you how to arrange a garden with your own hands.
Types of beds
High
A beautiful and practical design can be easily done by hand. An excellent harvest is obtained due to the good warming of the earth, and the original design can be an excellent decoration for the site. Look at the design of the beds in the garden photo in our article. 
To create them, it is possible to use:
- wood;
- stones;
- brick;
- twigs and vines;
- thin logs;
- slate;
- plastic boxes;
- bottles, etc.
Vertical
Effective use of vertical space and unusual design make these beds not only an ergonomic design, but also a decoration of the garden. It is quite easy to make beautiful strawberry beds with your own hands. They can also grow greens and some types of vegetables with a small root system.
A big plus is the mobility of many types of vertical structures: in bad weather and for the winter, they can be moved indoors. For their manufacture, you can use any available materials: from plastic bottles to specially designed racks. See examples of how vertical beautiful beds are made in the country, photos of which are available in our article. 
French
How to decorate a French-style vegetable garden beautifully? It's pretty simple. The geometric shapes of the landings are separated by clear path lines. Smoothly planted rows of vegetables with borders of low greenery or leafy salads of various colors. Or slightly raised landings with a border of finishing materials. For example, you can see a photo of a summer cottage with beds and lawns in our article. 
English
An English-style vegetable garden is created according to the “all together” principle - the garden, lawn, flower beds and beds do not have strict delimitations. The design of the beds in the summer cottage in the English style allows mixing vegetables and flowers in one area. The main thing is that everything is well-groomed and looks harmonious. 
Lazy
The delight of lazy summer residents - the beds do not require deep digging and weeding. The entire space between the plants is covered with mulch, which saves moisture and prevents weeds from germinating. They can be either ground-based without fences, or raised, fenced with curbs. 
Smart
How to equip a garden with your own hands in order to harvest more crops? The dream of any gardener has now become available. These are smart beds. High original beds, supported by sufficiently strong bumpers and filled not just with earth, but with a special composition, compost, etc. Some of the complexity of production is compensated by the ease of maintenance in the future and a bountiful harvest. 
Compact options
Compact decorative beds are easy to make with your own hands. For these purposes, you can use:
- wooden or plastic boxes;
- tires;
- various furniture (dressers with pull-out drawers, etc.).
Bumpers and fences
In the design of the garden, the sides for the beds play an important role. It is ideal if they are all made in the same style or in design will be combined with the house and the fence. A beautiful garden (photo below) can be made with your own hands, using for the sides:
- natural stones;
- bricks or paving stones;
- logs of various diameters;
- slate;
- boards;
- vine or twigs;
- plastic or glass bottles.
The choice of material is limited only by imagination and material possibilities. 
Tracks
The originally designed paths can become a decoration of the garden and vegetable garden. When laying paths, it must be borne in mind that the width of the main ones should be 50-60 cm, and for additional ones between plantings, 30 cm will be enough.For the garden, straight paths are better suited, but in the garden, winding paths will fit well into the landscape. There are many design options for tracks and materials for them. Most often used:
- cement;
- paving slabs or paving stones;
- bricks;
- natural stone;
- pebbles or rubble;
- wood.
See how the original and beautiful paths and beds in the garden look, the photo of which is below. 
Decor
Beautiful beds in the garden, the photos of which you will see at the end of the article, are in themselves a decoration of the site, but if you use the original decor, you can add a twist. Use old furniture, natural stones, tree stumps, original lamps and whatever your imagination tells you. Decorate the garden with ready-made or self-made garden sculptures. Several examples can be found in our article. For those who do not know how to make beautiful beds in the country, it will not be difficult at all. 
Non-standard ideas
We offer you to look at the photo, how beautiful arches of climbing plants with flowers and fruits look, hanging compositions and other original ideas for creating a unique garden and vegetable garden. 
Photo gallery
In our gallery you can see 13 more photos of beautiful ways to decorate a garden.


Probably, every owner of a summer cottage wants his garden to bring not only a harvest, but also aesthetic pleasure. At first glance, it seems that concepts such as a vegetable garden and landscape design have nothing in common.
However, if you move away from the traditional forms of gardening and make an interesting layout of the garden with your own hands, then as a result, the plot in the country will not be inferior in beauty to the garden. This does not require special costs and efforts. You only need materials at hand, skillful pens and creative thinking. Examples of beautiful beds can be found in the photo gallery below.
Layout of beds for a beautiful garden
In order to have an idea of the scale of work on arranging the beds, you should determine a place for them and sketch out a diagram or drawing.
In this case, it will immediately be seen how much material is needed for their arrangement.
The planning of the garden is carried out in accordance with some recommendations:
The shape of the beds can be any. It all depends on your imagination! They do not have to be the correct shape. They can be done rectangular or square, in the form of a trapezoid or in the form of any animals and objects.
You can arrange the beds with your own hands in accordance with the natural forms of relief. This will give the garden not only an aesthetic effect, but also make it possible to use the garden land with greater benefit. In the photo you can see how original and beautiful the beds of an unusual shape look in the landscape design.
If the garden is planned to be arranged along the fence, then the ones located next to the paths can be an interesting solution. narrow flower beds... You can plant fluffy greens on them one side by side, and plant low-growing flowers at the bottom.
At the corners of the plot, you can create triangular beds and plant vegetables or greens on them in a tier. That is, place tall crops closer to the fence and gradually lower the height.
Beautiful vegetable garden in the center of the plot
At the dacha, where the garden will be located in a place viewed from all sides, the center of the composition can be spectacular round bed... To create it with your own hands, you first need to carry out the markup:
When planting vegetables or green crops on a round bed, it is necessary to take into account the similar growing conditions and favorable neighborhood.
Beets will look best on such a flower bed, carrots, cabbage and various greens... You should not plant zucchini, cucumbers and other weaving crops on it. They grow to the sides and look ugly among the slender rows.
Do-it-yourself tall beds for the lazy
 A beautiful vegetable garden can be created using tall beds, fencing them decorative bumpers... Land cultivation and planting maintenance at such facilities is minimized, and the yield exceeds all expectations.
The first layer is used for cleaning, kitchen waste, etc. Then everything is covered with a layer of crushed grass or foliage, which is covered with earth.
The resulting "cake" will gradually decompose, while releasing a large amount of heat. Therefore, even on cold days, the roots and roots of plants will feel comfortable.
To decorate the sides on high beds, you can use:
- painted boards;
- ready-made plastic fences;
- empty bottles;
- old plastic boxes;
- large stones that are fastened with concrete mortar;
- paving stones or bricks;
- a decorative fence woven from willow or vine;
- slate cut into strips and painted.
To make the landscape look complete, do-it-yourself beds should ennoble with paths... They can be sown with lawn grass or lined with geotextiles, covered with colored sawdust, bark or decorative gravel.
French beds
 Symmetrical beds can often be seen in summer cottages. regular geometric shape... They are called French and are most often made in the form of a rectangle, which is divided by rocky paths into four squares.
In the middle of such a garden, a composition or sculpture is placed. The French garden, as you can see in the photo, is distinguished by the clarity of the lines, well-groomed and absolute harmony... If you wish, you can build it at your summer cottage with your own hands:
- French beds can be made flush with the rest of the parcels or raised to the desired height. The second option will be more difficult to perform, but it will look prettier. And it is much easier to care for high beds.
- You can use metal, wood or stone as borders.
- It is best to arrange the garden in a well-lit area with fertile soil.
- Track sizes depend on the irrigation system, which can be either manual or automatic. Their width is usually between 60 and 80 cm.
Any crops can be planted on French beds. To make them bright, you can plant along their edge beautiful undersized flowers or several varieties of salad.
Vertical beds for a small garden
 In small household plots, home craftsmen build vertical beds with their own hands. However, it should be borne in mind that not every crop can grow in such conditions.
Will grow well on vertical structures spices, onions, salads, strawberries... In conditions of constant watering, they can grow zucchini, and even cucumbers.
It is quite easy to turn a wooden fence or an ugly outbuilding into a green wall with your own hands. For this you will need:
- Nail plastic boxes onto a vertical surface, fill them with soil and plant vegetables.
- Screw on plastic bottles, pre-cut a hole in them from above and fill it halfway with soil.
It will look very nice in such containers and grow well. repair strawberry... She gives a lot of mustache, hanging down, decorated with flowers and berries.
Tire beds
From tires, a garden bed with your own hands can be made in the form of a pyramid. The rubber must be pre-painted. To prevent car tires from getting too hot in the sun, they are recommended paint in light colors.
During the construction of the pyramid, the lower tier is first installed and immediately covered with soil. The second tier is installed on it and covered with earth, then the third, etc. Seeds are sown in free spaces with earth. Radishes and greens will grow best in them.
Braiding vegetables arch
 To decorate a beautiful garden with your own hands, you can create decorative arch, on which cucumbers or other weaving vegetables will grow (see photo). If there is no suitable structure for this in the country, then an arch or pergola can be welded from thin pipes.
Plastic containers are placed next to the arched structure, in which vegetables are planted. Each shrub should be planted in a separate container. As the plants grow, their whips will need tie to a structure.
It is very easy to care for cucumbers planted in containers. They only require watering and feeding. In this case, spraying against fungal diseases and weed control are not required.
To give your garden personality, you can use some tips from experienced gardeners:
- On an area with a slope, beds in the form of terraces or tiers will effectively look. Growing only one crop on each tier, as a result, you can get a picture similar to the gardens of Babylon.
- Various undersized crops can be used as fences. The skillfully selected planted plants will delight you with a combination of different shades and colors. Such bosquet beds can be from rectangular to zigzag shapes.
- A pyramidal bed can be created from boxes of various sizes by placing them on a pipe dug into the ground. Having previously made holes in the pipe and pouring water into it, you can get an irrigation system.
- Small vegetables, strawberries and greens can be grown in hanging pouches or halves of plastic pipes. Plants can be planted in them in early spring, and after warming, they can be taken outside and hung almost anywhere on the site.
- Trellises, which can be of various options, will add their flavor to the design of the garden. Climbing plants or tall tomato bushes are planted near them. Tomatoes on a trellis will receive maximum sunlight and will delight you with a bountiful harvest.
- Flowers can be used to decorate not only flower beds and the area around the house. With perennial flowers that match the style, you can easily create beautiful beds.
- When choosing plants for your garden beds, don't be afraid to experiment. For example, climbing plants and tied tomatoes can be supplemented with oversized watermelons and zucchini contrasting in color and shape.
By connecting your imagination, looking at photo examples, and spending a little effort, you can turn an ordinary summer cottage into a beautiful, harmonious, well-groomed and unique vegetable garden... At such a dacha, you can fully enjoy the well-deserved rest and the fruits of your labors.

