How to make a wooden picket fence with your own hands? Photo. A fence made of a wooden picket fence: photos of beautiful options, prices, installation Do-it-yourself installation of a fence from a picket fence
(18
estimates, average: 4,36
out of 5)
 All owners of summer cottages or household plots come a time when it is necessary to decide on one or another type of fencing of the territory. There are a lot of design options: wooden fence; metal; concrete; brick. Each fence has its own advantages and disadvantages. We will not dwell on them, but we will choose the simplest and most affordable wooden picket fence for the implementation of our project.
How to make a picket fence with your own hands
Wooden fencing is quite common. Not least due to its advantages:

Preparation of materials
 Before proceeding with the manufacture and subsequent installation of a wooden picket fence, it is necessary to decide on the final design of the fence.
The final decision must be made taking into account the requirements of the general design of the site... The appearance of the fence should overlap with the exterior of the house.
- The house, built of red brick, will initially look spectacular as an organic architectural ensemble, with a fence, where the posts are made of the same material, and the inserts are made of wooden picket fences.
- A timber dwelling from a bar usually involves the use of an all-wooden fence.
- A building with a stone foundation based on buta looks good with a fence that has a similar foundation.
The choice can be made from the following options:
- completely wooden fencing;
- metal posts and logs in combination with a wooden picket fence;
- stone or brick pillars with a wooden picket fence.
Having decided on the preference, you can calculate accurately the number of required building material. Knowing the outer perimeter of the site, we take the distance between the posts 3 meters. Based on the chosen design, we calculate the need for the number of components.
Regardless of what the pillars will be in the structure, the length is considered as follows. Add the desired distance between the bottom end of the picket fence and the ground to the height of the fence, plus 1.3 meters, on which supports will be buried. Typically, such a recess is necessary to ensure high strength of the entire structure. Preparing wooden poles for installation usually comes down to treating them with antiseptics, especially the underground part.
The total length of the lags, to which the picket fence is usually attached, for a wooden fence is equal to two spans between the posts. The veins may not have a rectangular profile, but a round transverse diameter ranging from 6 to 10 centimeters.
All wooden products before installation is inevitable planed... Treated surfaces lend themselves more easily to finishing operations of impregnation, painting, and varnishing. Rust is removed from metal parts and a penetrating primer is applied to the outer surface.
Installation of the fence
 Installation of the fence usually begins with a breakdown of the location of the structure. With the help of a cord, we hang the dimensions of the site, marking the points for installing the pillars. With a manual or mechanical drill we pass holes with a diameter of about 20 centimeters to a depth of 1.3 meters.
Wooden or metal we put the pillars in the pits, align the straightness along the cord. We adjust the level vertically. We throw in the empty space between the pillars and the pit with a sand-cement mixture with the addition of granite crushed stone or broken red brick.
If freezing of the soil is noticed in a given area, then in order to exclude the extrusion of the main supports in frost, pillars instead of mortar, filled with small fraction and rammed.
Before installation, wooden pillars along the entire length of the underground part are wrapped from below with a wide layer of roofing material with an overlap of at least 15 cm for waterproofing.
After the mortar has set, installation of veins... Rectangular or round wooden logs are attached to the posts with nails or self-tapping screws. Splicing them is done by filing half the thickness. Splicing seams did not interfere with placing them so that they are in different places.
In the case of using metal posts and veins rigid mount applied welding or through special brackets with galvanized hardware. Lags are spliced by welding or using metal plates using fastening bolts with union nuts. Now the load-bearing structure of the fence is considered completely finished.
Moving on to no less responsible stage of installation of a picket fence... Various ways of placing it determine the uniqueness of the fence. Instead of the usual constant pitch inline, it can be used with increasing or decreasing clearance.
Corner plank placement will add variety to your fence style. The use of a carved picket fence will add individual originality to the appearance of the estate. A semicircular top or bottom, alternation of different board sizes and many completely different variations are available for implementation.
In order not to see the courtyard, you can apply staggered installation... One board has veins in front, and the second one with or without a gap relative to it, at the back. By independently adjusting the gap, they achieve the transformation of the line of sight of the land plot and the ventilation of the fence.
Fastening a picket fence to wooden logs is done the old fashioned way iron nails or galvanized screws... The boards are screwed to the metal veins with self-tapping screws.
Finishing work
 In order for a picket fence to serve for more than a dozen years, the tree must be immediately treated with antiseptic materials, and then paint or varnish... This operation will have to be done systematically. Once every 5-10 years, the board is checked for damage from fungus and mold. Spoiled picket fence are replaced with new ones... The whole structure is again treated with impregnations and opened with varnish.
A wooden picket fence is a once half-forgotten type of fencing that has now become a trendy type, gradually replacing the popular metal. Wood is a versatile and warm material, a symbol of home comfort in temperate climates. There are wooden picket fences in almost every settlement in Russia. Although they got their name from the German word for pole or pole.
Classics of the genre
The specificity of the fencing device makes it durable and strong, the material makes it cozy and decorative, the main advantage is the variability of the proposed construction. Any dimensions - width, height and length - can be given, and a simple staining will change even the most unsightly row of wooden slats.
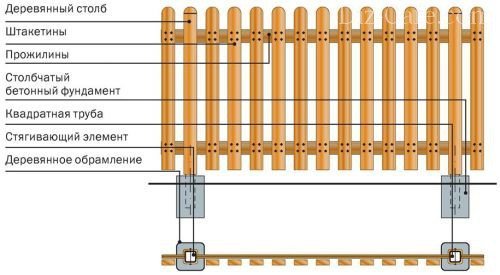
The picket fence got its name due to the specificity of the device from several standard elements. The developed technology for the installation of such barriers makes the fence functional and strong, relatively inexpensive. The worked out scheme: the longitudinal strips are fixed on the longitudinal strips.
Fence on the site
They are fixed on sturdy support posts, dug into the ground or concreted.
Craftsmen, in an effort to decorate the ordinary, have moved away from the boring German standard. A simple picket fence is sometimes a real work of art.
The photo shows the pseudo-Russian style, decorated with the simplest tools.
Before painting
A wooden picket fence, built in the country, easily turns from a functional fence into a decorative fence. This is due to the different method of fastening, the whimsical imagination of the owner who worked on, unusual coloring or the use of slats of different lengths.
It is difficult to say what exactly brought back to everyday life and construction the practice of installing fences from a wooden picket fence:
- fashion for natural materials;
- decorativeness inherent in the tree;
- relatively affordable cost;
- nostalgic mood for the good old days, when such fences were the most common thing and covered every meter of suburban streets and villages;
- the ability to install a picket fence with your own hands, without special tools, independently and accurately calculate the required footage;
- option to order a fence from a construction company;
- almost any size of fencing.
Fence decor
Perhaps the combination of advantages made a wooden picket fence in demand. The use of imagination and skills gives birth to such beautiful fences that passers-by stop to admire. And it has not occurred to anyone for a long time to believe that the choice of the owner forced them to make a lower cost of a fence from a wooden picket fence.
The photo shows a capital structure in the Tycoon style.
Beautiful fence for a private house
A picket fence is the best choice for a property, a summer residence, a settlement and rural housing. Its undeniable advantages include:
- various designs, subject to any whim of the owner;
- the presence, if necessary, of additional reinforcement, shields, stuffed to close the gaps, metal or;
- variable ways of placing rails (options for laying a picket fence: checkerboard, herringbone, oblique crossbars, beams, imitation of a log house);
- the presence of modern impregnation compounds that allow you to extend the previously short life of a structure, and at the same time emphasize the natural beauty of the tree;
- the ability to paint beautifully using modern paints with their bright colors, if necessary;
- the reliability of the structure, which can be further strengthened by using brick or metal pillars.
The photo shows a simple picket row. Comfort and a sea of light.
Democratic option for a village house
You can buy such material in almost any construction market or in a supermarket. A picket fence made of other materials (or) can be ordered on a turnkey basis or made by hand. A fence calculator can be found on builder websites. To calculate the approximate cost, you just need to take measurements.
How to make a picket fence can be found in the information space, but any zealous owner knows very well how to build a simple and durable fence. He will prefer, having purchased the materials, to begin the installation of the fence in order to be proud of the hand-made fence.
An original and beautiful hedge
Material preparation
The future builder has 2 ways: he can buy ready-made slats, processed in a special way, of the necessary parameters (in extreme cases, he will have to cut a little) and start installation on the day of purchase. Craftsmen who have the equipment prefer the second, more complicated way: they make pickets with their own hands.
Construction assembly drawing
DIY installation
The scheme of a conventional hedge is extremely simple. At a distance of 2 meters from each other, strong pillars are dug in, capable of withstanding the weight of the picket fence even when wet (when wet, the tree becomes heavy). Pits are dug under them, with a depth of 70 cm (for strength, you can also use a meter). To make the fence beautiful and even, the pits are pre-marked with pegs, and a string is pulled between them.
The distance is measured with a tape measure, it should not exceed 3 meters.
Such a fence will serve for a long time.
Installation of pillars and guides
Pole pits must be equipped appropriately, taking into account the type of soil. They can be made with a drill or dug out, this is not important, but sand and gravel must be poured onto the bottom and carefully tamped before installing the post and making concrete. For a simple fence in the country, you can do without concreting. And for the fortress of the structure - to reduce the distance between the supports by one meter.
Installation option without concreting the pillars
But the best option is to concrete the pillars so that, after the installation has been made, they do not have to carry out repairs as a result of adverse weather conditions. Experts are sure that wood rots faster in concrete, so it is better to lay sand and gravel, carefully ramming each layer. The pillars are additionally processed for strength. Bitumen is used as a democratic option.
Set of picket sections
The lags are attached to a wooden post, but do not forget that we install them only after the concrete has solidified well. To fix them, metal brackets are used. There are different types of fences and for their fastening, if the structure is simple, people use screws or nails.
Another installation scheme
How to correctly type the plank part directly is also decided in different ways:
- A block of crossbars and picket fence is assembled on the ground, and then attached as a whole to the supports.
- Lags are installed on poles, and pickets are nailed to the finished frame.
For a simple fencing that allows light to pass through, the optimal set is in sections. It makes it possible for several builders to work at once: some assemble sections, others attach ready-made shields to veins.
In Russia, wood has long been widely used as a building material. It is used to build log houses, window frames, interior items, and kitchen utensils. This natural material allows you to create an atmosphere of inner comfort and coziness. A wooden picket fence is one of the most popular types of fences in suburban construction, which is simply irreplaceable when arranging a site in a rustic style. Such a fence, on the one hand, outlines the boundaries of the site for us, and on the other, its territory is not shaded.
Picket fences can be given any height, shape, color, and even clearance distance, thanks to which they acquire an original look and complement the design of a suburban area with their appearance.
A wooden picket fence is used as a reliable fence for a personal plot, an element of territory zoning, decorative framing of beds and flower beds

Stems with flowers, filling the gaps in the gaps between the vertical bars, give the fence a more attractive look
The invariable popularity of this type of fencing is explained by a number of its parameters and properties, the main ones of which are:
- Versatility. Wooden fences fit perfectly into any landscape of the area. They go well with any other foundations, organically fit into an interior made of stone or brick, concrete or metal.
- Ease of installation. The installation of a fence made of a picket fence can be done independently by any summer resident and owner of a country house, without resorting to the services of professional craftsmen.
- Convenience of care. Caring for the fence consists only in the timely painting of the surface and the elimination of defects that may arise during operation as a result of mechanical stress and seasonal precipitation.
- Reliability. A high wooden fence will act not only as a decorative element of landscape design, but also as a reliable protection for the owners of the site.
One of the advantages of a picket fence, in comparison with a traditional solid fence, is the ability to plant plants right at its base.
- Support pillars. They can be made from metal pipes or thick beams.
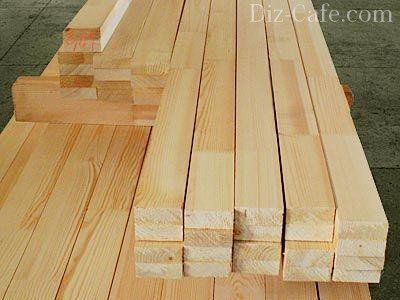
- Picket fences. Narrow slats are made from edged or planed boards.
- Veins. Cross bars, placed horizontally between the support posts, 2-2.5 meters long, are made of bars with a cross section of 40 mm.
When choosing a material to make a fence from a picket fence, you can go in two ways: buy a ready-made picket fence or make it yourself from boards. The first method saves time. The finished fence can be installed on the day of purchase. But a significant drawback may be low-quality raw wood, which serves as the basis for a picket fence, which, during operation, will "lead" the fence. Choosing the second way, the owner will need to make an effort to spend several days on the manufacture of all elements of the fence. But as a result, he will have a picket fence that fully corresponds to his ideas and wishes.
If the material is not sufficiently dried, it is necessary to use special dryers for the forest, because under natural conditions drying can take several seasons
The wood drying service, as well as the cutting of cross-beams and picket fences, can be ordered at the place where wood products are made. When preparing the material yourself, you must carefully grind and sand all the tops.

Design options for the tops of a wooden picket fence
The lower part of the wooden support pillars must be coated with hot water. This will prevent wood decay and extend the life of the structure.
Installation and assembly of the fence
Arrangement of a picket fence is carried out according to the same principle as the construction of other types of fences. First of all, the direction of the future fence is determined. It must be freed from weeds, bushes and tree branches that will interfere with construction. Then, on the cleared area, beacons are stretched and along the stretched cord they outline a place under the pillars. The distance between the posts should not exceed three meters. Otherwise, long spans between the supports can cause the crossbars to sag under the weight of the picket fences.
Support pillars can be installed directly into the ground, but to create a more durable structure, it is better to erect them using cement-sand mortar.
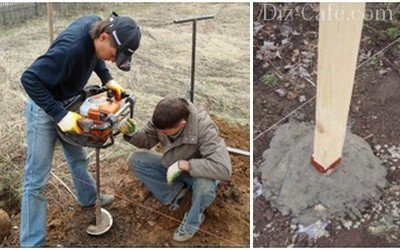
To install the posts, you will need to use a drill to dig a hole, the depth of which is determined by the height of the fence. On average, 1.3 m is sufficient
The columns are installed on a 20 cm gravel pad, which prevents the support from being squeezed out when the soil freezes. Vertically fixed columns are covered with alternating layers of concrete and soil mortar.
Having completed the installation of the posts along the line of the fence, you can install veins between them. In principle, a fence can be installed in two ways: at first, the cross-members are first attached between the posts, and then a picket fence is nailed to them, and at the second, the spans are assembled separately and fixed to the supports already in blocks.
The first picket fence is fastened vertically, and the rest are aligned according to a T-shaped pattern, in which the width of the leg of the letter "t" is equal to the step of the picket fence, and nailed
On average, the distance between the pickets is equal to the width of the planks themselves. You can fasten the transverse strips to wooden support posts using self-tapping screws, bolts or ordinary nails. The veins are attached to the metal posts on a specially welded corner for attaching the timber.
Finishing and decorating the fence
The finished fence remains only of other negatively influencing factors.
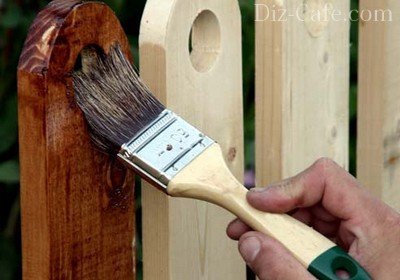
It is necessary to seal up all cracks and chips with putty compounds, soak the picket fence with an antiseptic, and then cover it with varnish, stain or paint
Film-forming agents do not fit well on freshly planed boards and do not last long. To "rough" the surface of the wood, you can sand it with medium-grained sandpaper.

Stain is an excellent preservative that protects wood from the development of microorganisms and mold
The varnish will protect the wood from moisture. Using wood stain and clear varnish, you can also imitate different types of wood.
Choosing a fence for a site is not an easy task - it is necessary that it be reliable, durable, beautiful. All these requirements are met by a fence made of a metal picket fence (euro fence). Climbing on it is problematic - not that toughness. Breaking it is "boring" - usually, hooligan lovers limit themselves to bending a couple of planks. Beauty, of course, is a subjective criterion, but such fences look better than the same solid one. In addition, they are not so susceptible to wind loads, which saves on support poles. An additional plus - they are blown through. In general, not a bad option.
What is a metal picket fence
The metal picket fence is made of galvanized steel sheet. A relief is formed on the sheet, after which it is cut into strips, covered with protective compounds, and painted. Planks of a certain height are obtained. Usually, the height is from 150 to 180 cm. To complete the fence, you also need support posts (most often 60 * 60 * 2 mm), bowstrings (two or three crossbars that go between the posts) and fasteners.
Types, forms, profiles
The thickness of the metal of the euro shtaketnik can be from 0.4 to 1.5 mm. The most common is made of steel with a thickness of 0.5 mm. The width of the picket fence is from 80 mm to 128 mm, the length is up to 2 meters.

P and M - shaped profiles of a metal picket fence
There is a metal picket fence with a different profile: P (rectangular), M-shaped and semicircular. M-shaped ones have more ribs, respectively, they have greater rigidity. But there are also U-shaped, in which grooves are formed in the "back". In this case, it is already difficult to say which of them will be tougher. Most likely, the latter, especially if it has rolled edges.

Semicircular ones also have greater rigidity, but are more difficult to form and usually have a higher price. Additional grooves can also be formed along the long side for added strength.
In general, the more stiffening grooves, the better the bar resists bending along its length. But with the complication of the relief, the price becomes higher. Since it is rather big in itself, you usually have to find a compromise. Either way, the bar should be able to withstand your attempts to bend it.
What to look for when choosing
When you are choosing a metal picket fence, it is advisable to look at the game offered to you live. The declared thickness of the metal may be the same, but in practice it turns out that the edge of the bar from one batch can be bent with a finger, with the other batch such a trick does not work. And this is from one manufacturer. It is a matter of the quality of the batch of metal, and it is rarely stable.

A rolled edge, several layers of protective coatings - these are the signs of a good metal picket fence
Also, be sure to pay attention to the edges - it is better if they are rolled up. Firstly, this is a more attractive appearance, secondly, the greater rigidity of the picket fence, and thirdly, the sharp edge is bent and it is impossible for them to get hurt. There is only one drawback of a picket fence with rolling - a higher price, since it requires special equipment and additional processing time.
If we talk about the products of specific companies, then the Euroshtaketnik Grand Line (Grand Line), Barrera Grande, Nova, TPK Center Metallokrovli, FinFold, UNIX (Unix) are popular.
Painting methods
It is worth understanding the coloring method. There is an iron picket fence with two-sided and one-sided painting. On one side, the back is covered with a layer of primer without staining. Has, respectively, gray color. A fence made of a metal picket fence, painted on one side, gray inside the plot. This is not so bad - it is not striking. If this option does not suit you, either buy with double-sided painting, or paint yourself. The paint is taken "for roofs", choosing a suitable shade. Note that brushed metal looks ... not very good. If you have a spray gun, the appearance will be good, although not perfect.

This is how the "wrong side" of a metal picket fence painted on one side looks like
You should also take into account that there are two types of staining a metal picket fence:
- polymer coating;
- powder paint.
The first method is much more reliable, since the application technology requires special equipment and strict adherence to the technology. As a result, such a picket fence can withstand increased mechanical stress. Even if a scratch appears in the coating (although you have to try), the metal does not rust, since there is still a protective coating that prevents rust from appearing.

Polymer coating is the best choice today
Powder spraying, in theory, is no worse. But only if it was made according to the rules: a protective coating was applied to the primed metal, and on top of it - powder paint and baked in special chambers. But the bottom line is that you can apply paint in the "garage", and somehow you can burn it there. The result will only be completely different. In addition, there are ready-made sheets of Chinese origin. In them, paint is applied in the workshop, but often directly on an unprimed steel surface. Outwardly, it is impossible to determine all these nuances, and after the slightest scratch, rust appears. So the polymer coating is safer.
What can be a metal picket fence
You may like metal fences or not, because there is no dispute about tastes. But in terms of practicality, they certainly outperform. Once installed, you then do not remember the fence for years. It does not need to be painted in order for it to look decent, since good quality paint lasts for years without visible changes. And this is one of the important factors that make you think about installing such a fence.


On a strip foundation

With a foundation and pillars of clinker bricks
Installation methods
There is a single-row and double-row (double-sided, checkerboard) method of mounting metal picket strips. With a double row, the strips are placed on both sides of the bowstring, and so that they overlap each other at least a centimeter. Therefore, the distance between the planks should be slightly less than the width of the picket fence. With this installation, 55-60% more strips per running meter of the fence will be required. But the fence turns out to be practically imperceptible - only at a certain angle you can see a small part of the area. And this despite the fact that the fence will not be solid and all the "charms" of a solid fence will not touch you.

Most often, the strips are mounted vertically, but there is also a horizontal mounting method - it can also be single-row or double-row. The horizontal fence looks more "exotic". With two-row (double-sided) installation of the strips, it turns out to be generally opaque.

The disadvantage of this installation method is that special posts and intermediate posts are needed, which will provide the required structural rigidity. Another nuance: slats are usually produced in lengths up to 180 cm, longer ones will have to be ordered, and this costs additional money. So either you will have to put up poles more often, or overpay for a non-standard size.
Dimensions and distances
When mounted in one row, the clearances between the planks may be different. The exact distance is chosen arbitrarily, depending on how "transparent" you want to make the fence. Most often, the distance between the pickets is 35-50% of the strip width. But this is not a rule, there are both smaller and larger gaps.
When installing in a checkerboard style, if you do not want your yard to be seen at an angle, the planks should overlap 50% of the fence width or more. If "visibility" is not important, you can set them so that the edges overlap by only 1 cm.
The height of the fence is chosen depending on the wishes of the owners. If you want the yard to be as closed as possible from prying eyes, the length of the plank should be at least 180 cm.Considering that they will be slightly raised above the ground, this is enough for the vast majority of people to be unable to look into your territory.

If you do not care whether something will be visible through the fence or not, you can take both 1250 mm and 1500 mm. In the first case, the fence will end somewhere at the chest level of passers-by, in the second - at eye level or slightly below (see the approximate layout in the figure), and this is without a foundation.
The width of the span of a vertical fence made of a metal picket fence is 200-250 cm. It is at this distance that the pillars are dug in, then two or three crossbars are fixed between them. These crossbars are called "lags" or "bowstrings". For a picket fence up to 150 cm high, two crossbars are sufficient, for higher ones, three are better.
Types of fillings
There are several more varieties of filling spans (distances between support pillars). The easiest way in installation is the direct method - this is when all the strips are of the same length. On top of such a fence, you can put a U-shaped bar made of the same material (sold in the same place as the euro shtaketnik). In addition to the aesthetic load, it also covers metal cuts, which increases the service life of the fence.

All "waves" require cutting most planks to a certain distance. One "wave" per span is made with a step of 50 or 25 mm. With a step of 50 mm, the difference in height between the shortest and longest planks is significant, but the fence looks more delicate. In the case of a "wave" with a step of 25 mm or with a "double wave", the difference is smaller. The upper planks are set here much less often, but they can also be installed. Only in the place of the “wave” fracture will the sides have to be cut and bent.
Features and installation rules
When installing a fence from a metal picket fence in Central Russia, it is recommended to install poles from a profiled pipe 60 * 60 mm (60 * 40 is possible). For crossbars, it is more convenient to take the same profiled pipe, but with a section of 40 * 20 mm. In this case, the fence will accurately withstand wind and snow loads.
When installing, the pitch of the posts is 2 meters. If there are two crossbars, then they are fixed so that the edge of the plank is 25-35 cm.With a picket height of 150 cm and more, the distance is 30-35 cm, with shorter ones - 25 cm.But, with a fence height higher than 1.5 m, it is better to do three logs, and not only in regions with strong winds. It's just that with two lags, the distance between the fasteners is too large, which is why the strips are easy to move apart.

There are two ways to attach the strips: with screws and with rivets. Self-tapping screws and rivets are installed on both edges of the strip on each of the crossbars. That is, if there are two crossbars, 4 screws / rivets are needed for each bar, if there are three, then 6 pieces of fasteners are needed per picket fence. You can, of course, fix it on one self-tapping screw or rivet on the crossbar, setting it in the middle. But in this case, pushing the pickets with your hands is as easy as shelling pears - and you don't need to climb over the fence.

This is faster to mount, but this is a "purely decorative" fence
Which type of fasteners should you choose? Self-tapping screws are easy to install - this is their plus. But they are also easy to unscrew, which, under certain circumstances, can be a disadvantage. Rivets take longer to install, but they are much more difficult to remove. What should you choose? On the front of the fence or if the fence is left unattended for a long time (giving a seasonal visit), it is definitely worth putting rivets. Of course, if the attackers set themselves the target, they will cope with the rivets, but this will be more difficult. When installing a fence between neighbors in houses of permanent residence, it is quite possible to attach a metal picket fence to self-tapping screws.
How to do it yourself
As you probably noticed, a metal picket fence is made using almost the same technology as a professional sheet, but the sheet is cheaper. Therefore, many have an idea to make a picket fence by dissolving the profiled sheet into strips. In principle, this can be done if you are able to cut strictly along the line without any noticeable deviations. But for cutting it is necessary to use scissors for metal - perforated or manual. In no case should you cut with a grinder, as it burns out the protective cover. So the work is not easy and will take a lot of time. If that doesn't scare you, you can try it.

What is the disadvantage of a homemade picket fence from a profiled sheet? Everything is obvious: the edge is rarely even, since it is difficult to do it manually. In addition, the cut is unprotected and may begin to rust. You can, of course, smear the sections with a primer / paint, but in order for all the layers to lay down normally, an absolutely clean surface is required. That is, the places of the cuts must initially be dedusted (not so difficult, but it takes time), then also degreased. Only in this case will the protective coating be really high quality.
It is advisable to roll up the edges - this will give the homemade picket fence more rigidity, because additional reliefs are rarely formed on the profiled sheet. It “keeps” its shape due to its size and alternation of waves.
- Materials and tools
- Manufacturing technology
A picket fence is one of the most popular types of fencing, with the help of which a summer cottage is ennobled. The main thing is to implement it correctly. Such a hedge has gained popularity due to a number of advantages, the main of which are the low cost of construction and appearance.
Materials and tools
The installation of a wooden fence does not require special devices, if we are not talking about combined structures consisting of several different types of materials, such as stone or brick. Bearing vertical and horizontal supports for the fence can be made of wood or metal.
To install a picket fence you will need:
- wooden beam 50x50 mm;
- wooden beam 20x40 mm;
- nails or screws;
- antiseptic;
- paint and varnish material.
A square beam is needed for the manufacture of vertical supports, and its length is planned in accordance with personal wishes: everyone determines the height of the future fence for himself.
The support is pointed into the ground by at least half a meter, therefore, 50 cm must be added to the desired height of the element for the fence.
A beam of a smaller section (20x40 mm) is intended for horizontal reinforcement of the spans of the picket fence. Its amount will directly depend on the length of the fence being installed. Nails or self-tapping screws are suitable as fasteners. The second option is more preferable, because the self-tapping screws do not loosen during the operation of the structure.
Fasteners must be purchased from galvanized metal, which does not rust from atmospheric agents.
There are many antiseptics and paints and varnishes on the market. You need to choose products intended for outdoor use. From the tools you will need a hacksaw for wood or a jigsaw. If you nail the planks with nails, you will need a hammer, and it is better to fasten the screws with a screwdriver. A shovel will come in handy for mounting support posts.

Manufacturing technology
A step-by-step diagram of assembling a picket fence with your own hands will help you organize and complete the work from start to finish.
- At the first stage, it is necessary to properly prepare the wood: all natural material must be impregnated with an antiseptic several times using a regular paint brush. The process is quite time consuming, but it cannot be ignored. Such a measure will help to ensure the protection of the tree from environmental influences, protect it from rotting, extending its service life.
- Now you can start installing the supports. We start by marking the places for their installation. In places where the fence changes direction (at the corners), set the pegs and pull a strong rope between them. Then you need to calculate the number of supports. To do this, we measure the distance between the pegs and divide it into equal intervals, the length of which does not exceed 2 meters. The resulting value will be the step between the bearing pillars, and at the place of their installation it is necessary to dig holes, taking into account that the support must go into the ground at least half a meter below the freezing point. For a long and reliable service, the support structures are wedged with coarse gravel and compacted with earth. The laying of roofing material in the holes dug for the posts helps to increase the life of wooden supports, and the supports themselves are wrapped with the same roofing material in places where they are buried in the ground.
- In the third stage, transverse fence guides are usually mounted. The main thing is that each vein is located strictly horizontally. It is easy to control with a building level. Horizontal supports are mounted in two places (at the top and bottom of the fence), however, in the case of a high fence, an intermediate rail will have to be installed. The veins are fixed to the vertical supports of the picket fence with self-tapping screws or nailed.
- The final step is to install the wooden picket strips directly onto the fence. The most time consuming but very simple process is that each fence is screwed strictly vertically at regular intervals. If you pull the thread on the bottom edge of the pickets, this will ensure one level of their placement.

At the fourth stage, the assembly process ends - the wooden picket fence is now ready for use. It remains to paint it in any chosen color, however, many craftsmen additionally decorate the hedge using simple techniques. This concerns the design of the upper edge of the picket fences, which are given a certain shape.
Fence sections can be made in the form of a wave or an arc. To do this, markings are applied to the fence, a trimming is made according to the template. The pickets are sharpened on both sides in the form of a sharpened pencil - this will protect the courtyard from unauthorized access.
Often there are picket fences with carved planks - we are talking about the creative approach of the carpenter. Such work cannot be called simple.
Alternative to wooden poles
No matter how prepared and processed the future supports, wood is inferior in durability to metal. If you want a wooden picket fence to last a long time, and its service life is not limited to 15 years, it is better to use a metal base, which is mounted in the same way, except for a few moments. The posts are made of a metal pipe with a cross section of 40 mm, and are fixed in the ground with concrete mortar.
To ensure optimal adhesion of the supporting element to the concrete, pieces of reinforcement or metal plates are welded to the bottom of the vertical supports.

Horizontal veins are made from a metal pipe of a smaller diameter and welded between vertical support elements, keeping an eye on the horizontal placement using a level. Then each shtaketin is fixed on the previously built metal frame with pointed self-tapping screws. You will get a wooden picket fence, but reinforced with a metal base.
Even if the pickets become unusable over time, they can be replaced, the supports will remain the same, which saves money.

There are many options for a wooden picket fence, and brickwork can be used as a basis here, which in combination with natural wood gives a special effect. Instead of bricks, if funds permit, they lay out spans of stone. For such a massive structure, a foundation is required. And this is a more laborious process.

