Schemes of platbands on window templates. Wooden platbands on windows carved templates pictures
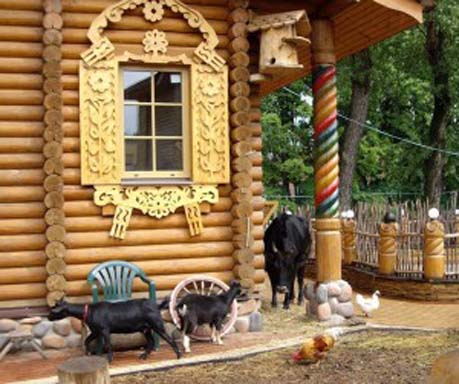
Fabulous beauty that has come down to us from time immemorial. It is visible to everyone on old, beautiful, log houses, decorated with interesting carvings of platbands with openwork patterns and rich kokoshniks located on the roof, and delights many modern people... You can admire such beauty for a long time, but creating it yourself is a very difficult task. However, with a strong and irresistible desire, you can make carved window frames (templates) with your own hands.
The problem of creating platbands made of wood
The question is not that you need the skills of a real artist or imagination to create geometrically correct, interesting, ornate patterns. The problem is more that products from natural materials, for example, made of wood, are rather short-lived due to exposure external factors... The disadvantage of wooden platbands and carving elements is that they can retain their original appearance for many decades if they are stored in dry rooms inside the house. And the humidity outside will quickly provoke the tree to warp, crack and, possibly, even cause chips to appear in places where the carving is thin. Any paintwork inferior to the effects of ultraviolet rays, and rains only exacerbate the overall picture.
This leads to the need to paint the product every year, constantly spending money on the coating and spending a lot of time on labor. Not to mention the fact that you will have to repair or even replace such carved templates with your own hands for these products can be made from various materials.
Why you shouldn't use wood
This moment can cause difficulties, but do not get upset ahead of time. There is always a way out, how best to create a cozy and pleasant atmosphere and improve the appearance of the building. Modern technologies made it possible to create a variety of materials that are more resistant to environmental influences.

Moreover, in all hardware stores, they can be found in abundance. You can, for example, use flat iron instead of wood. With its help, you can make durable and no less beautiful carved window frames in this case, you need it in the same way as in the manufacture of this decorative element from wood.
Flat iron
Flat iron or sheet, as it is customary to call it, given the factory classifications, is a thin sheet, the thickness of which is approximately 0.4-0.7 millimeters. In the store you can find rolls of this material from 20 to 50 meters. The standard width of such a roll is 1025 centimeters. It is customary to cover this material with various colors, and you can find both light and dark tin. In addition, each sheet of iron is covered with a protective film, which allows it to retain its original characteristics during transportation and does not allow scratches and dents.
Necessary materials
To independently make carved from flat iron (patterns can be seen in this article), you will need the following materials and tools:
- First, you need a flat sheet of iron (tin), which will have a standard width of just over a meter.
- Second, you need a roll of cheap wallpaper. They are used as an aid to make carved window frames with your own hands. Stencils for wall decor and other patterns are applied specifically to the wallpaper, and only then to the material.
- A set of staples with which you can fix the templates. Their fixation will help to more accurately and evenly translate the pattern with the pattern onto the surface of the material from which the carved door frames on the windows will be made with their own hands. Sketches for creating blanks are easy enough to find and just as easy to use. In addition, they will be needed when you need to fix the finished parts with each other.
- Connecting brackets. It should be noted that their size should not exceed 4 millimeters.
- An ordinary pencil for drawing the pattern and the necessary notes.
- Eraser: after all, there is a possibility that the first time the pattern may not turn out perfectly straight.
- A ruler to better measure all surfaces and determine the accuracy of the patterns.

- A drill with a diameter of 8 millimeters. It will be needed in order to create holes for the jigsaw. This will take place in those places where the upper carved window frames will be cut off. The templates, the photos of which we could use as the basis for the stencil of the blanks, we no longer need at this step.
- A drill, the diameter of which will not exceed 4 millimeters. With its help, the holes required in the place where the riveted joints of the parts will be will be created.
- Hacksaw for metal.
- Sandpaper, and both small and medium are useful. It is needed to remove burrs that inevitably form during work.
- Riveting machine (manual) and a hammer, preferably a rubber one. Using these tools, the workpieces will be straightened.
The subtleties of the process of making platbands from tin
Before you start creating carved window frames, you should make and install high-quality window slopes... It is needed to remove correct sizes and in order to make carved window frames with your own hands. Drawings can tell you how to do this correctly. This is done taking into account the protruding edges of the slopes overlooking the walls. After all dimensions have been removed, it is worth calculating the characteristics of future platbands. Standard width this product is about 30 centimeters.

Next, you need to choose any smooth roll of wallpaper in order to make carved window frames from it with your own hands (templates, of course). When the pattern is selected, you will need to prepare three "patterns". One of them will be longer, it is needed for the side symmetrical parts, the second and third, respectively, are shorter, for the upper and lower parts of the window.
Creating a template
The cut strips must be folded in half, and so that when the sketch is drawn, the center of the pattern corresponds to the fold. This manipulation will save time and reduce the likelihood of errors when creating a template.
The fact is that during the cutting of the pattern, both halves of the template will be created at once, in other words, this will allow you to create perfectly even and correct carved frames on the windows with your own hands. In this case, the patterns of the patterns will not be used as often as when each part of the workpiece is drawn separately.
Workplace and materials
To create the perfect workplace for further work, you need to move together two tables, the height of which will be the same. You need to leave a gap between the tables, which will be about 8 centimeters. This distance is necessary for the operation of an electric jigsaw. For the manufacture of platbands, metal of two colors is required. This combination is the most simple option... You can change this parameter if desired.

The overlay top color, for example, will be white. It is on it that patterns will be cut. As the second layer, you can choose a material of any color, since it will not be visible anyway, since it is used exclusively as a lining for the outer layer of the product, which is called carved window frames. We make templates with our own hands, we will remind you again.
Creation of platbands from sheet metal
You need to take a sheet of flat iron and cut it into strips to create the trims of the desired width. It is necessary to turn the blanks of the upper overhead part face down, and also make a turn on reverse side after securing the template with paper clips. After that, the openwork pattern is transferred to the material.

After the picture is displayed, you will need an electric drill with a drill with a diameter of 8 millimeters. Need to drill through holes and start cutting out the platband with a file and a jigsaw. Next, you need to put the iron strip on the table, and it is important that it is located clearly in the center of the table. This will allow you to cut out the drawing clearly and evenly without compromising the overall picture.
Bottom blank creation
After the top part has been cut out, you can move on to the next step, which is responsible for creating the bottom part, which will serve as the background. To do this, you also need to cut the material into strips with the required width and length characteristics. At the same time, do not forget that the part will have an edging, that is, the width of this pattern should exceed the indicators of external blanks. Ideal option in this case, there will be an increase in width by about five centimeters. Reversely, turn the sheet over - so that the front side is on top. Next, you need to put on this part the upper blank of the casing, which is located face down and circle the outer edging along the edge of the picture, taking into account the indent, and after that you can start cutting out the part.
Finishing work with blanks
After both blanks have been prepared, you need to remove the protective film from them and put them on top of each other. After that, the parts should be fixed with paper clips. Next, you should make one or more holes with a drill with a diameter of four millimeters. Using riveting manual machine, it is necessary to make a control coupling of the parts, thereby preventing their divergence. Having carried out this action, you can begin to drill and rivet the entire structure.
Everything - the product is completely ready to use. You can proceed to the next stage - do-it-yourself carved window frames. We made templates for them earlier.
Installation of platbands
In order to carry out the installation of platbands, first you need to find a ladder or stepladder, along which you can get to the windows. To carry out the installation of products on wooden wall, you will need:
- Hammer.
- Small nails, the length of which does not exceed six centimeters.
- Assembly syringe.
- Liquid silicone for mounting. Moreover, it must match the color of the clypeus or be generally colorless. It will be required to cover up the cracks that have arisen.
- A small art brush, as well as paint that matches the color of the product, with the help of these tools will paint the heads of the nails so that they do not spoil the appearance of the platbands.
To carry out the installation of platbands on a wall, which consists of stone, you will need:
- Electric drill.
- Drill with a diameter of 4 mm with a victorious tip.
- Screw plugs. If they are not available, you can cut out the wooden ones yourself and hammer them into the holes.
- Assembly syringe.
- Liquid mounting silicone, the color of which will either match the color of the product, or it will be transparent so as not to spoil the appearance of the structure.
- Small art brush and paint that matches the color of the product. These tools will be used to paint the heads of the nails so that they do not spoil the appearance of the product, which is called "carved window frames". DIY templates can be postponed until the next occasion.
The final stage of work
It is necessary to fit the platbands close to the edges of the window slopes that protrude, and fix them to the wall. Then you need to eliminate all cracks and irregularities using silicone. After bringing the product to aesthetic appearance the work can be safely considered completed.
Based on the information given above, it is immediately clear that it is quite possible to create carved window frames with your own hands. Templates - simple or complex - can be found or also made by yourself. Therefore, using even minimal skills and imagination, it is quite possible to improve the appearance of the building without spending a lot of money and time.
Carved window frames Is simple and inexpensive option decorating your home and giving it individuality since the days of old Russia. Several decades ago, every region of our country knew craftsmen with an individual style. decorative performance elements of platbands.
In this way, you could express your character. For example, in ancient times, a stranger could determine whose house it was - an official, a foreman, or just a bad place by the architraves.
Nowadays, they are only decorative. Today, even built by typical project a building can be distinguished and made unique. I am glad that interest in the origins and in the carved platbands is reviving.
Everyone can make their home individual, and besides, remember the origins of this art movement, which originated in the days of the ancient Celts.
You can design and come up with a composition for framing yourself, and then start implementing the idea, armed with the right tools and patience. Platbands have received a second life in our time, and are becoming more and more popular decor.
A bit of history
The word "clypeus" indicates its location, that is, on the face. Among different nations platbands were practiced in the days of wooden architecture. They appeared simultaneously with the windows, which were glazed with a fish bubble or mica. Initially, platbands were created to cover insulation and to isolate from wind and precipitation.
Patterned elements were originally seen among the ancient Celts, but their significance came to them during the renaissance of Russia after Mongol yoke... Craftsmen in Russia were the best in woodcarving.
When the time of Bolshevism came, the carved platbands were recognized as philistine and declared war on them. Destruction began. Nowadays, carved elements have received a second life.
It is interesting that in the old days it was believed that platbands could protect from the evil eye and served as a talisman, so often in the patterns one could see various figures and plants that make sense.
The value of the platband in the building
Platbands are essentially trim elements and correct name- cashing with many functions:

Design
There are several types of carved platbands.
Overhead
Materials and shape
For the manufacture of platbands, you can use natural or artificial materials. Previously, the elements were carved from wood that is resistant to weathering.

Important! Platbands should be regularly treated with waterproof paint or varnish to prolong their life.
Other materials are used:
- — laminated MDF, thanks to which you can accurately repeat the color of any wood species. But, such a thread is only suitable for internal use;
- -, ideally combined with plastic windows. It does not rot, with the rich color palette, resistant to light;
- — polyurethane- lightweight and unpretentious. Recommended for rounded windows;
- — metal- mainly used to protect the assembly seam.
Before getting into the hands of the master, the wood must lie down for at least 3 years until it is dry. The board, if possible, should not contain knots, chips, resin pockets. It is almost impossible to buy wood of this quality on the market. It is better to go to hardware stores or sawmills. It is also interesting that today you can buy ready-made platbands.
For self-made perfect for chamber drying, after processing in a special chamber. It will definitely not twist and crack. Its moisture content is only 10-12%.
Thread types
Let's talk about three ways of framing:

Platbands do it yourself
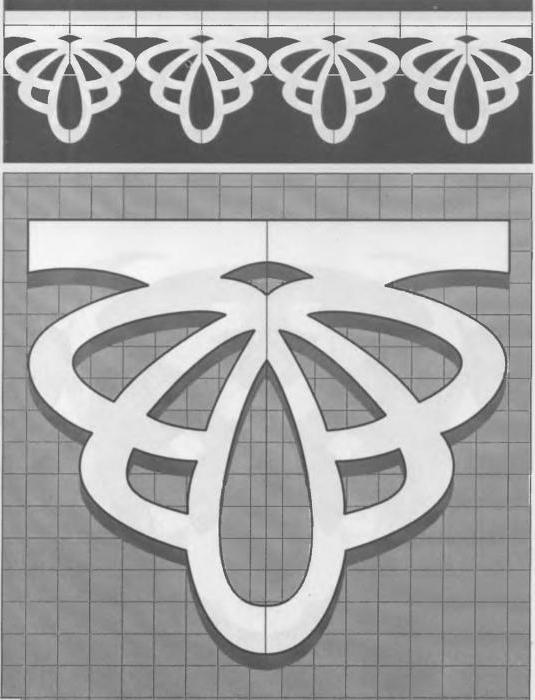
Pattern templates
To create beauty for the windows, you need first of all the patterns of the drawing, which is transferred to the wooden surface.
The template is created on the basis of a selection of patterns, which can be found in large quantities on the Internet or just in the photo.
To enlarge a drawing, there are several options:

When the drawing is enlarged, it is transferred to cardboard to be cut and used as a template. Each pattern has a pattern. Then the finished template is applied to the board, outlined with a pencil. If the windows are of different sizes, then it is better to make a drawing with a repeating rapport. For this, one or two elements are selected in turn.
The upper part of the casing is called a kokoshnik, and the lower one is called a towel. It should be borne in mind that fine threads are complex and deteriorate faster, which will require replacement of parts in the future. When working with drawings, you can come across the concepts of a lower bar, it is also a window sill, a vertical bar, an upper bar, hangers, vases, diadem, eyelet, panel, valance, crackers, sandrik, headdress, etc.
Important! Take into account the slope at the top carved platband to prevent the accumulation of snow and water during operation.
Design
Any process is based on a developed project. To do this, you need to make a drawing of the facade of the building with a detailed drawing of the elements. This will help you understand what the exterior of the building will look like. If you have a visualization program, you can complete the project in volume.
If we turn to traditions, then in ancient times the elements on the platbands carried the following meanings:
- The sun is carved on the kokoshnik and is a symbol of life, energy.
- Snake - reminds of wisdom and fertility.
- The cross is a symbol of harmony between the two worlds - material and spiritual.
- Plants are the personification of unity with nature.
- Earrings mean hospitality.
- The bird on the window is a connecting symbol of all times.
Work
The workflow begins with the preparation of materials and tools. It is better to use pine boards without knots.
Materials needed:
- jigsaw with a smooth descent and saws;
- pen drill with a diameter of 12 mm;
- chisels;
- sandpaper;
- Sander.
Measurements are taken from the window, stencils are circled. When the stencils are outlined, sawing begins. First of all, work is carried out with the internal openwork parts. To do this, you need to drill holes along the outline of the pattern.
Important! The drill should be perpendicular to the board.
Then the jigsaw comes into play. You need to start work from the holes and then follow the contour of the drawing. When the patterns are done inside, you can proceed to the outside. The tool should work from one end of the casing to the other. To make the work easier, you can make cuts.
 The result is a finished part on one side. The other side needs a mirror image of the pattern.
It is imperative that a sander or paper is used to give an aesthetic appearance. An 80-grit emery wheel is used. quick option- grinder, it will be slower to do this with a drill with an emery wheel and for a very long time - sandpaper.
After the work done, the platband can be primed to protect it from bugs, fungi, rain, sun and painted.
Painting
It should be understood that wood is a very sensitive material and can rot or be damaged as a result of an attack by insects, therefore, the part is often processed. The better the processing, the longer the decoration will last. The details must be thoroughly dried. Then you can paint the surface. Water-based emulsion is ideal for wood. The color can be chosen at will, in this case, white and cherry are often used.
You can buy wood oils that are absorbed into the wood. It is easy to update such a coating - I brushed off the dust and painted it on top. Among the disadvantages are the high price and a small selection of colors.
For painting, you need to prepare two brushes - a wide one for the outer surface and a narrow one for the side parts and hard-to-reach places.
Coloring is carried out in two stages. The second coat can be applied after the first one has dried.
The final stage is varnishing, while it is better to buy an acrylic composition for water based... The varnish is applied in one layer so that no smudges form. Platbands are dried outdoors.
How to assemble
 Before installation, the parts are assembled on the window to make it easier to work in the future. It is recommended to use scaffolding to make the process safer and more convenient.
The classic option for installing platbands is to mount to a wall or slopes. Today this is done using self-tapping screws 4.2-6x80x150. In the case when the wall is not wooden, then propylene dowels are used. Typically one attachment point for 5 square decimeters platband.
When joining the slopes, a step of 150-300 mm is used. The figure varies depending on the mass of the casing, which depends primarily on the thread. The heads from the fasteners are hidden in the ligature top level, or apply putty and paint.
With a laid on thread, the finished elements are attached to the wide casing with nails without heads. For the strength of the connection, they are lubricated with glue. Self-tapping screws can damage the carved area.
Telescopes
Modern buildings are already insulated and often sheathed with siding. Windows are usually placed flush with the main wall so that it does not sink into it. Fastenings are carried out on the frame without options. Of course, unless telescopic models are provided. However, they will only be able to hold onto reinforced frames used in harsh climates. The frame material itself is more durable or modified wood.
Telescopic elements are installed on the undercut additional elements related to the rigidity of the frame. Fastening is provided by groove extensions. Such telescopes are not intended for installation outside, even a gust of wind can break not only the platband, but the entire frame.
On a wooden frame or PVC with a keyway, telescopes are installed without removing it. If base surface the window is inaccessible, you will have to pull out the entire window.
Nuances of carved decoration
- home compatibility - often when combined with plastic frames, difficulties appear. It is better if the plastic in this case imitates a wooden structure;
- your experience, if platbands are made for the first time, then you need to choose a lighter pattern;
- each region of the country had its own traditions and design
The use of carved platbands during exterior decoration home is able to transform any building, even the most primitive in architecture. The word "platbands" is based on the meaning "on the face". It is not surprising that with such decorations the house acquires recognition, originality, originality and completeness of the image.


Peculiarities
By themselves, platbands have several functions. Decorative is just one of them. With the help of such elements, you can visually make narrow house wider, and the low structure "to increase in growth."
Thanks to such decorations, the gaps between window frame and a wall, which in turn leads to a decrease in the level of noise from the street. In addition, dust and water do not penetrate into the cracks, and cold into the house itself.
Using carved platbands, you can make the building colorful in the national plan and decorate it semi-antique. It is important that the application of these elements is appropriate. Wooden platbands on a plastic window will look just as strange as metal ones on a log house.


Views
Carved window frames can be made of plastic, MDF, fiberboard, metal and wood.
The most common and common option is wooden. They look great, often striking with rich carvings, and are amenable to restoration. Maple, alder or birch, as well as pine are often chosen as the basis for creating curly elements. Such a tree cannot be called particularly resistant and durable, but it is easy to cut and is inexpensive.
For the manufacture of small elements, an apple or cherry tree is often chosen.
Products made of beech, oak, larch or ash resist well to precipitation and temperature extremes, but these species are much more difficult to process.


There are several types of wooden platbands:
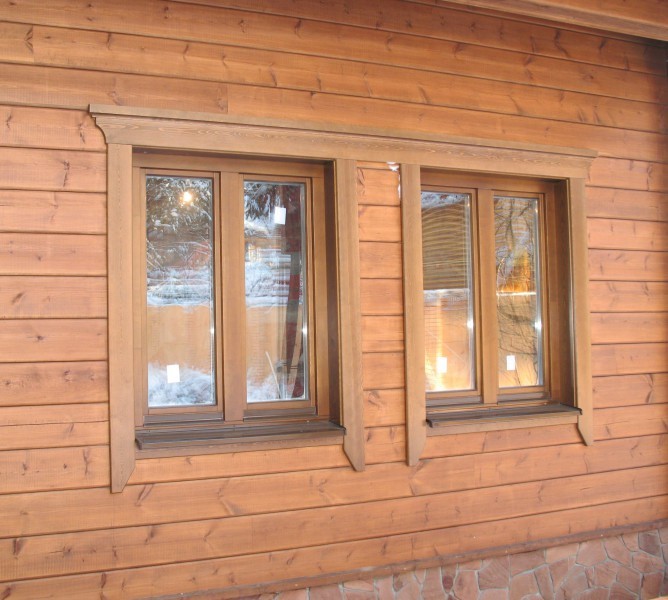
- Flat. There is no "decorative implication" in them. Such models are used only for one purpose - to close the cracks in the house in the most economical way.
- Shaped. Models have a convex surface. They can have protrusions and depressions in the form of cut patterns. In such "frames" the windows look very elegant. Window shutters are often especially expressive.
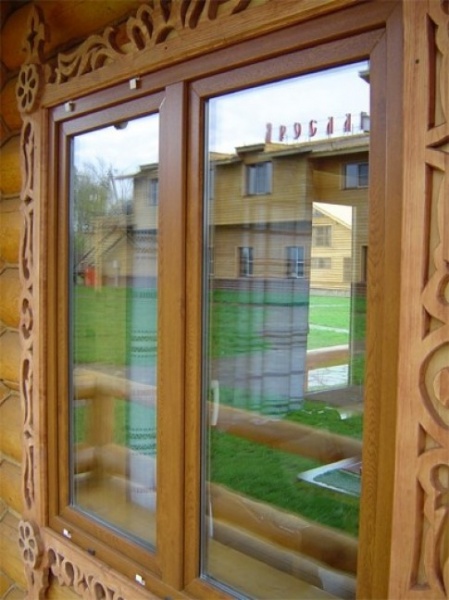
- Curly. Such products are distinguished by their special individuality, originality of shapes and slotted elements. They can be fully called decorative elements of the house. To make these products, you need a vertical milling machine.
The problem with wooden platbands is that over the years the material can darken, crack or rot. To prevent this, they periodically need to be treated with a protective varnish.


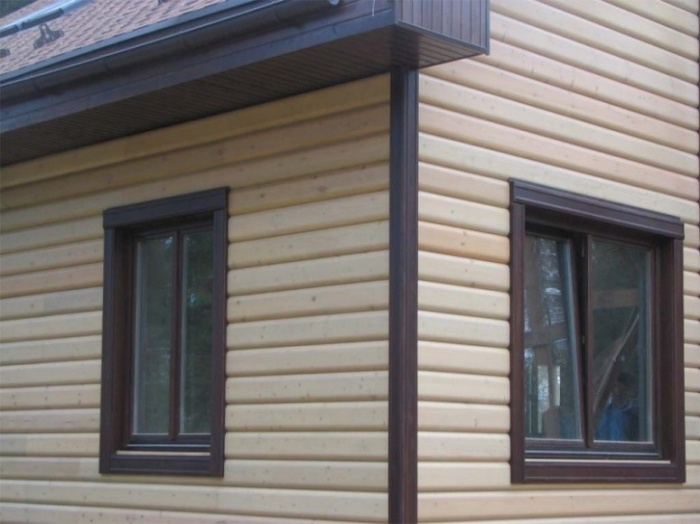
Platbands made of metal look no worse than wooden ones and organically fit into the appearance of the facade, decorated with siding. The material allows you to decorate the product with complex patterns and combined colors. Such platbands are durable and mounted without much difficulty. But do not forget that metal is susceptible to corrosion, therefore, measures must be taken so that traces of rust do not appear on the frame around the windows.


Window PVC is better all will be decorated with plastic platbands. Unlike wooden ones, these can be made in any shape and color. They will not crack over the years, will not rot, and insects will not eat them. Products are easy to install. They serve for a long time and do not require special care.
The only problem is that these products cannot be made independently, and manufacturers do not offer options with truly thin embossed carvings.


Fiberboard allows you to make any patterns on it and is easy to process. That is why it is often used to decorate windows. So that such products do not absorb water over time and do not deteriorate, they must be laminated before use.
A material similar in structure is MDF - a finely dispersed fraction of wood. In fact, this is an improved version of fiberboard. This material can also be used for the manufacture of platbands, it lends itself to processing no worse than fiberboard.


The thread itself also differs by type.
- Slotted. It is created over the entire area of the casing and resembles airy lace.
- Invoice. In this case, the openwork elements are superimposed on a solid base, to which they are glued or nailed. With this approach, finer, lighter and more precise ornaments are obtained than when using a blind thread (not through and through).


Platbands also differ in the type of installation.
- Overhead they are simply attached to the wall near the window and nailed without hats, or they sit on glue.
- Telescopic cr-shaped protrusions are inserted into the gaps between the window frame and the wall. It is not as easy to install them as overhead, but they provide more reliable insulation of the joint from external influences.


How to make and install?
To make wooden platbands with your own hands, you will need the following tools.
- drill and drills for it;
- jigsaw with a set of files;
- chisels;
- sandpaper;
- flap disc on a drill made of sandpaper;
- grinder;
- milling cutter.


First you need to decide on the openwork that will be present on the platbands. People with talent and proper training can make the desired image on their own. Also on the Internet you can find a huge number of a wide variety of drawings.
The selected option must be transferred to the board according to the template. Sometimes the template has to be enlarged. The easiest thing is to make a printout the right size, transfer the diagram to cardboard and cut it out.
Board thickness at slotted thread must be at least 3 centimeters. If the thread is laid on, you can use 1 centimeter thick wood to create an openwork.
When starting the process of creating slotted platbands, many are thinking about whether it is possible to create a drawing on several of them at the same time, folding future products in a pile. After all, the drawing is the same.


A professional with the appropriate equipment can allow such a solution to the problem. As for DIYers, they often have insufficient power jigsaws. As a result, the process of processing several boards at the same time is very slow.
When the lines are straight, the saw is running at an acceptable speed; in rounded areas, the process takes too long. As a result of the "wholesale" approach, the gain in time is not as significant as we would like.
It should also be borne in mind that even high-quality saws deviate when processing wood that is too thick. Therefore, sloppy cuts can occur on the lower boards. Therefore, getting down to business, you need to think carefully about all the nuances of the process.


It is important to correctly position the drawing on the wooden blank. To prevent the platbands from cracking, the elements should "go" along the wood fiber.
To begin with, you should cut out the excess tree in certain places. The saws are selected in such a way that required hole the diameter was slightly larger than the width of the tool.
A file is installed in the slots obtained at the first stage, and all unnecessary is removed according to the planned pattern. You need to act precisely, but taking into account the fact that the window frame will be looked at from afar, small errors should not overwhelm the master.


If the product has a curly edge, it is also created using a jigsaw. When cutting too complex shape some places may not turn out to be very elegant. The situation will be corrected by further processing with a chisel. The finished look is given to products at such mandatory manufacturing stages as grinding, priming and painting.
Grinding is fastest using a sander. With an emery wheel on a drill, the procedure is already slower. Manual processing using sandpaper is very time-consuming. If you bring the look of flat surfaces to completion with a grinder, and sandpaper it small details manually, you can get the desired result without delaying the process of creating platbands.
The primer is needed so that the beauty created from wood by yourself is not exposed to dampness, the effects of the sun, fungus and woodworm beetles. Any external impregnation will do. It is most convenient to lower the future platband into a container with an appropriate solution for a few minutes. Another option is to go over all curls and cuts with a brush.


For coloring, you can use different compositions. It is convenient to use the wood oil that is absorbed into it. Such coverage will need to be renewed only after a few years. Before re-processing, you will need to clean the surface and remove dust from it. When choosing this method of protecting a product, one should take into account that oil is expensive and the choice of colors is limited.
If you use opaque paints, you will need to repaint the platbands once a year. To keep the products neat, the old paint must be removed before applying a new one, the primer must be re-primed and only after that a fresh coat must be applied.
The last stage of work is the installation of platbands. They can be attached to a wall or backing board and only then to the façade around the window.


- If you want to decorate your house with wooden platbands, you can purchase selected material that has passed chamber drying... In such a chamber, moisture is removed from the wood in an accelerated mode, bringing its level to a maximum of 12 percent. Cracked and warped boards during drying are discarded, and only a high-quality product reaches the consumer. Therefore, buying it, you do not have to worry about the fate of future products.
- It is better to look for boards that have undergone special processing in hardware stores or at sawmills. In no case should the specimens have large knots, resin residues or other traces of negative properties that can be felt when creating a pattern. It is best to order boards, the width of which is 10-15 centimeters, and the thickness is 3-4.
- Before starting the direct creation of platbands, it makes sense to hone the skill of the carver and the skill of creating a specific pattern on cheap boards.


If you want to create not only beautiful, but also meaningful products, it is better to take into account the meaning of some elements of the platband pattern that have been featured on the facades of Russian-style houses since ancient times - the decorations on the houses carried not only a decorative function, but also the function of a talisman.
When creating platbands, the owner of the house got the opportunity to express himself, conveying certain information to those around him. For example, the sun in the center of the upper part of the casing signifies energy and life. The snake as a decorative element represents fertility and wisdom. The cross, inscribed in the carved decoration of the window frame, symbolizes the harmony of spiritual and material aspirations.
Platbands are an important component for any window. They are often associated with beautiful carvings that serve purely for decorative purposes. But they do not always have a catchy look, and they have much more functions. It is a versatile element that is essential for protecting windows and improving their insulating properties. Therefore, their installation is recommended in almost any wooden house.
What are platbands for?
The platband decorates the window and makes it much more colorful. But initially its purpose was defensive. Platbands are used as an external element window frame, which not only protects it from damage, but also closes the mounting gap between the frame and the wall of the house.
This approach provides:
- Reducing heat loss;
- Elimination of through holes;
- Dust and noise protection;
- Moisture protection.
Interesting ! Previously, platbands were also used as amulets. Because of this, they were given a colorful and non-standard look.
Although these advantages are not so significant in concrete and brick structures, for wooden houses they are extremely important. Over time, wood can dry out and deform, which leads to gaps between the frame and the rest of the structure. Platbands allow you to slow down this process, as well as reduce damage from existing holes.
Types of platbands
For houses, a lot of varieties of platbands are used. Often they differ in the material used, since they have a similar design. The main classification of platbands follows the installation method and marks two types of platbands:
- Overhead;
- Telescopic.
The overhead version is considered the most common, being the old type. It is installed simple method over the window frame, thereby blocking access to the sun and precipitation to the joint. Installation of this type is very simple and does not require much effort.
The telescopic casing is more modern. Its attachment does not require additional elements like screws or nails, because it is placed in the gap between the wall and the frame. As a result, it is securely fixed around the entire perimeter.
Priority use telescopic method installation. It is more convenient, because it more reliably covers the gap and prevents its deformation. However, its installation is complicated by the fact that for it it is necessary to completely remove the window, which is not always possible in wooden houses. In such cases, it is easier and more efficient to use the invoice platband.
Platband materials
Materials for platbands may vary. Wood is often used for these tasks, which is recommended for wooden structures... But here several options are allowed, including:
- Wood;
- Plastic;
Wood is a practical and natural option for any building. Due to its versatility, it can be given any ornament and style, and the use of the same type of material will allow it to perfectly complement.
Advice ! For better alignment, it is recommended to make platbands from the same wood as the structure. But if the texture is the same, then the color can be changed using special compositions.
Often it is chosen precisely because of the variety in the decor, because other materials require special treatment on machine tools and rarely have such decorative elements.
While wood is reliable and durable, it has its drawbacks. These include vulnerability to moisture and high temperatures... In addition, frost also affects it negatively, destroying and deforming the structure.
Plastic in this regard is much more convenient. It is practical and reliable, and ample opportunities during production, they can give it any texture, including woody. But at the same time, it does not deform from moisture and temperature extremes, and its lifespan is much longer. Another advantage of plastic is that it has fasteners in advance, which makes it possible not to spoil the appearance of the platbands with nails or screws.

Perhaps the only drawback of plastic is its artificiality. Many owners do not want to supplement their home with artificial materials and reduce its environmental friendliness. The third option can help here.
MDF is a board made from wood waste. They are natural, but at the same time impregnated special formulations, which significantly increases the life of the material and protects it from external factors. Often, such platbands are laminated, which increases their lifespan and reliability. The only drawback of such elements is their relatively low strength compared to plastic and wood.
What material to take is a purely individual choice. Each of them has its own advantages, but there are also disadvantages.
Which wood is better
If the choice fell on wooden platbands, then it is important to note the choice of wood species. In fact, almost all options are suitable for this task, because they do not need to transfer any load. But here, too, there are some nuances.

The best option for platbands is oak or beech. It is a tough rock that can last a long time and will not deform from moisture or heat. But the problem is that it is extremely difficult to work with. It is extremely difficult to independently cut patterns on such material, and not every master will undertake this.
Advice ! The way out of this situation is special milling machines, the pattern on which is pre-loaded into the program.
If you need a softer and more inexpensive breed, you can choose a linden tree. It's easy to work with, but without careful handling, it will quickly collapse. It is necessary to use high-quality antiseptics and some kind of coating, which can worsen its appearance.
An intermediate option for such a task is birch or pine. It is a fairly sturdy strain that only requires basic maintenance. But at the same time it will be easy to work with her.
Preparing for installation
You must first take all measurements from the window. It is important to choose the appropriate dimensions so that the frame contour does not peek out from behind the platband and is reliably hidden. Further, the preparatory stages are carried out with the material.
If wood is used in the process of work, then you need to pre-cut the blanks of the platbands, decorate them at your discretion and process. Plastic and MDF do not require processing, but wood needs to be impregnated with protective compounds against moisture, as well as to protect against insects.
Important ! All work is carried out with dry lumber. If it is poorly dried, then deformation is possible after installation, which will ruin the whole work.
After measurements and processing, it is important to mark in advance the places of joints and fasteners on the platbands. All holes are pre-drilled. Platbands are carefully polished.
It is also important to prepare the work site itself. Window joints are carefully insulated, because in the future access to them will be limited. If any insulation or repair work is planned, then they need to be done before installation.
You must first select the mounting method. For telescopic platbands it is not required, but there are several options for invoices. Among them, the most popular are:
- Nails;
- Deaf thorn;
- Through thorn.
The first option is the simplest, but spoils the overall picture and creates an extra load on the material during installation. Therefore, the cleats are more comfortable. A blind thorn implies the installation of small thorns on the window frame, and small holes are made in the casing for them. A through thorn implies the same technology, but a through hole in the casing.
If the house is built from a log house, then you need to make room for the platbands. To do this, it is worth cutting off the protruding edges, which can be done at an angle.

Installation of platbands in a wooden house

After carrying out all the preliminary procedures, the installation stage begins. To begin with, all the components of the casing are interconnected. To do this, you can use the same spike technology, nails or glue. But the latter is often used as an auxiliary component.
During installation, when using spikes, you need to do the following:
- Mark the future location of the studs on the frame and trim;
- Make or purchase spikes for this task;
- Drill the appropriate holes in the pre-marked places;
- Place the platband on the spike and fix it.
The first stage includes a preliminary marking of the perimeter, where the fasteners will be placed. It is important to evenly distribute the load, so they should be placed around the perimeter of the structure.
After the acquisition or manufacture of thorns, future holes are drilled for them. This is a simple step, after which the installation process itself begins. The platband is neatly positioned so that all the spikes fall into the holes.
The task is quite simple, it is only important to accurately mark the future location of the fasteners. It is recommended to use glue during work in order to securely fix the structure after installation. This will reduce the risk of it falling and improve the insulation of the holes.
You can simplify the process by ordinary self-tapping screws... Although they will degrade the appearance, their use greatly simplifies installation.

Upon completion of the work, it is worth treating the working holes with a composition so that they do not absorb moisture. Next, you just need to monitor the state of the structure and take care of it as needed.
The whole process is quite simple, it is only important to qualitatively connect all the elements and not neglect preparatory steps installation. Thanks to this, such a structure will serve long time decorating the house and protecting residents from drafts and moisture.
After installing windows in a wooden house, there is always a gap between the wall and the window frame. The easiest way to fix it is to install platbands. Apart from functionality, they play a role decorative element that decorates the facade of the house and makes its appearance unique and complete. One of the most beautiful are the carved wood trims.
Types of platbands made of wood
Today, platbands exist not only in wood, but also in wood-fiber, plastic and even ceramic. But the most demanded material for their manufacture is still wood. This is due to its environmental friendliness, affordable price and high aesthetic qualities. In addition, wood can be restored, thereby extending its service life.
Smooth or profiled from solid bars. If in the future the platbands are painted, then conifers are used, most often pine. When made from fine wood, they are varnished. Fasteners are nails, screws or liquid nails.
With figured carving from solid bars. They are mainly made of fine wood and varnished. They can be attached both to screws and to simple and liquid nails.

Smooth or profiled from glued bars. They can be produced already finished with laminated film or veneer of expensive wood species, which eliminates the need for additional finishing... But, there are also no finishing, intended for painting.
Stylized for a specific style. The most expensive type of platbands, which are made exclusively to order.
In addition, they are divided by appearance on flat, shaped and curly platbands.
Flat. The cheapest and simplest type of platbands. But it has a low aesthetic value.
Shaped... Most often they have a convex surface that has cuts, protrusions or grooves. They cost more than simple flat ones. This is due to the production technology, which requires the use of special equipment.

Curly wooden platbands... They are decorative elements and add personality to the house. They are produced on special machines equipped with vertical cutters. In this case, the desired pattern is programmed, and the machine automatically mills the surface. But despite Newest technologies, the capabilities of such equipment are limited.
And only a master can make an openwork relief. Wooden platband price self made will depend on the complexity of the ornament and the type of wood.
But the main difference between manual milling and machine milling is that the machine does not make a through thread, but only applies a pattern to a certain depth of wood.

Wood for the manufacture of platbands
If it is necessary to make a flat or shaped casing, then a simple pine is used. To make carvings, you need soft wood, such as linden. It is easy to process even hand tools and easy to sand. But due to its high hygroscopicity, it needs high-quality topcoat... This involves the application of several layers of paint and varnish composition.
In regions where significant temperature differences are possible, as well as high humidity or vice versa, a dry climate, wooden platbands are made of dense and hard wood. These include birch and oak, which are extremely difficult to process, but they will last for more than a decade. Therefore, platbands from these types of wood are most often made on milling machines.
The only drawback of all types of wooden platbands is their high hygroscopicity, which eventually leads to their cracking and drying out. This can be avoided by periodically updating the protective paint and varnish layer.
Tools required for the manufacture of carved platbands
Through thread most affordable way decoration of platbands for non-professionals. It does not require special skills, you just need to have patience, diligence and a sense of beauty.
A large number of firms offer, various platbands made in an industrial way. But it is much more pleasant to make it yourself. As a tool, manual milling machines, conventional or electric jigsaws, different kinds drills, chisels and hacksaws.
Basic rules for the manufacture of platband
When making wooden platbands with your own hands, it is important to consider that after installation, they should not interfere with the normal opening of windows. Therefore, the internal dimensions of the platband are made larger than the size of the window frame by 2-3 cm.
The upper part of the casing is called "kokoshnik", if necessary, it can be extended by fastening the parts with thorns. Bottom part called "towels" and is attached at an angle from the wall to drain water. It also has a thread that matches the style of the "kokoshnik" thread, but the bar for it should be 1 cm thicker than the top bar.

Before installing the platband, it is necessary to nail the slats around the perimeter of the entire window - this will completely close all the unevenness of the wall. The joints, however, must be carefully fitted.
All platbands are made in the same style.
Preparation for work
For the manufacture of a carved wooden casing, you should choose a board 3-4 cm thick. It is ideal for free opening of window sashes. The width should be sufficient to cover the edges of the walls and protect them from moisture. Alder, linden, aspen or conifers can be used as wood.
The choice of small ornament is not the best good decision... It will be difficult to distinguish from a distance, and it will take more time and a special thin tool to manufacture. Therefore, the ornament should have large elements that are clearly visible from afar.
The arrangement of the carved elements along the grain of the wood will protect the platband from cracking. This is especially true for coniferous wood.
Use simple patterns at first. The easiest for beginners in carving are the round pattern elements, which are simply drilled with a drill. Below are sketches of samples of wooden platbands.
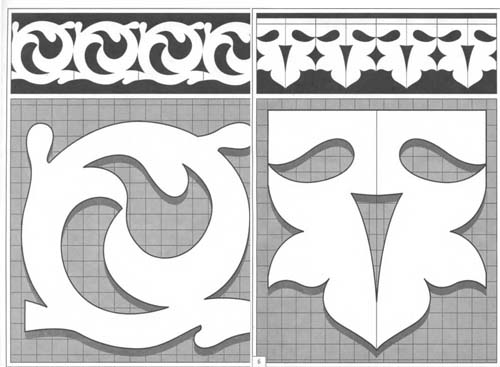

More details about their manufacture can be seen in the video.
Installation of platbands on windows
You can make stencils yourself or transfer a drawing from ready-made sketches. First, a pattern is applied to the workpiece, then a hole is drilled with a drill and the necessary ornament is cut from it with a jigsaw. Further, the cut out platbands must be well sanded with sandpaper.
After the carved blanks are made, they should be connected correctly. In total, there are two ways of connecting: on spikes or half-tree connection. The first method is much simpler and more popular, the second is used extremely rarely.
A special glue is used to fasten the platband. It is important that it is synthetic, since in organic compound fungus may develop and moisture may collect. All this is very harmful to the wooden platbands.
If the elements are attached to nails, it is advisable to first grease all joints with glue, and only then fix them with nails. Do not forget about the glue treatment of all joints and especially the thorns.
Platbands are easiest to install on windows using wood screws. You can decorate their hats with sawdust mixed with glue, which will be painted over later. But even without this work, the screws will be practically invisible against the general background.
Finished platbands must be covered with a protective compound that will extend their service life for many years. For this, it is better to use special impregnations, which should be periodically renewed. The paint, no matter how high-quality it is, will begin to crack and peel over time, and it will be much more difficult to fix it.
When choosing a pattern for the future platband, it is very important to take into account the style of the whole house, because they should harmoniously complement it. Here are some examples of photos of carved wooden platbands.