Decorative trims on the windows are carved. Carved windows in the interior: openwork grace (24 photos)
This summer, a successful idea came to me - to make some kind of individuality in our country house, so that it pleases the eye and makes it different from other houses.
I thought a little and found a solution, the more I gradually prepared for this. I have long been interested in the decoration of houses in the old days, I reviewed a large number of sites on this topic. Even a small collection of photos of platbands and decorative elements has been gathered.
But there, mostly houses of timber or logs were finished, and our house is sheathed with siding, and I thought that you could not make such beauty with siding.
In a word, everything worked out and came up with, it remains only to do.
I apologize in advance that there are not enough detailed photos, tk. at that time he did not yet know about the existence of the 7dach Club and did not take step-by-step photographs, but simply took pictures for his own interest.
I'll tell you how I made the platband, according to my technology and to the size of our window.

Used the tool:
- electric planer
- electric jigsaw
- drill
- feather drills of different diameters
- clamps - 4-6 pcs.
- drill D 4 mm
- a circular saw
- square
- pencil
- A4 paper - sheets 10
Material and consumables (for 1 platband):
- self-tapping screws 16 mm long - 8 pcs.
- self-tapping screws 70 mm long - 2 pcs.
- pre-dried board, 25 mm thick and 150 mm wide - 7-8 m
- dowels - 45 pcs.
- waterproof glue for wood
- sandpaper - about 10x20 cm
- plastic corner (the top 10 mm bracket is ideal for attaching a mosquito net to a plastic window) - 2 pcs.
Preparatory stages
1. Creating templatesFrom the photos I have, I chose the one I liked and reworked it in my own way. You can, of course, draw your own individual platband, but first you need to read a little about the amulets of Russia, about the symbols of Bereginya, the Sun, etc. All this is present in Russian platbands.

Photo used as source material
Our windows have an internal size of siding platbands of 88x88 cm. This was the starting point for the calculations. Therefore, the side parts should be exactly 880 mm in height and not wider than 140 mm (limited by the size of the board). The length of the upper and lower parts was determined by eye, the main thing is that they fit together beautifully. With the help of Photoshop I made a sketch of the casing in natural size.

2. Dividing a sketch into details in Photoshop

Amulet Bereginya - one of the elements of the casing

Some of the templates
Transferred the drawn details to thick paper and cut out templates.
3. Preparation of blanks
Sawed the board according to the length of the templates with a small margin. When sawing, it is imperative to select sections of the board without large knots. I sharpened these blanks to a thickness of 20 mm and drew the outlines of future patterns on them.
Sawed with an electric jigsaw with a narrow saw. The tilt adjustment of the saw blade must be set to "0", so there will be no burrs at the edges of the cut. Pay attention to the shape of the teeth, other teeth give a poor-quality cut with burrs along the edge, and cleaning it with sandpaper along all the bends is only a punishment for some kind of sin.

Jigsaw saw
Before you start sawing, you need to drill holes in the sawn places with a diameter of 8 mm to insert the file. Then drill out the round parts of the future voids with a feather drill of a suitable diameter. This is easier than cutting with a jigsaw, especially if the diameter of this part is small. You can't turn around with a jigsaw. And only after that you can start the main work with a jigsaw.
Assembling the sides of the casing
Each side of the casing consists of several carved parts, fastened together with glue and dowels. The assembled carved parts are fixed in the same way on rectangular slats.
Assembly

Dowels are glued into the carved parts, which, when assembled, are inserted into the mating sockets for glue.

Assembly

Assembly
Side part, composed of 4 parts
The black dot at the bottom is a hole (drilled in place) for attaching the platband to the wall.

Top part
The upper part consists of 6 parts. For clarity, the photo shows the joints of the parts and the location of the dowels. Two squares are the places where the brackets are attached from the back side (they are described below).

The locations of the dowels are marked. Consists of 4 parts.

Assembled on a dry (without glue) platband
After assembling all sides, you need to paint them in the desired color. And only then to make the final assembly of the casing.
For me, painting is the most tedious part of the job. It is necessary to paint over each curl with a small brush in two layers with intermediate drying. I made the first platband for the attic window and painted it by hand, but now I have made a kit for the remaining 4 windows and will paint only with a spray gun.

bracket
The casing is attached to the window using brackets for plastic windows screwed to the upper part of the casing from the back side. With these brackets, the platband clings to the upper part of the siding platband like hooks and hangs on the window. From the bottom, in the side parts, one hole is drilled from the side, through them the platband is attracted to the wall with long self-tapping screws.

I made dowels myself, I prepared 200 pieces. Enough, a little more and left.

Pediment decoration.
It was with him that the whole venture with carved lace and platbands began. As the saying goes, appetite comes with eating.

Gable
By the way, about the financial side: 5 platbands cost me a little less than 2,000 rubles. Having rummaged on the Internet, I found about the same, but more unpretentious, at a price of 8500 rubles. for one set. So at least 40,000 rubles. remained in the family budget. Also a pleasant incentive.
The entry is posted in sections:
Wooden platbands for windows: photo ideas how to make carved platbands do it yourself on the site. Tradition to establish window frames does not pass over the years and is still relevant today. Modern products can be made not only of wood, but also of other materials, and their functional purpose most often comes down to decorating the window opening. Making platbands with your own hands is not as difficult as it might seem at first glance, but it requires certain skills and tools.
Platbands are a traditional decoration of windows outside the house.
Advantages and disadvantages of wooden platbands
Before you start making carved window frames, you should consider their advantages and disadvantages. The positive aspects of this element of home decoration include the following:
- with its help, you can visually change the size of the window opening, for example, expand or narrow it. This is very convenient in cases where the window in your house does not look exactly the way you would like it to be. The element also affects the appearance of the entire facade of the house;
- emphasizes the original style of the building, and also allows you to combine all the buildings on the site into one architectural ensemble. If you make the patterns on the window frames of all buildings the same, then this will give the impression of a holistic composition;

Wooden house decorated with beautiful window designs
- protects the gaps between the window and the wall from moisture and dust. Increases the level of thermal insulation and reduces the noise level from the street;
- is the only optimal option for external decoration of wooden windows. Any other design option for a window opening in a wooden house will look simply inappropriate.
Installation platbands on windows may also have a number of disadvantages:
- the product is very dependent on external conditions, especially if wood is used for manufacturing. Wooden decorative elements can crack from frequent temperature changes, swell from high humidity and burn out in the sun. In order to prevent this from happening, the wood must be treated with special compounds that extend the life of the product;

Windows with shutters and discreet but pretty carved platbands
- the need for regular care and treatment. The element will have to be constantly opened with varnishes and paints, otherwise it will quickly lose its attractive appearance and will only spoil the facade of your house;
- inappropriateness of installation on modern. For PVC windows, wood trims may look alien, therefore it is recommended to install them on classic wooden frames.
Helpful advice! If you nevertheless decide to install an element with a plastic double-glazed window, then you should paint the frame under a tree, or paint the platband white.

Window trims define the style of the entire home
DIY carved window frames templates
View and design features carved platbands largely depend on how this element will be attached to the window. There are two main types of fastening:
- Overhead - mounted on a window frame using nails, screws or construction glue.
- Telescopic - have special L-shaped protrusions that fit into the grooves of the window or door frame. This type of thicket is used to frame doors rather than windows and is more difficult to manufacture.

Sample carved platbands on the windows
Also, platbands can be flat and standard, and the most attractive option from the point of view of appearance is the carved platbands on the window. Life-size stencils can be easily found on the Internet. The carved version is usually made using specialized equipment.
As for the material for the manufacture of this design element, it can be wood of various species, plastic, polyurethane, metal or laminated MDF. The first option is considered classic and is most often used for decorating wooden buildings. Its advantages include the original appearance and style, and its disadvantages are great dependence on external conditions.

Sketches of carved wooden window frames
The expediency of using plastic trims on windows is due to the fact that, unlike wood, plastic does not swell from water, tolerates temperature changes and does not lose its attractive appearance as a result of prolonged exposure to direct sunlight.
The disadvantages are not such an authentic appearance and a violation of the general stylistic concept of a wooden house. However, this can be corrected by decorating the plastic under a tree. Photos of plastic window trims, stylized as wood, confirm the demand for such a solution.

Platbands made of laminated MDF visually do not differ from wooden
MDF platbands are a borderline option between wood and plastic products. They are made from wood waste, so they can boast of being more environmentally friendly than plastic ones. They are also more resistant to moisture, ultraviolet radiation and temperature changes than natural wood. In the photo, window frames made of laminated MDF are indistinguishable from wooden ones.
Products made of polyurethane compare favorably with other types in that they are unpretentious in operation. You can buy a frame for a window in a wooden house made of polyurethane, install it and forget about its existence for a long time.

Metal platbands are good if you need to protect the assembly seam from the outside or inside of a door or window. The metal product is connected to the profile box into a single structure.
Choice of wood
If you decide to stay on the classic wooden version, then it should be borne in mind that the main operational characteristics of platbands depend on the type of wood from which they are made. There are the following options for carved platbands on windows in a wooden house:
- from hard hardwood species - beech, ash, oak. These types of wood are characterized by durability and strength, however, it is quite difficult to cut a pattern on hard breeds without special equipment, it takes a lot of time and effort;

Choice of patterns for wooden platbands sufficiently varied, which allows you to choose the most suitable option
- from soft hardwoods - alder, linden, aspen. Such materials are much easier to process, and you can even cut patterns on them by hand. On the other hand, such wood very easily absorbs moisture and becomes unusable under the influence of external unfavorable factors, therefore it needs special processing and impregnation;
- conifers and deciduous species - birch, pine. They have good performance characteristics, while being quite easy to process;
- from apple or cherry - these varieties of wood are good for the manufacture of individual decorative elements that are attached to the top of the main structure.

The most common material for the manufacture of platbands is wood.
Helpful advice! The combination of several types of wood can give an interesting result from a decorative point of view, but do not forget about the practical side of the issue. Try not to use both soft and hard grades at the same time, use impregnations and coatings.
The nuances of making wooden platbands for windows: photos and tips
There are a number of general points that you should pay attention to when making platbands:
- Consider the color scheme of the walls of your home when painting decorative items. This does not mean that the color of the wall and platbands should be the same, but there should be no obvious contrast. In the first case, the element will simply merge with the wall, and in the second, it will violate the integrity of the appearance. You can see the best options for color combinations on numerous photos of window frames on the Internet;
- the size of the platbands is very important. They should not be too large or too small, since an overly large element will obscure the window, and a small one will be lost against its background. The best option for the standard size of the window opening is 3-4 cm wide;

Platbands for windows can be made by hand
- the quality of the coating with which the element is processed is very important. To do this, you need to use special varnishes and paints intended for external work. Be sure to take into account the climatic characteristics of your region and choose a coating that will withstand all natural influences. And if a special fireproofing is provided for your wooden house, then the platbands should undergo the same processing;
- for the manufacture of external carved platbands, you must create a template. You can do this by focusing only on your imagination, or you can download one of the many options on the Internet.

Carved platbands on plastic windows of a wooden house
Wooden window frames: step-by-step instructions for making
As already mentioned, before you start creating decorative elements for the window with your own hands, you need to make a template or stencil. It should be the same for all windows to give the whole house a consistent style. If you are new to wood carving, then it is recommended to use variants of patterns containing large elements that will be easy to carve. In addition, it should be borne in mind that there are two main ways to create threads:
- Slotted thread - a through pattern that makes the decorative element look like the original wood lace. Quite difficult to manufacture, but it looks very original.
- Applied thread - the elements of the picture are created separately, and then attached to the main board. This option is easier and better suited for beginners.

Step 1: preparing the wood and the necessary tools for the job
When making do-it-yourself window frames according to a template, stencils are recommended to be used regardless of the selected type of thread. In this case, the elements of the pattern must be placed along the grain of the wood, so the thread will be insured against premature cracking.
To create your own window frames for windows in a wooden house using a template, you will need the following tools:
- hacksaw for wood;
- a set of special knives and various types of chisels;
- sanding or sanding paper;
- manual or electric jigsaw;
- drill;
- milling machine.

Do-it-yourself window frames, step 2: drawing a pattern on the front wooden surface with a simple pencil
Photo of carved window frames, made by hand, show that with certain skills and special tools, you can create a pattern of almost any complexity. The work itself is performed in this order:
- measurements are taken. For a window in a private house, the standard dimensions have fairly floating values, so you need to make accurate measurements of the height and width of the opening;
- boards are selected from the wood of your choice. The lumber must be dry, otherwise the deformation of the pattern and the rapid loss of the attractiveness of the appearance by the platbands is possible. The width of the board is selected depending on the size of the window opening, but the thickness should be at least 30 mm if you plan to make a slotted thread, and at least 10 mm for the invoice;
- according to sketches (pictures, templates) of carved wooden platbands, blanks are cut out on the windows. This is best done with specialized carpentry tools;

Do-it-yourself window frames, step 3: after applying the pattern, you can start cutting, it is important to remember that all holes should be carefully rubbed with sandpaper
- from the seamy side of the casing, it is necessary to select wood to a depth of about 1-2 mm. Thus, you will ensure a tighter fit of the element to the surface;
- the pattern, which is applied to the board according to the template, is cut out using a jigsaw and drills of various diameters;
- all holes and slots are processed with sanding paper, after which wood dust and shavings must be removed from the holes. This is done so that fine dust does not interfere with further processing of the product;
- casing elements are attached to its wide base. This can be done with nails without caps or with a special construction glue for wood.

Do-it-yourself platbands on windows, step 4: the finished platband can be tinted with stain or immediately covered with weather-resistant varnish
Installation of carved platbands on the window
There are two common ways to attach a finished product to a window. The first of these is the installation on a blind spike. Such spikes are installed on the inside of the element, and special holes are drilled in the frame for them. Then you need to apply a little wood glue to the spike and insert it into the groove. This type of fastening is good in that it protects the installation site of the platband from moisture and dust, and also does not spoil the appearance of the element.
The second installation option is a through spike. It is simpler, but less reliable, since water can get into the attachment point, which will damage the casing. Therefore, the place of entry of the thorn must be carefully painted over or varnished.

To fix the platbands on the windows, use special high-strength glue or liquid nails so as not to violate the integrity of the profile
Both of these options make sense when the platband is installed on a wooden window. If we are talking about plastic double-glazed windows, then it is necessary to use liquid nails that will not violate the integrity of the frame. The installation process is not affected by the standard window dimensions for a private house or the original shape of the window opening.
Care of wooden platbands

Regular care of window trims will ensure their beautiful appearance for a long time.
Remember that processing should be repeated every few years, so you will not only significantly extend the life of the product, but also maintain its attractive appearance for a long time.
If you have plastic, metal or polyurethane platbands installed, then they do not need special care, the main thing is to update the paint in a timely manner and make sure that the decorative elements do not suffer from corrosion.
Platbands are special strips for hiding assembly joints between the window frame and the wall. In addition to its direct purpose, platbands can be used to decorate the window and facade of the house. To choose the right platbands and make their correct installation, read our article.
The basic rule when choosing platbands is that their material matches the material of the window. If you have a wooden window, then the platband should be wooden, if it is plastic, then plastic. Although there are exceptions, in the form of a successful combination of platbands and windows made of different materials.
Wooden platbands
Wooden platbands are made of strips with a thickness of at least 30 centimeters. The width of the wooden platbands can be different, depending on the profile pattern and design. The profile pattern of simple wooden platbands is made using a milling machine.
Advantages: affordable price, easy installation.
Disadvantages: poor design, poor resistance to moisture and temperature extremes, the need for regular painting or varnishing.
Release form: rounded or beveled strips with a convex pattern, or smooth, 1.5-2 meters long.
Application area: hiding assembly seams on wooden windows. Additional protection of seams from environmental factors.
Carved platbands
Carved wooden platbands are made by hand or using a jigsaw. There are many options for the platband pattern: from simple ornament to sacred symbols that protect the house from evil spirits. Self-production of carved platbands is a job that requires skills in carpentry. If you want to make platbands with your own hands, but have no experience, choose a pattern without complex elements.
Advantages: very beautiful appearance, the ability to improve the facade of the house without significant financial investments.
Disadvantages: high price, complexity of manufacturing, fragility, the need for regular painting.
Release form: depending on an individual order or a design developed by the manufacturer.
Application area: decoration of windows and the facade of the house, hiding assembly seams. 
Plastic platbands
Plastic planks are the generic name for planks made of plastic, PVC and foam. Platbands made of plastic are often included in the set of installed plastic windows. Due to the specifics of the production of this type of platbands, they cannot be made at home. Plastic platbands can have a regular and carved pattern. The strips are mounted on special fasteners, liquid nails, glue or double-sided tape.
Advantages: resistance to moisture, long-term operation, easy installation.
Disadvantages: fragility of some products, small choice of design when imitating carved platbands.
Release form: smooth, carved or profiled strips, 1.5-2.5 meters long.
Application area: hiding assembly seams on plastic, sometimes wooden windows. Additional protection of assembly seams from environmental factors. 
Platbands from MDF
Due to the low resistance to moisture, it is recommended to use Medium Density Fiberboard trims only for interior window decoration. MDF trims are great for wood windows, especially if they match the color and texture of the wood. The platbands are fastened with nails, screws or glue.
Advantages: low price, good appearance.
Disadvantages: poor resistance to moisture, inability to use for external decoration.
Release form: smooth, rounded or profile-patterned strips, 1-3 meters long.
Application area: interior decoration of wooden or plastic windows. 
Aluminum platbands
Platbands made of aluminum are mainly designed to hide assembly seams, when installing windows and stained-glass windows made of the same material. In appearance and design, aluminum platbands strongly resemble plastic strips. Fastening of aluminum platbands is carried out on a special profile or latches.
Advantages: strength, durability.
Disadvantages: poor combination with windows made of other materials.
Release form: aluminum strips with a different type of pattern except carved, 1.5-2.5 meters long.
Application area: exterior and interior decoration of windows and stained-glass windows made of aluminum. 
Making platbands with your own hands
You can make platbands yourself only from wood. To do this, you will need a special tool and wooden planks.
Simple platbands
To make simple wooden platbands, you will need:
- Electric jigsaw.
- Plane (simple or electric).
- Sander.
- Milling cutter (manual or machine).
- Fine-grained sandpaper.
- Wooden planks with a section of 30x100 mm.

Simple platband manufacturing technology:
- Work all sides of the wooden planks with a plane.
- Install the profile attachment on a handheld or stationary machine.
- Finish the front side of the trim with a router bit.
- Finish the trims with sandpaper or a sander.
In the absence of a milling machine, platbands with a smooth surface can be made. To do this, use a planer to cut the front side of the plank at an angle of 20-30 degrees and grind it with sandpaper.
Carved platbands
If you are going to make wooden platbands with a carved pattern, keep in mind that this is not a quick business and requires "iron" patience. To create carved platbands, in addition to basic tools, you will need a set of special chisels with different blade shapes and a hand jigsaw. To make it easier to navigate in a large selection of patterns, below are some templates for cutting: 


Carved platbands can be made in two ways - conventional and overhead. In the usual way, the pattern is cut directly on the casing itself. In the overhead method, the pattern is made in the form of overlays, at least 10 millimeters thick, after which the overlay is attached to the main casing. For beginners, it is recommended to use the overlay method, because in case of an unsuccessful pattern, the overlay can be replaced with a new element.
The correct choice of wood species for the carved platband is very important. It is easier to carve softwoods because they are soft. Platbands made of hard larch species will last longer.
If you have not done wood carving, choose a very simple pattern for the first time and, as your skill increases, move on to more complex patterns. 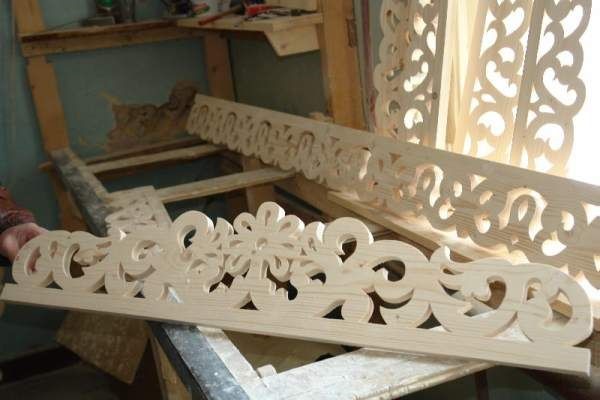
Stages of making a carved platband by an overhead method:
- Prepare the base for the platband, for this, process the strips with a thickness of 30 millimeters with a plane.
- Make overhead strips at least 10 centimeters thick.
- Draw the elements of the future pattern on thick paper or cardboard.
- Cut out the pattern with scissors.
- Place the cut-out stencil on the overhead strip and transfer the design to it.
- Use a drill and a jigsaw to make grooves along the lines.
- Finish the edges of the grooves with chisels, round the edges and finish the contours.
- Sand the finished cover piece.
- Install the trim over the main platband, securing it with glue or nails.
- Having collected all the overhead elements in one composition, proceed with the installation of the platbands on the window.
Installation of platbands
Installation of wooden platbands

You can install wooden platbands on the window using nails, screws or glue. The slats are attached to the sides and top of the frame. In some cases, the platband is installed on the lower part of the window, if this is provided for by the design.
For a beautiful joining of simple platbands, their edges are cut at an angle of 45 degrees. This can be done with a hacksaw and a miter box.
In the case of a deep location of the window in the opening, the platbands can be placed on the wall using extensions.
Fixing the platband to the wall depends on the material from which it is made. For a wooden wall, it will be enough to use nails or screws, for concrete or brick - dowel screws.
Installation of carved platbands mainly depends on their design and composition. Docking of carved platbands is performed in such a way as not to disturb the overall pattern.
After installation, the platbands are treated with wood impregnation, then painted or varnished.
Installation of plastic and aluminum platbands

Correct installation of plastic and aluminum platbands assumes the presence of a special installation profile that is attached to the frame. Platbands are installed in the groove located on the profile. In the absence of a profile, the platbands are installed on snap fasteners attached to the frame or wall. In rare cases, plastic trims can be fixed with glue, but this type of fastening is unreliable.
When using telescopic platbands, fastening is carried out by inserting the edge of the strip into the groove located on the frame.
Foam platbands, attached only with glue.
When it comes to window frames, the first thing that pops up in my memory is a wooden house in the village with my grandmother with carved window frames on the facades.
Memories dear to my heart. From time immemorial, Russian wooden architecture was famous for a variety of decorative wood carvings on the facades of buildings, and later on window frames.
Each region (province, county) had its own masters with their own style, which differed from the masters of the neighboring town.
"Platband" - "on the face", decoration and functional part of the window on the facade of the building.
Today, lovers and connoisseurs of Russian architecture, enthusiasts who are not indifferent to the history of Russian architecture, traveling across the regions of Russia, photograph windows with various trims (preserved or in a dilapidated state) so that their descendants could see them. On the Internet you can find the sites of these people.
What is window trim? First of all, it is still a structural element of the window, closing the gap between the opening and the window frame, preventing dust from entering the room, protecting it from precipitation, noise, and drafts.
But in the old days it was still a protection from the evil eye, magic spells of the pagans were encrypted in bizarre patterns, charms in the form of various figures, only they were applied to the valances, moorings, and later on the window frames. Patterns were passed down from generation to generation, they were repeated in embroidery on towels, clothes, new designs were invented.
Today, the platband has become more of a function of protecting living quarters from external atmospheric influences and decorating facades. But the craftsmen still put love and knowledge into the creation of the casing, relying on the experience of their ancestors.

Looking at any window you like, framed by a platband, you involuntarily compare it with the face of a Russian woman of past centuries. Even the upper decoration of the window is named in the same way as the female headdress - "kokoshnik". The peasant woman had a more modest dress, and the noblewoman had a more refined kokoshnik, richly decorated with stones and embroidery.
The same thing happened with the windows: various - simple and complex shapes, with rich carvings or very modest shapes. The lower part of the window was decorated with a "towel", like a towel with bread and salt in women's hands.

Platbands were made from tree species resistant to weathering and temperature extremes... Larch is the least susceptible to rotting, but this breed is not suitable for making carved openwork overlays, since it is fragile enough. But linden is an excellent material for openwork decor, soft, pliable, but requires special impregnation and processing, as it easily absorbs moisture.
Oak wood is the most resistant to all atmospheric influences and temperature extremes, but it is difficult to process. But after working hard on this material, you will get a durable product that will be admired not only by your children, but also by your grandchildren.
Currently, platbands are made made of wood, composite materials - laminated MDF or plywood, PVC, polyurethane and metal (aluminum, steel).
Wooden platbands the most environmentally friendly, elegant - an excellent decoration of a log house, but less durable. However, with proper care, they will last long enough. Periodically, the platband must be treated with a fresh layer of waterproof varnish or paint.


MDF platbands – This is a slab veneered with various types of wood, decorativeness lies in the color of a particular species.

Plastic platbands are made of PVC, are not subject to decay, more often they are installed on plastic windows. They have a wide range of colors and are UV resistant. The color of the platband can be matched to the color of the plaster or siding with which the house is sheathed, or set in contrast to the facades.

Polyurethane platbands lightweight and unpretentious in operation. Round-shaped windows can be framed with such a product, which is difficult to make from other materials.

Metal platbands or cover plates installed to protect the assembly seam from the inside or outside of the window or door, connecting it to the profile box into a single whole.

According to the method of installation, platbands are overhead and telescopic. The telescopic platband has an L-shape, made of wood, veneered with MDF, a modern type of platbands. Its advantages lie in the method of installation - there are no traces of fasteners (nails, screws), it fits tightly into the grooves of the window frame.
The platband installed on the window will become not only a functional decoration element, but also a decorative component of your facade. Simple rectangular, carved or curved arched window covers can be purchased from manufacturers or you can make your own platbands. But hand-made products will become the hallmark of your home and increase your self-esteem.
Making and installing window frames with your own hands
You can make templates for platbands and platbands themselves. Possessing any computer program for drawing, you can make and calculate any template, select a scale and print it on plain A4 paper. At the same time, it is not necessary to have any artistic skills, it is enough to find and load the photo of a window with a pattern or a fragment of a drawing you like into the program and circle it, changing or copying with accuracy, and then rescaling the scheme to fit your window sizes.
If you have several standard sizes of windows, then it is recommended to perform a scheme with an intermediate rapport, which can be repeated as many times as necessary. The diagram below shows how to do this.

The rapport can be repeated from the same elements or two fragments located alternately.
You can fix it with nails, screws or special synthetic glue. The horizontal and vertical parts are often joined together at an angle of 45 o, after having made the cuts with a hacksaw using a miter box.
There are several ways to make wooden platbands.
The first method is a slotted casing - perhaps the most decorative and delicate. A platband made of light wood tones or painted with white paint on a darker background of the facade looks very refined and sophisticated, like Vologda lace. There is something mysterious and fabulous in such a casing.


The next manufacturing method is a laid on thread. Individual cut-out elements are superimposed (nailed or glued) onto a solid board. The feeling of a three-dimensional pattern is created. Thus, you can decorate a simple platband.


The protruding part of the pattern is often painted in a contrasting color or shade. You can combine both threads in one product.

Existing, but already dilapidated platbands can be repaired by removing old elements that cannot be restored by replacing them with new ones. Clean old paint and paint with a fresh coat of moisture resistant wood paint or varnish.
Useful video
The appearance of the house largely depends on how the windows are decorated. It is they who emphasize, and at times, shape the style of the building. And the main way to give them character is window frames. Here we will talk about them further.
Purpose and classification
Platbands are narrow, long slats that frame windows or doors. According to this principle, window and door are distinguished. They usually differ in width, but, in order to maintain a uniform style, they must be made of the same material. In addition, they are made in a similar manner using repeating elements and painted in the same color.
Door and window frames serve not only to give a building / room a finished look, although this is also important. They also close the technological gap that forms between the frame of the door or window and the wall. After installing windows and doors, this gap is filled with insulation, but the view does not get better from this, and water, dust and sound continue to penetrate into the room, albeit in smaller quantities. So they once thought of closing that gap with planks, and even decorating them.

At the place of installation, platbands are external and internal. Platbands for outdoor installation mainly play a protective role. Therefore, they are made of materials that are resistant to climatic factors (or they are covered with protective compounds) and the thickness of this material is usually greater. Internal platbands are mainly used for decorative purposes. They are operated in gentle conditions, therefore the requirements for the properties of the material are different - decorativeness is important, and not resistance to climatic influences.
Materials used to make window frames
Window platbands are selected depending on the general style of home decoration. Houses are built and finished in different ways, respectively, and the materials and style of additional decorative elements are selected differently. For brick houses, for example, plastic or metal is better suited, but not wood (this is if there are platbands at all). Windows are also decorated with plastic or metal. For wood, on the contrary, wood is more suitable. But this is not a rule either. The choice of platbands is a personal matter of the owner. He sets what he wants. It is only important to understand all the pros and cons of each material.
Wood
Platbands for a wooden house are most often made of wood. But any kind of wood requires constant care - painting and / or varnishing. The coverage has to be renewed every two to three years. Only in this case, products from it look normal for many years.

The advantage of wooden window frames is that they can be carved, with figured elements of various shapes. This gives you an almost infinite number of options. There are also very simple models - ordinary planks, possibly with some additional elements. The choice depends on the style of the house.
Wooden platbands are used, both from the street side and indoors. Just when installing, they will use different protective impregnations and coloring compositions.
Plastic
If PVC windows are installed in the house, then plastic frames are also installed. They are good because all care is periodic wiping from dust and dirt. No other operations are needed.
Plastic platbands are made from climate-resistant plastics by adding a fade-resistant dye to the composition. Components are added to the mass that protect the material from high and low temperatures.

The advantage of plastic platbands is their low price. Minus - a limited choice of models and styles, not too large a range of colors. There are usually white, a couple of shades of brown in stock. The rest - can be available only on order, and even then not always. And one more disadvantage is that it is still an artificial material. Not everyone wants to put plastic platbands on a wooden house. Even though wooden ones are not cheap at all.
The area of use of plastic platbands is indoors or outdoors. If you need external plastic trims, pay attention to the temperature regime of operation. Plastic must withstand the most severe frosts in your area.
MDF
Platbands made of MDF - an option for indoor use. You can't put it on the street - it will quickly deteriorate. Represents compressed shredded wood fibers, from which products are formed. Their surface is laminated with a film that can be smooth, colored, imitate the surface of a stone (marble, for example) or wood.

If you don't like plastic on the windows, the second possible budget option is MDF platbands. In any case, most often it is them. There are even special telescopic models. They are good in that a special additional board is cut to the desired size, due to which they can change the width and become in any opening. With their help, the doorway is formed quickly and efficiently.
Caring for MDF platbands is no more difficult than for plastic ones - wet wiping. For stubborn dirt, you can use non-abrasive (liquid) and non-aggressive (no chorus, etc.) detergents.
Metal platbands
This type of platbands are usually placed on the street with plastic or metal-plastic windows. It is a thin sheet of galvanized metal coated with weather-resistant paint (usually powder paint).

Metal window trims belong to the budget category. They don't cost very much. Suitable for private houses decorated in a modern style. Metal platbands are perfectly combined with houses finished with metal and aluminum composite. The second area of application is for industrial and office premises. They are good because they combine practicality, durability, and low price.
Platbands device
Classic window trims consist of four elements: upper and lower trim, two side strips. They can be connected using a single spike (as in the picture). They can also be connected end-to-end, since they do not carry any load. In this case, they simply tightly fit the strips to one another, fixing each element separately.

If the window provides for the presence of a window sill, there is no need for a lower strapping. During installation, the window sill is first fixed, then the side strips and, lastly, the upper trim.

The width of the platbands is selected individually each time, but usually is in the range of -100-250 mm. When choosing the width, two technical parameters are taken into account:
- the platband should go over the frame by at least 5-10 mm;
- in order not to interfere with the opening of the windows, they should recede from the hinges by 10-20 mm (the further, the wider the sashes open).
Finally, the width is chosen based on the style of the house. Somewhere narrow strips are more suitable - 100-130 mm wide, somewhere wide ones are required - 200-250 mm. In order not to be mistaken, you can "try on" the planks by pinning them on a couple of nails and watch from afar which option you like more.

The thickness of the strips for the manufacture of platbands is 20-35 mm. In most cases, a board 20-25 mm thick is used, since this is the optimal size for self-execution - not too difficult to process, but rather voluminous to obtain a decorative pitchfork.
Platbands in a wooden house
Most of the questions arise when decorating windows in a wooden house. Most are inclined to believe that only wooden platbands are suitable for a wooden house. There is a reason for this - a tree with a tree looks the most organic. But choosing a material is far from everything in this case. There are several important points to pay attention to:

So the choice of the appearance of the platbands is far from the last, of those that will have to be decided. It is also necessary to choose the method of wood processing, the method of installation, and the type of platband too.
Types of wooden platbands
Wood is an extremely plastic and very beautiful material, therefore the number of variations in the design of platbands tends to infinity ... All of them can be conditionally divided into several types: simple and carved. Simple ones look great on modern houses, carvings are good for ethnic buildings.

Simple in shape from molded
Industry and private traders sell planks of various sections:

You can make simple platbands from this molding with your own hands. To do this, you need to calculate the amount of material required (based on the results of measurements of the windows). It should be borne in mind that the length of one plank is 220 cm. You are unlikely to make component elements, therefore it is worth considering that there will be a lot of scraps. The most successful case is when it is possible to "cut out" two elements from one plank - usually the sidewall and the upper / lower part.

The planks are joined in two ways - at 90 ° and floor at 45 °. At the same time, the appearance of the platbands is different. When docking the floor at 45 °, a neat frame is obtained, when docking at 90 °, a more expressive design. The protruding edges can be left straight, they can be cut at any angle, rounded, curly trimmed ... At this point, as you like more or what is enough skill, desire, imagination.
The simplest homemade platbands
The option differs from the one described above in that we carry out the primary processing ourselves. Edged and unedged boards are suitable. From the edged ones, a modest finish for a country house or for a house from planed / glued beams is obtained. We grind the board first with coarse sandpaper, then more and more thinner. When the surface is smooth and level, you can start cutting.

Nothing fancy at all - just well-finished boards
The bark is removed from the unedged board, the surface is also polished. There are options here. Smoothness can be achieved by removing imperfections. You can only remove the top rough layer, leaving all the imperfections of the wood in the future, only to emphasize it during processing.
Carved platbands
Openwork wooden platbands for windows are a beautiful, but expensive option. Expensive - if you order their execution, and laborious if you do it yourself. There are, however, simple, but spectacular patterns that, if you have a jigsaw and desire, you can make yourself.

There are two types of openwork platbands - with slotted and overlaid elements. Slotted - this is when the holes in the platbands are made through and through them the wall is visible. Overhead - this is when the window is decorated with ordinary strips, and on top of them are slotted thread elements or decorative protruding elements (overlays in the form of rhombuses, rectangles, etc.).

In the case of overlays, contrasting colors are often used. For example, the planks are painted in a dark color, and the openwork - in a light one. But this trick is easy only at the installation stage - you can paint both parts separately. Subsequently, you have to carefully apply different paints with a thin brush.
How and what to fix platbands in a wooden house
In a log or log house, windows and doors are placed on the casing - a special frame of the opening made of wood, which is not rigidly fixed to the walls, but is held due to the frictional force in the ridge / groove type lock. The casing is made from a thick wooden beam. The frame of the window or door is attached to the casing. When installing platbands, they are also attached to the casing. Since there is no load on them, the strips are usually attached from both sides, stepping back 10-15 cm from the edge.
There are two types of fasteners:

Fastening with dowels is more laborious, but it is absolutely invisible. If the process is too difficult, use finishing nails.
How to attach platbands to a log wall
There are no problems when installing platbands on an ohm from a bar: the surface is flat, it is easy to attach to it. If the frame is made of logs, everything is more complicated. There are two options:

Which method to choose is your decision. Both are viable and both are not perfect - it is difficult to ensure tightness.
How to prevent moisture leakage under the platbands
Ensuring tightness is the main concern when installing platbands on a wooden house. Most of the questions arise about how to prevent moisture from flowing under the upper bar. Water, flowing down the wall, inevitably gets into the gap between the platband and the wall. There are several options for solving the problem, mostly traditional, but using new materials.

Platbands with a wooden "visor"
Such platbands are also called "Finnish", since almost all houses in Finland are framed in this way. In them, in addition to the traditional four slats, they also make an additional inclined visor, which is supported by the consoles resting on the side slats. It is advisable to choose the angle of inclination of the plank the same as the angle of inclination of the roof or close to it. Although an insignificant detail, such a finish looks more organic.

When installing, under the visor in a log or bar, you can cut a few millimeters, "drown" the edge of the visor there, seal the remaining gap from the bottom and from the top with a sealant (silicone, frost-resistant, with adhesion to wood).
Finnish platbands are good for everyone, but they are poorly combined with carving. The style is not the same. They are great for simpler, more concise designs. Although, there are similar options in the Russian style, but making them is not at all easy.
Metal visor
By the same principle - to divert water from the platbands - this method solves the problem. Only the metal strip is used in the shape of the letter Z - part of the standard molding. The color is matched to the walls or the color of the cashing.

The installation method is the same: they make a cut in the wall, only its size is much smaller - the thickness of the plank is several millimeters. The installation is the same as described earlier: we put one part into the groove, seal the cracks with silicone sealant. The only difference is that the free edge can be fixed to the upper platbands (using self-tapping screws).
Installing the bottom harness at an angle
The lower plank of the platband can simultaneously serve as a protection against precipitation. To do this, it is installed at an angle. The choice of the angle of inclination is no different - close to the angle of inclination of the roof.

With the installation of this bar, everything is simple. From below it is supported by triangles carved from wood, fixed to the frame. The water will not flow down the wall, but at some distance from it. Here it is already important to be correct - so that the water does not undermine the foundation.
Photo of platbands on windows of different types


Simple platbands with only small elements of carving - these are often seen on a Scandinavian-style house

Carved overhead platbands - delicate carving on a dark background


Shutters and platbands - this can often be found on old houses


