Installing a toilet bowl on a concrete floor. The toilet is staggering, how to strengthen: simple effective methods
For a high-quality finish of a bathroom or toilet room, it is necessary to dismantle all extraneous elements that interfere with the decoration. It should be understood that the dismantling of plumbing fixtures is required not only for convenience, but also in order to preserve their integrity. After the completion of the repair work, the question arises: how to install the toilet on the tiles?
In contact with
classmates
Preparing for the installation of the toilet
Installation of a toilet bowl on ceramic tiles is carried out in several ways. But for any of them you will need the same installation tools and materials. To successfully complete the installation procedure, you must also have some tools available:
- pencil - used for marking;
- screwdriver - it is advisable to have a set of screwdrivers;
- rubber;
- hammer;
- special drills of two types: designed for drilling glass and concrete;
- you also need a tool for drilling - simple or sophisticated - it does not matter;
- center punch - a tool used to mark holes for a drill;
- adjustable wrench.
If you have the necessary tools, then little is left to do - materials:
- of course you need the installation object itself - a toilet;
- means connecting sanitary ware with sewerage and water supply systems:
- corrugated or fan pipe;
- flexible hose or copper tube;
- tap to open / close the water supply;
- any sealant to ensure the tightness of threaded joints;
- sealant;
- dowels.
Installation of a toilet bowl on a tile can be done with a hidden method, or open. The difference is in the placement of the fastening means: inside the base and outside, respectively.
How to fix the toilet with the open method?
First of all, it is necessary to mark with a pencil the location of the future location of the toilet. How to do it? We "try on" the toilet bowl at the intended place, then mark the attachment points with a simple pencil, and also outline the base of the toilet bowl. What mistakes can be made when working with a pencil? The offset of the marking will affect the holes you actually made, which threatens not to coincide with the attachment sinuses.
The next step is to remove the toilet from the working plane for a few minutes and drill holes according to the marks you made.
We will install the toilet bowl on the tile a little later, but now we will take a center punch in our hands, with which we will scrape off a little tile glaze at the fastener mark.
Note!
Failure to do so will cause the drill bit to slide over the tiles and damage the flooring.
Further, a glass drill should appear in our hands, which can easily overcome a fairly massive ceramic tile, though not without the help of a punch or drill. After the resistance of the tile has been suppressed, our drill will rest against an insurmountable structure for it - concrete. This is where the concrete drill comes into play, which needs to drill a hole along the entire length of the purchased dowel.
After clearing the hole from foreign objects, fill it with a sealant, which plays the role of insulation from water, and insert it.
Now it's time to fix the toilet to the tile, but before that, go over the pencil marks with the sealant. What is it for? The sealant is an excellent barrier to moisture accumulation. Then we install the toilet and fix it with fasteners.

Drill the tiles carefully.
Closed toilet installation
Before starting the toilet installation procedure, it is necessary to make outlets that will lead to the sewer, as well as from the water supply. Position the holes as close as possible to the plumbing fixture to be installed.
All actions are similar to the previous method. All the difference lies in the secrecy of the fasteners. Here they will not be conspicuous. We string the toilet on the fasteners and bolt through the side holes.
The decision on how to fix the toilet to the tiles is yours. But no matter which method you choose, experts advise not to tighten the bolts tightly, since adjustment may be required when connected to sewer and plumbing systems.
All excess sealant that has come out is carefully scraped off with a spatula.
The toilet has a warm floor. What to do?
Today, the "warm floor" system is quite common not only in toilets and bathrooms, but throughout the house. As you could already understand, if such a system takes place, then you cannot drill the tiles. Why? Because the heating system will be damaged and stop functioning.
But do not despair - there is a way out. Since you can't drill, you have to glue it. Only a couple of questions remain: what and how?
Regardless of the adhesive, sanding the toilet bowl and tile is required. With light movements of the hand, we give a slight roughness to the lower plane of the plumbing element and tile. This is a mandatory action, since when they are made, the best contact between the floor and the toilet is observed.
As an adhesive, you can use epoxy resin, silicone glue, or liquid nails.

The hole for the fasteners should be small
Adjustment of water supply
Connection to the water supply is carried out in two ways: closed and open.
The closed method is also more aesthetically pleasing than the open one. In order to connect the toilet to the water supply, we need a flexible hose or copper tube.
Note!
The copper tube is usually supplied with the toilet, but it is stiff, which makes it impossible to change position.
But the flexible hose is flexible for that - you can change the position and not depend much on the position of the device.
The water pipe requires special concentration of your attention. If the pipe thread is internal, you will need to equip the system with an additional adapter, which should be insulated with the seal to prevent leakage.
The final step is to check for leaks on all fronts. By opening the tap of the water supply, waiting until water is collected in the barrel, and by flushing, you can find the places through which water seeps. If there is no leak, then you can tighten the bolts that secure the toilet to the tile until they stop.

We give access to the sewer
When the installation of the toilet bowl on the tile is completed, the stage of giving life to the device begins - connecting to the sewerage and water supply systems. After all, without them the toilet bowl cannot perform its functions.
To connect the toilet with the sewer, we need a corrugation. Corrugation is good in that it allows you to change the distance of the toilet bowl from the outlet, as well as change the angle of inclination. Inside it is a rubberized membrane that fits snugly both to the toilet outlet and the sewer outlet. We carefully connect the toilet with the sewer by means of.
After the performed manipulations, you can proceed with the installation, which in turn will be connected to the water supply. Use silicone or plastic washers to prevent the bolts from coming into contact with the toilet bowl.
How to attach a toilet to a tile video:
In contact with
Do you see inaccuracies, incomplete or incorrect information? Do you know how to make your article better?
Do you want to offer photos on a topic for publication?
Please help us make the site better! Leave a message and your contacts in the comments - we will contact you and together we will make the publication better!
The fixing of the toilet bowl to the floor can be done in several ways, depending on the design of the base of the bowl, the type of fixing and the material of the floor itself. By the type of fasteners, they are distinguished by installation on:
Installation on dowels has a different sequence of work depending on the floor material.
Concrete, rough base
The easiest and fastest way to install on a concrete base. Recommended for compact models. In this case, it is imperative to level the base with a cement-sand screed. The slightest bias will affect the quality of the flush.
Installation on concrete has the additional advantage that the 3 cm thick screed will act as a cushion for the toilet bowl base. The sequence of actions is as follows:
- The toilet is attached to the place of future fixing;
- The points of attachment of the dowels are marked;
- Holes are drilled in the ceiling and plastic dowels are driven;
- A sand-cement mixture, mixed in a 1: 2 ratio, is laid with a thickness of 4-5 cm;
- The product is installed in place and pressed down so that the excess solution protrudes outward, and the bulk fills the cavity at the base of the sole.
- The fastening screws are tightened.
- It can be used only 24 hours after the mixture has completely hardened.
Carefully position the product before installation. The toilet is changed on average once every 10-15 years, so the wrong position can be quite annoying.
Installation on tiles
It is practiced when the repair in the bathroom has already been done and all communications are brought out. In this case, you should focus on the type of product release. It is recommended to mount a plinth with an oblique outlet as follows:
- The location of future holes is marked;
- Holes are drilled with a punch. They should be slightly smaller than plastic dowels, at least 60-70 mm long.
- Silicone sealant is poured into the holes to improve adhesion;
- Silicone is applied to the entire sole of the pedestal. In several places, wooden or plastic mounting wedges or plates 2-3 mm thick are placed under the sole. This is to prevent the silicone from squeezing out from under the base.
- The screws are getting profitable, not reaching the end by 2-3ot.
- A day later, after the sealant has dried, the wooden wedges are removed and the final tightening of the screws is performed. Thus, an elastic base is obtained, which will prevent cracking and chipping on the tiles.
- Silicone is poured into the gaps that formed after the inserts were removed.
To prevent the tile from bursting during drilling, the surface tension of the glaze layer is removed by punching the marked place with a core. 1-2 mm are drilled in drill mode and only then switches to punch mode.
 A plinth with a straight vertical drain is installed in the same way, only a sealing rubber is placed around the drain hole. This toilet mount may be optional and must be purchased separately. Silicone is also applied along the contour.
 It is recommended to lubricate the inner surface of the toilet bowl outlet with red lead sealant.
Silicone, which is applied to the floor under the toilet, can be replaced with sheet rubber 2-3 mm thick. It is marked along the contour of the base of the pedestal, but it is cut off by 1−2 mm less. The gap formed between the base and the tile is covered with silicone or tile putty to match the one used for the bathroom. This is done so that the black stripe at the base is not visible.
Installation on glue
This method of installation is sometimes found if heated floors are made in the bathroom without calculating the products to be installed. Then it is no longer possible to drill the floor, but a strong and reliable fastening must be done.
The glue is prepared as follows:
- Epoxy resin ED-6 is heated to a temperature of 50 ° C;
- Thinner is added, and the loan is a hardener;
- Stirring constantly, cement of a grade of at least M300 is added until a viscous homogeneous mass is obtained.
The mixture can be used within an hour and a half. The proportions of the composition - resin: solvent: hardener: cement - 100: 20: 35: 200.
Before applying, the surface of the tile and the base of the pedestal is degreased with acetone or another similar substance. The composition is applied to the surface in an even layer not exceeding 0.4 cm. You cannot use the toilet for 12-15 hours.
Refitting on taffeta
In case of violation of the integrity of the bowl or pedestal of the toilet and the need to replace it, it may turn out that the base on which the old product was installed is significantly lower than the general level of the floor in the bathroom.
In this case, it is mounted on taffeta. This is a wooden or rubber lining, cut along the contour of the toilet sole with anchor holes 5-30 mm thick, depending on the depth of the recess. In the case of a tree, it is compulsorily treated several times with antiseptics and water-repellent impregnations. You can even soak it in used engine oil. The floor at the attachment point must be carefully leveled.
Side anchors
In some models, the technological holes for fastening are not located vertically, but on the side of the pedestal at an angle of 90 °. In this case, special side mounts for the toilet are provided. However, the order of installation and sealing of joints during their use does not change. 
Types of fixing the toilet to the floor
Fixing the toilet to the floor, different ways depending on the type of base and the construction of the pedestal. Use of anchors, adhesives and underlays.
Securing the toilet to the floor

In this article, we'll walk you through the popular methods for attaching the toilet to the floor. It should be said right away that we will not describe the technology of concreting the toilet, it is gradually becoming a thing of the past. Now the toilet is installed directly on the tiles, and here it is important to understand the methods of fixing it.
Dismantling work
First of all, it is necessary to carry out dismantling work to remove the old device. All this work shouldn't take long. First of all, the tap for water supply to the tank is closed. After that, the nut on the hose is unscrewed. Water is drained from the tank. Next, the mount on the tank is dismantled.


After that, the dismantling of the fasteners on the toilet itself is carried out. Usually these are anchors screwed into the floor. If you still have an old toilet, it may be cemented. In this case, you need to carefully break the screed and completely remove the old toilet.
If there are no plans for it or it is already flowing, then you can break the toilet itself, in which case dismantling will be facilitated. But remember, this is acceptable if it is concreted!
In the process of dismantling, be sure to follow safety precautions so that fragments do not damage unprotected parts of the body. Plus, you need to carefully remove the toilet from the sewer pipe. If it gets damaged, the installation process can be difficult.
Preparation of the base
After complete dismantling, prepare the base for installing the toilet. The amount of work will depend entirely on the quality of the floor. If there is a tile on it and you do not plan to replace it, then you just need to make sure that it holds securely. If you will be removing old tiles and laying new ones, then you should not rush to install the toilet.

If the old device was concreted and a hole formed in the floor after it was removed, then it must be completely cleaned and cemented. It is also important to pay attention to the outlet of the sewer pipe. It must be complete to eliminate the possibility of waste water leakage. If you have cast iron pipes, then immediately plan to replace the pipe with a plastic one.
Tools
To fix the toilet with your own hands, you need an appropriate tool. Most DIYers have one. In particular, you may need:

This is the basic toolbox. Its complete set may vary slightly depending on the installation method.
Toilet fixing instructions - 3 ways
So, we suggest that you familiarize yourself with three ways of how to fix the toilet:
Although the technology is different, the challenge remains the same - to securely fix the toilet to the floor so that it does not fall during operation.
With dowels
If you have a flat floor, this is the most common method. But here, a perfectly flat tile floor is important. If a small drop is caught at the attachment point, the toilet may crack.

To prevent this from happening, you can put a rubber lining or a piece of old linoleum under the toilet. To cut it out, you need to put the toilet bowl on the material, trace the outline with a marker and then cut out the given shape.
After that, the markings are carried out directly on the floor. In most cases, toilets have two mounts. The markup process is carried out as follows:
- Place the toilet in the intended place.
- Trace its outline on the floor.
- Mark the locations where the mounting hole will be drilled.
- Remove the device and apply a sealant to the floor, with the help of which the lining you have chosen and cut out will be glued.

While the sealant hardens, you can start making the hole. The quality of the fastening will largely depend on the correctness of the selected drill diameter. It must fully correspond to the dowel diameter. You can drill through the gasket.
A plastic dowel must be driven into the prepared hole. After that, we put the toilet in place and fix it with dowels. Tighten the device well, but moderately, otherwise the ear on the mount may break off.
For simplified installation, usually the dowels for fastening are completed with a special plastic gasket, which eliminates the possibility of a possible chip.

At the next stage, the toilet bowl is connected to the sewage system, the tank is installed and the water is connected. When installing the tank, a rubber seal must be used. For a greater likelihood, it can be coated with silicone or other sealant. This will increase the quality of the docking and prevent water leakage during draining.

At the end of all work, it is recommended to treat the junction of the toilet bowl and the tiles on the floor with silicone sealant. This will prevent water leakage and moisture accumulation.
You can also fix the toilet with glue. This is especially necessary when there is a warm floor technology. Various materials can be used as an adhesive, for example, epoxy glue, silicone and other sealant.

If epoxy is available, use it only if the floors are smooth enough. The work process is as follows:
- First, the floor surface must be thoroughly cleaned of all kinds of dirt. Also, there should be no moisture that would interfere with good adhesion.
- To ensure good adhesion, the floor tiles can be roughened with a stiff brush.
- Next, the surface is degreased with acetone or another solvent.
- If the glue is ready, then it must be applied to the bottom of the toilet bowl, with a layer thickness of up to 4 mm.
- Then bring the device to the sewer hole, dock and at the same time install it in its place.
- After placing the toilet on the floor, press it down and leave it for half a day to harden the glue.
- Only when the glue is dry can the tank and water supply be connected.
That's the whole technology of gluing the toilet bowl to the floor.
If you have a wooden floor, then this method of fixing the toilet is the most suitable. Taffeta means a special wood strip.
The thickness of the wood should be around 300 mm. In order to prevent rotting of this embedded part, it must be treated with linseed oil and other anti-corrosion compounds without fail. The essence of this technology is as follows:
- Fill the prepared timber with nails so that they peep out of the taffeta by 30 mm.
- Next, a recess in the tie is prepared according to the size of the taffeta.
- Fill the hole with the solution.
- Apply the workpiece to the mortar with the side where the nails stick out.
- As a result, it should be flush with the floor.
- It is necessary to allow time for the solution to fully set and get stronger.
- After 12 hours, you can fix the toilet with self-tapping screws directly into the wooden mortgage.

After that, the standard procedure for connecting the barrel is carried out. Additionally, you can grease the junction of the toilet bowl with taffeta with silicone. This will eliminate the likelihood that moisture will leak and accumulate under the sole.
So, we looked at two of the most common technologies for how to properly install a toilet on a tile. In addition, we also learned what to do if you have a wooden floor. As you can see, there are no particularly complicated processes. One of the main tasks is to choose the right fasteners.
Although in most cases, it comes with the purchased device. We hope that this material will help you figure out all the details of installing and fixing the toilet on your own.
Fixing the toilet to the floor is easy to do with your own hands
No living space can do without a toilet. There are several easy ways to install it correctly. About this in our material.
How to fix the toilet to the floor: 3 ways to install the toilet

The installation of any plumbing equipment must be carried out taking into account certain building rules and regulations. For most people, it seems too difficult to carry out such an operation on their own. On this and play firms that offer their services for the installation of various plumbing for quite a lot of money.
Although installing a toilet is one of the simplest operations. For its correct implementation, you need to know some of the subtleties of the process. This article will discuss how to properly secure the toilet to the floor so that it does not wobble in several ways.
Regardless of which method you decide to use to install the toilet, all work should begin with assembling the cistern. The drain mechanism is assembled according to the instructions attached to the toilet, after which it must be installed in a specific place.
The preparatory stage also includes the arrangement of the water supply and sewerage mains. As mentioned above, there is more than one way to attach plumbing fixtures. His choice directly depends on the material with which the floor is finished.
This is the most common installation method. With its help, you can install plumbing quite quickly and effortlessly. This method is best suited for smooth surfaces, so if you have a question about how to fix the toilet on a tiled floor, then read carefully below.
The method is suitable for flat and smooth surfaces, since even the smallest difference in height will significantly reduce the quality of the installation. It should also be said that it is better to install lightweight models of toilets on the dowels, since the mounts may not withstand the significant weight of the product.
Experts in this field recommend putting the toilet on a special gasket that you can make yourself from a sheet of old linoleum; rubber is also perfect for such purposes. To make a gasket, you need to put the product on a sheet of material, and then circle its leg with a marker, pen or pencil. After that, you should cut the gasket along the markings.

You can use a utility knife or scissors. Plumbing fixtures are placed on the floor and securely fastened with dowels or fasteners. Fasteners, in most cases, come with the toilet, but if your situation is different, you can purchase them at any specialized store.
After making the gasket, you should mark the floor surface. To do this, you need to put the toilet in the intended place of installation and circle it with a contour, after which you should apply sealant without leaving the contour. It is better not to overdo it and apply a small layer of consumables.
A gasket must be installed on top of the sealant, which should firmly adhere after the sealant dries. This design is durable and reliable, although in some cases it is permissible to install a toilet without a gasket.
Now you need to start drilling the holes.

To facilitate all future installation work, it is necessary to approach this operation with all responsibility. The gasket must be glued firmly and precisely to the place of installation of the product, and the resulting holes must differ as little as possible from the drill in terms of diameter.
This is necessary so that the fasteners can then be used correctly, and the reliable rubber gasket will become a buffer zone between the flooring and the toilet bowl.
In some cases, it may be necessary not only to install plumbing equipment, but also to change its height by several centimeters. Such a need arises if there are several units of this equipment in the room, the last of which should be raised by 4 centimeters.

For these purposes, a wooden board is used to equip the stand. It must be made in the same way as a gasket made of rubber or linoleum, then "plant" a wooden product on a sealant, apply a layer of sealant on it and put a gasket on top of the resulting structure. If everything is done exactly to the size of the toilet leg, then you get a reliable design.
Holes for fasteners must be drilled directly into the spacer or stand. It is important to remember that tightening the fasteners on the installed toilet must be very careful. Here you cannot rush and overdo it, since there is a possibility of significantly damaging the surface of the toilet leg.
Large metal dowels or special elements for installing plumbing are used as fasteners. Special items are very often supplied with a toilet bowl. It should be said right away that the quality of the contact of the product leg with the floor is the same when using any of the listed options.
It is necessary to insert dowels into the holes drilled in the gasket and hammer them in. After that, you need to mount the plumbing equipment and secure it with fasteners. Remember the tightening force, which should not be excessive.

Now you need to connect the plumbing equipment to the sewer line. Particular attention must be paid to the corrugated pipe. Its sides must be covered with a silicone compound. One of them must be connected to the mains, and the second to the outlet on the back of the toilet.
The contact area of the corrugated pipe with the product and the line must be carefully treated with a silicone-based compound. In some cases, metal-coated scotch tape is additionally used. The final step in installing the toilet is to connect to the water main. Here you just need to firmly screw the hose to the pipe. Then the device can be used instantly.
Method number 2: mounting on glue
If you do not know how to fix a toilet bowl to a tile without drilling and bolts, then the following information will probably be of interest to you. This method is very simple and does not require qualifications or rich experience from the employee, but here you need to be patient, since the method is very time consuming.
It takes about 14 hours for the epoxy glue used for the plumbing installation to completely dry. This method is also used in the case of a smooth and even surface, since the difference in height will not allow for a strong contact of the product with the floor covering. Like the first method, this one is used mainly for tiles.
The method is very simple to implement. First, you need to thoroughly clean the contact area from dust and dirt. It is also better to grind the tile with emery to increase the adhesion of the material. After that, you need to degrease the contact surface with acetone or any other solvent.

Now you need to start making glue. In principle, there is the possibility of purchasing a ready-made adhesive composition, but if the budget is small, it is better to save money and do everything yourself. For preparation, you will need 100 parts of ED-6 epoxy resin, 35 parts of a hardener, 20 parts of a solvent and 200 parts of cement. At this stage, it is very important to maintain the correct proportions.
The epoxy resin must be heated to 50 degrees Celsius, after which the solvent is poured into it, the next ingredient is a hardener, after which cement had to be added to the mixture. During the preparation of the composition, it is necessary to stir it constantly. As a result, a plastic and homogeneous mass should be formed. To enhance the effect, you should first grease the contact area with glue, and then apply an epoxy solution.
The composition, which appeared under the pressure of the installed device, must be immediately wiped off with a damp cloth. If the composition was prepared according to the rules, then it can be used for no more than one and a half hours, since then it sets and loses its plasticity. The solution must be applied to the toilet leg in such a way that the layer of the composition is 4 millimeters, and the area on which the composition was applied is at least 25 square centimeters.
Now you need to install the toilet in the right place and connect the corrugated pipe to the sewer system. As in the past, a silicone compound must be used to seal the contact area of the corrugated pipe. Then you need to apply force and press the product to the floor as tightly as possible, then leave it alone for 14 hours.

Sewer connection
During the entire period, it is not recommended to even touch the device, since you can move it from its place, and you will have to repeat everything from the beginning. At the end of this period, you only need to connect the product to the water main, and you can start using it. Now you know how to properly fix the toilet to the tiles.
In most cases, this method is used when you want to mount the toilet on a wooden base. Taffeta is a gasket made from durable wood, on which plumbing fixtures will be installed. The thickness of the board from which the spacer is made should be equal to 3 centimeters. It is carved from wood in the same way as in the two previous cases. After that, the gasket must be impregnated with linseed oil to increase its protection against moisture.

Installation on taffeta
For a stronger contact, it is necessary to mount the anchors from the back of the gasket. As practice shows, it is best to drive in a few nails in a checkerboard pattern. The nails should protrude approximately 3 centimeters. Before fixing the toilet bowl to the wooden floor, it is necessary to fill the niche for its installation with concrete, and then put a prepared gasket in it, which must be drowned in the solution so that it does not protrude above its level.
Then you need to let the solution dry, you will have to wait about 12 hours. The product is attached to the gasket with screws. Place rubber washers under the fasteners. This is done in order to exclude the possibility of damage to the surface of the toilet bowl while tightening the fasteners. According to the experts in this field, it is better to process the fasteners with graphite or grease so that, if necessary, they do not have to be removed.
Also, instead of wood, it is permissible to use rubber, the thickness of which should be 1.5 centimeters.
In conclusion, it should be added that if you are not confident in your abilities, then it is better to trust the specialists. So you will spend more money, but you will be confident in the quality of the installation of plumbing equipment.
How to fix the toilet to the floor: the most common installation methods
How to fix the toilet to the floor: 3 ways to install the toilet. Step-by-step instructions for installing plumbing equipment and expert advice.
Fixing the toilet to the floor: analysis of 3 "correct" technological methods

Installation of plumbing equipment is carried out in strict accordance with building codes and regulations. Home craftsmen are often afraid of such work. This is used by service companies that charge very decent money for performing fairly simple operations. Meanwhile, fastening the toilet bowl to the floor is an exercise that is quite affordable for self-fulfillment. It is only important to carefully familiarize yourself with the existing work technologies, choose the most suitable one, and follow all the instructions exactly.
Regardless of the chosen method of fixing the toilet, the installation work begins with the assembly of the cistern. The device is assembled in accordance with the instructions and fixed in the place designated for it. Also, before installing the toilet, the water supply and drainage units must be prepared. There are several methods for attaching devices. The main selection criterion is the floor material on which the equipment will be installed. Let's take a closer look at the most common methods.
Method number 1: installation on dowels
The most practical method to install the device with the least effort and time. Ideal for use on a flat, smooth surface, since the slightest height differences negatively affect the flush quality. It is preferable to use this method of fastening for lightweight compact structures, since the fixation may not be entirely reliable. Plumbers advise to install the equipment on a special gasket, which can be easily made yourself from old linoleum or a sheet of thin rubber. The toilet is installed on the workpiece, traced around the contour with a marker. After that, a gasket of the desired shape is cut with a sharp knife or just scissors.

The device is fixed to the floor using dowels or special plumbing fasteners. Fasteners usually come with new hardware. It can also be purchased from specialized stores.
Now you need to markup. We “try on” the toilet bowl on the place prepared for the equipment and draw a circle around it. We remove the device. We apply a thin layer of sealant and glue a gasket on it. This design will be the most reliable, although some craftsmen prefer to do without a substrate at all. You can start drilling the holes for the fasteners. As practice shows, if you stick the gasket well and choose the diameter of the drill so that the holes for the fasteners are slightly larger than it, then further installation will be much easier. This is due to the fact that the rubber substrate acts as a kind of "contact spot" for the floor and the device.
It happens that you need not only to fix the toilet to the floor, but also to slightly raise it. This is true if there are several devices in the apartment. Then the last one in the system needs to be raised by about 3-4 cm. In this case, a piece of a two-inch board is used, which is used as a stand. It is cut exactly to the contour of the toilet and placed on the floor, with a rubber backing on top of it. All this is sealed with a sealant and forms a reliable and durable structure. We drill holes for fasteners directly along the gasket.

Tighten the fastening on the base of the toilet very carefully. Excessive force can damage the ceramic from which the device is made.
Long metal dowels or special plumbing fixtures can be used as fasteners. The latter usually come with new equipment. Their fastening quality is about the same, so you can use both options. We drive dowels into the holes prepared in the floor. We install the toilet and carefully screw it on. It must be remembered that over-tightening the ceramic from which the device is made can be damaged.
Method number 2: mounting on glue
Of all the methods for fixing the toilet to the floor, this is the simplest, but at the same time, the most time-consuming. It takes about 12-15 hours to cure the epoxy mixture, which is used as an adhesive. This method can only be used on a smooth surface. It is most commonly used to secure equipment to floor tiles. The method is very simple to implement. First, both surfaces to be glued must be well cleaned of dust and debris. Floor tiles can be sanded to roughen them. This will improve the adhesion of the material. Surfaces can be degreased with any solvent or acetone.
Cooking glue. You can buy a ready-made epoxy or make your own. To do this, you need to take 100 parts of ED-6 epoxy resin, 200 parts of cement, 20 parts of a solvent or plasticizer and 35 parts of a hardener. The sequence of adding components to the solution is important. First, the resin is heated to 50C, a solvent is added to it, after a hardener and at the very end - cement. The composition must be constantly mixed in order to form a plastic, homogeneous mass.

In order for the toilet to be securely fixed in place, the floor covering is prepared: it is cleaned for better adhesion and lubricated with a small layer of glue. Excess composition, which appeared under the weight of the equipment, should be immediately removed with a damp cloth.
A properly prepared adhesive mixture can be used within an hour and a half. We apply it to the base of the toilet so that the solution covers an area of at least 20 square meters. cm, and the layer thickness was at least 4 mm. We install the prepared equipment in the right place, combining the sewer socket with the outlet, and press it with force to the floor. Then leave the device for at least 12 hours. This period is necessary for the adhesive to harden. During this time, it is not recommended to even touch the toilet. Then we connect the equipment to the water supply and sewerage system.
Method number 3: fastening to taffeta
Most often, this method is used to install toilets on a wooden floor. Taffeta is a solid wood pad to which the equipment is attached. The thickness of the board from which the element corresponding to the shape of the toilet seat support is cut should be 28-32 mm. To protect the part from dampness, it must be carefully treated with linseed oil. For reliable fastening to the floor, anchors are mounted from the bottom of the taffeta. The simplest option is nails driven in in a checkerboard pattern, which should protrude from the part by 2-3 cm. The recess prepared for installing the toilet is filled with cement mortar. Taffeta is embedded in it down with anchors. As a result, it should be flush with the floor.
After about 12 hours, during which the solution is completely dry, you can start attaching the equipment. The device is fixed with screws. Washers made of rubber must be placed under their heads, which will prevent possible damage to the toilet bowl when tightened. Experts advise to lubricate the screws with grease or graphite before work, so that later, if necessary, they can be easily unscrewed. Wood taffeta can be replaced with rubber backing. It is cut from 5 to 15 mm thick sheet material, perhaps even from an old rubber mat. This support should be 1 to 2 cm smaller than the toilet seat support.

Mounting the toilet bowl on taffeta involves the use of a special wooden insert. The diagram shows all the elements of such an attachment.
There are many ways to attach a standard toilet to the floor. They differ significantly in complexity and time spent on installation work. It is important to choose the correct fastening method. It depends on the material from which the floor in the room is made. Installation work can be carried out independently, but if you have no experience or desire, it is better to turn to professionals. They will quickly and competently carry out all the work, guaranteeing a long and flawless service of the new equipment.
Fixing the toilet properly to the floor: 3 ways to secure the toilet to the floor
Competent fastening of the toilet to the floor can be done independently. Consider the technology of securing equipment in the three most common ways.
In a new apartment or in an old one, bathroom decoration is often done when the plumbing fixtures are either not yet available, or they are being dismantled in order to be replaced with new ones. In an empty room, it is naturally easier to lay tiles on the walls and floors, as nothing gets in the way.
In addition, standing plumbing fixtures - a bathtub, a toilet bowl, a washbasin, can simply be damaged during finishing work. If you are installing the tiles on the floor while the toilet is standing, imagine how difficult it is to cut through ceramic floor tiles that are much thicker than wall tiles to replicate the configuration of the toilet.
And how to install the toilet on a tile, we will try to tell you in our article.
In order to properly put the toilet on the tiles and connect it to the sewer and water supply system, you will need the following tools and materials:

- toilet;
- fan pipe or corrugation;
- flexible hose supplying cold water to the toilet;
- ball valve for cold pipeline;
- sealing material for winding threaded connections;
- silicone sealant;
- drills for concrete and ceramic tiles.
|
|
From the tools you need to stock up:
- drill or hammer drill;
- adjustable wrench;
- several screwdrivers;
- rubber spatula;
- pencil;
- hammer;
- core.
The installation of a toilet bowl on a tile is done in different ways, depending on the type of toilet bowl.
There is a closed mount and an open mount. With an open type of fastening, the fastening bolts are located on the protruding part of the toilet foot. The closed fixing system is located inside the toilet base.
We fix the toilet in an open way
This method requires minimal effort and less time, but loses to the second method (closed) in aesthetics.
The toilet is installed in the intended place of permanent location and marks are made on the tiles in the holes intended for fastening with a pencil.
It is important that the pencil is strictly vertical, otherwise the offset of the mark may cause you to drill holes that will not fit the mounting bolts.
In addition to the marks for the fastening, you need to circle the contour of the base of the toilet bowl on the tiles.
 After that, the toilet is pushed aside and holes are drilled in the places of the pencil marks:
- First, the glaze is scratched with a core on the tile so that the drill does not slip on the tile.
- The first is a glass drill to cut through the tile.
- After that, a drill for concrete is inserted into a drill or perforator and a hole of the required depth is drilled, depending on the size of the dowels purchased.
The finished hole must be free of dust and filled with silicone sealant, which in this case acts as a waterproofing, preventing moisture from entering the base of the toilet bowl. Dowels are inserted into the drilled holes filled with sealant.
Before installing the toilet on the tiles, a strip of sealant is applied along the previously outlined contour of the toilet, which will prevent water from penetrating under the base of the toilet.
Fasteners - bolts, bushings or screws - are inserted into the mounting holes and screwed to the desired position. The attachment points are closed with plugs to give the toilet an aesthetic appearance and to protect the fastening bolts from moisture penetration.
Excess silicone, which will inevitably come out under the weight of the toilet bowl, must be removed with a rubber spatula or other improvised means.
Installing a toilet bowl with internal fastening
 Before fixing the toilet bowl to the tile, you must first make outlets to connect it to the sewage system and to the water pipe.
The holes should be located as close as possible to the toilet to be installed.
In the same way as when installing a toilet with an open mounting method, the contour of the base of the toilet is outlined on the tile floor, and the marks of the fixing holes in the toilet are transferred to the floor.
The concealed mount is placed on the floor and marks are made for drilling holes, which are drilled in the same way as in the previous method. The mount is installed on the floor and secured rigidly with bolts. After that, the toilet bowl is installed with a void on the mount and through the side holes is fixed with bolts with a mount installed inside.
But there are situations when the floor cannot be drilled, since a warm floor system is installed under the tiles.
In this case, the question arises of how to glue the toilet bowl to the tile. You can use:
- liquid nails
- silicone glue,
- epoxy resin with hardener.
In all cases, preparation of the tile and the lower plane of the toilet bowl is required. The tiles and the toilet are sanded with sandpaper to roughen them for better adhesion of the adhesive to the floor and toilet surfaces.
Connecting the toilet to the sewer system
 A corrugated plastic pipe is used to connect the toilet to the sewer.
Corrugation allows you to change:
- the distance from the toilet itself to the entrance to the sewer riser,
- the angle of inclination, depending on where the outlet of the riser is located - in the wall or in the floor.
Having a rubber membrane inside, the corrugation does not stick to the outlet of the toilet bowl, it tightly and tightly connects with the outlet of the toilet bowl, precisely through the membrane. The corrugation is also inserted into the sewer riser without the use of glue, by means of the existing special rim, which does not allow unpleasant odors and drains to penetrate into the room.
After the toilet is connected to the sewage system, you need to mount the toilet tank in order to start connecting cold water.
Washers made of plastic or silicone should be placed on metal bolts to prevent them from coming into contact with the faience of the toilet bowl.
Water connection
Toilet bowls have a different system of connection to the water pipe:
- external connection,
- closed connection.
Despite the different connection methods, all joints must be airtight and prevent leaks.
With a hidden connection system, copper tubing or a flexible water supply hose made of various materials can be used. If the copper tube comes with the toilet, then the flexible piping will have to be purchased separately.
Special attention should be paid to the water pipe suitable for the toilet cistern. It can be either external or internal thread. If the thread is internal, then you will need to install an additional adapter and use a sealing winding.
After the connection is made, the operation of the drain tank and the possibility of leaks are checked. If everything works fine, then the fastening bolts are tightened to the stop and the toilet lid is put on.
Not as difficult as it might seem at first glance, but to work you need to have certain skills and knowledge. Dealing with the toilet bowl, the principle of the flush cistern, the assembly of the installation - that's not all. After all, it is also important to carry out high-quality fastening of the toilet to the floor. In this article, you will learn in what ways they do it today.
What types of toilets are there?
To begin with, before talking about the methods of fastening, let's get acquainted with the varieties of this plumbing fixture. Toilets can be classified according to the following characteristics:
- weight and dimensions;
- the material from which they are made;
- direction of release;
- type of tank, bowl.

If we talk about the materials that are used for manufacturing, then these include:
- faience... It is a fragile but inexpensive material with a service life of about 15 years;
- steel... It is reliable and sturdy; toilets made of it are ideal for public places;
- acrylic reinforced... Differs in durability, low weight, strength, but reacts negatively to high temperatures;
- porcelain... It is stronger, more beautiful and durable than faience, but it also costs more.

As for the design of the bowl and, the types of toilets classified by this characteristic can be found in the table below.
Table. Types of toilets from a constructive point of view.
| Name, photo | Short description | Pros and cons |
|---|---|---|
 | The device is installed using a metal frame that is attached to the wall. The frame houses the cistern, while the bowl is outside. After installation, the frame is closed with a false wall (plasterboard, as a rule). | The advantages include compactness and attractiveness. But there are also weaknesses - you need to spend a lot of time / effort to install such a toilet, and when repairing a tank, you cannot do without dismantling the false wall. |
 | Here, the bowl with the cistern are a single piece, and therefore do not need to be connected to each other. | The advantages of the design include reliability (there are no connections through which leaks could begin), as well as ease of maintenance. There is only one minus, and it consists in the fact that if one part is damaged (bowl or cistern), then the entire toilet must be replaced. |
 | This is the most popular version of the toilet - the cistern is installed at the back of the bowl and is located against the wall. | As for the advantages, they include ease of operation / maintenance, as well as a low noise level during flushing. The downside is the weaker fluid pressure during operation. |
 | It is also an extremely popular option, but only among outdated models. The distance between the bowl and the cistern is large, the first, as a rule, is located under the ceiling. | The main advantage is good water pressure. Even a high-level tank does not "steal" the usable area of the room, which is already minimal. Cons - the water makes a lot of noise during flushing, and if repairs are needed, getting to the tank is not easy. |

Now let's look at how exactly the toilet can be attached to the floor:
- dowels;
- , closed with a false wall;
- using sealant / glue;
- on taffeta;
- cement (the most "hard" method).

Below we will talk in more detail about two methods of fixing a plumbing fixture - with dowels and with glue.

Method number 1. Fixing on dowels
The use of dowels and bolts is a fairly popular way of fixing the toilet. The method is simple and practical, but not without its drawbacks. First of all, the tiles will have to be drilled. This must be done carefully and carefully, because the slightest mistake can ruin the floor covering. In addition, the use of dowels is designed more for light products, and therefore it is better to use the glue method to fix a heavy model.

To fix it on the dowels, prepare everything you need:
- roulette;
- ammonia;
- pencil or marker to mark up;
- a napkin or rag (preferably microfiber);
- electric drill;
- drill to it (exclusively for concrete).

Less commonly, you may need a small piece of linoleum, a sealant with a glue gun. Well, everything you need is at hand, so we can proceed directly to the work process.
Step 1. First, the toilet is tried on, pre-installed where it will stand. The convenience of its use, the ability to connect to water supply and sewerage systems are assessed. You can also shake the bowl to help determine the evenness of the floor under the toilet.

On a note! If the product staggers, then before fastening, a piece of linoleum, previously cut in the shape of the support, is placed under it. Alternatively, you can treat the junction with silicone sealant. Sometimes the problem is not in the unevenness of the floor, but in the toilet itself. If so, then you need to align the support, clean it with "sandpaper".

Step 3. The product is removed, large marks-crosses are already made at the designated points.

Step 4. Holes are drilled in the tiles with an electric drill. It is important to work extremely carefully so as not to damage the tiles, and also so that the tool works at low speeds.


Step 6. The tile is cleaned of dirt and dust (and after drilling this "good" will be enough). Then the surface is degreased with ammonia.

Step 7. Now it is required to insert dowels into the holes that were made earlier.

Step 8. The bolts are checked to see if they fit well into the dowels. You can replace the fasteners with others if the supplied ones are of questionable quality.

Step 9. The toilet is installed. The holes in the tiles must match those in the support.
Step 10. If there are no problems, the bolts are inserted into the dowels, while the washers - made of rubber or plastic - should not be forgotten. The bolts are tightened, but carefully, otherwise there will be a risk of damage to the bowl. After that, the hats are hidden with special plastic overlays. That's it, the toilet is successfully fixed to the floor with dowels!

Method number 2. How to fix the toilet with glue
This method is almost as popular as the previous one. For fixation, in this case, use a special construction glue (you can buy it in a specialized store) or a mixture made with your own hands from epoxy resin. In addition, toilet bowls are often secured with a simple silicone sealant.

On a note! The glue method is popular because it has important advantages. Let's get acquainted with them.
- Reliability... The device, fixed with glue / sealant, will not stagger for sure.
- No dirt, dust... Therefore, after the completion of the work, there is no need to carry out cleaning.
- Easy to install... You don't need to have any serious knowledge or experience to work. You just need to know how to work with a glue gun.
- Safety... By fixing the toilet with glue, you do not risk damaging its bowl.
Do not forget that this method also requires some patience - it will take 12-24 hours for the glue to dry completely (which means that you cannot use the toilet during this time).
To fix the plumbing fixture, prepare everything you need, namely:
- roulette;
- silicone based sealant or glue;
- square;
- ammonia;
- marker;
- sandpaper;
- spatula (narrow required);
- a spray bottle filled with soapy water;
- rag.
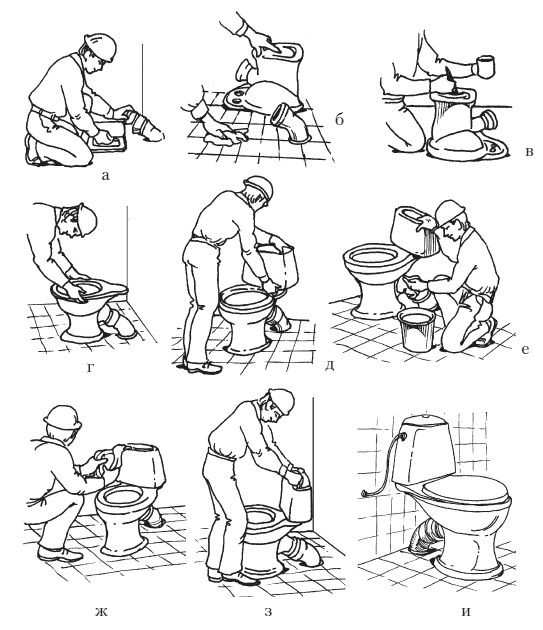 Toilet bowl installation: a - preparation of the installation site; b - preparation of the base; c - covering the bottom of the toilet with glue; d - installation of a toilet; d - installation of the tank; e - socket sealing; g - connecting the tank to the water supply network; h - adjusting the water level in the tank; and - fully installed toilet
 Once you have prepared everything you need, follow the step-by-step guide below.
Step 1. The toilet is tried on - placed on a pre-placed cardboard so as not to damage the floor covering. The convenience of the device is checked, how best to connect it to the sewer / water supply system.

Step 2. The product is centered, for which you can take a tape measure or a corner. The distance to the walls on the right and left is indicated.


Step 3. The cardboard is removed from under the toilet. The device is aligned with the walls of the room, which will require, as in the paragraph above, a tape measure or a corner.

Remember! When leveling, position the tank as evenly as possible in a particular situation. The holes through which the tank will connect to the bowl must be coaxial.
Step 4. The part of the bowl that will be in contact with the floor is outlined with a marker.

Step 5. The edge of the support is cleaned with sandpaper or a knife. It should be perfectly flat - this way the adhesion to the glue will be maximized.

On a note! Sometimes the section of the tile on which the support will be installed also needs to be sanded. But you should work carefully and not go beyond the markings, otherwise you can ruin the tile.
Step 6. Where the toilet will be installed, the tiles are treated with ammonia for the purpose of degreasing. Then wipe dry with a microfiber cloth.

Step 7. A sealant or adhesive is applied to the edge of the support. It is important to correctly calculate the amount of adhesive, because if there is too much of it, then you can stain the tiles, and if not enough, then the fixing of the toilet to the floor will turn out to be fragile.


Step 8. After glue treatment, the toilet bowl is brought into the toilet and carefully put in the place that was marked at the beginning of the process. It is better to do this with an assistant so as not to stain the tiles with glue and not install the product crookedly.


Step 9. The floor around the support is sprayed with soapy water. This prevents any excess sealant that has to be cut off to stick to the tiles.

Step 10. The spatula is moistened with soapy water and used to remove adhesive residues.


Step 11. After some time - on average, 12-24 hours - the glue or other compound used to fix the toilet bowl will dry out. The product must not be used or moved during this time.
Step 12. Now, after the glue has completely dried, work can be continued. It is connected to the sewer network, a tank is installed and connected to the water supply, a seat with a lid is installed, and so on.
Interesting! We have already said that the glue suitable for fixing the toilet bowl can be made by hand. Take epoxy resin (20 parts are required), heat it to +50 degrees, add 7 parts of hardener and 4 more parts of solvent. After mixing all the components, add another 40 parts of cement. After re-mixing, a homogeneous mixture should be obtained, which must be used as soon as possible (after one and a half to two hours, it will begin to harden and lose its original properties).
Video - The nuances of fixing the toilet with silicone
Are there other toilet seat fixings?
In addition to the methods described above, there are others. But they are less popular due to various reasons.
Previously very popular brickwork: they made a recess in the right place, put the product there and covered the lower part of it with cement mortar. Therefore, toilets fixed in this way are often found in older apartment buildings. The method is quite reliable, and its implementation is relatively simple.

However, brickwork with concrete has several serious disadvantages. First of all, the joint and the floor at the installation site look unattractive. Another disadvantage of the method is that it will no longer be possible to dismantle the toilet without damage. Simply put, during dismantling, the product will have to be broken, and therefore today the method is no longer relevant.
Another deprecated method is to use taffeta... Who does not know, this is a wood underlay with a height of about 5 cm, which is installed in a recess with cement mortar. There are many anchors or nails on the bottom of the taffeta, thanks to which the substrate is fixed in the mortar. The toilet is placed on top of the taffeta and fixed with screws.

On a note! When using taffeta, remember that the humidity in the bathroom is high, and therefore the substrate should be treated with varnish or drying oil, so that it does not become damp and lasts longer.
The last method for today, albeit not related to gender, is suspended mounting... A metal frame is being built next to the wall (it should be included with the plumbing fixture). A bowl is fixed to it. Tellingly, this frame, like the cistern, is closed with a false wall made of tiles or. The end result is an attractive and durable mount. But the method requires a lot of money and time.

On a note! When choosing one or another method of fixing the toilet, consider your capabilities and preferences. Be that as it may, if you get down to business wisely and perform the installation correctly, then the toilet will stand firmly in its place and will serve for many years!
Video - Overview of the toilet installation process with detailed instructions and installation tips
Modern technologies for the manufacture of plumbing fixtures allow us to fill the building materials market with a variety of models of toilet bowls.
Sanitary appliances differ in the modifications of the cisterns, the material of manufacture (porcelain, faience), the fastening device, the location of the water supply and the drain outlet. In most cases, bathrooms and toilets are tiled.
The walls and floors are covered with tiles. How to fix the toilet on the tiled floor so that it stands firmly on its base? In this article, we will provide the reader with information on how best to do this.
Preparatory work before installing the toilet

Get a comfortable toilet tube length
The drain sink is installed when the wall and floor tiles are finished.
If you install the plumbing first, and then proceed with the installation of ceramic flooring, then you will have to deal with a rather complicated cut in the slabs to bypass the base of the pedestal of the plumbing fixture.

This will lead to the risk of deterioration of the cladding if the selection of cut tiles is unsuccessful.
When tiling walls and floors with ceramic tiles, it is necessary to achieve a convenient length of the protrusion from the wall of the water pipe.
The outlet of the water pipe must be such that a shut-off valve can be installed.
The sewer drain can protrude both from the wall and from the floor. The sewer socket must ensure a tight connection with the corrugation.
Required tools and materials
To successfully complete this task, you should acquire patience and prepare the following set of tools:
- puncher, drill;
- marker;
- drills for glass and ceramics;
- screwdrivers;
- sealant;
- spanners;
- adjustable wrench and union heads with a collar;
- dowels with self-tapping screws;
- pliers;
- corrugated pipe;
- tap;
- core;
- grinder with abrasive wheel;
- connecting hose.
Related article: Electrician style interior. Stylish furniture and soft fabrics.
Installing a toilet bowl on a tiled floor

Toilet installation
The installation of a toilet bowl on a tiled floor is done in different ways, depending on the position of the mounting holes in the sink pedestal.
There are three options for attaching a plumbing fixture to a ceramic floor covering:
Installation of a toilet bowl with vertical fastening

Most models of sinks are made with mounting holes for vertical fasteners. The installation of the sink is carried out in several stages:

Before installing the toilet, check the horizontal position of the installation site. If no deviations are found, then the cleaning of the base of the pedestal and the tile along the contour of the support of the sink is not done.
Lateral fixation of the toilet

The installation of a toilet with side mounting holes differs slightly from the installation of a sink with vertical fasteners.
The difference is that the mounting parts are hidden under the pedestal of the device.
Install such a model of the device as follows:

Bonding the toilet bowl base
This installation method is used if the base of the floor is equipped with a heating system. There is a risk of damage to the heating equipment when drilling the bore holes. For more details on the work, see this video:
In this case, cleaning the base of the pedestal and the surface of the ceramic tiles along the circumference of the toilet bowl support is required. This is done to increase the adhesion of the bonded surfaces.

Press the toilet firmly to the floor
The toilet is glued to the tiled surface with liquid nails. The surfaces are covered with glue, then they are pressed against each other.
The toilet is removed from the installation site and placed on its side. Withstand the time specified in the instructions. Then they put the sink in place, press it to the floor.
The rest of the installation work is performed in the same way as in previous cases.
You can start installing a toilet bowl on a tiled floor yourself only if you have the skills and experience in this type of work.

