Drawings for cutting from plywood: features of creating a template and applying to the surface, cutting technology. Slotted thread (openwork) and stencils Cutting with a jigsaw drawings download diagrams
Crafts made by the craftsmen with a jigsaw look elegant and stylish. In skillful hands, an ordinary tool turns into a miracle jigsaw, with the help of which incredible masterpieces are created. Artistic sawing can be just a hobby or a professional activity because handicrafts are always appreciated. The features of the miracle of the jigsaw and the procedure for performing interesting crafts will be discussed further.
Characteristic features of the jigsaw
The miracle jigsaw provides convenient cutting of lines on a wooden base, this is facilitated by a narrow cutting blade. For woodworking, a band saw is more useful, but cutting out of plywood is better obtained as a miracle with a jigsaw. The main advantages of the tool are as follows:
- Accurate cutting of parts, the cut line comes out quite smooth, which does not require grinding.
- Due to the presence of a narrow blade in the miracle jigsaw, cutting of sharp corners and small parts is available.
- Internal grooving starts from the hole prepared with drill # 3.
Regarding the technical characteristics of the miracle of the jigsaw, the following features are noted:
- Easy tensioning and fixing of the blade.
- Sawing is much easier than using a band saw.
- Sawing a miracle with a jigsaw poses little or no threat of injury.
- The tool does not require frequent adjustments.

There are several parameters that you should be guided by when choosing a miracle jigsaw for cutting:
- The main thing is the capacity, this indicator indicates the size between the back wall and the cutting blade. There are miracle jigsaws with sizes ranging from 12 to 26 inches.
- The thickness of the material that the tool is capable of processing.
- Number of moves in 1 minute.
- Saw stroke height.
To cut out complex elements from plywood in a miracle jigsaw, two types of saws made of steel are used.
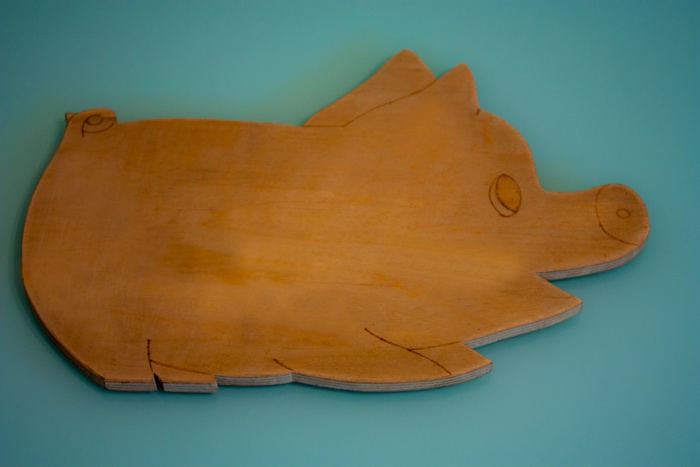
Advice! For beginners, it is best to train on a thick-toothed plywood belt. It is also used to make cutting boards. Small teeth on a thin file allow you to cut out filigree elements of crafts from thin plywood.
The result of the work of a top-class professional is shown in the photo:

Preparatory steps
Sawing a miracle with a jigsaw requires painstaking work from the master, develops perseverance and patience. Initially, you should take care of the organization of the workplace. Prerequisites for comfortable work are high-quality ventilation and lighting. A private house provides more options for choosing a utility room; a glazed balcony is suitable in a city apartment.
The second important step is the acquisition of material. High-quality plywood reduces the risk of delamination of the part or the appearance of cracks when cutting a miracle with a jigsaw. The second reason for the violation of the integrity of the material is an incorrectly selected canvas or unprofessional actions. For cutting out crafts, plywood with a thickness of 3-4 mm is intended. The following steps can help prevent delamination:
- Depending on the area of the surface to be treated, dilute the required volume of the mixture of water and PVA glue. For small areas, 2 tablespoons of water and a few drops of glue are sufficient.
- After thorough stirring, the solution is applied with a brush to the back wall of the plywood blank in 2-3 layers.
- The material is left to dry completely.
Comment! The adhesive solution will successfully replace furniture or parquet varnish.

Before cutting the miracle with a jigsaw, you need to clean the plywood. Chips, microscopic cracks, dark traces of knots are removed with sandpaper of various grain sizes. To give the surface the maximum smoothness is facilitated by stripping the plywood against the fibers. First, work with medium-grain paper, the final touches are applied with fine-grained sandpaper. The complete absence of burrs allows you to go to the main stages of work.
A simple example of a craft for beginners is shown below:

Craft making process
Preparing a drawing, sawing a miracle with a jigsaw, assembling parts and decorative finishing are key steps in creating original crafts.
Drawing translation
A well-executed drawing will provide a quick assembly of ready-made elements into a single figure. Otherwise, after painstaking work, a miracle with a jigsaw is at risk of encountering the problem of mismatching grooves and the need to rework individual parts. Drawings of crafts can be taken from this article or try to create a unique pattern for cutting. After printing or drawing on paper, the drawing is transferred to plywood in one of the most convenient ways. In the first case, the drawing is fixed with buttons on the plywood and copied using a pen and a ruler.


For cutting out crafts a miracle with a jigsaw, the technology of thermal transfer of toner from paper to plywood can be useful:
- Selects media with a low toner retention rate (such as glossy paper).
- In the printer settings, high-quality printing is selected to get more toner. The procedure for cutting out a miracle with a jigsaw in this case is facilitated.
- The printed image is applied face-down to plywood and ironed. For A4 format, one minute is enough. Instead of an iron, a construction hairdryer is suitable.
- After the paper has cooled, remove it. If there are gaps in the outline of the sketch for cutting out a miracle with a jigsaw, they are completed with a pencil.


Making holes and sawing
Cutting out the inner grooves with a jigsaw is preceded by the design of the holes. The process includes the following steps:
- Prepare a drill with a drill diameter of 3 mm or an awl of appropriate dimensions.
- The tool is placed in the middle of the groove and a hole is made.
- It is recommended to pre-protect the desktop with a board.
- The presence of an assistant is only welcome.
To decorate the inner grooves with a jigsaw, the nail file is inserted into the hole and fixed at the top of the tool. After processing a small area of about 2 cm, check the evenness of the sawing. In case of a poor-quality cut, it is better to replace the canvas with a more suitable specimen. If the cut is not straight enough, try correcting the imperfections with a flat file.
Important! Observe safety standards, do not get your fingers under the file.


Cleaning of parts
Upon completion of cutting, a miracle with a jigsaw, small chips on the back of the parts are cleaned with sandpaper. Also, the prepared items of the craft need grinding. The ribs and the back of the parts are first processed with medium-grain paper, at the final stage, fine-grained sandpaper is used. Internal grooves cut with a miracle jigsaw can be conveniently cleaned with a rounded file. Aim for a complete lack of roughness and burrs at the end of the cut.
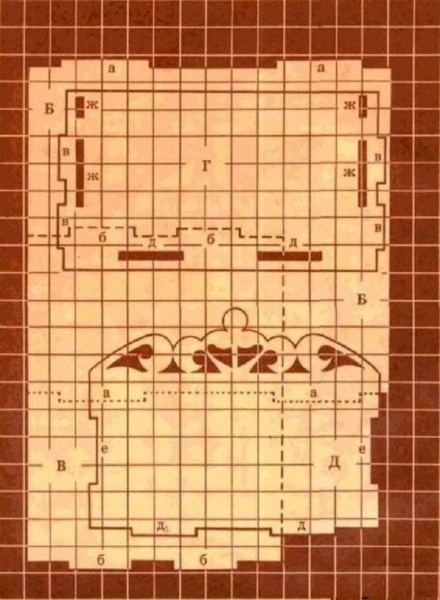
Having achieved the desired result, they proceed to assembling the parts of the craft, prepared by a miracle with a jigsaw. An interesting drawing for cutting and a photo of the shelf are presented below:


The final stage
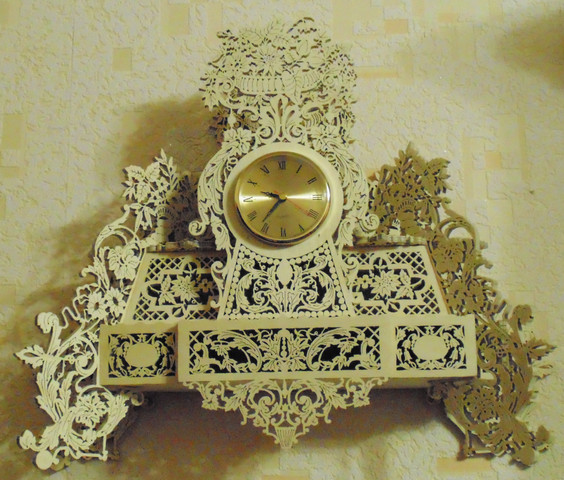
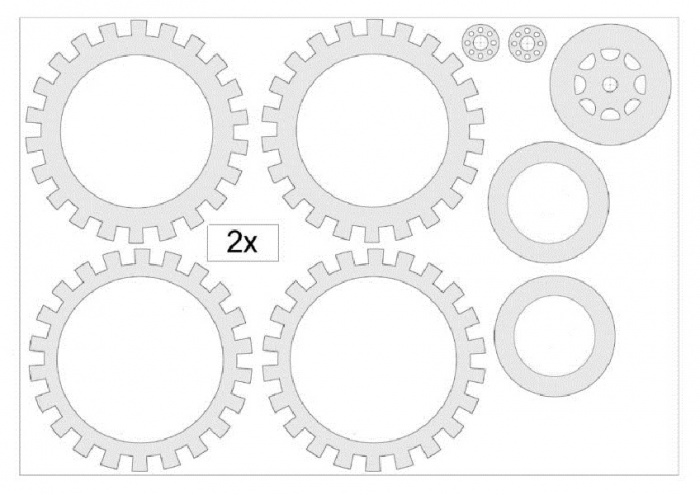
After assembling and adjusting all the parts, the crafts proceed to gluing using PVA or Titan glue. Depending on the design, it is recommended to tie the multi-layer elements tightly with a strong thread and leave to dry. The process lasts no more than 15 minutes. An example of a product that is difficult to cut out with a jigsaw is shown below in the photo and drawings:


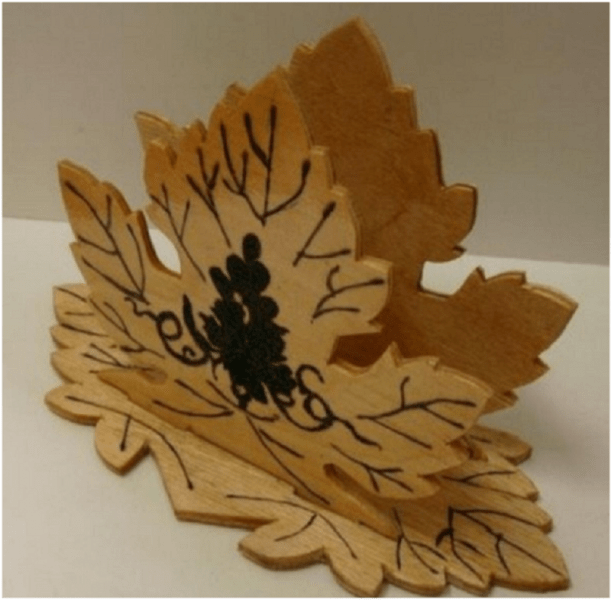
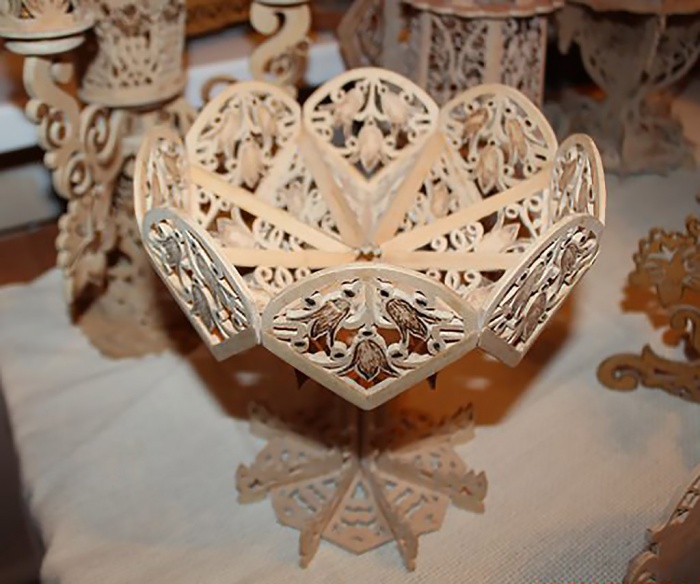
Burning patterns on individual elements of the craft allows you to add decorativeness. Previously, the drawing is applied with a pencil, after which they work with an electric burner. An openwork vase for sweets will become a worthy table decoration:


Sawing a miracle with a jigsaw is a painstaking task. In order for the product to serve for a long time, it needs decorative processing. The preservation of the pristine beauty of natural material is facilitated by varnishing on wood. For work, you need a high-quality varnish composition and a convenient glue brush. Aim to avoid scratches or visible streaks on your craft. When cutting out figures of animals or models of mechanisms with a miracle jigsaw, sometimes they resort to fragmentary coating of the product with paints. This technique brings the craft closer to the original.

One of the interesting hobbies is art cutting with a jigsaw. Beginning craftsmen look for drawings, drawings and descriptions for them on the pages of numerous printed and electronic sources. There are artists who implement their creative ideas on plywood by drawing a drawing on their own. This process is not too complicated, the main thing in the work is the accuracy of actions.
Some people use this kind of handmade just for fun, creating wall pictures or photo frames. Others use artistic cutting with a jigsaw from drawings, drawings and descriptions to decorate furniture or as additional income.
Skeptics might say that with the advent of the laser, this kind of creativity has become obsolete. Yes, indeed, industrial laser designers have made this much easier by performing large volumes of threads quickly. But this is for an industrial scale, maybe it is a suitable option, but if you want to have an object in which the soul of a master, a real artist, is invested, you will still get a unique thing, created in a single copy.
And besides, artistic cutting with a jigsaw according to drawings, drawings and descriptions will definitely captivate you, you only need to try it once.
Necessary materials
A good jigsaw is required for such a delicate and neat job. If you decide to speed up the process and use a jigsaw, then be prepared for the fact that it can cope with radii up to 2.5 cm. Small parts will have to be finished with a hand tool. The saw must be secured firmly so that there is no vibration that will cause uneven cuts.

Artistic cutting with a jigsaw according to drawings, drawings and descriptions is best done on plywood from 3 mm to 5 mm. This is the best option. It will not bend while working. It is better not to spare money and purchase good quality plywood, so as not to subsequently have problems with chips or knots found on it.

Think in advance how you will cover the product - varnish or paint. You will also need sandpaper (large and small).
Beginning of work
Having prepared the necessary materials, you need to find or draw a drawing on paper yourself. A vector image will do. For your first try, try something simple with a little twist.

Then coarse sandpaper is taken and the material is well processed. For convenience, use a wooden block. After removing the dust with a dry cloth, sand the surface again, but with fine sandpaper.
Then transfer the drawing with a simple pencil onto the plywood. You can attach a sheet of paper with buttons or tape so that it does not move. Then the paper is removed. If necessary, correct the contours by eye.

To start artistic cutting with a jigsaw from plywood according to drawings, pictures and descriptions, you need to drill a hole for the file. Then, carefully follow the contours. It is imperative to fix the plywood well.
Samples of artistic cutting with a jigsaw
Vector drawings, pictures and descriptions can be printed on a printer. If the diagram is large and divided into several sheets A-4, then make sure that the scale is the same, then the individual details of the pattern will be comparable without deforming the pattern.

If you like this kind of art, then your home will be transformed over time beyond recognition. Indeed, with the help of a jigsaw, you can beautifully decorate the doors of cabinets, make carved shelves. And how original the carved tabletop covered with glass will look! In private homes, craftsmen decorate shutters, window frames, a ridge, a gate, etc. And how happy your daughter will be if she makes toy furniture or a whole castle! The list can be endless, because there is no limit to human imagination.
If your new hobby is cutting out various decorative elements, burning or carving wood, then our advice would be to start with such material as plywood.
There are several significant reasons for this at once:
Plywood is easy enough to work with.

If you have a good tool in your hands, and you start with small figures, they will only take you a couple of hours to make.

The material is versatile in use, so you can make literally anything you want from it: furniture, toys, small decorative elements.

All this can be a great addition to your home interior.

Features of working with material
What is a plywood sheet. It consists of several veneer sheets at once, which are connected to each other with glue.
Important: plywood can be of different types: based on beech, birch, pine.

Not only the quality of the finished product, but even its structure and color depends on which sheet you choose.

If you are going to cut out various figures with a jigsaw, then you need to choose the highest quality types of plywood.

They are particularly durable, which ensures that the plywood does not crack, ruining the entire appearance of the product at the most unpredictable moment.

If you are going to start work immediately, immediately on the day of purchase, then choose only dry sheets of wood.

They will not break the jigsaw file every 10 minutes.

To work with plywood, you will need to acquire a number of tools.
Basically, they are constantly the same for all types of products, so that only a one-time investment is required:
- Jigsaw
- Jigsaw blades
- Hand or electric drill
- Ruler
- Grinding machine
- Scorcher.

Framework
If you want to beautifully decorate your home or present an original gift to someone close to you, make a plywood frame with your own hands.

The preparation process will not take you much time, because you just need to get the necessary materials.
Note!


They are standard for all cases, and we have already mentioned them earlier.

We will offer you master classes on light plywood crafts. You can make either a regular straight frame or cut various patterns and figures on it.
First you need to make a template, and after that you can cut it out, trace the contours with a pencil on plywood and start the manufacturing process.

This stage is not only the most responsible, but also the most exciting. If you put a piece of your soul into the work, everything will definitely work out. The finished structure must be varnished. Ready!

Doll furniture
This task will be a real test for parents.

Note!

The so-called test of the acquired design skills.

The peculiarity of creating doll furniture is that children absolutely do not tolerate falsehood.

If they see that the furniture is not worked out in detail, and instead of a kitchen stove for your favorite doll, you brought an ordinary rectangular bar, then you simply cannot avoid serious offenses and childhood disappointments.

The second feature of making such a plywood craft using a jigsaw is that all this furniture must be carefully worked out with sandpaper or a sander.

Your child will constantly be in contact with these self-made toys, and in the case of poorly processed edges, he may get injured.

Note!

Well, the last feature of plywood and home crafts is that the materials for such furniture must be absolutely non-toxic and normal for constant contact with the child, because he can drag it into his mouth or take it to bed with him.
This is not a simple applique or paper craft, so you need to take the matter seriously, following a whole list of actions to be performed.

Plywood work
Just as simple furniture is made in detail, and then assembled into one piece of furniture, so do-it-yourself plywood crafts should be done separately.

To do this, first of all, prepare special drawings of plywood crafts, on which specify the dimensions of all parts and their fasteners.

Take a finished plywood sheet and attach a paper part template to it.

Trace the part with a pencil and cut along the contour with a jigsaw.

After that, each detail must be cleaned with sandpaper or a grinding machine, and only then assemble the piece of furniture.

When you are done with the whole set, open it with varnish.

Below are different options and photos of plywood crafts. Choose the one that you like.

Photo of plywood crafts


Wood and sheets (slabs) based on it is one of the cheapest and most flexible materials. For those who like to work with a jigsaw, plywood is primarily of interest.
It is her home craftsmen who most often choose for the manufacture of various crafts. If you organize the work correctly, you can create real masterpieces.
Crafts from this material are made for various purposes, but basically they can be divided into two groups - for decorating premises or territory (for example, fences from the inside, a garden plot, and so on).
Variety of plywood
If you focus on the optimal combination of indicators such as quality and price, then FSF or FC products are selected. It is characterized by resistance to dampness and temperature fluctuations. This alone is enough to ensure the durability of a hand-made craft. But there is a fundamental difference between these types of plywood - in the component composition of the glue, which holds the veneer layers together.
In the first case, it is toxic, so FSF sheets are used only for outdoor work. But for crafts intended for indoor use, FC plywood is quite suitable. Its counterparts are much more expensive, therefore they are not considered as material for simple, easy-to-make crafts.

Type of sheet grinding
It's easy to figure it out: Ш1 and Ш2 - respectively, one- and two-sided; NSh - coarse plywood. That is, the craft still has to be "brought to mind", polished. The choice according to this parameter depends on how it is planned to be arranged and placed in the future. A sample fixed on the wall and, for example, a figurine (stand, vase, toy, or other) that is viewed from all sides are different things.

Plywood texture
Much depends on personal preference. If it is planned to preserve the natural appearance of the tree when applying the protective coating of the craft, then it is better to purchase birch veneer plywood under the varnish. But for the subsequent painting, it is advisable to choose pine.
For various plywood crafts, it is advisable to focus on an oil or acrylic base. The explanation is simple - they are less susceptible to fading in the sun, therefore, you will not have to frequently update the outer coating; it will not change its original appearance for several years.
Plywood grade
When choosing a sheet for crafts, you must first of all inspect it for knotty and inclusions. Significant defects will not only complicate the cutting of the material, but also initiate the appearance of cracks or "holes" (as a result of falling out of the same knots). Next - inspection of the end surfaces. During the cutting process, plywood is subjected to dynamic loads (vibration). If at least signs of veneer peeling are noticeable on the side parts, such material should not be purchased, even if its price is too tempting.

In the future, in the process of making the craft, many problems will arise. As a result - rejection of plywood and its increased consumption. In aggregate terms, this in terms of money will come out about the same in comparison with the purchase of high-grade material, and in terms of the time spent and the quality of work - a big minus.
Thickness of sheets
If the crafts are cut with an electric / tool, then it is limited to 30 mm. For a hand jigsaw, it is advisable to use relatively thin plywood; maximum three-layer. That is, no more than 9 mm thick.
What you need to work
Jigsaw
This is a priori, since we are talking about making crafts using such a tool. The question is - which one is the best to work with. Electric models are much more expensive than manual counterparts, but they have a lot of advantages. About V.

For example, high speed and accuracy of cutting, cleanliness of edges, the ability to change the cutting parameters and a number of others. If a plywood craft is not a one-time, short-term hobby, then it is worth spending money on an e / jigsaw. It is versatile, and it will come in handy on the farm more than once, since depending on the type of file it can "work" not only with wood, but also with non-ferrous metals, plastics, and plexiglass.
It is somewhat more difficult with a manual jigsaw. Its design is quite simple - a frame with screw clamps and a handle + file.

The nuance is that the cutting blades break quite easily (from excessive pressure, changing the position of the hand tool), and therefore it is advisable to purchase them with a margin; fortunately, they are cheap.
Hacksaw
It is needed only at one stage - when cutting the dimensional sheet into separate fragments. Doing it with a hand jigsaw is an unpromising and unprofitable occupation; time and files will be spent a lot.
Stand
Nobody will cut plywood by weight; It's clear. Cut out the details by laying the sheet on the tabletop - there is a risk of damaging it. It is in order to ensure the "safety" of the latter that the stand is needed. You can make it with your own hands from trimming the board. How such a device looks like (one of the options) can be seen in the figure.

The support is fixed on the base with clamps (on a non-working table) or self-tapping screws (in case there is a carpenter's workbench in the annex, shed, garage). Although these are not the only mounting options. How to proceed is easy to understand, depending on local conditions.

Skin
The ideal tool for fine woodworking -. But for plywood crafts that do not differ in large areas, it is not suitable. Therefore, only sandpaper; medium fraction - for primary grinding of workpieces and with fine grain - for finishing.
Additionally
- Files and files.
- Awl.
- Simple pencil and carbon paper.
- Glue, if the craft is created as a composite or multi-level, that is, with the fixation of two or more figured fragments in separate areas.
- Varnishes, paints, stains.
Examples of drawings and sketches of plywood crafts


Copying "one to one" in this case is hardly advisable. Any work done with your own hands is a process with a creative component. That is why the dimensions should be determined independently, depending on where it is supposed to place (or how to use) the craft. For example, will it "look" in a specific place, will it organically fit into the interior of the room.
Even if you like the drawing, it is not difficult to change the geometry of the figure by applying the scaling rules. Moreover, when it comes to drawing a contour on plywood with a simple pencil; to correct any mistake, it is quite easy to correct something in some areas. It is not much more difficult to modify any sketch, adding something of your own, original to the sample.


There is another solution - you can download any picture you like from the Internet. Printing it at the right scale is not a problem. All that remains is to transfer it to the plywood using carbon paper and shade the areas that need to be cut. This is when it comes to curly crafts. It's even easier with an outline pattern; cut exactly along the line - and that's it, you're done. All that remains is to do the decoration of the product.


Basic rules for cutting with a jigsaw
- Laying under a rigid backing sheet. It is in order to ensure the hardness of the surface under the plywood that the stand is used. A sheet, even a small one, bends quite easily (under pressure), therefore, without this device, a high-quality cut, strictly along the line, will not work.
- The working body of the jigsaw (saw) must be strictly perpendicular to the end of the sheet. Moreover, constantly, throughout the entire process of cutting the material.
- The tool is fed along the line in a translational motion, but without effort. Otherwise, the file will break immediately. As well as when it deviates from the "vertical".
- Cutting holes "blind", that is, somewhere along a sheet of plywood, with an indent from its edge, is done as follows. At any point of the outlined contour, a "hole" is drilled with a slight offset to the center of the fragment. The diameter is chosen so that the file fits easily into it. Once attached to the tool frame, you can cut in any convenient direction.
- A curly cut in plywood suggests sharp turns, smooth bends, and so on. First, at the point of changing direction with a jigsaw, without changing its position, it is necessary to make a small hole in the material. To do this, you need to continue the cut with a file, strictly maintaining the orientation of the tool, and at the same time turn the piece of plywood. As soon as the plane of the cutting part coincides with the required direction of further cutting, it can be carried out along the marked line.
Having mastered the manufacture of fairly simple crafts from plywood, you can take on more complex options. As an example - self-assembly of furniture (shelves, bookcases, original hanging shelves). With a skillful approach to business, plywood makes excellent countertops, cutting boards, window frames and so on. It is not difficult to make a folding chair from this material, with various modifications. Who is interested in this,.
Plywood also makes great frames for paintings and photographs. For those who have a plot, it will be possible to do the decoration of outbuildings; the same gazebo, a house above a well, or something else. There are many options. The main thing is to want to learn.
In the process of preparing for cutting with a jigsaw, do not forget that all drawings and drawings are nothing more than the basis for developing your project. A little imagination, time, effort, and you can make a truly real masterpiece from plywood.
You can make so many decorative items and useful little things from carved wood and plywood that it is foolish to limit the scope of the work. In fact, it can be absolutely everything that has enough imagination: caskets, covers for decorative and collectible books, lampshades, panels, shutters, furniture elements, platbands, cornices ... But the most attractive thing about creating exclusive works is that everyone can do them willing, if he makes a certain amount of effort.
Slotted wood carving: photographs, drawings and sketches
The main key to success in creating interesting gizmos with slotted carvings is the choice of pattern. It is he who conveys the general concept and sets the aesthetic tone for the entire product.
The easiest way for beginners will be to perform geometric patterns, as in the photo.


Carved drawings of floristic and animalistic themes are classic ornaments for any application.


Lettering is a modern use for wood and plywood carving. At the same time, you will hardly be able to find drawings and sketches on the network - they will have to be compiled purely individually for personal requirements for sizes, fonts, words.

Stencils for slotted thread
However, unlike slotted lettering on plywood, drawings with plant, animal and fantasy themes can be found on the net. So feel free to choose the stencils you like in the album, and ideas for creativity will last for a long time!
The simplest sketches are suitable both for training at the very beginning of the path of manufacturing products, and can become separate elements of a complex design. For example, this is how carved houses are decorated.


More complex patterns will take some skill and patience, but the results will be worth it. Such pictures can serve as an independent product, even a gift.


Whole compositions with an idea and meaning usually serve as either a separate piece or form the basis of a work.


Slotting tools: jigsaw or router
However, the choice of drawing is only a third of the success. Another important aspect that must be considered before starting the work itself. Namely - the choice of the tool that will be used to carve wood or plywood.
Depends on the equipment:
- how thin the thread will turn out;
- the complexity of the pictures;
- cutting speed;
- accuracy of work.
Therefore, it is important to evaluate all the pros, cons, possibilities and limitations of each of the traditional sawing tools:
A jigsaw is a device for curly cutting out parts. It is quite laborious to work with a hand tool, but it allows you to very accurately perform cutting according to the drawing. The power tool allows you to quickly produce curly plywood products, but requires caution.

A router is a tool that gives a flat-relief slotted thread a thinner and more complete look. It is with its help that it turns out to round off the edges, remove chips, make gaps, and carry out the most difficult cutting.

Theoretically, a milling cutter can perform the same work as a jigsaw, and even more, but in fact, such handling of the tool is fraught with its quick failure, frequent replacement of the frieze.
Slotted thread materials
In most cases, plywood is chosen for this type of work - it is uniformly thin, has a pleasant color and structure, it does not lead during further use or storage, unlike solid wood. It is the choice of material that becomes the third pillar of successful work.
The modern market is replete with different types of materials, so it is easy and confusing. For such work, you should choose:
- FC plywood - harmless to humans and the environment, durable, easy to cut, practical;
- FB plywood is also safe for humans, but resistant to aggressive environments, since it undergoes special processing and receives a protective coating, which can cost an order of magnitude more.
Note! In no case, do not choose plywood of the FSF class for interior work - it is processed with carcinogenic preservatives and is permissible for use only in the fresh air - they are perfectly lined with a bathhouse or a house outside.
Photo of carved wooden houses
For Russia, slotted carving is of particular importance as a decoration for the facades of buildings. For a long time, ornaments carved on birch bark and other similar materials adorn huts, baths, churches, which are colorfully demonstrated by photographs.


Wood milling video with a hand router
If you have just decided to try your hand at curly slotted carving, it will be useful to watch a video with a master class. It will help you better understand how drawings are created, and how such a home beauty appears.

