Making a salary for a roof window with your own hands. Recommendations for the installation of skylights
An exploitable attic is a great way to expand the living space of a house without taking away precious extra meters from the site. It is easier and cheaper to equip an attic than to build a second floor. It is only necessary to immediately design a sufficient ceiling height and provide windows. Windows are the most technically difficult part of the attic: they must provide sufficient illumination, while holding firmly and not leaking. Consider the installation of skylights on the example of the products of the popular manufacturer Velux.
Features of windows of the Velux trademark
The windows of this company are made of glued pine timber. The density of this wood is quite high, which guarantees the strength of the structure.

The beam is impregnated with a fungicidal (antifungal) composition and covered with two layers of water-repellent varnish. IN model line There are designs with a polyurethane coating.
Brand advantages:
- durability;
- comfortable trouble-free fittings;
- thoughtful ventilation system, the presence of filters from insects and dust;
- excellent heat / sound insulation properties, thickened double-glazed windows, three-level sealing contour;
- high-tech mount that simplifies installation;
- full set. The kit even includes wedges for adjusting the frame during installation;
- large model line;
- a wide range of accessories.
Window designs of this brand:
- Windows with central opening.
- Windows with combined opening.
- Additional lower and top elements.
- Window-balcony and terrace.
- Antiaircraft windows.
- Light tunnel.
- Roof exits.

The range includes models with energy-saving glass, shockproof, anti-condensation, self-cleaning. The energy-saving package is made using the “warm perimeter” technology, the filler is argon. The window withstands frosts down to -55.
There are models with remote control. In addition to the window itself, you can purchase Velux blinds, curtains, roller shutters, mosquito net and accessories for them.

Roof window installation scheme
Windows in the attic are auditory (installed vertically) and actually attic - cut into the slope with the same slope as the slope itself. The difficulty is the installation of inclined windows. Vertical install in much the same way as the windows in the residential part of the house.

The first stage (preferably at the design stage, but you can cut a window into finished roof) - choice of location and calculation of the glazing area.
According to existing standards, the total area of glass should be one tenth of the area of \u200b\u200bthe attic itself. The best option- install a window in the span between the rafter legs.

If you cut out the rafters, then you will need additional measures by amplification.
Based on the pitch of the rafters, the width of the window and, consequently, the number of windows are determined. The side rails of the frames should be located 2-3 centimeters from rafter legs(the gap is needed for laying insulation).
If the window does not fit in the span between the rafters, fragments of the rafter legs are cut out and reinforced with auxiliary beams. Horizontal beams are installed 30 cm from the upper and lower edge of the window, vertical - 5 cm from the window frame. The thickness of the beams is the same as that of the rafter.

The height of the placement depends on the slope of the roof. If the angle is large, the windows are mounted lower, on a sloping roof - closer to the ridge. The height also depends on the location of the handle on the selected model. If it is located at the bottom of the frame, the window is installed 1.2-1.3 m from the floor, if at the top - 1-1.1 meters. Minimum Height lower bar - 80 centimeters.
Some restrictions are imposed by the coating material: in metal sheets, an opening can be cut anywhere, and it is not recommended to cut ceramic tiles, you need to adjust the window niche to fit the whole rows.

The size of the salary depends on the height of the profile: the higher the comb, the higher the salary. For flat coverings, Velux produces DL/EDN flashings, for profile coverings - W.


The method of opening the sashes (along the upper axis, along the central one) depends on the design project and the personal taste preferences of the owners.
- on a roof with a small slope, it is better to install models with a combined opening, with a turn around the upper and central axis;
- if it is planned to install furniture under the window, a turn around the central axis is preferable;
- if the windows are high, the way the sash is rotated is unimportant. For such cases, the manufacturer recommends models with remote control.
Our work
Installation instructions for Velux skylights
If the insert is made into the finished roof, the first stage is the preparation of the opening:
1. Remove trim (if any).
1. Attach four slats of timber to the rafters - the base to which the box will be attached. The thickness of the beam is 5 centimeters, the indent from the crate is 8-10 centimeters. Check the horizontal and vertical level.

2. Cut out the crate with an indent of 2 cm from the rafter legs.

3. Cut out the waterproofing section. On all four sides, you need to leave a margin of film. Later, the excess waterproofing will need to be turned outward and fixed to the crate or to the frame.

4. Cut a piece of cover to fit the opening.
Before cutting the waterproofing, markup is drawn on it:
- bottom for profile coatings leave 9 cm;
- from below for flat coverings ( flexible tile etc.) - 4-6;
- top - 9-15;
- from the sides by 3 cm.
The rectangle is cut out with an indent of 20 cm from the marked lines.
2. From above and below, nail the waterproofing film with a stapler to the corresponding rails. Pull the vertical edges of the film outward.
3. Remove the sash from the window, remove the salary.
4. Attach the brackets and mounting plates to the box. With a large window height (1.4 meters and above), additional brackets are attached in the middle of the side frame bars.

5. Install the box.

6. Fasten the bottom brackets to the crate. Install top but do not fully tighten.

7. Install the sash. Check the fit, adjust the upper fasteners - the gaps on all sides should be uniform. Remove sash.

8. Place a heater in the upper gap, fix with a stapler.
9. Lay thermal insulation on the remaining three rails, press with a frame.
10. Level the box according to the level, tighten the fasteners.
11. Install a waterproofing apron around the perimeter of the frame. One side of the apron is brought under the crate, the second is attached to the box with clamps from the kit. At the top, the waterproofing film is brought onto the drainage gutter, the apron - under the gutter. Clamp fixing.
12. The drainage gutter itself is installed above the frame at an angle. Its purpose is to divert water from the opening to the roof.
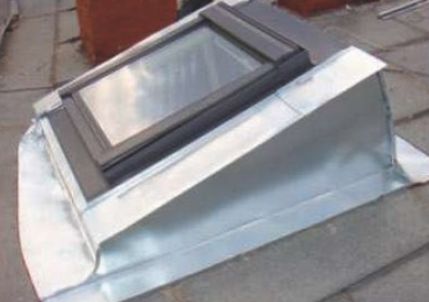
13. Set the salary: the lower apron, then the sidewalls, the upper part, the last - the lining. Parts of the salary are fixed to the crate and the box, the lower apron at the top - directly to the roof. When installing the sidewalls, do not confuse the right and left parts.

14. The side edges of the lower part of the salary must be bent (especially on a flat roof). This is done to prevent leaks. It is recommended to tap the bottom edge with a rubber mallet to fit snugly against the roofing. The salary is fixed to the roof with sealant or wire, screws are not allowed.
15. Replace the sash.
Do not use foam to seal the joints of roof windows. The material kit contains a sealant designed for this purpose.
The final stage is the installation of slopes. The upper slope should be oriented horizontally, the lower - vertically: with this arrangement, the flow of warm air from the heating devices will not be blocked, condensation will not appear on the windows.
If you are installing a window with a remote control, you must run the cable before installing the slopes. In the upper part of the box for it there is a special hole closed with a plug. A wire with a cross section of 2 by 1.5 millimeters is passed through it (with a wiring length of not more than 40 meters).
Related Articles
Features of installation of the roof window Velux
Recommendations for the installation of skylights different manufacturers essentially the same, but may differ in detail. The above procedure is universal. What you need to pay attention to when installing Velux roof windows:
- the window is attached to the crate (at Roto, for example, it is allowed to mount windows to the rafters);
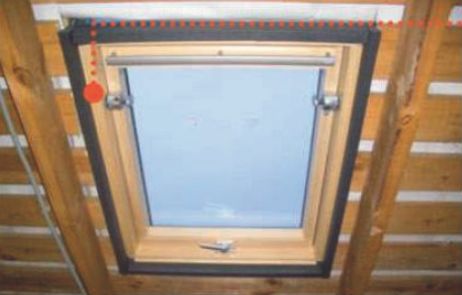
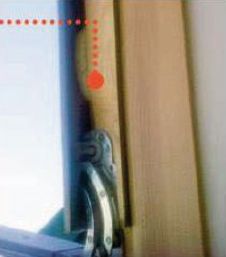
- it is necessary to remove the double-glazed window when installing from the attic. If from the roof, then you can not remove it.
Insulation for Velux windows is usually included in their package. This is a contour of strips of extruded polyethylene foam on a steel frame. If this element is present, the procedure is as follows:
- first, the frame is assembled from guides with insulation;
- install it in the prepared opening on the mounting beam;
- install a window frame;
- fix the heat-insulating contour together with the box to the crate with mounting plates.
If the gap between the rafters is not wide enough, the contour is adjusted in size by breaking along the groove on the sides.
note
There are some nuances in the installation of salaries on different types of roofs. On a profile roof (let's say it is a metal tile) before installing the lower W-glare strip sharp corners sheets are cut. The bar is fitted, the flexible part is bent according to the shape of the profile. The bottom is also folded in to ensure a snug fit.On the roof of shingles the lower part should cover the roofing material with the same overlap as the tiles themselves are laid.
In this article, we will analyze in detail how to install a do-it-yourself roof window. This operation will require compliance with all recommendations and maximum accuracy. Even the slightest flaws are unacceptable!
The design of skylights has a number of features. This element is operated in special conditions, because atmospheric precipitation (rain, snow, hail) will prevail on it. This requires the complete absence of cracks and seams, as well as high strength. The inclined arrangement puts an impressive load on the frames.
Almost all manufacturers of skylights use the appropriate heavy-duty glass. It easily withstands heavy loads. Ordinary can simply burst when heavy snowfall or hail falls.
Important! Be sure to ask the manufacturer about the strength level of the double-glazed window - there must be an inert gas inside it.
This design consists of sashes, frames and special fittings. Be sure to have a hydro and vapor barrier apron. This element helps to avoid leaks. The presence of additional thermal insulation is mandatory for the harsh Russian climate.
The cost of a roof window depends on several factors:
- Glass thickness.
- profile materials.
- Type of construction (we'll talk about this later).
- Brand popularity. For products from recognized manufacturers, you will have to overpay a little.
- The presence of additional elements (roller blinds, shutters, etc.).
All known classifications
By type of materials used
There are three options:
- Wooden. Despite the emergence of more advanced and practical materials, wood is still very popular. Its main plus is ecological cleanliness and more attractive appearance. The disadvantages include a low operating period (due to temperature changes and high humidity, they dry out) and fire hazard.
Tip: wood should be treated with antiseptics and protective compounds- it will prolong her life several times.
- Plastic. The most common option today. Advantages of PVC known to all - practicality, resistance to external factors, availability, etc. They are characterized by only one serious drawback - too strong tightness, due to which winter time the ventilation process is complicated (there is no natural ventilation).
- Aluminum. They have the best technical characteristics. However, their price is much higher. So far, this material has not received wide recognition, largely due to the high cost of the technology.

By design features
- Extensions - the upper elements of the opening, which create a decorative outline. They may have a non-standard shape (triangular, semicircular, etc.).
- Additional bottom elements. They are used in cases where the height of the room is small, and one opening is not enough for normal lighting.
- Light tunnel. It does not contact the attic - a reflective tunnel goes from it into the room, and a ceiling is fixed in it, which scatters light. Most often it is used in small attics.
- balcony elements. Addition, which provides access to the balcony. They are often used, with a strong slope of the roof.
- Cornice elements. They are installed vertically under the main roof window. The need for them arises when the wall is too high.

According to the location of the opening axes
The device of roof windows can be different - the method of opening is different. There are the following varieties, with respect to the location of the axis:
- Central. The most popular option, since this design allows you to scroll the sash in all directions.
- Raised. They are used in the area of the upper boundaries of the opening.
- Combined - the upper axis opens only outward, and the central part can be rotated (for example, to organize cleaning).
- Lateral are hatches.
- Lower (balcony).

There is another variety that cannot be attributed to any of the categories - the so-called " smart windows". This is a system in which the leaves are opened using a remote control. Such structures are used, as a rule, in two cases: if the height of the room is too high, or for aesthetic reasons.
Main front of work
If you wish to install it yourself, our skylight installation instructions will help you. Let's consider everything step by step.
Theoretical aspect - choose the location
At the first stage, remember a few simple recommendations:
- Ideal if the installation will not affect the rafters and they will remain unchanged. When planning, you need to strive for this.
- The size of the opening should be at least 10% of the area of the room - only in this case, favorable lighting will be provided at any time of the year.
- The width of the opening should be 5-7 cm less than the step between the rafters. If you have them too often, you can make, for example, two small windows next to each other.
- The height of the location is better to choose from the angle of the slope. The steeper the roof, the lower the opening should be. Recommended height 90-120 cm from the floor.
Opening organization rules
Installation of skylights begins with the preparation of the opening. In this case, there are several rules that must be observed:
- Between the opening and the frame, we subsequently lay a heater. Therefore, we leave an allowance of several centimeters around the entire perimeter (depending on the selected thermal insulation material).
- We leave a technological gap between the roof and the bottom line of frames (within 10 cm).
- We leave a gap of 4-8 cm between the roof and the upper beam. This is necessary in order to prevent the structure from skewing as a result of wood shrinkage.
- Frames must be mounted to the rafters, and not to the crate! Horizontal slats are also organized from a bar that is stuffed onto the rafters.
Guided by these rules, you must cut the opening (it is better to use a chainsaw). This procedure is quite simple. However, if you have already installed roofing material and made interior decoration, it will be much more difficult. You must know the internal layout of the rafters. Ideally, if you have a diagram at hand.

Remember that roofing material and rafters are sawn different tools. wooden elements we saw with a simple saw, and slate or profiled sheet with a grinder with a special nozzle. If you do not have the appropriate tools, or you do not know the location of the rafters, it is better to invite a specialist who will organize the opening for you. Otherwise, you risk causing serious damage to the roof.
If the attic ceiling is finished with panels or similar material, then they can be dismantled beforehand. This will allow you to find out the location of the rafters, as well as make life easier for us. We mount the panels back only upon completion of work - in this case, you will not damage them.
The specifics of the organization of the box
Making a do-it-yourself roof window is not as difficult as it might seem at first glance. The main thing is to constantly check the accuracy and correctness of the installation. Level (ideally laser), tape measure and plumb line should be your best friends at all stages of work.
So, you have cut an opening of the appropriate size, following the recommendations above. Next, you will need to create a box - an element due to which our design will hold.

- We install a temporary support from below - any bar can serve as it. The bottom of the window must be set strictly horizontally, so use the building level. Even a misalignment of 1 mm will jeopardize the success of the entire operation.
- We fix the bottom of the box with screws. Then fix the top corner.
Important! Do not turn the screws all the way in so that you can make adjustments if necessary.
- So, we temporarily fixed the box and now we need to adjust it. Along the entire perimeter, evaluate the distance to the roof, as well as horizontality (verticality) using a level or plumb line. The gap must be the same on all sides. We use special plastic wedges for adjustment.
- Having once again checked the correctness of the fixation, we install thermal insulation - we lay it in the gap between the box and the roof, leaving not even the slightest gaps! Remember that a colossal load will be placed on the structure, therefore even minimal errors and gaps are not acceptable.
- The insulating material should overlap the window by a few centimeters - this will provide additional protection from wind and moisture. Therefore, we cut it with a margin.
How to insert salary
Salary is a structure that connects the window to the frame. It also creates maximum tightness and strength. It is installed in the following order:
- Install first lower part salary. After that, the top lining is fixed. These elements are fixed with screws.
- Then the side sections are mounted on special nails.
- Next, insert the side parts all the way down. Sections are mounted to the crate using clamps.
- The top and side plates are fastened with screws.
- Now we bring the roofing material to the fold on the salary.
- We attach the upper section of the salary to the crate with clamps. We press it to the box with screws.
- If excess roofing is observed, we cut it, leaving 5-10 mm.

The simplest step - frame insertion
The most labor-intensive operations are over. Now you need to insert finished structure. If you are working alone, then pull out the frame first so that it does not slam, as this can cause defects. If you have a partner, you can not do this, as he will hold the sash with one hand.
- Attached is the payroll. It must match perfectly. Otherwise, you need to contact the manufacturer, as this is a marriage.
- First of all, we fix the bottom part. The lower brackets must be screwed in as far as they will go, and the upper brackets should be left slightly loose. As a result, we will create a slight play needed for adjustment.
- At this stage, the final adjustment is carried out. You must fix the window perfectly - the distance from the frame to the opening must be identical on all sides.
- Convinced of correct location, "tightly" we twist all the fasteners.
At the end, we finish the external slopes on the roof windows. In particular, you need to install a waterproofing apron around the perimeter of the frame (it will prevent leaks). Attach it to construction stapler. If this does not work, you can use small nails or special screws.
Last winter was a severe test for skylights. The mistakes of the installers, the oversights of the finishers and the omissions of the owners declared themselves in the most unpleasant way - in the form of leaks, frost and damage. Fixing defects takes time and money. Isn't it better to do everything right from the very beginning?
To begin with, there is a huge difference between façade (vertical) and sloped roof windows (mansard). The first are mounted in a solid wall opening using special fasteners - anchor bolts. By by and large the risk zone in this case is only a small gap between the opening wall and the window frame, which is filled with heat-insulating mounting foam and insulated with special materials (self-expanding vapor-permeable tape PSUL, waterproofing tape, etc.).
Roof windows are built into roof structure pitched roof(installed between the rafters, mounted on the crate). Thus, they become an integral part of the roof. To prevent leaks, it is necessary first of all to ensure the watertightness of the junctions. roofing cocoon block. This problem can be solved by special external salaries. Similar products are available for different types roofing (flat or profiled). It is important not to confuse and set the salary that is best suited for specific situation. To prevent freezing, the roof window area is carefully insulated with soft thermal insulation - mineral wool from basalt fiber (Rockwool, etc.). The joint with the subroofing hydro- and vapor barrier of the pitched roof is provided by insulating salaries and special elements and products.
Another significant point in the installation of roof windows is the formation, insulation and finishing of slopes. Errors at this stage lead to freezing, abundant formation of condensate, and in the future - to damage to finishing materials and even worsening living conditions in the attic. First of all, you need to make sure that the lower slope is perpendicular, and the upper slope is parallel to the floor. Soft thermal insulation should be laid under the rough sheathing (but in no case polyurethane foam!). We have already mentioned the vapor barrier apron (salary).
Meanwhile, in order to properly install a roof window, you do not need to be a narrow specialist in this field. The main thing is to strictly follow the manufacturer's instructions, which, by the way, are included in the product package. You just need to open the booklet and carefully study the installation process, and not according to written recommendations, but according to intelligible pictures. There is almost no text in the instructions, all explanations are given in an understandable pictorial form.
If desired, any neat and thoughtful roofer can handle the installation of a roof window. However, in practice, all work on the arrangement of the roof is run either by negligent amateurs or outright shameless hacks. In other words, the main cause of problems with sloped roof windows is poor-quality installation and complete disregard for the manufacturer's recommendations. At the same time, unscrupulous installers cover up their lack of professionalism with fairy tales, as if skylights in the Russian climate are doomed. Say, this is not Denmark with Germany and Poland. In fact, slanted roof windows have proven themselves in the most different regions our country, including Siberia and even the Far North.

The skylight looks like a layer cake. Moreover, all the "cakes" and "fillings" are produced by manufacturers of window products. After all, in addition to insulation and sealing, sloping roof windows need shading and blackout. From the usual curtains in the attic with its sloping walls-ceilings, there is little sense. Fortunately, blinds, blinds or roller shutters can be matched to all skylights. Consumers are offered a wide range of accessories, as well as many products and devices that make it easier to open and close the doors.
Do not forget that under the roof windows you need to install heating appliances, which will ensure the convection of warm air in the zone of double-glazed windows, otherwise in winter the glasses will fog up and even become covered with an ice crust.
Skylights can be built into slopes with a slope of at least 15°. However, for some owners of houses with almost flat roofs (or owners of apartments located on the upper floors of old five-story buildings), this rule is not a decree. They nonchalantly fit slanted windows into a horizontal plane. reinforced concrete floors. Leaks and destruction of window structures will not keep you waiting. Meanwhile, there is a technology for installing skylights in flat roofs using lining elements. In addition, you can purchase specialized sets of skylight windows.
Installers often forget to set the gaps, that is, adjust the position of the box relative to the swing sash. As a result, gaps appear that cannot be eliminated during the operation of the window. And one more nuance. The well-being of skylights directly depends on the general condition of the pitched roof. As a result of mistakes made when laying the coating and installing hydro, steam and thermal insulation, a large amount of moisture accumulates in the roofing "pie". Water flows down to the window structures and seeps through the finishing of the slopes and along the adjoining sections of the walls.
The owners argue like this: if leaks left marks on the slopes, then the windows are to blame. And call the manufacturer's customer service. After dismantling the finish, it turns out that there is no vapor barrier, ordinary polyethylene acts as a waterproofing, and the insulation is wet, even squeeze it out. In such a situation, urgent overhaul roofs with the subsequent reinstallation of skylights.
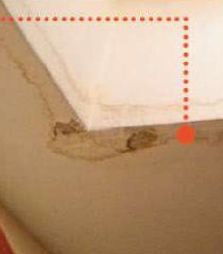
 | This window was installed with such large geometric deviations that the resulting skew caused the formation of a huge crack in the frame, that is, in fact, destroyed the base structural element. You will have to completely change the window unit. |
 | This roof window also had a geometry problem. Due to the distortion, a gap formed between the sash and the frame. To eliminate the defect, it will be necessary to dismantle and reinstall not only this block, but also the cornice window adjacent to it. What is especially sad, because repair work entail the dismantling of high-quality and expensive finishes. |
 | Here, the installers did without riveting. Steel was cut with blunt scissors at random and did not even turn up the edge - let it rust! And the joints were carelessly smeared with a sealant of unknown purpose. After such installation, you need to prepare for early repair of the roof and reinstallation of skylights (if they still remain in working condition) |
 | This window has chances for a happy future. The product is displayed accurately. Mounted around the perimeter warm contour. However, builders often forget to insulate the gap between the window and the rafters. Two strips of mineral wool - and the window is saved from freezing! |
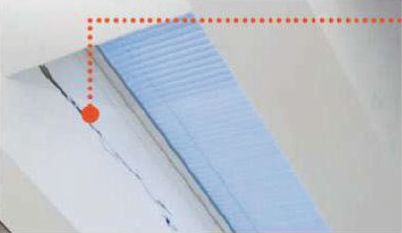
 | Here is an example of a classic leak. Installers did not adjust and level the position window frame. They didn't even bother to check if the window was closing. And the owners are forced to take measures to get rid of the gap between the box and the sash. |
 | This is how the frame of an obliquely installed roof window looks like shortly after installation. Water stains appeared, the varnish peeled off, the wood turned gray. |
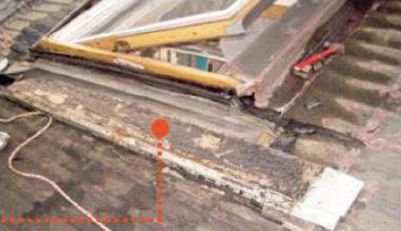
 | The roof window is built into the seam roof. At the same time, a reliable and hermetic adjoining of the window unit to the roofing is not provided. The joints of the outer flashing and sheet steel are filled with sealant and fastened with clamps (should be under the roof), nailed with ordinary nails (through damage to the coating). |
 | Another example of improper installation of skylights in a seam roof. Probably, during installation, components from dismantled blocks were used. The salaries seem to be collected in parts. For example, corrugated aprons were taken, designed for installing skylights in profile roofing (natural tiles, metal tiles). However, metal frames salaries just wound up under steel sheets. This means that leaks and dampness cannot be avoided. According to the instructions, these frames should be rolled into a kind of fold - a waterproof seam. in terms of its tightness, it is not inferior to the seam joints of the main coating. |
 | You can not thoughtlessly use mounting foam, forgetting that the windows for the roof are held on ordinary self-tapping screws. During the polymerization process, the foam expands and presses on the frame. The window is deformed. cracks appear through which water flows. |
 | Probably, the finishers thought they were doing a good deed by covering the slopes with foil foam. However, in this situation, this material serves only as a vapor barrier. It does not provide complete insulation. Without soft thermal insulation, which should have been located under the penofol, the slopes will freeze through. Due to the fastening with staples, the integrity of the foil vapor barrier is broken. Tiny holes are enough for the vapor to penetrate under the penofol, where they condense and dew drops onto the drywall sheathing. |
 | The gap around the perimeter of the window block was generously filled with mounting foam. When expanding, she squeezed the frame, which led to the skew of the window. The slopes are roughly hemmed with an ordinary board. There is no place for insulation, and without it, the fine finish will be spoiled by condensate. |
 | It will definitely not work to qualitatively perform slopes of dormer-windows. board over window block nailed almost vertically. Meanwhile, in order to ensure full-fledged convection of warm air in the area of the double-glazed window, the upper slope must be parallel to the floor. |
 | There are no complaints about the mounting foam. It was applied in layers, and the expansion was avoided. But without soft insulation the slopes were frozen, and there were signs of leaks on the drywall. The window was left without a vapor barrier, which increased the formation of condensate. |
 | And here are the consequences of unscrupulous installation and finishing of skylights. The plasterboard sheathing is hopelessly damaged by leaks. resulting from the formation of condensate in the slope area. Unscheduled repair of the attic provided. |
 | The slope is rough. The base cladding is made from a rough board. Finishers do not even think about steam and thermal insulation. Correctly mount the insulation, vapor barrier apron and fine finish almost impossible. |
 | The finishing of the slopes did not withstand the operating conditions. Moreover, the problem arose not so much due to errors made during the installation of inclined windows, but due to a systemic violation of the rules and regulations for arranging the attic. |
 | Due to improper installation of the outer flashing, rain and melt water penetrated into the area where the window unit adjoins the roof. This led to destruction and frame structure windows, and roofing systems. We're not talking about leaks. |
 | In the spring, ice on a double-glazed window will cause stagnation of melt water, which will inevitably lead to leakage. The unfortunate turn of events could have been avoided. if the owners regularly cleared the skylights from snow. |
In conclusion, a small but visual video on the installation of roof windows:
Most modern owners strive to make the most efficient use of the usable area of their home. This can be achieved, among other things, by adding an under-roof space to the living part, which is either not used at all or acts as a cold attic for storing unnecessary things. Make a gloomy nook bright and cozy room, the installation of skylights in the roof slope will help. The windows in the pediment of the house do not always effectively cope with lighting, so the process of arranging the attic most often begins with the installation additional windows. However, the installation of skylights is a technically complex and extremely responsible task, because in case of an error, the tightness of the roof will be violated. Today we will tell you how to install a roof window in compliance with all the rules, carefully arrange it and decorate it.
Types and arrangement of windows in the roof of the attic
Like any useful invention, mansard roof windows have their own history. Their prototype can be called attic hatches, through which chimney sweeps went to the roof to do their daily work, that is, to clean furnace chimneys. But at the beginning of the last century, one enterprising Dane made serious adjustments to the design of hatches, which he patented and are still used in the production process.
This is interesting Install sloped windows attic floor first proposed about 70 years ago by Dane Villum Rasmussen. He received a patent for his invention and opened a family business that manufactures and installs skylights, which is still thriving.


However, since then, the windows in the attic, the photo above clearly demonstrates this, have become much more modern, technically perfect and more beautiful. Here is a list of the main design changes that they have undergone over the past few decades:
- Instead of one glass inserted into the frame, a durable double or triple glazing unit is used, into which an inert gas is usually pumped;
- The frame or box is made either from especially durable types of wood using a typesetting and adhesive technology, or from metal-plastic;
- Hinges have become more perfect, which now not only allow you to rotate the frame 180 degrees, but also completely remove the sash, or prevent it from spontaneously slamming;
- Panoramic roof windows appeared, that is, wide fully glazed surfaces, consisting of individual segments, as well as light tunnels;
- Mansard roof with windows can now be electrified and equipped with a remote remote control which greatly simplifies operation.
How beautiful and technically perfect skylights can be - the photo gallery below will show you some striking examples:


Now let's take a closer look at the types and design differences of skylights. First, they are divided into two types according to the installation method:
- Vertical skylights, as the name implies, are mounted vertically, but to do this, a visor, or "birdhouse", is needed, since the roof is sloping. Such an architectural technique is probably well known to you, it perfectly enlivens and decorates the roof, but does not provide the attic space with enough daylight.

What is the difference between vertical and inclined skylights
- Inclined windows for the attic are installed flush with the roof slope, so they are 30-40% more efficient than vertical counterparts in terms of lighting. By the way, blind windows for the attic can be purchased exclusively by custom order, but rotary designs are offered in a wide range.

Inclined mansard roof window with pivoting sash
Secondly, roof windows differ in shape and installation location:
- Classic rectangular frames with blind or rotating double-glazed windows are used most often. It can be electric roof windows, wooden, plastic (metal-plastic, pvc), aluminum. They have standard sizes, and each of the listed materials has its pros and cons. It is difficult to say which is better, but as a rule, good roof windows are made in Europe and have a quality certificate.

Skylights in the kitchen with remote control
- A window-balcony is an interesting tandem of an inclined frame and a vertical one located under it. By lifting the slanted sash, you can "go out" there, like a balcony, to get some fresh air.

How to make a semblance of a full-fledged balcony in the attic
- The dormer window in the attic can also be composite, that is, one part rotates, while the other remains stationary. This technique is often resorted to when you want to provide a room as much as possible. big amount light, and there is not enough space in height for two full-fledged swing doors. The top extension may have original form, and perform a decorative function.

Window in the attic, consisting of two wings: movable and fixed
- Inclined and vertical sashes can be combined with each other, for example, if there is a very high wall in the attic that makes it difficult to look at the street. Then the inclined sash is used for lighting and ventilation, and they look into the vertical one attached from below.

Window in the children's room in the attic, consisting of a vertical and horizontal sash
- The light tunnel is pretty complex structure, which is rarely installed. A round glazed hatch in the roof surface is connected to the room to be illuminated with a pipe, and to enhance the effect, a diffuser is mounted inside. Such tricks are used to illuminate small rooms, which do not have direct access to either the pediment of the house or the roof.

Light tunnel with diffusing shade for natural room lighting
Thirdly, the windows on the mansard roof differ in the way they open and the location of the pivot axis. She may be:
- Central;
- Raised 2/3 from the bottom;
- Combined, that is, both central and elevated;
- Side;
- Lower.
The device and equipment of the roof window
Windows for the attic have a more complex device than ordinary ones, since their operating conditions are much more difficult. Such a design must withstand the onslaught of wind and precipitation for many years, while regularly opening and closing, and ensuring perfect tightness. In addition to the frame itself, double-glazed windows and fittings, the following components should be included in the delivery package:
- Protective salary, or rigid profile;
- Waterproofing circuit;
- Drainage chute;
- Internal slopes.

Schematic drawing of a roof glazing unit indicating the main components
Do-it-yourself installation of skylights
Even a mansard roof with a dormer window looks much more elegant and interesting, to say nothing of panoramic glazing. Therefore, many owners of private houses, having heard the rave reviews of their neighbors, start a global alteration of the roof, and often seek to do without the services of highly paid installers. However, if you know in principle how to properly install an ordinary window, this does not mean that you will be able to install skylights just as easily. Their installation scheme is somewhat different, and the process will require extreme precision and experience.
Advice Not right installed double-glazed windows leak and require repair, so it is better to entrust the installation of skylights to professionals. Get down to business on your own, only if you know exactly how to embed the frame, and follow all the installation rules.If you know how to install skylights because you already have the necessary experience, our further descriptions may help you refresh your memory. Well, if you just purchased the kit, and firmly decided to handle the installation on your own, our detailed instructions for installing roof windows will come in handy.

Installation of a roof window in a metal tile and installation of waterproofing
Choose the shape, size and location
Installation of skylights, first of all, should not violate the stability of the roof. Therefore, you need to try to choose their width so that the frame clearly stands between the rafters, and there is still a gap of 4-6 cm on the sides. Do not be upset if the window turns out to be too narrow, because you can install another one next to it, or even several.
Important Several windows give more light than one large, equal to them in total area. This expands the possibilities for management. For example, you can open for ventilation not one huge sash, but several small ones separately.You need to arrange the structure so that it is easy to manage, and create good review. If the roof has a strong slope, the insert is carried out at the bottom, if it is flat - at the top. It is also important to choose the right location for the handle so that it can be easily reached. Optimal Height from the floor - 80-130 cm. However, there are cases when the installation is much higher, then you need to take care of the remote control.
Advice Position a heater or radiator directly below the roof window to prevent frost and condensation from forming.
To prevent double-glazed windows in the attic from fogging and freezing, install them above the radiators
We make the installation of the box and the installation of waterproofing
A typical roof window installation scheme includes both internal and external work. From the inside of the room, marking, cutting holes and mounting the box are carried out. It is better to remove the sash at this time, but it is important to do it correctly so as not to disrupt the operation of the mechanism. Be sure to read the instructions. Outside, a drainage gutter, a waterproofing apron and a cornice are mounted, which is usually supplied as a kit. Installation of windows in metal tiles has its own characteristics, because it is necessary to take into account the dimensions of a solid profiled roofing. For those who want to know how to insert a roof window - video instruction below.
Finishing and accessories for roof windows
And now, installation work behind. you rejoice beautiful view and enjoy the rays of the sun pouring into the room directly from the roof. Remains finishing touch- registration. In the attic, blinds are often used, Roman and roller blinds, because they perfectly follow the shape of the box and are attached parallel to it without sagging down. This design looks great in the interior, and allows you to easily adjust the intensity of lighting.

Blinds are great for decorating skylights
However, there are boxes non-standard shape, for example, triangular, for the design of which good way out are homemade curtains, curtains or pleated. How to make sure that they do not interfere, sagging? For this, there are special accessories that allow you to fix the canvas, while creating a beautiful wave, for example, as in the picture below:

Beautiful translucent curtains for the attic bedroom
Anyone who wants to make a full-fledged living space out of their attic at home or a summer residence, first of all, should think about how it will go there. Fresh air and sunlight. Only decision for this - the installation of skylights. But, if you call a master or even a group of masters, then the work will be quite expensive. Therefore, now we will tell you how to install such windows yourself and what mistakes a beginner should not make.
The installation process directly depends on which windows you decide to install in your attic. Experts recommend the following designs:
- Windows should be with triplex glass. Also a good option is tempered glass;
- With an energy-saving element that allows daylight to pass through;
- With a durable frame that prevents exposure to ultraviolet rays;
- With seals and overlays;
- With devices that can greatly simplify operation, with a good ventilation system and protection. Choose those that prevent dust and water from entering the room.
It is also better to choose those windows that are not too demanding to care for. Constantly misted glass and damp finishing material can become a real problem for you in the future. But here everything largely depends on how correctly you install them. So let's start with the calculations.
Constantly fogged glass and damp finishing material can become a real problem for you in the future.
In order for you not to waste money, the calculations must be accurate and binding. Without them, you simply cannot install the window. First you need to measure the floor area in the attic. For 10 sq.m. area you will need 1 sq. m. clarification. It doesn't matter if it's one big window or several small ones. Please note that the higher the window is located, the more sunlight it transmits. But setting it too high is also not recommended. It doesn't have to be "holes in the ceiling". In this way, windows can be mounted only if you have a flat roof in the attic, and the slope of the slopes is up to 20 degrees.
If the slopes on the roof are steep, then the windows in the mansard roof are recommended to be installed with a lower frame line from the floor of 1-1.5 meters, no more. The main thing is that it should not be closer than 0.8 m from the floor. The upper limit is 1.9 m. In this case, let's make a reservation right away, the height practically does not affect the amount of light transmitted by the window. Therefore, estimate the area of the glazed surface using the formula above.
But if there are small children in the attic from time to time, make sure that the handles are no lower than 1.3 m from the floor
Advice! When thinking about how high to position the window, pay attention to where the handles are. If in the upper part, the distance should be no higher than a meter from the floor. The handle in the middle is one and a half meters. Handle from below - not lower than 0.8 m.
But if there are small children in the attic from time to time, make sure that the handles are no lower than 1.3 m from the floor.
When you have calculated how many windows you will need and where you will install them, you can get down to business. We advise you to do all the work in stages:
- Preparation of a window opening;
- Dismantling of double-glazed windows and installation of the frame;
- Waterproofing, laying insulation;
- Fastening the factory gutter above the structure;
- Fastening salary details;
- Installation of a double-glazed window in its place;
- Interior decoration.
Most modern window manufacturers provide installation instructions for their equipment. However, there are times when it is too superficial for a beginner to understand, or it does not exist at all.
Leave a gap between the roofing material and the bottom line of the window
Here are a few preliminary tips that you should remember before starting work:
- The entire perimeter between the opening and window frame you will fill with insulation. Do not forget to leave a margin of 2-3 centimeters, depending on the characteristics of the insulation itself;
- Leave a gap between the roofing material and the bottom line of the window. Usually it is up to 10 cm;
- The distance from the roofing material to the upper mounting beam should be from 4 to 10 cm. Thus, if the structure shrinks over time, they will not deform;
- The size of the rails to which the frame will be attached must be identical to the size of the crate beam;
- The waterproofing is cut out not along the contour, but as if with an envelope, leaving a margin of overlaps of up to 25 cm. This is necessary so that you can fix them on the crate with a stapler. remember, that better later cut off excess than not be able to properly fix the waterproofing layer.
We begin to install skylights with our own hands
Initially, you must remember that the window must be attached to the truss system, and not to the crate. Some truss systems equipped with special beams on which you need to install the window frame. First locate the fixed mounting brackets on the frame. Before fixing them, we recommend removing the double-glazed window to facilitate the installation process. Some window manufacturers, however, advise removing the double-glazed window only when the brackets are fixed and the frame is already “baited” into the opening.
At this stage, it is important not to forget, before putting the frame, lay the thermal insulation in the opening, fixing it on the bars.
Installation and installation of skylights takes place according to the following points:
- Attach the bottom brackets firmly. The upper ones should not be clamped to the stop. This is necessary so that in the future you can easily engage in adjustment;
- Take a building level and check how level the window is. Look at both vertical and horizontal positions. If there is a slope, it can be eliminated with plastic corners;
- Make sure that the distance on both sides of the frame to the opening is the same;
- When the adjustment process is over, you can tighten the top brackets. Now your window will be fixed exactly;
- Fasten the thermal insulation on the sides of the frame and lay a waterproofing apron around the perimeter.
Now you need to install the drainage gutter. To do this, in the crate, cut two pieces to the size of the drainage fixtures. Cut to the same size waterproofing coating. The gutter is brought under this waterproofing and fixed on the crate. Do not forget that the angle of the gutter must allow moisture to quickly drain into the ventilation gap.
When you finish the main stage of work, installing do-it-yourself skylights in the future will not cause you any problems. But don't forget that there are still a few steps to be taken.
The installation of the salary must be carried out strictly according to the scheme given by the window manufacturer
The installation of the salary must be carried out strictly according to the scheme given by the window manufacturer. Always start from the bottom element. Strengthen it properly, put all the parts under the seal. Note that if your attic has soft roof, then before setting the salaries, it is necessary to nail a thin rail under the window. It will lay down on the profile as smoothly as possible. All joints of warehouses and roofing material must be insulated with a sealant without fail. It almost always comes with a set. If it is not available, you can find adhesive tape suitable for this purpose at any hardware store, or maybe at home.
An important step is warming. One of the best materials- mineral wool. It is easy to use and safe for health, unlike some other materials. Just slip it around the perimeter of the window frame, and cover it with a foil layer on top. Do not forget also about the need to insulate from the side of the slopes.
FROM inside a vapor barrier is installed, after which it is already possible to install slopes. Make sure that the lower slope is completely parallel to the floor, and the upper slope is strictly vertical. Please note that in most cases you can put rough slopes to save your own time and money. Almost always they will be closed by finishing the entire attic. To install draft slopes, you just need to determine their dimensions and angles, and then install them, adhering to the requirements described above.
A vapor barrier is installed on the inside, after which it is already possible to install slopes
Do not forget about the instructions that the manufacturer himself gives you. The fact is that some nuances may differ from general rules and you need to take them into account. Before you install a roof window, make sure you have everything necessary materials and tools, and you have exactly studied all the points of our article and the instructions in the kit. If so, get to work. Now you are prepared.

