Do-it-yourself PVC pipe greenhouse - instructions with video and photo step by step. How to make a greenhouse with your own hands from pvc pipes. The procedure for connecting pipes and fittings to glue
A greenhouse on a suburban area is not only its decoration, but also allows you to get a crop of organic vegetables for the whole family.
To achieve this goal, a do-it-yourself PVC greenhouse is ideal. Not always the standard designs offered by the market are suitable for the site in terms of size and shape.
One of the popular ways to arrange this simple structure is to make it yourself. For this, they are used various materials, designs, installation methods.
Don't need a greenhouse? We suggest that you read the article -.

Types of greenhouses
 Devices for organizing closed ground can differ significantly from each other. It depends on many factors, including the shape of the structure, materials for its manufacture, seasonality of use, the presence of heating and its type.
Using PVC pipes the following designs are usually suitable:
- wall-mounted - the structure is adjacent to one or two walls of a building, residential or technical;
- a greenhouse with two slopes in the shape of a house;
- polygonal, having broken roof;
- arched - with a rounded dome.
Wall buildings
Usually they are installed against the wall on the southwest or south side of the building. In this case, it is, as it were, an accumulator of thermal energy, heating up during the day and giving it away during the cool night.
 This allows you to smooth out daily temperature fluctuations, which has a beneficial effect on plants.
The disadvantage of such greenhouses is the constant action of high humidity of the internal atmosphere on the wall of air, which can contribute to its premature destruction.
This can be avoided by plastering the surface and painting it with waterproof paint. To attach the greenhouse frame to the wall, you can use tubular brackets in the form of a glass.
The inner size of the pipe must match the outer diameter of the frame plastic pipe so that it fits freely into it. The connection must be fixed with a screw perpendicular to its axis. The metal bracket needs to be painted to protect against corrosion.
As a coating for such a greenhouse, it is advisable use monolithic polycarbonate. It is transparent, which makes the building an additional decoration of the exterior of the site.
Gable types
This is the most common form for indoor devices. The popularity is due to the simple form of the frame, which can be made by hand using standard PVC pipes and fittings.
 Such a frame is strong, durable and sufficiently resistant to wind and snow influences. Such frames provide a low reflection coefficient, and this contributes to the optimal heating of the PVC greenhouse under the influence of sunlight.
If you install a ramp under more acute angle, it is possible to achieve an arbitrary descent of snow masses from the roof, which eliminates the need for periodic cleaning in winter.
But this is possible only on a hard surface that does not sag from the load. This property has window glass or cellular polycarbonate.
Gable greenhouses are equipped with doors and vents for ventilation. Through them, warm, moist air is released, accumulating under the roof.
If the side walls of such a greenhouse are installed with a slope, the illumination in the morning and evening hours will be higher. This somewhat complicates the design, but in mid-latitudes such a solution will be justified.
arched structures
Without a doubt, they are the most popular forms of structures for the device of closed ground. The design is durable, good stability and simple to disgraceful installation. In addition, the preparation of a place for its installation does not require difficult decisions.
Thanks to the use of lightweight PVC pipes, the frame of the greenhouse is light enough to be moved without dismantling, which improves the possibility of optimizing crop rotation.
 The versatility of the material allows you to choose any size and configuration of the structure.
The arched shape of the greenhouse is demanding on its location in space. The structure must be oriented its axis from south to north. In this case, the maximum amount of sunlight will take place in the morning and evening hours.
In the daytime, the domed part of the greenhouse is most strongly illuminated, where the refraction of the rays is not so significant.
Dome structures made of PVC pipes
 Such a design can be considered a variant of the arched design. This shape allows the snow to flow freely from the blood, which facilitates maintenance in the winter.
In addition, this form is better suited for growing tall plants. Ventilation in a domed greenhouse is much more efficient given the reduced amount of space at the top of the building.
It is not difficult to make a greenhouse from PVC pipes with your own hands, since the installation uses proven assembly technologies for plumbing systems. In this case, the same fittings are used.
Site selection and site preparation
The efficiency of its use largely depends on the choice of the location of the greenhouse. We have already pointed out the importance of orientation in relation to the cardinal points. But it is also important that it be in a well-lit place, not being obscured by bushes or trees growing nearby.

In addition, the platform on which the structure of PVC pipes is installed must be on a strictly horizontal platform. The durability of the structure depends on this. If it becomes skewed, conditions are created for the displacement of the polycarbonate or glass coating, which may be followed by its destruction.
With PVC pipe sizes up to 6 meters in length, it can be installed on a wooden beam base. It must be placed on a flat area since the fall, and in the spring it should be additionally checked for horizontality and compliance with the shape.
As a rule, this is a rectangle and it is enough to achieve equality of the diagonals. After performing this operation, the base must be additionally fixed to the ground with anchors.
When installing a wooden base, it is necessary to pour a drainage layer of sand and gravel mixture 10-15 centimeters thick under it. This will allow more active removal of excess water from under the greenhouse.
To install a PVC pipe greenhouse with a length of more than 6 meters, it is preferable to use capital strip foundation . This is especially important for soils subject to seasonal heaving.
Calculation of the need for materials for a greenhouse made of PVC pipes + drawings
To determine the amount of materials, it is necessary to develop a drawing of a greenhouse made of PVC pipes for do-it-yourself manufacturing.

In order not to perform tedious calculations for each part separately, it is better to use graph paper to complete the drawing. This will allow, with a certain scrupulousness of execution, to obtain the true dimensions by measurement. The accuracy with this method of execution is sufficient to perform the calculation.
It should be borne in mind that all molded materials are produced in standard lengths. Therefore, when designing, it is necessary to take into account the possibility of their rational cutting in order to prevent unnecessary waste.
Standard sizes of some materials:
- Pipes PVC size 20-25 millimeters are produced in lengths of 1, 2, 3 and 6 meters.
- Beam made of coniferous wood - 4 or 6 meters;
- Cellular polycarbonate with a thickness of 4, 6, 8 millimeters is produced in sheets 2.05 wide with a length of 4, 6 or 12 meters.
- Polyethylene film with a thickness of 90-200 microns is sold in rolls, the width is from 1 to 3 meters. When installing, welding in width is allowed. For this, a household iron and aluminum foil are enough.
The distance between the arcs of the greenhouse made of PVC pipes is selected depending on the coating material. For a film, it should be 0.7-0.75 meters.
If the coating is made with polycarbonate with sheets overlapping by 10-12 centimeters, then it is necessary to provide for each sheet a support of at least 3 arches, that is, the distance between them should be: (2.05 - 0.1): 2 \u003d 0 .97 meters. The number of sheets is determined by the given length of the greenhouse.
 The amount of materials for the end walls is calculated separately. Basic structure it is made of a wooden block measuring 50 x 50 millimeters and sewn with the main covering material using planks 15-20 millimeters thick.
The design of the end walls should provide for a doorway with a width of about 90 centimeters and a height of 1.8-2.0 meters, so that it is convenient to use a garden wheelbarrow. A window should be provided in the upper part of the end wall.
If polycarbonate is used for the coating, its fastening is done in two ways:
- By applying a screed across the greenhouse body. This part is made of galvanized steel strip with a width of at least 40 millimeters and a thickness of 0.7-1.0. The length per strip should exceed the outline of the frame by approximately 0.5-0.7 meters, which are needed to form the collar. The tension is made with an M10 stud, the length of which is 20-25 centimeters, using two nuts with washers.
- Fastening to the arches with cutting screws with special compensating washers with an installation step of 250-300 millimeters.

To install doors and vents, you will need canopies of 2 pieces for each part. Below are the drawings various options frames with dimensions.


Connecting pipes and fittings when assembling a greenhouse
To assemble the greenhouse, PVC pressure pipes and appropriate fittings are used - couplings, angles, tees and crosses.

When a set of parts is selected, they must be checked for compatibility. A normal fitting must be pushed onto the pipe by plunging at least 2/3 of its own length.
Adhesive connection
Adhesive compositions for PVC as the main component contain exactly this material, diluted with a special solvent that keeps it in a fluid state. Various additives are also used as additives to improve adhesion and give the composition the desired consistency.
After applying the adhesive to the parts, long chains of PVC molecules are mixed, and as a result of the evaporation of solvents, the mass thickens. The material of both parts is mixed, forming a monolithic, durable assembly.
When purchasing glue for PVC, you need to carefully read the instructions for use, which contains instructions on how to prepare for gluing and proper conduct process.
At room temperature the setting time of the adhesive is about 4 minutes. At a temperature of 40 degrees, it is reduced to one minute.
A full-size part is cut off from the pipe with special scissors. They are designed in such a way that they do not leave burrs at the end.
Watch the video
Cutting can be done with any saw with fine teeth (hacksaw), but after that, you need to carefully remove burrs that can adversely affect the alignment of parts when gluing.
Before starting to glue the surfaces, the parts to be joined must be prepared in a special way. the main objective- degreasing. Gluing can be done outdoors if weather permits. The air temperature should be in the range of 5-35 degrees.
It is important to remember that the brush for applying the adhesive mass must be made of natural bristles, otherwise synthetic material will also be dissolved and this may damage the strength of the joint. Often, adhesive manufacturers include a brush in the package.
Bonding of parts is carried out in the following order:
- Check pipe and fitting for fit. Mark the borders of the glue application with a marker.
- Clean parts from burrs and gross damage.
- Degrease the surfaces to be bonded.
- Apply glue with a special brush.
- Align the parts by putting the fitting on the pipe. Turn the parts through an angle of about 90 degrees and set in the desired position. This operation should provide uniform distribution adhesive on surfaces.
- Details must be firmly held for 15-20 seconds.
- temperature dependent environment the drying time and the final setting of the adhesive will be up to 4 minutes.
- Excess adhesive mass from the surface of the parts must be removed with a rag.
- The glued parts must not be moved for 15-20 minutes.
Watch the video
When gluing PVC parts, the following defects may occur:
- Partial non-adhesion occurs when the adhesive is applied unevenly and if there are gross damages on the surface of the parts. In addition, an overdried layer of glue can lead - the time after application until the parts are combined is no more than 12-15 seconds.
- When performing work in conditions of minimum allowable temperatures, it can lead to soft non-gluing, which indicates insufficient polymerization of the adhesive.
- A porous adhesive layer is formed when the adhesive is applied unevenly. The reasons for this may be contamination in the area of gluing, poor mixing of the adhesive mass before application, involuntary displacement during drying.
Bonding is the main assembly method. However, when erecting greenhouse frames, there is no need for tight connections. Therefore, when performing such work, the assembly method using metal fasteners is often used.
Assembling the frame from PVC pipes with screws
The nature of the loading of the elements of the greenhouse frame made of PVC pipes allows its assembly using fasteners. This method even simplifies the assembly process. The pitched surface is not an obstacle to drilling if you use the simplest jig.
 During installation, drilling may be required at the installation site. With PVC pipes this is not a problem. In the right place, it is enough to leave a deep mark, which is easily done with a sharpened triangular pin made of any metal. In this case, the drill will not slip to the side on a sloping surface.
To assemble the greenhouse, it is enough to use standard M6 bolts with a convenient head shape. To install them, you need holes with a diameter of 6.5 millimeters. Together with the bolt you will need the appropriate nut, standard washer and spring washer - Grover. Caution must be exercised when tightening - PVC pipe does not have high compressive strength.
Watch the video
Self-filling foundation
A support base for a greenhouse is also necessary, as for any other structure. Only in this case it works a little differently.
The greenhouse itself, especially made of lightweight PVC pipes, is light in weight and has a large windage. If it is not well strengthened, it may well go to "walk" in neighboring areas.
Watch the video - the benefits of a concrete foundation
How can I arrange a foundation for a greenhouse:
- A support base made of wooden beams is installed if it is planned to keep the greenhouse in this place for 2-3 years. However, it is possible, without displacing this structure, to simply replace the wooden base.
 For it, a beam of 150x50 or 120x100 millimeters is used. Before laying it, you need to level the site and remove the sod from the locations of the supporting base.
It is necessary to arrange a drainage layer from a mixture of sand and gravel with a thickness of 120-15 centimeters. Lay roofing felt waterproofing in one or two layers on top of the drainage.
Lay the beam along the contour of the frame. The resulting rectangle check for equality of diagonals, fasten the sides together. Before laying, the material must be treated with an antiseptic, this will increase its service life.
It should be noted that treatment with antiseptics does not guarantee a long service life of the greenhouse, it will either have to be transferred after a few years, or the support must be changed.
The base can be fixed to the ground different ways. Most often, trimming reinforcement 80-90 centimeters long, driven into the ground, is used. But screw anchors are more reliable. It's more expensive, but more reliable.

A layer is poured over it concrete mortar, in which the first corner block is installed. It must be carefully set on the horizon using building level. Then pull the cords and lay out the rest of the blocks around the perimeter along them. setting time masonry mortar is about 7 days, after which you can continue to install the PVC pipe greenhouse frame with your own hands.
- Foundation made of bricks concrete base installed in the presence of loose soils on the site. To support the greenhouse, you need to dig a trench in the ground with a depth of 40 centimeters and a width of 20. A drainage layer 15-20 centimeters thick must be made along its bottom. It must be tamped and spilled with water for a better seal. Install reinforcement in the amount of two cores 5 centimeters from the bedding, using broken brick stands. It is advisable to install the formwork, aligning its upper edge with the horizon.
Concrete pouring in one run, continuously. In doing so, you need to install anchor bolts M12 at a distance of no more than 1.5 meters from one another.
After the concrete has completely cured, put brick belt in two bricks around the perimeter.
Watch the video
After a week, you can begin to install the frame of the greenhouse.
Other methods of making a foundation for a greenhouse using other materials are also used. Their choice most often depends on the presence and type of residues from the main construction on the site.
Step-by-step instructions for assembling the frame of the greenhouse
Greenhouse kits of various sizes are sold at construction markets. The attached instructions give a complete picture of how to assemble and install them.
But not always their designs and dimensions satisfy the buyer in accordance with the installation site. Then PVC pipe greenhouses the right sizes are made by hand.
But the basic assembly and installation techniques do not depend on this, since the components are the same.
Watch the video
When assembling, the following connecting elements are used:
- Cup - plastic product with an inner diameter corresponding to the outer dimension of the pipe. It is attached to the base with a self-tapping screw through the bottom. The tip of the arch is inserted into the hole and fixed with a screw.
- A tee is a connecting element with three holes. When assembling the arch, perpendicular coaxial holes are used to install longitudinal ribs during the installation of the frame. It is used only for the manufacture of extreme arches.
- The cross is used for the same purpose when installing intermediate arches, to which the longitudinal ribs are supplied from two sides.
The mating parts can be fastened with glue or screws. The second method is more often used, since greenhouses are installed, as a rule, in early spring when the outside temperature may not be sufficient for a secure adhesive bond.
When mounting the greenhouse directly on the ground, the arches can be mounted on pins.

For the manufacture of pins, reinforcing steel is used, the diameter of which is selected depending on the internal size of the pipes used for the frame. Their length is 0.6-0.8 meters, they are driven into the ground to a depth of about half a meter.
After installing all the arches around the perimeter of the frame, wooden box boards are installed. Their size is 40-50x120-150 millimeters. Fastening is made directly to the arches using a metal strip self-tapping screws.
Watch the video
Installing the frame on a prepared base is practically no different from the described procedure for greenhouses made of PVC pipes when mounted on the ground.

Greenhouse door installation
For a normal greenhouse, two doors are needed, which are installed on both end walls. Their main purpose is to provide convenient maintenance of the internal space of the structure.
Therefore, the width of the opening must be at least 90 centimeters, which allows the free passage of a garden wheelbarrow. In this case, the height should be about 1.8-2.0 meters.
In addition, the passage device must be sufficiently sealed to ensure the preservation of the microclimate at night.
In addition to the door in the greenhouse are installed several vents for ventilation. They are needed to remove warm humid air, which is collected at the top of the building and are harmful to seedlings and greenhouse plants.

For the manufacture of the door, a wooden bar measuring 50x50 millimeters is used. The rectangular door frame is divided by a cross member. Mandatory element is a jib that gives rigidity to the structure. The joints of the parts are additionally reinforced with corners made of galvanized steel.
The door leaf is made of the same material as the main cover of the greenhouse - film, polycarbonate or window glass.
Watch video - door installation
Installation of the door at the place of use is carried out using standard door canopies in the amount of two pieces.

The doorway on the end walls is formed in the process of manufacturing their skin. For this, wooden blocks are most often used, even if the main material of the frame is a PVC pipe.
Cover installation - polyethylene film or monolithic polycarbonate
To separate the room from the outdoor space, it is done in several ways:
- installing a cell phone or monolithic polycarbonate thickness 4 - 8 millimeters;
- coated with polyethylene film 90-200 microns thick.
It should be noted that the use of the film is several times cheaper, but it has to be changed, as a rule, annually.
Watch the video
But polycarbonate, if it is of high quality (you need to beware of Chinese fakes), can last up to seven years, after which the material begins to become cloudy due to wear on the outer surface.
 Before installing polycarbonate sheets on the upper ends of the arches, you need to install a self-adhesive sealing tape.
The sheet is installed in such a way that the internal cavities are located vertically. In this case, there is no accumulation of moisture in the voids.
Used for installation special fasteners, which take into account the properties of the material, for which only a standard tool is needed.
Watch video - installation and fastening of polycarbonate
A thermal washer and an elastic sealing ring are installed under the screw, and its head is protected by a cap. It should be remembered that this material has an increased coefficient of thermal linear expansion. Therefore, the hole for the screw should be 1.0-1.5 millimeters larger than the diameter of the screw.
 The distance between the fastening screws should be no more than 400 millimeters.
Joints and junctions of the polycarbonate coating are made using additional elements .
The procedure for installing polycarbonate is as follows:
- The end walls of the greenhouse are sewn up with a sheet.
- Extra parts are cut along the generatrix of the frame. To do this, you can use an ordinary construction knife.
- Cut out openings for doors and vents.
- The first sheet of polycarbonate is superimposed and attached. In this case, you need to perform an overhang in the amount of 8-10 centimeters.
- Further, the remaining sheets are successively superimposed and attached.

Film coating is installed in the following order:
- The end walls of the greenhouse are sheathed with a film. At the same time, at the edges of the door and window openings, it is fastened with strips of 15-20x40 millimeters and nails 60-70 long.
- Along the generatrix of the frame, the film is attached with a construction stapler as a temporary measure.
- The film is installed on top of the frame after sealing the ends. It is positioned in such a way that there is an overlap on the lower wooden base, to which they are attached with planks. If the greenhouse is installed directly on the ground, the edges must be filled under the base of the frame and sprinkled with earth.
- The edges of the film on the end sides are wrapped and fastened with planks together with the previously installed film on the end wall.
Pros and cons of PVC
The material has a number of positive qualities consisting of the following:
- Quick and easy assembly and dismantling of structures.
- The disassembled structure takes up little space and is light in weight.
- The construction of a greenhouse from this material does not require special skills or abilities and is available for DIY construction.
- Availability and low cost of materials for the construction of the greenhouse.
- High strength and impact resistance external factors.
- The service life of a PVC frame is estimated at at least 10 years.
Even with a strong desire, it is not easy to find pronounced shortcomings in the design of a greenhouse made of PVC pipes. It is believed that it is dangerous to put them in a region with strong winds.
But this applies equally to any material. And there is only one way to solve it - installing additional stretch marks and stiffeners. For durability, it is also not recommended to use in such conditions. soft material for coverage.
EntriesWe will send the material to you by e-mail
P arnica, or, simply put, a greenhouse is an integral part of any suburban area or vegetable garden. This structure protects plants from the adverse effects of the environment. Although the greenhouse is not heated, it is still always warm inside. This factor is provided by the materials from which the greenhouse is made. So, pipes made of polyvinyl chloride (PVC) are now widely used as a frame. Let's find out how to make a greenhouse with your own hands from PVC pipes.
PVC pipe greenhouse
- Strength. Such pipes will not break under enormous weight. Studies have shown that one PVC element of average size can withstand weight up to 500 kilograms;
- Elasticity. As you know, to build a greenhouse, you need to create arches from pipes. from metal and wooden materials this is quite difficult to do, while PVC pipes are easily bent into desired shape. Do-it-yourself arcs for a greenhouse are easily made only if, as source material Are you using PVC?
- Durability. All PVC products do not break for decades. Therefore, the greenhouse will be a safe haven for your plants for many years.

If you decide to make a greenhouse out of plastic pipes with your own hands, then polyvinyl chloride is the best material available today.
Video: options for greenhouses to give
What do you need to build a greenhouse yourself?
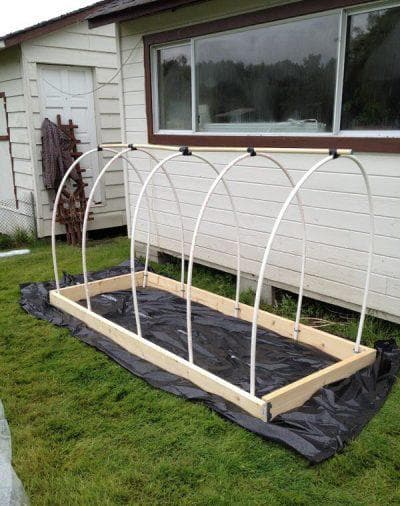
The construction of a greenhouse is a rather exciting and not complicated process, the main stages of which are presented in the photo below.

The greenhouse consists of three main elements: foundation, frame, cover. These elements are made from the following materials:
- PVC pipes. It is desirable that their cross section is 13 mm, since this size is the most optimal for creating a greenhouse;

- Boards. Give preference to treated, durable wood, the thickness of which varies from 20 to 40 millimeters. It is advisable to cover them with transparent varnish before laying - this maneuver will give strength to the structure;

- Steel wire. Necessary for connecting pipes to each other. Prepare cuts from 80 cm to 1 meter. Their number should be twice as many as pipes;
- Coating. For this purpose, you can use a special greenhouse film or polycarbonate sheets. They are strong enough to protect plants from negative environmental factors. In addition, they allow air to pass through, so the cultures will not wither;
- You will also need a hammer, pliers, screws, nails and other small things.

To make greenhouses with your own hands from PVC pipes, stock up on all of the above materials in the right amount. The larger the size of the greenhouse is planned, the more materials will be needed.
Related article:
Step-by-step instructions for building a greenhouse
The creation of a greenhouse consists of 4 stages:
- Construction of a foundation made of wood;
- Installation of fasteners for PVC pipes;
- Installation of arches;
- Greenhouse cover.
Let's consider each process in more detail.
Building a timber foundation
To begin with, it is worth leveling the area, which is reserved for the greenhouse. Using a tape measure and steel rods, mark the corners of the greenhouse. Using the level, you can check how flat the ground is.

Further, in the corners of the greenhouse, dig trenches (there should be 4 of them) with a depth of at least 10-15 centimeters. 4 boards are installed there, which serve as the foundation for the greenhouse. These boards should be reinforced with nails and screws. So it will be possible to achieve better fixation and durability of the greenhouse.

Installation of fasteners for PVC pipes
Next, we drive steel bars into the ground. They need to be installed evenly. To make the length between the rods the same, count their number, divide by two (one batch on each side) and measure the length of each side with a tape measure. Then calculate the optimal distance between the bars. It is important that they are located opposite each other, and that the distance between them is the same. Steel bars are driven into the ground with a hammer. They should stand close to the foundation, that is, to the boards that were previously installed.

Also, to fix the arches, you can use special glasses that are attached directly to wooden base.

Installation of arches
To create arches from plastic pipes, you will need a pipe bender, or a building hair dryer to heat the pipe and give it the shape of an arc. After the arch is ready, it is put on a steel bar on both sides and attached to the base with a clamp.

After installing all the arches at the top point, a pipe is attached to the entire length of the greenhouse with a wire. This additional stiffener will give the structure strength and stability.

The PVC industry offers a wide range of fittings for pipes, so there are special crosses to give the design a presentable appearance and ease of installation.

PVC pipes have long been used for the manufacture of greenhouses and greenhouses, as this material is quite durable, flexible and reliable. You can make these products with your own hands, without resorting to the help of professionals. Both collapsible and stationary design allows you to grow your favorite vegetables when the temperature is below zero.
PVC pipes for building a greenhouse: pros and cons
PVC pipes are excellent and inexpensive material, which is used to create greenhouses and greenhouses various forms and sizes. In order to build them, a large number of tools and special skills are not required, therefore this type of construction is available even for summer residents or owners of private houses with a small income.
Material Advantages
This material has large quantity advantages:
- assembly and disassembly of the structure is quite fast;
- the unassembled design does not take up much space;
- the construction of a greenhouse does not require professional skills in working with the material;
- light weight;
- availability of materials, their low cost;
- high degree of strength and stability of the finished structure;
- long service life (more than 10 years);
- the ability to create a greenhouse of any shape and size, monolithic structures;
- resistance to temperature extremes and moisture, the formation of corrosion, the reproduction of fungus and mold;
- environmental friendliness.
Disadvantages of PVC pipes and greenhouses from them
There are few disadvantages of greenhouses made of PVC pipes, but they still exist. For example, when installing a structure in regions where strong winds prevail, it may deform. The polyethylene coating is short-lived and also has poor thermal insulation properties, so it will have to be changed every few years or purchased more expensive material such as polycarbonate. In winter, it will be impossible to use such a design in the northern regions of the country.
There are several types of PVC pipe greenhouses that you can make yourself.
- Arched structures with polyethylene or polycarbonate coating.
- Structures with pitched roof attached to the main building.
- Greenhouses with gable roof with any type of coverage.
Greenhouses are very popular arch type, as they are easily and quickly erected, quickly dismantled if necessary.
Preparation for construction: drawings, dimensions, assembly diagrams
A greenhouse made of PVC pipes does not need a strong and expensive foundation, as it will be a lightweight structure that can be quickly disassembled. Therefore, the base can be made of wooden boards.
It is necessary to choose a suitable place on the site for placing the greenhouse, check the soil so that it does not sink under the weight of the future structure. Do not forget to remove from the site extra garbage and vegetation, if necessary, remove part of the topsoil.
As a coating, dense polyethylene film(better reinforced).
Arched greenhouse dimensions
This parameter is determined not only depending on the preferences of the owner, but also on the size of the material itself.
Usually PVC pipes are sold standard sizes(3 and 6 m). Longer bends form an arc correct form. Thus, the width of the standard design is 3.7 m, the length is 9.8 m, and the height is 2.1 m.
The optimal pitch between pipes is 900–1000 mm.
Material selection
The quality of the product also depends on the material used:
What materials and tools are needed
For the manufacture of a standard greenhouse, it is necessary to prepare the following materials:
- five-meter boards with a section of 2x6 cm - 4 pieces;
- boards with a section of 2x6 cm, 3.7 m long - 2 pieces;
- PVC pipes 6 m long - 19 pieces;
- fittings 3 meters long (Ø10 mm) - 9 pieces;
- PVC film (thickness 6 mm) - 6x15, 24 meters;
- wooden slats (length 1.22 m) - 50 pieces;
- nails or screws;
- metal fasteners;
- door hinges - 4 pieces;
- door handles - 2 pieces.
Materials for the ends of the greenhouse:
- timber 2x4 cm long 3.7 m for the frame;
- 11’8 3/4” - 2 beams 3.6 m long;
- 1’6” - 4 bars of 0.45m each;
- 4’7” - 4 bars of 1.4m;
- 5’7” - 4 bars of 1.7m;
- 1’11 1/4” - 8 bars of 0.6m each;
- 4’1/4” - 2 bars of 1.23m each;
- 4 bars 1.5 m long;
- 4 bars 1.2 m long.
Required tools:
- hammer;
- Bulgarian;
- electric screwdriver;
- hacksaw for metal;
- electric saw;
- building level;
- roulette.
Do-it-yourself construction stages
Making a greenhouse with your own hands is very simple, you just need to follow the consistent instructions:
- For the construction of the base of the greenhouse, it is necessary to cut the reinforcement into 4 parts. You should get 36 identical segments 75 cm long. To fix the pipes, you will need 34 pieces of reinforcement. Cut two of them in half, resulting in 4 rods 37.5 cm long.
- Next, from boards measuring 2x6 cm, you need to make the base of a rectangular greenhouse measuring 3.7x9.8 m. Knock down the boards with nails or twist with self-tapping screws. Install the base on the site. Check the evenness of the corners (90°), hammer in a piece of reinforcement (37.5 cm) inside each of them to fasten the structure.
- Hammer 34 pieces of reinforcement at the same distance from each other (about 1 meter) along the long sides of the base. This should be done in such a way that the length of the rods on the surface is about 35–40 cm.
- On the reinforcement bars driven in from both sides, put PVC pipes alternately, bending them into the correct arc. You should get an almost finished frame of the greenhouse.
- Fasten the pipes to the wooden base with metal plates. For this, screws and a screwdriver are used.
- In order to make the end part of the greenhouse, it is necessary to make a frame of bars. Install them in the frame of the structure, secure with screws.
- Cut 4 pieces of 70 cm from the timber with a hacksaw. Saw one end of each of them at an angle of 45 °. They are necessary to strengthen the ends of the greenhouse. Fasten the frame of the side part to the base.
- After the frame is assembled, it is necessary to make a stiffener at the top of the structure. For this special plastic connector fasten 2 pipes, cut off the excess so that it turns out total length 9.8 m. On top of the frame in the center, attach the pipe with plastic ties to each of the 17 arcs.
- Cover the pipe frame with a dense polyethylene film with an overlap in the lower part. Then, along one of the long sides, firmly fix it with pieces of wooden slats.
- Pull it with a little effort on the frame, fix it on the other side. It is better to start doing this from the center, and then move on to the ends.
- On the end parts of the frame, the film must be pulled well down. Nail it to the base with wooden slats. In the place where the door will be, you need to cut out a square, leaving 5–10 cm allowances for attaching the frame. Carefully wrap the film behind the opening, secure with nails or self-tapping screws inside the greenhouse.
- Before installing the doors, it is necessary to carefully check the actual dimensions of the opening so that it fits exactly in size. For its device, you need to cut bars with a section of 2x4 cm of different sizes (4 pieces each, 1.5 m and 1.2 m long). Knock down two frames from them, fix the beam diagonally for greater structural rigidity. Screw the door hinges to the opening with self-tapping screws.
- The remaining film can be used for doors. To do this, pull it over two frames, then also attach it with wooden slats. Screw on the handles and hinges. Put the doors on the prepared fasteners, check the evenness of the installation so that there are no distortions and large gaps.
The second option for the device of the ends of the greenhouse
There is another way to make the ends of the structure:

If you are making a greenhouse for the first time, it is recommended to heed the advice of experts:
- In order for the greenhouse to be effective, it is necessary to choose a place on the site with the maximum number sun rays. It is also important to consider what crops will be grown, inquire about the necessary rapid growth conditions.
- For the construction of an arched structure, it is best to choose flexible pipes PVC.
- It is best to stretch the plastic film on the frame of the greenhouse in warm time of the year.
- If it is too hot outside, then the greenhouse doors should be kept open to ventilate the room. Otherwise, condensation will collect under the film, turning into steam.
- In the northern regions of the country, it is best to remove polyethylene for the winter, since during heavy snowfalls it can stretch or tear. In addition, snow will reliably protect the soil from deep freezing, as a result of which all useful material and moisture.
- If the film remains for the winter, then it is necessary to put strong supports that will not allow the structure to fall.
- Instead of a plastic film to cover the frame, you can buy more modern and reliable materials, for example, lutrasil, agrospan, reinforced or bubble film.
- Light-stabilized or reinforced polypropylene is one of the best coatings, as it does not warp when exposed to ultraviolet rays.
- It is recommended to cover the area under the greenhouse with a waterproofing film, on which then pour special soil with fertilizer. Thus, plants can be protected from external influence and protect them from pests.
- If the base is made of concrete, then it will be possible to grow seedlings in boxes.
- It must be remembered that the service life of PVC pipes in the open air is significantly reduced (up to 15–20 years).
- Everything wooden elements greenhouses must be well treated with antiseptic agents so that they are not exposed to fungi and mold.
Video: how to quickly build a greenhouse from PVC pipes
A greenhouse made of lightweight PVC pipes will allow you to always have maximum on your table. fresh vegetables and greenery. The cost of building such a structure will be minimal, and the degree of its efficiency will be maximum. Having bought some plastic pipes, wooden planks and a plastic film in one or two days, you can independently build a convenient and reliable greenhouse in your summer cottage.
Having your own greenhouse in the garden is always profitable and convenient. It's still cold outside, and you have organic vegetables in your fridge that can't be compared to the products bought in the supermarket. Today, you can build a greenhouse from any material, but if you need to build a structure quickly and easily, then you should use the PVC pipe option.
Which pipes are suitable
Before proceeding to the description Supplies, it is necessary to highlight some of the advantages of a greenhouse made of PVC pipes:
- ease of installation, dismantling or transfer to another location;
- low cost of materials for the construction of the structure;
- creation of conditions necessary for growing numerous crops;
- high strength, lightness and environmental safety.
With all the advantages, it should be noted that a PVC pipe greenhouse is being built temporarily. It will be possible to grow vegetables there only one season. After this time, at least the top coat will have to be replaced. At choice of pvc pipes, it is necessary to calculate the required number of them.
To build a small greenhouse, you need to buy PVC pipes of the following length:
- 190 cm (4 pieces);
- 68 cm (10 pieces);
- creation of hinges 10 cm (10 pcs.);
- 350 cm (2 pieces);
- 558 cm (4 pieces);
- 170 cm (2 pieces);
- 360 cm (2 pieces);
- 90 cm (4 pcs.).
On the video - a greenhouse made of pvc pipes with your own hands:
When choosing a material for sheathing the frame, you can pay attention to polyethylene, polycarbonate or reinforced film. The most durable of all remains polycarbonate. But not everyone can afford it because of the high cost.
But what it looks like can be seen in the photo in the article.
What is the best and most suitable material for a greenhouse is described in great detail in this
What a spunbond greenhouse looks like, and how to make it yourself, the information from the article will help you understand:
But the budget option is polyethylene or reinforced film. If every 2 years you will change the top cover of the greenhouse, then it is worth using polyethylene. It is inexpensive and can withstand small wind loads.
Manufacturers and prices for pipes
Today there is a wide range of PVC pipes used for greenhouse installations. The most popular manufacturers are:

Installation of greenhouses
With wooden box base
An arched building made of PVC pipes can be mounted not only on the ground, but also on a pre-made wooden box. Thus, it is possible to create more favorable conditions for growing crops, accurately monitor their condition, soil composition and temperature.
From a wooden box
Everything installation work carried out according to the following plan:
- To complete the foundation, it is necessary to prepare a site for installation, markup.
- Drive metal rods along the edges of the future box. They will be the basis for PVC mounting crates.
- A distance of 70 cm must be observed between the pins. Drive in the pegs so that their length above ground level is at least 10 mm.
- Check all diagonals, all corners must be right. Otherwise, the greenhouse will not be stable.
- Using the prepared boards, you can start creating the box. Its height can reach 30 cm.
- Next, proceed to the assembly of the PVC pipe sheathing. To make ends, you can use wooden bars. Just do not forget to leave room for doors and vents. Cover the assembled frame with foil. Fill its edges under the box and fix with staples. The last step is to install doors and vents for air circulation. But what the new generation greenhouses look like can be seen in the photo
A box for such structures can only have soil at the base, which is poured to a certain level. But there is also the option of installing the box on a pillow of expanded clay and sand. This will improve the microclimate inside the greenhouse. Such a structure will be warmer, and it will be much easier to assess the condition of the soil.
Polycarbonate coated
You can get a more durable building from PVC pipes, provided that the frame is sheathed with polycarbonate. Such a structure is durable, reliable, and it is also much easier to maintain the conditions necessary for the full growth of plants. It is absolutely not required to build a powerful frame for polycarbonate sheets. So prepare metal pipes won't have to. PVC structures perfectly withstand all loads, if the assembly conditions were not violated.

Installation work is reduced to compliance with the following plan:
- The first step is to prepare the site for installing a greenhouse. There carefully level the soil.
- The assembly of the greenhouse takes place in the end parts. First, cut out 3 sheets with dimensions of 2x2.1 m. For these purposes, you must use a sharp knife. But the material should lie on a solid and even surface.
- Assemble PVC pipe frame on the ground. In this case, it is necessary to take into account the fact that there should be a window and doors that will open up. So the greenhouse looks like
- Dismantle the protective film from the polycarbonate sheets, lay it on the prepared horizontally mounted frame outer side up.
- Polycarbonate align. The first sheet must be laid so that the doorway and the window are covered. When the sheet is installed evenly, it can be fixed to the PVC pipe crate using self-tapping screws. After fixing, cut off unnecessary parts of polycarbonate in an arc using a construction knife.
- Now you can start fixing the second sheet. He must or butt to first. Also make sure that there are no gaps between the materials. Perform the second end of the building in the same way.
- You can start creating doors and vents. Using a knife and a ruler in polycarbonate sheets, draw and cut through the center of the door frame so that an overlap forms when closing. Cut out the vents in the same way. In order for them to close well, it is necessary to make protrusions for the hinges. It is not surprising, but any doors and windows can be made from improvised materials, but, it is described in great detail in this article.
- Now you can proceed to the assembly of the frame. Along the perimeter, run from boards wooden box. Now mark all its longest sides and drive metal rods around them. They are necessary for the crate racks.
- Install PVC arcs on these guides, fasten them to the ends with a longitudinal tie.
- Using the building level, check the position of the crate. Now you can fix the greenhouse. To do this, drive in special pegs at the corners of the crate to the base. Thus, the structure will not change its position during its use or strong wind.
- Completes the installation of fixing polycarbonate sheets. It is necessary to measure the arc and cut the material with a margin of 10 cm. The outer side should be directed upwards. It is worth leaving a margin of 5 cm above the ends. All unnecessary parts of the material must be removed after fastening.
- Fixation of polycarbonate sheets is carried out using press washers. Take off protective film from the material is possible only after the installation work is completed.
- All joints formed between sheets must be sealed.. Neutral is perfect for this purpose. silicone sealant. Install handles on doors and vents. You may also be interested in learning more about what are, and in what part of the garden it should be planted.
On the video - installation of a greenhouse made of pvc pipes:
From PVC pipes. I would like to note that homemade products are presented by a foreign author. Their PVC pipe is not soldered, like ours, but glued to a special glue. Therefore, if you decide to reproduce homemade products, keep in mind that our pipes and connectors are of the same diameter and cannot be connected without processing. I will talk about what materials and tools will be needed when considering each homemade product. All connections, with the exception of some, are fixed with glue for PVC pipes. So, let's begin.
Step 1: Floating Stick
The author made such a wand for fun in the pool. For its manufacture you will need: 20-30 cm 15 mm pipes, two plugs, sand, glue.
Closes one end of the pipe with a plug. Pours two-thirds of the sand into the tube. Closes the other end of the pipe with a plug. Plugs are fixed with glue during installation. Now, when placing the tube in the pool, it will always stand on the bottom. You can arrange a game to get the tube. You can not pour sand, then the tube will float on the surface.


Step 2: Shower
For the shower you will need: fifteenth pipe, 3 plugs, cross, 2 90 degree corners, 1 45 degree corner, hose connector, glue.
Two 50 cm pipe sections are installed in the crosspiece from two opposite sides. The opposite ends of the pipes are closed with plugs. A piece of pipe with a connector for connecting a hose is installed at one end of the cross. In the remaining connector, the cross is installed, through a short piece of pipe, at an angle of 90 degrees, with the angle up. Then 1.8 m of pipe is installed in the corner. Sets another 90 degree angle into the pipe. Then a small segment and a 45 degree angle. At the end of the corner installs a plug. In the plug, drill several holes with a 1.5 mm drill. Connects the shower to the hose, turns it on.


Step 3: Briar Walker
This homemade product is useful for those who go hiking and its route can run through thorny thickets.
For such a device you will need: 90 cm inch PVC pipe, 2-2.5 meters of rope, drill.
The author drilled holes at the ends of the pipe. Tie the ends of the rope to the holes. Homemade is ready. Now how does it work. He puts the pipe on the ground and steps in the middle with his foot. He takes the rope in his hands. Holding the rope tight, lifts the leg and moves it forward. Then he lowers his leg, crushing the bush. Thus, according to the author, one can cross the thorny bush.


Step 4: Key Stash
To make a hiding place you will need: 2 plugs, a small piece of 20 mm pipe. The size of the pipe depends on the key.
Cut off a small piece of pipe. Closes one side with a cap. He places a key in the pipe, and closes it with a second plug. Now you can place the cache, for example, in the pool. The hermetic design will not allow water to penetrate, and the air cushion will not allow the cache to sink.

Step 5: Water Volleyball
Volleyball is an exciting game. Playing volleyball with a water net instead of a rope net is not only interesting, but also fun. For water volleyball you will need: 15 mm pipe, 3 T-connectors, 2 90 degree angles, 4 plugs, glue, drill.
He cuts two pieces of pipe 1 m each from the pipe. Drills 1.5 mm holes in them with a drill, along the entire length of the pipe. Connects them together with a tee. Pipes are inserted into opposite ends of the tee, the remaining end looks in the opposite direction from the holes. on the ends of the pipes sets, angle down, two 90 degree angles. Cuts seven pieces of pipe 61 cm each. Installs two pipes at the edges and one in the middle. A plug is installed at the end of the middle pipe-leg. A T-shaped connector is installed on the extreme ones. Four pieces of pipe are installed at the ends of the tees. He installs plugs on three of them, on the last hose connector. By connecting the hose and turning on the water, you can enjoy playing water volleyball.


Step 6: Folding chair
The author considers the following homemade product as a children's one, but I think that such a chair can be useful, for example, to fishermen. So, to make a chair, you will need: a 20 mm pipe, 8 right angles, 2 long bolts with nuts, old jeans, a drill, sewing supplies.
Cut off eight 30 cm pieces of pipe. Connects pipes using corners, making two squares. In the two sides of each square in the middle, opposite each other, makes holes. Pushes one square into another, connects with bolts. Opening the legs measures right amount fabrics, cuts. Covers the seat. The folding chair is ready.


Step 7: Planting Cage
In order to plant plants at the same distance, the following homemade product was made.
For its manufacture you need: 24 pieces of 15 mm pipe, 4 right angles, 4 crosses, 8 T-shaped connectors.
First, the author collects the middle. Installs tubes in the crosses, collecting a square from them. Then he attaches T-shaped bends to the ends of the tubes, they again have tubes and corners. Thus, a lattice is obtained. By setting the grid on the ground in squares, you can plant plants at the same distance.


Step 8: Flashlight Holder
The following homemade product is simple and functional. To make it, you only need a piece of pipe, two screws and a drill. Cut off a piece of pipe. From the edges to the middle cuts off the pipe at an angle, leaving about a third in the middle. Drills along the edges of the hole. screw the holder to the wall. Now you can install the flashlight in the holder.


Step 9: Puppet Show
The next homemade product should interest parents. For its manufacture, the author used a pipe and various connectors, as well as sheets and pins.
