How to put slate on a roof. Laying slate on the roof: we study the technology of creating a slate roof What to put on the roof under the slate
Slate has long been used as a roofing material, it has not lost its popularity today, especially since everyone can cope with the work on the roof on their own, if you know how to cover the roof with slate.
The main advantages and disadvantages of slate
The advantages of this roofing material include:
- incombustibility,
- ease of installation,
- strength and low cost,
- long service life (35-40 years).
The slate roof is suitable for any building design, looks beautiful and lasts a long time.
Disadvantages:
- relatively large weight: more powerful rafter structures should be made,
- fragility: may break if carelessly transported or handled carelessly.
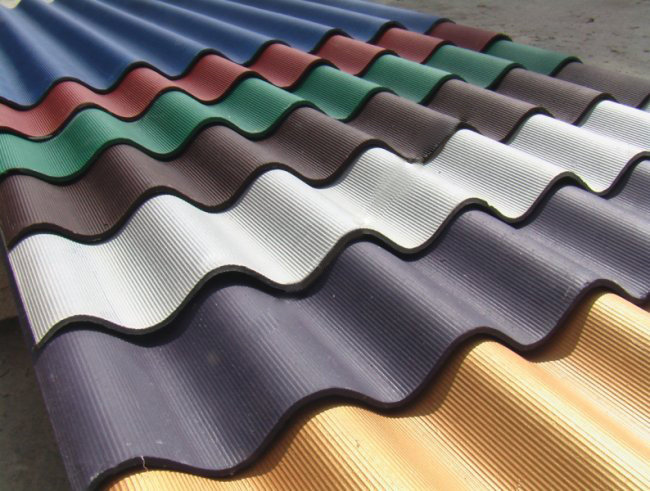
Types and sizes of sheets of wave slate for roofing
Slate sheets are produced in 6, 7 and 8-wave. The standard sheet length is 1750 mm, the width depends on the number of waves and is shown in the figure, the thickness is from 5.8 to 7.5 mm, the wave pitch is 150 or 200 mm.
The height of the crest (wave) is 40 mm for 7 and 8-wave and 54 mm for 6-wave sheet.
Features of rafter systems for slate roofs
Reinforced crate
Fastening of the slate on the roof is carried out along the crate, for which a block of 60x60 mm is used, rafter boards with a thickness of 60 mm or more. This is due to the increased load of the roofing material on rafter system... The distance between the lathing bars is made such that the slate sheet lies on at least two of them with a margin of 15 cm on each side.
The smaller the slope angle, the stronger the sheathing
For slate roofs, a slope angle of at least 22 ° is recommended. For pitched and gable roofs, the angles of inclination may be less, but reinforced lathing is required. The amplification principle for different angles the slope of the ramp is shown in the figure. A vapor barrier is placed under the slate, especially if roof insulation is planned.
Important! Before laying slate, all wooden structures must be treated with an antiseptic with fire-retardant properties for 1-2 times. This will protect them from decay, fire and extend their service life.
How to determine the amount of roof slate
When planning the work with your own hands, it is important to correctly calculate the amount of slate for the roof so that there is enough material and there is no waste. For a person familiar with the basics of geometry, such calculations will not be difficult. For a roof with one or two slopes, you will need to measure the width and length of the house, the angle of inclination of the slope.
It is easier to calculate slate according to roof dimensions, it is done like this:
- determine the size of the roof along the cornice, divide the resulting distance by the size of the width of the sheet and add 10%, get the number of sheets in one row;
- measure along the slope the distance from the ridge to the eaves and divide it by the size of the slate sheet height, get the number of rows, increase the result by 13% for overlap;
- the resulting numbers of rows and sheets in one row are multiplied and the number of slate sheets per one slope is obtained. If the roof is gable, the result is doubled.
For hipped roofs, the area of the slopes is calculated geometrically (the area of the triangle and the area of the trapezoid, as shown in the figure), divided by the area of the slate sheet and 15% is added.
Important! When buying slate, you should pay attention to its integrity. Slate sheets should be covered with paper or foil. You need to store the sheets on a flat horizontal surface, protected from moisture and sunlight.
Preparatory work for the installation of the roof
Before starting work on the construction of a slate roof, prepare everything necessary tools and a flat area on which you will saw the sheets and drill holes in them. The site should be such that the sheet can be approached from either side.
Tools and equipment
To mount a slate roof, you will need: a hammer, slate nails, or self-tapping screws, a drill, a grinder or a hacksaw for metal, a respirator, paint for staining sections, a step ladder, a ladder ladder, ropes, metal hooks.
How to raise slate on the roof
Those who plan to make a roof with their own hands often have the question of how to raise the slate on the roof. This is done with a rope and two hooks. The leaf is hooked from below with two hooks, to which a rope is tied. The rope along with a sheet of slate is pulled to the roof. You can hand the sheets using a stepladder if the work is done by two or three people.
Preparation of slate sheets
Before laying the slate on the roof, unpainted sheets, if necessary, can be impregnated with a water-repellent compound, painted with acrylic, water-dispersion or alkyd paint... The paint closes microcracks, makes the slate smoother, snow in winter time it rolls off easier.
The slate, depending on the ambient temperature, is subject to deformation, therefore there should be a small gap between the nail and the asbestos cement. It is done by drilling holes in the ridge of the slate 2-3 mm larger in diameter than the nail. You can also drill these holes at the place of laying the sheets, if it will be more convenient.
Laying slate on the roof, how to do it right with your own hands
The drain is installed before the start roofing works... Slate sheets begin to be laid from the bottom row.
How to put slate on the roof
- In order for the sheets to lie flat, a cord is pulled along the cornice at a distance of 15 cm from the edge and the sheets are leveled along the cord;
- the roofing material is laid in a ragged manner with an overlap of 1-2 waves, sheet per sheet, 15-20 cm row per row (the size depends on the angle of inclination of the slope). The order of stacking is as follows: first, the lower 3-4 canvases, then above them 2-3 of the second row, above the second row - 1-2 canvases of the third row, then one cloth is added to each row, starting from the bottom;
- the overlaps of the slate waves should be in the prevailing wind direction so that the wind does not blow under the slate and does not seek to lift it.
Sheets are sawn with a hacksaw or grinder. The sections are painted over so that the asbestos does not crumble.
Attention! You need to drill and saw slate sheets in a respirator, especially if you use a drill and grinder. It is recommended to wet the cutting site first. Asbestos-cement dust is harmful to health.
How and what to fix the slate on the roof
Fastening the sheets of roofing material to the lathing is an important stage on which both the strength of the roof and the integrity of the slate itself depend during operation. It should be borne in mind the seasonal deformations and movements of the rafter systems and slate, increased loads on the roof in winter.
Slate nails and screws
Fastening the slate on the roof to the lathing is performed with slate steel nails with a head with a diameter of 14 mm or self-tapping screws. The head of the nail and the slate are separated by a metal washer and a gasket of rubber or other elastic material.
How slate sheets are nailed
The slate is nailed with an ordinary hammer. Nails are inserted into a pre-drilled hole and hammered not all the way, but so that the slate does not move. An 8-wave slate is hammered into the 2nd and 6th wave from the joint, 7-wave - into the 2nd and 5th, respectively. Vertically, the sheet is nailed in two places to the crate. The distance from the nail to the edge of the canvas is at least 15 cm. This is how they move to the ridge.
Important! It is not recommended to bend nails from the side of the crate, if they are long. It is better to cut them to the desired length.
Chimney junction device
If the house has a stove, a bypass for the chimney is required on the roof. For a chimney on a roof slope, the junction is arranged differently, depending on whether there is waterproofing or not. In the presence of waterproofing, the abutment from steel sheet installed under the slate and the film, and in its absence, they are made in such a way that the upper edge of the steel sheet is under the slate, and the lower along the slope is above it. The junction device diagram is shown in the figure.
Roof ridge device
Skate device - finishing stage roof installation. The ridge protects the roof from water ingress, provides ventilation, is a decorative element of the roof.
The ridge of the slate roof is made of galvanized steel or ready-made ridge elements to match the color of the sheets. A sheet of galvanized steel of the required width is cut out and bent on a sheet-bending machine or by hand so that the fold angle is slightly less than the angle between the slope sheets. The same nails are used to attach the ridge. How to install the skate correctly is shown in the figure.
How much does roofing with slate cost
Installation of a slate roof is a simple matter, it is within the power of someone who is familiar with a hammer and a hacksaw, has enough time to work. Wave slate costs 170-260 rubles. per sheet, which is from 90 to 135 rubles / m 2. On average, taking into account fastening materials and waterproofing, the price of a roof with your own hands will cost about 200 rubles / m 2.
When there is not enough time to cover the roof with slate with your own hands, you can hire a team. The cost of laying slate will be from 150 to 300 rubles / m2. If you need to install a rafter system, heat, steam, waterproofing, lay slate, then the work will cost from 700 to 800 rubles / m 2.
Subject to consistent and careful performance of the work, the slate roof will serve for a long time and reliably.
Slate is a popular material that is inexpensive, but has high reliability and durability. If you paint it, then in terms of decorativeness, it can safely compete with modern roofing innovations. Therefore, the scope of application of slate is practically unlimited: asbestos-cement roofs can also be found on modest country buildings, and in luxury cottages.
The spread of the material is also facilitated by the fact that laying slate on the roof is not difficult work, anyone can do it. But in order for the coating made to serve, as it should, for at least half a century, it will be necessary to study all the nuances of this simple but responsible event.
Many people think that slate is a versatile roofing material. This is not true. To prevent precipitation from seeping under the slate, it is recommended to lay it only on one or gable roofs with a slope of at least 15 °. If you want to use a flatter roof as a base, you will have to build serious waterproofing under the crate from several layers of roofing material or membrane, as well as increase the overlap of adjacent sheets up to 300 mm.
Slate laying methods
To obtain a roofing covering, the slate is fixed on the lathing in horizontal rows, moving from the bottom up (from the eaves). Each subsequent sheet in a row is superimposed on the previous one by 1-2 waves. Each subsequent row is also shifted to the previous one, as a rule, by 120-200 mm.
There are two ways to lay out slate:
- Scattered- when slate sheets of one horizontal row are mounted with a shift of 1-4 waves in relation to the sheets of the adjacent row. The joining line is stepped. This technology is recommended for roof slopes that are wide in the transverse direction (horizontally), but narrow along the slope.
- No offset- when slate sheets are mounted in the same, even rows, without shifting. The joints of all rows form one line. Since when laying it is not allowed to arrange a double overlap (that is, to combine more than 2 layers of slate at one point), the edges of the sheets are cut at an angle of 30 ° -60 °. This method the most rational for covering slopes that are wide on the slope, but small in diameter.
As a rule, wave slate is laid in a ragged manner. This option is less laborious, since it is not associated with big amount pruning. Installing slate without offset is much more difficult, since almost every sheet has to be cut in the corners. But this technology also has a significant advantage - it saves material.
Let us consider step by step the process of covering the roof with slate, focusing on the difference in the two layout schemes.
Slate laying technology
The first step for attaching the slate is to prepare the base - the crate, which is fixed directly to the rafters. The lathing is solid and sparse.
Solid sheathing is a flooring made of OSB, plywood or planks. Such a base, as a rule, is used if it is required to cover the roof with non-standard slate thickness.
For a typical slate with a thickness according to GOST, a sparse lathing is recommended - a structure made of bars installed with a certain step over the rafters. The suitable cross-section of the lathing is 40-70 mm. Too thin bars are not used, due to their possible damage under external load (for example, under the influence of snowfall). Too thick bars are also bad. When warped, they can cause the asbestos-cement fibers to break and the slate to crack.
It is recommended to use bars as part of the lathing frame different heights... Ordinary bars usually have a cross section of 60x60 mm, they are fixed in odd rows. Even rows are made up of elements whose height is slightly higher - half the thickness of the slate used. For example, if the thickness of the slate is 6 mm, then the height of the "even" bars is 63 mm. The first (cornice) bar also has a different height - 66 mm, which should rise above the privates by the thickness of the slate sheet. For uniformity, a different scheme is often used: they use slats of the same height - 60x60 mm, but, in even rows and near the cornice, they are built up with 3 mm thick linings.
The lathing is fixed on the rafters, at right angles, using nails or self-tapping screws. Since slate is a durable, non-bending material, 3 support bars are enough to install each sheet. The step of the lathing from the bars depends on the length of the sheet. The standard length is 1750 mm, respectively, the pitch of the lathing is 700-750 mm.
1-2 lathing beams are installed on the ridge (on each slope) for the subsequent fixing of the ridge parts on them. The height of the bars is selected on the spot, in fact.
Additionally, lathing is performed around the chimney. To do this, ordinary bars are fixed along the perimeter of the pipe trunk at a distance of at least 130 mm from it (to ensure fire safety).

Stage # 2. Calculation of the amount of slate
Correct calculation of the amount of slate is another important step that will save the roofer from having to buy 1-2 missing sheets at the last moment and order transport for this.
It must be understood that not the entire surface of the material goes directly to the roof covering. Part of the area (along the perimeter of the sheet) is lost under the overlap.
Therefore, the calculation of the amount of slate is carried out as follows:
1. Determine the amount of slate in the transverse (horizontal) row (P) by the formula:
P = (L + 2C) / (B 2 - B 1),
- L- the width of the slope;
- WITH- removal of the overhang on the pediments;
- B 2- sheet width;
- IN 1- the width of the sheet under the overlap.
2. Determine the amount of slate in the longitudinal row (n) using the formula:
n = (L o + C 1) / (L 2 - L 1),
- L o- the length of the slope;
- C 1- the size of the overhang from the cornice (approximately 100 mm);
- L 2= Is the length of the sheet;
- L 1- the size of the longitudinal overlap of the sheet.
3. The resulting figures are rounded up to a whole number, multiplied and the total number of sheets per 1 roof slope is obtained. If the roof is gable, then the calculated number of sheets (+ 10% - for battle and scrap) is purchased in two times.
Stage # 3. Slate sheets cutting
Before lifting the slate sheets onto the roof, it is necessary to sort them out and, in accordance with the chosen laying scheme, cut them out.
You can cut slate with several tools:
- grinder;
- a hacksaw for wood or foam concrete;
- jigsaw;
- using a drill or slate nail and hammer.
The easiest and fastest way to cut slate with a grinder with a stone (concrete) disc or a diamond disc.
Cutting process:
- a sheet of slate is laid on a plank walkway so that the cut point is raised above the ground;
- mark the cutting line using a flat wooden lath;
- the place of cutting is watered with water to avoid overheating of the disc, to make the slate softer and more pliable, as well as to settle the emitted asbestos-cement dust;
- perform a cut, constantly wetting the cutting line and the grinder's disc (pouring water from a bottle over them).
Likewise, sheets are cut with a hacksaw or jigsaw, however, when using these tools, you need to be extremely careful not to break them.

Cutting methods with a drill or a slate nail deserve special attention.
When using a drill, a 2 mm drill is used to make through holes along the cutting line with a step of 0.5 cm.After drilling is completed, the sheet is placed on a support (table, for example) with one edge, and pressed on the other edge, after which the slate is split along the intended line.
Instead of a drill, a drill to get through holes you can use a sharpened nail and a hammer. To do this, set the nail on the marked line and hit the head with a hammer. The blows should be accurate, strong enough, but not sharp. In this way, multiple punched holes are punched at a small distance from each other. After that, the sheet is split into two parts.
The technology of cutting a slate sheet with a grinder is shown in the video clip:
Stage # 4. Laying slate sheets
Laying of slate begins on the side opposite to the direction of the prevailing winds. That is, the installation of sheets begins from the left side, if strong winds blowing from the right and vice versa. This will prevent rain and snow from blowing into the overlap areas.
A cord is pulled along the eaves at a distance of the length of the overhang in order to level the rows of slate along it. Instead of a cord, you can use a flat wooden strip.
The sequence of work in the layout is staggered:
1. The first horizontal row begins to be made of whole sheets of slate. Each subsequent sheet overlaps 1-2 waves of the previous one (as a rule, there is 1 wave per overlap). Fastening is performed using roofing nails or self-tapping screws with soft (rubber) gaskets.
2. In the second row, the first sheet is cut into a number of waves, depending on the desired offset value. Then they put in whole, uncut, products. The sheets overlap the underlying row, forming an overlap of 200 mm - with a slope of 15-20 °, 150 mm - with a slope of more than 20 °. That is, the greater the slope, the less the allowable overlap.
3. The third and all subsequent rows begin with sheets cut by twice the number of waves cut off from the first sheet of the underlying row. For example, if the first sheet of the second row was shortened by 1 wave, then the first sheet of the third row will have to be cut by 2 waves, then by 3 waves, etc. It is more convenient to offset 1/2 the slate width. In this case, only the sheets in each even row will have to be cut in half. Odd rows are made up of whole sheets.
4. The ridge row is laid last, making it from sheets cut across.

With no displacement layout:
1. The first sheet is laid whole, not cut off. Align it along the cord, fix it with nails or self-tapping screws. For subsequent sheets of the first row, the upper right corner is beveled at an angle (if the installation begins on the right side of the slope).
2. At the first sheet of the second row, cut off the lower left corner, and then join it with the cut corner of the second sheet in the first row. Subsequent sheets are beveled in two corners - in the upper right and lower left (arranged diagonally). At the last sheet of the second row (located on the left), only the upper right corner is cut off.
3. The elements of the upper row (under the ridge) are trimmed along the lower left corner and in height - in fact. The corners of the last sheet are not cut. Such a scheme of forming corners is reliable only when stacking sheets from right to left. If the installation direction goes from left to right, then trimming is performed in opposite corners (instead of left corners - right corners and vice versa).

Stage # 5. Installation of additional elements
After covering the roof with slate, the finishing stage begins - the installation of additional elements. To overlap the ridge, it is advisable to use special ridge parts made of asbestos cement. Each such element consists of two parts connected by hinges. As an alternative to the factory part, you can use a galvanized sheet, bent on a sheet bending machine or with your own hands.

Chimney collars, dormers and the places of abutment to the walls are made out with the help of corner pieces made of asbestos cement or galvanized collars. They are fixed over the slate sheets with self-tapping screws passed through the crests of the waves. The upper edge of the apron is attached to the wall and sealed. The lower edge covers at least 1 wave of an ordinary sheet.
The valleys are covered with galvanized or asbestos-cement trays, installing them from the bottom up. In this case, the longitudinal walls of the tray should be overlapped with slate sheets by at least 150 mm.
At the end of the fixing of the additional elements, the laying of the slate roof can be considered complete.

Features of fastening slate on the roof
An important nuance that should be discussed separately is the selection of fasteners and their use in the process of attaching slate to the roof.
As fasteners you can use:
- Slate (roofing) nails. Manufactured from durable steel, they are main feature- an enlarged head reaching 14 mm in diameter. To exclude the appearance of rust, the caps are made of galvanized or metal coated with an anti-corrosion compound. The length of the slate nails should be in direct proportion to the height of the slate wave. That is, the higher the slate waves, the longer the nails driven into them. According to the recommendations of experts, the length of the nails should be 10 mm longer than the total value of the slate wave height (where the fastener will be driven in) and the thickness of the lathing (bar or board). It is not necessary to bend the excess of the rod.
- Self-tapping screws for slate. These fasteners are more expensive than nails, but also more convenient to work with. Self-tapping heads can have three versions: under wrench(hexagon shape), for flathead screwdriver (with straight slot), for Phillips screwdriver (with Phillips slot). A sealing washer with a rubber gasket is located under the head. Some manufacturers paint heads and washers in different colors (most often according to the RAL base).
Fasteners are mounted in two ways (optional):
- Into slate holes pre-drilled with a drill. Their diameter should be 2-3 mm wider than the rods of the fasteners. The resulting gap will prevent the slate from cracking when the wooden lathing moves, but it can cause water to leak under the roof. To prevent this from happening, a rubber gasket is put on the fasteners, which seals the slate roof. Self-tapping screws for slate are equipped with such a gasket structurally, in contrast to roofing nails. Therefore, under the nails, the waterproofing washer will have to be bought separately or cut out independently - from rubber, roofing felt or roofing felts. Then it is put on the rod, under the hat.
- Without pre-drilled holes(This method is recommended by most "experienced" masters). In this case, only roofing nails without gaskets are used to fix the slate on the roof. The nail is driven into the coating with light hammer blows so that the asbestos-cement layer crumbles from impacts, and does not crack. Otherwise, the slate may burst. However, even with the correct technology of driving nails directly into the slate, it often cracks. This is due to the poor quality of the material, which, unfortunately, is common.
An important feature of the fastening: during installation, a nail or a self-tapping screw is not pulled to the limit to the slate sheet, but a small gap of 2-3 mm is left to compensate for temperature expansions. If you neglect this advice, then soon the slate roof will crack.
Fasteners are installed only in the upwardly protruding parts of the wave (in the ridge), where the slate is in contact with the lathing (to connect the roofing sheet with the lathing material). Fastening is carried out at a distance of 80-100 mm from the edges of the sheets.
- for 5 wave slate- fastening in the 2nd and 4th waves;
- for 6-wave slate - fastening in the 2nd and 5th waves;
- for 8-wave slate - fastening in the 2nd and 6th waves.
Since the slate usually rests on 3 lathing bars, and the fastening is performed at the points of contact of 2 waves with the lathing, the total number of nails (self-tapping screws) for each sheet is 6 pieces.

Some additional nuances of how to cover the roof with slate can be found in the video clip:
Conclusions - is it realistic to do everything yourself?
Slate roofing technology is very simple. She will not require you special costs time, labor and money. Despite this, the roof will turn out to be beautiful (especially if you get acquainted with the paint for slate!), Reliable and durable.
A couple of decades ago, many houses had slate roofs. It was chosen for its cheapness and relative ease of installation, while many of these roofs are still in use. However, it is often necessary to insulate the roof under the slate, and very few know how to do this. In addition, when performing work on the creation of a heat-insulating layer, there are many problems associated with the features of such a roofing material as slate.
The slate has a wavy shape and it will not work to put the insulation close to its surface. This is the bottom of the main problems, since it will be difficult to create a dense heat-insulating layer in this case, especially when using fibrous insulation materials. It will be necessary to mount a special system of cranial bars and lathing so that the insulation has something to rest against during installation.
The second challenge is waterproofing the heat-retaining material. Slate waves go along the entire plane of the roof and get into them without hindrance. wet air, which is capable of making any insulation from the fibrous category unusable - moisture can accumulate in them and the effectiveness of the material will decrease. Therefore, it is necessary to provide high-quality waterproofing.
Roofing material was previously used as an insulator from water, nailed directly to the roof lathing before laying the slate. However, over time, it becomes unusable very quickly and cannot serve as a full-fledged protection against water. We'll have to fix another layer of waterproofing materials on the rafters. It could even be a simple plastic wrap.

However, the question immediately arises with the removal of excess moisture from the insulating layer. It is necessary to fix the vapor barrier and waterproofing membrane in such a way that small ventilation ducts remain between it and the roof, through which moist air will escape to the outside. Moreover, to do this, you need to be extremely careful not to damage the protective film.
The choice of insulation
Having dealt with the protection of heat-retaining material, you need to go to one of the most important issues- the choice of insulation. It must be chosen in accordance with the requirements that apply to it. Moreover, in different cases these will be different requirements.
- For houses that do not live permanently, a thin layer of material is sufficient - from 50 millimeters. It will retain heat while the house is being heated and will let it go out quickly enough after the heaters are turned off or the stove goes out.
- Permanent housing requires a different approach - you need to keep heat as efficiently as possible and the insulation layer should be at least 100 millimeters already.

This data is correct for the layer mineral wool- the most demanded and popular insulation. However, there are other options for insulating materials. For example - expanded polystyrene. It is lightweight, easy to install and retains heat well. But, it also has disadvantages that will override the advantages in the form of cheapness and lightness. It is a highly flammable material that emits harmful substances during melting and burning. In addition, many people are allergic to the smell of styrofoam. So, it is suitable for technical structures, but it is better not to use it for housing.

Spray polyurethane foam can be an ideal solution for slate roofs. It is, in fact, a sprayed insulation that covers the entire treated surface with a dense layer, without cracks and gaps. When using it, it will only be necessary to ensure that there are no through slots and holes in the roof and from the side of the gables. Its only drawback is the lack of air exchange between the external environment and the treated room. We'll have to think about good ventilation.

Another option for how you can insulate a slate roof from the inside is to use bulk insulation type of expanded clay, which are laid on the outer side of the floor in relation to the premises. Such a decision will not allow making warm attic however, the insulation of living quarters will be very effective. The most modern material in this category will be ecowool, which can be simply scattered over the floor surface and covered with a waterproofing film from the outside.

Today, more and more developers are asking this question. The fact is that a cold roofing system allows you to build a residential building for relatively little money, when an insulated roof requires colossal costs, both financially and in terms of time and effort. Realizing that such a system is in a sense better, many developers wondered if they needed a vapor barrier under a cold roof?
Construction of a cold roof in a residential building
Many developers, who want to save some of their money on construction, seek to purchase the cheapest materials, but at the same time, so that the quality of the entire building does not suffer greatly from this. This is possible if primitive two slopes are used as a rafter system, corrugated board is used as a covering, and the roof is made cold.
The design features of such a roof can be listed on the fingers, since there is no need to lay thermal insulation material, a vapor barrier layer and other components that are often found on insulated roofs. If you all doubt the savings, then it is safe to say that the cold version will cost 50-60% less than the insulated structure. In addition, the work can be carried out independently, therefore, the savings will increase even more.
Cold roof cake, in most cases, includes the following products:
- Rafter legs
- Waterproofing material
- Counter battens
- Lathing
- Profiled metal sheet
Do you need waterproofing under the cold roof metal tiles?
It should be noted that all metal surfaces have one similar feature, they collect condensation. The waterproofing that is part of the cold roof cake will correct this problem and protect the room from the incoming moisture both from the outside and from the inside. When constructing an insulated roof, many developers advise their friends not to lay a vapor barrier if they are going to build a building with a cold roof type. They think that the cold will remove the condensation that is visible on metal products, but they are greatly mistaken.
Condensation occurs due to the temperature difference between the roofing room and the external environment. Naturally, when the attic is not heated and is not insulated by anything, the difference will be small, but still it is sufficient to provoke the release of moisture from the air. As you can see, condensation will form regardless of the type of roof, therefore, the question posed at the beginning of the paragraph can be answered unequivocally: yes, it is needed.
As an example, we can cite outbuildings, the owners of which do not care much about their service life. In such buildings, the roofing cake is the most primitive and even violates building codes. Most often, a roofing cake consists of rafters, a discharged sheathing and a roof covering. All layers of vapor barrier and waterproofing were simply thrown out. Despite this fact, this building can stand significantly long period, and maybe vice versa, fall apart in a couple of years. Here you are already as lucky, but why risk it if you can do everything in a high-quality way?
Residential buildings should not be allowed to take risks, as someone's life may depend on it. I am not exaggerating, because if the condensate acts on the rafter system and other elements of the roof for a long time, it will simply destroy them, which can lead to the fall of the entire roofing pie.
IMPORTANT: If at the beginning of construction you decided to build a cold roof, but later after a certain period you will insulate it, then it is most advisable to lay a micro-perforated film as a waterproofing product. Its properties are practically the same, but according to the price tag, it is much lower than the membranes.
Cold roof waterproofing and ventilation
If you are laying a micro-perforated product, then such a layer will block the access of moisture from the outside, but at the same time water vapor can pass this area without problems. We can say that laying of vapor barrier products on roof slopes is optional in this case. After steam penetrates inside, it is between the waterproofing material and the metal cover, from where it is removed by natural ventilation.
IMPORTANT: When a dense waterproofing film is used that traps water vapor, this leads to a significant increase in air humidity and, as a rule, dampness in the room.
With increased air humidity, condensation processes begin, thus moisture accumulates on back side the film penetrates into all roofing materials. Due to this fact, it is not recommended to use materials such as polyethylene and polypropylene, roofing felt, and glassine for the construction of a cold roof.
The ventilation system for cold roofs is fairly straightforward. To create it, gaps are left, which, as a rule, are located along eaves... Air masses pass through them, collect all the humidified air and remove it through the cold triangle located in the ridge part of the roof.
The counter grill is a construction to provide additional ventilation. Most often it can be found on complex roofing systems, where products with a high degree of waterproofing are used as a coating, for example, metal, shingles, and others. The gap that is created by installing the counter battens allows fresh air dry the roofing cake on both sides, so designs with such a cake last much longer than others.
Cold roof. Do you need waterproofing on outbuildings?
First of all, it should be noted that outbuildings differ significantly from residential buildings in both their structure and volume. The overwhelming majority of developers are trying to save money on the construction of secondary structures, so the issue of waterproofing is more relevant than ever. Before answering the question posed, let's understand the coverage. Today, corrugated board is one of the cheapest materials, so I will talk about buildings covered with it.
Manufacturers different countries strive to produce such products so that the whole world can use them. If you are a fan of corrugated board, then today, such material is a sheet of metal with an anti-condensate coating.
In appearance, it practically does not differ from its counterparts. A synthetic compound is applied from the inside, it looks like felt. Due to the large number of pores, this material is able to retain in square meter up to 1 liter of water. After the surface is saturated with moisture, ventilation comes into play and if it is done according to all the rules and regulations, then the drying process will not take much time.
Thanks to the laying of such a "tricky" coating, the need for laying a vapor barrier and waterproofing layer is removed, but it should be understood that the weight of such a coating will vary depending on weather conditions. Making necessary calculations it is very important to take these parameters into account and use them in calculations. It is worth noting that the finished roofing will be much cheaper, because it will not have almost half of the roofing pie.
Installation of waterproofing for cold roofs
So, based on the information obtained above, you realized that the waterproofing material is laid regardless of the type of roof and the functional purpose of the building. However, if you want to save money, you can use roof coverings with an anti-condensate layer, but not all people like metal coatings, so I'll tell you now, general principle laying waterproofing.
- First of all, an inexperienced roofer must repeat the safety precautions and the principle of working at height. After that, he dresses in a special outfit, which should include the following: individual protection, good shoes with non-slip soles and a mounting belt.
- After rafter legs fixed in place, you can start laying the vapor barrier layer. It is attached to the rafters with a construction stapler and pressed against the crate. With a small slope, strips of material are placed across the slope, and on strongly sloping slopes along. To improve the quality of laying this layer, the joints are coated with bitumen or glued with double tape.
IMPORTANT: Before installing the lathing, it is very important to treat its elements with special protective solutions, which will increase the degree of fire of the wood and protect it from decay.
- Next, the counter lattice is laid. It creates the necessary air gap, thanks to which moisture will be removed from the roofing cake.
- A waterproofing material is placed on top of the lattice.
- After that, proceed to the installation of corrugated sheets.
Most developers strive to cover as much as possible long length one strip of profiled sheet. This is justified by the fact that in this way fewer joints are obtained, therefore, the waterproofing qualities of the entire roof increase significantly. You can do all the work yourself, but to increase efficiency, it is better to invite 1-2 partners.
When building or renovating a private house, roof arrangement is one of the most important milestones... If it is improperly designed, then precipitation will accumulate on it, which will be an unnecessary load and will contribute to the deterioration of the roofing material. If you lay the roof incorrectly, then moisture will get into the seams and over time it will leak into the house, and if you do not insulate the roof from the inside, then cold air very quickly gets into the room and will not allow it to be fully warmed up by any means, that is, to live in such conditions all year round it will be impossible.
Physical factors: impact
Any house that is used for housing must meet certain requirements in order to live in it cozy and comfortable. It is important to lay the foundation correctly so that the house does not shrink or crack, insulate it and erect a roof. The choice of coverage is very important, since it determines the weight that applies to the house, the time to complete the floor work and the cost. In addition to all this, it is necessary to take care of the insulation of the inner side of the roof so that the structure of the house remains as reliable as possible, and the residents feel comfortable at any time of the year.
In different climatic conditions, various factors affect buildings.
For our latitudes, the following will be characteristic:
- rainfall;
- snow, groats and similar phenomena;
- hail;
- icing of the roof;
- active sun;
- strong wind.
To withstand all these negative factors, the roof must be covered with sufficiently dense materials that can reliably protect the house for many years.
A private house is a structure that consists of a main floor and an attic. If the roof is not insulated, then through the ceiling up to 15% of the heat leaves the room in cold weather, which makes it necessary to intensively heat the rooms. In addition, having an insulated attic, this space, if desired, can be made residential and used as rooms for a specific purpose. In conditions large family this is ideal.
Processes inside
In order to properly insulate a private house and make the roof a full-fledged protective mechanism for both the main room and the attic, you need to be able to choose the right material for insulation. Usually, the selection is based on the physical processes taking place inside, under the roof.
The most important are several.
- Heat exchange, which occurs due to different temperatures in the house and outside. If the roof is not insulated, then some of the heat escapes through the roof, and the insulation prevents this process and maintains the optimal temperature in the room.
- Moisture exchange, which arises from the person himself, his breathing, vapors from body temperature to cooking processes, when vapors rise to the ceiling, carrying particles of moisture that are removed through the roof. If the roof is insulated, the humidity level remains optimal and unwanted odors can be removed with ventilation.
When insulating the roof, you can protect yourself from temperature changes inside the room, because the insulation has its own temperature, which is often slightly higher than that outside, and does not allow the heat of the building to go outside, which will eliminate the need for additional heating, which requires reserve funds.
Insulation layer helps to avoid condensation, which is formed when hot and cold air comes into contact, therefore laying it together with insulation will help keep it appearance and efficiency. Correctly performed work increases the service life of the building almost twice and minimizes the need for repair work every year.
Necessity or whim?
A private home often has a pitched roof that forms an attic space over the main residential floor. If there is no insulation, then living in such conditions will be very uncomfortable due to the lack of heat in the cold season. If the attic is made in the form of a residential floor - the same attic, then the insulation process should be mandatory.
Any roofing material will not be able to protect as well as foam, mineral wool or other types of coatings. In addition to the insulation itself, it is important to use vapor barrier film that will cope with all kinds of fumes.
If you ignore the installation of an insulation coating, then in addition to the cold in the house, problems with the roof rafter system will begin very soon, which will rot and there will be a risk of collapse. The same effect can be observed with the wrong installation technology or inaccurate choice of insulation. If it is wrong to choose the thickness of the insulation while standing, then instead of protection, the opposite effect will be provided. Under normal conditions, with a temperature difference, protection against condensation and heat removal is carried out, which makes it possible to feel comfortable in any weather.
If the thickness is broken and is selected thin insulation, then an excessively large amount of condensation will form on it, which will contribute to the rapid decay of the rafters and the violation of the microclimate of the room.
Failure to comply with standards is hazardous to both health and safety as the roof structure could collapse. The choice of material that needs to be insulated depends on a wide variety of factors that are important to consider in order to be able to independently establish what you need. If you have difficulties with the choice of insulation or its installation, it is better to turn to professionals and get comprehensive advice and assistance in installation.
Roof Pie: What Is It?
A properly constructed roof involves a large number of layers of different materials that are stacked on top of each other, which resembles a pie - hence the name. The basis of the construction "pie" is the rafters, on which all other layers are already being laid.
In order to lay out all the layers correctly, it is important to know their correct sequence, which looks like this:
- Roof.
- The lathing on which the installation of finishing materials will be carried out. It can be laid flat or with gaps.
- Counter-lattice in the form of bars, which serves to ventilate the space under the roof itself.
- Waterproofing film.
- Materials for thermal insulation.
- A layer of material for vapor barrier.
- Creation of a batten, where insulating materials and internal cladding are mounted.
- Interior cladding material.
If you lay the "pie" correctly, you can avoid the loss of heat from the dwelling in the cold season, and it will also help from overheating the space in intense heat. The waterproofing layer will help protect the insulation from moisture coming from the outside, and the vapor barrier layer will protect against all kinds of fumes.
Pitched roof - a fairly common type, therefore, it will not be difficult for her to find all the necessary materials. A positive aspect of high attics is the convenience of insulating them and the ability to equip a full-fledged living space.
It will be extremely unpleasant to be in it without additional work - it is very cold in winter and too hot in summer.
Requirements for materials and their functions
To carry out quality work, you must choose the right materials. It will depend on them how accurately it will turn out to be done comfortable conditions for living and secure the roof supports. The choice will depend on the region where the building is located, its size, purpose, as well as the funds that are available for the purchase of materials.
There are four main methods of insulation.
- Use of mineral wool, which is the most commonly used material due to its properties. It is best to purchase the basalt variety. It is advisable to obtain a quality certificate in the store in order to know for sure that the products are safe and meet all norms and standards. There are varieties that are lighter in weight, they are suitable for work in conditions of independent insulation of the room. Positive qualities cotton wool can be considered a non-combustible composition and moisture repellency, which corresponds to the main task of this layer. In addition, rodents do not like it, which means that you do not have to worry that someone may start in the house, especially on the roof.
Of the minuses, a rather high cost can be noted, but it is fully compensated by the positive aspects.
- The use of glass wool. Some time ago, this material was considered the main material for roof insulation, but due to some dangerous properties very soon they found more safe counterparts... The thermal insulation of the glass wool is not bad and the efficiency is very high. When working with such material, it is very important to follow all safety rules, namely to use a protective suit, gloves, glasses. It is important to close the nasopharynx and eyes so that no pieces of glass dust get into them.
People with allergies will not be able to live in such a house, so you need to be able to choose the right type of internal insulation coating.
- Polymeric roof insulation- these are special tiles made of polystyrene and expanded polystyrene. They have both advantages and disadvantages. This is an inexpensive option, because anyone can afford it, but if you understand the cons, then you should think carefully about purchasing such insulation. These materials are highly flammable, and when they burn, they emit a large amount of smoke, which is very dangerous for humans.
Usually, this type is resorted to when other options cannot be used.
- Warming with expanded clay. This material is very often used for floor insulation and has good thermal insulation properties, but it is very difficult to use it for the roof due to the heavy installation. Usually, only experienced workers can cope with it to make the internal insulation of the ceiling in the house.
If we consider alternative options, then among them there is polyurethane foam, which can be used in two states - in the form of plates and foam. It is advisable not to take plates for arranging the ceiling, because it is inconvenient to work with them and they have a very high cost. At the same time, liquid or foamed polyurethane is easy to apply and has a number of advantages. With its help, it is possible to fill voids of any shape and size, cracks and lines of openings are very well clogged. If the rest of the materials need to be cut and to achieve maximum fit, then in this case the foam lays down on its own, the main thing is to distribute it correctly and evenly.
It is very convenient to use foam for slate roofing or broken structures when there are many drops on the roof and the frame has significant differences. Another significant advantage can be considered autonomy from hydro and thermal insulation, which are not needed for polyurethane foam. In addition, the material has excellent combustibility properties, which ensures the safety of the home.
How to choose?
When choosing a material for insulation, it is important to understand what exactly is worth paying attention to, what indicators will play a decisive role in the selection of a particular type.
The main criteria are:
- Mass of material. Heavy insulation will serve as an additional mass on the house itself, which will affect both the roof rafters and the building as a whole. If the house is built of high-quality bricks or foam blocks, then reinforced insulation can be allowed, but in this case you need to make the rafters more powerful so that they can withstand a lot of weight.
- Thermal conductivity index. The lower the numbers, the better for the roofing material. If the indicator is approximately equal to 0.04 W / m * s, then it will be the best option.
- Index of resistance to adverse factors external environment.
- The density of the material, which affects the heat transfer of the material. If the density is low, the porosity of the insulation increases, which reduces thermal conductivity and leads to an increase in thermal insulation properties.
- Ability to absorb moisture. In order to repel moisture, any insulation can be treated with a hydrophobic substance. Some materials are already sold with this impregnation.
- Flammability indicators, which is the most important factor for arranging the roof.
- Ability to resist low temperature levels.
- Resistant to chemical elements.
- Environmental friendliness of the material.
Having considered all these indicators, the best option would be to use mineral and glass wool. Glass and mineral wool is sold in the form of rolls or slabs. It is safer to insulate with mineral wool, because it is more resistant to fire.
If we consider modern insulation, the most progressive technology will be roof sheathing with foam flex. It is a durable and lightweight unit that can be easily installed on any surface, be it a wall or ceiling. You can cut off the desired piece with an ordinary knife.
In addition, the storage conditions of penoflex, which can be outside at any temperature, are also distinctive, but it is better to have packaging on it.
It is convenient to use polystyrene foam, which is also called penoplex, in rooms with unfavorable conditions, because he is not afraid of them, also various microorganisms will not begin to develop in him. A very important feature is the environmental friendliness of this insulation. It does not emit any harmful odors and vapors and is completely harmless to both adults and children.
Preparation
To carry out insulation procedures, it is important to clearly understand which roof you have to work with. Having correctly determined the order of work, you can quickly and efficiently insulate the roof. It is worth considering the materials that will be at hand during work. It is important to clearly understand for yourself what exactly you have to work with and what to do.
If the process of warming has become fully understood, then you can cope with absolutely any roof, be it at a rural house or a large villa by the sea. In order to carry out insulation work, it is important to prepare the roof itself for this.
There is a specific procedure for this, which includes:
- inspection of the rafter system so that you can identify damaged boards in time and replace them;
- treatment of wooden structures with an antiseptic;
- checking communications, if they are located under the roof. This applies to piping and wiring.
As soon as the roof is ready, you need to check the availability of all the materials with which the insulation will be made, prepare the tools, and only after that you can get to work. The workflow has its own rules and patterns that you need to know in order not to make mistakes and get a good and high-quality result.
Step by step process: how to do it?
In order for the work to proceed quickly and efficiently, it is important to prepare well, read the articles on the topic, watch videos in order to clearly see what is being done and why in the process of working on the internal insulation of the roof.
The algorithm for carrying out the work is reduced to four points.
- Installation of a waterproofing layer. This task should be done at the time of covering with roofing material. The waterproofing is installed along the rafters so that there is a slight sagging. Slate house involves laying this material immediately for insulation. It is important to install the waterproofing correctly - its smooth side should be on top. The strips of material must be sealed with tape so that gaps do not form over time. Only after that, counter-rails are stuffed onto the rafters, to which the sheathing will be installed. On finished boards and you need to lay the roofing material.
- Installation of thermal insulation. It is important to choose an insulating mat with the required thickness and place it between the rafters. The material is laid in a spacer or on a rough filing, which is made of small-width slats, fishing line and rope, which are attached with nails to the rafters. Thermal insulation mats take up free space, and excess pieces are cut out.
If you need to insulate the room as efficiently as possible, the mats are stacked, shifting to the side with each row.
- Placement of a vapor barrier layer. This material consists of a smooth side, which is placed towards the insulation, and a rougher one, which is directed towards the building itself and takes steam emissions from the room. Laying such a film is an important point for its full-fledged work. The installation process takes place with a stapler. In this case, you can do without counter-lattice, but it is important to glue all the joints with adhesive tape.
- The process of installing profiles and guide bars. These materials serve as the basis for the installation of decorative elements and ventilation, which is necessary for correct work insulation.
The technology of work will be similar, be it a summer cottage, where the house has a flat floor, or a large Vacation home where a gable roof is built. The correct choice of materials and installation in the right sequence will give the desired result.
Attic floors
When choosing insulation for an attic floor, you need to take into account its thermal protection, strength and stable qualities in relation to adverse environmental phenomena. It is important to take into account the type of flooring, the material from which it is made. Concrete with wood has its own characteristics.
The process of installing insulation depends on the material if it is mineral wool, then it is better to use thick layers (about 20 cm), but if you want to create increased thermal insulation, you can increase the thickness up to 30 cm. Wool is laid only after the vapor barrier has been placed. It is best to lay it under an overlap made of boards or beams so that they do not absorb moisture and do not rot. If you could not put a solid piece of vapor barrier, you need to glue it with tape.
After that, work begins with insulation, which is placed in wooden frame so as to fill everything free places... As soon as the mineral wool has been placed, the waterproofing is laid on top, which prevents the wool from absorbing excess wool. It is especially important to do this if the next step is to pour concrete, when the 2nd floor is planned in the building. Instead of concrete, you can make a flooring from OSB slabs. This is how you can insulate the attic and, if desired, make it a living space.
You can insulate the slopes different ways, the choice of which depends on the design of the rafters, their height and the skills of the one who will work with the surface.
There are only three options for insulating a pitched roof:
- with thermal insulation, which is located between the rafters, the frame must be flush with the insulation;
- with thermal insulation between and above the rafters, the frame is wrapped on all sides with insulation;
- with thermal insulation between and under the rafters, the frame is not insulated.
Warming pitched roof best done with mineral wool mats or fiberglass backing. The roof can be installed both inside and outside. Only the layers and their stacking order will differ. At internal works the roof is insulated with a layer of waterproofing, on which the insulation material itself is already laid, and after that a vapor barrier tape is stretched.
A sloping roof is a special structure that you need to know how to properly insulate, especially if the whole procedure is done by hand. Knowing the technology and correct location layers, you can get a high-quality roof covering that will protect the house from heat loss and moisture penetration and help create a comfortable microclimate inside.
Flat roof: features of work
If there is a need to insulate a flat roof, then the installation of the appropriate materials is often done after the roof has been installed. The work is carried out indoors, and after their completion, the height of the ceilings is significantly reduced, which is a tangible disadvantage with all the other advantages.
Before starting work, it is important to think over exactly how the attic will be illuminated.
We insulate flat roof by stuffing bars along the entire length of the room, after which they need to be divided into squares, in which the heat-insulating material will be placed. You can hold it in the cells with a cord or gluing it to the surface, which is less desirable. The cord can be removed when all the gaps are covered with foam, which will hold the insulation in place.
The first layer should always be thermal insulation layer, and the last - a vapor barrier, which in total will give the necessary result of a dry and warm roof. If you do not use protective layers, then the insulation will very soon become unusable and will cease to perform its functions.
When the work with the insulation is over, you need to pay attention to the wiring. If it is present there, only then proceed with the installation of lamps and decorative finishing premises.
Useful Tips
If the attic appears to be large and cold room, you can use different kinds of insulation, after which it will be possible to live in this room. It is possible to install thermal insulation material both during the construction of the roof and after that. If the roof is already covered with slate or other material, then the work is done from the inside, which changes the location of the layers during the installation of the insulation.
When working with glass wool, protective equipment must be used. to prevent glass particles from getting into your eyes or nose. The choice of modern materials is not always the most acceptable, if only because of their high cost.
The correct procedure for laying all layers will allow anyone to insulate the room, even a non-professional.
For more tips on insulating the roof from the inside, see the next video.
There is no need to do vapor barrier under a cold roof. In this article, we will take a closer look at why this is not necessary.
Why a vapor barrier is not needed for a cold roof
A cold roof is a rafter system on which a waterproofing material is laid. It will prevent moisture from entering the under-roof space and protect the rafter system from premature destruction. Then a counter grill is mounted to ensure natural ventilation: Air flow enters under the roof and removes excess moisture. Usually a bar of 50 * 50 mm is used.
Since there are no significant temperature changes in the roofing "pie", the dew point will be shifted to the insulation of the last floor ( warm air will condense in the insulation in front of the attic), therefore no vapor barrier required in a cold roof, but it will be needed before the insulation on top floor, in front of the attic.
Do I need cold roof waterproofing?
Yes, definitely needed... No matter how ideal the roof is, no one is safe from water getting into a microcrack or a minimum gap. From such a gap in the future there can be big troubles, especially if access to the inner surface is hidden: something is undermining somewhere, and where it is unclear. Waterproofing in such cases is needed, even if there is no insulation.
If the roof is metal, then waterproofing will protect against premature corrosion. Since the thermal conductivity of the metal is higher than that of slate, ondulin or bituminous tiles, condensation will also form more often.
Laying of the waterproofing film is carried out with a slight sagging (about 20-25 mm) so that the condensate flows freely onto the eaves strip, and from it into the gutter. Also Basic structure in this case, the roof will be protected, and a ventilation gap is provided for effective evaporation of moisture.
Ondutis films for cold roof waterproofing
Waterproofing films Ondutis D (RV) are intended for waterproofing cold roofs.
The film is a gray fabric with the addition of a protective layer and UV stabilizer. This film is used for waterproofing cold or insulated metal-coated roofs. It retains moisture and protects the under-roof space from the harmful effects of condensation and cold air on inside roofs.
Ondutis Smart D (RV) is produced with an adhesive tape applied to the base, which simplifies installation and reliably insulates joints and overlaps.
Conclusion
If it is not at all necessary to install a vapor barrier in cold roofs, then high-quality waterproofing is the key to a long and reliable service of the entire roof.
There are many materials on the market that are used for roofing roofs. However, some options are still popular in society and in demand. Despite the large number of modern and attractive analogues, slate roof waterproofing is for some people the best option create coziness and comfort in the house. The advantages of slate primarily relate to technical indicators, optimal prices and easy installation.
According to experts, slate is of two types: cement-fibrous and asbestos-cement. Specifications materials practically do not differ in anything, except that asbestos is not included in the cement-fiber version. That's why given view has the lowest strength. Nevertheless, both options perfectly support the weight of a person, coping with basic tasks.
Interesting fact. Slate sheets are made from materials that have been pressed. You can also find unpressed slate on sale, but it has low level density and shows less efficiency at a sharp temperature drop.
Slate is created either flat or fibrous. The only difference between them is their thickness and size.
Pros and cons of slate
- The material has high strength, weather resistance and long service life;
- Fire protection;
- Resistance to chemicals;
- Low level of thermal conductivity;
- Low cost;
- Easy installation;
- Wide range of color shades.
The disadvantages include the following factors: high weight, fragile structure, the appearance of moss.
It is important to remember that slate is very fragile, so you need to be extremely careful during installation. This work is best done with several people to avoid problems with the roofing.
Slate waterproofing

Slate like others modern materials, demands to itself special attention, since the quality of the work performed depends on the integrity of the structure. If we are talking about waterproofing, then only a few technologies are used in this case - roofing material and a polyethylene reinforced hydro-barrier.
Still, the hydro-barrier method is used more often by specialists, since it has a sufficient number of advantages.
It is worth noting that a material such as roofing material has been used for decades as a waterproofing agent. The fact is that the component is impregnated with bitumen and made in the form of roofing cardboard. One of the sides is covered with a special powder, which is responsible for the reliability and strength of roofing material. In this case, it is worth noting the following qualities of the element: elasticity, resistance to moisture, weather conditions and temperature changes. It is very easy to install, no additional skills are required to cope with the work. Simultaneously with the installation of roofing material, mastic and bitumen are used. It is they who provide a high-quality connection between the waterproofing of the roof and the base.
To install high-quality material on the roof, you must follow the rules:
- At the very beginning, you need to process special composition surface wooden structure... For the roof, this procedure is very important.
- Mastic or heated bitumen serves as a layer for the bond.
- After that, the material is laid on the surface and takes root tightly. The width of the overlap depends on the dimensions of the ramp.
- For the best waterproofing effect, roofing felt is heated, especially at the joints. Thus, there is a complete sealing of the seams.
In this case, it is worth remembering that the installation of roofing material cannot be mounted when low temperatures... Other modern waterproofing materials for slate roofs are sold on the market. For example, builders like to use such trade marks like "Rubemast" or "Hydroizol". In this case, it all depends on the client's preferences and budget. Certainly, foreign materials cost twice as much as domestic ones. However, Russian brands are now produced no worse than foreign firms, since many enterprises install innovative equipment for production. This approach makes it possible to create high-quality and efficient building components.
In addition, the better the roof, the fewer problems with the roof in the future. After all, it flows from time to time, delivering a lot of problems to the owners. If inexperienced specialists are involved in the work, then it is better to consult with highly qualified craftsmen who not only understand the range building materials, but also know the technology of laying the roof on the roof. In any case, before work, you need to clarify all the subtleties in order to competently do the job.
Not sure how to cover your roof with slate? The installation process is quite easy, so you can do it yourself. It is advisable to carry out certain types of preparatory work, characteristic specifically for slate roofs. They must provide additional structural reliability.
Preparation
From the very beginning it is required to do solid foundation- crate. Well suited for this unedged boards, which are installed at right angles to the rafters. For attachment, self-tapping screws or nails are used, while the fastening distance must be observed - at least 40 cm, up to 75 cm. If there is a chimney pipe on the roof, the crate is made around it.

Unedged boards do not fit together very well with each other, in any case there is a distance between their raw edges. Given this, you need to place them freely, not end-to-end. The task of such a batten is to serve as a base, and not as a solid surface. The distance between the boards is allowed up to 10-12 cm.
Please also note that the downpipe must be installed in advance.
The main stages of covering with slate
Waterproofing
1. Roofing felt, roofing felt or a number of modern rolled roofing waterproofing materials on a bitumen basis ("Gidroizol", "Rubemast" and the like) are usually laid under the slate. The rolls are rolled horizontally starting from the bottom row. If desired, you can weld the rolled sheets together. In this case, one should be guided by the technology specified for this material - how much to overlap, which side to lay, how to weld.

The steeper the roof (slope), the less need to weld the waterproofing to each other.
2. Fastening roofing material and others like it does not make sense, since slate sheets are subsequently fastened through to the crate, capturing and waterproofing. When laying sheets of roofing material, it is only necessary to be guided by a practical sense: so that before installing the slate, the waterproofing does not fly away from gusts of wind or under the weight of its own weight on a steep roof.
Covering
1. Slate is laid from the bottom rows. Installation must be started from the bottom first, usually from three slate sheets. The overlap is performed on one wave, regardless of the number of waves and their size (length). The slate is fastened with special slate nails with a wide head. One slate sheet is punched in four or six places, depending on its length.

Fastening is done in the second wave, in the first - it is impossible! In the place of the overlap, the slate does not break through two sheets! For slate with eight waves, such nails are hammered in even - the second and sixth waves, placing them on the crest, and in the seven-wave - in the second and fifth. Nails should be driven into the top of the wave, not the bottom.
2. Then two sheets of slate are strengthened in the next row, and one more sheet is added to the first row, and then the top one is placed. Thus, they provide free access to all sheets. Laying of slate on the roof is carried out before the final closure of the entire roof slope.
Supplements

- For inexperienced people who are laying slate with their own hands for the first time: it is necessary to drill a place for nails before hammering, otherwise you can crack the surface by hitting with a hammer. Hole sizes should be up to about two millimeters larger than the nail, so you should consider sealing them and sealing them against water ingress. In one case, you can use a rubber gasket, a plastic washer or a piece of roofing material, or in the other, after hammering under the cap, pour a hermetic agent. Do not drive in the nails so hard, there should be a small gap between the surface and the head. The correct nail is the nail, the head of which eventually touches the slate lightly.
- The nails can be exchanged for screws specially designed for such technologies. Holes, if convenient, can be made with a drill.
- Modern fasteners for slate can be equipped with rubber gaskets under the cap - then there is no need to seal the holes.
- An increase in the quality of the roofing is facilitated by the laying of a vapor barrier membrane under it.
- It is recommended to trim all irregularities on the slate cut with a grinder, the power of which will be enough up to one kW, with a disc diameter of up to 1.8 cm and a thickness of up to 1.6 mm - this is the optimal solution; if you use a thick abrasive disc, then you can get bogged down in the slate, and a thin one, on the contrary, will not be able to cut it at all. Carry out the pruning very carefully, smoothly and slowly lower it so as not to provoke the formation of cracks and chips along the edges. As a result of such trimming, slate dust is formed containing asbestos, which is harmful to health, in this case, it is required to process a freshly sawn cut with acrylic paint on water based... Work in a respirator.

To extend the life of the roof, it will be good to treat the surface with an antiseptic - this will protect against swelling and reproduction of mosses, and if you apply paint to the laid slate, then you can provide protection against the effects of various atmospheric influences and precipitation.
In the case of laying flat slate, the crate should be made continuous, and before installing it, it is proposed to draw a grid, along the cells of which such sheets will be laid. Flat sheets can be laid on a surface that has a slope of a little more than twenty degrees, using the same technology as that of a wave.
The slate roofing device ends with the installation of gutters, under which it is required to lay roofing material. Next, make a drainage system, put on an iron apron on the chimney and ventilation pipe.

Summary
At self-styling you can save a lot without hiring professional specialists. And do not forget to stock up on slate sheets, although they are heavy and dense, they are fragile, which can lead to accidental and unaccounted for damage to the roofing material.

