Epoxy resin for bulk floors. Epoxy self-leveling floors, cost and work plan Filling the floor with epoxy resin yourself
It would seem that modern parquet or laminate has all necessary qualities and is able to satisfy the most demanding owner of an apartment or house. But progress does not stand still, and with the advent and widespread underfloor heating technology instead of traditional wood parquet boards and slabs, a self-leveling bulk floor began to be used everywhere. The use of polymers instead of capricious and expensive wood made it possible to design a polyurethane or epoxy self-leveling floor in a completely new, amazing form using graphics and 3D images.
What is epoxy flooring
In fact, this is a self-leveling self-leveling floor, based on traditional acrylic or cement materials modified epoxy resins are used. But in this case, the epoxy coating acts as a finishing self-leveling floor, and in no case is intended to replace the cement-based self-leveling floor, but rather serves as an addition to the polymer concrete base.

The optimal service life of a modern floor is usually limited to ten, maximum fifteen years, after which outer layer have to be overhauled and replaced with a new one. At the same time, the degree of wear of the top layer of the floor covering rarely exceeds 1%, so it is easier and cheaper to make the floor in the form of a monolithic epoxy, polyurethane or methyl mass a few millimeters thick.
The use of epoxy resins for shaping finish coat floor allows you to get new qualities that are practically unattainable using other methods and materials:
- Absolutely dense glassy coating has almost zero water absorption and very high dielectric constant. Even if there is water standing on the surface of a heated epoxy self-leveling floor for a week, this will not lead to leaks or short circuit in the electrical wiring system;
- Wear resistance self-levelling epoxy coating can compete only with self-leveling polyurethane flooring, concrete or ceramics. At the same time, unlike the latter, the epoxy floor does not emit dust, is not afraid of temperature changes and the effects of oil, alkalis, acids, any detergents and aggressive substances;
- Bulk warm floor based on epoxy polymers is much thinner, stronger and more durable than any other modern coatings.
For your information! The small thickness of the bulk epoxy layer, only 2-3 mm, can reduce losses during the operation of a warm floor by 20-25% compared to polymer cement screed and even laminate flooring.

Epoxy polymers in the cured state initially appeared in workshops and laboratories of enterprises engaged in the production of chips and components of microelectronics and precision optics. Today, an industrial self-leveling floor has become an invariable attribute of most high-tech industries, wherever a chemically inert, hard coating is required that does not collect dust and vapors of substances in the air. Epoxy self-leveling floors came to "taste" operating rooms and infectious disease departments of hospitals, commercial offices of companies seeking to give the design of the premises an exceptionally expressive look.
But a truly self-leveling floor became popular after the emergence and spread of fashion for the use of 3D decor, photo wallpapers and author's graphics in the interior of apartments and offices.

Important! The use of transparent, almost colorless epoxy allows the most complex three-dimensional patterns to be applied to the floor, creating the illusion of a three-dimensional image and completely changing the perception of a living space.
Glossy self-leveling floor makes it possible to hide and disguise geometry defects separate parts premises without resorting to traditional finishing and leveling walls with drywall.
In order to reliably protect the warm floor, a coating with a thickness of 1.5-3 mm is sufficient. In practice, self-leveling floors are often made thicker and in several layers for several reasons:
- Firstly, the finished self-leveling floor with a glossy surface shows the imperfections and unevenness of the base very well, so the quality of the preparation for epoxy coatings must be very high. The use of two or three layers allows you to make it as flat and durable as possible;
- Secondly, unlike polymer cement, polyurethane flooring and methacrylate, the "life" ready mix 20-25 minutes are calculated. at room temperature. The higher the temperature, the faster the viscosity of the composition increases, therefore, in order to obtain an ideal mirror of a self-leveling floor, pouring and leveling the mixture must be done as quickly and efficiently as possible.
High quality is achieved through chemical principle curing through the use of a hardener. If cooking bulk mixture exactly in accordance with the requirements of the technology, then the poured epoxy mass simply hardens without shrinkage, sweating and the release of solvent vapors, volatile substances.

Epoxy screed toxicity
Often, builders and craftsmen involved in laying self-leveling floors voice information about the dangers of epoxy compositions for human health. There is a certain amount of truth in such statements, but with one caveat. The toxicity or harmfulness of an epoxy composition depends on several factors:
- Epoxy grades. Today, there are several dozen brands of epoxy resins and hardener options, some of them are used only for industrial purposes. If you try to use such a mixture for home use, you can get serious poisoning;
- Epoxy resin and hardener qualities, the degree of their purification during synthesis. All branded materials for arranging self-leveling floors are maximally purified from epichlorohydrin, maleic and phthalic anhydride;
- Compliance with the technology of preparation of the mixture. To attain maximum strength and the quality of the polymer, it is necessary to maintain the recommended proportions very accurately, mix the components thoroughly with a hand or electric mixer.
After the polymer has cured, all dissolved components are sealed in the vitreous mass. Microdoses of unreacted substances, even when the floor is heated, cannot evaporate and stand out on the floor surface.
The only condition that must be observed when working with epoxy self-leveling floors is the non-use of water or polar alcohol-containing solvents. Even a small amount of these substances that have fallen on the base or added to the polymer composition can render the expensive adhesive mass unusable.
Technology of work with self-leveling epoxy floor
Experts recommend pouring the floor on polymer base in three stages. At the first stage, a concrete or wooden base is prepared for pouring the adhesive mass. Next, an intermediate epoxy layer is made, which is leveled and cleaned with the highest possible accuracy, after which it is applied decorative layer epoxy material with filler and coloring toner.

Foundation preparation procedure
The first stage of preparing a concrete pad for a self-leveling floor is practically no different from similar operations for other types of self-leveling filler coatings. Initially, concrete is cleaned from layers and bumps with a conventional grinder. Cavities and potholes are rubbed with polymer concrete mass. To reduce the consumption of expensive epoxy resin, most of the screed and leveling work is done with concrete or acrylic compounds, planning a total layer of 10-15 mm thick for the self-leveling epoxy floor.
If the self-leveling floor is supposed to be laid on a wooden base, the boards will need to be sewn together, freed from paint and strengthened so that under the weight of a person there is no deflection characteristic of a wooden floor. The cracks are sealed with adhesive tape, after which the floor surface is covered with one layer of epoxy varnish.

After setting and shrinkage of concrete, the procedure for leveling the plane of the future floor is repeated, but already using screw supports - beacons, a building, preferably a laser three-beam level. If it is planned to lay a film heating system, then the final leveling for the final casting is carried out after laying the intermediate epoxy layer.

How to pour a self-leveling epoxy floor
To ensure normal adhesion of the self-leveling floor to concrete, it will be necessary to prime the surface special composition supplied with epoxy. After the primer has set, a damper tape is laid out along the walls, providing a gap between the floor and the vertical surface. To control the level of the future floor, it is best to install a horizontal laser level or a conventional bubble tool.

After preparing the mixture, the container is poured onto the base with a tape, then the mixture is leveled by the rule along the screw beacons or the laser beam. To remove air from bulk composition, the poured mixture is intensively compacted with a spiked roller. After a couple of hours, the mixture sets to low tide, but the floor gains its final strength after 4-5 days.
Conclusion
For the formation of complex three-dimensional images, up to 5 layers of epoxy mixture can be used, therefore, when calculating the required amount of bulk material, it is necessary to take into account an overrun of 10%, which inevitably occurs due to mass sticking to containers and working tools. The multi-layer method is often used for bathrooms and kitchens, wherever there is a risk of damage to the floor surface. dropped objects. In other rooms - bedrooms, living rooms, hallways or corridors, you can fill the floor in one or two steps.
Polymeric epoxy floors are used for finishing not only industrial, but also residential premises. They represent enough solid construction, which, contrary to popular belief, does not pose any danger to human health. Epoxy self-leveling floor can often be seen in airports, private homes and restaurants.
What is this material?
Epoxy floor coating is a two-component composition based on a hardener and epoxy resin. The mixture also includes:
- Pigments that give the emulsion the desired shade;
- Fillers;
- Special additives that during pouring provide uniform distribution floor emulsions.
Thanks to this composition, the filling of floors with epoxy resins is greatly simplified. In this case, the coating is obtained not only seamless and smooth, but also very durable.
It should also be noted that this two-component material has pronounced antistatic properties and good vapor permeability. At the same time, the polymer epoxy floor coating may vary in texture:
- matte and semi-matte;
- glossy and semi-gloss.
Where are they applied?

This type of coating is subject to certain requirements, enshrined in the relevant standard (GOST-R 50766-95), according to which, epoxy-polyester floor coating can be used in pharmaceutical and food industries, printing houses, as well as workshops specializing in electronics.
To date, the scope of application of two-component emulsions based on epoxy resins has expanded significantly. They have also been used in:
- educational institutions;
- clubs, cafes and restaurants;
- luxury apartments;
- medical institutions;
- private and multi-apartment buildings.
Note: Epoxy flooring can be poured not only indoors closed type but also in open areas. This is possible due to the excellent performance characteristics of the material.
What are the pros and cons?

Epoxy flooring materials have become very popular for a reason. After all, they have a large number advantages compared to other types of floors:
- Ease of care. Epoxy flooring is very easy to wash and clean. It is much easier to care for them than, for example, for a parquet surface;
- Significant temperature differences do not affect the quality of the material. For this reason, they can be easily used even in baths. If you leave epoxy liquid floors on winter period in an unheated room, their surface will not crack and burst;
- Due to the solidity of the coating, there are no places of significant accumulation of dirt on the floor;
- Wear resistance. Epoxy resin floors laid in compliance with technological process, will last for decades. Moreover, due to the maintainability of the material, scratches, chips and dents are very easy to eliminate. This will require a regular brush and a transparent epoxy;
- Resistance to chemical influence(solutions, acids, alkalis);
- Good waterproofing. If you decide to use this type of flooring, you do not have to think about additional waterproofing of the room. The polymer solution itself will cope with this task.
True, epoxy liquid floors are not without drawbacks, they are also worth mentioning:
- Price. The material itself costs a lot of money, in addition, it is necessary to take into account the cost of work carried out by specialists in pouring the emulsion;
- Any type of damage is very visible on the surface;
- Since epoxy flooring is a monolith, it will be very problematic to dismantle it.
Coating types

A modern manufacturer is able to offer the consumer many types of epoxy textures. They are specially made for specific operating conditions, so they must also be taken into account:
- Thin-layer. During the pouring of such an emulsion, a layer with a thickness of about 1 mm is formed. Despite the dubious thickness of the surface, it copes well with mechanical and chemical loads;
- Thick-layer. Unlike previous version, this design may not be single-layer. The thickness of one layer also does not exceed 1 mm. But due to the application of several layers, the floor is very durable. It easily copes with chemical reagents and mechanical loads. Now such materials are often used in housing construction;
- Quartz coating. Quartz sand is added to the bottom layer of the composition, which improves the adhesion of the bottom and upper layers. The material is resistant to almost any kind of load, which makes it very durable and reliable. Such a floor covering can even be decorated for a certain interior of the room;
- Epoxy industrial floors used in the construction of industrial facilities. They are able to withstand enormous loads of both mechanical and chemical nature. At the same time, epoxy bulk coating floors can be one or two layers, multi-colored or plain, matte or glossy, rough or very smooth.
Quite serious requirements are imposed on this type of floors:
- environmental Safety;
- safety while walking on the surface;
- fire safety.
Criterias of choice

If you decide to purchase epoxy-polyamide flooring materials, consider the product selection tips offered by experts:
- You can fill the floor not only indoors, but also in the garage, since the temperature difference for the coating is not terrible;
- The composition of emulsions may vary. It all depends on the purpose of the coverage. For significant dynamic loads, one type of emulsion is suitable, for chemical action - the second, and for current non-conduction - the third;
- aesthetic component. Most likely, for industrial premises, this criterion is not very important, but for restaurants and private dwellings, this is the main thing. Epoxy flooring mixes can be of all kinds of colors and shades, even with the presence of patterns and ornaments. You can also purchase materials with a 3D effect that will decorate the interior of any room.
How to fill?
If you decide to pour epoxy self-leveling floors with your own hands, you need to take into account a lot of nuances when carrying out construction work. Regardless of which type of liquid floor you choose, the application technology will be the same.
Foundation preparation

- First you need to prepare the base. If you are going to pour on a concrete base, please note that the temperature in the room should not be below 5 degrees;
- Also, you can not start work if the humidity in the room is above 75-80%;
- At this stage, you need to detect and eliminate all defects on the coating (dents, chips). To cope with the task, use the usual cement mortar;
- If the surface is very large, preliminary grinding and polishing in this matter will not hurt;
- take away construction garbage and dust generated after grinding.
Surface priming
- Then the floor needs to be primed. This stage is needed in order to improve the adhesion of the base to the liquid emulsion;
- When the primer dries, sprinkle the floor with quartz sand. Only then will the base be ready for pouring.
The video and photo show the implementation of all preparatory work taking into account the characteristics of the room and the base of the floor (metal, concrete, wood).
Applying the base coat

- When the primer is completely dry (at least a day), proceed to pour the base layer;
- The self-leveling polymer product is applied in strips;
- To evenly distribute the composition, use a doctor blade. Then the layer thickness will be the same over the entire area;
- To distribute the emulsion in the corners of the room, you can use a spatula;
- To prevent air bubbles from forming in the coating, roll the entire surface with a special roller with needles;
- By the way, you should also be wearing paint shoes that will not leave marks on the floor.
Applying the final layer
- This stage of laying is practically no different from the previous version. To fix the effect, you can apply polyurethane varnish. It will make the surface of the floor glossy;
- Wait until the varnish dries. This will take at least 2 days.
As you can see, pouring an epoxy floor with your own hands is not so difficult. The material is laid by the method of monolithic casting. In this case, there are no joints between the sections. If necessary, decorative layers can be applied zoned. It is not uncommon for professionals to refer to these areas as chips. According to the design project, finishing layer you can install different decorative elements that visually divide the room into zones.
Private construction often includes the manufacture of the floor. There is a wide variety of flooring types. The most common materials that are widely used for the manufacture of floors are the following: laminate, linoleum, parquet, concrete and others. Special place occupy the so-called liquid polymeric materials. They are now being used more and more. Among the polymeric materials, it is necessary to highlight epoxy, which are also found when applying the finish coating for the floor.
The optimal density of the self-leveling floor layer for an apartment is 1.5 mm.
Unlike conventional building materials, epoxy self-leveling floors have excellent performance characteristics. This floor has no seams, joints. When applying such a layer, the surface is absolutely smooth and sealed, which greatly simplifies construction works. Epoxy self-leveling floors are successfully used for office and medical premises, restaurants and industrial facilities. In apartments, such materials began to be used relatively recently. Let us consider in more detail what features epoxy self-leveling floors have, the material pouring technology.
Advantages and disadvantages

Self-levelling epoxy floors have whole line positive characteristics. Epoxy resin is a two-component material, which includes epoxy resin and a hardener. Such a coating is homogeneous, since the process of pouring the floor is carried out in one go. The result is a seamless surface. Such self-leveling floors protect the underlying layers from the penetration of moisture, microorganisms (bacteria, viruses, fungi), as well as from corrosion. Self-leveling floors are hygienically clean and safe for humans and animals. They do not emit harmful chemicals from their surface.
Epoxy floors can be washed due to their smooth surface. TO positive aspects such a coating can also be attributed to chemical resistance. Epoxy floors can withstand exposure to any chemical agents, including alkalis and acids. For safety reasons, you can choose a certain type of coating, which ensures the fire safety of the floor. It is important that epoxy floors are not slippery at all, the risk of injury on them is minimal.
Thus, the epoxy coating is durable and resistant, including mechanical stress. It is UV resistant and high temperatures. The disadvantages include the fact that when dismantling the floor, such a coating is quite difficult to remove. In addition, with irrational use, the surface of such a floor can become brittle and be subject to destruction. It is also possible for plasticizers to escape from the thickness of the material, which will lead to a violation of the integrity of the coating.
Preparatory work

Rules for preparing the base for the installation of a self-leveling floor.
The flooring technology includes preparatory stage work. It consists in leveling the base and dismantling the old coating. Depending on the type of old floor, the procedure for preparing the base will be different. If there is an old coating, then it must be removed. After that, the surface is leveled. You will also need to clean it from dust, dirt and debris. If the base of the floor is made of concrete, then it is necessary to give it an even outline. For this use grinding machine or grinder with a diamond nozzle. Grinding is needed to eliminate cracks and pores, which can eventually lead to the destruction of the floor.
The thickness of the layer that is removed is on average 1 mm. The next step is cleaning the floor and applying disinfectants. Next is the application of the primer. The primer roughens the surface and improves adhesion. polymer material. In some cases, it is necessary to resort to leveling the floor by pouring cement or concrete screed. An alternative option is the use of coating materials (mastic). As for the preparation of a wooden base, this is not the most a good option for the manufacture of liquid floors. The thing is that the tree is able to absorb moisture, which will affect the quality of the coating.
Preparation of a wooden base includes removing a layer of paint, sanding the surface with sandpaper and applying a deformation tape. The tape is glued along the perimeter of the room at the points of contact of the liquid floor with the walls. Of great importance is the fact that immediately before pouring the solution, a reinforcing mesh is laid on the base of the floor. If the base of the floor is presented ceramic tiles, then the destroyed slabs are removed and cement mortar is laid in their place. After that, the surface is cleaned, degreased. Next, a layer of primer is applied.
Surface priming
The technology of self-leveling floors includes such a stage as priming.

The primer is applied only on a dry surface. It is important that after cleaning the surface of dust, you must wait 2 hours. The primer is sold in a semi-liquid form, but it must be diluted in water according to the attached instructions. It is better to apply a primer immediately to the entire surface of the floor. This is done with a roller or other device. The type of primer is selected depending on the type of coating. It is recommended to use a primer with antiseptic properties. The number of layers is from 1 to 3.
If shiny spots soon appear, it is required to determine the presence or absence of contaminants on them. They will need to be removed and a layer of primer applied again. After the first layer dries, you can apply the second. The floor plane must be perfect. Small slopes are possible (no more than 2 mm per 2 sq.m of area). Of great importance is the fact that the building must be provided with waterproofing against ingress ground water. This is especially important for rooms located close to the ground.
Requirements for the premises

Epoxy floors can not always be poured. There are certain restrictions. In order for epoxy floors to be erected without difficulty, a certain temperature and humidity regime must be observed in the room. The temperature of the base of the floor and air should be between +5 and +25 degrees. The polymer-based material itself should have a temperature of 15-25 degrees. Relative humidity during repairs should not exceed 80%. Substrate moisture is of great importance. Its maximum value is 4 mass fractions percent. As for the conditions of transportation, there are also some nuances here. The storage temperature of the epoxy polymer is from -30 to +30 degrees.
To check the moisture content of the base, it is advisable to use improvised means, for example, polyethylene. It is attached to the base of the floor close and left in this position for a day. After that, the film is removed. If water drops appear on the inside, and the surface has somewhat changed color, then such a floor is unsuitable for pouring a polymer mixture.
Applying the base coat

The technology of pouring the floor includes the application of the very first, base layer. As it is used epoxy primer. It is very easy to prepare. To do this, mix both components present in the package and let them stand for 3 minutes. After that, you can apply the mixture to the base of the floor. The finished epoxy primer is poured onto the floor in a snake or stripes. After that, it is distributed over the surface using flat metal spatulas or rollers. It must be remembered that the layer dries out on average in 18-24 hours. Epoxy primer is applied in a layer of 1.5 mm. It is necessary to eliminate small defects and closing pores. The consumption of the mixture is approximately 400 g per 1 sq.m. When distributing the solution, the formation of thick sections and puddles is not allowed.
After about 20 minutes, sand is poured onto the surface of the epoxy primer at a rate of 1.5 kg/m. The pouring process is carried out in special flat feet. After applying the base layer, you can not walk on it for 12-24 hours. After the layer has hardened, you will need to remove excess sand. To do this, you need to have a brush on hand. After all this, the surface is cleaned of dust and sealed. To do this, the pre-prepared self-leveling floor is applied to the base floor with spatulas using the sdir method. After the base layer, you can apply a decorative layer, but this is not necessary. As it can be used films with decorative drawings or other materials.
Applying the finish coat

Self-leveling floor device with 3D effect.
Bulk floors involve the application of the top layer. The mixture is prepared in the same way as when using epoxy primer, only it includes pre-mixing the first component of the mixture. You will need a mixer or mixer. The mixer must have a power of at least 1.5 kW. Do not use needle mixers. It is recommended to immerse the mixer completely in the container so that the components mix better. It is important that the pouring of the epoxy solution is carried out in such a way that each subsequent batch should be poured no later than 40 minutes from the beginning of the previous one. This affects the quality of the connection.
It is recommended to do before pouring the main layer expansion joints. A squeegee is used to control the layer thickness. Of particular importance is the procedure for removing air from the material. A needle roller is best suited for this purpose. It shouldn't be dirty. Poured face layer in the same way as the base. Its thickness is 1-2 mm. It is necessary to ensure that the solution does not fall on the walls when pouring, otherwise it will be very difficult to remove it. The hardening time depends on its temperature. On average, it is 12-24 hours. The floor is left open, it is not recommended to spill liquids on it. At the end of the work, the insulating tape is removed. Possible gaps are filled with sealant. Self-leveling floors are ready. Walking on the floor is recommended only after three days.
List of tools and materials
In order to make self-leveling floors, it is necessary to have a whole list of tools and materials available. It includes:

Special shoes for aeration work.
- brush;
- hammer;
- nail puller;
- spatulas;
- scraper;
- needle roller;
- building or water level;
- roulette;
- mixer;
- solution containers;
- sandpaper.
In addition, you will need:
- polyethylene film;
- sealant;
- insulating tape;
- primer, plaster;
- cement mortar;
- water, gloves;
- special footwear for workers;
- mask or respirator.
Thus, if you follow the entire technology of pouring and surface preparation, self-leveling floors will turn out to be even, beautiful and will serve their owner for many years.
Epoxy self-leveling floor is a strong single structure, absolutely harmless to health and easy to clean. Yes, that's exactly it beautiful coverage, which can be increasingly found in restaurants, airports and luxury apartments. In addition, due to its environmental friendliness, such a coating is quite popular in children's institutions and hospitals. Solid pluses! Do you dream of pouring such a floor into own apartment? Now we will tell you how to do it.
Self-leveling epoxy floors are rightfully considered one of the most resistant to moisture and aggressive chemicals: acids, alkalis and solvents. Such floors can be washed with hot water and almost any detergent, which is why they are preferred to be arranged in various laboratories, rooms with high humidity and in residential buildings.
Epoxy self-leveling floors are also valuable for their unique maintainability: in the case of a deep scratch or crack, just one stroke of the brush is enough, while with polyurethane you will have to tinker.
Let's note the equally important advantages of epoxy self-leveling floors:
- Ease of operation. Epoxy flooring is a perfectly even base, which is no more difficult to care for than varnished parquet.
- Resistance to temperature changes. You can make such a floor in the bath with peace of mind: neither heat, nor steam, nor unheated winter months will damage such a coating.
- No joints. More dirt will not get anywhere.
- Wear resistance. The durability of this coating will surprise you.
- Variety of colors and opportunities exclusive design design.
And the biggest advantage of an epoxy self-leveling floor is that it no longer needs to be additionally waterproofed - this is already a kind of waterproofing!
But keep in mind that dismantling such a floor is practically impossible - it is much easier to make another one directly on it with a second layer.

Myths and truths about the sustainability of epoxy floors
It turns out that there really is such a fear among the inhabitants, which is why many refuse to make such a beautiful floor covering at home. But in fact, among all the thermoplastic resins that we breathe every day (just get out of the house), epoxy resins are the most harmless. In the solid state, they are absolutely environmentally friendly. Of course, heating is just as undesirable for them as for ordinary natural wood, which emits resins under such conditions.
Well, let's list exactly what possible fumes today scare some and give rise to many myths:
- Epichlorohydrin. It irritates the skin and mucous membranes, causes bronchitis, and has a bad effect on the vascular system.
- Anhydrides. May cause severe suffocation.
- Toluene. If you breathe it for a long time, then the process of hematopoiesis will be disrupted.
- Hexamethyldiamine. If it gets into the eyes, it will reach necrosis.
- Polyethylpolyamine. Gets on the skin - there will be very unpleasant sensations.
But all these volatile substances in the amount of 3-5% stand out only when applying floor layers! During polymerization, they completely come out, and exactly after a week there is already no trace of them in the room. That's when epoxy flooring is considered 100% environmentally friendly and safe even for children. Until then, you must protect your eyes, lungs, and skin.
Yes, polymer floors do not consist of natural materials, but in terms of their sanitary and hygienic characteristics they are very close to them. You can always learn about this from quality certificates. Although it is worth noting that among epoxy floors there are also brands that can fully guarantee safety even during the work itself.
How to pour such a floor yourself? The essence of the process is extremely simple: first, a base is prepared, which must be firmly grasped with base layer, and epoxy resin is already poured on it. And it dries fairly quickly. And it doesn't smell anymore.

Chips, flocks and sparkles: how to create a masterpiece?
If in your interior design, although beautiful, but the monochromatic floor does not fit into the idea, then you can easily make it decorative even at the pouring stage. So, the easiest way is to use various mixtures: flocks, glitters and acrylic "chips". With their help, you can give the self-leveling floor any texture, even marble.
Flocks for such a floor are monochrome and two-color, in the form of straws or scales, or even as sparkles. Most often for residential premises, epoxy floors are poured with flock "mixes" of pastel colors.
Glitters today are used holographic, aluminum, polyester and iris. The most beautiful of them are polyester: gold, silver, blue, red and green shiny particles of a special hexagonal shape. But iris glitters are iridescent iridescent particles of the most different colors. Moreover, such glitters can be made in the form of hearts, stars and crescents. Everything to your taste!
Please note that there is a difference in that the chips are always scattered on the main polymer layer, and glitters can also be applied to the top coat.

Let's take a closer look at the device technology of such a floor:
- Step 1. We prepare the base. Most suitable is a flat concrete floor, additionally processed with a grinding or shot blasting machine.
- Step 2. Now we apply a highly penetrating primer, which will improve the adhesion of the floor to the base.
- Step 3. Next, pour a pre-prepared mixture of epoxy resins with quartz sand onto the floor.
- Step 4. We lay out the filler or also the image, if the design suggests it.
- Step 5. Fill with clear epoxy varnish.
An example of the work on the video slideshow:
You will be surprised to learn that just the same transparent epoxy floor is several times cheaper than the same white. By the way, among those who have already given free rein to their imagination with a transparent colorless epoxy floor, the most positive reviews about the Durafill brand. Under this layer on epoxy paint, you can lay out not only photographs or shells, but also silver or bronze powder - now there is no problem getting it.
But oil paints you can’t draw under such a layer - the epoxy will not stick later. Therefore, for those who like to be creative, it is better to just take a few different colors of the self-leveling floor and make a neat drawing. But you can paint an epoxy coating with acrylic paints: for this, use stencils and fashionable vinyl stickers.
All this filling plays a huge role in floor design: firstly, with the help of such "chips" you can easily highlight a certain area of the interior, stylize drawings or patterns and significantly reduce the reflective ability of self-leveling floors, which is not to everyone's liking. Secondly, "chips" give self-leveling floors additional anti-slip effect. The polymer coating really does not look so smooth with them anymore - all because of the protruding uneven edges of the filler. Plus, in this way it is convenient to visually hide the unevenness of the floor.

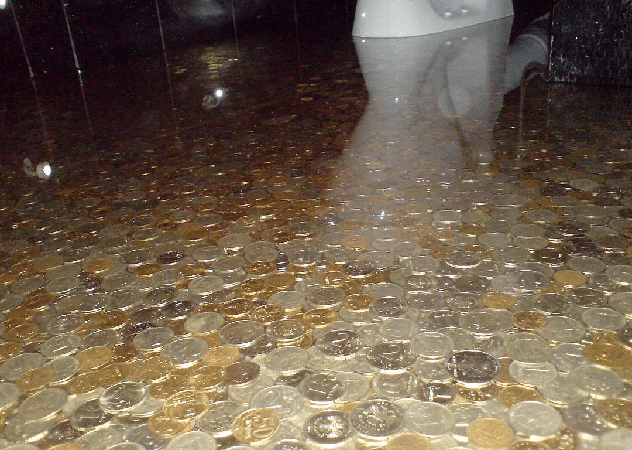
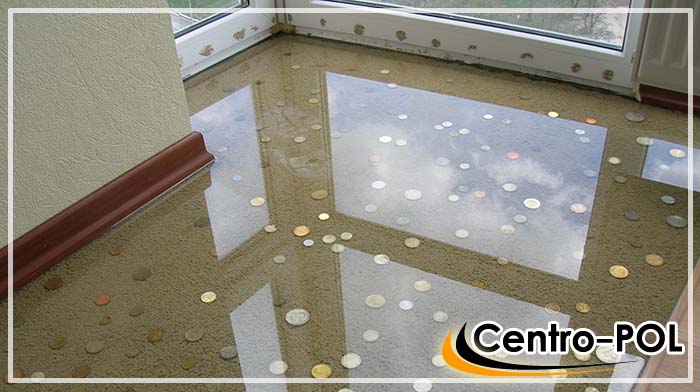
Golden 3D floor made of coins - looks great!
If you decide to make small items such as coins, shells and glasses the main element of the decor, then be sure to sketch in advance what you want to end up with. The objects themselves would be better to fill in on the same photo printing: for example, shells - as if at the bottom of the river, coins - on the golden sands. It is also very beautiful when the old ones are “rolled up”. Wrist Watch or family photos.
Moreover, in our time, even a box of matches cannot be bought at a kiosk for just a trifle. And many townsfolk have already accumulated one three-liter jar with this "wealth". Look at these photos, maybe you were waiting for just such a moment?

If the room already has a self-leveling floor and you want to redo it completely or partially, then you may be interested in our material:.
And such a 3D composition looks simply amazing, especially if the coins are cleaned in advance. And if they are not only domestic, but also from all possible countries. So here's what to do:
- Step 1. We clean the surface and measure the area of the future coating. Lay out a space of 10x10 cm with coins, calculate how many of them it took and you will know how much you need for the whole room. The formula is simple: number of coins x 100 x number of square meters rooms.
- Step 2. Make the floor perfectly smooth: sand and grind all the bumps, and fill the cracks with cement.
- Step 3. Using detergent degrease and wash the floor well. Dry.
- Step 4. Cut the self-adhesive fiberglass into individual squares of the same size - as many as you need for the room.
- Step 5. Arrange the coins on the cut out squares - this is quite easy and fast.
- STEP 6. Start laying out the fiberglass with the coins, starting at the back of the room and gradually moving towards the door. Press the tiles firmly to the floor.
- Step 7. Prepare an adhesive solution in water and fill the floor with coins with it - this will help fill in all the gaps between them. Let this floor sit for at least 72 hours.
- Step 8. Mix the epoxy sealant with the UV blocker and pour over the entire coating. That's all!
Without a shadow of a doubt, the coin floor can be called the most real 3D in the full sense of the word - after all, here the decor is really presented in a three-dimensional version. Photos of the mint floor always turn out to be not very impressive, but in reality walking on such a coating is a pleasure. Why not Uncle Scrooge's pool?
Self-leveling epoxy floors are found today not only in the premises where the production of the chemical industry is based, in factory floors and garages with significant mechanical loads. Increasingly, polymer floors are being designed in halls public buildings and facilities, in shopping malls and supermarkets. Sometimes epoxy floors can be found even in private houses and apartments.
Strength and beauty
Epoxy flooring is a solid polymer bulk coating that is resistant to mechanical stress and impact. chemical substances. The thickness of the layer varies depending on the purpose of the room from 0.2 to 10 mm. The usual composition of self-leveling epoxy floors:
- the foundation- epoxy resins;
- hardener– carboxylic acids, their anhydrides and diamines.
If self-leveling floors are planned for laying in public areas, a filler is added to the mixture - tinted quartz sand, colored chips, and so on. The imagination of designers when arranging floor coverings for restaurants, bars, hotel lobbies is not limited by anything. Special decorative elements, as well as colorful banners, are placed on the primed base before pouring epoxy self-leveling floors. The recommended layer thickness when laying chips under it is 3.5 mm.
Three types of polymer coatings - the right choice
For the base device, manufacturers produce many materials that differ in quality and cost. The price, as well as the degree of complexity of the work performed, determines the final costs. Depending on the conditions for further use of the premises, one of the three main types of polymer coatings is chosen:
- thin layer. Its thickness is less than 1 mm, after preparing the base, grinding it with a mosaic grinder, removing dust, a double layer of primer is applied and painted with a polymer mixture in two stages. Such floors have good strength and resistance to liquid penetration, well withstand the loads from the movement of people. Scope - rooms with low humidity, back rooms of car washes, canteens. They are suitable for a temporary solution to the problem of dust in the destruction of a concrete monolith in garages and small warehouses.
- Bulk.The thickness of the layer in this case is over 1 mm. After the usual preparation and priming, an intermediate coat of epoxy mixed with a hardener is applied. Finishing floors are poured after complete hardening of the draft. These high-strength substrates are resistant to moisture, traffic, acids and alkalis. Self-leveling floors are used in car washes, confectionery shops and large kitchens, at dairies, in laboratories of chemical industry enterprises. Due to the aesthetic appeal, epoxy floors equipped with this method are used in office buildings for various purposes, in apartments and houses.
- With quartz filler. TO conventional technology powdering of the rough layer with quartz sand is added. This material allows to achieve excellent wear resistance and impact resistance, extends the service life of the coating. Its thickness in some cases reaches 1 cm, it endures mechanical loads from the movement of heavy vehicles, the movement of goods. Scope - large motor transport enterprises, shops of the metallurgical industry, oil refineries, where aggressive chemical environment appears most active.
If necessary, the finishing layer of the polymer base of the floor is sprinkled with quartz sand. In this way, an anti-slip surface is obtained, which is necessary in conditions of high humidity. In rooms where explosives are stored, in explosive industries there should be no accumulation of static electricity. Here to floor coverings special requirements are imposed, first of all - antistatic. It is achieved by applying a conductive primer, sticking a copper tape on it, and coating it with an antistatic compound.
Advantages and disadvantages - what more?

Epoxy floor– aesthetic coating, seamless, perfectly smooth and glossy. However, they choose it not only because of its beauty and decorativeness. Among its other advantages:
- wear resistance - high mechanical loads, common in industrial facilities and sports grounds, do not violate the integrity of the surface layer;
- durability - service life reaches 15 years;
- monolithic hardness and lack of dust - ideal conditions for garages and warehouses;
- resistance to aggressive chemical compounds and moisture penetration - epoxy self-leveling floors are usually arranged in the working premises of food and chemical industries;
- fire safety - the components that make up the coating do not support combustion;
- ease of cleaning - the ideal surface is cleaned with minimal labor, both manually and mechanized.
For polymer bulk foundations many benefits. Before the final choice, you should familiarize yourself with their shortcomings. They exist, although they are minor:
- the plasticizer sometimes evaporates over time;
- low elasticity due to increased hardness.
The disadvantages include the inability of the material to bridge the cracks, but this problem is being solved. proper preparation floor bases. In general, small flaws are more than offset by advantages.
Safety and security
Previously, epoxy coatings were installed only in industrial premises, where special strength and wear resistance were required, and the stay of people was only episodic. The reason for this is the fear that building materials made from epoxy resins can harm the human body. Ideas about its harmfulness did not arise from scratch. On the surface of any package containing epoxy flooring components, information about safety measures when working with these materials is necessarily contained.
Why do self-leveling floors today decorate the halls and corridors of public buildings, schools and even kindergartens? Moreover, colorful coatings become an element of decor. modern apartments. The reason is that harmful substances released and volatilized exclusively during installation, until the materials have hardened. When performing work, builders use special means protection. As a result, they get an excellent result - a durable, beautiful and absolutely safe polymer floor.
Modernization and repair - preparation of concrete floor base
 Even the most durable concrete over time, under the influence of moisture and temperature changes, it begins to become covered with microcracks and dust. If the process has begun, it proceeds like an avalanche. V concrete base cracks, chips and potholes appear, it is required urgent repair. Normal repair of damage concrete mix solves the problem for a while. To achieve good strength and durability, other technologies are required.
In such cases, the problem is easily solved by applying a concrete epoxy coating. It should be remembered that before the main work, high-quality preparatory work is required. Their complexity depends on the degree of damage to the concrete base.
- Smooth concrete with a small number of microcracks. Before the main work, it is vacuumed, degreased and primed.
- Concrete with large cracks and chips is puttied, dusted and primed.
- If the concrete is severely damaged, screed and primer must be applied before applying the epoxy coating.
Remember, the better the foundation preparation work is done, the more durable and strong the final result will be.
How to start a self-leveling floor?
 The basis for self-leveling floors is not only monolithic concrete, but also any hard, even surface with differences of no more than 2 mm per 1 m. If the floors are tiled with ceramic tiles, feel free to proceed with its putty and primer, this is a good basis for a durable coating. First of all, calculate the cost of work. If you plan to do the filling yourself, it is equal to the total cost of materials, tools and protective equipment. If you want to order a self-leveling floor installation for a team of builders, multiply the amount received by two, this will be the approximate cost of all work.
Usually home craftsmen independently perform pouring using the simplest technology, more complex ones require considerable costs for tools and equipment. Before starting work, provide yourself with personal protective equipment: rubber gloves, goggles, respirator. If the base is prepared - it has been puttyed, sanded, dusted and primed, it's time to start pouring epoxy floors.
7 stages of flooring
- One- or two-part epoxy mixture is thoroughly kneaded with a construction mixer. Remember that the prepared mortar hardens in about 30 minutes, during which time it must be laid and leveled.
- The application of the finished mixture is carried out along the wall farthest from the door, leveled towards the center of the room, topped up and leveled again until the mortar runs out. The thickness of the draft layer is from 1 to 1.5 mm.
- The solution distributed over the surface is finally leveled with a special metal spatula to achieve a straight surface of the rough coating.
- In most cases, the base self-leveling floor is strengthened; for this, 15 minutes after laying, it is covered with quartz sand. After the mixture has completely dried, excess sand is removed from its surface with a brush, and preferably with a vacuum cleaner.
- Prepare the second portion of the mixture for the final front layer. Its amount is calculated based on the consumption of 400 g of the mixture per 1 m 2.
- The freshly prepared solution is evenly distributed, leveled with metal spatulas. After 10 minutes, the entire surface of the mixture is rolled with a roller to remove residual air from it.
- A week later, epoxy varnish is applied to the final front layer twice with a break in a day. At all stages of work in the room must be provided good ventilation and constant air temperature not lower than +12 and not higher than +25°С.
To ensure personal safety, be sure to use personal protective equipment. In order for the floors to last as long as possible, adhere to the requirements indicated on the packaging with the materials.

