Brick barbecue drawings. How to make a brazier out of bricks with your own hands: options and step-by-step instructions
A metal brazier is definitely good. But, in addition to functionality, I also want beauty, especially on the site: in the country or near the house. A brick barbecue gives an attractive look without sacrificing functionality. There are very simple models that can be folded, even without skill, in a day or two, there are more complex ones - whole complexes. We do not recommend folding such without experience, but try a simple barbecue oven or just a brick brazier. Master the masonry, the basic techniques, and then you can take on more serious projects.
Barbecue grill - what's the difference
There is no exact division between barbecues and barbecues. The main difference is that they cook on skewers on the grill, while berbekyu is made on a wire rack. But both of these cooking methods can be used even over a fire, so - for us in any case - that the grill, that the barbecue maker is one design.
It can also be classified by the presence of a roof. A brazier is always an open device, without a chimney. In barbecues, especially made of bricks, chimneys are often made, although there are also simple open models.
Simple brick grill
This design is very simple, easy to change to suit any needs and desires. It consists of brick walls, in which protrusions are arranged (the brick is placed on the edge). Heat-resistant sheets (metal, etc.), grates, skewers are placed on these ledges. Convenient, especially if there is some kind of roof over your head in case of precipitation, but it is built separately and at will.

Project and photo of the finished barbecue / barbecue made of bricks
Any brick building requires a foundation, or at least a prepared foundation. Not even this small brick barbecue. Since there are not many bricks - the wall is half a brick, a rammed platform lined with some kind of hard coating is suitable for this structure.
Preparation of the base
Remove the fertile layer, if necessary, deepen the pit. The depth should be about 20-25 cm. The dimensions of the foundation or platform are 50 cm larger than the dimensions of the furnace in all directions. The bottom is leveled, crushed stone of the middle fraction is poured onto it. The thickness of the crushed stone layer is 15 cm. It is well rammed. Desirable - a vibrating plate, if not, a metal or wooden rammer.
Further steps depend on the chosen base. If this is one of the coatings - paving stones, paving slabs and similar materials, then a layer of fine-grained sand is poured into which the coating is laid according to the level.
If a slab foundation is chosen as the base, it is reinforced with a rod of 10 mm in diameter. It is laid along and across the foundation with a step of 20 cm, at the intersection it is tied. If you do not know how to knit with special wire, you can pull it off with plastic clamps. Reinforcement with a finished thick wire mesh is allowed for this model. The formwork is exposed at the edges and everything is poured. Work can be started in a week if the average daily temperature was not lower than + 20 ° C, and after two, if it was + 17 ° C.
For this brick barbecue, a solid ceramic brick M200 is used. You can take a stove, but it is more expensive, you should not put fireclay: the temperatures are not the same and it loves moisture too much to feel normal in an open grill.
The masonry is carried out on a clay-sand mixture, to which a little cement is added for greater strength. For beginners, it is better to take a ready-made mixture for stoves, just not heat-resistant, without chamotte. Knead according to the instructions, the seam thickness is 3-5 mm, keep strictly. Constantly control the verticality of the walls and the horizontalness of the masonry. This is essential for the normal operation of the oven.

As you can see, everything is really very simple. Each odd row starts with a whole brick, an odd row starts with a half. In the 6th and 10th rows, bricks are placed on a spoon - sideways, and unfold across the main masonry. If you are making a barbecue - under the grate - in the same rows, the back wall is made of bricks, also placed on spoons, and to maintain the thickness of the masonry, they are placed in two rows, as well as the others - with dressing - offset seams. If you are going to use ka brazier - for skewers - put a brick on the back wall, also on a spoon, making a ledge in this area as well. In front, as a support for skewers, a profile metal pipe of small cross-section, cut to size, is used. In it, under the skewer, you can make recesses.
Starting from the 7th row, the laying is carried out only in half - right or left - as you like, but this layout is given under the frying chamber on the left - it is wider, and there is a table on the left. If the opposite is more convenient for you, do a mirror image of this order.
Brick is a hygroscopic material, in order to reduce the amount of moisture that it will "pull" from the base and extend its life, waterproofing is needed under the first row. You can lay rolled material in two layers (such as roofing material or waterproofing material), walk along the perimeter with a hydrophobic impregnation. A layer of waterproofing between the first and second row will not interfere.

This is what one of the variations of a brick barbecue looks like without a table (if you don't need it, just ignore this part)
After the brick brazier is folded, it is left to dry in warm weather for 1-2 days, in cooler weather - 3-5 days. Then you can conduct a test run. Approximate "equipment" is shown in the photo of the finished barbecue. In this version, three rows of protrusions are made: the upper one is for products, the middle one is for coals, and the lower one is for collecting burnt coals and ash.
In order for the folded brazier to serve more or less for a long time, it is desirable to cover it with a composition that reduces hygroscopicity. For this case, the KO-85 varnish is best suited. And it would also be nice to provide some kind of lid: to close it in case of rain and for the winter.
Brick BBQ with chimney: ordering
This barbecue option is a little more difficult, but also not the most difficult. The most important thing is that the combustion chamber here has a straight vault, and it is much easier to make it vaulted. The brick frying chamber is raised to a height of 90 cm, the total height - to the beginning of the pipe - 217.5 cm.

It all starts with the preparation of the foundation. For this barbecue oven, only a monolithic reinforced base (reinforcement pitch 15 cm) on a base compacted with rubble is suitable. On the dried foundation, waterproofing is spread in two layers, then laying begins. If barbecuing is done in a gazebo, the first row of masonry should start at floor level. If the foundation is lower, lay out an additional row (or two) bricks, and then begin laying according to the above diagram.

The first 9 rows do not require any special explanation. They are laid exactly according to the scheme, observing the order, using halves and cut bricks, if indicated on the plan. It is imperative to check the verticality of the resulting walls, as well as control the thickness of the mortar - 8-10 mm and the horizontal laying of each brick.
To control the thickness of the seam, you can use a reinforcement bar of the appropriate diameter. It is placed on the edge, the surface of the row is filled with a solution, the excess is cut off with a trowel just above the bar. After laying and tapping the bricks, an even seam is obtained - the bar does not allow the brick to go lower than necessary. The bar is then removed and shifted higher.
To be able to lay the 6th row (solid), after laying the 5th, put a strip of metal 4-5 mm thick, 40 mm wide. Length - slightly less than the furnace span - 1450 mm. Strips are needed 3 - one on the edge, two approximately in the middle of each row of bricks, or as indicated below (11th row).

The layout of the next rows of barbecue is clear. Only in the 12th row, pay attention - you need bricks sawn along. It should also be said that the 12th and 13th rows are larger than the lower ones - forming a decorative "belt".

Fireclay bricks (ША-8) are marked in light color in these rows. They put it on the same composition of clay and sand (it is possible to add a small proportion of cement). It is better not to use mixtures based on chamotte: they need very high temperatures for sintering, which are unattainable in street barbecues. As a result, this solution may subsequently simply crumble.

On this part of the ordering, everything is also clear: we begin to shape the arch of the firebox. It overlaps on the 22nd row in which it gradually tapers.

The vault continues to form, which in the 30th row passes into the chimney. Next, the 30th and 31st rows alternate until the required height is reached.
Video
Photo of a brick barbecue
At first, a few simpler options. You can make these brick barbecues yourself.


Variations on the same theme - original finish
Several barbecues that can be built with some experience, but it is better to entrust a specialist (if you find it, of course) 


You have a summer residence. You want to make it not only beautiful, but also convenient and comfortable for your family and friends to relax. And so that everything was not very expensive. Not sure where to start? Braziers and barbecues for a summer cottage made of bricks made with your own hands from a photo are an ideal start for arranging a summer cottage. We assure you that after reading this article and looking at the drawings, you will build an ideal barbecue grill on your site, on which you will then cook delicious and healthy food.
A step-by-step guide to preparing and building a DIY brick barbecue
Preliminary work (layout and drawings)
Before you build a brick brazier, you need to carefully consider what it will be. We recommend paying attention to the following points:


When you decide what kind of barbecue you want to make, draw up detailed drawings with exact dimensions. Thanks to them, you will not only be able to correctly build the structure itself, but also calculate the amount of required materials.
Choosing a place for the barbecue
Brick barbecue grills can be located anywhere in the summer cottage - in the garden, in the gazebo, on the terrace - if only it is convenient. But we advise you to consider the following recommendations:
- The first and most important point is fire safety! Do not build garden barbecues near wooden buildings, dry trees and bushes.
- There should be no playground nearby.
- It is convenient if the stove and the brick wall of the summer kitchen are located nearby, so as not to run far for groceries and everything else.
If the project provides for a sink, build a water supply nearby.
In order for the future brazier to stand well and firmly for many years, make its base as reliable and stable as possible. The dimensions and strength of the foundation depend on the dimensions of the planned structure. In any case, the area of the foundation should be about 50 cm larger than the barbecue on each side.

After two weeks (if the heat is as low as possible), when everything has solidified well, you can start building a barbecue with your own hands.
Choosing a brick for a barbecue
Here again we should remember about fire safety. If the barbecue is going to be indoors, you should take a special refractory fireclay brick, it contains a lot of clay, due to which it withstands high temperatures well and quickly warms up the room.

Types of bricks used to build a barbecue
If the future construction is planned for the street, then professionals do not recommend doing everything from fireclay bricks, since it does not like moisture. It is better to take solid ceramic brick M200 or facing. The inner part of the firebox itself will be laid out of fireclay bricks.
If desired, at the final stage of the construction of the barbecue, its decorative finish is made.
Preparing the solution
For cladding, a cement-sand mixture is needed, and for the masonry of the furnace itself, a clay-sand mixture with the addition of a small amount of cement for strength. You can take a ready-made oven mix and prepare it according to the instructions.
To make your own clay mortar, you will need:
- red clay;
- sand;
- cement;
- water.
The clay is filled with water and left for 5-6 days. Then it is thoroughly mixed, a little sand and cement are added (a glass of 400 cement per bucket) and mixed again. The mixture is ready to use.
After the foundation has solidified, before construction, you need to put two layers of roofing material on it for waterproofing. This is done so that the brick pulls less moisture from the base, this will extend its service life.
Then we determine the position of the wall, apply the solution and begin to build a brazier out of bricks with our own hands.
Be sure to check everything with a level so that the masonry is even, as this will affect the quality of the stove in the future.
Bricklaying of a simple barbecue (ordering)
To build such a brazier, carefully consider the scheme according to which the step-by-step laying is done, the so-called order. 

The so-called masonry is carried out in a half-brick: each odd row (1,3, etc.) begins with a whole, and each even (2, 4, etc.) from a half. This is done for a bunch of bricks. 

On top of the 4th row we lay an overlap, on which you can then put the dishes. 

On the 8th row, you need to put 4 thick-walled corners, as shown in the figure. We put the 9th row on the corners.
In the 10th row, all the beauty of this barbecue is “piano keys”. They can be cut with a grinder from white fireclay and red facing bricks.
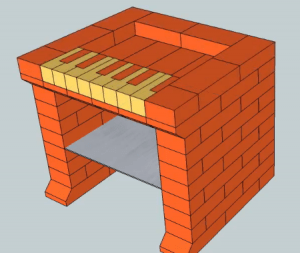
The last 2 rows - and the barbecue is ready. Please note that the 11th and 12th rows use longitudinal brick halves.


Skewers and a grate will then lay on them.

View from all sides
This is how our brick brazier-piano looks from different sides.

Option 1 - drawing with dimensions (click to enlarge)
The final result with dimensions.

Option 2, improved - dimensional drawing (click to enlarge)
Another option for a brazier is a piano. It is wider and the back wall is erected from the very bottom. Watch the video for the masonry process for this option.
This was the most one, which is easy to build on your own, even without experience in this area.
DIY brick barbecue - step by step construction with real photos
Consider another, more complicated option - how to make a barbecue out of bricks with your own hands, which includes two lower compartments for firewood, dishes and other little things, a combustion chamber, a countertop and a chimney at the top.
For the construction of the structure itself, in this case, facing bricks were used, and refractory bricks for the inside of the furnace.

Initial stage of construction
We start laying in the same way as described above. The lower part will be in the form of the letter "W", only the compartments are different in width. That which will be wider for firewood, above it there will be a firebox and a chimney. The second is for dishes and other utensils, there will be a table top at the top.

We make even seams between the rows
So that there is an identical and even seam everywhere between the bricks, a metal bar is used here for laying, in the section of which a square with a side of 12 mm. But we advise you to take thinner - 5-10 mm will be enough. Also, you constantly need to control the level of verticality and horizontality of the masonry.
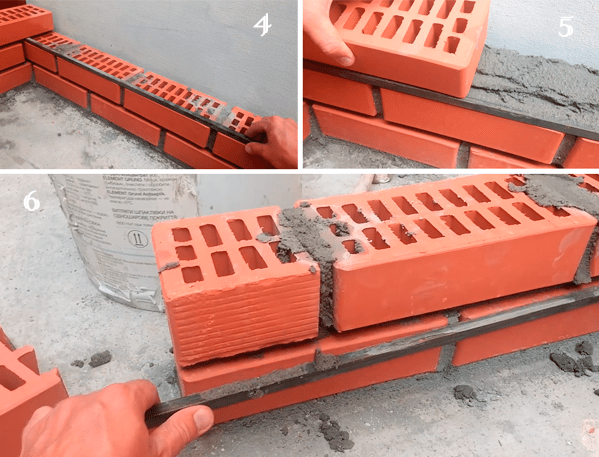
Bricklaying process
The plank is placed on the edge, as shown in photo 4, then carefully covered with a solution. On the side where the plank was put, we put the mixture on a par with it, on the other a little more, with a slide. We lay the brick, from the side of the plank we hold it with our hand, and on the other, slightly tapping with a hammer, we level it under the level. When the solution dries up a little, we remove the bar.
In order for the masonry process to move faster, there should be several planks, since they are needed for each row.
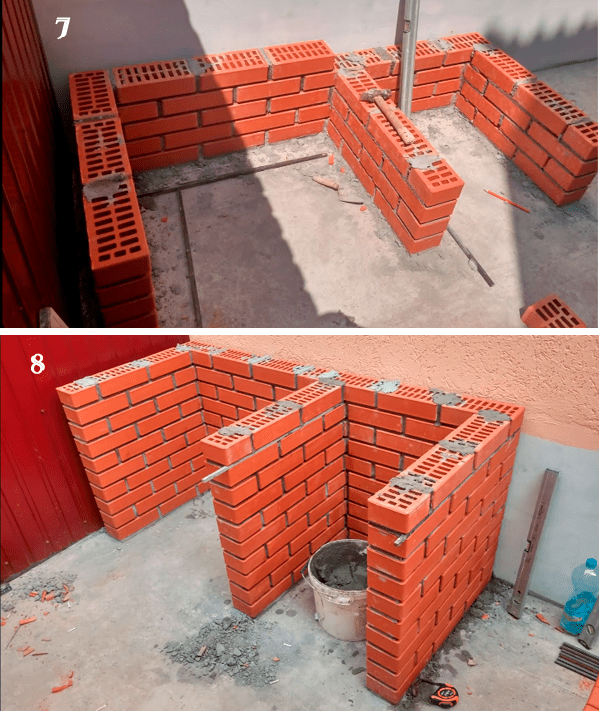
Laying out the bottom - the first 10 rows
According to this principle, 10 rows are laid out.

Preparing the base for the firebox and countertops
Next there will be a firebox and a tabletop. On the 10th row we put reinforcement with a diameter of 12 mm. The distance between the rods is 70 mm. Formwork is placed between the reinforcement so that the mixture does not fall down when the joints between the bricks are filled.
Professional advice: it is better to take metal corners, since there is a possibility that the reinforcement will bend under the weight.

We lay out the brick and fill it with mortar
Bricks are laid out at the same distance from each other over the entire area. Those that fall on the previously erected walls are put on the mortar, the rest are simply on the formwork. Then the gaps between the bricks and the surface are filled with mortar.

We form the combustion chamber and vault
After drying, the firebox is erected - 8 rows are laid out vertically. Further, the back part, which is located near the wall, is also being erected, and the other three sides taper upwards on a half-brick. So 9 more rows are laid out.

We build a chimney
The next stage is the chimney. In this case, 20 rows are lined with bricks, and at the top there is a stainless chimney. A high chimney is needed so that the smoke does not interfere with you or your neighbors, and the draft is better.

The last stage of construction - we finish the countertop and firebox
And the final touches - the table top is laid out with tiles, and the inside of the firebox - with refractory bricks.

Final result
After a few days to dry completely, the barbecue is ready to use.
We recommend watching a video, where there is the whole process of laying a garden brick oven.
Below in the gallery you can see more photos of barbecues and barbecues for a summer residence made of bricks with your own hands, and choose the one that is suitable in style, functionality and location for your site.

 In the gazebo
  On the terrace
  With hob
  Outside
  With built-in smokehouse
There is no fundamental difference between barbecues and barbecues, except that the first meal is cooked on skewers, and the second — on a wire rack. Both can be done on one structure, the construction of which will be discussed.
Often, a summer cottage barbecue is a simple outdoor building in the open air. A brick barbecue is a more sophisticated device that can be located in a summer kitchen, gazebo or outdoors, but it already has a chimney and in most cases a cover to protect it from rain and snow.
A temporary brick cooking device is a great summer option
If you do not plan to visit the country in winter, then a barbecue or grill made of bricks without mortar is perfect for this purpose. It can be folded quickly and easily in the spring, and dismantled for the winter.

Masonry scheme without mortar
Here is a diagram and step-by-step instructions that show how to make such barbecues and barbecues from bricks.
If the barbecue is planned to be small (9-10 rows of bricks), you can simply level and tamp the ground well. For a larger structure, it is better to fill the foundation.
We begin to lay out bricks according to the same principle as in the previous versions, but in a circle and with gaps of about 50 mm.
On top of the 5th row, we lay a steel sheet, which will serve as a pallet for coal.
Place 2 more rows and place the cooking grate. Then 2 more rows for wind protection.
To build such a round barbecue bricks, you need a little more than 100 pieces.
This is one example of a temporary barbecue, you can change it at your own discretion. Or choose yourself and build one of the options presented below in the photo.


Once, outdoor fireplaces were considered an item of luxury and wealth, but now it is a fairly common thing in any country house or in the country. They are functional and designed for a comfortable stay and food preparation.

It doesn't take a lot of effort to buy an outdoor fireplace, and you can also try to make it yourself. It is enough just to get the necessary drawings and decide on the details of the building.


Types of outdoor fireplaces
Of course, there are many options for an outdoor fireplace that you can build on your property. Therefore, we will now take a look at some of them.
Russian stove
Its appearance resembles an ordinary Russian stove, only it is located not in the house, but on the street outside it. It will differ only in that it has insulated side walls, which reduce the consumption of firewood during cooking. Also, the oven retains heat well, so you can cook various dishes in it, from barbecue to homemade soup.

Brazier oven
This is a kind of scaled down Russian stove. Suitable for preparing any kind of food. It has the ability to fry, stew, bake, simmer and even smoke. It is important that for smoking you will need to leave several coals in the firebox, sprinkling them with dry sawdust. Not a bad outdoor fireplace option for those who like to cook on a fire.
Read also: a place for a fire in the country - we make a hearth with our own hands.

Tandoor, or Asian oven
The main profile of this oven is the preparation of meat. On such a fireplace, you can fry a large kebab, whole carcasses, poultry and game. Additionally, there is a possibility of hot and cold smoking of products. The only thing the tandoor is not suitable for is the preparation of culinary pastries.

Smokehouse
A separate type of barbecues and fireplaces, which is designed specifically for cold and hot smoking. It has two chambers, a firebox and a chimney. The principle of operation is quite simple. Firewood burns in the firebox and gives off smoke, which enters the smoking chamber and exits through the chimney. This is a hot smoked version. For a cold one, you will need to install a cast-iron or steel container filled with sawdust above the firebox.
Related article: Laying heating pipes under the floor screed with your own hands

BBQ oven
It is mainly intended for cooking barbecue, or dishes that are grilled or grilled. In such a fireplace on the street, you can quickly cook fish, chicken and meat dishes. For even frying, you will need to constantly rotate the meat. Remember that a barbecue oven is not suitable for preparing oriental dishes.

Classic outdoor fireplace
It can be made with a skewer rack and a barbecue grill. An excellent option for cooking both meat and fish dishes. By the way, folding such a fireplace on the street is not at all difficult, it is quite possible to do it yourself.

Important points for installing a fireplace outdoors
In order for your outdoor fireplace to be safe for you and your neighbors, consider the following installation points:


DIY outdoor fireplace construction: step by step instructions
Basically, an ordinary classic outdoor fireplace is most often installed or built. For its construction, we first need to decide where exactly it will be located, as well as find a structure diagram.


Stages of work
The first and most important task will be to make a good and solid foundation for our facility. This is very important, because the entire future structure will be held on it.
Related article: How to putty drywall - important nuances of the technological process


So let's get to work.
Basis of construction

Outdoor fireplace masonry
The second stage after we have made a solid foundation will be brick laying. The main thing here is to adhere to the basic rules in construction.

At this stage, it is worth considering the factor that our structure will come into contact with fire, and therefore must withstand high temperatures. Therefore, it is worth adding a little clay and chamotte powder to the solution (about 10% of the total mass). It is these materials that will give the required heat resistance, and our oven will not fall apart. By the way, in places of the highest temperature, it is recommended to use heat-resistant bricks.
Progress

Chimney for outdoor fireplace
Almost the final stage will be the installation of a chimney on our fireplace. It is needed in order to remove smoke and provide air circulation.


For outdoor fireplaces, it is best to use the modular chimney option. It is easy to install and will allow the exhaust gas to be discharged.
You can buy such a design, because it is on sale. It has the necessary insulation, and even a person without experience can install it, following the instructions. The main thing is to adhere to these principles:

Finishing work
Well, our design is ready and all that remains is to make it look beautiful. For finishing work on the fireplace outside, you can use tiles or plaster. Additionally, decorate it with a drawing or some other design elements.

As you can see, it is quite possible to independently build a fireplace on the street with your own hands. The main thing is to adhere to certain rules in installation and construction. After completing all the work, you will be able to arrange delicious barbecues and kebabs at home.
Photos of beautiful outdoor fireplaces, stoves and barbecue


Metal structures are too shaky, and they burn out quickly enough - their service life is low. A brick structure is more fire resistant. Plus this material cools down slowly. It is enough to heat it well only once, and the heat will be enough for several batches of meat at once. You can use a handmade brick brazier as a grill or barbecue.
Choosing a place for the barbecue
If there is a place for comfortable gatherings on a personal plot or dacha (a gazebo or at least a couple of benches dug into the ground), it makes sense to build a barbecue nearby, at the same time covering them with a single canopy. You should not just locate the hearth near green spaces - such a neighborhood will not have the best effect on their growth. Naturally, you should not build a brazier near latrines and garbage collection points. It is also necessary to take into account the convenience of the approach so that guests do not have to wade through sheds and bushes.Since such a structure is fire hazardous, it should not be near the buildings. It is also necessary to take into account the prevailing direction of the winds so that the smoke leaves in the direction opposite to the buildings. Neighbors on the site should not suffer from sparks and smoke scattering from the hearth.
The brazier is located in an open area away from buildings near the gazebo or under a common canopy with it.
Foundation for a stationary barbecue
It is not worth building a brazier right on the ground - a brick is able to draw moisture out of it, and it will not be easy to melt the hearth. Even a well-tamped pad will not be enough. A heavy brick structure will lead sooner or later when the ground moves. Therefore, first of all, you need to take care of the slab (this option is better) or at least the strip foundation. As a base for the barbecue, you can also use a small concrete slab, laid on a cushion of sand and crushed stone.The foundation is made a little wider (by 10-15 cm) than the boundaries of the barbecue:
First, we prepare a pit, at the bottom of which we fill it with a layer of 10 cm. sand and 5-10 cm layer rubble; so that the sand is better compacted, it is spilled with water; for a small structure, a pit 30 cm deep is enough; for a heavy voluminous barbecue - up to 60 cm;
The formwork can be built from old planks of a suitable size or plywood;
As fittings use scrap metal or several thick rods with a chain-link wire screwed to them;

Formwork for foundations
For cooking solution you will need cement, sand and crushed stone, which are kneaded in a ratio of 1: 3: 3, add 1 part of water; cement is used grades M300 and higher;
To obtain a homogeneous mixture first mix the dry components, and only then add water;
When pouring, carefully ram or bayonet with a shovel so that there are no voids in it;
The finished foundation is covered with foil or burlap and left for a couple of weeks to harden; on hot days, it must be periodically moistened so that the concrete dries out evenly and does not crack.
Advice! It is better to moisten the formwork with water before assembly so that the tree does not draw moisture from the solution.

Ready foundation
Masonry mortar
Any cement-based mixtures for laying the hearth should not be used - under the influence of high temperatures, they will immediately crack. We will use a clay-sand mortar. In principle, you can buy ready-made mixtures for laying bricks.The preparation of the clay solution will take a certain amount of time, so it is better to knead it. in advance, while the foundation dries... Such a mixture is stored for a long time, so there is no danger that it will lose its properties.
The clay is mixed with water, trampled underfoot and soaked for 2-3 days. Then the excess water is drained, the mixture is crushed, and any dry lumps are removed. While it is infused, experiment with making the solution by mixing a small amount of it:
We take sifted sand with grains of medium fractions;
Clay will need medium fat content: it is plastic enough so that it does not crumble when moistened, but also not excessively greasy, otherwise, when it dries, its volume will decrease and the seams will crack; clay color - dark red or burgundy;
When moistened, it should not crack and crumble; if the clay is not plastic enough, it is added to the solution in larger quantities.
For 100 bricks, you will need about 2.5-3 buckets of mortar. His proportions determined experimentally. For oily clay, on average, they are equal to 1: 2 (clay, sand), for clay of normal fat content 1: 1. We need to get a thick enough mixture that does not run off the trowel.

Preparation of the solution
Scoop up a little mortar with your hand and roll it into a ball, then flatten it slightly or drop it on the floor. The lump should not crack much from the impact. If this happens, add clay. Let it dry for 2-3 days. If the ball is cracked, the solution is too greasy, and it is worth adding sand.

Mixing solution
Grill laying. Ordering
To protect the foundation from moisture, coat it with tar and cover it with two layers of roofing material. Average masonry height barbecue - 10-12 bricks. The width is 6 bricks, and the depth is 3. If you plan to lay out a shelf for storing firewood, then their number will increase accordingly. The structure itself is laid out of ordinary red brick, and the place near the hearth is made of fireclay- it does not burn out so quickly.
Barbecue device
1. The figure below shows the order (layout order) of the simplest barbecue. If you want a hearth of a different shape or size, look for a scheme for laying it out on the net - there are plenty of them there. A structure with a chimney will be less flammable - the order of its order is shown in the figure at the end of the article. The chimney can also be made of metal. In the meantime, we will deal with the construction of the simplest barbecue.

The order of the simplest 12-row barbecue
2. To prevent the clay from crumbling quickly, do not make too thick seams. Their standard thickness 10-15 mm. According to the rules, the less clay is in the masonry, the better and more plastic the solution should be. Spread bricks with them and lay them on top of each other. If after 5 minutes you lift the upper one, and the lower one does not come off at the same time, the mixture turned out to be of high quality, and you can start working.

Layout of the first row
3. It is better to soak the brick one day before starting work. In this case, it will not take water from the solution, and the masonry will turn out to be stronger.
4. Cut its a grinder with a disc for wet cutting. However, experienced stove-makers for these purposes use the usual pickaxe- it is installed at an angle of 90 ° and is abruptly removed along it with a hammer.

Brick cutting
Important! Every 4-7 rows, it is necessary to allow the solution to dry out so that it sags slightly, and only then continue the calculation. In this case, it will turn out to be more durable.
5. Work begins from corners to center... To prevent the product from turning out to be lopsided, do not forget to control the corners using a plumb line or a building level.
6. The laying is done offset, so that the center of the brick of the next row covers the joints of two bricks of the previous row. If there was a whole brick in the corner of the first row, then the next row must be started from half.

Please note that in the masonry, the bricks of each row are displaced relative to the previous ones.
7. Closer to half the height, metal corners are walled up into the masonry for fastening removable grates... The grates themselves should not be laid in the masonry - sooner or later the metal will burn out, and they will require replacement. Under them are the corners on which it will be installed ash tray... After another 3-4 bricks, fasteners are bricked into the masonry grills for meat.
8. Too high firebox it is not worth doing - otherwise the thrust will decrease. It can also be made closed, with a damper and a blower.

Barbecue device
Canopy and decor
If desired, the brazier is plastered or tiled. The countertop - the upper part of the barbecue - is laid out with sidewalk, floor tiles or thick-walled glass is used for these purposes.The construction of a canopy is not so expensive. It is enough to brick up wooden or metal support pillars in concrete and attach a roof made of thick polycarbonate, metal profile, wooden battens or any other suitable material to them.
Advice! To prevent the grates from rusting, it is better to remove them for the winter, clean them, and put them in storage until spring.

Ordering a grill with a chimney

Brazier with a metal chimney-umbrella
Video: Do-it-yourself brick brazier
In our guide, we will tell you how to make an outdoor grill complex and a brick barbecue oven yourself. Step-by-step instructions with a photo of the construction process will help you understand the details of self-laying of this structure.
As a result, you should get a barbecue grill as shown in the photo below.
So, you have decided on the type of barbecue, its size and location. Now you need to build a foundation for it.
Usually such buildings are made on the street, in a gazebo or on a terrace. If the foundation of the gazebo or terrace can withstand the weight of a brick oven, which is about 3 tons, then you can start construction right away. If you are going to build a brazier from scratch, then first of all fill in a suitable foundation for it: tape or tiled.
You will find instructions for the construction of such foundations in our section ““.
The next step will be the installation of waterproofing under a brick brazier. It is done to prevent the bottom bricks from getting wet by capillary suction. It will be enough to spread a roll of roofing material or waterproofing material. At the end of the construction, cut off the excess with a knife.
Do-it-yourself barbecue grill made of bricks. Step-by-step instructions with a photo.
We proceed directly to the laying of the barbecue.
We recommend that you first lay out the first row of bricks without mortar and evaluate how your future structure fits into the foundation. Do not forget to leave 1 cm gaps between the bricks. Also check the diagonals, they must match.
After that, you can start laying the barbecue. The facing brick is placed on a cement-sand mortar (cement-sand ratio 1: 3). For the plasticity of the solution, lime or a special masonry plasticizer from the nearest hardware store is added. The seams are made in sizes of 8-10 mm, for this they use a metal rod, reinforcement, etc. In the places where bricks adjoin without ligation, the masonry is reinforced with perforated tape, wire, etc.

We do the laying with an offset of each subsequent row by half a brick. To cut bricks, you need a grinder with a stone disc.
We continue to lay out the barbecue grill.

Do not forget to check the verticality of the masonry in the corners at least every 3 rows. And also, check the coincidence of the length of the diagonals of the barbecue.
We continue laying.

After you have made 8 rows of masonry, it's time to make jumpers for the barbecue and countertops. They should look as shown in the photo below.

There are several ways to make such jumpers.
First, you can hold the bricks together with a metal pin and mortar.

Secondly, you can use metal corners.
In our case, we used the second method. We folded the corners together in the shape of an inverted T and sawed off half of the shelf. Here's what happened.

Take a corner with a size of at least 45x45 mm. A smaller corner will bend. But do not take too large, so that it does not protrude beyond the edges of the brick.
Make a cut in the brick with a good margin so that the metal does not tear the masonry when heated.
Such a shelf is invisible to the eye, reliable and beautiful.

We begin to lay out under the (bottom) of the barbecue. We use refractory fireclay bricks for the firebox. We make masonry on a ready-made refractory mixture from a construction supermarket from clay and sand. Can be used mortar... We make the seams as thin as possible, about 3-4 mm.
We use corners to support the bottom of the barbecue. Remember to leave at least 1 cm of gap between the ends of the corners and the brick. This will prevent the masonry from cracking when the corner expands.
Put the second row on the first row of the bottom of the firebox, overlapping all the seams of the first. This will exclude burnout of the seams and the ingress of coal on the firewood in the bottom of the firebox. You can, of course, pour a concrete slab instead of the corners and the first row of the firebox. But in our case, it was cheaper and faster to do so.
If you pour a concrete floor, then one row of refractory bricks will be enough for the bottom of the firebox.
We continue to lay out the walls of the barbecue.

Facing bricks and fireboxes can be laid both in parallel and alternately. You can first make the walls of the firebox, and then overlay it with facing brick.
Important! Leave a 1 cm gap between the facing and refractory bricks. The firebox and facing should not touch.
We put the next rows of the barbecue oven.

We come to the moment of construction of the furnace arch. We make a circle (an arc structure made of wood) and install it in the brazier portal. Then, we carry out the laying of the arch, cutting the bricks to the desired size. We put a brick castle in the middle of the upper point. The arch is ready.

Note! The facing brick arch is covered from the inside with a fireclay brick lintel. It is placed on a metal corner slightly above the top of the arch so that it is not noticeable. It looks like this.

The arch is assembled, we continue to display the walls of the barbecue grill.
Remember to check the verticality of the masonry.

We come to the moment of construction of the smoke collector.
We bring the top of the firebox and cladding to one level and begin to lay out the smoke collector. We make masonry from solid brick of the brand not lower than M150. We put on a cement-sand mortar. We put the first row flush with the inner wall of the firebox. We put the rest of the rows with an offset of about a third of the brick.
Do not move the bricks more than halfway, otherwise they will fall into the firebox.

We carry out the laying of the smoke collector until there is no hole for the chimney with a size of 27x27 cm, taking into account the seams. Your chimney size may differ from ours. In this case, make a smoke collector for the size of your chimney.
Some stove-makers cut the inner edges of the bricks so that the inside of the smoke box is smooth. We did not notice any differences in operation between the smooth and ribbed inner surface of the smoke collector. Of course, this is only true if you observed the correct proportions between the dimensions of the portal - smoke collector - pipe (read about the proportions below).
This is how the smoke box looks like without cut bricks from the inside.

We continue laying the pipe. Its dimensions depend on the size of your barbecue portal.
After finishing laying the chimney, cover it with a cap to protect the firebox from precipitation.
We have successfully built a brazier aka a brick barbecue oven with our own hands! Wait until the solution dries and you can do a test run.
Here we will analyze the most common questions about laying a brick barbecue (grill) with our own hands and the answers to them.
What size should the smoke box be?
The size of the smoke box depends on the size of the firebox portal. The optimal ratio should be at least 100-120%. So in our step-by-step instructions, the height of the portal is 6 rows, and the height of the smoke collector is 8 rows.
What is the height of the pipe?
The height of the chimney is proportional to the height of the smoke collector and is not less than 100-120% of its height.
What is the diameter of the chimney?
The section of the chimney pipe depends on the area of the firebox portal. The optimal chimney area is 1/8 - 1/10 of the portal area. Extreme sizes from 1/6 to 1/13.
How to fill the gap between the firebox and the cladding?
In front, around the portal, you can fill the gap with basalt cardboard. There is no point in filling the rest of the space. Therefore, it is left blank.
Do I need to paint the metal corner in the lintels?
Brazier (grill) - do-it-yourself brick barbecue. Step-by-step video instruction.

