Growing garlic outdoors: tips and tricks. How to grow large garlic How to grow winter garlic with large heads
Garlic is one of the most common crops that can be found in every garden plot in any region of the country. Such plants produce spicy fruits with a sharp taste, besides, garlic is very easy to grow and it is not afraid of cold, return frosts and other weather factors.
You can grow a vegetable in a garden or cottage, or sow it at home, for example, in a pot at home, on a balcony or in an apartment on a windowsill in winter.
Basic requirements for growing garlic in a country house or in an apartment on a home windowsill
Growing garlic is a fairly simple process, which even a novice gardener can do. The main thing is to follow all the rules and take the necessary actions in time: take care properly, although if grown correctly, it may require trouble.
Having decided to grow a vegetable on your site, you first need to choose the right type because the planting and cultivation of winter and spring crops are different from each other.
Varieties belonging to different species differ from each other in terms of planting time, arrangement in the garden and care rules, so if you compare them and do not take into account important details, you can forget about any rich harvest of spicy heads.
Also, before planting it on your site, you should think about a suitable place that will meet all the requirements. The soil must be light, nutritious and have neutral acidity. To achieve all these indicators on unsuitable soil can take a lot of time.
When to plant winter and spring garlic in the garden - the right conditions
Planting dates depend not only on the preferences of the gardener and the climatic conditions of the region, but also on the species that is planned to be grown.
Spring garlic is planted in early spring, once after the snow melts, but no later than April 10. This species has small heads with randomly arranged teeth. The disadvantage of such fruits is their less saturated and spicy taste, the advantage is a long shelf life and the possibility of using it for 12 months.
Winter crops are planted before winter, that is, in the time period mid-September to mid-October. It is very important to take into account the fact that before the onset of the first frost, the teeth must have time to build up a powerful root system, on average, this process lasts 3-4 weeks.
Winter crop boasts large heads, with even and sharp teeth. The main disadvantage of the species will be a shelf life of 3-4 months.
Landing dates play a huge role.
In spring, plants are planted as early as possible so that they have time to mature before the onset of cold weather. Early autumn planting can also ruin the entire crop, because if the frost comes too late, the garlic starts to grow and then dies.

Soil preparation before cultivation and sowing
It's not a picky culture, but choosing the right place can significantly increase the amount of harvested. The plant prefers fertile lands with neutral acidity. Also, the soil should be light and breathable. Loams are best suited for such purposes.
The location must meet the following criteria:
- plenty of sunlight necessary for fruit ripening;
- meltwater and precipitation should not accumulate on the site. A deep location of groundwater is also desirable;
- peas, cabbage, zucchini, pumpkin or greens are considered the best predecessors for culture. It is not recommended to plant it in those places where cucumbers, tomatoes, onions, carrots and garlic itself grew before it.
If clay or sandy soil prevails on the site, then they are diluted with peat, while peat soil is mixed with sand or clay.
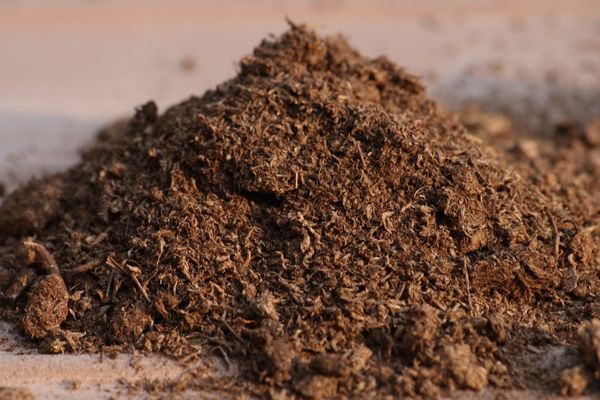 If the soil is clay, it is diluted with peat
 Regardless of the timing of planting, the ground must be prepared in the beginning of September. To do this, it is dug up, weeded, cleaned of stones and debris, after which the following fertilizers are applied to each square meter:
- 1 bucket of humus or rotted manure;
- 30 grams of superphosphate;
- 20 grams of potassium salt.
Planting material preparation
Before planting garlic in open ground, planting material must sort, choosing from the total mass damaged, diseased, soft, twisted, too small and unshelled teeth. They are not suitable for planting and are unlikely to be able to give a decent harvest.
Preparing teeth for planting is as follows:
- for stratification, planting material is placed in a refrigerator for 15-20 days;
- then the teeth are disinfected, keeping for 2 hours in a solution of wood ash, potassium permanganate or copper sulfate;
- so that the teeth germinate as soon as possible, they are treated with a growth stimulator or wrapped in a damp cloth, put in a plastic bag and kept in this state for 2-3 days.

Planting process
Landing is carried out according to a certain scheme:
- Initially, furrows are made in the garden, at a distance 20-25 centimeters apart;
- When planting spring garlic, the depth of the furrows should be 7-9 centimeters, and when using winter varieties, 15-20 centimeters;
- The distance between individual plants will depend on the size of the planting material. Usually, spring varieties are planted at a distance 6-8 centimeters from each other, and winter varieties at a distance 12-15 centimeters.
The teeth are deepened strictly vertically. In the event that the rib is located to the south, then the garlic feathers will grow greener and more saturated. If the soil is dry, then immediately after planting it must be watered.
In the spring, mulching of plantings with peat or sawdust should be done at the request of the gardener, while during autumn planting, this work must be done so that the garlic can survive frosts in snowless winters.
Care for good and large heads and feathers
Care is extremely simple and consists of several familiar operations, which include watering, weeding, loosening and feeding plants.
Water the vegetable so that the soil always stayed wet. In dry weather, such work is performed 2-3 times a week, while on rainy days, watering can be completely abandoned. It is worth remembering that in August soil moisture must be stopped. At this time, the bulb begins to gain weight and volume and does not need watering.
All top dressing of garlic is carried out in conjunction with watering, this is necessary for the best absorption of fertilizers. Winter and spring garlic are fertilized according to various schemes.
| Spring garlic | Winter garlic | |
| 1 dressing | As soon as the plant releases the first leaves, it is fertilized with nitrogen fertilizers (urea, a solution of mullein or bird droppings) | In early spring, about 7-10 days after the snow melts, 100 grams of superphosphate, 50 grams of potassium sulfate and 50 grams of ammonium nitrate are applied per 1 square meter of soil. |
| 2 top dressing | 2 weeks after the first feeding, complex mineral fertilizers are applied. | After 25-30 days using the same composition. |
| 3 top dressing | In late June-early July, phosphorus-potassium fertilizers are applied | The last top dressing is made in mid-July, when the head begins to grow. |
To get larger heads of garlic, you need to remove the arrows every time they reach a size of 15 centimeters.
Winter garlic needs periodic updating. To do this, once every 3-4 years, bulbs are planted instead of cloves, which by the end of the season will bear single-toothed fruits, which are planting material for the future harvest.

Diseases and pests
Garlic is often affected by diseases and pests. Of all the existing diseases on such a culture, the most common are:
- white, gray and cervical rot;
- helminthosporiasis;
- fusarium;
- smut;
- downy mildew;
- mosaic;
- rust, etc.

Insects most commonly found on garlic:
- onion secretive proboscis;
- tobacco thrips;
- nematode;
- caterpillars;
- onion flies;
- bear;
- onion moth;
- centipede.

Unfortunately, many diseases destroy plants, so it is impossible to get rid of them, the only way out is removal of affected garlic and preventive treatment of healthy individuals with fungicides or folk remedies, which include ash infusion.
You can get rid of insects with the help of insecticides, mechanical methods, which include manual assembly and various folk tricks.
In order to prevent the occurrence of such troubles, it is necessary to follow the rules for planting plants, to prevent unwanted neighborhood and predecessors. It is also very important to pre-disinfect planting material.
Harvest and storage
After a rich harvest of garlic has been obtained, it must be kept intact for as long as possible. Harvesting of winter garlic fruits is carried out at the end of July-beginning of August, and spring one month later.
You can see the maturity of garlic by the following signs:
- new feathers ceased to form, and the old ones turned yellow and lay on the ground;
- the protruding head has acquired the correct color and size.
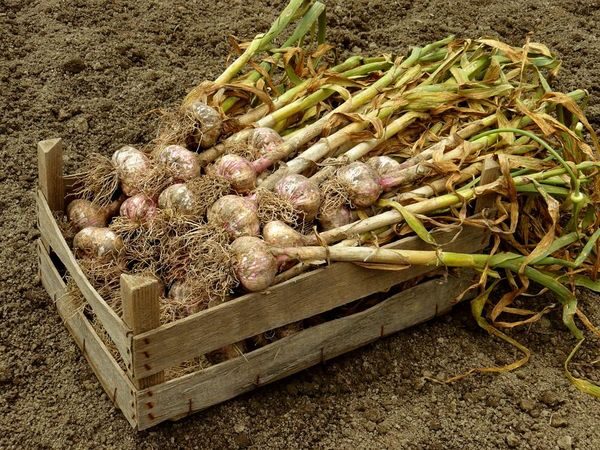
After harvesting, it is prepared for storage by doing the following:
- The heads are shaken off the ground and dried for 10 days at a temperature 25 degrees outdoors or in a well-ventilated area;
- Roots and leaves are completely removed, the neck is cut off up to 2-5 centimeters;
- At the last stage, the heads are folded into boxes with holes, nets or woven into pigtails.
Winter garlic is stored worse than spring. Autumn heads are stored at a temperature of 2-4 degrees, and spring 16-20 degrees. Humidity in the room should be between 60-80 percent.
Growing garlic on your own plot is a very interesting activity, during which you can learn useful skills regarding the proper planting and care of plants. If you follow all the recommendations, then a rich harvest will delight every gardener from year to year.
How to grow garlic? This culture is bred in almost every suburban area. Such a plant can even be propagated indoors on a balcony or on a windowsill in a pot. This is due to the fact that the fragrant spice is undemanding in care and grows rapidly.
Below you can get acquainted with the varieties and varieties of the plant, as well as tips on how to germinate and care for winter and spring garlic in various conditions.
Species and varieties
To date, a large number of different varieties of garlic have been bred. But they are all divided into two types, namely:
- winter (planted in open ground with the arrival of autumn);
- spring (suitable for growing in spring).
Garlic is also divided into two large groups - arrowing and non-shooting varieties. In the first group, instead of seeds, single-toothed bulbous bulbs develop, which are used for planting crops in the ground. Often arrows let only winter types of garlic, and in spring this feature is extremely rare.
Large, large garlic can be grown from winter varieties. However, such a culture will be stored very little. Already in almost the last month of winter, the vegetable will begin to deteriorate.
As for summer garlic, the bulb heads don't grow as gigantic, but the shelf life can be up to 2 years.
In order to grow a good harvest of garlic without problems and hassle, experienced gardeners advise planting two types of vegetables in the garden at once. Despite the fact that the spring crop is in second place in terms of yield and head size, it is still stored longer than the winter crop. In terms of taste, both types of garlic are exactly the same.
Winter varieties of garlic are grown on a large industrial scale for sale. A spring vegetable is cultivated for long-term consumption.
In the country, you can grow different varieties of vegetables. For example, most farmers are engaged in the cultivation of Indian and Chinese garlic (the "solo" variety), they also grow the "rocambole" variety (such garlic is called "elephant" or giant).
If you want to grow garlic with a head the size of a fist, it is advisable to use large-fruited crop varieties. For such purposes, it is best to take "rocambole". It is worth noting that only when planting seeds for the winter, the size of the heads will be large. If you plant a vegetable as a spring crop, the bulbs will be small.

Many are interested in the question: “Is it profitable to grow garlic for sale?” Such a business, of course, does not require large expenses, however, it usually does not bring high profits either. The main thing is to regularly care for the spice, as well as plant high-quality seeds, which in the future will give a good harvest. In addition, farmers and enterprises engaged in the cultivation of vegetables in the open field argue that such a business can be accompanied by risk and organizational difficulties. This is due to the fact that high-quality seed is not cheap, cultivation also depends on climatic conditions. In this regard, farmers often grow garlic in a greenhouse.
How to grow winter garlic?
Winter garlic is characterized by a fairly high yield and large dimensions of the bulbs. However, this type of plant has a short shelf life.
This vegetable crop is great for salting with other vegetables, as well as for preservation.
Landing time
It is necessary to plant winter garlic in the fall, when the weather will be cold outside, but the soil should not yet freeze. Landing is carried out approximately from October to November.
Soil preparation
One of the secrets of how to grow large winter garlic in the open field is the proper preparation of the land for planting a crop. A few weeks before planting the spice in open ground, the substrate must be mixed with sand and ash. You need to grow garlic from seeds in well-drained soil, since the vegetable crop does not like stagnant moisture, and also prefers soil with organic matter. In this case, the beds should be high.
Either compost or rotted manure must be added to the ground. To do this, a five-centimeter layer of fertilizer is distributed over the entire surface of the area, and then dug up.
Garlic prefers to grow in soil, the acidity of which will not exceed 6 or 7 units. If the soil is fed with compost or rotted manure immediately before winter sowing, the soil will not need to be fertilized until the spring months.

According to the rules of crop rotation, it is undesirable to plant a crop in the same area more than once every 5 years. However, often a small area of \u200b\u200bthe garden does not make it possible to adhere to this rule. In this regard, the plant can be planted in the same area if an interval of 3 years is maintained, and the correct predecessor crops are selected.
You do not need to grow garlic where onions, potatoes or carrots grew, because after their cultivation, the soil loses a significant part of its nutrients. Also, do not plant a crop after nightshade, which can infect the plant with Fusarium. It is best to grow garlic after melon, legumes or cucumbers.
To properly grow garlic in the garden, consider the following:
- At the place where the vegetable is bred, the sun should shine for at least 5 hours a day.
- The acidity level of the soil should be either medium or weak.
- It is not recommended to fertilize the land with fresh manure.
- Seedlings must be distributed at a distance of fifteen centimeters from each other and immersed to a depth of seven centimeters.

Properly prepared soil will be the key to a large, plentiful harvest.
Planting material preparation
To grow a good and healthy winter garlic, seedlings must be processed before planting in the ground. In this way, the culture can be protected from bacterial, fungal and viral infections.
For the treatment of seeds (lobules), various chemical compositions can be used, for example, Maxim or Fitolavin.
According to grandmother's advice, in order to obtain a quality harvest, the cloves must be dipped in a weak manganese solution for about 12 hours.

Immediately before planting, the seedlings can be immersed in a saline solution for 3 minutes (3 tablespoons of salt will be needed for 5 liters of water).
You can also treat garlic heads with a solution of copper sulfate (0.1 g of copper sulfate per 1 liter of water).
Reproduction methods
You can grow winter garlic by several proven methods. The following methods of culture propagation are considered the most effective: from bulbous cloves, bulbs and single-toothed bulbs. Which method is best, everyone chooses individually, based on personal tastes and preferences.
From bulb cloves
To grow garlic from onion cloves, on the day appointed for planting, it is necessary to make beds up to 2 meters wide. Seedlings need to be planted to a depth of 7 cm, while maintaining a distance of 20 cm from each other. The landing site must be sprinkled with a centimeter layer of humus.
For planting, you need to take cloves that weigh at least 4 grams. Garlic grown from cloves should have time to take root before the onset of cold weather. Therefore, it is advisable to sow the crop from early October to mid-November.
Garlic should be sown not with a whole head, but with single cloves. Therefore, before planting, the bulb must be divided into slices.

From bulbs
To harvest a high-quality garlic crop, you need to sometimes change the planting material. For this purpose, the seeds of small air bulbs of garlic are used, which develop from the arrow peduncle. As soon as the twisted garlic arrow becomes even, it will be possible to remove the seeds of the air onions.
Growing garlic from arrows is done for the winter in the year of collecting seeds (bulbs), which must first be sorted and then dried for a month.
The planting time, as well as the procedure for preparing the land, are the same as when growing a winter vegetable with cloves. Before sowing in the soil, the bulbs must be immersed in a solution of wood ash (1-2 tablespoons of the substance per 100 ml of water) for twelve hours.
Planting seeds is carried out to a depth of up to 4 centimeters, while maintaining a distance between planting material of 6 centimeters.
After planting, the soil must be covered with a two-centimeter mulch layer. With the advent of spring, crops need to be looked after in the same way as during the planting of onion cloves.
Initially, only a single-tooth bulb (also called a set) grows from bulbs, which can serve as planting material for a new crop of garlic.
It is very important to harvest on time, because ripe single-toothed bulbs can self-burrow. The time of harvest is determined by the state of the crop, namely: the leaves begin to turn yellow and slop down.
After 2 years, the bulbs will reach the standard size of a garlic head.

From single-tooth bulbs
To grow large single-toothed garlic, sevok needs to be planted in the soil in the spring, in mid-April. If you need to bring out ordinary garlic heads, then planting is carried out with the advent of the autumn months.
Before sowing planting material, you should pick up the brightest, even and largest heads. Seedlings should be sown in rows at a distance of twelve centimeters from each other. The distance between rows should reach 20 centimeters.
The planting time and the procedure for preparing the soil and material for sowing are the same as for propagating garlic with bulbs and cloves.

Winter care
After the seedlings are in the soil, they will need to be covered with a thick layer of leaves or straw. This will protect the heads of garlic from sudden changes in temperature during severe frosts until the thaw. As a result, the bulbs will not freeze.
Caring for a grown plant is quite simple. The main thing is to do all the procedures on time.
With the advent of spring, the mulch layer can be removed so that the earth can warm up with the sun's rays, thereby accelerating the growth of seedlings.
When the soil warms up and the first garlic shoots grow, a small layer of mulch should be returned to its original place to retain moisture and prevent the development of weeds.
If the ground is not too dry, there is no need to pour garlic abundantly. The less liquid will be used when watering, the richer the smell of the vegetable will be.
In the summer, winter and spring garlic give arrows that need to be disposed of, otherwise they will not allow the crop to grow normally.

Cultivation of spring garlic
Spring garlic differs from winter garlic in the number of cloves and the size of the bulb. Such a vegetable is quite small and is not often used in cooking. However, spring crops are characterized by a long shelf life. This makes it possible to use the vegetable during the entire cold period of time.
Planting dates and co-propagation
It is best to grow spring garlic at the end of frost, that is, from mid-April.
In addition to meeting the deadlines for planting seedlings, you also need to choose the right neighbors in the garden, whom garlic will protect from infectious diseases and pest invasions.
Clue! Lettuce leaves and spicy plants grow well next to vegetable crops. Remarkably, they can be planted on the same bed, alternating rows.

If you grow spring garlic near strawberry and strawberry bushes, the vegetable will scare away ants and aphids from berries, and will also contribute to high yields.
In no case should you grow summer (spring) garlic along with beans, cabbage and peas. The spicy plant slows down their development, resulting in low yields.
If garlic is grown in Siberia, then the material for sowing a month before planting in the ground should be placed in the refrigerator. And the day before planting, the seedlings will need to be removed from the cold, leaving at room temperature.
plant care
After planting, spring garlic does not need special care. It will be enough to moisten, loosen, feed and weed the soil from weeds in time to get a good and rich harvest.
To reduce the amount of watering, as well as protect the land from drying out on hot days, the beds with the plant must be mulched.
From May to July, the green mass begins to actively grow, so the plant needs to be watered four times a month. If there were heavy rains and the soil is too wet, then it is better not to water, so that there is no excess moisture in the soil. From the second half of summer, the number of waterings should be reduced.

During the growing season, the spring crop should be fed twice, namely:
- For the first time, fertilizers are applied to the ground when the first green shoots are formed. For these purposes, a solution of wood ash is used (a couple of glasses of ash will be required for 12 liters of water). Nitrogen fertilizers can also be used.
- The second time the plant is fed when the bulbs are formed. Here you can take either humus or some mineral fertilizers.
With proper care, spring garlic will bring many healthy and strong fruits.
Harvest and storage
Winter varieties of garlic begin to ripen by early August. As soon as the leaves turn yellow, you can start picking fruits. Cleaning should not be delayed, as the bulbs can dry out and begin to crumble. In this case, the shelf life of the product can be drastically reduced.
Spring garlic can be harvested from the end of summer, when the leaves turn yellow and droop down, and the bulbs are fully formed.
After the crop is harvested, it must first be shaken off the ground, and then dried for 1.5 weeks.
After drying, the roots and a little stem are cut off from the plant, leaving a 5 cm long stem for winter garlic, and 2 centimeters for spring garlic.
For planting material, it is advisable to take only large specimens.
Garlic storage conditions:
- temperature regime for winter plants - +4 degrees, and for spring - +20 degrees;
- humidity for all types of culture should be medium.
Many are interested in the question: “How much garlic can be grown on a hundred square meters?” The amount of crop harvested from 1 acre of land will be different. It all depends on which variety is cultivated in the field. For example, the “saved” garlic variety can bring up to 200 kg, and the “benefit” variety gives 400 kg per hundred square meters.

Growing at home
Garlic can be grown at home (on the balcony or on the windowsill). In winter, it is preferable to breed winter varieties of plants that can bring a good harvest of greenery. If you want to grow garlic arrows, then it is better to plant a spring variety of a plant in the summer.
For growing in an apartment on a window or balcony, it is best to use garlic cloves, which can quickly bear fruit. To do this, take only strong, large and dense slices.
From sprouted garlic cloves, fruits can be grown much faster.
For growing garlic on greens, a winter variety of a plant is suitable, since it is able to give a powerful green mass. Remarkably, greens can be grown even from store-bought sprouted vegetables. In this case, the crop can be harvested in a short period of time. Of course, you can take unsprouted garlic, but then the green mass will have to wait a long time.
As for the soil, the soil from the street must first be disinfected, and then calcined in the oven. After that, sand and peat must be added to the ground.
If the soil is purchased in a store, then you need to take a universal substrate for seedlings, which must be fertilized.
The capacity for plant propagation should be spacious and up to 20 centimeters deep. Also, there should be a small rim at the top so that water does not spill over the edges when watering.
At home, garlic can be grown in a ceramic pot, a plastic box, or a glass container. In this case, the container must be placed either in a pallet or on a stand so that the liquid can drain freely.
Garlic cloves are introduced into pre-prepared pits to a depth of 3 centimeters. The distance between crops should be 5 centimeters. The soil should be slightly moist. As soon as the seeds are introduced into the soil, they need to be sprinkled with earth and watered. After that, it remains only to wait until the first shoots appear. The ripening period is approximately 21 days.

Seedlings need to be watered every three days. However, if the soil dries quickly, then the interval between waterings can be reduced.
You can feed the crop with both nitrogen and mineral fertilizers.
The optimum temperature for growing a plant at home is +20 degrees. Therefore, it is best to grow garlic on a glazed balcony.
Periodically, the ground near the seedlings needs to be loosened. As a result, the heads will be large and developed.
As you can see, growing garlic outdoors or at home is not so difficult. The main thing is to choose the right plant variety and the time of planting the planting material, and then it will be possible to get a high-quality and high yield.
Below is a video showing how to grow winter garlic.
Garlic has been known to mankind for six thousand years. It is grown in almost every garden and can be found in any kitchen in the world. Garlic is used as a seasoning for many dishes, as well as a remedy in the fight against influenza, scurvy and other diseases. Growing garlic is not difficult, but you need to know some of its features and the secrets of agricultural technology.
The technology of growing garlic in open ground
In the vast majority of cases, garlic is grown outdoors. The greenhouse method is used much less frequently, and only in regions with a harsh climate. There are two types of garlic - winter and spring - and we will talk about both.
Technology for growing winter garlic
Winter garlic is most popular with gardeners. This is evidenced by the fact that more than seventy of its varieties are registered in the State Register at a time when there are only fourteen varieties of spring garlic. Such popularity is due to its positive qualities:
- High yield - two to three times higher than that of spring.
- Early ripening - the first half of July.
- Larger heads compared to spring garlic.
In the vast majority of varieties of winter garlic are arrows, that is, from the middle of the bulb they grow an arrow with a spherical umbrella formed by small flowers. After flowering, each flower forms an air bulb (the so-called bulb) used for reproduction.
After flowering, each garlic flower forms an air bulb (the so-called bulb) used for reproduction.
Reproduction of winter garlic occurs in two ways:
- The first way is to plant cloves in the fall, which take root by winter, and sprout in early spring. With this option, young greens and heads of garlic can be eaten as early as late May - early June, and full ripening occurs by mid-July.
- The second way is propagation by bulbs. In this case, the bulbs collected at the end of summer are planted in the ground before winter, and by the end of the next season, single teeth grow out of them. They, in turn, are planted again before winter, and the next year they get a crop of ordinary, but already healthy, garlic. This method is used for the following purposes:
- To obtain a large amount of planting material in a short time. The number of bulbs of the desired variety can be an order of magnitude higher than the number of cloves obtained.
- In order to improve the planting material. As you know, when growing garlic from cloves, various diseases, especially stem nematoma, persist and accumulate in it. Bulbs are devoid of this drawback.
- To restore varietal characteristics. When growing garlic from cloves for several years, it degenerates, the heads become smaller, and the yield drops. After growing planting material from air bulbs, the characteristics of the variety are completely restored.
Growing spring garlic
Spring garlic is only non-shooting, so only its cloves can be used for reproduction.. It has smaller heads and low yields. Its main advantage is long shelf life. Often prudent gardeners plant both types of garlic. Winter varieties are used for canning and consumption until the middle of winter, and spring varieties are used for long-term storage.
In the garden, it is better to have both winter and spring garlic.
Planting garlic outdoors
Planting winter and spring garlic has some differences. Let's break them down in detail.
Site selection and garden preparation
In any case, garlic needs good lighting and ventilation. Therefore, a place for it is chosen open, even, dry, without flooding.
For growing garlic, choose a flat, sunny place without flooding.
On waterlogged soil, the garlic gets wet and rots. To prevent this, it is often planted on high beds - this is especially true for winter garlic. The best soils are loams and sandy loams with neutral acidity. It is also necessary to observe the principles of crop rotation. You should not plant garlic for 3-4 years after crops such as:
- potato;
- tomatoes;
- beet;
- any kind of onion;
- garlic.
Garlic will feel good after such crops:
- any cereals (with the exception of barley and oats);
- zucchini;
- squash;
- pumpkins;
- cabbage;
- legumes;
- strawberries and strawberries.
The bed should be prepared no later than 3-4 weeks before planting, and for spring garlic it is better to prepare it in the fall. In this case, the soil should be dug deep and fertilizer should be applied at the same time:
- compost or humus at a rate of 5-10 kg / m 2;
- superphosphate - 40 g / m 2;
- wood ash - 1-2 l / m 2.
Landing dates
As with any other crop, planting dates depend on the growing region, or rather, on the climatic conditions of a particular region. When choosing the optimal time for planting winter garlic, you should know that it is important for it to take root before the first frost. Winter-hardy varieties withstand frosts down to -25 ° C, but if the garlic does not have time to take root well, then it will freeze already at -10 ° C. Therefore, it is believed that planting dates should be chosen 3-4 weeks before the appearance of stable frosts, and it is better to plant earlier than later. If the garlic even has time to climb 2-3 centimeters, forming 1-2 leaves, then this is not scary. Experts believe that it is optimal to plant winter garlic at a soil temperature of 10-12 ° C.
Spring garlic does not like dry weather and dry land when planting. Therefore, it is better to plant it as soon as the snow melts, and the soil warms up to + 5-7 ° C. Return frosts will not interfere with the development of the vegetable, as it has good frost resistance. If you are late with planting, then the yield will decrease, since the formation of garlic roots and leaves actively occurs at a temperature of 4-10 ° C, and at a higher temperature, growth slows down greatly.
Planting winter garlic
This process is absolutely simple and it looks like this:
- Planting material is prepared immediately before planting. For this:

- Beds are formed on the prepared site. Usually, for ease of care, the beds are made one meter wide and three longitudinal grooves 10-12 centimeters deep are formed on them with an interval of 25 centimeters.
- The teeth are planted in the grooves with the bottoms down, slightly deepening them into the soil. The planting interval should be 10-15 centimeters, depending on the size of the teeth.
Usually garlic is planted in long beds in three rows with an interval of 25 centimeters.
- Fill the grooves with loose soil, no need to water.
- Before the onset of frost, they cover the bed with straw, hay, fallen leaves, etc. In the spring, this shelter should be removed after germination.
With the onset of frosts, a bed with winter garlic is covered with straw
Planting garlic bulbs
A bed for planting bulbs is prepared in the same way as for cloves. The size of the bulbs should be at least 4-5 millimeters, and even more is better. Air bulbs can be planted in late autumn at such a time that they do not have time to germinate before the onset of frost. This should happen in early spring. And you can also save the bulbs until spring in a canvas bag at room temperature and plant them on the beds at the same time as the teeth. In this case, the bulbs are placed in a refrigerator for hardening 30-40 days before planting. The sowing interval should be 3-4 centimeters, and the embedding depth 2-3 centimeters.
For sowing, bulbs with a diameter of at least 4-5 mm are used.
Planting spring garlic
Spring garlic, unlike winter garlic, forms many (up to 15-30) cloves growing in 2-3 layers. For planting, only the largest teeth from the outer layer are used, and the rest are either used for food or sown with other crops to repel pests. Since spring garlic is planted in the spring, its planting depth should be less than that of winter garlic. After all, it does not need to be protected from frost and it needs to create conditions for faster germination. Therefore, the grooves for its landing are made 4-5 centimeters deep. The planting interval in a row is also small - about 6-7 centimeters, since spring garlic cloves are much smaller. To speed up the emergence of seedlings, you can germinate the teeth by wrapping them in a damp cloth for several days.
Care
The rules for caring for garlic during the growing process are the same for both types. They are simple and consist in performing the usual procedures for garden crops.
Watering
In the spring after germination, garlic needs regular watering. Their frequency depends on the specific weather conditions of the current season. It is important to observe constant soil moisture to a depth of 40 centimeters, preventing it from drying out. Under the condition of mulching the beds, 1-2 waterings per week are usually sufficient. W and 4-5 weeks before the expected harvest, watering is stopped. It is convenient to carry out watering with the help of drip irrigation systems.
top dressing
Garlic will need top dressing in the spring during the period of gaining vegetative mass. Usually, after 2-3 weeks, the beds are watered with a solution of urea (20-30 grams per bucket), using 10 l / m 2. Then it is advisable to feed the garlic twice with an interval of 2-3 weeks with liquid organic fertilizers. It is best to use chicken manure, dissolving it in water (proportion 1: 10), and in its absence, you can use mullein (2: 10). Like watering, top dressing is stopped 4-5 weeks before the crop ripens.
Garlic is best fed with liquid organic fertilizers.
Treatment
Garlic is generally resistant to most diseases and pests. Often it is used to combat these problems on other plants. But still, sometimes (usually with any violations of agricultural technology), he himself is exposed to fungal diseases such as rot, rust, mold, downy mildew. For the prevention and control of them, it is better to use biological preparations (biofungicides), for example, Fitosporin or Trichodermin. Phytosporin is more effective as a prophylactic, it is used for treatments at intervals of 2-3 weeks throughout the season. In addition, it is also an excellent foliar top dressing, absolutely harmless to humans. Trichodermin copes well with root rot and other fungi. It can be used when signs of illness are detected.
Of the pests of garlic, the best known are the onion fly, onion moth and stem nematoma. Less commonly, garlic is attacked by weevils and mites. As for flying insects (flies, moths), it is best to use repellent treatments with infusions of tobacco, ash or a solution of 1 tablespoon of kerosene in a bucket of water during their flight. Of the chemical means of protection, the following insecticides can be recommended:
- Alatar;
- Iskra-Bio;
- Fitoverm and others.
Table: preparations for tillage against nematoma
Harvest and storage
Winter garlic usually ripens by mid-July, and spring - by the end of August - beginning of September. Readiness for harvesting is determined by the presence of certain signs. If the garlic is arrowing, then the signal to start harvesting it is the opening of the seed box. The second sign is yellowing of the lower leaves and stem. If this happens, then do not delay with the start of digging the crop. Bulbs of overripe garlic will disintegrate and store poorly. At the same time, unripe garlic dug early will be soft and unsuitable for storage.
Bulbs are dug up in dry weather and laid out along the beds for 2-3 days to dry. If there is a risk that it may rain, then drying can be done under a canopy, in a barn or in the attic. This process lasts until the tops are completely dry (usually 1-3 weeks). At this time, the food from the stems and leaves continues to be absorbed by the bulbs and they increase their mass. After that, the tops are cut off, leaving tails 2-3 centimeters in size. Spring garlic is often not cut, but braided and hung in a dry place.
Dug out garlic is laid out along the beds for 2-3 days to dry.
In general, the topic of storing garlic is quite extensive, it is the subject of discussions on forums, where many options are offered. Without delving into the wilds, we note one important parameter - the temperature during storage of winter garlic should be within + 1-3 ° C, and spring - 16-20 ° C.
Video: how to store garlic in jars
Features of growing garlic in the regions
Since garlic is a frost-resistant crop, it is grown in almost all regions. The methods and methods of cultivation are the same. The difference exists only in specific calendar dates for planting and harvesting, depending on local climatic conditions. When starting to grow garlic, you need to know that there is one important feature inherent in this culture. Over the years of cultivation of garlic in a particular area, it adapts to its characteristics and, as it were, gets used to, adapts to them. If you later take seed, for example, from the Moscow region and plant it in Ukraine, then the gardener may well be disappointed. Head size, quality and yield may be significantly lower than when grown in a familiar region. Therefore, when purchasing seed material in an online store, you need to be prepared for the fact that the expectations of its properties declared by the seller may not come true. It is better to use local tested varieties.
Video: the secrets of a great garlic harvest
In summary, it can be noted that growing garlic is easy and affordable for a novice gardener in any region. Applying the above rules in practice, he will certainly receive a decent harvest of vitamin and healthy products.
Hello. And let's today I will share with you my secret of how to grow garlic in the open field so that there is a rich harvest. I will conduct a short review of the varieties of this root crop. I will also tell you how to prepare planting material, soil, and tell you about the methods of planting garlic: lateral buds, bulbs, sevkom. After all, following the simple rules of my amateur instructions, both an experienced gardener and a beginner can grow garlic.
Garlic is one of the mandatory plantings on my site. I, like many gardeners, choose this vegetable for a combination of useful properties:
- Tasty tart spice that stimulates appetite, improves digestion.
- A versatile product: garlic is added to salads, sauces, meat dishes, soups, side dishes, marinades, canned food and pickles.
- Garlic strengthens the immune system.
"King of spices" is easy to grow in the garden. The plant is unpretentious - suitable for sowing in open ridges, requires minimal preparation and simple care.
When to plant garlic outdoors in spring
There are two ways to grow garlic - winter and spring. The first is sowing crops before winter, in late autumn. The second is spring planting.
When to plant summer garlic outdoors
Winter garlic is planted from the 2nd half of September to mid-October. It is necessary that the plant, before the onset of frost, has time to form a root system, deepen into the soil by 10 cm. But at the same time, it does not start growing with the advent of winter.
By region
The timing of spring planting varies by Russian regions:
- North-West, Siberia, Ural: late April, early May.
- Middle band: the second third decade of April.
- Southern regions: beginning of April.
Garlic is planted as soon as the soil warms up to 5-6 C. It is a cold-resistant plant that develops comfortably under such conditions. Garlic is able to form a root system only in moist soil, whose temperature is in the range of 4-10 C. When warming, the development of the root system stops - the culture begins to actively grow tops, head.
According to the lunar calendar
I will present favorable dates for sowing spring garlic according to the lunar calendar for 2019:
- April: 1-4, 8-13, 15-19, 23-27, 29-30.
- May: 1-3, 7-11, 13-17.
Now - lucky numbers according to the lunar cycles for planting winter garlic in 2019:
- September: 1-5, 7-12, 16-21, 23-26, 30.
- October: 1-4, 6-12, 16-20, 22-26, 30-31.
It is believed that plants sown on these dates grow stronger, healthier, and more resistant to adverse conditions.
Overview of garlic varieties for planting in open ground
All varieties of garlic can be divided into three categories:
- Spring non-shooting.
- Winter shooting and non-shooting.
Winter varieties are chosen because of the large harvest, early ripening, the formation of large heads and cloves. But their major drawback is their short shelf life. Garlic is suitable for fresh consumption, for cooking first and second courses, pickling and canning.
Popular winter varieties:
- Jubilee Gribovsky. Medium early, high yielding, disease resistant. Shooting variety. The garlic is very spicy. These are large heads with 10-12 teeth in a matte purple skin.
- Boguslavsky. Cold hardy variety. The heads are small (up to 40-50 g), with 5-6 cloves in a purple shell.
- Petrovsky. High yielding and shooter. Differs in excellent keeping quality, resistance to diseases, tart taste.
- Losevsky. Mid-season high-yielding shooter variety. The weight of the heads is up to 80 g, the number of cloves is no more than 5-6. The pulp is dense, sharp. Garlic is stored up to six months.
- Gulliver. Shooting, mid-season. The head is covered with dark gray "scales", the flesh is dense, sharp. Weight - 90-120 g, number of cloves - 3-5. The maximum storage period is 8 months.
Other winter varieties that deserve your attention:
- Flight;
- Sail;
- Komsomolets;
- Gribovsky;
- Prometheus;
- Saved;
- Anniversary;
- Sofievsky;
- Lyubasha;
- Kharkov purple;
- Promin;
- Saky;
- Leader.
Spring varieties are distinguished by the possibility of longer storage. However, you need to create optimal conditions (temperature, humidity, ventilation). The growing season for such varieties is shorter - about 3 months.
The most popular spring varieties:
- Ukrainian white. The head is large - about 20 teeth.
- Gafurian. Early maturing, fruitful, prolific (up to 20 slices) variety. The pulp has a very pungent taste.
- Yelenovsky. Medium-sharp garlic, suitable for long storage.
- Degtyarsky. Mid-season variety. The number of slices in the head is 16-18, the taste is semi-sharp.
- Ershovsky. Medium-early garlic with small heads (up to 35 g). Multiple - up to 15-25 small cloves. The taste is pleasant, semi-sharp. The product is stored up to 7-8 months.
Pay attention to varieties from foreign breeders:
- Silver. High yielding, disease resistant variety. The head has 15-20 teeth.
- Red Duke. Cold hardy garlic. In the head - 8 large slices.
- Elephant. Giant variety - the weight of one head can reach 1-2 kg. The diameter of the fetus is about 15 cm. In one head there are up to 20 teeth.
You can easily get your own seed, leaving a few arrows for the development of bulbs.
Planting material preparation
The richness of the harvest always depends on the quality, proper preparation. Therefore, 2-3 weeks before sowing, I carry out the following procedures:
- Stratification. I put the teeth, bulbs in the refrigerator.
- Sorting. I reject deformed, damaged, soft, twisted, with suspicious inclusions. I remove the seed, left without a shell, scales.
- Disinfection. I usually use an ash solution: 400 g of ash per 2 liters of water. I boil the suspension for 30 minutes, cool to room temperature. Then I soak the onions in it for 2 hours. An alternative is a 1% solution of potassium permanganate, a suspension of copper sulphate of low concentration. In such liquids, the seed is kept for 12 hours.
- Germination. Optional procedure - I turn to it to improve germination. I moisten a napkin, a flap of fabric in water, wrap the cloves in matter. I place the envelope in a plastic bag, tightly tie it, store at room temperature for 2-3 days.
After such simple procedures, the material is completely ready for sowing.
How to prepare for planting garlic
In order for planting to please you with a rich harvest, I advise you to properly prepare the site for sowing garlic.
Soil preparation
Garlic prefers fertile, neutral soil. It develops well on a loamy substrate, loves moderately moist soils. A lowland, a swampy area where melt water accumulates, will not work.
And under the winter, and under the spring land they prepare in the fall:
- For 1 m2 - 1 bucket of humus, 20 g of potassium salt, 30 g of superphosphate. Fertilizer is mixed with garden soil.
- The area is being dug up.
Under winter garlic, the bed is leveled after 2 weeks. Under spring, they are treated with a rake already in the spring.
Crop rotation
The best predecessors for a garlic ridge:
- cabbage;
- legumes;
- pumpkin;
- green manure;
- zucchini.
Unwanted predecessors:
- the root crop itself;
- tomatoes;
- cucumbers;
- carrot;
Neighborhood with a garlic ridge is useful for plants:
- gooseberry;
- Strawberry;
- raspberries;
- currant;
- potato;
- tulips;
- gladioli;
- roses.
Garlic scares away pests from these plantings - caterpillars, slugs and even moles.
How to plant garlic outdoors
I will present several ways to plant winter and spring garlic. They differ in the type of seed you will be using.
Planting with teeth (lateral buds) of bulbs
This method is suitable for winter planting. Pre-divide the head into individual cloves. The sowing scheme is simple:
- Form ridges 1-2 m wide.
- At a distance of 15-20 cm, make uniform furrows.
- Deepen the teeth by 5-7 cm. Use specimens weighing at least 4 g for sowing.
- Cover the furrows with garden soil. Above is a centimeter layer of fertile humus.
Lateral buds should take root before the onset of cold weather - do not hesitate to plant them. A little trick: with a lack of sun, place the teeth in the groove with the ribs to the south. So the sprouts will be turned to the star, which will increase their productivity, simplify care.
How to plant air bulbs (bulbs)
Air bulbs are collected from the peduncle of the plant - the most developed arrows are left for its formation. As soon as the process straightens, the bulbs are ripe. They are sorted, dried for a month. Before planting, soak for 12 hours in an ash solution.
Sowing with bulbs is carried out in the fall, in order to get single-toothed bulbs (sevok) the next year. Already when planting the latter, they get a full-fledged edible garlic. Sevok is harvested when the plant begins to wilt, turn yellow. It is important not to miss the right moment in order to prevent self-deepening of the bulbs.
The scheme for sowing air bulbs is simple:
- Planting depth - 3 cm.
- The distance between the bulbs in the line is 2 cm, between the rows - 10 cm.
Be sure to prepare the bed for winter - mulch with sawdust, chopped bark, last year's compost or peat. The layer thickness is at least 2 cm. Such a mulch will reliably cover the garlic ridge from the cold. If severe frosts come, additional protection with roofing felt or film is needed. Winter garlic survives cold snaps down to -20 C.
To hold snow on the beds in the spring, brushwood is used. With the onset of warm days, all protective layers are removed to prevent the plantings from warming up. The mulch is carefully removed with a rake so as not to damage the first shoots. For access of oxygen to the roots, the earth is loosened with a hand chopper.
Planting with single-toothed bulbs (sevkom)
You can start sowing spring (spring) garlic when the soil warms up to 5-6 C. Follow a simple algorithm:
- Make even grooves with an interval of 20-25 cm.
- The depth of the furrow is 7-9 cm.
- Place the bulb upside down. The distance between neighbors is 6-8 cm.
- The depth interval is equal to twice the height of the sowing. On average, 6-7 cm.
- If the substrate is sufficiently moistened with melt water, watering is not required. Water procedures are needed only with dry soil.
- Although garlic is not afraid of spring frosts, mulch it with wood chips, sawdust, straw or compost.
Sowing winter garlic in this way takes place according to a simple scheme:
- Make the grooves deeper - 15-20 cm.
- Pour coarse-grained sand mixed with ash into the bottom of the recesses, with a layer of 1.5-3 cm.
- The bulbs are placed bottom down, deepening by about 5 cm. If you plant garlic in sandy, sandy loamy soil, the distance can be increased to 12 cm.
- Place large onions at a distance of 12-15 cm, smaller ones - 8-10 cm.
- After planting, watering winter garlic is not required.
Don't forget to mulch your garden bed. If there is a threat of sudden frosts, cover the plantings with "non-woven", dense polyethylene. In conditions of warm autumn, before the onset of winter, the first sprouts may appear. This should not be feared - if the plant has developed a strong root system, it will be able to survive the cold months.
Caring for garlic after planting in open ground
I have already voiced that garlic requires very simple maintenance. Take care of the timely removal of arrows (if the variety is arrowing). The plant wastes energy on the development of shoots to the detriment of the formation of the head.
The arrows are abruptly cut off or cut off with a knife, scissors. You should not pull them up - this way you can pull out the plant, damage the root system. I remove the arrows as soon as they reach 12-15 cm. I break off closer to the leaf rosette. I do not advise removing too small arrows - they will grow again, taking vitality from the plant.
The key to a good harvest is timely weeding and loosening. I am not too lazy to do these procedures after every heavy rain, watering.
How to water garlic outdoors
I water it when the soil dries up. The plant loves infrequent, but abundant water procedures - up to 10-12 liters per 1 m2. On rainy days, I reduce both the amount of watering and the amount of water used. In August, I reduce water procedures to nothing. In order for the garlic to be tasty and tart, to be stored longer, watering should be abandoned during this period.
top dressing
Garlic plantings require both mineral and natural fertilizers. Any last year's manure is suitable for plants - pig, cow, horse, rabbit or sheep. Potassium and phosphorus supplements are also important. For winter plantings, the following schedule is recommended:
- Early spring. The following is added to the frozen substrate: 100 g of superphosphate, 60 g of ammonium nitrate, 50-60 g of potassium sulfate. This is an approximate consumption per 10 m2 of ridge.
- A month later. The same substances are added in similar proportions.
- Achieving the head volume of a walnut. Repeat procedure.
 dressing for garlic when grown outdoors
 Now I’ll talk about feeding spring garlic:
- The appearance of the first shoots. Mullein solution: one part dry matter to 50 parts water. It can be replaced with herbal infusion, a solution of bird droppings of low concentration or a mineral nitrogen agent.
- After 2 weeks. Use any complex mineral preparation for culture.
- End of June beginning of July. Phosphorus-potassium fertilizers.
What difficulties can arise when growing garlic in the open field
The difficulty that can be encountered when breeding garlic is susceptibility to diseases and pests. I will tell you about the main diseases and enemies, methods of dealing with them.
Pest control
Many uninvited guests are not averse to eating garlic:
- stem nematode;
- bear;
- scoop;
- thrips tobacco;
- flies - sprout, onion;
- caterpillars - cabbage, winter;
- onion moth;
- onion secretive proboscis.
Pests can be resisted with effective folk remedies. The most popular is an infusion of shag:
- For 2 liters of heated water - 250 g of tobacco, 1 tbsp. a spoonful of red pepper.
- Infuse the composition for 3 days.
- Strain the concentrate, dilute with 10 liters of water.
- Add 30 g of laundry soap shavings, mix until smooth.
- Use a spray formulation.
With the dominance of pests, turn to effective insecticides - Neoron, Aktellik, Calypso, Dimetoat. Use the products according to the instructions, observe the waiting periods in order to harvest a safe crop. Take care of your own safety - a respirator, goggles, closed clothing and shoes.
Disease prevention
Garlic suffers from almost the same diseases as onions:
- rust;
- powdery downy mildew;
- mosaic;
- rot: white, neck, gray;
- jaundice;
- helminthosporiasis;
- fusarium.
At first, an infusion of yarrow and calendula will help garlic:
- For 1 liter of hot water - 500 g of chopped green mass.
- Insist composition for 7 days.
- Dilute 1 liter of concentrate with 10 liters of plain water.
- Use spray liquid. It is also useful for tillage before sowing.
In case of severe damage, treatment with fungicides is required. But I do not advise you to allow such a stage - garlic absorbs not only minerals from the substrate, but also the poisons with which you processed it. This makes eating the crop unsafe.
For beginners step by step: how to stepson cucumbers in a greenhouse
Garlic is a popular culture among gardeners, which today can be found in almost every household plot. Due to its unpretentiousness in care, this vegetable can be easily grown even by novice gardeners. Gardeners only need to know how to grow garlic, what kind of care the plantings will need, how to properly plant the seeds in order to get the maximum possible yield.
Proper cultivation of vegetables
Growing this plant is not difficult, so every gardener can get a good harvest of garlic. It is only necessary to decide when to plant garlic, which can be done in spring or autumn. In cold regions, winter planting is most popular, when garlic is planted in the fall, which allows you to get an excellent harvest next year. In the south, where it gets warmer already in March, and the first frosts are noted only in December, the spring technology of growing this vegetable is very popular, when the seedlings are planted in early spring and harvested in September-October.

