Insulation of the iron balcony. How to insulate a balcony with your own hands: from the refrigerator to a warm island
V recent times more and more apartment owners in multi-storey buildings decide to expand their area at the expense of a balcony. This is a great option if you figure out how you can properly insulate and equip it from the inside.
If the balcony is not glazed, windows must be installed before insulation. It is better to choose double-glazed windows of high quality, without saving, because the amount of heat in the apartment depends on them. Elements of window structures should adhere to each other as tightly as possible so that drafts do not penetrate into the house.
The balcony is a part of the building that needs insulation more than others, because not all residents use it only as a warehouse. Increasingly, people begin to equip their balconies for an additional room, for example, Personal Area... For these and not only reasons, it is necessary to produce competent insulation of the structure from the inside.
Balcony insulation stages
In modern technologies of insulation of open hinged structures(balconies) four types of material are used as internal insulation: polystyrene, penoplex, penofol and mineral wool. Consider technological features installation and types of wadded insulation used for thermal insulation of balconies.
playlist
1. First, the existing gaps are closed. It is necessary to carefully examine the balcony and determine their location. You can fix the problem with polyurethane foam, even if the slots are quite wide, you just need to choose a quality one, for example, "Macroflex", "Soudal", "Moment Montage". After the foam dries, the excess is trimmed with a utility knife.
2. Waterproofing the balcony from the inside. For these purposes, you can use penetrating waterproofing "Aquatron", "Penetron" and the like. They are applied with a brush, roller or spray method. The advantage of penetrating waterproofing is that it penetrates into the walls, as a result of which they become more resistant to low temperatures and more durable. In addition, waterproofing eliminates all microcracks that are invisible to the “naked” eye.
3. Laying thermal insulation material. For this purpose, you can use polystyrene foam, polyurethane foam, foam, mineral plates, etc.
Laying the vapor barrier. You can use polymer "breathable" membranes, vapor barrier films"Izospan", "Rockwool" and the like or, in extreme cases, penofol, which is laid with the foil side towards the apartment. So the heat leaving the room will come back.
4. Exterior decoration ceiling and walls on the balcony.
Insulation option in which there is no additional insulation
This technique can be used provided that materials are available that have low vapor permeability ( it comes about materials such as polystyrene, polystyrene foam, or extruded polystyrene foam).
# 1. Thermal insulation of a balcony with expanded polystyrene: a sequence of works
If you chose expanded polystyrene as a heater, then the sequence of work is as follows:
After all the cracks are closed and the waterproofing is done, the surface is treated with a deep penetration primer, for example "Ceresit". This can be done with a brush or spray. The primer is poured into a bucket or other container that you do not mind, then applied to the surface. Carefully work on the walls, ceiling and floor to achieve maximum adhesion of the insulation boards to them.
After applying the primer, wait at least six hours, then continue working. If the wall is made of cinder concrete, then the primer is carried out twice.
Have a rest - we continue. We unpack the expanded polystyrene plates. They are attached with glue and fasteners. The glue must be prepared according to the instructions and mixed thoroughly. Then apply it on the first sheet, which is glued to the surface (do not forget to step back three centimeters from the edges, and leave small gaps between the sheets). Install the expanded polystyrene sheets in a checkerboard pattern.
It is up to you to lay a vapor barrier or not. In this case, it is not necessary to do it.
Reinforcing mesh installation. When all slabs are securely fixed to the walls or ceiling, the reinforcement mesh should be installed. For this, the surface of the slabs is worked out with glue, perforated corners are fixed at their corners. The reinforcing mesh is rolled with a roller to the glued surface, then another layer of glue is applied. When the wall is dry, it is primed and plastered.
# 2. Insulation of the balcony with penoplex
Penoplex is actively used in the insulation of premises. You can fix it to the surface using bituminous mastics, polyurethane foam or dowel mushrooms. Consider the option of mounting on polyurethane foam.


So. The waterproofing is done. Polyurethane foam is applied to the insulation plate along the perimeter. It's enough. After application, we wait a couple of seconds and fix the plate on the insulated surface. The next slab is stacked to the first end-to-end. After two days, you can fix the slabs with additional dowels. Further, the whole process is repeated in a similar order, which is described above. Do the finishing at your discretion. You can sew up the insulation plates with plastic panels, they look very original.

Advice. If the balcony is intended only for storing essential things on it, then it is enough to insulate the walls in one layer. If you need to insulate more thoroughly, then it is better to lay the insulation in two layers.
No. 3. Thermal insulation of a balcony with mineral wool: technology features

Thermal insulation of balconies with mineral wool is carried out under the constructed lathing. A lining is attached on top of the frame - wooden or plastic panels with special grooves.
A well-known fact is the building recommendation to carry out insulation from the outside of the building. However, in the insulation of balconies and loggias, it is often impossible to arrange the insulation material outside. Internal placement of a layer of insulation requires certain calculations, adherence to technology and correct selection materials so that in the future the work performed does not lead to wetting of the walls, corners and ceiling inside the outrigger structure.

Views mineral wool
Depending on the raw materials used in the production, there are three main types of mineral wool: glass, stone and slag. All three materials are suitable for insulation work.
Mineral wool is a soft material that does not have rigid dimensions. It is supplied in the form of rolls (they are unwound into a track before laying) or soft mats. Sometimes one side of the insulation is covered with aluminum foil to enhance the thermal insulation properties.

Important! During installation, the foil should be located on the side of the room. Inner warmth the room will bounce off the foil surface back into the living space.
The thickness of the mineral wool layer determines the quality of insulation and varies in size from 20 to 200 mm.
Mineral wool installation technology
Any kind of mineral wool is mounted under the frame, located between outside wall(ceiling, roof) and frame supports. As supports, you can use wooden sticks or metal profiles, depending on what kind of cladding will be used in the future.
When using lining for finishing wall cladding, the lathing frame is constructed of wood. Wooden sticks are set cross section 150 - 250 cm 2, while you can save a little the inner space of the balcony by installing sticks of rectangular rather than square section (30 × 50 cm 2, 30 × 70 cm 2).
All racks and horizontal battens are installed under the level. Fastening the uprights to concrete surface ceiling and floor are provided with anchor bolts. Horizontal supports are attached to vertical supports. If the future cladding is made of plastic lining, the horizontal slats are attached at three levels: knee, hip, shoulder.
For internal insulation with mineral wool, it is mandatory to install a vapor barrier. The cotton material itself is breathable, it easily permeates gaseous substances (air, steam).

Considering that with internal insulation, the point of condensation formation shifts into the insulation, it is necessary to limit the ingress of steam or air from their living quarters into the construction wool. For this purpose, a vapor barrier film is inserted between the mineral wool and the finish.
Interior decoration
The purpose interior decoration:
- Close the heat insulator material from the living space.
- Create an aesthetic interior wall covering for a room or a heated loggia.
Exists various materials for interior decoration of balconies (drywall, wood, plastic, plaster). With a previously erected lathing frame, the decoration is carried out by hanging different types panels: plywood, MDF, lining made of wood or plastic.
Finishing with clapboard is carried out by cladding the walls with wooden (or plastic) carriage panels that have special grooves around the perimeter for ease of installation and tightness of fastening. At the same time, plastic lining is often a cheaper imitation wood covering, laid on the inner walls of the balcony (or loggia). It is characterized by less strength and stiffness.
Wooden carriage panels are reliable, environmentally friendly, and have sufficient rigidity for the floor covering. The ceiling of the loggia can be sheathed with plastic clapboard, the floor is covered with wood, as for the walls - both types of carriage covering (plastic and wood) can be used here.

It is recommended to start clapboard cladding from the corner. Each panel is checked for verticality with a level and fixed on the crate special mount(with a cleat). You can fix the carriage panel with small studs.
After finishing the finish, the inner surface is treated with a composition that protects the wood from moisture and from destruction.
Problems that have to be faced with the internal insulation of the balcony
1. When sheathing walls, ceilings and floors with insulating material, the area of the room inevitably decreases. And this shortcoming is not the only one.
2. In many structures, condensation often occurs, which is difficult to get rid of when everything construction works already produced. Why does excess moisture appear?
The insulation structure installed on the balcony includes the following items:
- outdoor fencing located on the street; insulating material; warm room.
Air masses tend to get outside, and their moisture, which has passed through the insulation, settles on the outer fence in the form of condensation. The insulation gets wet and completely loses its performance characteristics.
Warm vapors, colliding with a cold fence, also pass into liquid state... Excess moisture in a room causes many problems: for example, the appearance of mold or rotting of wooden structural elements. That is why you need to know how to properly insulate your balcony.
From the inside, this can be done in two ways.
Hydro-barrier
Hydro-barrier is a special design that prevents moisture condensation on the outer fence. The technology of its installation includes certain stages:
- installation of vapor barrier;
- finishing with facing materials.
The hydro-barrier makes it possible to use even moisture-resistant materials when insulating from the inside. Polyethylene or foil is used as insulation.
Important! In this case, all seams must be sealed with construction tape.to insulate the balcony with the best quality.
The disadvantage of this insulation method is that the walls cannot breathe.

Thermal insulation without additional insulation
It is possible to insulate the balcony from the inside in this way only if there are materials with low vapor permeability: polystyrene, expanded polystyrene or extruded polystyrene foam. The design includes:
- fiberglass mesh, also mounted with glue; finishing.
Advice! For better fastening insulation, you can use plastic dowels.
No glue is required for thermal insulation with expanded polystyrene. This material is supplied to the surface to be insulated using a spray, foams and dries.
Innovative insulation from TechnoNICOL LOGICPIR The balcony is suitable for walls, ceilings, floors. saves space - plate thickness from 20 mm.
- keeps heat due to the unique thermal conductivity of 0.022 W / m ° K (compare with glass wool 0.032-0.041 W / m ° K);
- protected from moisture, rot, mold and fire (flammability group G1 according to GOST 30244-94);
- will last for many years (the insulation retains its properties for 50 years).
Advice! When insulating a balcony from the inside with expanded polystyrene, it is better to make a layer of material about 80 mm thick. The vapor permeability of extruded polystyrene foam is lower than that of simple polystyrene, so its layer can be even smaller.
Floor insulation
Behind the insulation of the balcony walls, the floor should be insulated. If you correctly calculate the amount of insulation and the thickness of its layer, you can make the floor on the balcony at the same level as in the other rooms.
At the first stage of work, the slab is cleaned of dirt, debris and crumbling plaster. Then the floor is covered with foil and penofol. The second stage is the fastening of the crate, previously cut with a jigsaw. Insulation plates (preferably foam) are laid between its beams, and the gaps between them are filled with foam. The final stage is the installation of flooring, linoleum or parquet and skirting boards.
This design can raise the balcony floor by about 150 mm.
Electrically heated floor
You can also insulate the floor using modern technologies... Then the balcony will not differ from other rooms in almost anything. Installing heat tracing is a relatively straightforward process, but energy costs increase significantly.
For heating the balcony floor, a special electric cable is installed from the inside.
Important! Under no circumstances should moisture get into the cable.
Insulating construction components:

Ceiling insulation
Advice! If the neighbors living on the floor above have already insulated their balcony, there is no need to insulate the ceiling.
The most optimal material for ceiling insulation is polystyrene. It weighs very little, which is very important in this case. Its main layer is complemented by foil, which acts as a vapor barrier and heat reflector. Foil polystyrene foam is fixed with polyurethane foam glue and disc dowels. All seams are sealed with special metal tape.
Polyfoam is attached to aluminum hangers using the same combined method.
Important! Insulation sheets should adhere to each other as tightly as possible.
All cracks are filled with polyurethane foam with special care, so every, even the smallest, hole can make all work absolutely useless.
You can insulate the balcony from the inside both independently and using the services of professionals. However, these construction jobs can be easy if you follow the advice and carefully understand the technology.
How to insulate a balcony with your own hands: step by step photos and instructions

(c) (c) (c)
Errors when insulating a balconyHas the day come when it's time to finally throw out your old ski and take out all the cans from your balcony to the garage? Your head is full of ideas, and if not, then the global web will help you. You are ready to realize all the brightest and wildest desires on the vacant piece of living space. There is one little problem left. These are harsh conditions that attack your blood square meters.
Therefore, the primary task that must be solved before letting fantasy unfold is keeping warm. In order to minimize repair costs as much as possible, let's figure it out how to insulate a balcony from the inside with your own hands.
If a decision is made to attach the balcony area to the living area of the apartment, it is necessary to carry out work on its insulation. So that after the repair there are no unforeseen problems, the work must be carried out in compliance with the established norms, rules and approvals.
Serious reconstruction will require permission from local executive authorities, architecture and the Ministry of Emergencies. You should not ignore this point in order not to be punished for violating the housing code. In addition, reconciliation will help avoid certain mistakes when changing structural elements... Experienced specialists will immediately notice that there are no joints in the project. Correction of errors at the design stage will avoid the cost of correcting errors after repair.
The order of work and their volume depend on what tasks the reconstructed balcony will perform:
- It will continue to be a place to relax in the warm season, and insulation is carried out to protect it from wind, dust and precipitation. This is a less expensive method and easier to implement.
- It will be added to the area of the apartment as a full-fledged living space, used all year round. Here, the scope of work increases significantly, since it will be necessary to provide for heating, steam and waterproofing, and change the power supply system.
Attention! Balcony with sliding windows it is practically pointless to insulate, since the windows themselves will let the cold through.
How to insulate a balcony from the inside with your own hands
First of all, it is necessary to make measurements and determine the amount of materials, their composition and quality. Manufacturers offer a wide range of materials for insulation, insulation and decoration for every taste and material wealth. Saving on quality, of course, is not worth it. You need to take care of environmental friendliness and fire safety housing.
A balcony is a remote structure that is located outside the building, its three sides and the ceiling require insulation, even if the neighbors have already done the work. The sequence of work should be built in such a way as not to miss important nuances, which then have to be corrected:
- Particular attention must be paid to the condition fencing parapet... Most often, it is a thin plate made of metal, profile, or iron rods. Such a structure will have to be replaced with a brick wall or foam blocks. For the construction of the wall, you need to choose light, hollow bricks so as not to create unnecessary load on the supporting plate.

The enclosing parapet of the balcony
- Glazing it is better to entrust it to professionals. Depending on the chosen interior, the profile can be wooden or PVC with double glazing. The number of doors is determined in advance to ensure ventilation and ease of maintenance. During the installation of windows, expansion profiles are installed, which will facilitate the fastening of insulation boards.

Glazed balcony
- Sealing cracks, joints, holes, chips and cracks polyurethane foam, polyurethane sealants or mastic. They will protect against moisture, dust, negative environmental influences.

Sealing cracks on the balcony
- Let down power supply so that access to food is as practical as possible. Electrical work and the heat supply device must be carried out by specialists with special permissions to carry out such work.

Conducting electricity on the balcony
- Warming is carried out in the following sequence: walls and ceiling.
How to insulate walls on a balcony
To choose the right insulation, you need to know its technical characteristics, pros and cons.
The main parameters that determine the quality of the material is its thermal conductivity, ecological and Fire safety... It is very important that the insulation is lightweight and takes up less space.
- ... Multi-layer, consisting of foil and polyethylene foam, reflective material several millimeters thick. At the same time, it reflects at least 90% of heat, durable, lightweight, inexpensive. During installation, it easily takes the shape of a surface and is attached.

Insulation of a balcony with penofol
- Polyurethane foam... Provides fire and environmental safety. It is applied to the surface by pouring or spraying, closes all cracks, provides waterproofing, does not require a frame and fastening.

Thermal insulation of a balcony with polyurethane foam
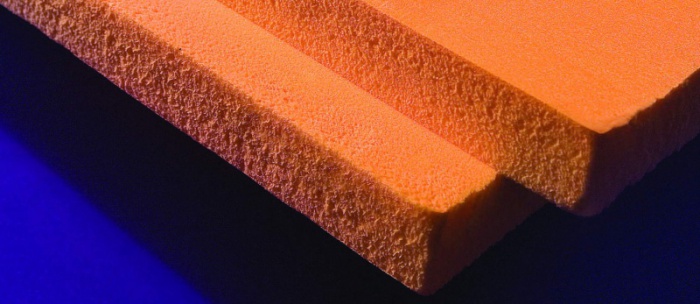
- Penoplex... These are foamed polystyrene boards. The material practically does not absorb moisture, but it is bulky and poorly accepts the parameters of the surface to which it is attached.

Insulation of the balcony with penoplex
- Expanded polystyrene... It has excellent sound, steam and heat insulation properties. Due to its efficiency and environmental friendliness, it is well suited for balcony insulation.

Thermal insulation of the balcony with expanded polystyrene
- Stirodur... A type of expanded polystyrene, extruded, green, with good characteristics.

Balcony insulation with styrodur
- Isover (mineral wool)... Widespread fiberglass based insulation. This is mineral wool, which retains heat, provides sound insulation, and does not weigh down the structure. Has an affordable cost. It is used with additional waterproofing and vapor barrier.

Insulation of a balcony with isover (mineral wool)
It is not advisable to use fiberglass, as it is fire hazardous and releases toxic substances.
Taking into account the temperature difference between the outside air and the room, it is necessary to provide a kind of hydro-barrier that will not allow warm air to create condensation in contact with a cold fence. The presence of condensation will lead, in the future, to the formation and decay.
Insulation is fastened, depending on the type, with glue, special dowels with a wide head, spacer nails or spraying.
Using mineral wool the surface is pre-primed. After drying, they are applied to the wall mineral slabs smeared adhesive composition... Installation starts from the bottom and is carried out according to the type brickwork... Allow the glue to dry completely within 24 hours. It is possible to carry out reinforcement in several places with dowels.
Often used for laying slabs wooden frame, the design of which retains heat worse than insulation. Therefore, it is better to fasten the material end-to-end and seal them with aluminum tape or polyurethane foam.

It is better to fasten the layers of mineral wool end-to-end
The next layer is attached to the vapor barrier. It could be foil-clad polyethylene... It is laid with foil inside the building so that it reflects the heat coming from the house. Insulating materials for other heaters may not be used, depending on the purpose of the room.
How to insulate the floor on the balcony
About a quarter of the heat loss on the balcony occurs through the floor, so work needs to be done to prevent these losses. This is not the most difficult operation and it is quite possible to do it yourself. When choosing a material, it is necessary to take into account that the floor level on the balcony after installation must be at or below the floor level in the adjoining room.
There are several simple and affordable ways:
- with a frame device;
- monolithic;
- electric warm floor.
Only one professional skill may be required - the device of a warm floor.

Underfloor heating installation on the balcony
The main point in choosing a method and material is the condition of the supporting plate. In houses old building structures can wear and are not always ready to withstand heavy loads. Therefore, it is important to agree with the specialists of the architecture department what weight of materials can be used for repairs. This is especially important when installing monolithic concrete floors.
The frame floor, in turn, can be arranged using:
- mineral wool;
- expanded clay;
- pepoplast;
- foam or expanded polystyrene.
Floor insulation technology consists of several stages.
- Leveling the surface of the slab is carried out if necessary.
- Waterproofing with plastic film or roofing material (for damp rooms).
- Arrangement of wooden lathing. A bar is used with a height close to the thickness of the insulation. It is laid along the length of the balcony at a distance of 50 cm from each other or another convenient distance, depending on the size of the insulation sheets. Leave indents from the walls 5-7 cm, and the ends - 5 cm, so that when high humidity the wood is not deformed. Attached to the floor with anchors or self-tapping screws with a depth of at least 4mm. This will provide a firm hold. If the installation of transverse beams is required, it is necessary to make cuts up to half the thickness at the joints and make grooves with the help of which the transverse logs are connected to the longitudinal ones. They control the level, do not allow the bars to sag. If necessary, put wooden wedges or dies, which are fixed to the floor, with polyurethane foam. It is important to prevent foam from getting at the junction of the wedge and the bar.
- The lathing is filled with the selected insulation.
Cheap and effective material — mineral wool... Available in rolls and slabs, lightweight, easy to install. The size of the canvas is chosen in such a way as not to crease or bend it. This degrades the protective qualities due to the decrease in the amount of air between the fibers. The main disadvantage of mineral wool is its low moisture resistance, so it is necessary to use the next layer of vapor barrier.

Popular, inexpensive Styrofoam due to the ease and simplicity of installation, it is most often used as a heater. It is highly hygroscopic and resistant to any environment. Among the disadvantages are deformation under loads and poor sound insulation.

Thermal insulation of the balcony floor with foam
Penoplex it is resistant to mold development, mechanical stress, temperature changes and excellent thermal insulation performance. As disadvantages, you can cancel its flammability with release harmful substances and the thickness of the material.

Insulation of the floor and walls of the balcony with penoplex
High fire resistance, durability possesses expanded clay... But it is not very good for insulating a balcony, since a thick layer is required for normal thermal insulation.

Thermal insulation of the balcony floor with expanded clay
- The cracks remaining after filling with insulation are foamed.
- On top of the insulation or vapor barrier (if used) as a rough flooring, after which the selected floor material will follow, chipboard or moisture-resistant plywood is attached.
A cement screed is used only with a fairly solid balcony structure. In order not to exceed the permissible load, use reinforced screed up to 50 mm thick.
The following methods will require special professional skills.
As insulation they implement electric heating systems using a special infrared film, cable, tapes. They are laid on a thin layer of insulation and installed according to the manufacturer's instructions.
For water floors a device in a special way of the water circuit is required.

Water floor device diagram
How to insulate the ceiling on the balcony
Before starting work, you should carefully inspect the ceiling for signs of leakage, since even a small amount of moisture, falling on top of the insulation, can lead to the development of mold.
Considering the difficulty of working on the ceiling, it is necessary to protect the eyes and use glasses.
Already familiar penoplex, mineral wool, polystyrene foam (foamed polyethylene foam) are used as material for work.
Penoplex density 35-45kg / cm² allows the use of panels from 20mm, which will provide normal thermal protection. The only drawback is the high cost.

Insulation of the balcony ceiling with penoplex
Thickness foam can be within 50mm, and the density is 15kg / cm², then MDF, PVC or drywall panels are mounted on top. At a density of 25kg / cm², a putty can be used.

Insulation of the balcony ceiling with foam
For ease of installation, markup is carried out taking into account that the plates or sheets of insulation fit well into the prepared crate, determine the level of fastening. It is better to calculate everything in advance at the bottom, then the work at the top will take less time. The thickness of the layers of insulation and finishing should be such as not to interfere with the opening of windows.
Use a different sequence of work:
- Sheathing device → installation of insulation → cladding.
- Fastening of insulation throughout the entire area → vapor barrier → installation of a wooden lathing or frame from a metal profile → cladding.
If the balcony is located Upstairs building, it is important to prevent moisture from the roof from getting onto the insulation; for this, an additional layer of insulation with polyethylene or foil polyethylene foam is provided under the roof.
The first layer for waterproofing can be a special compound based on bituminous mastic, applied to concrete slab brush. The next step is to install a sheet waterproofer.
How to insulate a balcony with penoplex
Penoplex is an accumulation of expanded polystyrene balls with air spaces... Practically does not absorb moisture, has a long service life, low thermal conductivity. Slabs are produced with a thickness of 2-10 cm.

Penoplex plates
The lightness of the material does not place additional stress on the base plate. It is resistant to deformation, does not emit harmful substances. To increase fire safety, choose the type with the C marking. Since the walls of the balcony are thin, thick insulation plates are used, which will reduce the useful area of the room.
Under the influence of sunlight, penoplex loses its properties, therefore it is used only as an internal insulation.
The material is easy to cut, does not crumble, does not create problems during installation. It is used to insulate walls, floors and ceilings. The following types of fastening are used:
- Disc type dowels with plastic cores. This mount is suitable for uneven surfaces, metal profile roofs.
- With a special glue applied to a previously primed surface, it is enough to apply the glue in dots or in a zigzag pattern. It adheres well to smooth concrete substrates.
- With glue, with additional fixation, dowels.

Methods for applying glue to penoplex
Plates of penoplex are placed in prepared cages of the crate or without it, on the entire surface. The use of battens, especially on the façade, impairs thermal protection.
The fit of the plates is carried out tightly, the joints are sealed with construction tape or filled with polyurethane foam. The insulation is covered with a layer of polyethylene with a foil layer. Depending on the purpose of the room, the vapor barrier may not be used.
Penoplex insulation is suitable for all types of interior decoration: special plaster, plasterboard, wood and finishing boards.
How to insulate a balcony with foam
One of the most common ways to insulate a balcony (walls, floor, ceiling) is polystyrene foam. This material, at a relatively low cost, is capable of correct installation, provide excellent thermal insulation performance. Among other positive qualities, it is worth noting resistance to adverse weather conditions. It does not absorb moisture, does not collapse under its influence, is resistant to the formation of rot and mold.
Polyfoam does not emit harmful substances, it goes well with other materials.
For insulation of the balcony, polystyrene is used both outside and inside. It is better to entrust external work for a multi-storey building to specialized organizations for the purpose of safety.
For internal insulation, a foam thickness of 4-6 cm is sufficient.If the front part is thinner than the side panels, a thickness of up to 10 cm can be used.When choosing a thickness for floor insulation, it is necessary to leave a margin of height for the floor itself, and for the ceiling - for opening windows.
Warming is carried out in two ways:
- Glue... On flat surfaces that do not require a waterproofing device, foam plates can be glued with a special glue (Ceresit ST-85). This method is good for installing a floor under the next screed or walls - under plaster. In this case, when the foam sticks, the glue is applied to its outer surface with a thickness of 2-3 mm. Without waiting for complete drying, they apply a reinforcing mesh, but do not flood it and cover it with another layer of glue.

Glue method of foam insulation
- Wireframe... Since the use of other finishing materials requires additional mount, arrange a wooden crate or a frame made of a metal profile. This method is convenient for creating a multi-layer cake that provides waterproofing on the outside, and vapor barrier on the inside. Layers can fill the cells of the frame or be located under the bars and on top. The foam itself is cut to the size of the cells so as to fill them as tightly as possible. It is fastened with dowels or self-tapping screws with wide mushroom-shaped caps.

Frame method of insulation with foam
Slots , emptiness , irregularities are filled with scraps, polyurethane foam or sealant. After drying, you can attach a layer of vapor barrier over the insulation and the cake is ready for finishing with plasterboard, plastic panels or other finishing.
How to insulate a plastic balcony
Plastic balconies or decorated with plastic panels resistant to impact external environment, sun rays, temperature difference. The guaranteed service life of high-quality panels is at least 50 years. They are easy to install, have an affordable price, are easy to maintain and look aesthetically pleasing. Thanks to positive characteristics, plastic balconies have gained popularity.
Plastic panels improve the aesthetic appearance and provide sufficient thermal protection for balconies with improved glazing.

Balcony with plastic panels
The balcony cladding with plastic is carried out on a mounted wooden frame or metal profile, which reacts poorly to temperature changes and changes in humidity. The frame device creates free space between the walls and finishing panels... It is foolish not to take advantage of this moment and add one of the common heaters to this space. If, at the same time, the seams and joints of the balcony structure are sealed, then even one layer foam, penoplex or mineral wool filling the crate cages will significantly change the microclimate. And the use of an additional layer of vapor barrier will make it possible to use plastic balcony during all year round as a full-fledged living space.
How to insulate a wooden balcony
Lovers of wood in the interior, maintain the style on the balcony. The main advantages of wooden structures are their environmental friendliness, favorable microclimate created by breathable material. The texture of the wood, supported by modern finishing materials, creates a cozy atmosphere and an attractive look. However, without additional insulation, a wooden balcony can only be fully used in the warm season. In addition, under the influence of the external environment, the tree ages quickly, absorbs moisture, cracks, and lends itself to decay. It takes an ongoing investment to keep open wooden balconies looking attractive.

Wooden balcony
Insulation with installation will help to improve consumer qualities glazing and a set of works on waterproofing.
The interior is well supported by double-glazed timber frames of the appropriate species, allowing the balcony to be used as a living space. After their installation, work is carried out to seal cracks, cracks and abutments using polyurethane foam. Insulation technology is similar to work for structures made of other materials, however, wood requires mandatory hydro and vapor barrier.
Work order:
- Wooden balcony structures are treated with agents to protect against decay, insects and increase fire resistance. This also applies to the bars for the lathing device.
- The concrete base is primed.
- Waterproofing is laid on the prepared surfaces. Roofing material or mastic is used for the floor, polyethylene or foil for walls and ceilings.
- A wooden frame is prepared from bars, which provide the possibility of laying an insulation of the selected thickness.
- Insulation (mineral wool, polystyrene or penoplex) is tightly placed in the cells of the crate. The remaining voids are filled with foam.
- A layer of vapor barrier made of foamed polyethylene foam, penofol is attached on top of the insulation.
- Finishing wood paneling, clapboard. It must be ensured that the weight of the finishing material does not overload the supporting plate of the balcony. Some of the wooden materials can be replaced with lighter ones, without sacrificing functionality and attractiveness.
To insulate the balcony with your own hands was a pleasure and ensure an excellent result, think over the goals and objectives in advance, carry out the necessary approvals and measurements. Choose materials in accordance with the technical characteristics and your material capabilities. Carry out work in the complex, not missing the little things. And success is assured.
You can also watch several videos that will help you insulate the balcony with your own hands.
Video
Thermal insulation of balconies and loggias with mineral wool
Balcony insulation technology with penoplex
Warming and joining the balcony
How to insulate the balcony? The choice of insulation
How to insulate a balcony? Step-by-step instruction
How to insulate a balcony with your own hands: how and how to insulate + video
Loggia, from a constructive point of view, is perfect to become a full-fledged room or an extension of an apartment. To make this possible, it is necessary to carry out a number of construction and installation work on insulation, glazing, decoration. The result will be cozy room for relaxation, spacious living room, additional work space.
The result of insulation may differ from the desired one, if several factors are not taken into account when choosing materials and technology of insulation works.
The first factor is the further purpose of the premises:
- if it is supposed to have a utility room, then any insulation is used in one layer; mainly, only the part directly in contact with the street is insulated - the parapet;
- the desire to have a separate full-fledged room will require the use of different types thermal insulation materials, which fit in two layers over the entire surface of the loggia;
- the option of combining a loggia and a room will also require two-layer insulation, but in this case, the main attention is paid to the parapet, and the walls are covered in one layer.
The second factor is the size of the loggia itself, since if it is small, then such insulation is selected, which, with a small thickness, has a sufficiently high thermal protection index. In this case, the usable area will be reduced slightly.
The third factor is taking into account the fact that any material from which the walls are made indoor space, passes the moisture accumulated inside. This water vapor, colliding with the colder air of the street, settles on outside walls. If this wall is insulated, it means that the insulation is covered with moisture, which leads to its rotting and a decrease in its thermal insulation properties. It is necessary that the water vapor does not reach the insulation.
Insulation materials
On construction market there is whole line, with the properties of which you need to get acquainted before properly insulating the loggia inside. What is attached to the consumer?
Mineral wool and all materials based on its production or basalt fiber are a very popular material with good indicators of thermal insulation, sound insulation and fire resistance. During service it retains its shape and structure, does not succumb to aggressive media and microorganisms, but is highly hygroscopic. Such high permeability requires careful waterproofing works... The disadvantages include the thickness of the material and the need to equip the lathing and hydro-barrier, which takes up the usable area.

Polyfoam is produced from polystyrene. It is chosen for its durability, low thermal conductivity, resistance to the influence of microorganisms, and low hydrophobicity. Self-extinguishing foam is suitable for insulating the walls of the loggia inside, since the usual one is very flammable.
Penoplex, Tepleks, Primaplex, Styroform, Ursaform, URSA, XPS - materials based on extruded polystyrene foam. They have the lowest thermal conductivity, which means the highest thermal insulation properties. These materials are durable, easy to install, provide good waterproofing and sound insulation.

Materials made of extruded polyethylene and covered with foil on one or both sides are suitable as insulation for the loggia: Penofol, Izokom, Tepofol, Izolon. Among all the listed heat insulators, its thermal conductivity is the highest. Therefore, it is used as an independent material for "cold" insulation or as a reflective material for interior walls. But its small thickness and high vapor permeability allows it to be used as a second layer of insulation.

Separately, it should be said about the material that is not produced in plates or rolls. which is sprayed like foam and creates a single heat-insulating surface. In all technical indicators, it surpasses other materials. The main disadvantage is high flammability with release toxic substances. Self-assembly practically impossible, since a special installation for spraying is required.

Stages of thermal insulation work
Before insulating the loggia inside, a number of preparatory work is carried out:
- glazing and sealing of all gaps between the frames and the wall, parapet;
- surface preparation;
- waterproofing.
Double-glazed windows with frames made of any material are chosen as glazing. They must be functional, have a ventilation mode and be light enough so as not to create additional load on the floor slab.
Walls, ceiling, floor are pre-cleaned of debris and other contamination, and the integrity of the surface is checked. If cracks and inter-tile gaps are found, they are filled with a sealant. Align if necessary.

An important approach to correctly and better insulating the loggia is to create a layer of waterproofing. To do this, use one or more materials, since it is necessary to waterproof the parapet and that's it. external walls, floor, ceiling, frames.
Waterproofing materials include:
- roofing material;
- various types of coating, painting substances;
- penetrating waterproofing;
- folgoizolone.
Rolled waterproofing is glued with an overlap to the base, and the seams are sealed with a sealant, sealed with special tape or soldered, as is the case with roofing felt. When coated with foil-insulating material, an additional layer of thermal insulation is obtained. The use of coating, paint, penetrating insulation is justified in hard-to-reach areas and in the case when the dimensions of the room are very small.
After determining which insulation is best for the loggia and carrying out preliminary work, proceed directly to the insulation itself. There are two ways:
- a continuous layer of heat-insulating material is created and any options for steam penetration to the insulation are minimized;
- lining of insulation and covering it with a vapor barrier.
Warming methods
First.
In this case, materials with low vapor permeability are used: polystyrene, expanded polystyrene. Their thickness must be such as to create the required resistance to the passage of steam and, at the same time, be sufficient for the required thermal insulation. In case of use tile insulation the sequence of works is as follows:
- tile glue is divorced;
- glue is applied to the corners of the slab and in the center;
- the plate is applied to the surface and holes up to 6 cm deep are drilled through it with a puncher for dowels;
- across drilled holes with the help of mushroom dowels, the final fastening is carried out, at least 5 dowels are used;
- the next slab is also laid after checking the surface with the rule;
- the seams between the slabs are sealed with assembly glue or glued with tape;
- it is possible to lay a second layer of insulation, for example, penofol;
- after laying all the sheets, fiberglass mesh is reinforced;
- putty for leveling mesh texture.
Reinforcement is carried out in four stages:
- the plates are treated with coarse grain sandpaper;
- cover the slabs with glue up to 3 mm thick;
- a fiberglass mesh with cells of 5x5 mm is pressed into the glue;
- apply a second layer of glue over the mesh.
You can also use rolled thermal insulation materials, the installation technology will not change. In this case, pieces of insulation are cut off. required size.
After such insulation, surfaces are obtained that are completely ready for painting, or any other decorative material.

Second.
For this method, there are no restrictions on the choice of insulation, since the technology provides for the creation of a vapor barrier between it and decorative trim... Such insulation is carried out with the help of arrangement wooden lathing or without it, but then the crate for PVC plates is made on top of the vapor barrier.

The crate is made from wooden beams or metal fasteners and profile. In the case of metal parts, heaters must be laid under them.
The height and width of the crate depends on the type of insulation:
- for mineral wool, the beams are selected with a smaller width than its mats, so that the laying is carried out with a roll;
- it is advisable to lay several layers of cotton wool so as to cover the beams, then they will not become conductors of cold;
- for polystyrene, all parameters of sheets and beams must match.
After laying the insulation in the crate, a vapor barrier material is attached to it with an overlap. It can be ordinary polyethylene, a membrane. All joints of the vapor barrier are glued with tape. If the lining with insulation was carried out without lathing, then profiles for mounting the finish are attached on top of the vapor barrier.
Do-it-yourself insulation of the loggia will allow you to significantly expand the living space of the apartment: the room previously used as a storage room or dryer will turn into a full-fledged room.
Insulating a loggia means creating a so-called thermal effect around the entire perimeter of the room. This process involves a whole range of works:
- glazing;
- preparatory stage;
- floor insulation;
- insulation of the ceiling;
- wall insulation;
- installation of waterproofing;
- insulation of external surfaces;
- fine finishing.
Each stage is discussed in more detail below.
Loggia glazing
Obviously, the insulation of an open unglazed loggia is meaningless, so the process should be started with the installation of windows.
The glazing of the room is performed according to the standard algorithm, but using an additional (additional) profile for resizing window opening... Framing the entire structure around the perimeter, it is intended so that the surfaces (walls and ceiling) subsequently thickened with insulation do not overlap the glass.
Important! Do not try to save money when choosing a profile and double-glazed windows: "cold" glazing using inexpensive structures can protect the loggia from precipitation, but cannot cope with the drop in temperature outside.
You can find out how to choose and install a plastic frame on a loggia by watching this video.
Insulation of the loggia from the inside
After installing the double-glazed windows, you can proceed to the insulation of the loggia floors. However, this stage also requires a number of preparatory work.
Preparatory stage
First of all, you must determine which surfaces on the loggia require insulation, and which do not. As a rule, only "cold" floors are covered with thermal insulation, "warm" ones to save useful space do not "process".
"Warm" slabs are surfaces adjacent to heated rooms.
The next step is the choice of material for thermal insulation of the room. and its thickness is selected based on climatic conditions. Descriptions of materials on the market, their characteristics, advantages and disadvantages are given in the next section.
Important! In cold climates, it is better to give preference to tiled thermal insulation, which is connected according to the "thorn-groove" system.
The final stage of preparation is foaming of cracks and voids in ceilings. This procedure is necessary: it will help protect the future from the negative effects of natural factors.
Materials for thermal insulation
When choosing thermal insulation materials, pay attention not only not to their thermal conductivity, but also to the thickness: in a small area of the loggia, saving space also means a lot.
Many people who insulate balconies and loggias still use traditional, but outdated materials, while modern industry offers a wide range of insulation.
Extrusion (extruded) polystyrene foam... This material is commercially available in the form of panels (plates) or rolled in a roll. It has excellent thermal insulation characteristics, low specific gravity and provides a good level of moisture insulation. The only drawback of expanded polystyrene is mediocre vapor permeability. This circumstance makes additional requirements for the organization of ventilation of the room: if you do not drain the condensate from under the thermal insulation, the loggia has every chance of becoming moldy from the inside. Due to the low vapor permeability of the material, before insulation with expanded polystyrene, the surface should be treated with a special antifungal compound, and a vapor barrier should be attached to the insulation itself with tape.
When insulating a loggia with expanded polystyrene, it must be remembered that it belongs to fire hazardous materials and releases toxins during combustion.
Expanded polystyrene in the form of panels and slabs is on sale under the name "Penoplex"; it is for them that it is most convenient to insulate the ceiling and walls, while roll material can also be used for flooring.
Thanks to standard sizes it is very easy to calculate the required number of panels. Do-it-yourself insulation of the loggia with penoplex will not cause difficulties: holes for dowels are drilled in the plates, the material is fixed. The hole is filled with foam, the excess of which is cut off with a knife (then the surface in this area is sanded with sandpaper).
Polyethylene foam. This material is characterized by a porous internal structure and therefore has excellent thermal insulation characteristics. At the same time, the surface of polyethylene foam is smooth: this circumstance prevents moisture from getting inside. This type of insulation provides not only heat preservation, but also good sound insulation; is produced in the form of plates (panels) or rolls.
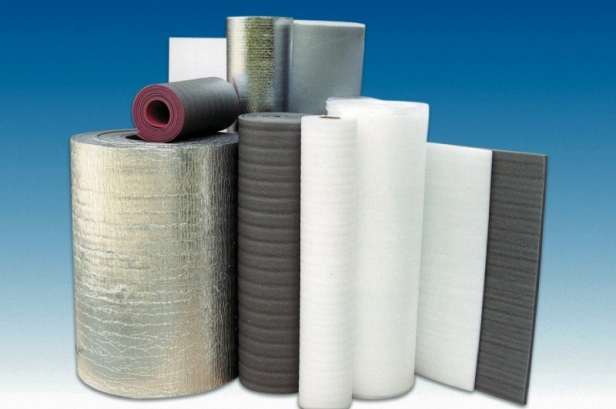
Today it is easy to find on sale improved polyethylene foam, which has even higher heat and moisture protection properties. Laminated with a layer of foil on one or two sides, it is produced in rolls under the names "Penofol" or "Izolon".
Penofol is indispensable in humid climates, as it is perfectly vapor-insulating and moisture-insulating.
Polyurethane foam. This material is commonly known as foam rubber or polyurethane foam. It has a low specific gravity, is characterized by high thermal insulation performance, good protection against noise and moisture. One of the main advantages of foamed polyurethane foam is the presence of a continuous film on the surface. It is she who prevents moisture penetration.
Today, you can use the progressive technology of warming a loggia with polyurethane foam - spraying. The material is not mounted, but is sprayed with water high pressure on the wall in the form of a powder, which immediately after hitting the surface sticks together and forms a one-piece heat-insulating layer.
Dignity this method are obvious: work on the insulation of a loggia of any area can be done in the shortest possible time. In addition, the use of this method allows significant savings in useful area: the thickness of the insulating coating is minimal.

Styrofoam . One of the most common and affordable materials is foam. It demonstrates high heat and sound insulation properties, is not susceptible to the action of fungi and can be used even in humid climates. The only drawback of this material is its absolute instability to chemical liquids. However, they are not used in everyday life, so this property will have to be taken into account only during the repair on the loggia.
It is quite simple to insulate the loggia with foam: the plates of the material are attached to the dowels.
Important! In addition to insulation, you will need a number of other materials. Before starting work, prepare foam and a cleaner for it, foil tape, antiseptic (antifungal composition), dowels with a plastic and metal core, self-tapping screws, nails, timber for logs and pads for logs, metal profile and drywall.
Required tools: level and tape measure, foam gun, screwdriver, pliers, hand-made construction tools, metal scissors, shoe or clerical knife.
Thermal insulation of the vertical surfaces of the loggia (parapet, area above windows and walls)
Consider one of the simplest options - insulation of the loggia with penoplex in plates or rolls. This material is really easy to install and does not require you to have special skills. Algorithm necessary actions- below.
First of all, treat the surface of the walls with a special antifungal compound and a layer of waterproofing. While the applied layers are drying, prepare the material.
According to your calculations, made at the preparatory stage, cut the insulation. To do this, you need an ordinary clerical or boot knife.
It is advisable to make grooves at the ends of the plates. It is very simple to make them: cut the plane and the butt, and then remove the unnecessary piece.
If you live in a cold climate, prepare the material based on the fact that it will be attached in 2 layers, and the seams of the first should overlap with the panels of the second by at least 5 cm.
Important ! The minimum width of the insulation strip (if you purchased Penoplex in a roll) should be at least 30 cm, the length - along the height of the wall.
Start installing Penoplex. The first layer of insulation is attached to the mushroom dowels, "targeted" by a special hand tool... The second layer is placed on the polyurethane foam or is also "targeted" to the first.
Insulation of the loggia with foam is performed according to the same principle.
Insulation of the ceiling of the loggia
- Insulation of the ceiling of the loggia begins with the installation of suspensions.
- Then guides from a galvanized profile are installed.
- Before fixing the insulation plates on the ceiling, the holes necessary for the suspensions are cut in it.
It's okay if the slots turned out to be larger than necessary: a little later, their size can be changed using polyurethane foam or pieces of insulation.
- Insulation plates are mounted using polyurethane foam or dowels. Depending on the specific gravity material choose dowels with a plastic (for light panels) or metal (for heavier) core.

Insulation of the loggia floor
It is the floor of the room that is considered the "coldest" surface and needs maximum insulation. Even if the insulation was installed on the walls of the loggia in one layer, the floor is made "double".
The technology for insulating the floor of the loggia is as follows.

Vapor barrier
After the end of the thermal insulation of all surfaces of the loggia, the already insulated surface must be covered with a continuous layer of vapor barrier. This will protect materials from moisture ingress and, as a result, the formation of mold and decay.
As a material for vapor barrier, you can use the previously discussed penofol. You can fix it with glue (by the way, you can also find a self-adhesive version on sale) or with a special stapler with a foil surface to the living space.
In this article, we will talk about how to protect the walls of the loggia from the penetration of cold, and also give advice on what tools and materials will be useful to you for this purpose. But first I would like to dwell on the problems that will have to be overcome in the process of work.
Typical mistakes
Condensation, which forms from the inside on the cold surface of the walls and ceiling, creates a serious problem. The result is moist areas that quickly become moldy. This is due to poor ventilation, improper insulation and heating systems.
When the ventilation of the room does not work correctly, the air quickly moves from the warm part of the apartment to the cold one, that is, to the loggia. There, excess moisture settles on the coldest surfaces. Help to avoid such a negative effect ordinary doors that share rooms with different temperature conditions, and, therefore, with different humidity.
Insulation systems also cause a lot of trouble. If, for example, the walls and floor were insulated incorrectly, then the moisture will definitely leave its marks on the problem areas of the loggia.

If you decide to save on foam, and instead sealed the joints between the slabs with a putty mixture, then in these places it is very likely that condensation will settle with all the ensuing consequences. It is better not to make such mistakes at all, since it will be very difficult to eliminate them. Therefore, it is very important to adhere to the technology of all insulation processes.
Often a poor-quality heating system of the loggia becomes a problem. If this process occurs only due to the warm air from the next room, then mold will form in the cold corners of the outdoor room. Therefore, it is advisable to start wall insulation with floor insulation on the loggia.
This is also important for compliance building codes, because the installation of water heating on balconies is prohibited. A well-equipped warm floor reacts sensitively to temperature changes in its various areas and automatically eliminates this imbalance.
Silence
Insulation of walls, in addition to its main purpose, has other positive effects. It becomes much quieter on the loggia, which means that the noise level is significantly reduced in other rooms of the room.
After all, it is the loggia that is exposed to numerous noise influences from the outside.
Material selection
The modern market for thermal insulation materials provides buyers with a huge selection, which is quite difficult for a beginner to understand, so it is better to seek advice from specialists. Many of them are advised to opt for extruded polystyrene foam or, as it is commonly called, expanded polystyrene.

This material has excellent heat-saving properties, high strength and low hygroscopicity. In addition, it is easy to process with high environmental standards and chemical neutrality.
Other types of polystyrene are widely used as insulation, however, unlike penoplex, they have more modest thermal insulation characteristics... Often, penofol and mineral wool are used to insulate balconies and loggias.
Wall insulation
Balcony wall insulation consists of several stages. Let's consider each of them in detail.
It is possible to successfully insulate the wall only if the appropriate preparatory work was initially carried out on the log. Take the time to spend time preparing, this will ensure excellent results.

First of all, thoroughly clean the walls from the old covering. It is good if, before insulating, you replace outdated window structures with double-glazed windows, and also remove the old mounting foam from the frames.
The best way to do this is to use a utility knife. If there are significant mold growths on the inside of the walls, it is imperative to get rid of them. In this case, a fungicidal spray will do.
Then you should carefully mark the lines for fixing the foam sheets.
Laying the insulating layer
Direct insulation of the walls of the loggia begins with laying a layer of foil-clad polystyrene foam. The sheets must be cut in advance, and then securely fixed with special dowels and polyurethane glue.

On top of the heat-reflecting layer, metal suspensions are attached, which serve as an additional retainer. All seams and holes should be carefully insulated with special aluminum tape.
Laying the main layer of insulation
At the next stage, the main layer of foam insulation is laid. Remember that you must first make holes in the sheets for aluminum hangers. The gaps between the plates should be kept to a minimum.
Penoplex plates should be securely fixed with glue and fastening materials, and each joint should be carefully sealed with polyurethane foam. Also pay attention to the suspensions. For better sealing after removing excess foam, you can use the same metal tape.
Next, you should insulate outer wall loggias with a layer of foil-coated polystyrene. Try to carefully seal all seams and holes with metal tape.

Should all walls be insulated?
The fact is that the walls of the loggia from the inside and so insulate well enough warm air next room. However, many experts believe that interior walls also require insulation. True, from the inside, you can limit yourself to only two layers of foil-clad foam and extruded thick polystyrene foam.
Insulation around windows
Insulation of walls near windows is a rather laborious process. In this area, the sealing of all cracks, joints and seams must be done especially carefully and accurately.

We recommend using foam and metal tape without fail. Do not forget that the foam should be allowed to dry for some time. After that, be sure to remove any excess with a construction knife, and then seal the seams with aluminum tape.
At the final stage of applying polyurethane foam, you will need a special solvent, which is designed to instantly remove its remnants. This is an important procedure because once the foam hardens it will be difficult to remove.
Finishing
After completing the thermal insulation of the loggia, you should think about finishing works, which also affect the degree of thermal insulation in the room. When all layers are laid and sealed, the metal hangers must be returned to their original position, and then aluminum profiles must be attached to them.
It is convenient to attach almost any of the materials available on the modern construction market to these profiles. As a finishing material for the walls of the loggia, wooden, cork and metal slatted panels, PVC structures, siding and many other options are perfect.
Moisture-resistant drywall has proven itself quite well. The advantages of this material lie in the lightness of the structure, which "breathes" well. Drywall is very affordable in terms of price, and it is also easy to process, paint, fix, stick wallpaper on its surface.
At first, insulating a loggia may seem like a rather complicated and time-consuming process. However, if you dare to try, you will quickly realize that there are no particular difficulties here. All operations are quickly mastered and do not require special construction skills.
It will also be possible to make a comfortable and useful room from the balcony. For example, equip an office, a workshop, a small sports corner or comfortable room recreation.

