Do-it-yourself wall insulation on the loggia. The better to insulate the balcony inside: what materials to choose
Sections of the article:
Over time, old doors become less attractive and require renovation. Not every person can afford to replace old doors with new ones, especially if such a step cannot be justified by an urgent need. In most cases, only repainting or decorating the door is required, after which a new life can begin at the door.
Preparing the door
Even a cracked door leaf can be updated. Do-it-yourself door decor will allow, with a minimum investment of finance and the use of often only improvised means, to update the old door beyond recognition. However, before you can decorate a wooden door, it must be thoroughly prepared.
Sequence of work
The first step is to remove the old coating. This is imperative to ensure that the new coating is as strong as possible and that many microbes that have been absorbed by the old paint are removed. After you have removed the door leaf from the hinges, you need to put the door on a flat surface and remove the hardware. If there are glass inserts, they must be removed for the time of decoration. To remove old paint, sandpaper or a solvent designed for this purpose can be used. Gloves and a respirator will be needed to handle the solvent. A building hair dryer can also be used.

Once the paint has been removed, it is necessary to assess the condition of the canvas. If there are cracks and chips, you need to fill them with wood putty. To ensure a flat, smooth surface, you need to process it by hand using sandpaper or a grinder. Wood cannot be wetted! It is necessary to wipe the surface of the door with a slightly damp cloth and treat it with an antiseptic.

In order to preserve the natural texture of wood, it is necessary to varnish in several layers. If you cover the canvas with a stain, the tone will be slightly darker. Thus, it is possible to turn pine into cherry (a kind of imitation of noble species), while the natural beauty and naturalness of the material are preserved. In the event that the door will not be repainted, as soon as the antiseptic dries, the surface will need to be covered with two layers of primer.
Selection of decor options
There are a lot of ways to decorate and update a door. Even without having any artistic skills, you can translate some of your ideas into reality.

The easiest way to decorate an old door is to re-paint the door with new paint. In the modern building materials market, in addition to ordinary enamel, there is a large selection of various paints.
The most optimal option at this time, how you can decorate an old door yourself, is the use of acrylic paints. When using them, you will definitely make sure that they are convenient to work with, odorless, and a wide color palette. For painting doors, you can use more than one color, but several - the main thing is to combine them correctly so that the result is only pleasing.

Alternatively, you can use water resistant latex paint to decorate the door. This option is more suitable for doors to the bathroom and nursery. Odorless latex paint, the drying speed is very fast, as a result, all the work can be done in about an hour. By painting the door to the nursery, you can attract the children themselves and come up with a unique design with them.
Application of stencils
Even if you are not a professional artist, you can use a variety of stencils to create a beautiful interior door. Using them is quite simple: you just need to attach the stencil to the door and apply paint. Once the paint is dry, the stencil should be carefully peeled off the door leaf.

And with the skills of a painter and artist, you can get an incredibly attractive drawing. If the resulting pattern does not suit you with something, you can always fix it - repaint it again.
If you want to get the effect of a tree or an antique item, you can use some available tools: a sponge to create spots on the surface, steel wool to get an imitation of an antique surface, a stiff brush - a jeans effect. There are also special paints on sale, with the help of which denim is imitated.

Using film
An equally simple way to decorate doors with your own hands is to use vinyl film. However, this method is only applicable to canvases that are in good condition. It will help to complement the interior of the room with bright colors. It is enough just to choose the desired option and transfer the self-adhesive film to the door. Despite the minimum time spent, the result will please for a long time.

Ready-made stickers are available at many home improvement stores. In the event that you want to make a certain drawing from films, you can purchase a self-adhesive PVC film, having previously made a cardboard template. Now you need to transfer the contours of the template to the film, cut out the decorative elements and glue them to the door.
Application of moldings
Moldings will help you get an original decorative finish. Using them, you can create an imitation of stucco molding - an excellent option, combined with a classic interior, antiquity. Moldings are special elements made of polyurethane or foam. Fixation on the doors is carried out with glue, which is liquid nails. With the help of moldings, any composition of door decor is possible, but it is necessary to take into account the limitations of its shape. This decor option is not suitable for sliding doors.

Mosaic decor
Do-it-yourself door decor using mosaics is quite rare and unusual. Ceramics, due to their weight, are not suitable for every door, therefore, mosaics are used much more often.

To decorate the door, it is better to insert the mosaic in fragments. This method will provide an original and striking look. Such a finish will not lead to a significant increase in the weight and thickness of the blade. If the products are made of glass, it is necessary to purchase tile adhesive in a special white color. Better yet, use clear resin or liquid glass.
Stained glass for decorating doors
Decorating doors with glass inserts is a great option for decoration. The best option is to decorate the canvas with your own hands, shops offer ready-made glass covered with film, metal inserts or glass with a pattern. Currently, the most popular method of painting glass with the use of acrylic paints, as well as the independent creation of stained glass.

If you choose the latter option, then you need to acquire a decorative contour mastic to create an imitation of a metal frame. To ensure even distribution of paint over the glass surface, work with stained-glass windows must be done in the horizontal position. As soon as the stained-glass window is dry, insert it into the panel and fix it with glazing beads.
Decoupage
Thanks to decoupage, it is possible to create an attractive door design without much investment. To decorate an old door using a similar technique, you only need napkins with the desired pattern, 200 ml PVA glue, a brush (preferably made of natural bristles) and acrylic varnish.
The canvas must be prepared - primed and painted in the desired color. Once the paint is dry, you can start decorating. For napkins, separate the layer on which the drawing is depicted and tear it lengthwise into two parts.
Tear napkins with the image lengthwise into three strips. The edge should be slightly uneven. We put aside stripes with even edges for now. We tear the middle part of the napkin into squares with sides of about 3-4 centimeters.

In a small container, we dilute PVA glue in water. The proportions should be approximately 50/50. Let's start decorating.
Apply a strip with one straight edge to the area to be decorated. Using a brush dipped in glue, smooth out the fragments. The resulting folds provide the texture of the finish. In work, it must be borne in mind that wet wipes are quite elastic and gentle.
You need to work carefully with a brush dipped in glue. Step by step create a frame with one smooth and the second torn edge. Fill the middle of the frame with squares from napkins in the same way.
Do-it-yourself door decor is almost complete. If you have any difficulties, be guided by the photo in our article. Leave the finished surface to dry. After about a day, we cover the decor with acrylic varnish. The varnish should be water-based, then it has no odor. With a minimum of material costs, we obtain a beautiful door surface.
The interior door occupies an important place in the interior of the room. It serves not only as an obstacle to noise, delimits space and allows privacy, but is also a noticeable piece of decor.
There are several reasons that may motivate you to decorate the interior door:
- Firstly, despite the huge selection of ready-made (and very attractive) doors, it is sometimes very difficult to find the right model. Sometimes all the doors seem to be the same - "I've already seen this one at the neighbors'", "and this one looks like the door to our office." You don't want to repeat yourself and acquire something unoriginal and has become banal, because your interior is unique, so the door must match.
- Secondly, even an old door with scratches, peeling paint and stains that cannot be removed is not known from what you often do not want to change! After all, any replacement of a door is also a replacement of the box itself, which is associated with dust, plaster, sealing of the resulting cracks, the need to change the wallpaper (at least around the new door) - in general, with local, and sometimes overhaul.

That is why sometimes it is much easier for the owner to update an already installed door "on the spot", that is, without changing the whole box, right here in the room. Of course, in some cases, you still have to remove the door from the hinges, but this is much easier and faster than starting a full-fledged repair. Whatever the reasons that prompted you to start decorating the interior door, we will say right away that often you do not need practically anything for this, except for the materials left over from the last repair.
And one should not think that real masters and needlewomen will be able to cope with such a task - even a person who has never held a hammer or a brush in his hands can embody some of the ideas proposed in this article. And the result of your work in any case will be original, unusual and will become a source of pride - “here it is, our door, I made it myself (well, at least decorated it)”.

So, we offer you 14 ideas for decorating an interior door that you might want to bring to life by decorating your interior.
The first idea. We paint, we just paint
The easiest way, without frills and unnecessary work, to put the door in order. To do this, you will first need to remove the door from the hinges, then walk along it with a spatula, removing the old paint, level the surface with sandpaper, fill up cracks and scratches with putty, remove grease stains, seal the glass with masking tape so as not to stain, and you can take it in hand roller or brush! It is better to choose acrylic paint - it dries faster, and painting the door in a horizontal position - so the paint will not drain and will lay down more evenly. However, if it is convenient for you to do all of the above on a vertically standing door, you can not remove it from its hinges. Just remember to put something on the floor while painting so as not to stain the linoleum or laminate flooring.
 White, plain painted door. Updating it or repainting it in a different color will not be difficult, although moldings and carvings need special, careful handling when sanding and removing a layer of old paint
Second idea. We paint in several colors
The option is more complicated, although it is also associated with staining. In this case, we do not just paint the door in one color, but create a simple or complex geometric pattern from stripes, squares, rhombuses, and so on. The door must first be prepared, as in the first case - that is, cleaned of old paint and level the surface. However, in this case, we will need much more masking tape - it is with its help that you delimit the zones between stripes or rectangles. In addition, in order not to buy several cans of paint of different colors, you can buy white paint (one liter for the door is quite enough), as well as several dyes with which you can experiment with shades.
 Gold and white, blue and pale pink, bright stripes on a neutral background, rhombuses and winding lines - a variety of patterns and color combinations can appear on the canvas of your door
 When choosing a geometric pattern, remember that a wide strip along the entire door leaf is more suitable for the country style, and for the classics it is better to choose other options, for example, paint the upper part of the door in a lighter shade and divide the parts with a horizontal strip
Third idea. Selecting moldings
Also the painting of the door, which in general is not too different from the first option. However, in this case, we will focus on the moldings by painting them in a contrasting color. White and black are a great combination, but already well-worn, so think about which colors would work best together. Designers have long recognized white and green, blue and yellow, red and dark blue as an excellent option. Such a door will look great both in a bohemian boudoir and in a strict classic living room.
 The white door with highlighted black moldings is a real classic. By the way, if your door does not have such decorations, it is easy to make them yourself - special wooden thin strips are sold, which are simply nailed to the canvas.
 An unexpectedly bright, pink door that looks especially aristocratic and attractive thanks to the frames highlighted in white
The fourth idea. We paint according to the finished stencil
A very convenient and easy way to turn your door into a work of art, even if you do not have the talent of an artist. Ready-made stencils can be purchased in construction and specialized stores, or ordered on one of the sites, and the choice of drawings and patterns is very large. Then we simply apply the stencil to the already prepared door and paint. Easy, fast and the result is very beautiful!
 It is as easy as shelling pears to apply a drawing using a ready-made stencil, and the choice will allow you to choose an original inscription, an exotic pattern, and an unusual picture
 Such a deliberately simple drawing can be easily created without stencils. It was the uneven lines and simplicity that became its main highlight.
Fifth idea. Art painting
Unlike all the options for decorating a door already listed, this option is not for everyone. To create a real masterpiece on an ordinary door, you need the talent of an artist and certain skills in working with brushes, since a roller is no longer enough here. Imagine that your door is a blank white canvas, on which, thanks to your skill, a beautiful landscape, a cheerful painting or an exquisite pattern will appear. Thin hand-painted painting always looks expensive and stylish, and you can achieve this effect by spending money only on buying paints.
 Many European companies offer ready-made interior doors with artistic painting. They are, of course, not cheap, so you can try to create something similar with your own hands. Afraid it won't work? You can always just paint over a bad drawing!
Sixth idea. Children's creativity
Does your kid love to paint? Give him such an opportunity - let him decorate the door to the children's room. Yes, such a naive, bright drawing would be inappropriate in a strict living room, but as a decoration for a children's room it is a great option. Just agree with the young artist that the second half of the door is already your field for the embodiment of fantasies!
 Usually, children's paints can be washed off very easily, so that your aspiring artist can paint the door again every day. But you will have to pre-prepare the canvas, putting the door in order.
The seventh idea. Unusual texture with paint
If you think that just applying paint is boring, and you are afraid to take up hand-painting, you can try to achieve unusual textures, for example, the effect of a wooden surface or an antique door, using very simple tools. So, using a sponge, you can get a spotty surface, steel wool will help to achieve the effect of an old door, a hard brush - to create an expressive surface of denim. Special ready-made paints are also sold, perfectly imitating jeans, wood, canvas, velvet or slate board.
 On such a door, painted to resemble a slate board, it is convenient to leave messages to household members
Eighth idea. Wallpaper
If all the previous ideas concerned only working with paints and brushes, then this method is suitable for those who do not want to mess with paint. Wall murals will instantly transform the appearance of your interior door, turning it into a striking design element. Of course, it is best to purchase wallpaper designed specifically for doors - in this case, your drawing will definitely look complete. Ready-made wall murals usually have a standard size of 86x220 centimeters, so they are suitable only for standard doors, and without moldings and glass inserts. However, now many online stores offer custom-made door murals, so you can choose the option that is ideal for your door, with any pattern. You can cut to size doors and regular wall murals, but in this case, the drawing may look unfinished.
 How do you like such an unusual option - a door, with the help of photo wallpaper, turned into a telephone booth?
Before gluing the wallpaper, the door must be cleaned of stains, and the surface must be leveled, sanded and degreased with a solvent. You can use regular wallpaper glue, but PVA is much more reliable. The disadvantages of this option for decorating the door include the fact that a bright image will immediately catch the eye, so it can quickly get bored. In addition, photowall-paper on the door, due to frequent touches, will lose its original attractiveness. However, no one will prevent you from changing the photo wallpaper on the door to something more original in a couple of months.
 Photo wallpapers with picturesque landscapes are especially popular.
 Photo wallpaper on the door will help to make a small room visually larger due to the increased panoramic perspective. And it is very easy to stick them on, for this you don't even need to remove the door from its hinges.
Ninth idea. Regular wallpaper
Previously, this decor option was very popular, but now many designers consider it bad manners. This does not prevent the usual wallpaper, "migrated" to the door, to remain a popular way of decorating the interior. Paper and vinyl wallpaper is especially popular in Sweden, the USA and Canada. By the way, there is no need to hide the entire door behind the wallpaper - on the contrary, the wallpaper, divided into clear "compartments" thanks to moldings, looks especially interesting. The remaining surfaces of the door can be simply painted by choosing a shade that matches the color of the wallpaper. Alternatively, you can buy cork wallpaper and varnish it on top for reliability. Their unusual texture will make the door more original.
Preparing the door is exactly the same as in the case of using photo wallpaper. The main advantage is low cost, since you can use wallpaper left over from previous repairs, and ease of decoration. The main disadvantage is quick wear - wallpaper can peel off and tear at the joints.
 Wallpaper glued not on the entire door, but on the parts highlighted by moldings, look more spectacular
 The door, covered with the same wallpaper as the walls, will literally merge with the interior. On the reverse side, the door, of course, is pasted over with other wallpaper so as not to stand out against the background of the wall of another room.
Idea ten. Fabric instead of wallpaper
This option will look especially cute and home-like. The door decorated with fabric looks original, the choice of fabrics today is surprisingly wide, but this method also has its drawbacks.
 If you choose a single piece of fabric to decorate the door, you should take care of the original drawing.
First, when choosing a fabric, you should make sure that the glue does not stain it. Secondly, the edges of the fabric must be pre-processed, otherwise the protruding threads will not look very aesthetically pleasing. Thirdly, the doors decorated with fabric are not suitable for every style of interior design. Those who are fond of patchwork, that is, creating canvases from different pieces of fabric, can turn their door into a real applique made of bright patches. By the way, if there is room for a glass insert on the door, you can hang a small curtain here, fixing it on a fishing line and small nails.
 Very nice door, decorated with patchwork technology. The trouble is that such bright patches have nothing to do with the classic style of the interior, this is an option, rather, for a "rustic" and colorful country
The eleventh idea. Posters, cards, paper
An option for creative people and a great idea for a teen's room. The door can be decorated with a poster and a picture of your favorite artist or band, sheets from an old geographic atlas or sheet music. Sticking on such paper sheets and posters is as easy as conventional wallpaper.
 An old geographical map will be appropriate even on the interior door of an ordinary living room, but it is better to "lodge" posters in a teenager's room
Idea twelfth. All kinds of stickers
This simple and not too expensive way to decorate a door is becoming more and more popular today. Vinyl stickers can be purchased in online stores, the cost of a model of the size of a standard door starts at 2.5 thousand rubles, they are glued very easily, and will last longer than ordinary photo wallpaper.
 Stickers with such funny and at the same time useful inscriptions will not only decorate the doors, but also cheer up the guests.
If you do not want to hide the entire door behind the stickers, it is quite possible to purchase small images - a butterfly, a bright flower, and so on. They are cheaper, and the outer appearance of the door will be completely transformed. Also popular are "informative" stickers, for example, on the door of an office, bathroom or toilet, which will tell guests what is hidden behind this door.
 The elegant lady on this sticker will immediately inform the guests of the house that it is this door that hides the bathroom.
 Often, the stickers can look like ordinary photo wallpaper, and sometimes like hand-painted on a white door or a child's drawing.
Thirteenth idea. Decoupage
The technology of scrupulous cutting out of the vending images from paper and further composing applications from these pieces allows you to transform not only a casket or photo album cover, but also an ordinary door. Everything that a novice master of the ancient art of decoupage will need: paper drawings, napkins with a pattern you like, postcards and the like - everything from which you can cut a picture, a brush, PVA glue, scissors, glitter, acrylic varnish, contour and acrylic paint.
 In the decoupage process, you can use literally anything - from scraps of old newspapers to greeting cards.
In a brief description, the process looks like this: apply a layer of white acrylic paint to the door surface, wait for it to dry, then another layer - and wait again until it is completely dry. Then we apply a layer of paint of the selected shade, and then we attach the cut paper drawings with PVA glue. At the same time, we try to glue the piece as evenly as possible, without folds and expel all air bubbles. With the help of glitter and contour, we can draw dots, stripes and other small details. Then we cover the finished painting with a layer of varnish. That's all. The rest is your imagination and beautifully selected drawings.
 The decoupage technique allows you to create amazingly beautiful paintings, and the varnish coating will extend the life of the decor
Idea fourteen. Mosaic
A door decorated with bright mosaics will be an excellent option for a bathroom; you can also decorate a metal entrance door in this way. Moreover, it is not at all necessary to use pieces of ceramics for these purposes - in this case, the door may turn out to be too heavy. Mosaics can be created from pieces of wood or veneer, or purchased ready-made made of glass.
 In this case, a bright glass mosaic takes up most of the door, making it very unusual and cheerful.
The mosaic is fastened with special glue ("Moment" or liquid nails are suitable) on the prepared and cleaned surface. It is worthwhile to think over all the details of the pattern in advance by drawing a diagram of the arrangement of the pieces with a pencil. By the way, you can decorate with a mosaic not only the door itself, but also the box, highlighting the slopes using the selected pattern.
 Creating a mosaic pattern is a huge scope for creativity. And if some part still falls, you can always attach it back
An old door can become a real art object, just a little imagination and effort is enough. To begin with, you can use one of the simplest ideas, and then, having got a taste, try yourself in the art of decoupage or painting. In any case, your door will definitely be one of a kind!
Do you want to update the decor of your favorite room, but do not want to start renovation work again? They are not necessary. It is worth showing ingenuity, applying a little diligence and the transformation of your home will not be long in coming.
Let's start with some simple decoration. Pay attention to your interior door - a key element in any interior. Decoupage glass on the door will help to give it an updated and refined look.
Decoupage as a decoration tool
The essence of the decoupage technique is to paste over the surface with cut or torn paper fragments and cover them with varnish. In this way, anyone can decorate a home with unique things and hand-painted interior elements, because this is how decoupage glass looks on any object, especially on the door.

This design looks attractive on a transparent surface. Glass transforms the image, breathes life into it and adds volume. In addition to this interesting technique, you can update the decor with fabric and wallpaper. They will enhance the style of the old door by embodying your fantasies or decor ideas from leading designers in it.
What is required for decoupage glass
The key material in decoupage technique is the image. Handicraft stores sell ready-made decoupage cards, with which you can easily and quickly make beautiful decor on glass

Shake up your bins, which are sure to have some cool images from old magazines suitable for glass décor. it is recommended to scan the image and print it on rice paper. It will help to advantageously beat any areas of the image, creating a three-dimensional pattern on the glass.
But if you want to create a custom design with a unique pattern, draw it yourself on special rice paper. A glass canvas decorated with your photos will give a special decor to the room. You also need to print it on special paper.

But there is also a way to prepare a drawing you like from any paper material. To decorate a photo, a wallpaper or other paper image is varnished, and a thin layer of plaster is applied to the back side, after which it is extremely carefully necessary to remove the peeling parts of the once integral paper product. The resulting picture is used for glass decoration.
Often, novice decorators use ordinary three-layer napkins in their work with a pattern they like. They combine ease of use, a penny cost, a huge selection of patterns and colors, and the original appearance of the resulting product. What else do you need for decoration?

Having chosen a napkin for surface decoration, you must first straighten the folds, otherwise they will remain on the finished product. This is easy to do. To do this, the napkin is sprayed with hairspray and well ironed with an iron. The napkin is ready for decoration.
Important! Water-based varnishes can warp the napkin, so read the ingredients carefully before starting work.

In addition, you will also need:
- glue;
- putty;
- scissors;
- brushes for applying varnish and paint.
Step-by-step instructions for decoupage
Before starting work, thoroughly prepare the surface intended for decoupage.
Step 1. Wash it with soapy water or a glass cleaner.
Step 2. You will need regular alcohol. Apply it to the canvas and wipe with a dry cloth to degrease the surface.
Step 3. Dry the prepared blade thoroughly.
Applying an image to the canvas with decoupage
Stage 1. Elements of the picture are carefully cut out. If it consists of many small details, it is not necessary to cut out a complete image. You can divide it into components.

Stage 2. The glue is applied both to the glass sheet and to the prepared drawing. At the same time, it is important to distribute it in a thin layer so that it is not noticeable when it dries.
Stage 3. The prepared image is applied to the glued surface. Using a paper towel, press down on air bubbles.
Stage 4. After that, a layer of varnish or glue is applied to the finished drawing. The excess is removed with a wooden stick. Your decoupage is ready.
How to age an image exquisitely
If you want to give the image the effect of antiquity, which will emphasize the design individuality of the interior in the Victorian style, country, shabby chic, then this is not so difficult to do. We offer ways to get the desired result.
The effect of old decoupage from scrap materials
Prepare onion peel decoction, freshly brewed coffee beans, or strong tea. Just hold a little image in one of the suggested compositions.
Antique decoupage effect from art materials
Pour turpentine into a suitable container and add literally a couple of drops of burnt sienna oil-based paint. Leave the image in it for a while. In this way, you can achieve the effect of an old parchment.
The effect of old decoupage from building materials
Add a little bitumen to white spirit until a pale color is obtained. Apply the resulting composition already on the glued image. To get the cracking effect, brush over the image with a metal brush.
Door decoration
If the decoration of the glass on the door does not seem enough for you, process the canvas itself. For this, different methods and materials are used. Consider the most creative examples of decor that are often used by venerable designers when creating a new image of an old door.
The easiest way to decorate a door is to paint it. The use of paint of standard "door" colors will simply refresh it, but the use of juicy shades and their combinations will radically change the decor of the door, but the design of the entire room.
Cloth decoration
As with decoupage, the surface is preliminarily prepared according to the principle described earlier. While the door is drying, prepare the fabric. To determine the degree of shrinkage, measure the size of a piece of fabric, moisten and dry it. After that, measurements are taken. If the difference in parameters is large, then all the material will have to be subjected to such processing.

The fabric is fixed to the door leaf with glue, it is preferable to use casein. In addition, you may need a hard spatula and, if desired, decorative fittings.
Step 1. Prepare the decor fabric to fit the door.
Attention! You can use not a solid canvas, but a combination of fabric scraps of all kinds of geometric shapes, which will form the overall pattern.
Step 2. Apply glue to the surface evenly and apply the cloth. Smooth down the fabric with a spatula, expelling air bubbles and smoothing out wrinkles.
Step 3. Complete the fabric surface with suitable decorative hardware.
Decorating with liquid wallpaper

Liquid wallpaper is a versatile material that will create unusual patterns and even three-dimensional patterns on the surface.
What is required for decor:
- dry wallpaper mixture;
- hopper pistol;
- roller;
- selected pigments for tinting;
- transparent varnish;
- alkyd primer;
- white oil putty for liquid wallpaper;
- spatulas of various sizes.
Before applying the wallpaper, the surface is prepared in a known manner. In this case, it is recommended to remove the old paint layer, if any.
Stage 1. The door is covered with a primer in one layer, and then putty.
Stage 2. If you want to create some kind of drawing using liquid wallpaper, then apply its outlines with a simple pencil on the surface. To avoid confusion, make notes that indicate the use of a specific color.
Step 3. Add warm water to the wallpaper mixture and stir with your hands. After 15 minutes, stir again to add the desired color. The more color scheme, the richer the shade.
Attention! When creating a multi-colored picture on the door, it is recommended to prepare the wallpaper mixture in portions, according to the colors. The mixture is infused for about 12 hours. After this period, you can start decorating.
Step 4. Take some wallpaper mixture on a spatula and spread it evenly over the door surface. Make sure that the layer of wallpaper to be applied is the same thickness. If you want to create a relief for such a decor, go over the applied decorative layers with a textured roller.
This decor dries from 1 to 3 days. After complete drying, the decorated surface is varnished. If you don't like something, repeat the decorating process by rinsing off the superimposed layer with warm water.
As you can see, making colored decoupage or door decor yourself is not so difficult. To learn more about the decor processes, check out the video.
In contact with
Comments (1)
Unfortunately, there are no comments or reviews yet, but you can leave your ...
New articles
New comments
S.A.Grade
SvetlanaGrade
SergeyGrade
SergeyGrade
AlexeyWhen carrying out repairs in an apartment or house, we often ask ourselves which things are worth changing and which ones to continue to use. As a rule, high-quality doors remain in good condition for a long time, but against the background of new wallpaper or other wall finishes, they simply cease to harmonize in color or style. Considering that the purchase and installation of even one new interior door is not a budget idea, it seems an excellent alternative DIY door decor... Moreover, there are many ways to do this quickly enough, inexpensively and tastefully.
Dyeing
So, the first and most simplified way to transform an old door surface is to paint it. This method is applicable to absolutely all materials, the main thing is to remove the door mechanism from the hinges and place it in a horizontal position on the floor before painting - this way, the paint will dry evenly and will not flow down. It is very important not to forget to remove the previous paint or sand it with sandpaper.
In addition to monochrome painting, there are many effective ways to make the door decor with your own hands truly special and memorable with the help of paint:
- Painting the sides of an interior door in two different colors, corresponding to the color scheme of the rooms that it delimits.
- Wide vertical stripes in two American style colors that mimic country style. Ideal for a country house or summer cottage.
- Painting the moldings in a color that is contrasting with the main shade. This technique corresponds to a classic interior or modern design. If moldings are not provided, they can be recreated by hand using thin baguettes or strips attached to the surface in the form of symmetrical rectangles.
- Drawing with stencils. You can decorate the surface with absolutely any stylized designs - be it monograms made to look like classics, frames drawn in the form of moldings, or ornaments and labyrinths in ethnic style. Both cans and aerosols can be used here.
- Author's drawing. If you are good at drawing, use your talent for home decor purposes. An author's hand-made drawing, art painting, or even a full-fledged picture of the size of the entire door plane will turn into a full-fledged art object of your interior and will be the real pride of your home.
- Glass staining. If your interior doors contain glass fragments, they can also be effectively diversified. By painting the door glass in a variety of rich colors, you will give it a fresco effect that is associated with a vintage design direction.

Wallpaper
The decor of interior doors with your own hands is quite simple to carry out with the help of photo wallpaper. This is a special type of photo wallpaper that can be easily picked up and purchased at any building supermarket or on the market.
Due to the affordable price, it is possible to change door photowall-paper quite often, thus creating new moods in the interior. Another advantage of this kind of decoration is the ease of pasting. Step-by-step instructions for applying wallpaper are included on each roll. At the same time, experts recommend applying an additional layer of varnish over the entire texture after pasting - thus, the wallpaper will last much longer and take on a brighter glossy look.

Paper and vinyl wallpaper
Of course, the door surface completely pasted over with ordinary wallpaper looks cheap and not aesthetically pleasing. However, it is a great idea to compose an abstract drawing or ornament from pieces of paper or vinyl wallpaper using the application technology that remain after pasting the walls of the rooms. In addition to the fact that the color scheme of the decoration will repeat the general concept of the interior, this method almost does not require the cost of additional materials. Fragments of wallpaper can be used to glue the molding cells on the doors, while the unsealed areas are best painted with paint that matches the color, or is several shades different from the color of your wallpaper.

Fabric decor
The choice of textiles is always much wider than the choice of wallpapers, so this type of decoration provides just an endless flight of imagination. Before you start, you should take into account some technical nuances: first, if you use glue, it should not leave stains and streaks on the fabric, and second, the fabric should not be loose or fluffy. The ideal material for this job is thick cotton, like the kind used for patchwork. If you are not sure that the chosen material will work well with the adhesive, use double-sided masking tape - in this case, it is a safe bet.

There are many examples of do-it-yourself textile door decor in the photo of various thematic resources:
- Cloth trim inside the moldings with painting of the rest of the fragments. It is still the most popular and traditional option. In this case, the fabric must necessarily balance with the shade of paint and the color scheme of the room's wallpaper, since this technique is more classical in nature.
- Applying the patchwork technique. You can prepare in advance a sewn patchwork cloth and carefully attach it to a fragment of the plane - this option is perfect for any country interior and just a cozy bedroom or nursery. Along the perimeter of the applique, you can install thin strips or baguettes of 0.5-1 cm, or paint the gaps between individual parts using a thin brush.
- Drapery and curtain technique. This method is optimal for Provence, country and romantic interiors. Its essence lies in the fact that glasses are removed from the doors with glass inserts, and instead of them draped fabric is fixed with the help of a fishing line. Outwardly, it resembles the curtains on the windows in the house. A natural, non-synthetic material such as cotton, linen, canvas, or lace in neutral colors is best suited for this. Along the "curtain", you can decorate with a small silk ribbon of an accent color or a little to pick up the fabric with it.
- A combination of fabric and other materials. An interior door can acquire a unique and refined look if you decorate it with different materials at the same time. For example, the main part of the plane can be occupied by a fabric finish, from above and below it can be framed with a plaster molding made for stucco molding, and the remaining extreme fragments can be painted with paint to match the entire decoration.

Stickers
Special stickers for door surfaces can be purchased at any building supermarket. This is a fairly simple decorating method and works best in children's rooms. Decorating the old surface with stickers in the form of cartoon characters or just funny images in the form of the sun, stars or animals will not only diversify the general atmosphere of the room, but will also impress your children.

Children's drawings
Continuing the theme of children's rooms, let us recall the beloved family tradition of hanging the results of children's creativity in plain sight. If your drawing loves to paint, help him create his own gallery of drawings, the place of which will be at the entrance to his room.
Other spectacular textures
In addition to those mentioned above, there are a huge variety of options for decorating door surfaces, you just need to apply your imagination. In addition, some design options do not require additional cash investments from you, but can be implemented using secondary materials that you may have forgotten about for a long time:
- Old geographic maps. Perfect for decorating a children's room, veranda and balconies. Fragments of cards are glued, as a rule, inside moldings and painted along the perimeter.
- Notes. The technique of pasting with notes is no different from the previous version, however, they can look harmonious in any part of your home. The note texture carries a classic mood, so it is best suited to the corresponding interior.
- Cork. Finishing the door plane with pressed cork is technically straightforward. Special cork panels are glued on the entire surface or in separate places. To make the material last longer, it is advisable to cover it with one layer of varnish after pasting. It is worth considering that this option is not the best way for the kitchen and bathroom, since the cork reacts in a special way to moisture and evaporation and can deform. Also note that cork is not cheap and is not sold everywhere.
- Slate. Recently, slate board elements appear more and more often in modern interiors, both in home and commercial ones, which clearly speaks of the relevance of such a tool. You can recreate the imitation of a coated board at home by fixing a special coating on the door surface. The color of this board is most often black, but you can consider chocolate and emerald hues, depending on your overall color scheme. In case of such a choice, it will be necessary to acquire crayons (both white and multi-colored). In addition to its decorative value, a slate board can serve as your personal organizer, because on it you can fix plans for the day, month, year, write down various reminders, as well as wise and motivational thoughts. It is advisable to dilute all your notes with elementary drawings so that the general view does not seem too formal and boring.
Whichever version of door decor you would not opt for, be sure: this is the right decision in terms of practicality, economy and creativity. Having engaged in this kind of decorations for your home, you get the opportunity to quickly and effectively transform the interior. In addition, all family members can be involved in the creative process and everyone can do their part of the work. This will ensure a fun and rewarding pastime with your household.
DIY door decor, photo:


Many tenants of apartment buildings are faced with the problem of a shortage of square meters. An excellent solution to this issue can be an independent insulation of the loggia. This is a painstaking business, requiring certain construction skills and time from the contractor. However, the finished result is worth it. A warm balcony expands the possibilities of using space, "ennobles" the living space and can become the pride of a home craftsman.
The need to insulate the loggia
Each apartment owner decides for himself how to use the additional square meters of the loggia. Some equip a pantry or a workshop on the balcony, others operate the premises more rationally - they create a "winter garden" or a separate room. The insulated loggia can be converted into a cozy place for rest, work, a compact gym or an area for children's creativity.

In addition, an insulated balcony solves a number of problems:
- the heat loss of the premises and the cost of heating the apartment are reduced;
- reduces the risk of mold on the walls of the balcony.
External or internal insulation can be done. The obvious advantages of the outdoor method:
- useful area is not "eaten up";
- simplification of interior wall decoration.
A significant advantage of internal insulation is the ability to perform work on your own without hiring workers.
The choice of thermal insulation material
Various heat-insulating materials are used as insulation, ranging from traditional, inexpensive, and ending with modern high-tech ones. To insulate the loggia from the inside, it is better to use thin, lightweight materials. Thanks to their small width, it will be possible to save useful space.
Consider the characteristics of the main thermal insulation materials for warming a loggia / balcony.
Foil-clad polyethylene foam - a layer of foil is applied to one side of the polyethylene, which reflects the IF radiation and "throws" heat fluxes back. Insulation characteristics:
- roll width - 1 m, thickness - 2-5 cm;
- ease of installation - the polyethylene foam sheet is easily cut with a knife;
- laying method - end-to-end or overlapping;
- the effectiveness of thermal insulation is almost doubled;
- the material is used to insulate the ceiling and walls.
Warming the loggia: step by step instructions. Penofol use
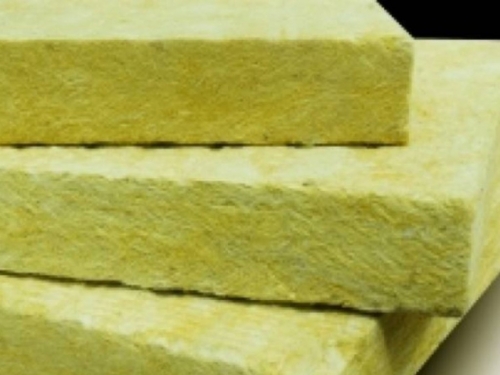
Mineral wool has good thermal insulation properties and an affordable cost. However, experts do not recommend using this material for insulating a loggia for a number of reasons:
- poor moisture resistance - mineral wool absorbs liquid, so you will have to additionally strengthen the waterproofing;
- when using mineral wool, natural ventilation is required - a gap must be left above the insulation, which slightly "hides" the area of the balcony;
- for facing the loggia, you will need wall reinforcement and additional measures.
Polyfoam - foamed plastic of various densities. The bulk of the material is gas. Polyfoam has the following characteristics:
- slab size - 1 * 1 m;
- insulation thickness 2-10 cm;
- foam density - 15 or 25 kg / sq. cm;
- durability.
Extruded polystyrene foam (penoplex) is a modern heat insulator, reminiscent of polystyrene, but characterized by a more durable structure and functionality. Properties of expanded polystyrene:
- rectangular plates 1200 * 600 mm;
- thickness - 2-10 cm;
- foam density - 35-45 kg / sq. cm;
- vapor permeability;
- frost resistance;
- slabs are chamfered for tighter laying;
- light weight and ease of installation;
- flammability class - G-1;
- the material is not used in open places where UV rays penetrate.
Do-it-yourself loggia insulation: step-by-step instructions. Penoplex installation photo

Insulation fastening methods
The choice of the method of insulation, first of all, depends on the used heat-insulating material and the further decoration of the walls.
Insulation for putty and plaster is suitable when using foam or polystyrene foam. Thermal insulation panels are glued to the base with tile adhesive. Plates are additionally fixed with dowel mushrooms. You can start plastering / filling walls or ceilings one day after installing the insulation.
Foil-coated polyethylene foam is laid under the base of the frame. In this case, it does not matter how the profiles are fastened - to the wall or by means of U-shaped fasteners. Penofol sheets are applied to the ceiling / wall of the loggia and are fixed with slats. In this case, an overlap joint is permissible, and the connecting strip can be glued with tape.

Insulation under the base of the frame is possible only when using a thin insulation with a thickness of up to 20 mm. Pressing a thicker heat insulator will affect the stiffness of the battens and fixings.
If you plan to clad the balcony with plasterboard or PVC, MDF panels, then it is advisable to lay the heat-insulating material in the cells of the frame. As a heater, 15 density foam or mineral wool is used. The disadvantage of this technology is an increase in the thickness of the heat-insulating "pie".
Options for arranging a "warm" floor
The technology of floor insulation on the loggia is somewhat different from the insulation of the hay and the ceiling. Excessive requirements are imposed on this element of the balcony.
There are several basic options for arranging a "warm floor":

Do-it-yourself loggia insulation: step-by-step instructions
Below is a step-by-step instruction for insulating a loggia with penoplex.
Tools and materials
For work you will need:
- foam plates;
- building level, stationery knife, marker;
- PVC pipes for cable laying;
- container for kneading glue;
- construction mixer;
- trowel;
- polyurethane foam;
- assembly gun;
- a grater for grinding heat-insulating sheets;
- plastic smooth trowel for grouting the floor;
- metal grid;
- sand concrete M300 coarse fraction;
- polyurethane glue.
Warming the loggia: step by step instructions. Photo - a diagram of a heat-insulating "pie".

Preparatory work
First of all, it is necessary to install energy-saving plastic windows on the loggia. It is not worth saving on glazing - it is better to choose double-glazed windows and fittings from firms that have proven themselves in the "window" market.
If high-quality windows have already been installed on the balcony, then you can proceed to the insulation of the balcony.
Preparatory activities:

Ceiling insulation

Installation of heat insulator on walls and parapet

Warming the floor of the loggia with penoplex: step by step instructions
Consider the stages of creating a "warm floor" using foam and cement-sand screed:

- If it is necessary to install the supporting frame, it is better to use a galvanized metal profile. Unlike wood, it does not rot and is not heavy.
- Thermal insulation work should be carried out in dry weather. Many adhesives and primers have features of application in high humidity conditions.
- The slots on the loggia are treated with foam that is resistant to low temperatures.
- The wood used must be dried, and then treated with anti-fire and decay agents.
Warming the loggia with your own hands: step by step instructions. Video.

