Do-it-yourself pond in the country, the rules for its creation and the selection of materials. Do-it-yourself film pond How to make an artificial pond with your own hands
We will send the material to you by e-mail
O One of the best accents in landscape design can be an artificial reservoir. Such a structure will delight the owners of the site and serve great place for relax. Many summer cottages are limited in size and are not suitable for large bodies of water, but with instructions and certain building skills, you can make a small pond in the country with your own hands step by step. Photos of all stages of installation will allow you to determine the technical side of the issue. Before installing the reservoir, you will need to prepare certain materials, select the appropriate project and read the recommendations from experts.
It is not necessary to spend a lot of money to build a beautiful pond in the country. From improvised options you can build a budget option
When deciding how to make a pond in the country with your own hands, you first need to decide on the size and shape of the structure. These parameters depend on the size of the site and the preferences of the owners. At the same time, the reservoir can be either of a strict geometric shape or have the natural contours of a natural pond.

The following requirements are imposed on the location of the future location of the water structure:
- the reservoir should not be illuminated by the sun's rays all day long, only 7-8 hours a day is enough. In intense light, water can bloom;
- the pond should not be located in a too shaded place;
- there should be no trees nearby, as foliage will pollute the water;
- the chosen place should not be strongly blown by the wind.
When choosing a good place, the terrain is important and good review structures from anywhere.

If you plan to install a fountain in the pond, then you should take care of convenient electrification. There are no special rules for choosing the configuration of a structure. The pond can have any shape - asymmetric, winding, oblong or square.

Helpful information! The deeper the tank, the brighter the pond should be placed. If fish will live in the water, then it should be borne in mind that the amount of oxygen decreases in very hot water.
Do-it-yourself pond in the country house step by step: photo and installation guide
There are several ways to build a pond in the country with your own hands. Landscape photo ideas will help you choose. For a quick installation work worth buying finished form. On sale there are special containers made of rubber rubber and reinforced plastic. Insulating film is considered a budget option.

Installation using a ready-made form
After choosing a suitable place, the finished form must be laid on the ground and a contour drawn. A trench is made according to the marks. After installing the tank, it must be filled by a third and sand should be poured into the voids formed. The bowl is then filled with water. After shrinkage, plants are planted around the resulting reservoir, and a stone is laid.

Helpful information! Plastic containers are durable and easy to install, but such structures break down over time under the influence of ultraviolet rays. The best option it is a fiberglass tank that is reinforced with a rubber backing.

Arrangement with film
With the right approach, you can equip a pond in the country with your own hands from a film. A step-by-step photo shows how to do such a job with high quality. For installation, you can choose the following colors of the film:
- black reflects clouds well, the bottom looks like a mirror;
- brown material imitates soil at the bottom;
- cream and blue film will give a resemblance to the pool and at the same time the fish are remarkably visible against such a background.

When choosing a material, you should pay attention to the composition of the material, thickness and resistance to mechanical damage. Bonding of the material is carried out with special glue. The use of a film may be accompanied by a preliminary arrangement of a sand cushion. The laid film should lie freely, without undue tension. After laying the material, the pit can be filled with stones. After the water has settled in the container for several days, the film can be cut.
Helpful information! The more complex the device of the reservoir, the stronger the film should be.

Features of water filtration and planting
The installation of a filter system must necessarily accompany the design of the pond in the country with your own hands. At the same time, the photo necessary work can be viewed on the website. This is especially important when launching fish into the water.

Filtration kits are available from stores. They are accompanied by instructions with which the installation of equipment is carried out. An important milestone planting is considered. For landing in the water, an arrowhead and a tail are suitable. You can pick up floating crops: hyacinths and lilies. Ferns, reeds and reeds will look good around the reservoir.
Helpful information! An artificial reservoir must be cleaned periodically. In this case, the bottom should be cleaned of silt, leaves and other debris.

Related article:
Do-it-yourself pond in the country: landscape photo ideas and decoration
Do-it-yourself ponds in the country require special design. The photo displays the best design techniques. Figurines, stones and beautiful trees can be used as decor. Drops and uneven terrain allow you to build a reservoir with a cascade and a waterfall. original solution there will be a bridge or an artificial slide.

The finished building can be decorated with the following elements:
- underwater lighting looks bewitching, for this mini spotlights are mounted;


- for the installation of fountains will be required different types pumps.

Vegetation is considered an important decoration. It can be planted in baskets filled with earth and installed on the surface of the reservoir. Will look good side by side high grades plants.
Helpful information! Before purchasing fish, you need to clarify the conditions for their maintenance. Some types of fish are at enmity with each other, so you need to choose those that get along with each other.
Useful tips: how to equip a pond in the country with your own hands, video
- the pond is better to decorate with stones of different sizes. A harmonious combination of boulders with small stones will create a magnificent view;

- when creating a reservoir, do not use sheer surfaces on which it is difficult to place plants;
- when landscaping, it is worth using containers that will prevent the strong growth of plants.

Helpful information! A special soil is required for planting aquatic crops. In this case, plants should not occupy more than half the area of the reservoir.
How to prepare a pond for winter
The pond, made of a plastic bowl, tolerates the winter cold well. To prevent the bowl from deforming under the load of ice, several plastic bottles with sand.

In the case of a film construction, a similar method can also be used. AT winter time equipment and plants should be covered. At the first appearance of leaf fall, the pond must be covered with a fine-mesh net. Before frosts, the reservoir is cleaned and water is pumped out. Plants and fish must be sent to winter in warm rooms. Pumps and filtering equipment should also be removed.

In the spring, the reservoir can be launched when night temperatures become above zero. Subject to all the installation rules and in the presence of high-quality material, you can build a beautiful pond in the shortest possible time. Usage stylish elements decor will create a wonderful central composition on the site.

How pleasant it is to spend a few hours by a shady pond or lake in the hot summer time! Of course, it's great if there is one in the neighborhood. However, most often we spend our free summer days in the country, and not everyone has the means to buy a large country house and the services of a landscape designer. In this case, there is nothing left but to make a pond with your own hands, especially since it is not so difficult.
It all depends on your imagination, the size of the site and what is at hand. With a little effort and Money, then the country pond will not only delight you, but also cause burning envy among your neighbors.
The size and shape of yours primarily depend on the area allocated for these purposes. But what more area pond, the easier it is to take care of it - a small one needs to be cleaned more often. If you plan to have fish and plant a lot of aquatic plants, then a small reservoir will not suit you either, because it is very difficult to maintain the correct eco-balance in it.
The best place for a home pond will be an open part of the site, at the same time protected from strong winds. You should not place the pond in a well-lit place: the location should be such that the sun's rays do not fall into the water for more than 6 hours in a row, otherwise it will bloom, and only frogs can live there. Dubious prospect, right? At the same time, if the lighting is insufficient, the plants will develop slowly, and a beautiful corner for relaxation will not work.
If you decide to equip a small fountain, you will definitely need a pond diagram in order to properly connect the pump and other equipment. With a little effort, you can sketch out the plan yourself. Of course, in this case, it will be necessary to consider the proximity of the location of the power supply network.
Do not place your home pond under the crowns of trees. Firstly, this will lead to additional water pollution with fallen leaves, and the pond will have to be cleaned much more often, and secondly, tree roots can damage the reservoir bed, and it will dry out quickly.

And, of course, the whole idea will become useless if you cannot enjoy the beautiful view from the window or from the terrace, so when planning to make a pond on the site with your own hands, do not forget about the aesthetic side of the issue.
Home pond on a rigid basis
If you are a supporter of solid, durable construction, then you can approach the process on a grand scale: dig a foundation pit of sufficient size and cast a reinforced concrete bowl of the pond using metal fittings and cement. Such a design, of course, will cost a lot, but it will last for many years (at least 30). If you are not an adherent of a global approach, you can get by with an easier and cheaper option.
So, how to make One of the most elementary ways to make a dream come true is a ready-made “bowl”, which can be purchased at the store. Perhaps the main disadvantage of this option is that you can come up with your own original form the reservoir will not succeed, you will have to be content with the proposed assortment.
The cheapest solution is plastic pond small size, from 4 to 8 m 2. Of course, there are larger molds, but they already belong to the category of pools and are much more expensive. When choosing a container, you should definitely pay attention to its depth - it should be at least 0.8-1 meter. In summer, the water in such a pond will warm up completely, and all its inhabitants will be comfortable, but in winter such a pond will not freeze to the bottom, which is also very important.

If you decide to organize a pond on the site with your own hands and want to use a ready-made base for this, then first of all you need to study the materials from which the molds are made - there are also a few nuances here.
The simplest and cheapest option may be a regular plastic container, but it has its drawbacks. First of all, you need to be very careful during transportation and installation - such a tank can crack even with a slight bend. Also, plastic tends to break down from sunlight, which means that the service life of such a product is not too long - 5-10 years.
If you want your pond to last longer, choose forms made of special reinforced plastic - they have a much longer service life (up to 20 years). Such tanks are more plastic and less exposed to ultraviolet radiation.
The highest quality and, of course, the most expensive are products made of rubber-based fiberglass. This form is resistant to temperature changes, does not collapse from exposure to sunlight and does not release harmful substances into the water, which is very important for the inhabitants of the reservoir. Such a tank will serve for more than 30 years, in addition, it can be repaired, which extends the time of use by an almost unlimited period.
Building ponds from a fiberglass bath is a simple process, and its result is quite aesthetic, as these forms come in different colors, and some even have a coating imitating stones, sand or small pebbles. This allows you to beautifully mask the edges of the reservoir and give it the most natural look.
We build ourselves
So, in order to build a pond on the site with your own hands, first of all you need to decide on the location and shape of the reservoir. Decided? Let's start construction work:
- To begin with, we mark the contour of the pit. It is very easy to do this - set the shape to the right place and outline its silhouette using the usual bayonet shovel, tightly pressing the cutting into the edge of the tub.
- Add about 20 cm to the resulting contour to fill the plastic pond with sand.
- If you have acquired a form with ledges, then each level must be marked and dug separately, from larger to smaller, while remembering to add 10-15 cm on each floor for a sandy substrate.
- When the pit is ready, its edges should be well leveled and compacted, all glass, stones and tree roots should be selected. Failure to do so may damage the mold. Then you need to pour and carefully compact the sand with a layer of at least 10 cm - this will save your pond from subsidence.
- Install the plastic mold and make sure it is level, you can use the rule for this. Then carefully fill the pond with water to about a third, being careful not to budge it.
- Fill the gaps between the edge of the pit and the mold carefully with sand. At the same time, you need to make sure that there are no voids left. Why periodically water the soil with water, but try not to make the pressure too strong.
For a week after installation, regularly water the ground around the pond and add sand as needed. After the subsidence of the soil stops, you can completely fill the reservoir, decorate the edges of the pond bowl with stones, flagstone and plant ornamental plants.

Country pond made of flexible materials
Now let's talk about how to make a pond on the site, if it is not possible to purchase a ready-made container or you want to equip a large pond of a bizarre shape.
by the most budget option in this case, ordinary polyethylene with a thickness of at least 500 microns will be used. However, despite the fact that it is quite inexpensive, there are quite a few disadvantages of such a coating. The fact is that polyethylene is a rather thin material, it is very easy to damage it, and under the influence of sunlight it becomes completely brittle and quickly collapses. A pond on a polyethylene substrate will last you a maximum of 2-3 years.
PVC film for the pond - the material is also not too expensive, but much more durable, such a coating can withstand 8-10 years. Polyvinyl chloride coating can be ordinary and two-layer, in which a woven mesh is laid for strength. Of course, PVC has the same disadvantages as polyethylene - it is destroyed by ultraviolet radiation, it is easily cut and torn, but, unlike the latter, it can be repaired. For this, special kits are sold. Besides, pvc is better stretches, and after filling the pond with water, most of the folds stretch and straighten out over time.
The most expensive, but at the same time, the highest quality is a coating made of butyl rubber: the service life of such a material is about 50 years, and it does not care about the sun's rays. In addition, butyl rubber is not afraid of low temperatures, so you do not have to drain the water from the pond in winter. This is a very flexible and plastic material that can withstand significant loads, so if you decide to equip a spacious pond of an unusual shape, you simply cannot do without it.
We mark the pit
To equip a pond on the site with your own hands, you will need:
- pegs;
- rope;
- film coating;
- geotextile or felt;
- sand;
- crushed stone or large pebbles;
- shovel;
- special kit for film coating repair;
- bricks;
- garden hose for watering;

With the help of twine and pegs, you need to mark the desired shape of the pit and proceed with earthworks. If you plan to break a pond of a fairly large size, you can bring an excavator. In the process of work, it is necessary to ensure that ledges and slopes alternate, this will make the banks of the pond more stable. It is also necessary to provide terraces (at least 30 cm wide) for planting plants. Descents from one level to another must be made quite gentle, with an inclination angle of up to 45˚.
It is worth remembering that the depth of the pond should not be less than 80 cm, otherwise in winter the water in it will freeze to the bottom, and its inhabitants will die. Thus, you need to dig a pit, about 15-20 centimeters larger than the estimated size of the reservoir. This is necessary in order to be able to fill the terraces and the bottom of the pond with sand, in order to avoid subsidence and damage to the film. The sand cushion must be carefully leveled and compacted, after removing all pebbles, sharp sticks and plant roots from the bottom.
Drainage and waterproofing
When the drainage cushion made of sand is ready, we proceed to the next stage of work. In order for the pond film to remain intact for as long as possible, geotextiles should be laid on a layer of sand, preferably in 2 layers. Next, we straighten the film itself and fix it on the banks with bricks or large stones. Do not try to straighten and expand all the folds - let the water do it for you.

We place the flexible one in such a way that its end is in the center of the future reservoir, and we begin to supply water, making sure that the pressure is not too strong. As the pond fills with water, partially release the edges of the film and straighten it along the slopes of the pit. After the reservoir is filled to the brim, leave it for 1-2 days. During this time, under the weight of water, the film will straighten out and fill all the voids.
After it completely sags, you need to cut off the excess parts, leaving at least 40-50 cm for arranging the banks. The edges are fixed with pegs or special metal shackles, and then masked with flagstone, large stones and pebbles. It's time to install the pump, decorate the hoses from the fountains and start planting plants.
Pond above the ground in the country
When there are kids in the family, one of the main problems when building a pond is how to make the pond safe. It is best if such a reservoir is slightly raised above the soil surface. Firstly, it greatly facilitates its care, and secondly, the risk that small children or pets accidentally fall there is significantly reduced.

In this case, you can not do without a reinforced concrete foundation. Dig a pond pit in its deepest part, form terraces for plants, as well as in the previous case. Pour the concrete foundation along the banks of the reservoir using wooden formwork desired height, for strength it can be reinforced with a metal mesh. After the foundation is completely dry and settled (this will take at least two days), the formwork can be removed, and the inner walls can be plastered to smoothness. This will help prevent tearing of the film. We line the bottom of the pit with it and fill the bowl with water. At the same time, we fix the edges of the material so that they are behind the concrete fence. After the pond is full, let the water settle, cut off the excess film, fix it and decorate the edges of the bowl.
Inventory: what you need
Of course, the construction of ponds is not an easy task, but what can you do for yourself, because if everything is organized correctly, the result will please the eye for more than one year.
However, it is not enough to build a home pond - you also need to take care of it. Here are some technical tools that will be very useful to you:

Rules for the care of a country pond
The pond in the garden is, of course, very beautiful, but if you do not want to become the happy owner of a personal swamp in which frogs croak in the evenings, then you need to properly care for it. First of all, you need to ensure that the water in it does not bloom. Of course, it is best to purchase a special purification system, but this, unfortunately, is not a cheap pleasure. However, there is another, more available remedy: take a bag of canvas and stuff it Place such a "surprise" under the water, and there will be practically no algae at the bottom of the pond.
It is also necessary to carefully monitor the cleanliness of the reservoir - regularly remove debris from the surface and add water as it evaporates. If your pond is small, then winter period it is recommended to drain it completely, and for large tanks, a complete cleaning is necessary at least 2-3 times a year, while the water must be completely pumped out.
From what's at hand
And what about those who do not allow the size of the site to accommodate even a small pond? Do not be upset: a small pond can also be arranged in the front garden by adapting a trimmed metal barrel or just a large basin for this purpose. Such a mini-pond can even be placed on the balcony of a city apartment, decorating the container with glued pebbles or mosaics. Of course, you won’t hear the murmur of a fountain near such a “reservoir”, but you are provided with coolness and lush greenery of aquatic plants.
Foreword
Having chosen a place for a decorative pond in the country, it is time to think through all the stages of the work in detail.
Required Tools and materials
 fittingsBituminous masticClayA rockExpanded claySandPolyethylene filmCement
Content
Having chosen a place for a decorative pond in the country, it is time to think through all the stages of the work in detail. But before proceeding to the detailing of the plan, it is necessary to choose the material for the construction of the pond - this is what will affect the complexity of the upcoming process, and will determine the time and economic costs. It also depends on the material chosen and whether it will be necessary to involve additional labor force in the work.
There are several options for constructing a pond, depending on the materials used. What can you make a pond in the country on your own? To create a bowl, you can use concrete, polyethylene, butyl rubber film and PVC film, as well as a special film coating, fiberglass bowls in ready-made or made to order on an individual project. In addition to these pond materials, when constructing small decorative ponds, you can use a variety of improvised means and objects (for example, an old barrel) or leave a natural cover. It is important when choosing a material for a pond with your own hands to make sure that it is non-toxic, otherwise the plants, fish and frogs in this artificial pond will not survive.
What can you make a decorative pond for a summer residence: concrete
- this is the most reliable and durable material for a country pond: it will be possible to walk on the bottom of reinforced concrete without fear, for example, when it is necessary to clean up a reservoir or thin out and replant plants. However, working with concrete is much more difficult than with other materials. It will require full compliance with the technology (welding of reinforcement, making formwork, pouring concrete), double waterproofing (on both sides of the concrete casting - outside and inside) to protect against groundwater. The cost of all these works on the creation of decorative concrete ponds is the highest. Of course, you can save on waterproofing by using special grades of mortar that are not exposed to water, but this material will cost even more, and its use will require precise adherence to casting technologies. In addition to the high cost, such a pond in a country house made of concrete, once built, will then be extremely difficult to remake.


But this material for artificial ponds is resistant to external climatic factors (it is not afraid of either groundwater or freezing), to physical influences (stone falling, damage caused by rodents, etc.).


Typically, such reservoirs are rarely used in country design, but if it is planned to build a bridge over a pond or install sculptural heavy compositions, then the best choice there will be reinforced concrete - this is the capital version of the reservoir, which is built for many years and will serve faithfully for more than one generation of owners of the site.
What film can be used to make a garden pond
Using a film coating, it is possible to form a reservoir of any configuration, and it will also be possible, for example, after a year, to freely change this shape, if such a need arises. The film bottom is easy to repair, small holes can be sealed, and in case of severe damage, it is better to simply replace the old film with a new one. The main disadvantage of this material is that in winter the water from the reservoir will have to be poured out, because if it freezes and expands, it will definitely tear the film. The film coating can be used both when constructing a pit reservoir, and when creating a pond raised above ground level, laying the material on the inside of the erected walls.


Films for ponds are indispensable when creating large decorative ponds in the country, if there are no ready-made containers of this size, and the reinforced concrete structure will be too expensive. It is convenient to use a film coating when creating reservoirs of complex shape: such material greatly facilitates the construction process.
In addition, the film is various colors, and this is very important, because the color of the bottom seriously affects the general appearance of the reservoir. For example, a black bottom will turn a pond into a kind of mirror that will reflect the sky, clouds, and plants planted along the shore.


In addition, the black film (as well as brown) imitates the color of natural bottom soil well. If you choose a film of a cream or blue tint, then the color of the bottom will look unnatural, but colorful fish will look great against such a background. A grayish or bluish tint to the bottom will make the pond look like a swimming pool. So you can choose the color of the film to taste and depending on the overall design of the reservoir.
The following describes which film can be used to make a pond in a suburban area.
Polyethylene and butyl rubber film for the pond: thickness and dimensions
Polyethylene can be used to create a reservoir. But only if the thickness of the film for the pond is 500 microns, and it is necessary to lay it on the bottom of the decorative reservoir in 2-3 layers. The cost of this film coating among others is the lowest. But this material is unreliable, since it can be easily torn, for example, with sharp stones, etc.
Under the influence of the sun, the polyethylene film quickly becomes brittle, and repairing the damage is almost impossible, it is easier to immediately replace it with a new coating. And although it will come out inexpensively, it’s too troublesome, because everything will have to be arranged first: the bottom, the plants, etc.
With careful handling, the polyethylene coating can last a maximum of 5 years, but usually it lasts for 2-3 years. This cover can be used as a temporary solution for those who do not like permanence and are planning to change the design of the pond in a year or two or install it in a new location.


Butyl rubber film is more durable and reliable - its service life is 50 years. The material is not destructible as a result of exposure to ultraviolet rays, is not damaged by low temperatures (withstands temperatures up to -35 ° C), so it is not necessary to drain water from the reservoir for the winter. Thanks to these qualities, it is possible to make a film pond at any time of the year - both in winter and summer, but it is better when the groundwater thaws so that the soil does not subside after the construction of the reservoir.
If the soil on the site is rocky or it is planned to build a reservoir with a high load on the base (great depth and considerable width), then it is better to choose a butyl rubber coating, because the material is not prone to cracking.
Butyl rubber film is available in three colors: black, stone and charcoal.
These films are produced in different countries, but experts in the creation of ponds recommend using the product of German manufacturers: it is better in quality and is guaranteed to last 15 years.
Due to all these qualities, butyl rubber film for garden ponds is one of the most common materials for the construction of a pond.
Although its cost among other film materials is the highest, these costs justify themselves: with the help of a film, you can make any shape of a reservoir, and if you wish, change it in the future. Also, the film can be easily repaired, and the service life finished building is at least 10 years.
The standard parameters of the roll of this film for the pond are as follows: width - 4.5, 6.1, 9.15, 12.20 and 15.25 m; length - 20-25 m.
PVC film for artificial pond
The PVC film for the pond is more durable than ordinary polyethylene. Its thickness is 0.5-1 cm, a film 0.8 cm thick can be used for a pond. It is also simple and easy to use, allows you to create a variety of reservoir reliefs, but from an aesthetic point of view, this is not the best option.
Such a film still cannot be completely masked by covering it with stones or gravel - there will still be open areas.


The cost of a film for an artificial pond is low; a wide range of various qualities and from different manufacturers. There are two types of PVC coating: the usual two-layer and reinforced, in which a woven mesh is laid between the layers of the film (for strength). The elasticity of the film and its high-quality structure ensure the service life of the reservoir up to 15 years, but in practice this period is reduced to 8-10 years.
Such material for a dacha pond as PVC film, despite its advantages, has all the disadvantages of polyethylene. It is subject to destruction under the influence of sunlight, it can also be torn or perforated. But, unlike polyethylene, damage in PVC film can be repaired with a special repair kit.
In addition, this material, due to its elasticity, stretches better and, after filling the reservoir with water, it quickly levels and smoothes out, creating a flat bottom surface without folds and creases.
Do-it-yourself liquid rubber and EPDM-membrane for a pond
Do-it-yourself liquid rubber for a pond is another option suitable for creating a large pond. correct form. This material, after hardening, provides high strength of the pond bowl.


Using liquid rubber for the pond, no seams, folds, creases are formed - the bottom surface is perfectly flat and smooth.
Service life of a reservoir with use of this material - 50 years. Its cost is high, and the technology of work is quite complicated.


EPDM membrane- This is a more promising material, which is gradually beginning to take the place of PVC film. Such a membrane is capable of tenfold stretching without the threat of rupture, very strong and reliable. On sale, this garden pond material can be found in the form of panels and sheets of standard sizes, which are glued on site using special glue or heat-sealed tape. The cost of an EPDM membrane, which is understandable, is very high.
Tanks for garden artificial ponds in the country
To create a reservoir, you can use ready-made bowls made of plastic or fiberglass. The volume of these containers for a garden pond can reach 1000 liters or more. Bowl made of mass-produced plastic, as a rule, have a small square. Usually, if the area of \u200b\u200bthe bowl is 4 m2, then its depth is 50-80 cm. In such a tank for a pond in the country, the water will warm up well in summer, and in winter it will not freeze to the very bottom.


Large volume bowls can be made to order, but usually they are intended for pools (over 10 m2) and their cost is very high, not to mention additional structural elements.
Cheap plastic baths with a wall thickness of 3 mm have the shortest service life.
With mechanical damage, cracks may appear on the surface of the bath, which will be quite difficult to seal.
In addition, the material is gradually destroyed under the influence of sunlight. And although the cost is small, it is better for long-term use to choose the more expensive and reliable option.
Plastic containers for artificial ponds are made of durable frost-resistant plastic with a UV filter. Their service life is up to 20 years.


Some models already have several terraces for aquatic plants, a deep bottom for fish, recesses for lighting and a pump. There are bowls that have special shapes for creating cascading (multi-level) waterfalls. Of course, they are more expensive than ordinary simple forms, but by buying such a container, you can save on the purchase of other materials that are used in other cases.


Usually ready-made plastic containers are used when you need to create a pond quickly and at low cost. Arranging a pond with a finished bowl will be very simple, without spending a lot of time and effort on creating bottom levels and other stages of work.
In this case, it is only necessary to dig a pit, install a container (according to all the rules) and proceed with the design of the pond.
For small suburban areas, a capacity of 4 m2 is quite suitable for creating a medium-sized pond.
Finished fiberglass tanks with a rubber base are considered the best and, accordingly, the most expensive. Their service life is 30 years.
Unlike plastic containers for a pond in the country, they can be repaired, and without any damage. Fiberglass is more resistant to low and high temperatures, exposure to sunlight. It is characterized by high environmental performance, which means it is completely safe for the flora and fauna of an artificial reservoir.


Fiberglass containers have an aesthetic appeal: they come in black, brown and green. The edges of the tanks are decorative coating imitating natural materials, which will facilitate the work on the design of an artificial pond.
In addition to the usual forms, fiberglass bathtubs are produced for the device of streams. Such containers have an imitation of a "stone" texture, so they easily fit into the overall landscape. The multi-stage form of the structure allows you to quickly plant aquatic plants at the required level. The stream bed in this container is fenced on the sides with protrusions, which should protect the roots of plants from washing out. Everything is thought out to the smallest detail, but, of course, the cost of these containers is very high, but making a pond with a stream or a waterfall with their help is as easy as shelling pears.
Separately, it should be said that the installation of a large-volume fiberglass tank (about 6000 liters) with various steps and levels is a rather laborious task and is not always possible for a person without professional experience.
These containers were originally created for European countries with a mild climate and warm winters, therefore, in European conditions, exact adherence to the installation technology is not required. When installing the tank, it is not necessary to carefully fill the voids and ram the sand and soil. Under our own conditions, severe frosts in winter, if this is not done, then the presence of voids will damage the tank in the winter season. Therefore, the installation of the tank requires great care. It is also important to accurately align the horizontal position of the reservoir, checking all the time by level. It will be problematic to do all this with a large capacity, therefore, without professional skills, it is better not to undertake such a large-scale work - limit yourself to small or medium-sized reservoirs.
Country pond from improvised materials and bottom coating
One of the cheapest ways to create a reservoir is to use improvised means: an old barrel, a basin, a bathtub, a large tire, etc. In this case, as with any ready-made container, the entire construction process comes down to constructing a pit for a buried reservoir or making a frame or cladding for installing a decorative reservoir above ground level. Moreover, a country pond from improvised materials can be made both ordinary, and multi-level, and cascading - there are various options, the main thing is to find the right material.


Natural bottom cover is the cheapest and easiest way to build an artificial pond. All that is needed in this case is clay, sand, gravel and flat stones. And all these materials for the pond to the bottom can be found either on the site or in natural environment without spending money to buy.
01.03.2016
45 434
How to make a pond in the country with your own hands - step-by-step technology and mistakes

Beautiful decorative ponds, photos and pictures of which can be seen everywhere, have become an integral part of many garden and summer cottages. However, not everyone knows how to make such an ornament with their own hands. The pond is an element of decor, a place where they relax, get distracted from the bustle of the city. Water is the most the best remedy from stress. Recommendations, a photo gallery, tips for arranging will help you overcome the steps on the way to the beautiful, serene, and also teach you how to ennoble your home area with minimum investment. The arrangement of a pond in the yard, its design will not take you much time.
What style to choose, where to place?
The initial stages of the improvement of the reservoir are important and necessary. Thoughtful styling in harmony with landscape design will be the basis for creating a reservoir. You need to choose a style in accordance with the architecture of the house, buildings. In the interior of the garden, you can arrange a formal version (of the correct geometric shape), or a free natural reservoir that forms an integral composition with others. decorative elements.
Formal views are the main decorative element in the garden. They are suitable for small and large areas, come in different sizes, are placed in the center. Free reservoirs are equipped in arbitrary forms, giving a natural look, hiding artificiality.
 do-it-yourself pond in the country - in the photo
 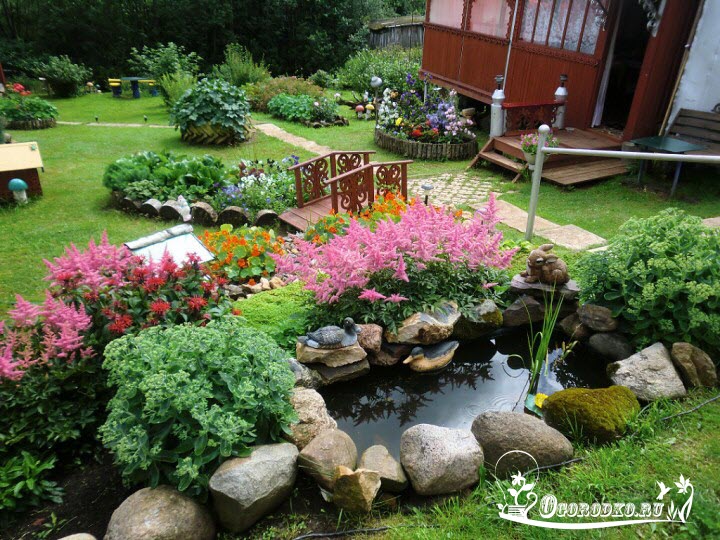 small pond in the country with their own hands
 in the photo - a pond at their summer cottage
  in the photo - a pond in the garden
Choosing Japanese style, remember, stone, water and lanterns are the basis of the image. Think in advance of the shape, location. Bonsai-style trees, a tea house will complement and decorate the garden. An indispensable attribute of Chinese manners are considered garden walls, windows, moon gates. The entrance to the structure is equipped with an entrance gate. English garden seeks to merge with nature, the French is filled with majesty and large space with fountains, cascades, sculptures. Italian mini-pits with fountains are placed in front of the main entrance of the house and are the central composition.
Choosing a place and material for arrangement
Many craftsmen know how to make a pond with their own hands, given the size, location, choosing sunny open areas. Trees located in close proximity will create additional trouble. Fallen leaves, constant shade of trees impede growth ornamental plants, pollute the water. You can arrange the structure under the trees, but the obligatory stay in the sun for 5-6 hours a day.

 do-it-yourself pond in the country house
Regarding the size, consider the scale of the site. The reservoir should harmoniously fit into landscape design. small garden plots an area of 6 acres is equipped with small structures that are easier to build, the financial costs will be negligible. Deep and voluminous make for large areas and fish breeding. Do not plan to run fish, do not dig a big pit.
 do-it-yourself pond in the country house
  in the photo - do-it-yourself country pond
To build a pit with your own hands, you need to buy, prepare materials for future construction. There are great opportunities for your imagination here. You can build a decorative lake on the site from any materials. Capital reservoir with concrete base takes time, money. Various plastic containers, a lake from an old bathroom, tires from large tractor wheels will cost less, and will look beautiful if done right. It is easy to make a design using a special elastic durable film.
 in the photo - a pond on its site
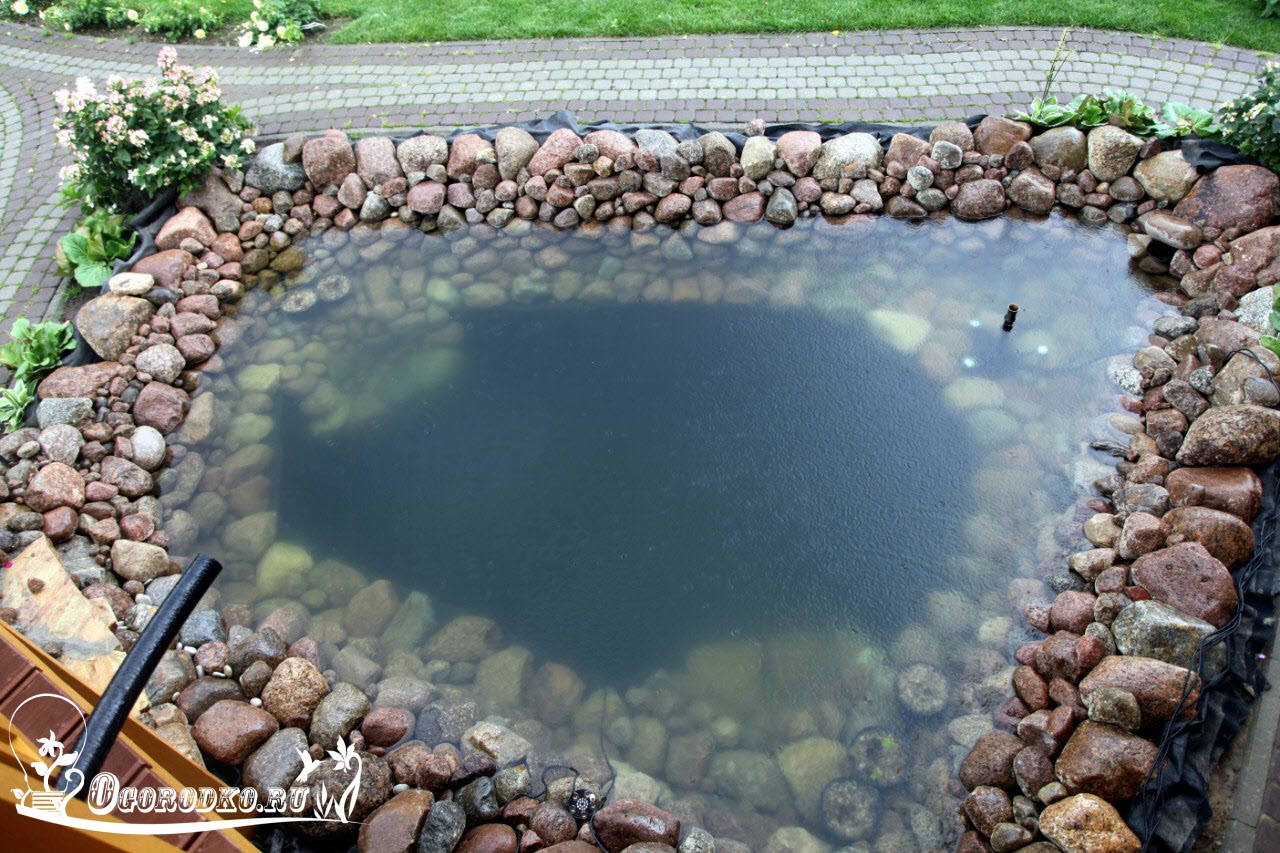
How to Create a Lake Step by Step Using Black Film
— Schematically outline the project of the future reservoir, indicating the width, depth, location of curtains (thresholds for planting). The drawn drawing will allow you to correctly position the plant, decor elements, avoid misses, alterations.
 step 1
  step 2
- Draw the outline of the lake with a garden hose, sand, spray paint, other improvised means. uneven surface must be level.
- A pit is dug to the depth of the near threshold (for plants and flowers), the next tier is marked, and dug out. The lake can be made in several tiers. You can do without thresholds if it is small.
 step 3
- To buy film required size, the finished pit is measured with a cord, added 40-50 centimeters on each side of the bowl.
- The next step is to fill in the sand and tamp. No sand, start laying the next layer. small variant can be done without sand.
- You can protect the material from cuts and damage with the help of geotextiles, which are laid on the bottom, the walls of the pit after a layer of sand. You can replace the purchased material with the existing old unnecessary linoleum, carpeting, roofing material.
 step 4
  step 5
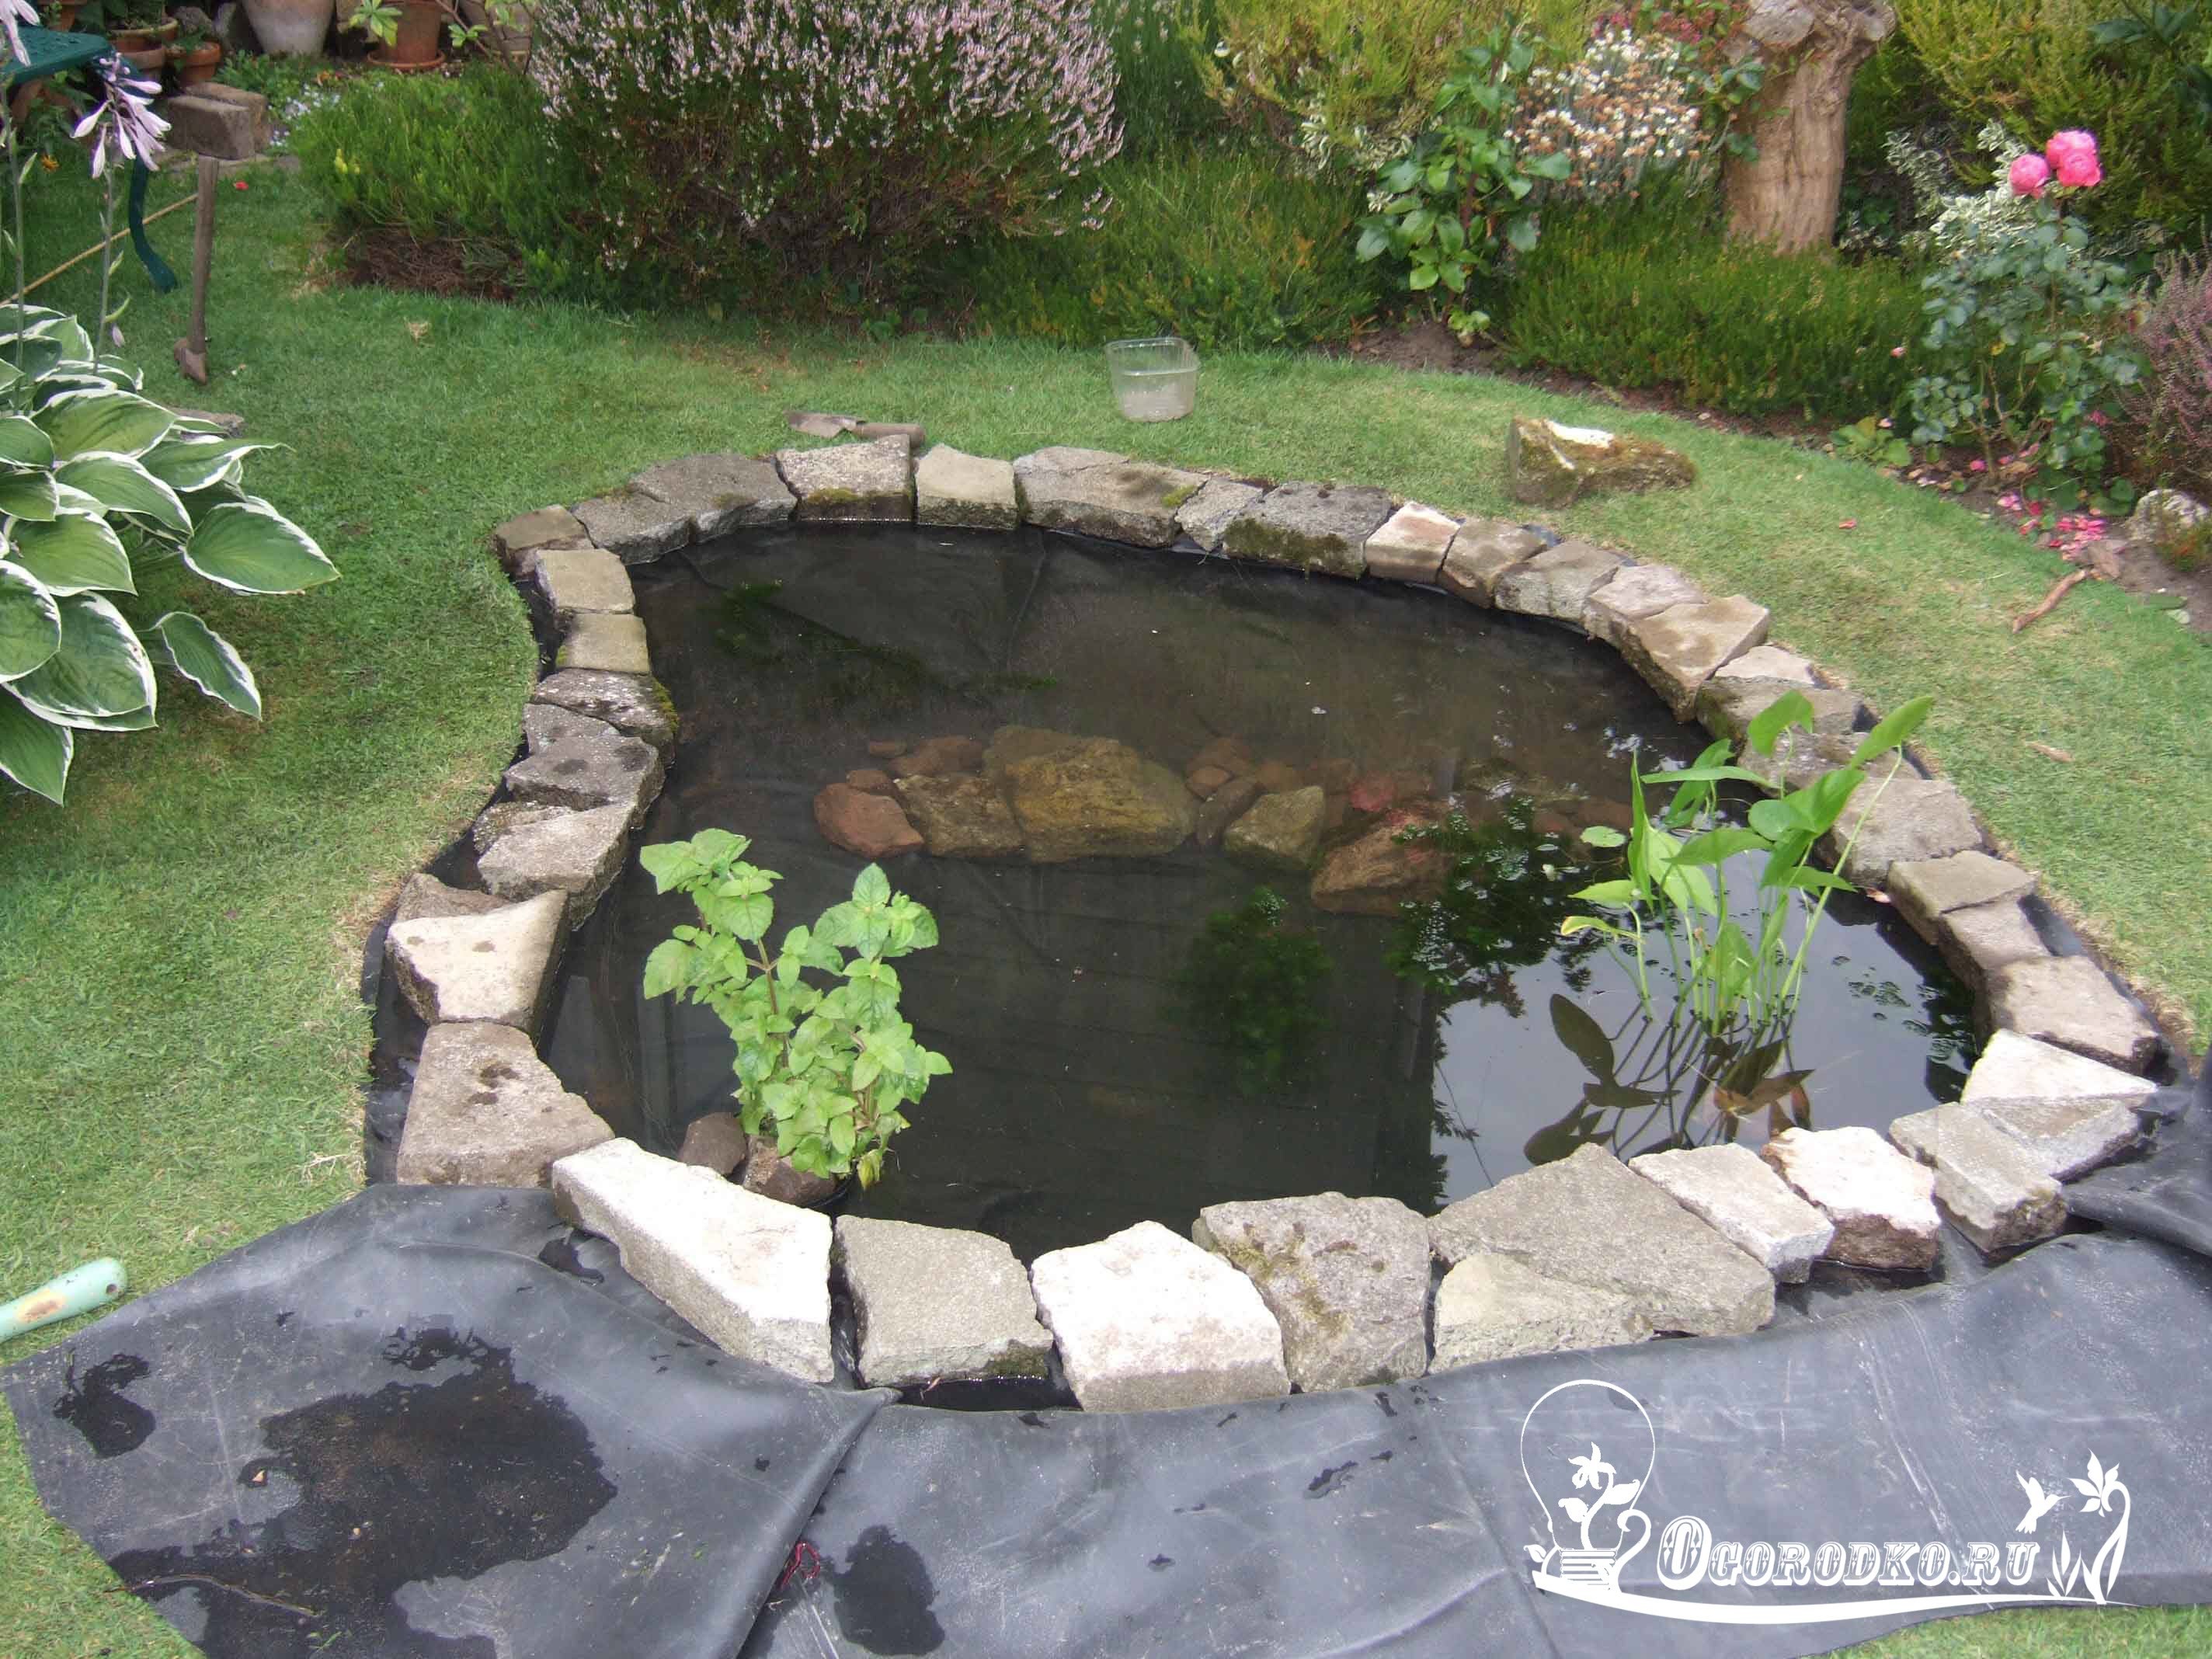
- It is more convenient to fix the material by tearing a shallow trench along the edges. The edges of the film are laid in it, sprinkled with a layer of earth, rubble.
- A stream will help to rid a large pit of stagnant water and submersible pump which is placed at the bottom. The pump is connected to the cleaning filters. The stream is placed above the level of the lake, so that the water flows down freely, rises with the help of a pump. You can hide it under beautiful stones, plants. They plant a hill from a stream beautiful flowers, decorate with various decorative elements (sculptures, clay pots).
 step 6
  step 7
- The coastline along the entire perimeter is laid out with decorative stones (natural cobblestones), preventing the earth from sliding into the pond. Place the plants, sprinkle the bottom with small pebbles, fill with water.
The construction of the lake with your own hands is completed, keep the pond clean and tidy, remove debris and algae in a timely manner. Use biological balancers, plant fertilizers, anti-algae products, water clarification. Find appropriate place, do it right, decorate it beautifully. Mistakes, miscalculations can turn an attractive good body of water into a continuous problem, keep this in mind.

Recreation in the country is an opportunity to dedicate yourself to nature, relax, forgetting at least for a while about city everyday life, and this is best done on the shore of your own pond. It all depends on your imagination and size. suburban area. Is it possible to make a pond in the country with your own hands? Of course. Follow the instructions below and you'll be fine.
Man-made pond in the country
Of course, I want to spend time in a well-equipped dacha, on the territory of which landscaping and complete landscaping are done - after all, resting in a dacha, which is a rickety house with a small courtyard overgrown with weeds and thistles, will definitely not contribute to peace of mind.

At the same time, a green, well-groomed lawn and neat trees, flower beds and artificial reservoirs will turn the territory of the dacha into a real earthly paradise. And ornamental ponds will take not the last place in it. Own pond in the country can be of almost any size - from a couple of square meters to a pond of a large area.

First of all, you need to understand the very purpose of an ornamental pond: unlike pools, the water in which must be subjected to special treatment (chlorination, ozonation, etc.), a garden pond will require the creation of a certain biological balance. Otherwise, the water in it will bloom and become cloudy, the plants will wither and they will take a fancy to it, except that midges and frogs are a dubious pleasure for the owner of the pond.
Types of garden ponds
Garden ponds having a geometrically regular shape - rectangular, round, diamond-shaped, etc. - look especially good in suburban areas, landscaped in the correct geometry (smooth lines, ideal shapes). As a rule, such decorative reservoirs are edged along the edges with tiled stone (artificial or natural), they are arranged near buildings, thereby emphasizing straight lines.

Ponds with the correct geometry can be made above ground level: this type of pond minimizes excavation at their device, simplifies their care, reduces the risk of small children falling into it. The sides of such a pond protruding above the ground are suitable for a flower garden, you can install seats on them, and arrange a fountain in the pond itself.

Artificial ponds imitating natural reservoirs - they are characterized by rounded shapes and a coastline of arbitrary shape. Plants that are natural for marsh flora are planted along their banks. A gentle slope under the water, covered with medium-sized cobblestones or pebbles - landscape designers usually place this type of pond in the far part of the garden, near the lawn. Such natural ponds are especially successful in arbitrary garden improvement.

Choosing the size and location of the garden pond
Of course, the size of an artificial pond directly depends on the total area of \u200b\u200bthe summer cottage. If we talk about building a pond ecosystem, then large ponds are more convenient for this. Balancing vegetation and aquatic life in a large body of water is easier than in a small one, and larger ponds are easier to maintain. The smaller the artificial reservoir, the more often it will have to be cleaned - the lack of space for the inhabitants of the reservoir will not allow establishing a full-fledged ecological balance.

The place for the future pond is chosen from the point of view of aesthetics, the placement of an artificial reservoir near the main building is especially successful - it will be possible to watch the water surface from the windows or sitting in an armchair on the terrace.

The best place for a pond would be open space not exposed to strong winds strong wind hinder the development tall plants on the shore of the reservoir. It is necessary to calculate the illumination of the pond: the direct rays of the sun should not illuminate the reservoir for more than 10 hours (6 hours of illumination is optimal). With greater illumination in stagnant water conditions, the active development of aquatic bacteria and green algae (for example, mud) will begin. At the same time, in those parts of the pond where the illumination is insufficient (shading), the growth and development of aquatic plants will slow down.

The proximity of an artificial reservoir to the crowns of trees will lead to its pollution during seasonal leaf fall, in addition, root system trees can damage the pond bed, breaking through the underlying film or displacing the edges of the bath.
Owners, suggesting a device for lighting a reservoir in dark time days, a pump device for a waterfall cascade or fountain, you should consider the location of the pond from the position of power supply.
Artificial Pond - Materials
A man-made reservoir can be made from polyvinyl chloride (PVC) or butyl rubber film, use a ready-made container made of reinforced plastic or fiberglass, or create a reinforced concrete pond bowl.
In terms of the speed of creation, the first place is occupied by purchased containers made of fiberglass - all that is required is to dig a deep enough pit for them and place the container in it on a prepared and compacted sand cushion (it resembles a plastic basin of large size and, often, a bizarre shape).

True, it will not be possible to arrange a large fiberglass pond - serial production tanks, as a rule, have a small quadrature (usually an area of \u200b\u200babout 4 m 2, depth - 500-800 mm). Larger fiberglass tanks are intended more for swimming pools (above 10 m2) and are therefore more expensive. However, a small pond made of plastic or fiberglass for small suburban areas is quite suitable. The cost depends on the volume, shape and color.

A large pond and a “free” (i.e., not tied to any standard forms) layout can be arranged using a film (PVC or butyl rubber) - the film is needed to waterproof the reservoir. The cost of such material is low, in outlets it is widely represented both in terms of quality and manufacturers.

Do not use ordinary polyethylene in creating an artificial reservoir, it will serve you for a maximum of 2 years, then its density will be broken under the influence of physical and temperature influences.
PVC film or butyl rubber is suitable for creating a garden pond. The first material has sufficient strength and elasticity, has a high-quality structure - the reservoir formed by it will last at least 15 years. However, the undisputed leader in the field waterproofing materials for artificial ponds, butyl rubber is used - it has high resistance to sunlight, high and low temperatures, and is not prone to cracking. Among other materials, butyl rubber has only one drawback - it is not cheap, but its service life exceeds 50 years.

If we are talking about complete reliability and durability, then there is only one material left - reinforced concrete. Unlike pond bowls formed by film or cast materials, you can walk along the bottom of a concrete reservoir without fear - it is difficult to damage such a bottom. However, it is more difficult to work with concrete, full compliance with the technology (welding of reinforcement, manufacturing of formwork), double waterproofing (on both sides of the concrete casting, both outside and inside) will be required - to protect against groundwater, i.e. the cost of such work will be the highest. It is possible to use special grade concrete that is not exposed to water, but it will cost even more and its use will require strict adherence to casting technologies.
Let's summarize the characteristics of materials for artificial ponds
The main advantages of film waterproofing: the ability to form the required shape, change the shape of the reservoir bowl in the future, ease of repair (if the film breaks). Minus: in winter, water from the reservoir will have to be poured out, if it freezes and expands, it will inevitably tear the film.
Advantages of reinforced concrete: high reliability, independence from external climatic factors (subject to the concreting technology), resistance to physical influences (stone falling, rodents, etc.). Cons: high labor intensity, extremely difficult rework. As a rule, the creation of artificial ponds from concrete is not popular, since the film is much easier to use. But if it is planned to build bridges over a reservoir and sculptural compositions on its banks, reinforced concrete would be the best choice.

When creating garden ponds, it is necessary to make sure that the materials chosen are completely non-toxic, otherwise the fish and plants in the pond will not survive.
Pond in the garden based on a finished (rigid) container
When choosing a rigid container for creating a pond with a total area of up to 4 m 2, it is worth stopping at a fiberglass or plastic bath. The minimum depth of such a tank should be about 800 mm - the water in such a pond will warm up evenly in summer, and in winter it will not freeze to the bottom.

A ready-made container as a basis for a garden pond will allow you not to engage in cutting and fixing (activities performed when installing the film base of the pond), there is no need to build a general configuration - everything has already been done, the container is equipped with terraces for planting aquatic plants. The choice should be taken carefully - it will not be possible to change it.

Ready-made bathtubs for the pond are sufficiently durable, they are not afraid of winter frosts. And yet, when transporting the pond tank to the site, it must be handled carefully and not stepped on. The wall thickness of such a tank is 3 mm, and in case of mechanical damage, cracks will appear, which will be difficult to seal.
Cheap plastic bathtubs have the shortest service life - they are gradually destroyed by sunlight, and the surface of such containers cracks when bent. Unlike them, tanks made of reinforced plastic are more resistant to ultraviolet radiation, have a greater margin of safety (they are more plastic) - the service life of such tanks for ponds is up to 20 years.

The best and therefore the most expensive are fiberglass tanks with a rubber backing. A reservoir based on them will last more than 30 years and, unlike plastic containers, they can be repaired without damage. general characteristics. Fiberglass is the most resistant to low / high temperatures and exposure to sunlight, it has high environmental performance and is completely safe for the flora and fauna of an artificial reservoir.

In addition to quality characteristics, fiberglass containers also have an aesthetic appeal: they can be of three colors - black, brown and green; a decorative coating imitating natural materials is applied to their edges, which makes it easier to give the artificial pond a natural look.
Fiberglass bathtubs are made not only for ponds, but also for streams. Containers for imitating a stream have an outwardly “stone” texture and easily fit into the overall landscape, and a multi-stage shape allows you to conveniently plant aquatic plants. The bed of such a stream is fenced on the sides with protrusions that protect the roots of plants from washing out.
Artificial reservoir with film waterproofing
The laying of flexible coatings is carried out both in a prepared pit and between erected walls raised above ground level. Such a decision in creating a pond in the country is justified if the estimated size of the future reservoir is larger than the parameters of the rigid shells offered by specialized stores. The film coating is also used when creating reservoirs of complex shape - the use of a waterproofing film will greatly facilitate this task.

To create a reservoir, you can use polyethylene (thickness 500 microns), laid in two layers, among other film coatings, its cost is the lowest. Although the characteristics of polyethylene are more than minimal: it is easy to tear (by sharp stones, animal claws, etc.), it becomes brittle under the influence of the sun, and if damaged, it is practically impossible to repair. Polyethylene coating will provide waterproofing of the reservoir for no more than 5 years (on average - 3 years). This is rather a temporary solution for those summer residents who do not like constancy - after three years there is an excellent reason to change the place of the pond.

Polyvinyl chloride (PVC) coating will cost more than polyethylene, but it will also last longer - on average, about 8-10 years. Manufacturers offer two types of PVC coating: the usual two-layer and reinforced, in which a woven mesh is laid between the layers of the film (for strength). In general, such a coating has all the disadvantages of polyethylene. Solar ultraviolet damages the strength of the PVC film, it is easy to perforate. But, unlike polyethylene film, damage in PVC film can be repaired using a special repair kit. In addition, this film stretches better - after filling the reservoir with water, most of the folds will stretch and even out.

The best pond film is made from butyl rubber - this material is durable (service life of about 50 years), strong and indestructible by ultraviolet light. Butyl rubber film comes in three colors: black, stone-like and charcoal-like. If the soil in your area contains big number stones, or it is planned to build a reservoir with a high load on the base (great depth and considerable width of the pond) - choose a butyl rubber coating and you will not be mistaken.

Characteristics of butyl rubber coating: high plasticity, ease of installation, regardless of the season and air temperature. Low temperatures this coating is not affected, so it is not necessary to drain water from the reservoir for the winter.
Film for the pond - which color is better
The color of the film will seriously affect the overall appearance of the reservoir. The black bottom will turn the reservoir into a kind of mirror, reflections of the sky and clouds, plants planted along the coastline will be clearly visible in it. A film of black or brown color will serve as a good imitation of natural bottom soil. A cream or blue bottom will look unnatural, but colorful fish look great against such a background. If you choose a grayish or bluish tint, the pond will look like a swimming pool. Choose the color of the film depending on the functions of the reservoir: if it is a pond - black or brown, if the pool - white or blue.

Create a decorative pond using a film
We draw the contour of the future pond at the selected place and determine the required film size. The calculation of the film coating is done as follows: the width and length of the canvas will be equal to the sum consisting of the size of the width (in the second case, the length) of the future reservoir, twice the size of the depth and 600 mm allowance for fixing the film along the edges of the pond.

It must be taken into account that the standard parameters of a roll of butyl rubber film are as follows: width from 4.5 to 15.25 m (more precisely, then 4.5; 6.1; 9.15; 12.20 and 15.25 m) , length - 20-25 linear meters. Sometimes it is easier to make adjustments to the parameters of the future pond than to glue pieces of film together. If there is a need for gluing a film for a pond, this is quite possible, only special adhesive compositions and adhesive tape produced by the same manufacturer as the selected film. To obtain a high-quality seam when gluing a butyl rubber film, use mastic followed by hot vulcanization.

In addition to the waterproofing film, when forming the basin of the reservoir, geotextiles will be required (optimum density - 350 g / m 2) - for the insulating coating, it will act as a protective layer (from the roots of trees, teeth and claws of animals, sharp stones, etc.).

To create a reservoir with your own hands, you will need: sand (for the underlying layer), spirit level ( building level), a coil of cord (or twine - for marking), wooden pegs, garden hose, shovels.
We create a pit of a reservoir
First of all, evaluate the future shape of the reservoir, for this with a hose of sufficient length and pegs - change the position of the hose fragments until the shape of the reservoir bowl suits you. When planning a free-form pond, try to get rounded lines without sharp corners- such a pond will look better. In the process of planning the pond, mark out terraces for pond plants along its edges, they are performed at a depth of 300 mm.

Having decided on the shape of the reservoir and completing the markup, proceed to work on the pit. First, three-hundred-millimeter terraces come off (after filling the reservoir, the distance from the terrace to the water level will be about 200 mm). The banks of the future pond should have a slope of approximately 45o. In the process of creating a pit, try to remove all plant roots and stones that come across to you. Having completed work on the terraces, check the horizontality of the banks using a board with a spirit level laid on it.

The next stage of work is the formation of the main bowl of the reservoir, its deep part. Remember: the minimum required depth of the reservoir is 600 mm. Such a reservoir will not freeze completely in winter, and in summer pond fish will be able to find shelter at such a depth from the scorching rays of the sun. Then, along the coastline, it is necessary to dig a ledge with a depth of 60-70 mm, for the subsequent laying of a blind area of tiles, bricks, natural stone or laying turf.
We form a drainage layer and waterproofing
Having completed work on the pit, it is necessary to pour washed sand over its entire area with a layer of 30-50 mm - the sand is placed on the bottom, banks and terraces, carefully rammed. After making sure that the sand drainage is done well enough (there are no bumps), place a geotextile on top to isolate the film coating from damage.
The next step will be laying the prepared sheet of film. Do not try to align the film along the contours of the reservoir - let it sag over it - lay it loosely. Align the sheet of film along the banks, securing the edges with a sufficient number of bricks (stones).

Connect a garden hose to a water source and feed it in the center of the film laid over the pit - it will gradually sit down, taking the shape of a reservoir. Watch for drawdown by moving holding stones along the banks. After the artificial reservoir is completely filled, you need to wait a day, then cut off the excess film, leaving a margin of 250-300 mm along its edges (a blind area will be laid on them). Secure the edges around the perimeter of the pond using wooden wedges or wire arcs.
The next step is laying the blind area. Its width must be at least 600 mm, it is made of tiles, bricks or natural stone. The blind area must be laid on a cement mortar - if it is laid only on a pillow of sand, a person who steps on the tile can move down into the pond with it.

Summer residents planning a waterfall or fountain in an artificial reservoir need to lay and close the blind area with a water supply hose before laying the tiles on the cement mortar. The same should be done if there is a need for power supply to the pond (underwater floodlights, water pumps), after holding a plastic or copper tube for the subsequent drawing of an electric cable.
Creation of a reservoir raised above ground level
For such a reservoir, at least one retaining wall is required. The foundation for such a reservoir is required, otherwise the pond bowl may be distorted.

The construction of a reservoir above ground level is carried out in the same way as the construction of an ordinary garden wall: the place and parameters of the future pond are determined, trenches are dug out for laying the foundation. After casting, the foundation must harden within two full days.
When creating a body of water half-submerged in the ground, dig a pit in the deepest part, then form terraces for planting (roughly at the level of the concrete foundation). Then carefully remove all the stones and lay a pillow of sand on the bottom of the pit.

Build retaining walls around the perimeter of the pond, carefully tracking the position of each row. Before laying the waterproofing film, wait 48 hours - the wall mortar must completely harden.
Lay the film in such a way that its edges protrude evenly from all sides of the supporting wall. If your future pond is rectangular or square, form folds from the film in the form of a neat accordion at the inner corners. The film panel must be temporarily pressed on top of the supporting walls with bricks.

Gradually fill the film hanging over the pond with water by moving or removing the pressing stones on the supporting walls, aligning the corner folds. After the reservoir is completely filled, cut off the excess film along the edges, keeping the indentation at half the size of the supporting wall (it will be covered with stones when forming the ridge). Remove water from the reservoir. To protect the edges of the film, we install ridge stones. The pond is ready - fill it with water, place plants and fish.
Decorating a country pond
On my own garden pond not bad - you can put a gazebo near the water and relax on a hot afternoon in the shade and coolness, watching the game of fish in its depths. But you can turn it into something enchanting and colorful - fountains created by a system of pumps and underwater lighting will help here.
Pond pumps are produced in two versions: surface and underwater. Let's say you want a two-meter jet of water to come out of the pond - you need an underwater pump. If a two-meter fountain is not enough, choose a surface pump and you will be provided with a really high column of water.

The underwater pump is mounted at the bottom of the pond: first, a stone plinth is placed, the pump is placed on it and closed on top with a ceramic casing made to look like natural stone. A complete set (pump, plinth and casing) can be purchased from one retailer.
How an underwater pump works: it draws water from the bottom of the reservoir and sweeps it over the water surface with the help of special nozzles. If a fountain or waterfall is installed separately from a reservoir, water is supplied through supply pipes. Some models of pumps can supply water for both a waterfall and a fountain at the same time. The pump is powered by electrical cable with waterproof insulation.

The surface pump is installed in a disguised brick chamber on the shore of a reservoir, not far from a fountain or waterfall. Water is supplied to the pump from the reservoir through a pipe with a mandatory filter at the inlet. The surface pump needs more technical equipment than the underwater pump - a drain system, filters (on the suction pipe), a suction system. Otherwise it will overheat.
The greatest effect from the work of fountains is achieved in reservoirs of the correct form. Fountains are placed in the center of the reservoir in such a way that the water thrown out by them does not fall on coastal plants.

The type of fountain and the height of the jet ejection depend on the type of nozzle installed on the submersible pump. The jet of water itself, depending on the installed nozzle, may have the shape of, say, a bell or a beating key. A boring fountain tube can be decorated with fiberglass, stone, bronze or ceramic cladding. If a cladding is used, then the water nozzle is attached to the brass connector with which the cladding is equipped. The cladding body is exposed either to the bottom of the reservoir, or to a special stand.

Lighting will help create a magical atmosphere in the evening and at night. Lighting equipment for private reservoirs is designed for 12 V power supply. The power of halogen lamps in lamps can be from 5 to 75 W - it is enough for bright lighting, because the luminous flux of such lamps is 3 times higher than household ones.

Mini spotlights are installed on a special support or on a fountain nozzle, highlighting the scattered spray of water. There are floating lanterns, they consist of a light bulb placed in a sealed ball of glass. They can be lowered to a certain depth in a reservoir, suspended on a load, or installed at the bottom. Thanks to the equipping of the spotlights with colored light filters and rotary devices, the night pond will take on a simply stunning look.

How to take care of the pond
The natural balance of the reservoir will be formed quite quickly. To maintain it, it is necessary to remove all wind-blown debris and fallen leaves before this mass falls to the bottom and begins to decompose. It is possible that the bottom of the reservoir will have to be cleaned with a net every autumn, eliminating bottom debris.

To protect the water area of the pond from falling leaves, you can use a fine-mesh net - it should be stretched over the mirror of the pond before autumn leaf fall and removed closer to winter. Or use a skimmer - a special pump for collecting floating debris.
To clean the bottom, a bottom vacuum cleaner is useful - its design resembles a conventional one, but there is no filter in it. Water from the bottom of the pond is sucked into the device, as the chamber fills up, the device automatically turns off and the container with mud must be emptied into the drainage system.

If you have settled fish in your decorative pond, then they will need oxygen. If it is lacking, use aerator pumps - they resemble aquarium ones, only larger and more powerful.
The main problem facing the owners of reservoirs with the beginning of the warm season is that the water in it turns green, which is caused by the active reproduction of protozoan algae. Most often, this problem is faced by owners of small reservoirs with a shallow depth and therefore quickly warmed up by the sun's rays. Water overheating can be prevented by using aquatic plants with large floating leaves (water lilies and egg capsules), as well as by planting oxygen generators - plants that fill pond water with oxygen (Canadian elodea, hornwort, swamp).

At the beginning of spring, when the plants have not yet had time to develop sufficiently, application is required. chemicals fight (algicides). However, these drugs are harmful to both humans and aquatic life - so they should be treated only as a last resort.
The danger for fish in the pond can be birds and cats, for them the fish is a subject of hunting. To protect pond fish from birds (for example, herons), you need to tighten the space above the shallow areas of the pond with a net or black threads (the latter solution is especially successful - black threads are practically invisible against the background of the water surface). An obstacle for cats will be decorative fence from wire (not less than 150 mm high), usually used for fencing flower beds.

The main threat to aquatic life in areas prone to frequent frosts is ice. The ice shell, which steadily covers the reservoir for more than a day, will lead to the accumulation of poisonous gases formed by the decaying remains of vegetation and, as a result, the partial or complete death of fish. It is necessary that part of the pond is always free of ice, a special small heater is the best solution. You should not try to break the ice using force - hitting the ice shell can stun and even kill the fish.

If your artificial reservoir has a great depth, use a pump to bring warm water from the depth to the water surface - this measure will prevent the formation of ice. As a last resort, in the absence of other methods and means, arrange an exhaust hole in the ice shell - with wormwood, for this, put a pot of boiling water on the ice (after the formation of the wormwood, do not forget to remove the pan!).
How to green up a pond
Aquatic plants perform an important task - they are a kind of water filters. The biological balance will be established when at least a third of the artificial reservoir is devoted to plants. Moreover, each type of aquatic plants requires planting at a certain depth.
So, the reservoir is finished, filled with water - it needs to be allowed to settle for 10 days and only then proceed to planting. The best time to plant aquatic plants is early summer.

You can plant plants in the laid soil at the bottom of the reservoir, but it is best to place them in mesh baskets, setting the latter to the bottom. It is easier to take care of plants in baskets - move them to a warm room for wintering and reproduce. The soil in the baskets is ordinary soil from the garden, its enrichment with manure, fertilizers or peat is not required. To keep the soil layer in the baskets from being washed away by water, a clean burlap or other coarse fabric laid on top will help. Place medium-sized gravel over the cloth to protect the roots from pond fish.

Before planting, remove especially long roots and old leaves from plants. After planting, compact the soil around the stem of the plant so that the distance between the soil and the edge of the basket is 40 mm.
Some types of pond plants do not require planting - they float freely on the surface of the reservoir, keeping themselves afloat. Representatives of such plants are water lilies and lotus. Such plants need to be closely monitored, because in favorable conditions they will multiply quickly and occupy the entire pond - periodically some of them must be removed. The main plant problem for any closed reservoir is duckweed, which reproduces rapidly and tends to capture the entire area of the reservoir - do not plant it on purpose!

When buying aquatic plants, be sure to ask the seller at what depth they should be planted. When planting, stick to the measure - plants need light, and dense thickets on the water surface do not look attractive.
During the winter season, aquatic plants whose natural habitat is temperate climate remain in the water. If you planted in a pond exotic plants from warm countries, they should spend the winter outside the pond. Take them out and place them in a body of water indoors - an aquarium or a bath, before doing this, pruning especially overgrown plants.

An important point: when transferring plants for wintering indoors, do not forget to provide them with sufficient lighting.
Pond fish care
For the full existence of fish in a country pond, its depth should be no less than 1200 mm. At shallower depths, fish need to spend the winter outside the pond, otherwise they will die. Just bought fish should not be placed in the pond, give it time to acclimatize - it should get used to the temperature of the water in the pond. Let the container with the fish swim in the pond - this measure will avoid the shock state of the fish.

If you did not purchase fish from specialized stores, then you should not immediately release them into a garden pond. Place them in an aquarium by filling it with pond water. The time of such quarantine should be at least seven days - so you find out if the fish is sick.
Now about fish nutrition. In principle, there should be enough food for them in the pond: duckweed, algae, mosquito larvae and other insects living at the bottom of the reservoir. However, if there is not enough food or the number of fish increases, it needs to be fed. Purchase fish food in specialized stores - it contains everything necessary for pond fauna, in addition, such food is enriched with oxygen and will not become a source of pollution for the pond, it will float on the surface for some time. Give the fish as much food as they will eat in 10 minutes, otherwise it will still sink and rot.

A special need for vitamins occurs in fish in the spring, during this season increase the number of feedings. In autumn, when the temperature in the reservoir drops below 10 ° C, stop the feed supply completely.
Constantly monitor the condition of the fish, do not overfeed them, control their numbers (optimally: for 50 liters of water - one fish 100-150 mm long. Keep in mind that the fish is growing!).
A sick fish can be identified by its behavior: as a rule, it swims in circles and at the same time “staggers”, rubs its sides against objects in the reservoir, lies on its side on the surface. The presence of diseases is evidenced by “glued” fins, white coating on the eyes, snout, fins or gills. Having found a sick individual, immediately isolate it from the rest and place it in an aquarium. Then visit the pet store, describe the signs of the disease to the specialist and buy the necessary medicines.

